Aperture settings camera
What is Aperture? Understanding Aperture in Photography
Illustration that shows types of photography at different aperture settingsAperture is one of the three pillars of photography (the other two being Shutter Speed and ISO, which are two other chapters in our Photography Basics guide). Of the three, aperture is certainly the most important. In this article, we go through everything you need to know about aperture and how it works.
An image captured with a wide aperture of f/1.8 isolates the subjectTable of Contents
What is Aperture?
Aperture can be defined as the opening in a lens through which light passes to enter the camera. It is an easy concept to understand if you just think about how your eyes work. As you move between bright and dark environments, the iris in your eyes either expands or shrinks, controlling the size of your pupil.
In photography, the “pupil” of your lens is called aperture. You can shrink or enlarge the size of the aperture to allow more or less light to reach your camera sensor. The image below shows an aperture in a lens:
Aperture can add dimension to your photos by controlling depth of field. At one extreme, aperture gives you a blurred background with a beautiful shallow focus effect. This is very popular for portrait photography.
At the other extreme, it will give you sharp photos from the nearby foreground to the distant horizon. Landscape photographers use this effect a lot.
On top of that, the aperture you choose also alters the exposure of your images by making them brighter or darker.
Aperture Explained in Video
If you prefer to understand how aperture works visually, we put together a video for you that goes through most of the basics. In the video, we go through what aperture is, how it works, and every effect that aperture has in photography. (These points are also covered further down in this article.)
How Aperture Affects Exposure
Aperture has several effects on your photographs. Perhaps the most obvious is the brightness, or exposure, of your images. As aperture changes in size, it alters the overall amount of light that reaches your camera sensor – and therefore the brightness of your image.
A large aperture (a wide opening) will pass a lot of light, resulting in a brighter photograph. A small aperture does just the opposite, making a photo darker. Take a look at the illustration below to see how it affects exposure:
In a dark environment – such as indoors or at night – you will probably want to select a large aperture to capture as much light as possible.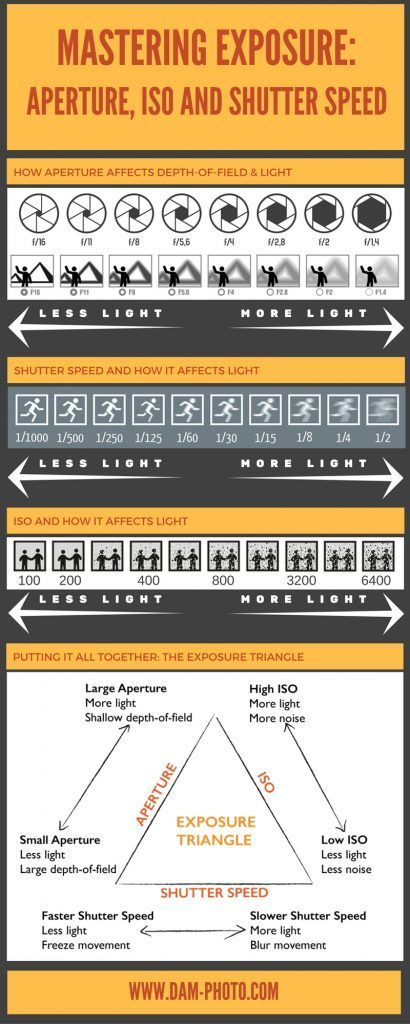 This is the same reason why people’s pupils dilate when it starts to get dark; pupils are the aperture of our eyes.
How Aperture Affects Depth of Field
The other critical effect of aperture is depth of field. Depth of field is the amount of your photograph that appears sharp from front to back. Some images have a “thin” or “shallow” depth of field, where the background is completely out of focus. Other images have a “large” or “high” depth of field, where both the foreground and background are sharp.
For example, here is an image with a shallow depth of field:
This photograph has a thin depth of field – a “shallow focus” effect.In the image above, you can see that the girl is in focus and appears sharp, while the background is completely out of focus. My choice of aperture played a big role here. I specifically used a large aperture in order to create a shallow focus effect (yes, the larger your aperture, the bigger this effect). This helped me bring the attention of the viewer to the subject, rather than busy background. Had I used a narrower aperture, the subject would not be separated from the background as effectively.
One trick to remember this relationship: a large aperture results in a large amount of both foreground and background blur. This is often desirable for portraits, or general photos of objects where you want to isolate the subject. Sometimes you can frame your subject with foreground objects, which will also look blurred relative to the subject, as shown in the example below:
Taken with a portrait lens using a very large aperture of f/1.4Quick Note: The appearance of the out-of-focus areas (AKA whether it looks good or not) is often referred to as “bokeh“. Bokeh is the property of the lens, and some lenses have better bokeh than others. “This article explains how to get better bokeh as a photographer. Even though some lenses are better than others, almost all lenses are capable of a nice shallow focus effect if you use a large aperture and get close enough to your subject.
On the other hand, a small aperture results in a small amount of background blur, which is typically ideal for some types of photography such as landscape and architecture. In the landscape photo below, I used a small aperture to ensure that both my foreground and background were as sharp as possible from front to back:
Taken using a very small aperture of f/16 in order to remove background blur and achieve sufficient depth of fieldHere is a quick comparison that shows the difference between using a large vs a small aperture and what it does to your depth of field:
A comparison of two images shot using large vs small aperturesAs you can see, in the photograph on the left, only the head of the lizard appears in focus and sharp, while the background and foreground are both transitioning into blur. Meanwhile, the photo on the right has everything from front to back appearing in focus. This is what using large vs small aperture does to photographs.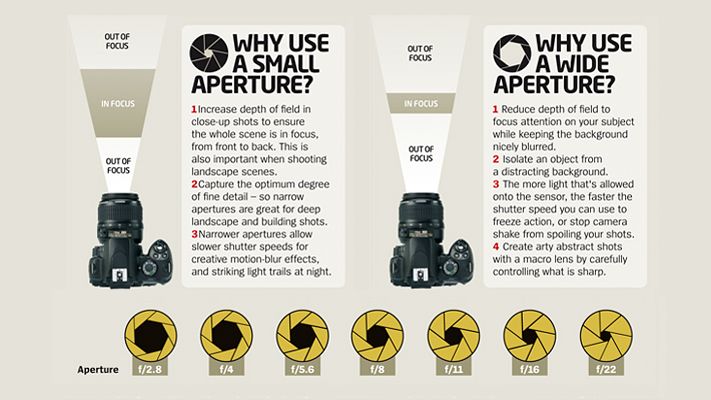
What Are F-Stop and F-Number?
So far, we have only discussed aperture in general terms like large and small. However, it can also be expressed as a number known as “f-number” or “f-stop”, with the letter “f” appearing before the number, such as f/8.
Most likely, you have noticed aperture written this way on your camera before. On your LCD screen or viewfinder, your aperture will usually look something like this: f/2, f/3.5, f/8, and so on. Some cameras omit the slash and write f-stops like this: f2, f3.5, f8, and so on. For example, the Nikon camera below is set to an aperture of f/8:
Aperture is labeled in f-numbers, and in this case, I’m using f/8.So, f-stops are a way of describing the size of the aperture for a particular photo. If you want to find out more about this subject, we have a comprehensive article on f-stop that explains why it’s written that way and is worth checking out.
Large vs Small Aperture
There’s a catch – one important part of aperture that confuses beginning photographers more than anything else. This is something you really need to pay attention to and get correct: Small numbers represent large apertures, and large numbers represent small apertures!
That’s not a typo. For example, f/2.8 is larger than f/4 and much larger than f/11. Most people find this awkward, since it goes against our basic intuition. Nevertheless, this is a fact of photography. Take a look at this chart:
As you can see, an f-stop like f/16 represents a much smaller aperture opening than something like f/2.8.This causes a huge amount of confusion among photographers, because it’s completely the reverse of what you would expect at first. However, there is a reasonable and simple explanation that should make it much clearer to you: Aperture is a fraction.
When you are dealing with an f-stop of f/16, for example, you can think of it like the fraction 1/16th. Hopefully, you already know that a fraction like 1/16 is clearly much smaller than the fraction 1/4. For this exact reason, an aperture of f/16 is smaller than f/4. Looking at the front of your camera lens, this is what you’d see:
So, if photographers recommend a large aperture for a particular type of photography, they’re telling you to use something like f/1.4, f/2, or f/2.8. And if they suggest a small aperture for one of your photos, they’re recommending that you use something like f/8, f/11, or f/16.
How to Pick the Right Aperture
Now that you’re familiar with large vs small apertures, how do you know what aperture to use for your photos? Let’s revisit two of the most important effects of aperture: exposure and depth of field. First, here is a quick diagram to refresh your memory on how aperture affects the exposure of an image:
If you’ve read the prior chapter in our Photography Basics guide covering shutter speed, you already know that aperture isn’t the only way to change how bright a photo is. Nevertheless, it plays an important role. In the graphic above, if I didn’t allow myself to change any other camera settings like shutter speed or ISO, the optimal aperture would be f/5.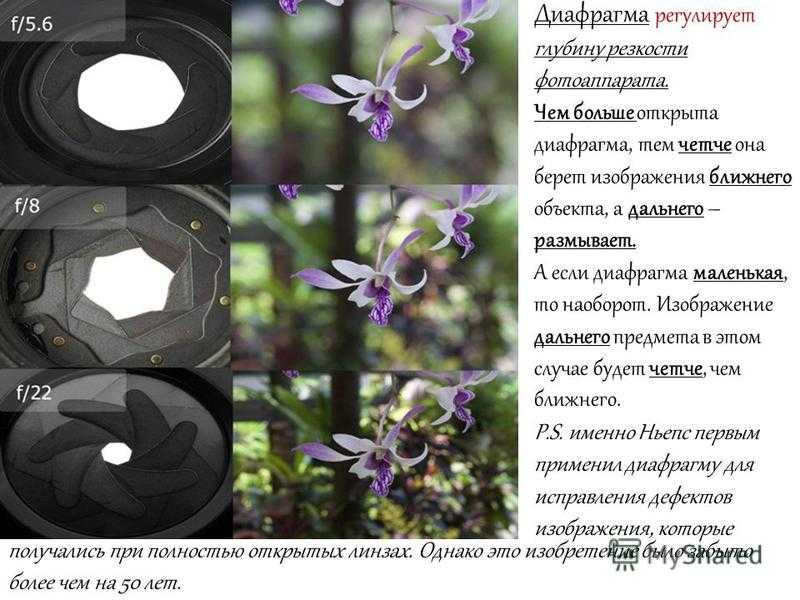 6.
6.
In a darker environment, where you aren’t capturing enough light, the optimal aperture would change. For example, you may want to use a large aperture like f/2.8 at night, just like how our eye’s pupils dilate to capture every last bit of light:
As for depth of field, recall that a large aperture value like f/2.8 will result in a large amount of background blur (ideal for shallow focus portraits), while values like f/8, f/11, or f/16 will give you a lot more depth of field (ideal for landscapes and architectural photography).
In fact, depth of field is the part of aperture that I recommend thinking about the most. My process for almost every photo I take goes like this:
- Ask myself how much depth of field I want
- Set an aperture that achieves it
- Set a shutter speed that makes my photo the proper brightness
- If that shutter speed leads to unsharp photos thanks to too much motion blur, dial back the shutter speed and raise my ISO instead
- Win photo contest :)
Here is a quick chart that lays out everything we’ve covered so far:
| Aperture Size | Exposure | Depth of Field | |
|---|---|---|---|
f/1. 4 4 | Very large | Lets in a lot of light | Very thin |
| f/2.0 | Large | Half as much light as f/1.4 | Thin |
| f/2.8 | Large | Half as much light as f/2 | Thin |
| f/4.0 | Moderate | Half as much light as f/2.8 | Moderately thin |
| f/5.6 | Moderate | Half as much light as f/4 | Moderate |
| f/8.0 | Moderate | Half as much light as f/5.6 | Moderately large |
| f/11.0 | Small | Half as much light as f/8 | Large |
| f/16.0 | Small | Half as much light as f/11 | Large |
| f/22.0 | Very small | Half as much light as f/16 | Very large |
Setting Aperture in Your Camera
If you haven’t guessed it already, we highly recommend selecting your aperture manually as a photographer. If you allow the camera to set it automatically, you are likely to end up with the completely wrong depth of field in your image.
There are two modes in photography which allow you to select the aperture manually. These are aperture-priority mode and manual mode. Aperture-priority mode is written as “A” or “Av” on most cameras, while manual is written as “M.” Usually, you can find these on the top dial of your camera (read more also in our article on camera modes):
In aperture-priority mode, you select the desired aperture, and the camera automatically selects your shutter speed. You can select ISO manually or automatically. Aperture priority mode is great for everyday photography, where you rarely need to worry about any camera settings other than aperture. It’s what I use 95% of the time even for professional landscape and portrait photography.
In manual mode, you select both aperture and shutter speed manually. (ISO can again be manual or auto.) Manual mode takes more time and usually gives you the same results as aperture priority anyway.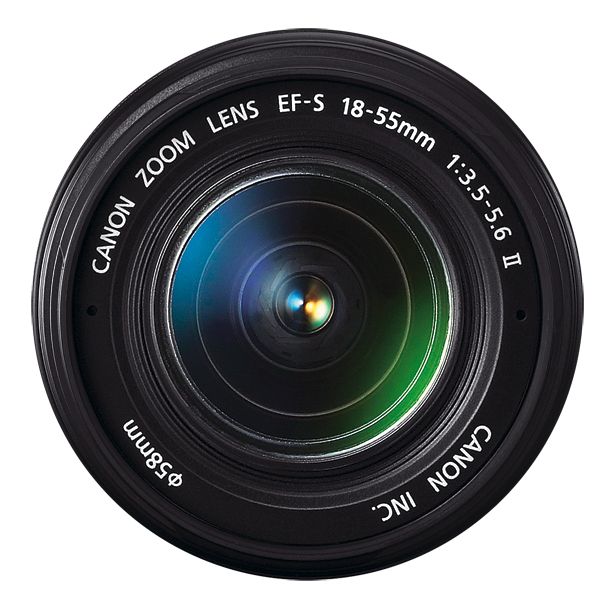 It’s only needed in special situations where you need a consistent exposure from shot to shot, or when the camera’s meter is messing up. I use it for Milky Way photography and for portraiture with flash.
Minimum and Maximum Aperture of Lenses
Every lens has a limit on how large or how small the aperture can get. If you take a look at the specifications of your lens, it should say what the maximum and minimum apertures are. For almost everyone, the maximum aperture will be more important, because it tells you how much light the lens can gather at its maximum (basically, how dark of an environment you can take photos – and how much of a shallow focus effect you can achieve).
A lens that has a maximum aperture of f/1.4 or f/1.8 is considered to be a “fast” lens, because it can pass through more light than, for example, a lens with a “slow” maximum aperture of f/4.0. That’s why lenses with large apertures usually cost more.
By comparison, the minimum aperture is not that important, because almost all modern lenses can provide at least f/16 at the minimum.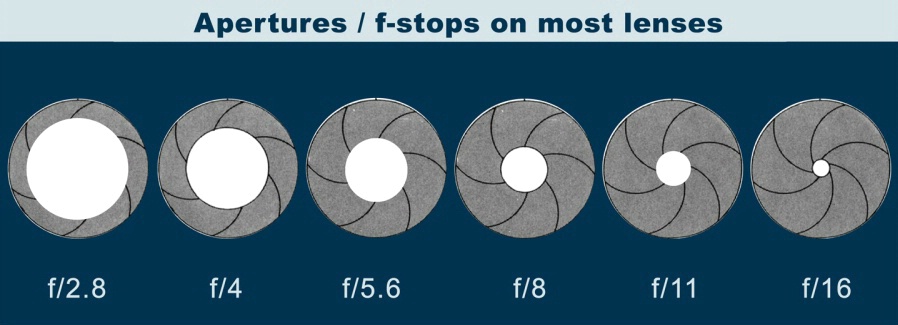 You will rarely need anything smaller than that for day-to-day photography.
With some zoom lenses, the maximum aperture will change as you zoom in and out. For example, with the Nikon 18-55mm f/3.5-5.6 AF-P lens, the largest aperture shifts gradually from f/3.5 at the wide end to just f/5.6 at the longer focal lengths. More expensive zooms tend to maintain a constant maximum aperture throughout their zoom range, like the Nikon 24-70mm f/2.8. Prime lenses also tend to have larger maximum apertures than zoom lenses, which is one of their major benefits.
The maximum aperture of a lens is so important that it’s included in the name of the lens itself. Sometimes, it will be written with a colon rather than a slash, but it means the same thing (like the Nikon 50mm 1:1.4G below).
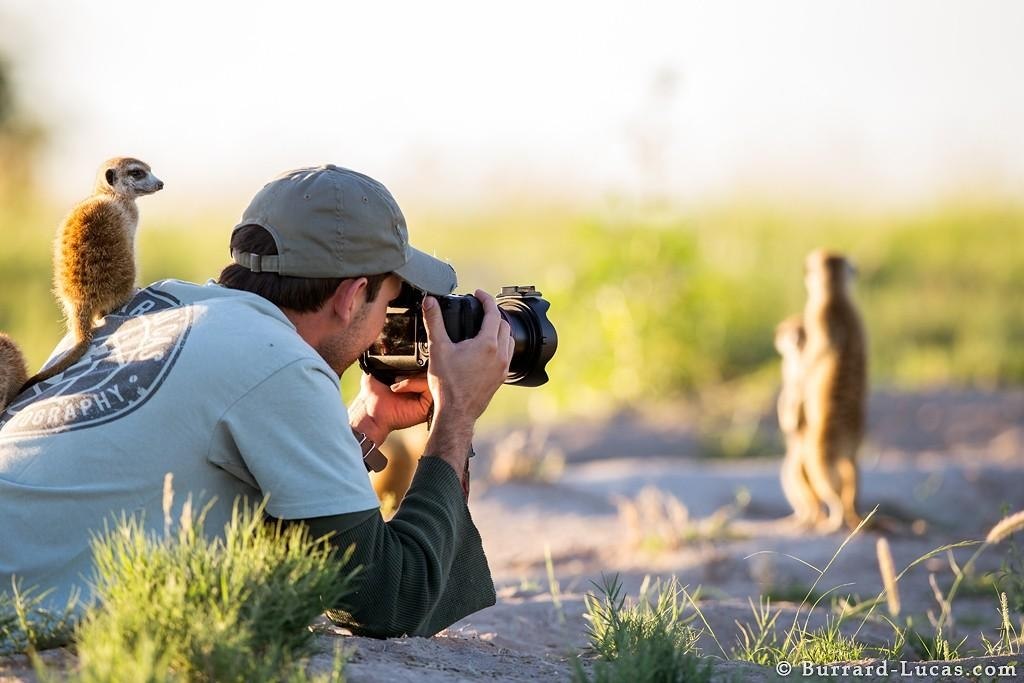
Examples of Which Aperture to Use
Now that we have gone through a thorough explanation of how aperture works and how it affects your images, let’s take a look at the situations where you’d want to use various f-stops.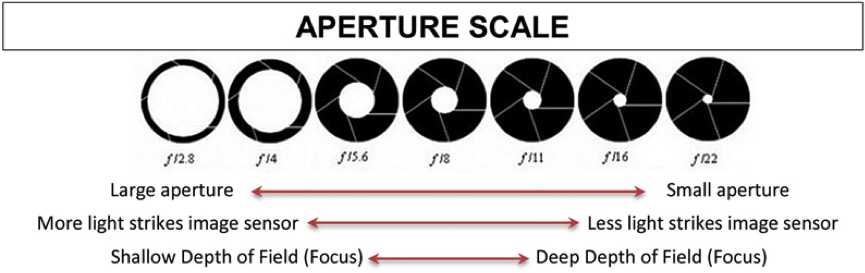
- f/0.95 – f/1.4 – Such “fast” maximum apertures are only available on premium prime lenses, allowing them to gather as much light as possible. This makes them ideal for any kind of low-light photography (such as photographing the night sky, wedding receptions, portraits in dimly-lit rooms, corporate events, etc). With such wide f-stops, you will get very shallow depth of field at close distances, where the subject will appear separated from the background.
- f/1.8 – f/2.0 – Some enthusiast-grade prime lenses are limited to f/1.8, which still has very good low-light capabilities. Also, if your purpose is to yield aesthetically-pleasing images with shallow focus, these lenses be of tremendous value. Shooting between f/1.8 and f/2 typically turns your backgrounds nice and creamy for portraiture and other similar types of photography.
- f/2.8 – f/4 – Most zoom lenses are limited to a maximum aperture of f/2.8 to f/4 at best.
 While they are not as capable as f/1.4 lenses in terms of light-gathering capabilities, they are still enough to shoot in reasonably low light conditions, especially if the lens or camera has image stabilization. You’ll get some subject separation at these apertures, but usually not enough to make the background completely fuzzy. Such apertures are great for travel, sports, and wildlife photography.
 - f/5.6 – f/8 – This is the right starting point for most landscape and architectural photography. It’s also ideal for documentary and portrait photography where you don’t want a blurry background. Also, most lenses are sharpest around f/5.6, which doesn’t matter as much as getting the right depth of field, but is still nice.
- f/11 – f/16 – Typically used for photographing scenes where as much depth of field as possible is needed, like macro photography or landscape photography with a nearby foreground. Even though these apertures offer more depth of field, they do lose some low-level sharpness due to the effect of lens diffraction.

- f/22 and Smaller – Only shoot at such small apertures if you know what you are doing. Sharpness suffers greatly at f/22 and smaller apertures because of diffraction, so you should avoid using them when possible. If you need to get more depth of field, it is usually best to move away from your subject or use a focus stacking technique instead.
You’ve made it this far, but are you willing to learn more about aperture? So far we have only touched the basics, but aperture does so much more to your photographs. Let’s take a closer look.
Everything Aperture Does to Your Photos
Ever wondered how else aperture affects your photographs aside from brightness and depth of field? In this part of the article, we will go through all other ways aperture impacts your images, from sharpness to sunstars, and tell you exactly why each matters.
A landscape image captured at f/16 to bring everything from foreground to background into focus. Diffraction can be a problem at such small apertures, as explained below.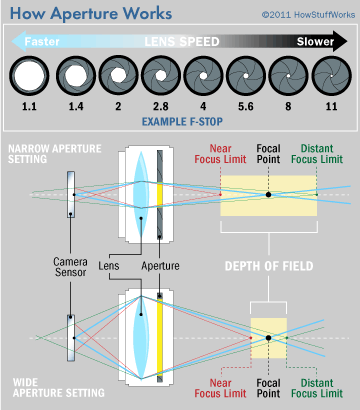
Before diving into too many specifics, here’s a quick list of everything aperture affects in photography:
- The brightness / exposure of your photos and depth of field, as discussed so far
- Sharpness loss due to diffraction
- Sharpness loss due to lens quality
- Starburst effects on bright lights
- Visibility of camera sensor dust specks
- The quality of background highlights (bokeh)
- Focus shift on some lenses
- Ability to focus in low light (under some conditions)
- Controlling the amount of light from the flash
1. The Negative Effect of Diffraction
So, if you’re a landscape photographer who wants everything as sharp as possible, you should use your lens’s smallest aperture, like f/22 or f/32 to get maximum depth of field, right?
No!
If we go back and take a close look at the photo of the lizard from earlier in this article, where I used apertures of f/4 and f/32, you can see how diffraction is making the second shot less sharp. Here are the images when zoomed in to 100% view:
Here, you’re seeing an effect called diffraction. Physics majors will know what I’m talking about, but diffraction is a foreign concept to most people. So, what is it?
Diffraction is actually quite simple. When you use a tiny aperture like f/32, you literally squeeze the light that passes through your lens. It ends up interfering with itself, growing blurrier, and resulting in photos that are noticeably less sharp.
At what aperture does diffraction start to become an issue? It depends upon a number of factors, including the size of your camera sensor and the size of your final print. Personally, on my full-frame camera, I see hints of diffraction at f/8, but it’s not enough to bother me. I actually use even smaller apertures like f/11 and f/16 all the time when I have a close foreground in landscape photography. However, I try to avoid f/22 or smaller, since I lose too much detail at that point.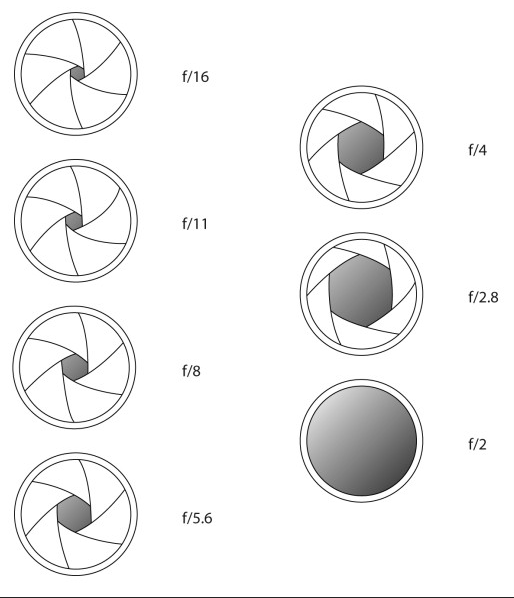
Diffraction isn’t necessarily a huge problem, but it exists. Don’t be afraid to take pictures at f/11 or f/16 just because you lose a little bit of sharpness. In many cases, the added depth of field is worth the tradeoff.
Side Note
If your camera has a smaller sensor, you’ll see diffraction sooner. On APS-C sensors (like on Nikon D3x00 series, Nikon D5x00 series, Fuji X-series, Sony A6x00 series, and many others), divide all these numbers by 1.5. On Micro Four-Thirds cameras (like those from Olympus and Panasonic), divide all these numbers by 2. In other words, I don’t recommend using f/11 with a micro four-thirds camera, since it’s equivalent to f/22 with a full-frame camera.
2. Lens Aberrations
Here’s a fun one. For some reason, everyone wants to take sharp photos! One of the ways to do so is to minimize the visibility of lens aberrations. So, what are lens aberrations? Quite simply, they are image quality problems with a photo, caused by your lens.
Although most problems in photography are because of user error – things like missed focus, poor exposure, or a distracting composition – lens aberrations are entirely due to your equipment. They are fundamental, optical problems that you’ll notice with any lens if you look too closely, although some lenses are better than others. For example, consider the image below:
What’s going on here? In this crop, most of the lights look smeared rather than perfectly round. On top of that, the crop just isn’t very sharp. That’s lens aberration at work! The lights didn’t look this blurry in the real world. My lens added this problem.
It’s likely that your lenses are blurrier at certain apertures than others, and it’s almost always blurrier in the corner of the image than the center. That’s due to lens aberrations.
Aberrations can appear in several different forms. This article would be way too long if I explained every possible aberration in detail: vignetting, spherical aberration, field curvature, coma, distortion, color fringing, and more. Instead, it’s more important to know why aberrations occur, including how your aperture setting can reduce them.
It starts with a simple fact: designing lenses is difficult. When the manufacturer fixes one problem, another tends to appear. It’s no surprise that modern lens designs are extremely complex.
Unfortunately, even today’s lenses aren’t perfect. They tend to work fine in the center of an image, but everything gets worse near the edges. That’s because lenses are especially difficult to design around the corners.
Here’s a diagram that explains what I mean:
Adapted from a Creative Commons image on Wikipedia.And that brings us to aperture.
Many people don’t realize a simple fact about aperture: it literally blocks the light transmitted by the edges of your lens. (This doesn’t lead to black corners in your photos, because the center regions of a lens can still transmit light to the edges of your camera sensor.)
As your aperture closes, more and more light from the sides of your lens will be blocked, never making it to your camera sensor. Only the light from the center area will pass through and form your photo! As the diagram above shows, this central area is far easier for camera manufacturers to design. The end result is that your photos will have fewer aberrations at smaller and smaller apertures.
How does this look in practice? See the photos below (heavy crops from the top-left corner):
What you’re seeing above may look like an increase in sharpness, but it’s really a decrease in aberrations. The end result? At f/5.6 on this particular lens, my photo is much sharper than at f/1.4.
Here’s a key question: How does this balance out with diffraction, which harms sharpness increasingly more as your aperture gets narrower and narrower?
In practice, the answer is that most lenses end up sharpest around f/4, f/5.6, or f/8. Those “medium” apertures are small enough to block light from the edges of a lens, but they aren’t so small that diffraction is a significant problem. However, you’ll want to test this on your own equipment.
Of course, you can still take good photos at large apertures like f/1.4 or f/2. As I mentioned earlier, portrait photographers sometimes pay thousands of dollars to get a lens exactly for that purpose! So, don’t lock your lens to f/5.6 just because it gives you a tad more corner sharpness up close. It’s better to choose an aperture that gives you the right artistic look to the image.
Side Note
Some types of aberrations don’t change much as you stop down, or they may even get slightly worse. Axial chromatic aberration, for example – color fringes near the edges of your frame – often work that way. This is normal. It happens because a small aperture doesn’t inherently reduce aberrations; it simply blocks light that has passed through the edges of your lens. So, naturally, if the edges aren’t the source of your problem, you won’t see an improvement by stopping down.
3. Starburst and Sunstar Effects
Starbursts, also called sunstars, are beautiful elements that you’ll find in certain photographs. Despite the odd names – one a type of candy; the other a type of starfish – I always try to capture them in my landscape photos. Here’s an example:
How does this work? Essentially, for every aperture blade in your lens, you’ll end up with a sunbeam. This only happens if you photograph a small, bright point of light, such as the sun when it is partly blocked. This is fairly common in landscape photography. If you want the strongest possible starburst, use a small aperture. Whenever the sun is in my photo, I almost always set f/16 purely to capture this effect.
Also, the starburst effect looks different from lens to lens. It all depends upon your aperture blades. If your lens has six aperture blades, you’ll get six sunbeams. If your lens has eight aperture blades, you’ll get eight sunbeams. And, if your lens has nine aperture blades, you’ll get eighteen sunbeams.
Wait, what?
That’s no typo. You always end up with an even number of sunbeams. If your lens has an odd number of aperture blades, you’ll get double the number of sunbeams.
It sounds strange, but the reason is actually quite simple. In lenses with an even number of aperture blades (and a fully symmetrical design), half of the sunbeams will overlap the other half. So, you don’t see all of them in your final photo.
Here’s a diagram to show what I mean:
When you have an even number of aperture blades, the sunbeams will overlap.Most Nikon lenses have seven or nine aperture blades, resulting in 14 and 18 sunbeams respectively. Most Canon lenses have eight aperture blades, resulting in eight sunbeams. I took the photo above using the Nikon 20mm f/1.8G lens, which has 7 aperture blades. That’s why the image has 14 sunbeams.
It’s not just the number of blades that matters, though — their shape is also important. Some aperture blades are rounded (which results in a more pleasant out-of-focus background blur), and others are straight. If your goal is to capture good starbursts, straight aperture blades typically produce more defined rays of light.
Again, some lenses are better than others in this regard. For the best results, find a lens that’s known to have good starbursts, and then set it to a small aperture like f/16. That’s going to give you the strongest definition in your starbursts.
Another image with a starburst using a 24mm f/1.4 lensNIKON D7000 + 24mm f/1.4 @ 24mm, ISO 100, 1/50, f/16.0
Finally, there’s one last related effect that I wanted to mention briefly. When you shoot into the sun, you might end up with flare in your photographs, as shown below. Depending upon your chosen aperture, the size and shape of this lens flare may change slightly. This isn’t a big deal, but it still exists.
The flare in this photo is shaped like my lens aperture blades.4. Small Aperture and Unwanted Elements
When you shoot through things such as fences, dirty windows, plants, and even water droplets on your lens, you’ll probably be disappointed by photos taken with a small aperture.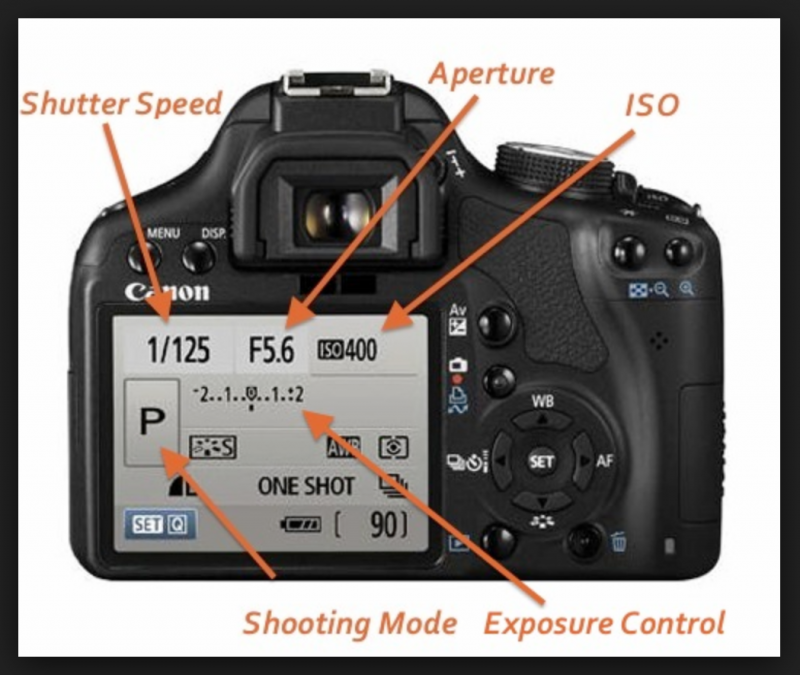
Small apertures like f/11 and f/16 give you such a large depth of field that you may accidentally include elements that you don’t want to be in focus! For example, if you’re shooting at a waterfall or by the ocean, an aperture of f/16 could render a tiny water droplet on your lens into a distinct, ugly blob:
A water droplet landed on my lens while taking this picture. My aperture was f/16, which means that it’s particularly visible.In cases like that, it’s better just to use a wider aperture – something like f/5.6, perhaps – in order to capture the water droplet so out-of-focus that it doesn’t even appear in your image. In this particular case, you could simply wipe the droplet off, but that’s not possible if you’re shooting through something like a dirty window.
Side Note
You might have realized that this section is really just an extension of depth of field, and that’s true! However, it’s a bit of a special case, so I decided to mention it specifically.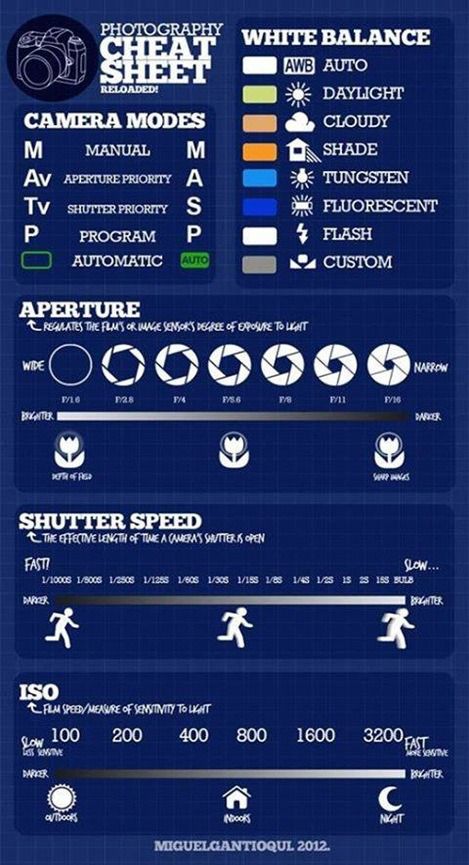
Another example of shooting through things is when a piece of dust lands on your camera sensor. Unfortunately, as you change lenses, this is very common. Dust specks on your camera sensor will show up very clearly at small apertures like f/16, even if they’re invisible at something larger, like f/4.
Luckily, they are very easy to remove in post-production software like Photoshop or Lightroom, though it can be annoying if you have to remove dozens of them from a single photo. That’s why you should always keep your camera sensor clean.
Dust specks on my camera sensor, taken at f/11 (a fairly small aperture). I circled some of the most visible spots in red.5. Changes to Your Bokeh
What is bokeh? It’s simply the quality of your background blur. If you take a lot of portraits, macro photos, or wildlife photos, you’ll end up with out-of-focus backgrounds in most of your images. Naturally, you want them to look as good as possible! Different aperture settings will change the shape of your background blur.
Why is that? It’s because the background blur of your photographs always takes on the shape of your aperture blades. So, if your aperture blades are shaped like a heart, you’ll end up with heart-shaped background blur. Most of the time, that would qualify as distracting bokeh, although it’s kind of cute in this photo of two fake tortoises:
Heart-shaped background blur, due to a heart-shaped aperture. I didn’t take this photo, unfortunately. Downloaded as Creative Commons.On some lenses, aperture blades change shape a bit as they open and close. Large aperture settings (such as f/1.8) often have rounder background blur compared to smaller aperture settings. You’ll also get more background blur at large apertures, since your depth of field is thinner.
If bokeh is something that matters to you, you’ll want to test this on your particular lenses. Take some out-of-focus photos of a busy scene, each using a different aperture setting, and see which one looks the best.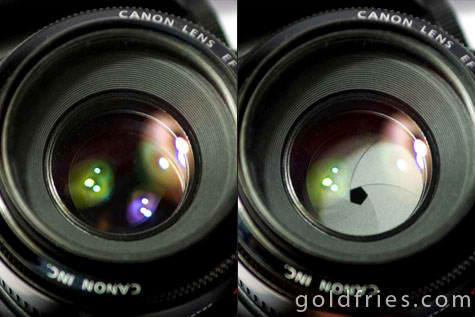 Most of the time, it will be the lens’s widest aperture, but not always.
6. Focus Shift Issues
With certain lenses – even if you’re in manual focus, and you don’t move your focus ring – your point of focus may shift as you use smaller and smaller apertures.
Obviously, this isn’t ideal. How do you tell if your lens has problematic focus shift? It’s pretty easy. Here are the steps:
- Put your camera on a tripod, and set your lens to manual focus.
- Find an object with small details that extends backwards, and focus at the center of it. A table with a tablecloth works well.
- Double check: When take a test photo and magnify it, you should see pixel-level details, as well as portions of the photo that are clearly out of focus.
- Take a photo at your lens’s widest aperture, and then at progressively smaller apertures.
 Be sure not to move your focus ring, and double check that you are using manual focus.
 - On your computer, zoom into 100% on these photos and see if the sharpest point of focus moves continuously farther back as you stop down. The more it moves, the worse your focus shift issue is.
You’re done!
If your lens has extreme levels of focus shift, you’ll want to compensate for it:
- With your widest aperture, just focus like normal.
- As you stop down the aperture, make sure to set your aperture first, then focus second (rather than focusing first). On DSLRs, we recommend focusing in live view at these apertures, because the viewfinder always focuses at the widest aperture. Mirrorless camera users don’t need to worry about that.
- With small apertures like f/8 and beyond, your depth of field will be large enough to hide any focus shift problems, so just focus like normal.
Side Note
When it comes down to it, focus shift is just another type of lens aberration. The edges of your lens may not focus light the same as the center, so, by stopping down — again, blocking light from the edges — your focus point changes slightly. That’s the underlying reason for this effect.
7. Ease of Focusing
The autofocus system on your camera doesn’t work well unless it receives plenty of light.
So, if you’re shooting with a cheaper lens like a 70-300mm f/4.5-5.6, the largest aperture isn’t bright enough to gather a lot of light. Focusing in dark conditions may be impacted. This is part of why a lot of pro photographers will use a more expensive lens like a 70-200mm f/2.8 instead.
You’ll also enjoy a brighter viewfinder (on a DSLR) or a less noisy viewfinder (on a mirrorless camera) if your lens has a large maximum aperture. If you shoot a lot in low light, this can make it much easier to focus and compose your images.
8. Flash Exposure
When using speedlights or any kind of strobes, it is important to remember that aperture takes on a whole different role of controlling flash exposure. While shutter speed’s role becomes controlling ambient light, aperture has an outsized impact on how much light from your flash is captured. Even though it’s just a subset of exposure, we wanted to include it in this section, since flash is tightly correlated to lens aperture.
A Chart of Everything Aperture Does
Once you understand the information above, you will know everything aperture does to your photos. However, it may take a few re-reads of this article before it’s all completely clear.
Practice is your best friend. Go outside, take some photos, and get a feel for aperture yourself.
If it helps, I compiled the main information in this article into a chart. This chart covers the most important effects of aperture in photography, as well as common terms that photographers use to describe their settings.
Note that to make this diagram easier to see, I did not darken or lighten any of the sample illustrations (as would occur in the real world). Instead, I simply wrote “brightest” through “darkest”:
Although this chart is intentionally simplified, it covers all the basics that you need to know.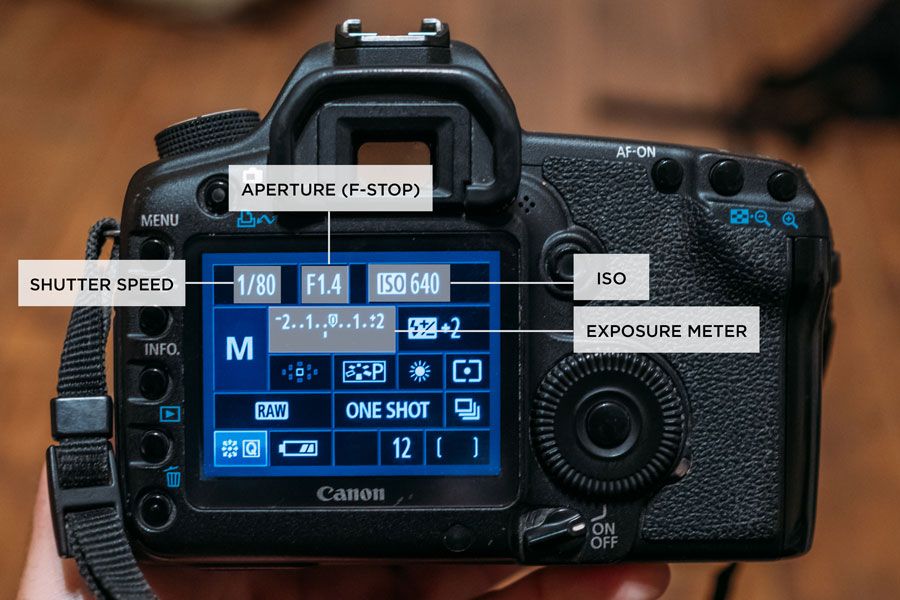 Feel free to download and print this chart if you find it useful. Just right-click on the image, then select “save as,” and pick the location where you want to store it.
Aperture FAQ
We put together some of the most frequently-asked questions related to aperture below.
What is Aperture?
Aperture can be defined as the opening in a lens through which light passes to enter the camera. It is expressed in f-numbers like f/1.4, f/2, f/2.8 and so on to express the size of the lens opening, which can be controlled through the lens or the camera. Our full article on aperture with many examples and illustrations starts here.
How Does Aperture Affect Depth of Field?
A large aperture results in a large amount of foreground and background blur. This yields a shallow depth of field, AKA a shallow focus effect. On the other hand, a small aperture results in a wide depth of field that can give you a sharp foreground and background for landscape photography.
How Does Aperture Affect Shutter Speed?
Aperture and shutter speed are controlled separately. However, they both affect a photo’s exposure. If you “open up” the aperture to capture a lot of light, you can use faster shutter speeds like 1/1000 second. Or, if you “stop down” the aperture to get more depth of field, you are reducing the amount of light that reaches the camera sensor, which requires a longer shutter speed to yield an image with the same brightness.
How Does Aperture Affect Bokeh?
Bokeh refers to the quality of out-of-focus highlights of the image rendered by the camera lens. Using the maximum aperture of the lens will typically yield circular background highlights of large size, whereas stopping down the lens will typically result in highlights looking smaller and taking different shapes such as heptagon. These shapes depend on the number of aperture blades and their roundness.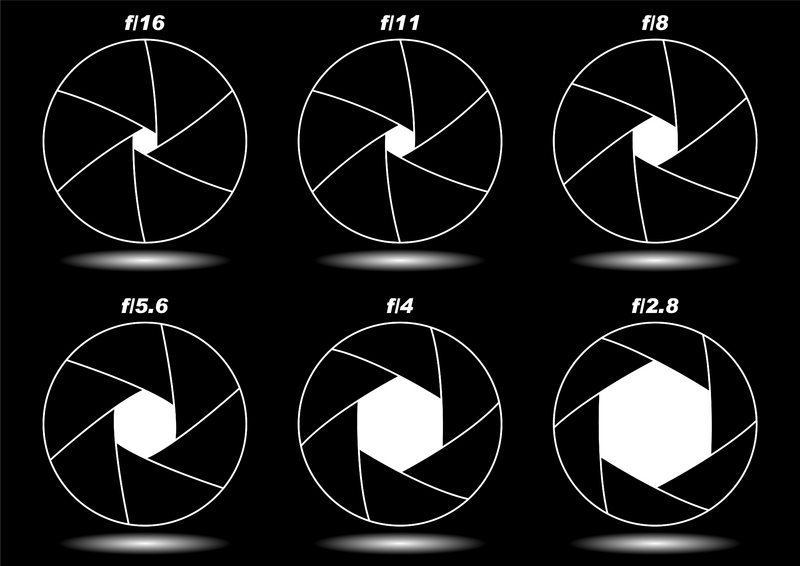 Here is an image of a 50mm f/1.4 prime lens stopped down to f/2.8 and f/4 apertures:
What is the “Maximum Aperture” in a Lens?
Maximum aperture is how wide a lens can be open. It is usually expressed in f-stops such as f/1.4 and stated on the name of the lens. For example, the Nikon 35mm f/1.4G lens has a maximum aperture of f/1.4, whereas the Nikon 50mm f/1.8G has a maximum aperture of f/1.8. Some lenses have variable maximum apertures that change depending on focal length. A lens like the Nikon 18-55mm f/3.5-5.6 has a maximum aperture of f/3.5 at 18mm and f/5.6 at 55mm.
Which Aperture is Best for Portrait Photography?
If your goal is to make an image with shallow depth of field, where the subject appears sharp while the foreground and the background appear blurry, then you should use very wide apertures like f/1.8 or f/2.8 (for example, if you are using a 50mm f/1.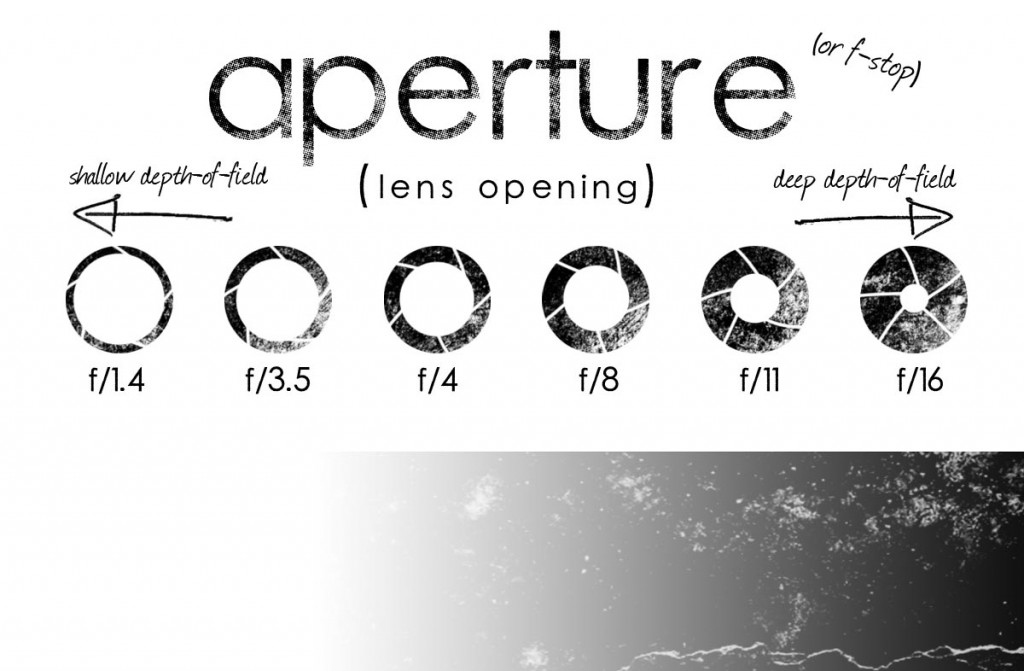 8 lens, you should set your lens aperture to f/1.8).
Which Aperture is Best for Landscape Photography?
When photographing landscapes, you often want to have as much depth of field as possible in order to get both foreground and background looking as sharp as possible. In such cases, it is best to stop down your lens to small apertures like f/8 or f/11.
Is it Better to have Higher or Lower Aperture?
It really depends on what you are photographing and what you want your image to look like. Lower apertures like f/1.8 allow more light to pass through the lens and yield shallow depth of field. In comparison, higher aperture numbers like f/8 block light while yielding wider depth of field. Both have their uses in photography.
Does Aperture Affect Focus?
Changing lens aperture can affect focus slightly due to focus shift. It is therefore best to stop the lens down to the desired aperture before focusing. On DSLR cameras, we recommend to use live view to focus at the desired aperture to reduce the negative effect of focus shift. This is due to the fact that DSLR cameras focus at the widest aperture.
At What Aperture is Everything in Focus?
That really depends on your camera’s sensor size, focal length of the lens, and how close your camera is to your subject. Generally, a small aperture like f/8 will give you enough depth of field to be able to make most of your image sharp. However, if the subject is too close to your camera, you might need to either move back or stop down the lens even further to get everything looking sharp.
How Does Aperture Affect Sharpness?
A wide aperture yields shallower depth of field, which some photographers mistake for a blurry photo. Wide apertures also show the weaknesses of the lens optical design, often resulting in visible lens aberrations. A narrow aperture, on the other hand, yields more depth of field, making more of the image appear sharp. However, narrow apertures also have more low-level image blur due to diffraction.
Which Aperture is Best for Sharpness?
Most lenses are not designed to yield good sharpness at their maximum aperture, which is why it is often desirable to stop down to smaller apertures like f/5.6 to get the best results. However, the best aperture of the lens, or its “sweet spot” really depends on its optical design.
What Aperture Should I Use to Get a Blurry Background?
If you want to get your subject isolated from the scene and make the background appear blurry, you should open up the lens aperture to its maximum aperture and get as close to the subject as possible. For example, if you are shooting with a 50mm f/1.8 prime lens, you should shoot at f/1.8 with your subject at a close distance. If you use a zoom lens, you should zoom in to the longest focal length and use the widest aperture, while being as close to your subject as you can. For example, if you are shooting with a 18-55mm f/3.5-5.6 lens, you should zoom to 55mm, use the maximum aperture of f/5.6 and get close to your subject.
What Aperture Lets in the Most Light?
The maximum aperture of the lens, such as f/1.4.
What Aperture Lets in the Least Light?
The minimum aperture of the lens, such as f/22.
Summary
Aperture is clearly a crucial setting in photography and it is possibly the single most important setting of all. Aperture affects several different parts of your photo, but you’ll get the hang of everything fairly quickly. For a quick summary, a narrow aperture…
- Makes your photos darker
- Gives you more depth of field
- Increases blur from diffraction
- Decreases blur from most lens aberrations
- Makes sensor dust more visible
- Heightens the intensity of starbursts
…whereas a wide aperture does the opposite.
Soon, this won’t be something that you even need to think about; you’ll remember it all naturally. Personally, if I want a starburst effect in my photos, I immediately know to use an aperture of f/16. When I need as much light as possible, I set a larger aperture like f/2.8 or f/2 without a second thought. It doesn’t take too much practice to get to that point.
With how important aperture is, it shouldn’t be a surprise that, at Photography Life, we shoot in aperture-priority or manual mode all of the time. We simply never want the camera to select the aperture for us. It’s just too important, and it is one of those basic settings that every beginner or advanced photographer needs to know in order to take the best possible images.
As always, it’s best if you learn all this for yourself. Find something spectacular to capture, and put your new knowledge into practice. The more photos you take, the more you’ll learn. Aperture is no exception.
Below are some other related posts you might enjoy:
- What is F-Stop?
- What is Exposure?
- Exposure Stops in Photography
- Understanding Depth of Field
- Choosing a Creative Mode
Hopefully, you found that this article explains the basics of aperture in a way that is understandable and straightforward.
If you are ready to move on, the next important camera setting to learn is ISO, which we explain in Chapter 5 of our Photography Basics guide.
Take me to Chapter 5: ISO
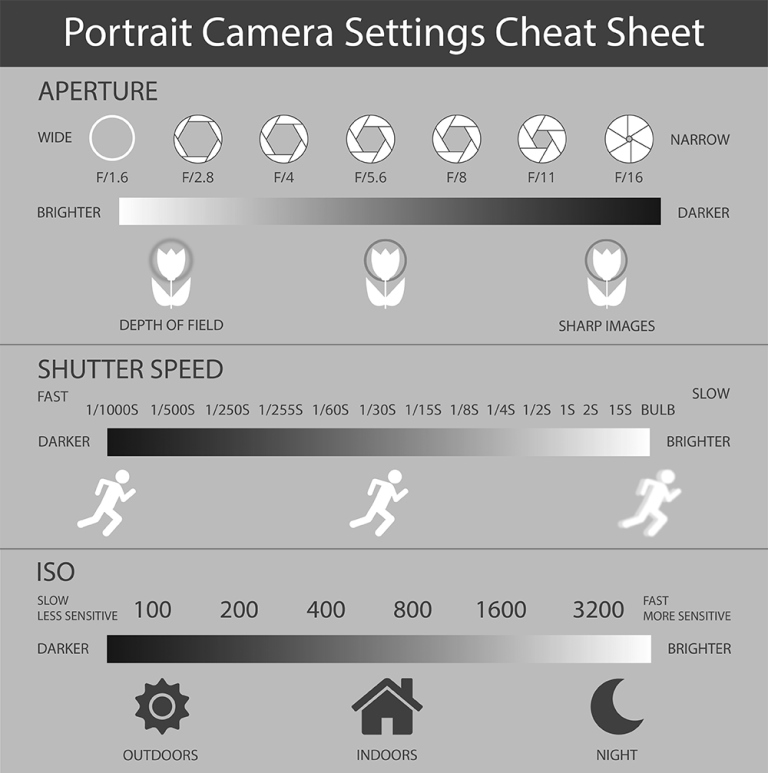
Photography 101: What Is Camera Aperture?
Reading Time: 8 minutes read
The human eye is amazingly agile for adjusting to lighting conditions. When a room gets dark, pupils in the eye expand to take in more light or shrink in a bright, well-lit room to adjust. The camera aperture works similarly in its mechanical realm. Aperture is an integral part of photography included in exposure settings, along with shutter speed and ISO.
Aperture Definition
In photography, the aperture works like the pupil of an eye. It expands and shrinks to allow more or less light through to a camera’s sensor. The larger the aperture, the more light comes in, resulting in a brighter photo. If the aperture is smaller, less light enters, and the image captured will be darker.
Aperture is adjusted to control how much light is allowed in.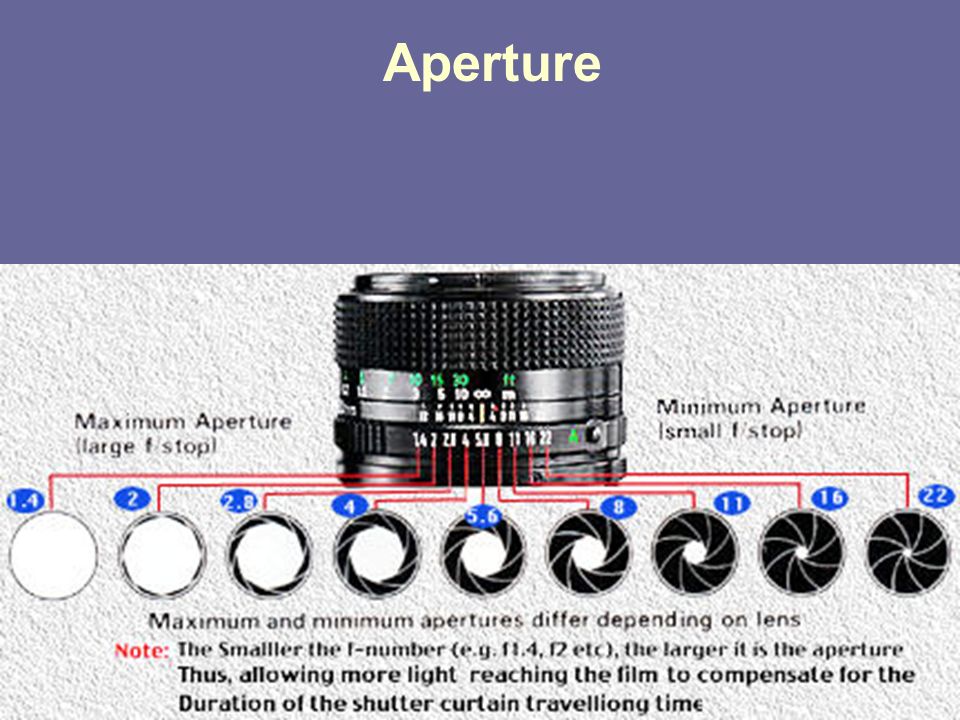 It also controls the depth of field. Aperture is displayed in an “f/number” format.
- A low number = large aperture:
- Lets in more light
- It has a more shallow depth of field
- A high number = small aperture:
- Lets in less light
- Has a deeper depth of field
Aperture is defined by the size of the opening through which light can enter the camera.
Aperture sizes range from the widest (f/1.4) to the smallest range (f/32). Between them are additional “stops” of f/2, f/2.8, f/4, f/5.6, f/8, f/11, f/16, and f/22. Each f-number represents one “stop” of light, a mathematical equation (the focal length of the lens divided by the diameter of the aperture opening) that determines how much light enters the lens regardless of its size. For example, an f/4 on a 50mm has a smaller opening than an f/4 on a 200mm. However, the same amount of light travels through both lenses to reach the image sensor, thus providing the same exposure.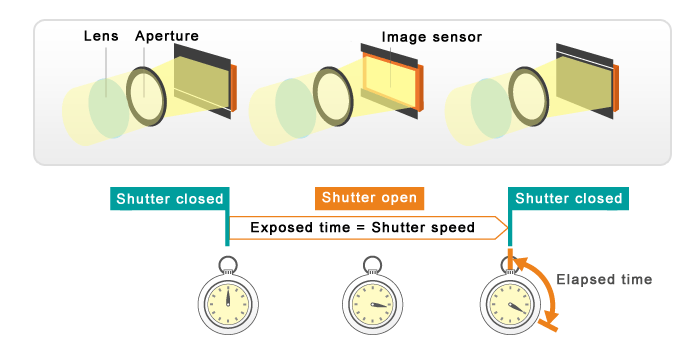
Aperture Camera Components
Aperture blades
Like an eye, a camera lens has an “iris” that controls the aperture. Inside each lens is a set of blades that open or close making the aperture wider or smaller. The aperture size controls how much light gets in and how exposed the photo will be. The more light that comes through the lens, the brighter the image.
Lenses have varying numbers of aperture blades, depending on the price and quality of the lens. A basic lens has five or six blades on the aperture. More professional lenses may have nine or more blades on the aperture. Aperture blades can also be placed straight or rounded on the lens. The aperture shape itself is often a polygon or a hexagon rather than a perfect circle.
Image sensor
An image sensor is a photo-sensitive semiconductor that captures light rays and converts them to electronic signals. These signals transform into a color image based on a processor inside a camera. Larger cameras have larger sensors and smaller cameras have smaller sensors.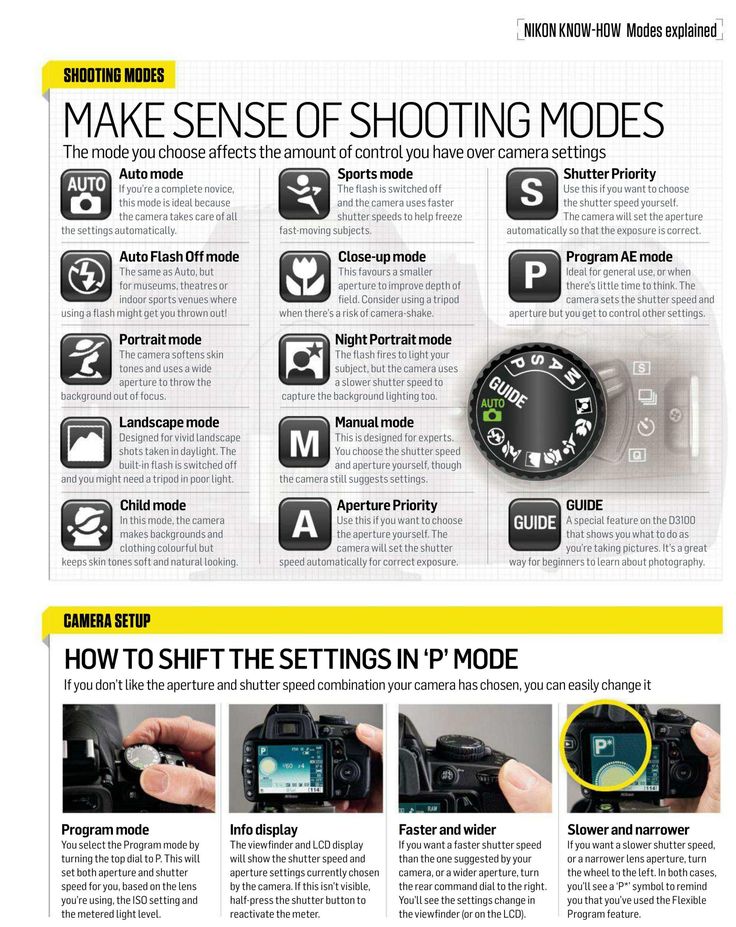 A smaller sensor captures a smaller portion of the image.
Aperture Settings
Aperture also changes how images look by controlling the depth of field. Depth of field refers to how much or how little of the scene is in focus. Photographs with a large depth of field have a larger focus area, while images with a shallow depth of field have a small area in focus.
What controls aperture?
Aperture is controlled by several important factors, including focal length, which in turn controls the depth of field. Depth of field and the camera lens size, combined with the light source and the photographer’s need, controls aperture. Here’s how:
Focal length
The focal length is the distance from the lens’s center to the imaging point (focal plane) where the light for the image is collected. When a lens is described as a “50mm lens,” it refers to focal length. Different focal lengths create different levels of magnification and change the viewing angle of the resulting photograph.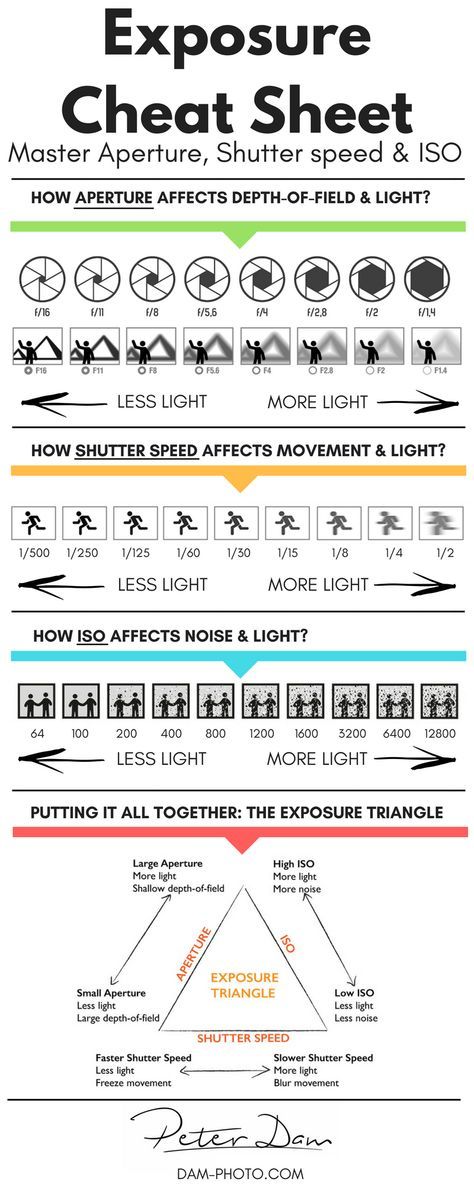 Camera lenses with short focal lengths have a wide-angle of view, while longer focal length lenses will have stronger magnification, such as a telephoto lens.
The brightness of a lens is a combination of focal length and lens diameter. If the focal length of two lenses is the same, the larger diameter lens will be brighter. With a 50mm lens and a lens diameter of 17.8mm, focal length divided by lens diameter gives the lens a maximum f-stop of 2.8. The f-stop value is aperture, showing how much light will pass through it when the aperture is opened to its maximum. The smaller the aperture value, the brighter the lens.
Minimum and maximum aperture
All camera lenses have a maximum and minimum aperture. Knowing how minimum and maximum aperture work helps photographers understand what lenses to use for different photography types.
If a camera lens has an aperture range of f/4 to f/32, the minimum aperture is f/32, while the maximum is f/4. Since a lower f-number means the aperture is higher (more light), the maximum aperture is faster and lets in more light. Maximum aperture camera lenses are considered to be “fast” because of a higher shutter speed. With a maximum aperture of f/1.2, photos can be taken in places with little light.
Minimum aperture is used for different purposes. Landscape and architecture photography utilizes the minimum side of the aperture spectrum. This kind of photography frequently utilizes small apertures such as f/8 and f/11. The goal is to get both the foreground and the background elements in focus simultaneously and not lose any part of the shot.
Background blur
The photography effect used to produce a sharp subject and soft, out-of-focus background is called the bokeh effect (pronounced BO-cuh). It often results in soft light flares and reflections that add to the look of the photo. To create the bokeh effect in an image, use a fast lens. —the quicker, the better. Use a lens with at least an f/2.8 aperture or even apertures of f/2, f/1.8, or f/1.4.
Using bokeh is popular in portrait photography or macro photography when a subject is very close up, or there’s a lot of lighting in the background. When purposely photographed out-of-focus, harsh or bright lights become soft or diffused. Bokeh can also add softness to an otherwise brightly lit photograph.
Wide aperture
Wide apertures let in a lot of light and create a shallow depth of field for portraits. For example, photographers prefer an f/2.8 aperture since it’s wide and fast. A wide aperture has a lot of uses for a wide range of photography. Examples of wide-aperture photography include:
- Subject Isolation
- Portrait Photography
- Sporting events
- Night Photography
- Close up (macro) photography
Smaller aperture
Smaller camera apertures (or big f-numbers) are used much differently than larger, wider apertures, because they can cause a loss of detail in photography. However, small apertures are still useful. In landscape photography, smaller apertures provide a large depth of field when the foreground and background are both in focus. Smaller apertures also work well with macro and product photography, since small subjects can be focused on more easily.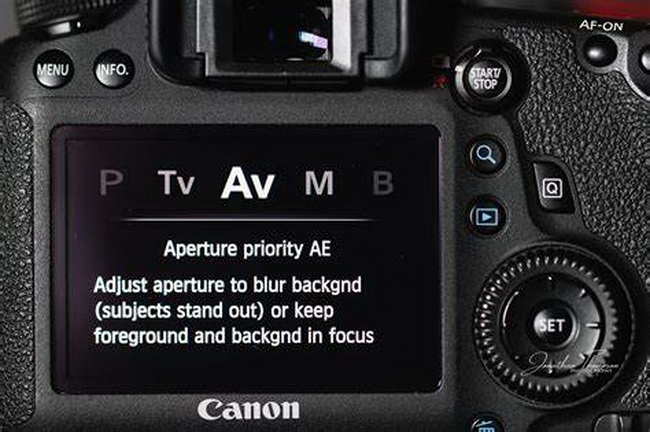
Aperture priority mode
Aperture Priority mode is a semi-automatic shooting mode in cameras. The user tells the camera which aperture and/or ISO setting to use, and the camera works out the correct exposure. It sets the remaining element, shutter speed, on its own. Some cameras label aperture priority as Av (Aperture value) or as A (Aperture) on the settings wheel.
Although only one or two settings are used manually, and the camera is doing all the balancing, it gives the photographer more control than shooting entirely automatically. After determining the subject of the photo, choose the aperture number (f-stop). When shooting a landscape, choose a larger f-number, such as f/9 or f/16. For a blurred background on a portrait shot, choose a smaller f-number, such as f/2.8 or f/4.5. The camera adjusts the ISO and shutter speed before taking the photo.
Variable aperture
Variable aperture is specifically used with zoom camera lenses. Lenses with variable apertures change the aperture based on focal length.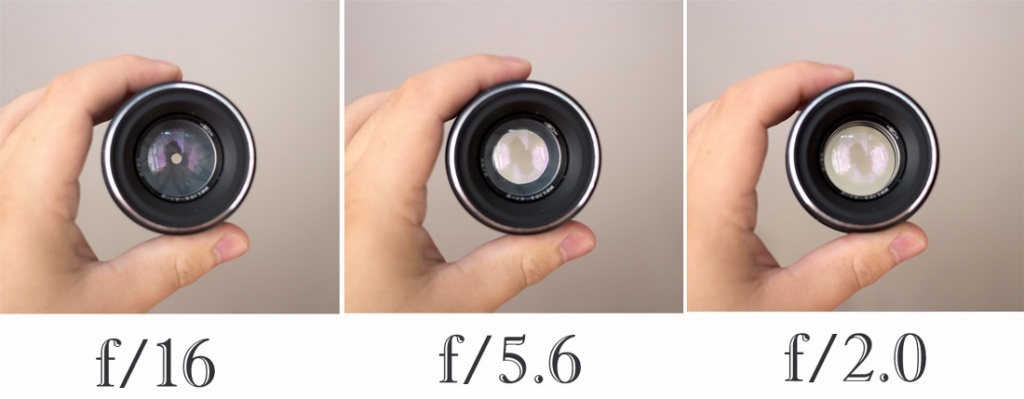 On an 18-55mm lens, an f/3.5 aperture occurs when zoomed out to 18mm. When zoomed in to 55mm, the widest aperture available is only f/5.6. It’s a smaller range of aperture choices and is more difficult to control exposure. However, lenses with variable aperture have a lighter weight, are more cost-effective, and have easier mobility.
Aperture can be a simple yet exciting way to understand and practice photography. Use different aperture settings anywhere photos are taken. See the differences in background, focus, and the right amount of light for the perfect photograph.
Bring Your Photos to Life with a Personalized Photo Book.
Once you’ve mastered using aperture with your camera, create a beautiful memory book with Motif. Whether it’s your latest vacation photos, candid everyday shots, or cherished family photos, creating a personalized photo book is easy with Motif.
There are over 80 personalized layouts, with various themes and sizes to create the perfect photo book for your needs.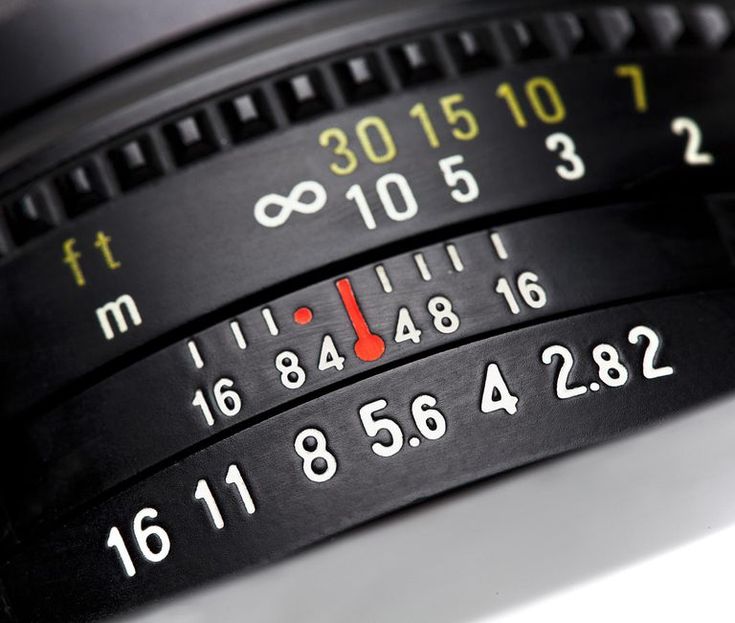 Photo books are the perfect way to celebrate and share your favorite photographs with family and friends. Download our free app today and give your stories a home with Motif.
What did you think of this article?
- Author
- Recent Posts
Pete
Editor at Large at Motif Photos
A natural born storyteller based in NYC and the Catskills. Pairing stories with photos for safe keeping and telling.
Latest posts by Pete (see all)
Aperture, shutter speed, and ISO
A photo's exposure setting determines how dark or light an image captured by your camera appears. Believe it or not, there are only three settings: aperture, shutter speed, and ISO sensitivity (“exposure triangle”). Skillful use of them is an essential part of developing a photographer's intuition.
What is exposure
Getting the right exposure is a lot like trying to collect rainwater in a bucket. While the amount of rain is out of your control, there are three factors you can control: the diameter of the bucket, the amount of time you expose the bucket to rain, and the amount of water you want to receive.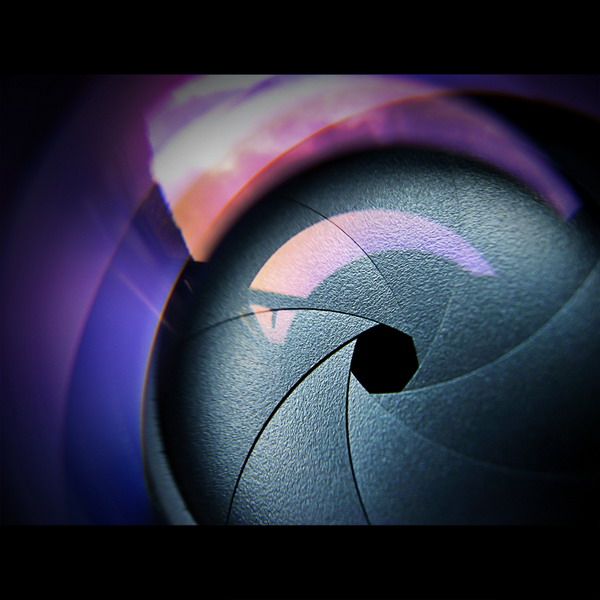 All you need to achieve is to score not too little (“underexposure”) and not too much (“overexposure”). The key is that there are many different combinations of bucket sizes, times and amounts of water possible. For example, the same amount of water can be obtained in less time if you take a wider bucket, and vice versa, a narrow bucket will need to be kept in the rain for much longer.
In photography, the exposure parameters are aperture, shutter speed, and ISO sensitivity, which are the same as the bucket diameter, time, and amount of water described above. Further, both rain and natural light are out of the photographer's control.
Exposure triangle: Aperture, shutter speed and ISO
Each setting affects exposure differently:
Aperture : Controls the area through which light enters the camera
Shutter speed : controls the exposure time
ISO number : controls how sensitive your camera sensor is to the amount of light
each of the parameters affects other properties of the image as well. For example, aperture affects depth of field, shutter speed affects motion blur, and ISO speed determines the amount of visual noise.
Next, we will look at what each of the parameters means, how to evaluate its influence, and how the camera's shooting modes affect the combination of parameters.
Shutter speed
Camera shutter determines when the camera sensor is open or closed to light entering through the lens. The exposure time determines how long the sensor will be open. "Exposure" and "exposure time" mean the same thing, and shortening the exposure means shortening the duration of the exposure.
Numerically . The effect of shutter speed on exposure is probably the easiest to evaluate: it is related to the amount of light entering the camera as 1:1. If the exposure time doubles, the amount of light entering the camera also doubles. In addition, the widest possible range of values is possible for this parameter:
| Shutter speed | Use of |
|---|---|
| 1 to 30 seconds or more | Shooting at night and in low light with a tripod |
| 2 to 1/2 second | Smoothing flowing water Landscaping tripod with deep depth of field |
| 1/2 to 1/30 second | Motion blur capture for the background of a moving subject Accurate handheld shooting with stabilization |
| 1/50 to 1/100 second | Typical handheld shooting without significant zoom (zoom) |
| 1/250 to 1/500 second | Freezing a subject in motion Handheld shooting at high magnification (telephoto lenses) |
| 1/1000 to 1/4000 second | Freeze very fast and very close movement |
What looks like.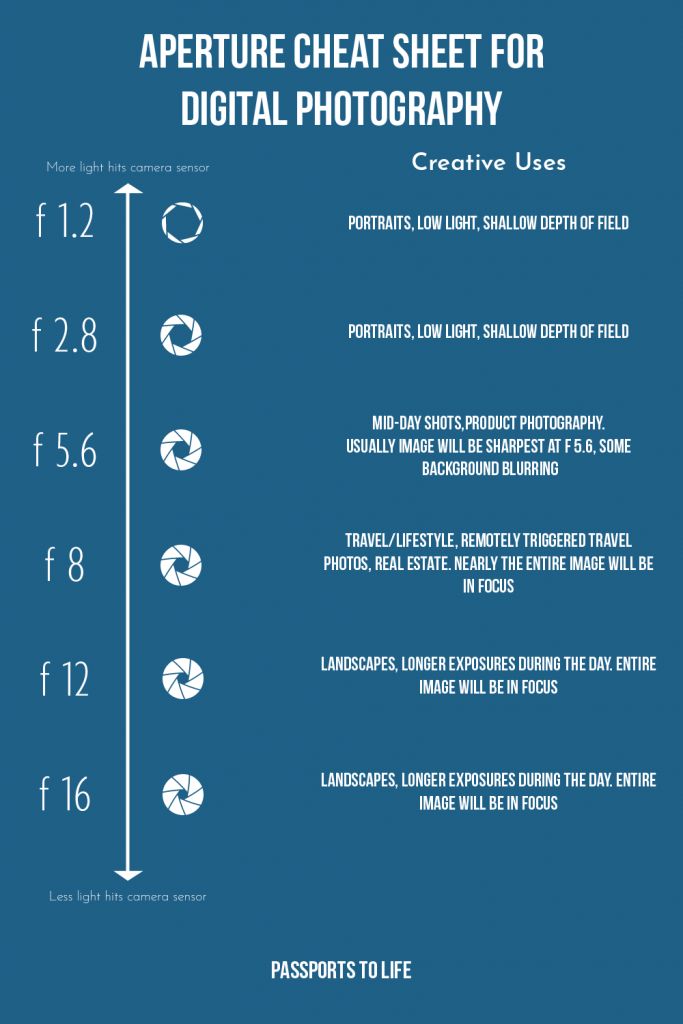 Shutter speed is a powerful tool to freeze or accentuate movement:
| Long exposure | Fast shutter speed |
|---|
In creative photography or for waterfalls, for example, motion blur is sometimes desirable, while in most other cases it should be avoided. As a result, shutter speed is usually chosen based on the value that a sharp shot can provide - either to freeze movement or to eliminate camera shake when shooting handheld.
How do you know what shutter speed will give you a sharp handheld shot? With digital cameras, it's easiest to experiment and evaluate the results on the camera screen (at full zoom). If your shot is blurry with the right focus, you may need to slow your shutter speed, keep your hands more stable, or use a tripod.
Aperture
The aperture number of the camera controls the area through which light can pass through the lens. The aperture value is expressed in terms of f-stops, which at first glance are not intuitive, since as the f-stop increases , the light transmission area decreases .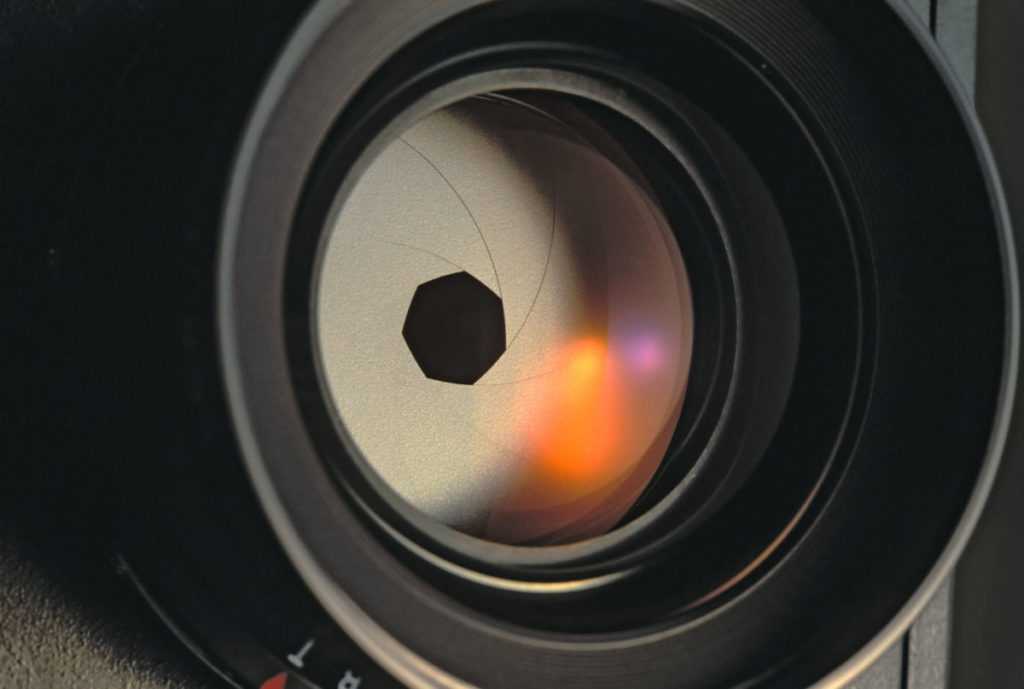 In photographers' jargon, if someone says "close" or "open" the aperture, they usually mean increasing or decreasing the f-stop, respectively.
Numerically . Whenever the f-stop is halved, the light transmitting area is quadrupled. This follows directly from the fact that the area of a circle is proportional to the square of its radius, but most photographers simply memorize the f-stops that correspond to each doubling or doubling of light:
| Aperture | Light transmission | Excerpt example |
|---|---|---|
| f/22 | 1X | 16 seconds |
| f/16 | 2X | 8 seconds |
| f/11 | 4X | 4 seconds |
| f/8.0 | 8X | 2 seconds |
| f/5.6 | 16X | 1 second |
| f/4.0 | 32X | 1/2 second |
| f/2.8 | 64X | 1/4 second |
f/2. 0 0 | 128X | 1/8 second |
| f/1.4 | 256X | 1/15 second |
The above combinations of shutter speed and aperture result in the same exposure.
Notes: The available shutter speed options do not always allow you to increase or decrease the shutter speed of
exactly by half, but the approximations are always so close that the difference will be negligible.
The above f-stops are standard on almost every camera, although most cameras also allow for more flexible settings such as f/3.2 and f/6.3. The range of values may vary depending on the camera and lens. For example, a compact camera can range from f/2.8 to f/8.0, while a DSLR with a portrait lens can range from f/1.4 to f/32. A narrow aperture range is usually not a big problem, but a wider aperture range provides more creative flexibility.
Tech Note: For many lenses, light transmission is also affected by transfer efficiency, although this is almost always a much smaller factor than aperture. In addition, it is beyond the control of the photographer. The difference in transfer efficiency is usually more noticeable when using a high magnification (zoom). For example, the Canon 24-105mm f/4L IS lens lets in about 10-40% less light at f/4 than the equivalent Canon 24-70mm f/2.8L lens at f/4 (depending on focal length). ).
What looks like. The aperture value of a camera determines the depth of field of an image (the range of distances within which objects appear sharp). Decreasing the f-stop means reducing the depth of field:
| Wide aperture f/2.0 - small f-stop shallow depth of field | Closed aperture f/16 - large f-stop large depth of field |
ISO
The ISO number determines how sensitive the camera is to light. Similar to shutter speed, ISO speed is related to exposure change as 1:1. However, unlike aperture and shutter speed, a minimum ISO is almost always desirable, since increasing the ISO increases visual noise significantly. As a result, the ISO speed is increased only in cases where the required aperture and shutter speed are otherwise unattainable.
| Low number ISO (low noise) | High number ISO (high noise) |
note: in traditional photography, visual noise was defined as "film grain"
ISO numbers such as 100, 200, 400, and 800 are commonly available, although many cameras allow lower and higher values as well. Typically, ISO numbers in the 50-200 range provide acceptable low noise, while 50-800 (or even more) is often acceptable when using digital SLR cameras.
Camera shooting modes
Most digital cameras have standard shooting modes: auto (), program (P), aperture priority (Av), shutter speed priority (Tv), manual (M), and shutter release (B) modes. Av, Tv, and M modes are often referred to as "creative zone" or "auto exposure (AE) modes."
Each of these modes affects how aperture, shutter speed, and ISO speed are selected for a given exposure.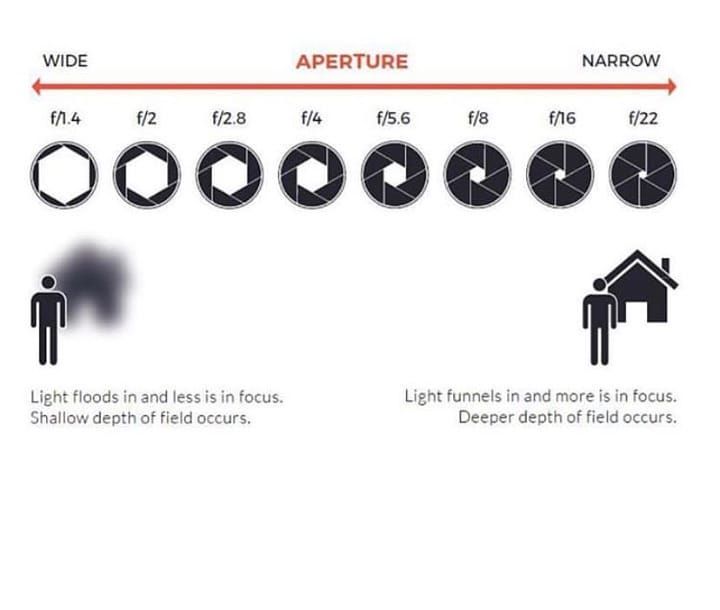 Some modes try to pick all three values for you, others let you pick one setting and let the camera pick the other two (if possible). The following table describes the effect of each shooting mode on exposure settings:
| Shooting mode | How it works |
|---|---|
| Automatic () | The camera automatically selects all shooting parameters. |
| Software (P) | Camera automatically selects aperture and shutter speed; you can choose the ISO speed and exposure compensation. |
| Aperture priority (Av or A) | You choose the aperture and ISO, and the camera automatically selects the appropriate shutter speed. |
| Shutter priority (Tv or S) | You choose your shutter speed and ISO, and the camera automatically selects the appropriate aperture. |
| Manual (M) | You choose aperture, shutter speed, and ISO speed, regardless of whether the selected values will give the correct exposure.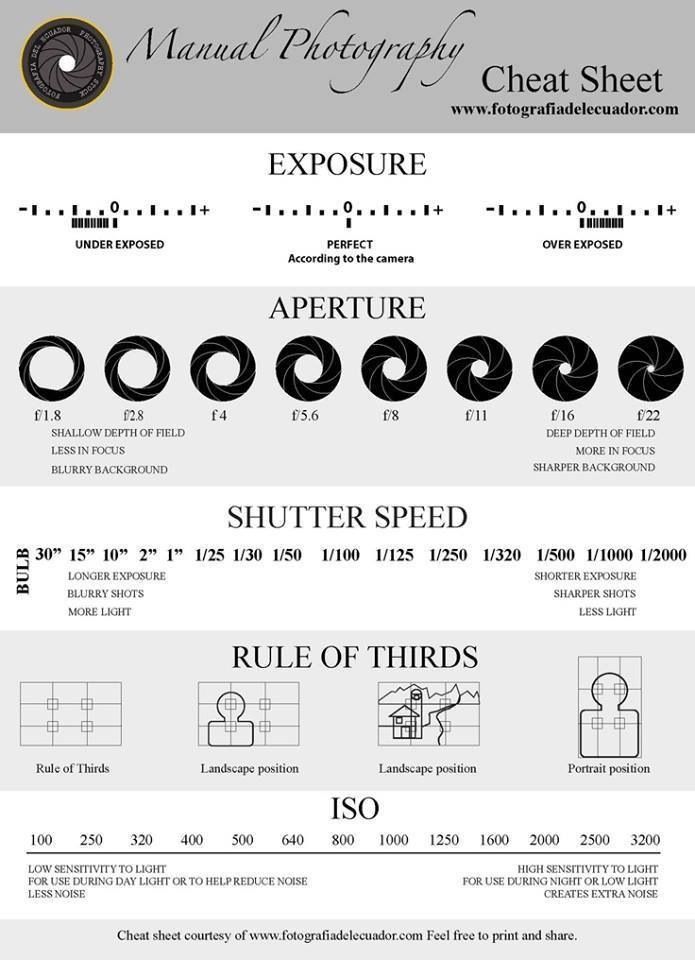 |
| Trigger (B) | Useful for exposures longer than 30 seconds. You choose the aperture and ISO speed, and the shutter speed is determined either by a remote switch or by the moment you press the shutter button a second time. |
In addition, the camera can have several preset shooting modes; the most common are landscape, portrait, sports and night modes. The symbols used for each mode vary slightly depending on the camera model, but will most likely look similar to the following:
| Shooting mode | How it works |
|---|---|
| Portrait | The camera tries to find the smallest f-stop possible for the given exposure. This ensures the smallest possible depth of field. |
| Landscape | The camera tries to select the largest f-stop to provide a large depth of field. Compact cameras often set the focus distance to infinity as well. |
| Sports | The camera is trying to achieve the fastest possible shutter speed for the selected exposure, ideally 1/250 second or faster.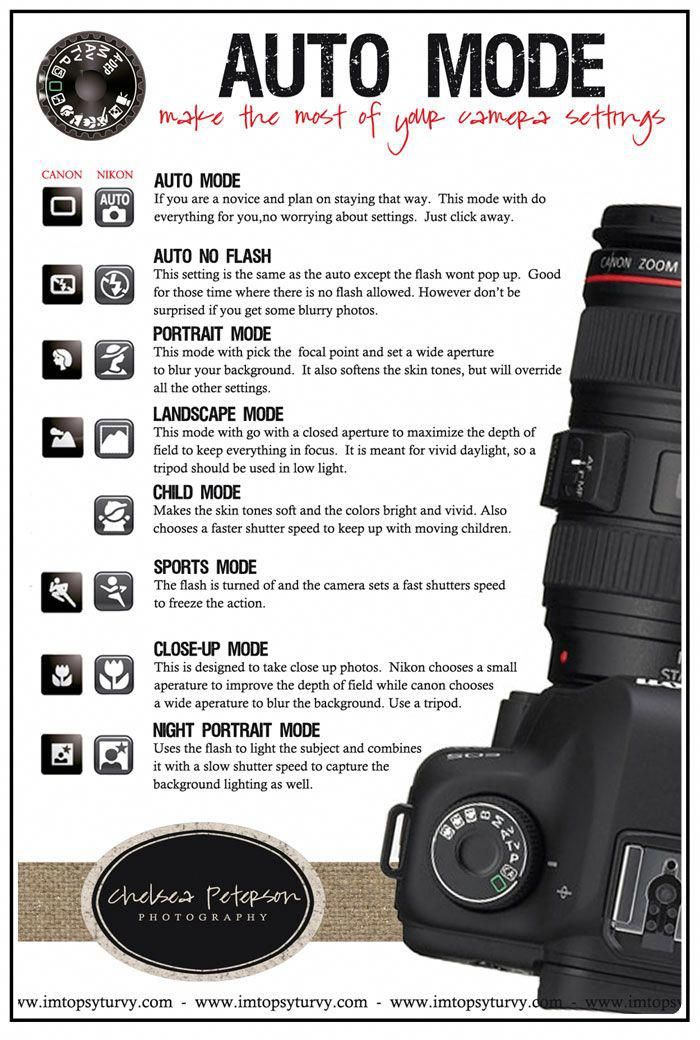 In addition to using a small f-stop, fast shutter speeds are usually achieved by increasing the ISO speed more than would be allowed in portrait mode. In addition to using a small f-stop, fast shutter speeds are usually achieved by increasing the ISO speed more than would be allowed in portrait mode. |
| Night | The camera allows slower shutter speeds than is normally allowed for handheld photography, and raises the ISO to near the maximum possible. However, on some cameras, this mode means that the flash is used to illuminate the foreground, while slow shutter speeds and high ISO speeds are used for the background. Check your camera manual for unique features . |
However, keep in mind that for the most part the above settings depend on the camera's exposure metering system, which determines the correct exposure. When shooting complex subjects, the metering system can often be fooled, so it is useful to understand under what conditions it can make a mistake, and what can be done to compensate for exposure errors (see the chapter on camera metering).
Finally, some of the modes listed above can also control camera settings that are not related to exposure, but this depends on the camera model. Such advanced options may include, but are not limited to, focus points, metering mode, and autofocus.
Basic camera settings for portrait photography | Articles | Photo, video, optics
It's silly to say that there is only one right way to make a good portrait, but there are some general conventions and basic camera settings that you need to know and understand if you want to develop in portrait photography. In this article, based on the publications of renowned photographer John Harris, we will go over the basic settings that you can use as a starting point for shooting portraits.
Camera
A variety of cameras can be used for portraiture: Nan Goldin used a battered 35mm Nikon film in her early work, and Richard Avedon shot with a Deardorff 8x10 large format camera, among others. For some photographers, high resolution is a necessary criterion for a good portrait, while others prefer "dreamy" softness.
In general, experienced portrait photographers are more likely to choose full-frame DSLRs, mirrorless cameras, and medium format cameras. But even if you do not have such a camera, this is not a reason to limit yourself and not take pictures until you save up for the “right” camera. The main thing is to find the right way to interact with the model, and capture the moment when a person discovers his true self. Andy Warhol, for example, did this with a Polaroid Big Shot, a camera that you're unlikely to find on any list recommended for portrait photography.
Canon EOS R full-frame mirrorless camera (left), Nikon D7500 full-frame DSLR (center), Fujifilm GFX 50R medium format mirrorless camera (right).
ISO
The concept of ISO is a legacy of film photography, and on a digital camera it reflects the sensitivity setting of the image sensor. A high ISO setting produces a brighter image in low light conditions, but the side effect is the potential for noise, or grain as it is also called. These are digital artifacts that become noticeable at high ISO settings and do not contribute to beautiful (from a conventional point of view) portraits. The best practice is to use as low an ISO as the light source will allow. Depending on your lighting, camera stability, and assuming your model is not moving, try to keep your ISO below 400. For the most pleasing skin tones and overall image clarity, try ISO 100. It may not be possible to maintain this ISO level in all lighting situations, but if you are using strong continuous, flash or daylight, ISO 100 will be the best option.
Low ISO (left), high ISO (right). Source: Matt Granger
Exposure
Exposure is the amount of time a digital camera's film or sensor is exposed to light. Fast shutter speeds are good for stopping (“freezing”) motion, while slow shutter speeds allow for more light but can result in motion blur. Even such fleeting things as the model looking away or blinking can lead to blurring, which, in turn, can spoil the portrait. The same applies to camera movement at slow shutter speeds.
So what are the ideal shutter speed settings for portraits? Again, this is very subjective and depends on the type of portrait you want to take.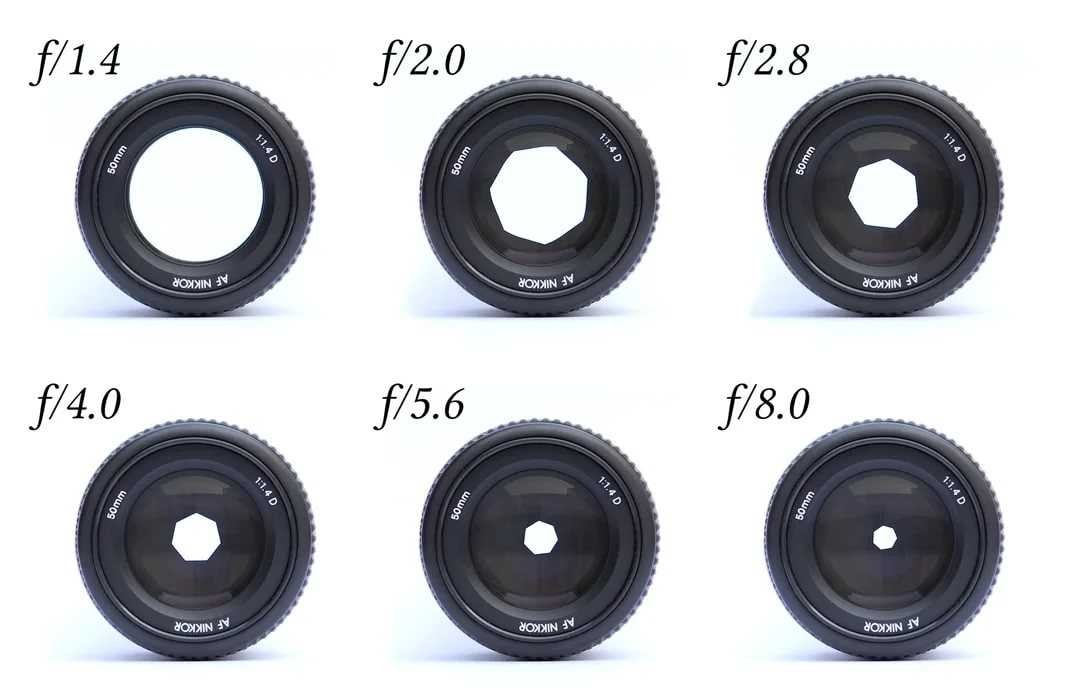 Think, for example, of Richard Avedon's photograph of the choreographer Killer Joe Piro, or, conversely, a portrait of a dancer "frozen" in a jump.
However, since this material is for beginners, as a general rule, try to use shutter speeds no slower than 1/60th of a second to avoid blur. Many photographers in the right conditions use even slower shutter speeds, especially when using a tripod or other support. However, shutter speed is not the deciding factor when deciding on settings because there are other camera settings, notably aperture, that will determine how fast a shutter speed can be.
Also remember that during a portrait session you have some control over the movement of your subject, and you can also place the camera on a tripod or other stable support.
Motion blur portrait and fast shutter speed portrait with frozen motion. Source: bhphotovideo.com
One last thing about shutter speed: your light source, be it flash or natural light, will also determine what shutter speed should be.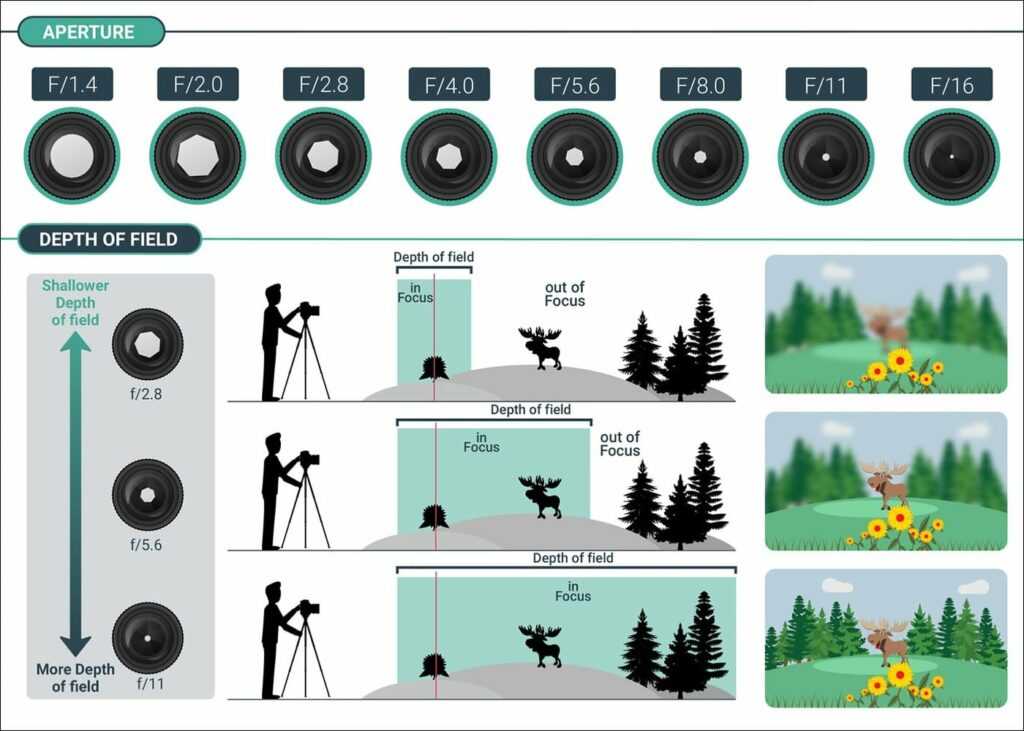 You can be flexible with this setting and change it as you shoot.
There is a simple rule that the slowest shutter speed you can use when shooting handheld should match the focal length of the lens you are using. If you're using an 85mm lens, for example, the slowest shutter speed you can use to avoid blur is about 1/85th of a second. In general, sometimes it's better to make a mistake and underexpose a picture a little (in this case, it will be a faster shutter speed) than to overexpose it with a slow shutter speed and get a blurry picture.
Aperture
The aperture setting determines the size of the lens opening through which light enters the camera. On most lenses, the aperture can be adjusted - the size of the hole is indicated by the number f (relative aperture of the lens), or, as they say, f-stops. F-stops on most portrait lenses range from f/1.4 to f/22, but can be larger or smaller. The smaller the f-number, the more the aperture is open, and vice versa.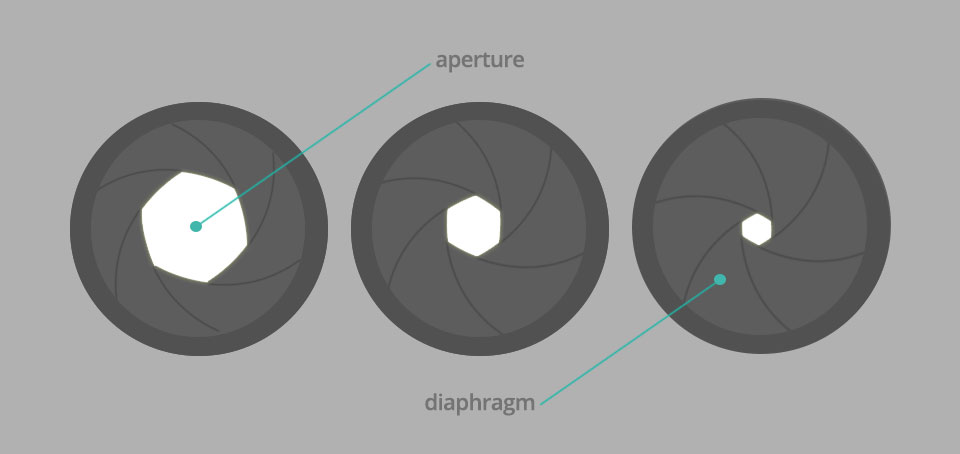 An aperture of f/22 is a tiny aperture that lets the least amount of light into the frame, while f/2.8 is a relatively open aperture that lets in more light. The main trick in photography is to balance ISO sensitivity, shutter speed and the amount of light passing through the aperture so that the image is well exposed - neither too dark nor too light.
But aperture also provides another function that is especially important for portraiture. Aperture size determines the depth of field (DOF), or simply depth of field, and describes how much of your image, from the background to the foreground, is in focus. An image with a large depth of field will be in focus from the foreground to the background, while an image with a shallow depth of field will only focus on a certain point in the frame.
Portrait with shallow depth of field (left) and portrait with large depth of field (right).
Setting the aperture to get the picture you want is essential for portrait photography. For a portrait in an environment in which the background and the physical space around the person is important for understanding their character (or, for example, profession), it is worth using an aperture setting of at least f / 5.6, so that most elements of the composition are in focus.
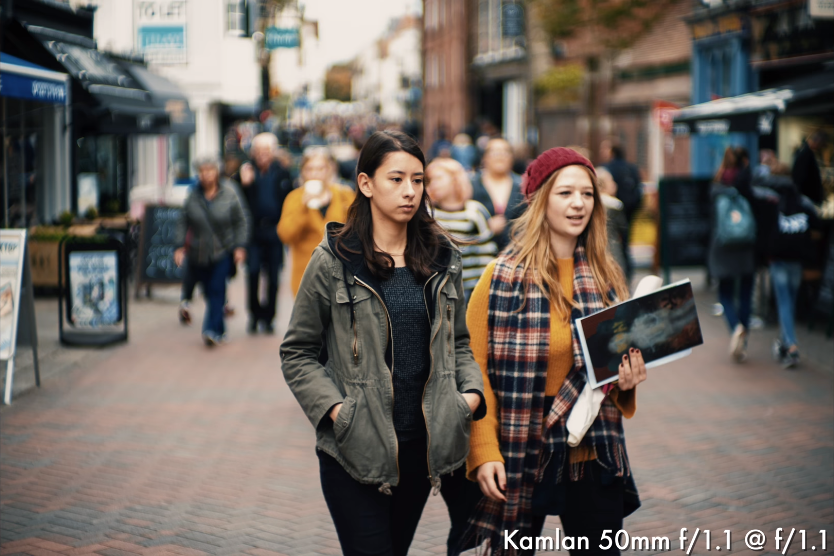
When you want your subject's eyes to be in focus and everything else to be softly blurred (for bokeh), set your aperture to f/2.8 or lower if your lens allows. To simplify as much as possible, an open aperture is usually considered a setting that is favorable for creating beautiful portraits.
After setting the aperture, you can set the ISO and shutter speed. Most cameras have built-in exposure meters, but to better measure light and determine these settings, photographers sometimes use a handheld exposure meter.
Lenses
Certain lenses are commonly referred to as "portrait lenses" because they are best suited for the task, but as with cameras, many great portraits have been taken with other types of lenses, from wide angle to telephoto.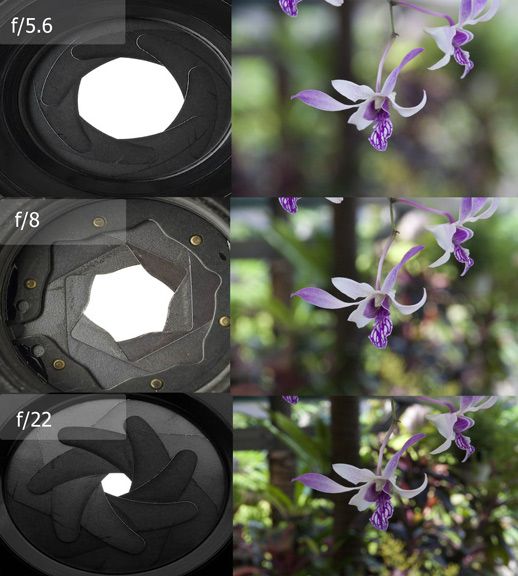 And, of course, "portraits" can also be used not only for portraits, but also for other genres of shooting.
Focal length is the most common way to describe and classify lenses. Telephoto lenses are lenses with a focal length between 85mm and 600mm (telephoto/telephoto). Lenses with a short focal length from 8mm (fisheye) to 35mm are called wide-angle. The intermediate area between them from 40 mm to 70 mm is usually called the normal focal length (although there is some disagreement in the definitions). Normal, as well as close telephoto lenses, in particular from 85 to 105 mm, are usually used for portraiture. Whether you use a zoom lens that has a full range of focal lengths or a fixed focal length (so-called prime) lens, it is this set of focal lengths that is considered optimal for shooting faces and portraits.
Canon EF 50mm f/1.4 USM
An important reason why wide-angle lenses are not suitable for portrait photography is that they create distortion that your model is unlikely to like: the nose will appear too large, the eyes will be wide apart, and the overall shape of the face can look odd, especially when shot from the side.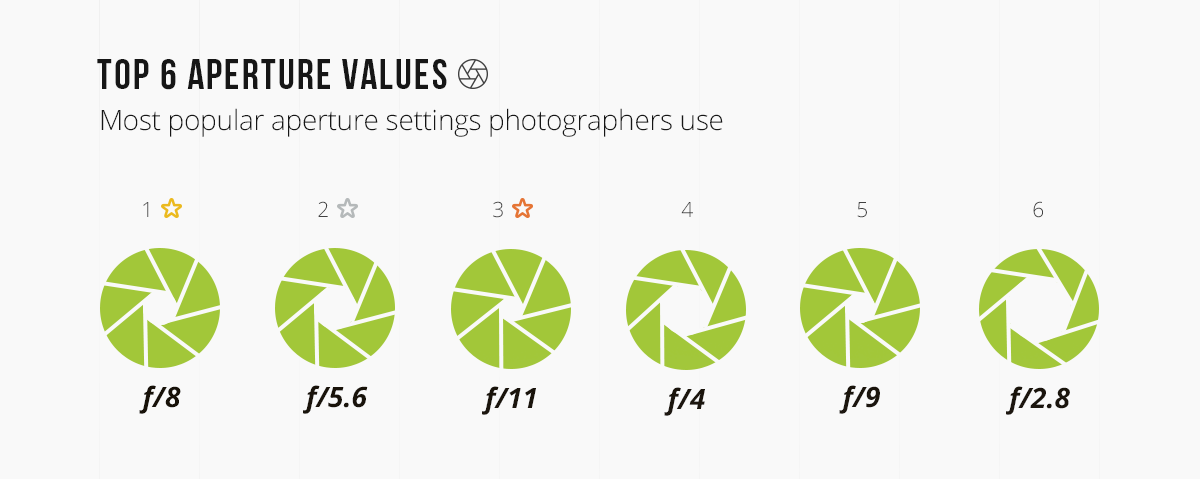 This does not mean that you can not make portraits with such distortions - sometimes it even helps to better convey the essence of the character, but this is rather an exception.
However, when using a far telephoto lens, the image in the frame shrinks, which makes the background and foreground seem unnaturally close. This may have its advantages for portrait photographers, but it is better not to overdo it with this effect. Another reason to avoid long telephoto lenses is entirely practical. If you don't stand far enough away, you won't be able to achieve focus, or you won't even be able to fit everything you need into the frame.
A similar but opposite problem with a wide-angle lens is that you may have to get too close to the subject for the face to become the main subject in the frame. Wide-angle portraits are more commonly used for environmental portraits that include (and keep in focus) elements across the frame.
When using portrait lenses with the above average set of focal lengths, the subject's head and face will look more natural and realistically scaled.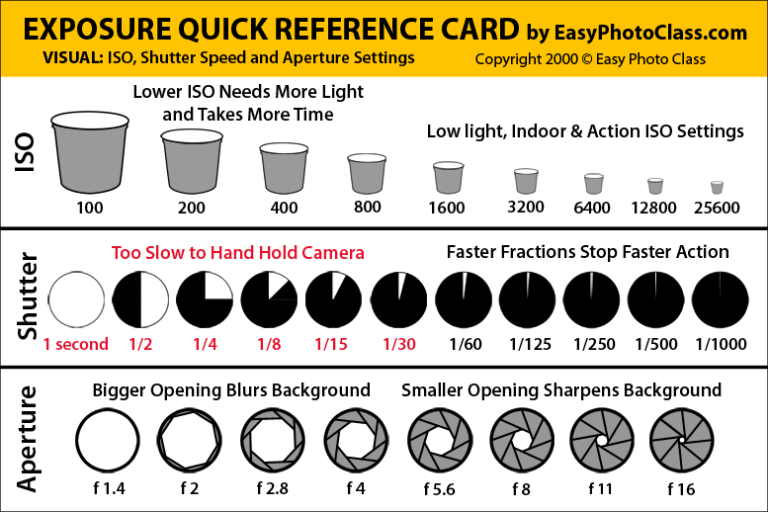 Thanks to their soft telephoto effect, these lenses place the subject comfortably in relation to the background, but without too much compression and with the right separation to bring the face into focus while slightly defocusing the background.
The quality of the out-of-focus area is another criterion for lens selection and camera setup. As discussed above, lenses with large maximum apertures (below f/2.8) provide shallow depth of field, which is good for portraiture. Being able to focus on the face, especially the eyes, while maintaining a soft background defocus is often the most important aspect of portrait photography, and a close telephoto lens with a high maximum f-number is the best way to achieve this.
Summary
Creating interesting creative portraits is more than just having the right camera settings. The placement and control of lighting, the use of shadows and contrast, location and work with the model are important, which we will cover in our other materials.