Camera with manual settings
How to Shoot in Manual Mode (+ Cheat Sheets for Beginners)
Want to use and understand Manual mode like a pro? In this article, I’m going to explain everything you need to know about shooting in Manual, including:
- What it actually is
- How to use it for amazing results
- Why Manual mode might (or might not!) be a good idea
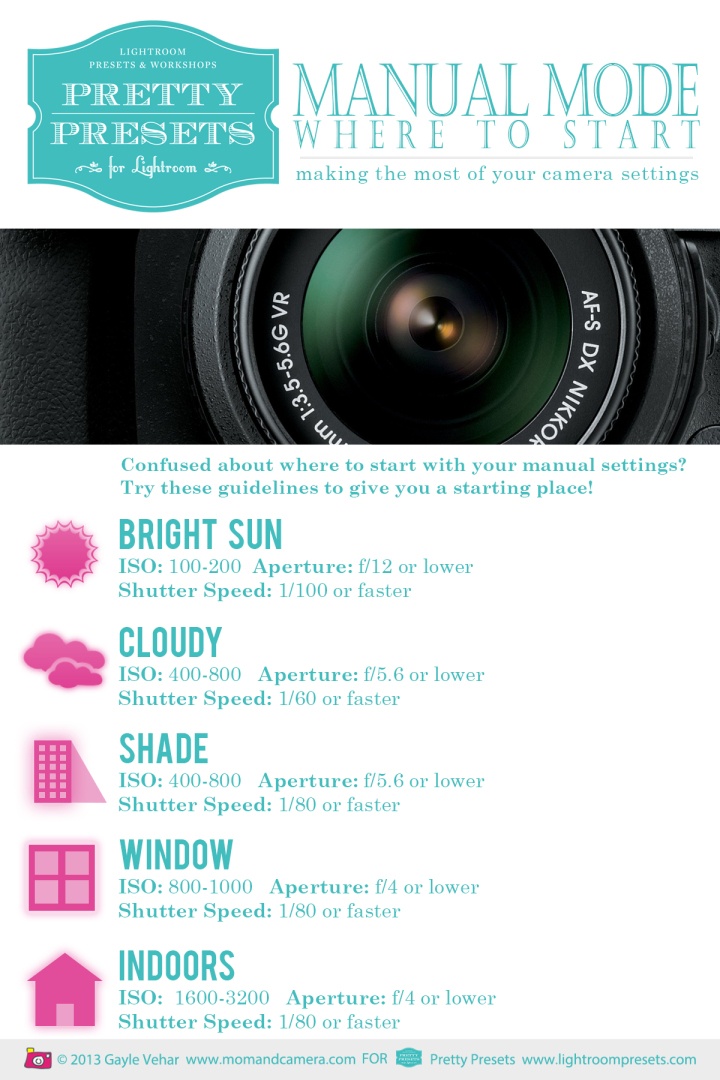
I’ll also share with you a few helpful camera settings cheat sheets, courtesy of the London School of Photography.
So if you’re ready to become a Manual mode master, then let’s get started!
What is Manual mode in photography?
Manual mode gives you complete control over your camera settings. Once your camera is set to Manual, you can adjust different settings and even control your flash.
Most importantly, shooting in Manual lets you independently adjust the three key exposure variables:
- ISO
- Aperture
- Shutter speed
Together, the ISO, aperture, and shutter speed determine the overall brightness of your photos (i. e., the exposure). They also affect your photos in other key ways – by adjusting the sharpness, depth of field, and overall image quality.
That’s what makes Manual mode so powerful. In Manual, you can make your photos appear exactly as dark or light as you want. You can also ensure perfect sharpness, create different depth of field effects, and keep your low-light photos looking high quality.
Now let’s explore these three settings in more detail:
ISO
Simply put, ISO controls your camera’s sensitivity to light.
So by adjusting the ISO, you can increase your camera’s light sensitivity which will, in turn, give you a brighter image.
Say you’re shooting at night and your shots keep turning out too dark. If you’re working in Manual mode, you can boost your ISO – and your images will instantly brighten up.
A low-light image like this one can benefit from a high ISO.On the flip side, if you’re shooting on a sunny day and you want to reduce your exposure, you can drop the ISO to achieve a darker result.
Unfortunately, ISO does come with a significant drawback. As illustrated by the ISO cheat sheet below, the higher the ISO, the noisier your photos become. Noise rarely looks good, and it’s an easy way to ruin an otherwise great image.
For that reason, I generally recommend you leave your ISO on its lowest value unless you specifically need to raise it (e.g., you’re shooting in low light).
Aperture
The aperture is an opening in the lens. The wider the aperture, the more light it lets in and the brighter the resulting exposure (see the aperture cheat sheet below):
Note that photographers use f-stops to refer to aperture sizes, where a smaller f-stop refers to a larger aperture and vice versa.
So an aperture of f/1.4 lets in a lot of light, giving you a brighter image. An aperture of f/22 lets in very little light, producing a darker image. Make sense?
Aperture is also responsible for controlling the depth of field – the amount of your image that is in focus.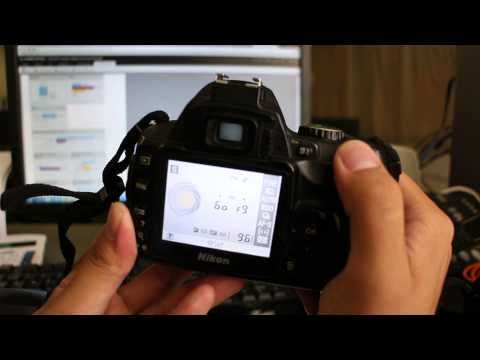 The larger the aperture, the smaller the depth of field.
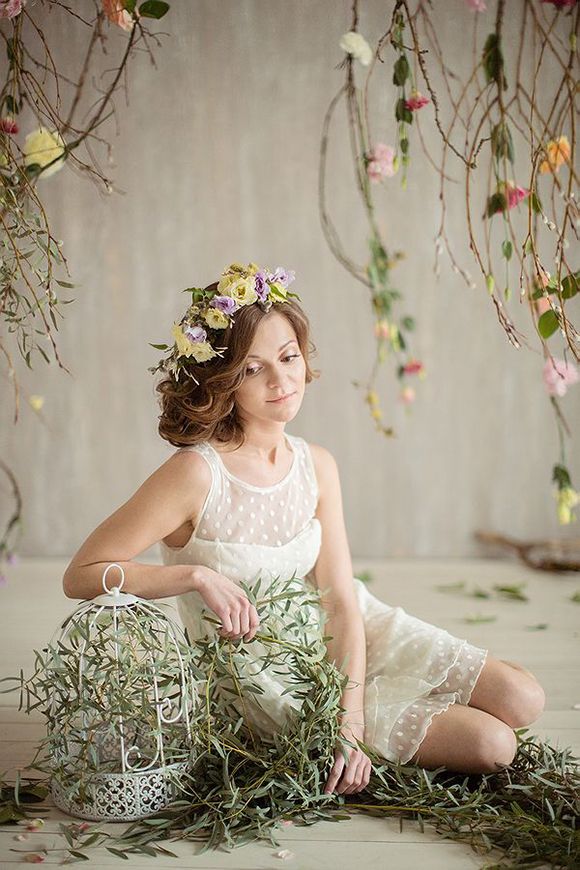
Here’s an image with a shallow depth of field (shot at f/2.8 or so):
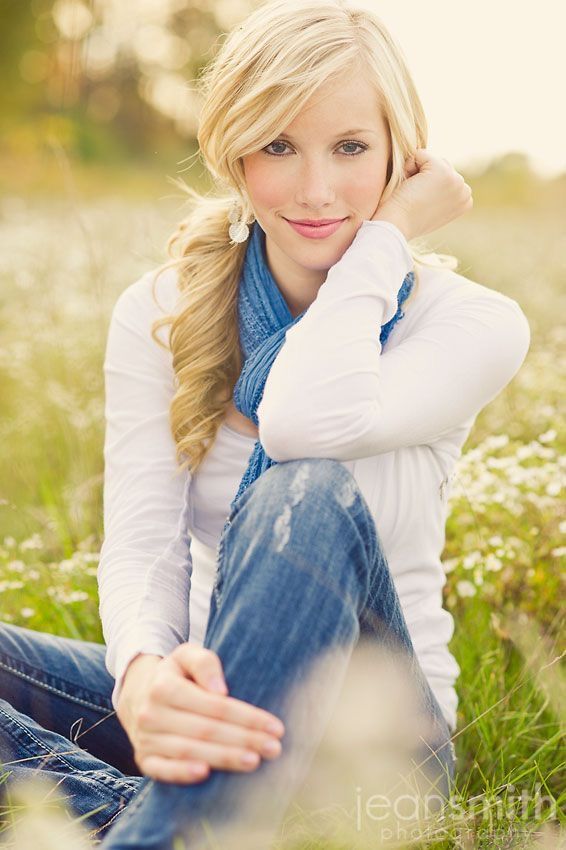
And here’s an image with a deep depth of field (shot around f/11):
See the difference? The wide aperture ensured a very blurry background (though a portion of the flower is still sharp). The narrow aperture, on the other hand, kept the shot sharp from foreground to background.
So if you want a nice, blurry background, you can use Manual mode to dial in a low f-number. And if you want a shot that’s sharp throughout, you can dial in a high f-number instead.
Shutter speed
Shutter speed is essentially the exposure time of an image; that is, how long the shutter stays open to allow light to hit the sensor.
The faster the shutter speed, the less light that hits the camera sensor and the darker the final image.
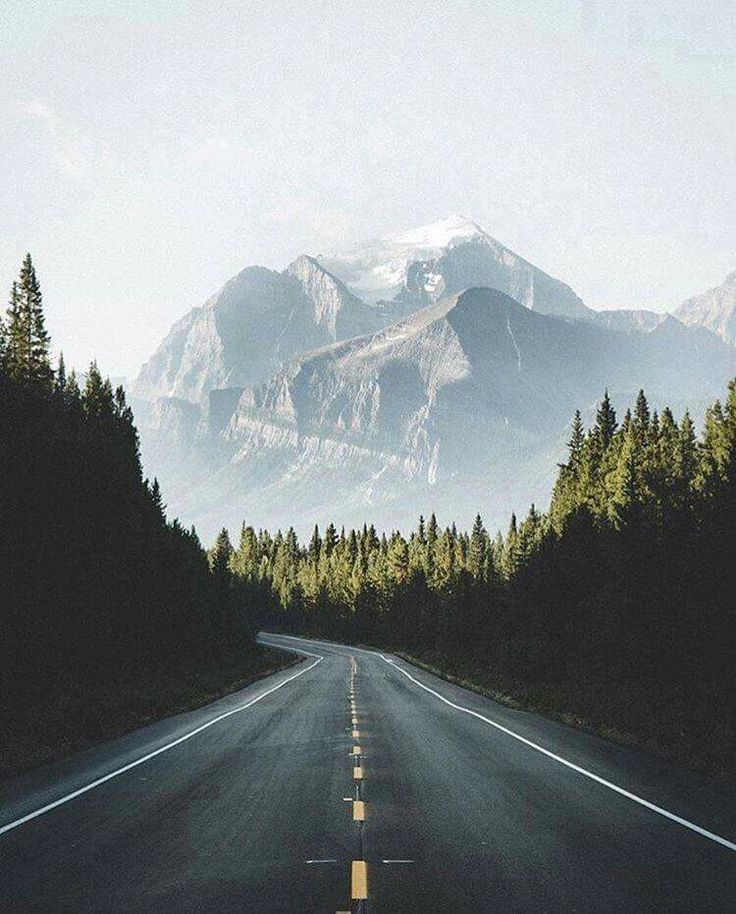
The shutter speed also determines image sharpness. A fast shutter speed freezes the action, while a slow shutter speed will produce motion blur:
In general, it pays to use a higher shutter speed to capture sharp images. But there are times when you might want to create motion blur for artistic effect, in which case a slower shutter speed is the way to go.
White balance is one final Manual mode setting worth learning.
It lets you remove color casts from your scene – and by adjusting the white balance, you can achieve neutral white tones. (It’s especially useful for removing harsh yellow tones or redness on the skin.)
White balance can be used in unconventional ways to get different creative results. For example, you can use the Tungsten white balance preset on an overcast day to produce blue hues and enhance contrast. Or you can use the Shade white balance preset at sunset to enhance the golden light.
Therefore, it’s highly beneficial to experiment with the various white balance modes; you never know what creative looks you might produce!
How to use Manual mode: a three-step process
So, Manual mode lets you adjust your ISO, aperture, and shutter speed to get a well-exposed – or poorly-exposed – final image. (It also lets you adjust your white balance setting to remove color casts and produce creative effects.)
And once you’ve switched your camera to Manual mode, the goal is to carefully set your variables for the results you’re after. But how should you approach this? What’s the best way to go about determining the right Manual mode settings?
While there’s no single correct approach to adjusting settings in Manual, here’s my step-by-step advice:
Step 1: Set your aperture based on depth of field considerations
Do you want a shallow depth of field? Or a deep depth of field?
Start by dialing in your desired aperture. If you want a blurry background, pick a wide aperture. If you want a sharp background, pick a narrow aperture.
Step 2: Set your shutter speed for sharpness
Ask yourself:
How fast is my subject moving? What shutter speed do I need to keep it sharp?
Here, you might think about using the handy Reciprocal Rule, or you might estimate based on previous experiences.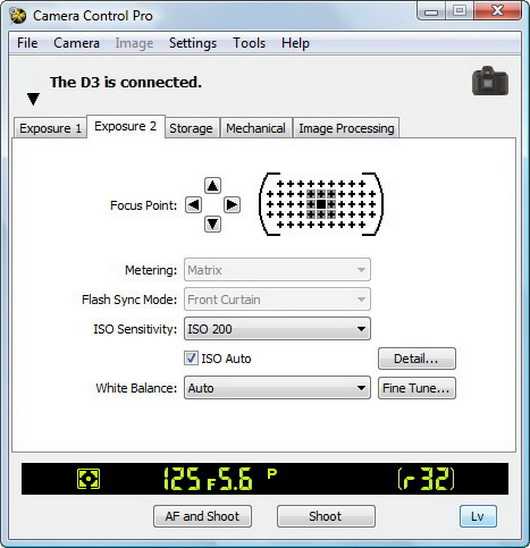 When shooting handheld, I rarely stray below 1/125s or so (and if my subject is moving quickly, 1/800s is my bottom limit).
Of course, if you’re after artistic blur or you’re using a tripod to photograph an unmoving subject, you’re free to lower your shutter speed to 1/30s and beyond.
Step 3: Set your ISO (and adjust your shutter speed/aperture) for the best exposure
At this point, you should have picked an aperture based on artistic considerations, and you should have a shutter speed dialed in for perfect sharpness.
So all that’s left is to nail the exposure, and I recommend you do it with your ISO, if possible (though you may also need to tweak your shutter speed and aperture).
Start by setting your ISO to its lowest value. This is generally ISO 100, but might be ISO 160, ISO 200, or ISO 50, depending on your camera.
Then simply point your camera at the scene you want to photograph and carefully observe the exposure bar at the bottom of your viewfinder.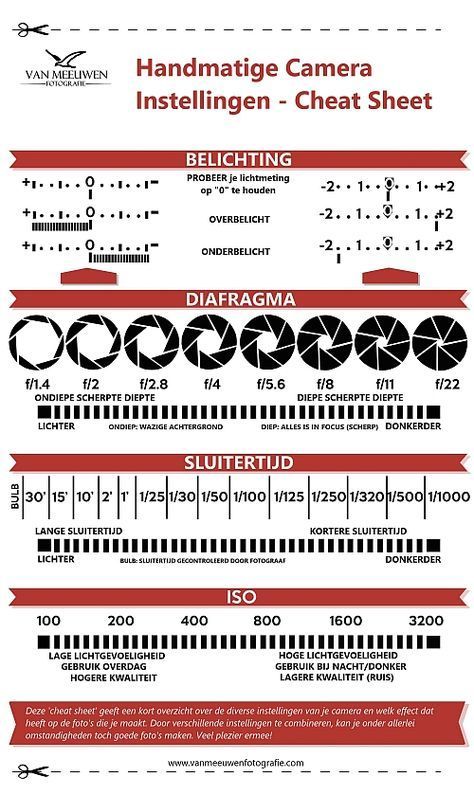 If the bar is showing underexposure (skewed to the left), you’ll need to increase your ISO until you get a centered exposure bar.
If the bar is showing overexposure (skewed to the right), you’ll need to either increase your shutter speed or narrow your aperture until you get a balanced exposure bar. Which setting you adjust doesn’t really matter – the key is to preserve any creative effects you want to produce. So if you’re using a wide aperture for a shallow depth of field, then boost your shutter speed instead. Whereas if you’re using a slow shutter speed for artistic motion blur, then narrow your aperture.
Should you always use Manual mode?
Manual mode is superb for many situations. It’ll help you step up your photography game and capture sharp, well-exposed, well-composed photos.
That said, there are plenty of times when you’ll want to choose a different camera mode instead, such as Aperture Priority, Shutter Priority, or Program mode.
Manual mode is good if…
- You’re working in unchanging lighting conditions.
- You want complete control over your different exposure variables.
- You want to underexpose or overexpose your photos for creative effects.
- You’re shooting slow, deliberate photos (e.g., landscapes) and you have the time to carefully adjust your settings.
Manual mode is best avoided if…
- The light is changing rapidly or your subject is moving between sun and shade.
- You care about the aperture or the shutter speed, but your other settings are less important.
- You’re photographing action where nailing the autofocus is your primary concern (and your particular exposure settings take a backseat).
- You’re a beginner and don’t yet feel comfortable with the different exposure settings.
Other shooting modes
As you can gather from the lists above, Manual mode is great for situations where you need control over your settings and you have time to fiddle around with your camera dials. But you’ll want to avoid shooting in Manual if you’re dealing with fast-paced conditions and changing light, or you’re just not yet an experienced photographer.
In such cases, you’ll want to use a semi-automatic mode instead:
- Aperture Priority mode lets you control the aperture and ISO while your camera selects the shutter speed. It’s great for situations where you want to set the depth of field, but you don’t want to spend too much time dealing with shutter speed. It’s also a good transitional mode if you’re not quite ready for Manual mode but you want to start experimenting with different settings.
- Shutter Priority mode lets you control the shutter speed and ISO, while your camera selects the aperture (it’s like Aperture Priority, but reversed!). It’s useful in situations where you want to select a particular shutter speed for creative purposes, and you don’t particularly care about the aperture.
- Program mode lets you control the ISO, and you can also adjust the exposure via your camera’s exposure compensation setting.
 It’s a great transitional mode when getting off Auto.
Manual mode: final words
Now that you’ve finished this article, you should be able to confidently use Manual mode in your own photography.
(Also, don’t forget to download the cheat sheets featured throughout!)
So head out! Practice working with different settings. And have fun!
Understanding Digital Camera Modes - Everything You Need to Know
Having a good understanding of the digital camera modes is essential to control the exposure in photography. Whether you are a beginner or an advanced amateur, you should know what each camera mode does and when it should be used, under what circumstances.
Table of Contents
What are Digital Camera Modes?
Digital Camera Modes allow photographers to control the parameters of an exposure, specifically, Shutter Speed, Aperture and ISO. While certain modes can fully automate the camera exposure, there are other modes that let the photographer manually control some or all parameters of the exposure.
Back in the old days, there was no such thing as a camera mode – everything was manual. Photographers had to manually set the aperture, shutter speed and choose the right type of film for their cameras. To evaluate the intensity and the amount of light, they used to carry special light metering devices that measured the light and provided the exposure information, which they would then use in their cameras. In 1938, Kodak introduced a film camera with an integrated light meter and in 1962, a Japanese company called “Topcon” introduced the first SLR camera that measured the light coming through the lens into the camera. What this meant, was that photographers no longer needed to carry special light meters with them – the camera would do it for them. New “Automatic” camera modes started appearing on cameras, which would evaluate the amount of light that passed through the lens and would automatically pick the right exposure parameters to produce a properly-exposed picture.
Today, most digital cameras have various types of camera modes that can be used in different situations.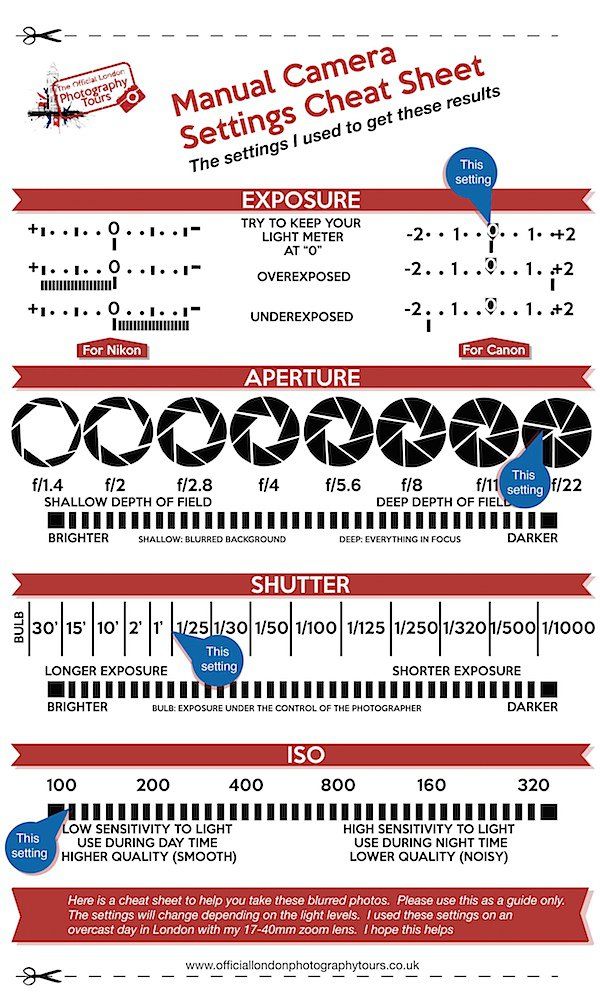 While most point and shoot cameras concentrate on automatic modes for simplicity’s sake, more advanced cameras feature modes that allow both automatic and manual exposure control.
NIKON Z 6 + NIKKOR Z 35mm f/1.8 S @ 35mm, ISO 100, 1/250, f/5.6
Types of Camera Modes
Here are the four main types of camera modes that can be found in most digital cameras today:
- Program (P)
- Shutter Priority (Tv) or (S)
- Aperture Priority (Av) or (A)
- Manual (M)
Program Mode
In “Program” mode, the camera automatically chooses the Aperture and the Shutter Speed for you, based on the amount of light that passes through the lens. This is the mode you want to use for “point and shoot” moments, when you just need to quickly snap a picture. The camera will try to balance between aperture and shutter speed, increasing and decreasing the two based on the intensity of light.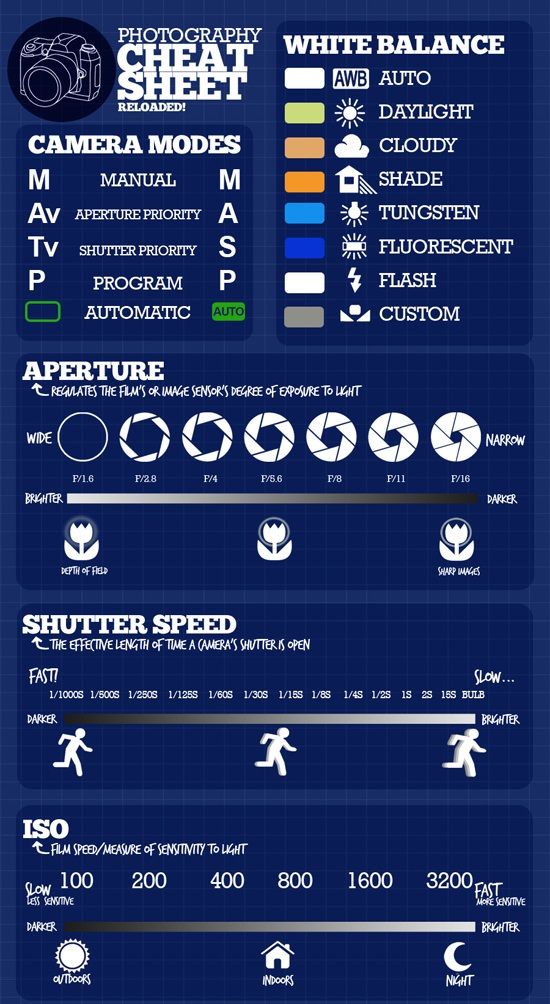 If you point the camera to a bright area, the aperture will automatically increase to a bigger number, while keeping the shutter speed reasonably fast. Pointing the camera to a darker area will decrease the aperture to a lower number, in order to maintain a reasonably fast shutter speed. If there is not enough light, the lens aperture will stay at the lowest number (maximum aperture), while the shutter speed will keep on decreasing until it reaches proper exposure.
I personally never use this mode, since it does not give me much control over the exposure. There is a way to override the camera-guessed shutter speed and aperture by moving the control dial (on Nikon cameras it is the dial on the back of the camera). If you rotate the control dial towards the left, the camera will decrease the shutter speed and increase the aperture. If you rotate the dial towards the right, the camera will increase the shutter speed and decrease the aperture. Basically, if you needed to get a faster shutter speed for freezing action, you would rotate the dial to the right, and if you needed to get a large depth of field, you would rotate the dial to the left.
Shutter-Priority Mode
In “Shutter Priority” mode, you manually set the camera’s shutter speed and the camera automatically picks the right aperture for you, based on the amount of light that passes through the lens. This mode is intended to be used when motion needs to be frozen or intentionally blurred. If there is too much light, the camera will increase the lens aperture to a higher number, which decreases the amount of light that passes through the lens. If there is not enough light, the camera will decrease the aperture to the lowest number, so that more light passes through the lens. So in Shutter Priority mode, the shutter speed stays the same (what you set it to), while aperture automatically increases and decreases, based on the amount of light. In addition, there is no control over subject isolation, because you are letting the camera control the depth of field.
I try not to use this mode either, because there is a risk of getting an overexposed or underexposed image. Why? Because if the amount of ambient light is not sufficient and I set the shutter speed to a really high number, my exposure will be limited to the aperture/speed of my lens. For example, if the maximum aperture of my lens is f/4.0, the camera will not be able to use a lower aperture than f/4.0 and will still shoot at the fast shutter speed that I manually set. The result will be an underexposed image. At the same time, if I use a very slow shutter speed when there is plenty of light, the image will be overexposed and blown out.
Aperture-Priority Mode
In “Aperture Priority” mode, you manually set the lens aperture, while the camera automatically picks the right shutter speed to properly expose the image. You have full control over subject isolation and you can play with the depth of field, because you can increase or decrease the lens aperture and let the camera do the math on measuring the right shutter speed. If there is too much light, the camera will automatically increase the shutter speed, while if you are in a low-light environment, the camera will decrease the shutter speed. There is almost no risk of having an overexposed or an underexposed image, because the shutter speed can go as low as 30 seconds and as fast as 1/4000-1/8000th of a second (depending on the camera), which is more than sufficient for most lighting situations.
This is the mode that I use 95% of the time, because I have full control over the depth of field and I know that the image will be properly exposed under normal circumstances. The metering systems in most modern cameras work very well and I let the camera calculate and control the shutter speed for me.
Roseate Spoonbills at SunriseNIKON D3S + 300mm f/4 @ 300mm, ISO 3200, 1/250, f/8.0
Manual Mode
As the name suggests, “Manual” mode stands for a full manual control of Aperture and Shutter Speed. In this mode, you can manually set both the aperture and the shutter speed to any value you want – the camera lets you fully take over the exposure controls. This mode is generally used in situations, where the camera has a hard time figuring out the correct exposure in extreme lighting situations. For example, if you are photographing a scene with a very bright area, the camera might incorrectly guess the exposure and either overexpose or underexpose the rest of the image. In those cases, you can set your camera to manual mode, then evaluate the amount of light in darker and brighter areas and override the exposure with your own settings. Manual mode is also useful for consistency, if you need to make sure that both shutter speed and aperture stay the same across multiple exposures. For example, to properly stitch a panorama, all shots that you are trying to put together need to have the same shutter speed and aperture. Otherwise, some images will be darker, while others are lighter. Once you set the shutter speed and aperture to the values of your choice in manual mode, your images will all have consistent exposures.
NIKON Z 7 + 300mm f/4 @ 420mm, ISO 200, 10 sec, f/8.0
I only use this mode in extreme situations, when shooting panoramas or when using on-camera or off-camera flashes.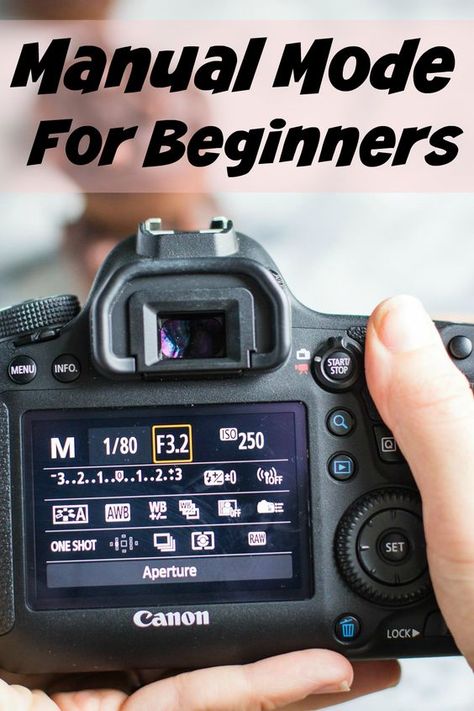
Where Can I Set the Camera Mode?
The camera mode dial is typically clearly visible on all entry-level and semi-professional cameras – it is a large rotatable circle that has the modes listed as “P”, “S”, “A” and “M” in Nikon DSLRs and “P”, “Tv”, “Av” and “M” in Canon DSLRs. Here is a picture of the mode dial on the Nikon D5000 DSLR (highlighted in red circle):
And Canon 50D:
On professional cameras, the mode dial might not look the same. Take a look at the picture of the Nikon D300s, where it is a small “Mode” button on the top right hand side of the camera:
What About ISO?
In most DSLR cameras, the ISO does not automatically change in the above camera modes, so you have to set it manually. If you do not want to manually set the ISO all the time and have an “Auto ISO” feature in your camera, enable it, then set the maximum ISO to “800-1600” and your minimum shutter speed to something like 1/200th of a second. If you notice too much noise, change your maximum ISO to a lower number. If you do not have an “Auto ISO” feature, then set your ISO to the lowest ISO number and increase it in low-light situations.
What About Other Camera Modes?
Many of the entry-level and semi-professional cameras have other modes such as “Portrait”, “Landscape”, “Macro”, “Sports” and “Night”, depending on the camera (professional cameras do NOT have these modes). I won’t go through any of these modes for three reasons:
- They are simply a combination of the above four modes plus some camera-specific settings
- Different cameras have different custom modes and you should not get used to any of them. If you ever switch to a different camera brand or get a professional camera, you might get lost, just because you relied too much on a specific custom mode.
- All of these custom modes are evil :) Stop using them and learn the four main camera modes explained in this article.
If you have any questions or feedback, please post your comments in the comments section below.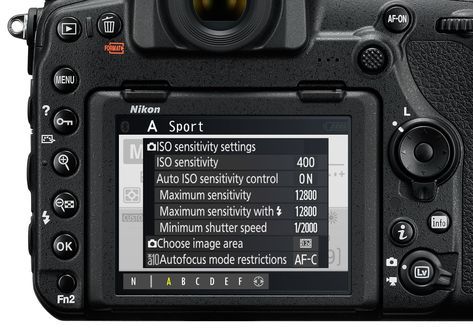
Take me to Chapter 9: Focusing
11 Best Camera Apps for Android
Modern smartphones are equipped with powerful cameras, the possibilities of which most of us have not even thought about. Most likely, we will just launch a standard application to take a picture of a moment that we do not want to miss. However, the stock camera doesn't have a lot of features, especially for users who like to play around with manual settings.
Fortunately, the Google Play Market has a huge number of Android applications that will help you get the most out of your smartphone camera. To help you, we have reviewed a huge number of applications and selected the best ones. If you want to level up your photos, be sure to check them out. While many of them are free, some cost a few dollars. If this does not suit you, look for their Lite or Trial versions before deciding to buy.
Google Camera
Google Camera - the peculiarity of this application is that it is developed directly by Google and is installed only on Google Pixel smartphones. But thanks to the large Android community, a version was developed that is suitable for many other devices on this OS. A complete list of supported devices is available at the link above.
If you manage to install Google Camera, then you will have access to all its functionality without restrictions - portrait mode, night vision, HDR +, lens blur, slow motion, spherical photos, video stabilization and much more.
ProShot
The ProShot camera has a number of features. It can be set to two fully customizable user modes (the settings of which are remembered) or use manual or automatic. Regardless of the mode you shoot in, you can adjust ISO, focus, exposure, shutter speed, white balance, and more. The application also allows you to enable effective noise reduction.
With ProShot, you can shoot videos up to 4K resolution. Burst mode and interval shooting will ensure high quality. There are burst, timer, and slow-motion options, as well as zero-lag exposure adjustment up to +-3 in 1/3-stop increments. Bracketing function (automatic shooting of several frames with different values of the desired parameter).
By default, photos are saved in RAW format, but you can change it to JPEG or DNG. Finished shots can be immediately finalized in real time, watching how the photos change right before your eyes. The app provides manual focus assistance and builds a real-time histogram. The front camera has exposure control, and the zoom can be adjusted with the touch of a single finger.
Latest update added image resolution selector (with 3 options), added EXIF support for Light Painting on certain devices, added AF/MF switch with real-time focus value.
Footej Camera
Footej Camera is ideal for replacing the stock Android camera. The interface is designed in a minimalist style, but almost all necessary functions are supported. You can control ISO, shutter speed, and exposure in the app. Manual control of ISO, focus and shutter speed is available. There is support for shooting in DNG format. You can take photos while recording video. It is possible to record video in slow motion. The Selfie Light mode will help you take the best selfie.
The paid version allows you to set the burst interval to less than 500 milliseconds. As a result, there will be more than 20 photos in one series so that you can choose the best option. The 5-minute video limit is also removed. A histogram of pictures and GIF animation in high quality will be available.
VSCO Cam
VSCO (stands for Visual Supply Company) is a great all-in-one camera and image editor. It can shoot in RAW format, there is a manual adjustment of white balance, ISO, exposure and grid mode. There's also a handy Split Tone tool that lets you adjust the depth of shadows and highlights. The HSL tool is designed to adjust the saturation and brightness of primary colors.
The application impresses with a variety of filters. Luckily, filters and presets are grouped into collections for easier searching, such as B&W Fade for monochrome photos or Isle of Dogs based on the animated film of the same name.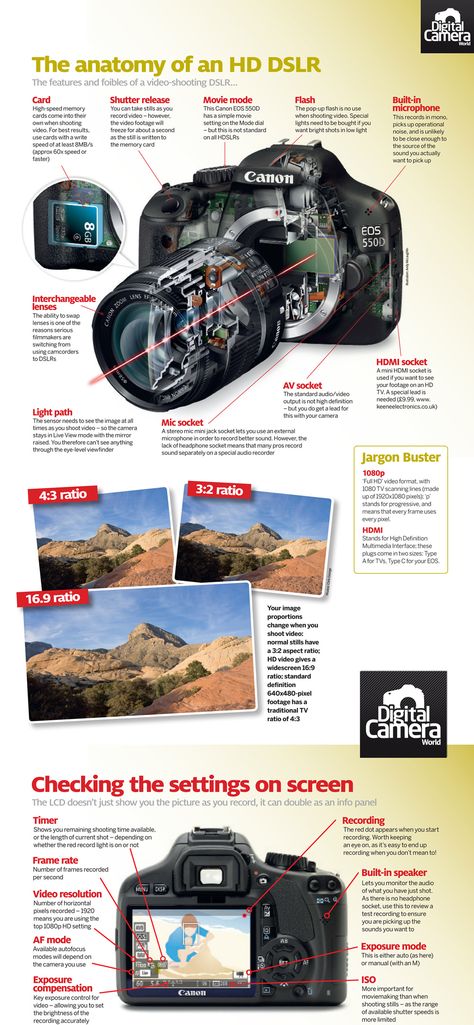 The user can add various presets and save favorite combinations of settings for quick image processing. At the time of this writing, the hashtag #vsco has been attached to 189 million posts on Instagram.
Unfortunately, you have to pay $20 per year to fully use VSCO. There is a free trial for 7 days. Also, the application can be used for free, but the functionality will be limited. All that's left is access to some basic filters, photo editing tools, and viewing community content.
Camera MX
Autofocus and HDR enable Camera MX to shoot even in low light. The "recording of the past" function allows you to see even those frames that were taken before the shutter was released - so you definitely do not miss anything. There is a built-in photo and video editor that allows you to fully process the material by adjusting the contrast, brightness, saturation, sharpness and color shades. Additional features include self-timer (start shooting after a set time), auxiliary grid and display flash for selfies, allowing you to shoot even in low light. But it's still better to shoot in good lighting.
When recording video, you can create real-time transitions, slow motion, fast motion, apply various filters, or pause. If necessary, you can turn off the recording start signal, which is especially important when observing animals in the zoo. If you want to change the "stock" camera on your Android, this app can be a great option.
Camera FV-5
In the Camera FV-5 application, all parameters are adjusted manually, like in professional cameras: exposure compensation, ISO, exposure metering mode, focus, shutter speed and white balance. There is a DSLR-like viewfinder display that lets you adjust EV shift and real-time bracketing. Exposure bracketing is full: from 3 to 7 frames, unlimited distance between freeze frames. The screen displays a lot of useful information, such as exposure time and aperture.
All camera settings can be made using the side volume buttons: EV, ISO, color saturation, etc. In this case, you can change the settings of the buttons, setting them one or the other function.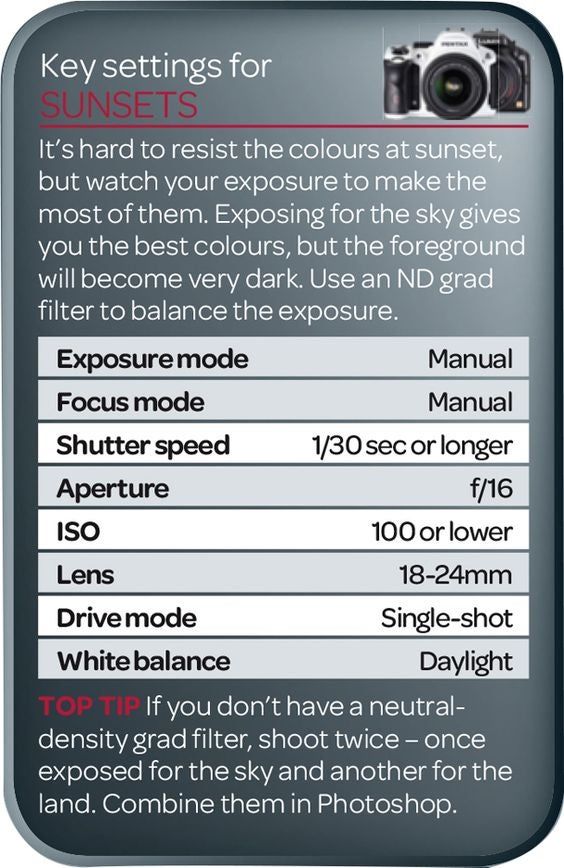 EXIF and XMP data are supported, there is an autofocus mode, macro shooting and one-touch focusing. If necessary, you can enable autofocus lock. It is possible to take beautiful night photos and light trails with long exposure times up to 30 seconds. Shutter speed is adjustable from 1/80000 of a second to 2 seconds. A focal length of only 35 millimeters is possible. JPEG and PNG file formats are supported.
Open Camera
Open Camera has automatic stabilization and HDR to make your photos look perfect. Supports various focus, scene modes, color effects, white balance, ISO, exposure compensation. There is dynamic range optimization. You can take photos while recording video (including HD). If necessary, you can connect an external microphone. For silent shooting, there is an option to turn off the shutter sound.
Remote control available: voice countdown timer and auto-repeat with adjustable delay. It is possible to take pictures remotely by saying commands such as whistling or the word "cheese".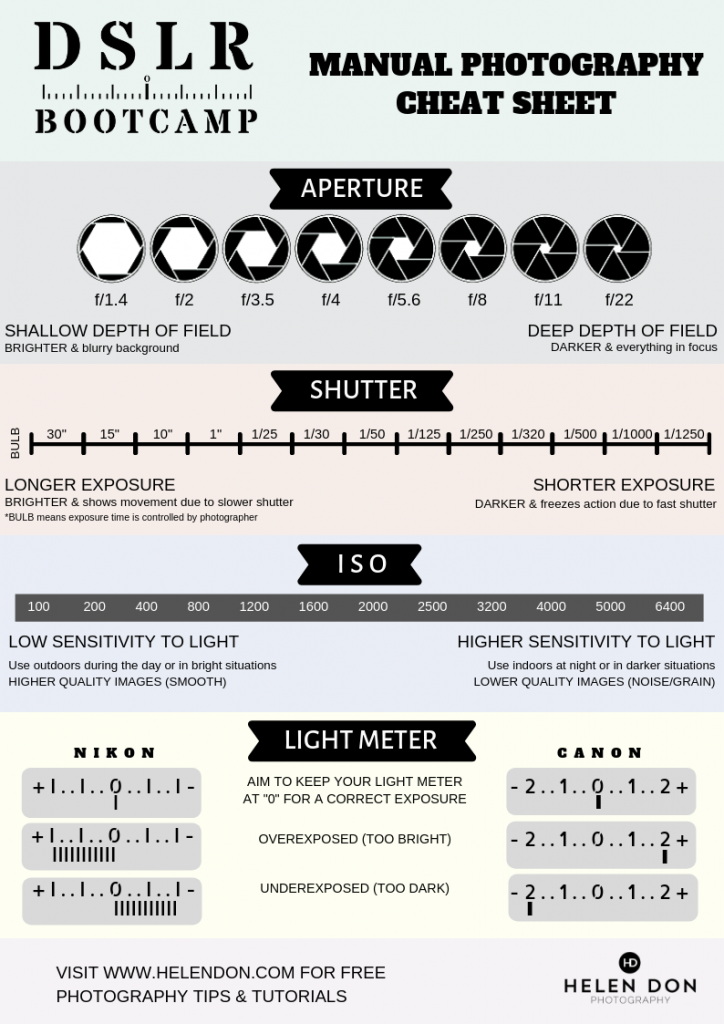 The volume keys can be assigned different functions, and the entire interface can be customized. There are modes of operation for left-handers and right-handers. Supported by Camera2 API.
With a special noise reduction system (including low-light night mode) and a dynamic range optimization mode, even poor quality photos can be improved. There is support for Mi Band 2 and Amazfit Selfie to control the camera with a smart watch. The application is absolutely free and does not contain ads, has an open source code.
Camera ZOOM FX
The developers of Camera ZOOM FX claim that it's the fastest camera on Android, and we can agree with them, because it can shoot up to 50 frames per second. Just a fantastic result! The interface does not lag behind, it is fast and simple. Manual control allows you to combine shooting modes, such as Timer + HDR, Stable Shot + Timelapse. There is an interesting "incognito" shooting mode, which disguises the application as a web page, when clicked, you will take a picture.
Application supports full manual control using Camera API2, shooting in RAW, adjusting ISO, focal length, exposure, shutter speed. Compared to previous applications, it has a faster and more powerful interface. You can set up control via smartphone buttons, while assigning different functions to each button.
Standard set of options includes many options for flash and effects, hidden camera, scene modes. There is a silent snapshot option. Additional features include: best shot mode, Stable Shot (ensuring a clear shot), timer, voice activation, collage editor, time interval setting, HDR Pro.
Candy Camera
Candy Camera is a free application designed to take great selfie photos. There are a huge number of filters to improve the photo: add a smile, whiten teeth, make big eyes, reduce the face or make a narrow waist. To change the filter, just swipe left or right.
Filters are also displayed directly when you take a selfie. In addition to filters, the app also includes additional editing tools to make your selfie perfect: tapering, whitening, concealer, lipstick, blush, eyeliner, and even mascara.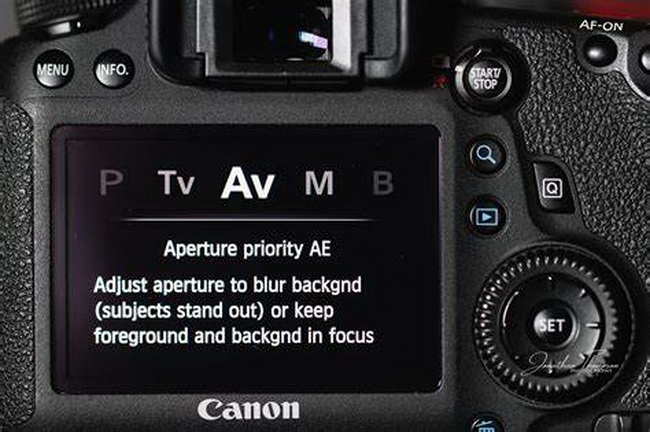 In order to take silent selfies, screenshots and photos anywhere, the application has a silent shooting option.
Cymera
Cymera has over a hundred million downloads on the Play Store, but like Candy Camera, this software is not for professional photography. It has 7 different types of lenses, image stabilizer, timer and silent mode. There are also selfie features you love, such as connecting a selfie stick via Bluetooth. Using the built-in editor, you can play with body parameters: adjust your figure, make your waist thinner, or tighten your hips. A specially developed algorithm will improve the skin in 5 steps.
There is a set of photo editing tools: changing brightness, contrast, mosaic effect, frame cropping, rotation, lighting effects, frames and vignettes. Of the interesting features, there is also a collage mode for combining up to 9 photos into one. As well as blurring the background with one touch. There is a built-in program that allows you to retouch photos. There is a complexion alignment option and over 200 realistic hair and makeup elements. Of the unusual lotions - an improved red-eye removal function. The application supports 12 languages, including Russian and Chinese.
A Better Camera
A Better Camera is a versatile camera for creating high quality photos. It contains most of the advanced features from other applications: HDR, high quality panoramic shooting up to 100 Mp, one-click removal of unwanted objects, night shooting. There is a best shot mode that determines the best shot after a series of photos.
There are a lot of functions for movies too: white balance lock, focus lock, paused movie shooting, Pre-shot function that allows you to shoot before you press the shutter button, action shooting and exposure bracketing, self-timer shooting, time lapse. The full-featured paid version costs less than $1.
TOP 13 Best Camera Apps for Android in 2022! 📷
Sometimes the stock camera app fails. If you find yourself in this situation, check out our roundup of the best camera apps for Android!
- Advertisement -
Cameras on smartphones are much more complex than they used to be. Manufacturers are striving to make their cameras more reliable, take better photos in low light, and develop features that people want.
When choosing a smartphone, most people first of all pay attention to the camera. The fact is that these days cameras are an important factor when choosing a phone. Most use the stock camera app rather than third-party programs.
Smartphone manufacturers simply know their cameras better and optimize camera programs in the best possible way. This is especially noticeable on Google, Samsung, and Huawei phones, which use AI and other software optimizations in conjunction with camera hardware specs.
Adobe Lightroom - Photo Editor
Adobe Lightroom - Photo Editor
Developer: Adobe
Price: Free
Adobe Lightroom is technically a photo editor, not a camera app. However, it also has a built-in camera program. The camera is decent enough and includes key features like HDR, RAW support, and various modes and presets. In addition, it has the usual set of manual camera controls, if needed. The good news is that Adobe Lightroom is one of the best photo-editing apps on mobile right now, so you can take a photo and start editing it right away. It's part of Adobe Creative Cloud, so the monthly price is too high if all you want is the camera. However, if you're already a Creative Cloud subscriber, give it a try and see if you like it.
Bacon Camera
Bacon Camera
F.G.N.M.
Price: Free
To be honest, we thought that Bacon Camera - when we first saw the name, we thought that the application was not serious. However, it is a decent camera software. It boasts manual controls such as focus, white balance, exposure compensation, ISO, and more. There is also support for RAW and DNG along with traditional JPEG. It has support for manual control on devices that do not support the Google Camera2 API. We did not have test devices that would not support this, so we take the word of the developers. Of the function, it is also worth noting GIF support, panorama mode and synchronized shots. The app is surprisingly good, and the pro version is surprisingly inexpensive.
Camera MX
Camera MX - photo and video camera
Developer: MAGIX
Price: Free
Camera MX is one of the oldest and most popular camera apps. The developers regularly update the application and keep it up to date. The application has many shooting modes. You can take both photos and videos. There's even a GIF mode for creating your own GIFs. The built-in photo editor can also perform basic functions. It's a decent all-in-one solution. Serious photographers are best done with a different application. You can use the pro version of this as part of the Google Play Pass if you have one.
Cymera Camera
Cymera- Cam, beautiful editor
Developer: SK Communications
Price: Free
Cymera is another old and popular camera app. Here, much attention is paid to the main functions. This means that you will get a bunch of filters, stickers, special effects and similar features. It also has a camera mode with a beauty filter. It can correct facial and body features. We are not big fans of such dramatic changes, but to each his own. The app also includes a photo editor for small edits. Distributed for free. You can buy additional things like in-app purchases.
Google Camera
Google Camera
Developer: Google LLC
Price: Free
Google Camera is the official Google camera app. It is the same as in most Google devices. It has a small but effective feature set. These include lens blur mode, slow motion (on supported devices), sphere photo, video stabilization, and more. The only downside is compatibility. You can only use it on devices running Android 7.1.1 and above (as of this writing). In any case, the application is free and it's really good. However, if you want all the features of Google Camera, you will need to download a modified version for your device.
Open Camera
Open Camera
Developer: Mark Harman
Price: Free
Open Camera is one of the most popular applications for serious photographers. It has most of the major features we discussed earlier. Includes manual camera control. The app also includes a timer, support for some external microphones, HDR, exposure bracketing, and more. It's also a great option for both photographers and videographers. The app is completely free without any in-app purchases or ads. It is also completely open source. It's always a plus. There is an additional (and separate) donation app if you want to support the developer.
Pixtica 📷
ProCam X (Pro HD Camera)
Developer: Imagi Mobile
Price: Free
Pixtica is one of the new camera apps on our list.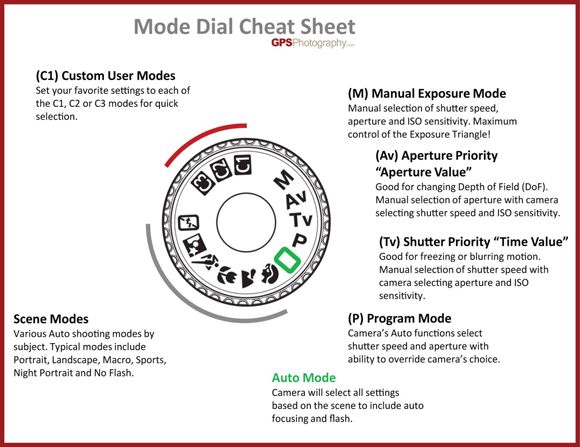 It has a bunch of neat little tricks and decent post-processing. Some of the features include live filters, manual control, exposure control, GIF recorder, slow motion mode, RAW file support, QR code scanner and more. It even comes with a very basic gallery and photo editor. We love its wide range of features and all-in-one style. However, some features require a subscription and a stock camera app will probably do better in post-processing.
See also:
- Top 10 best file managers for Android
- 10 The best messengers and chat applications for Android 9016 9016 SayCheese
- 17 Best Free Android Apps
- 16 Best Android Apps
SayCheese - Remote Camera
Developer: Franco apps
Price: Free
SayCheese is a remote camera app with little functionality. It allows you to connect to a friend's phone and take pictures using the camera on your device. This is a great solution for when you want to take a group photo but don't have someone to take your picture.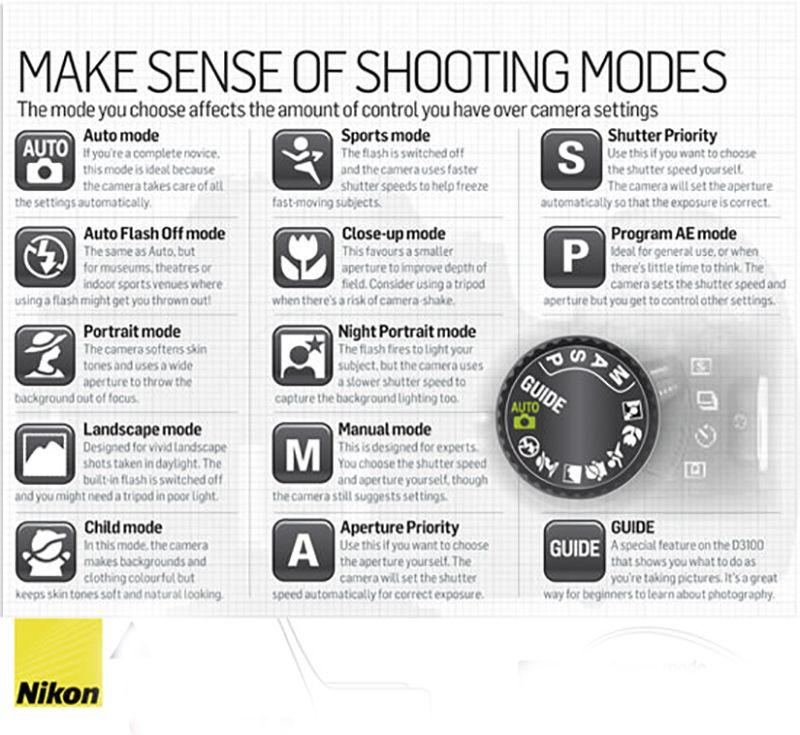 At the time of this writing, the app is in early beta, so there are some bugs. However, it worked quite well in our testing and we expect more updates to add more stability.
Simple Camera
Simple Camera
Developer: Simple Mobile Tools
Price: Free
Simple Camera is a very simple camera app. It has a no-frills interface and doesn't have a ton of extra features. You can take photos with the front and rear cameras, change where photos are saved, and limit the resolution if necessary. That's all. We do not recommend it to people who want to improve their photos. However, we would recommend it to those who are constantly confused and annoyed by how complicated new camera apps are and don't mind dropping photo quality for something simple that just works.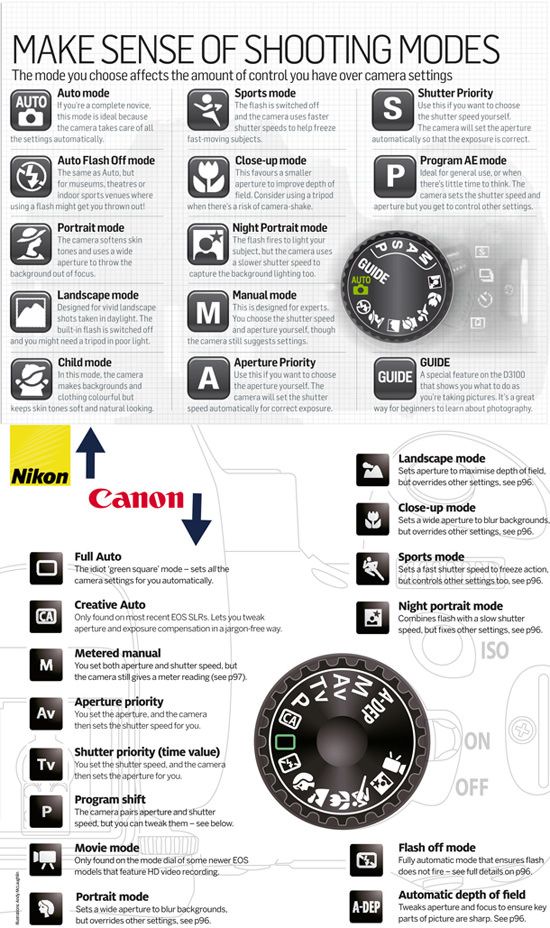 We'd recommend Google Camera for this one, but it's another decent, super-minimal, no-frills option.
Snap Camera HDR
Snap Camera HDR
Marginz Software
Price: 189.00 RUB
Snap Camera HDR is a good choice for serious and amateur photographers. There is support for manual camera control, 4K video recording, support for RAW, HDR, and file size options. It also includes fun shooting modes, effects, borders, color effects and vignettes. There are camera apps that have the best manual settings and apps that make fun filters. It's rare to find an app that does all of this as well as Snap Camera HDR. Be sure to try the free version before buying the pro.
VSCO
VSCO: Photo & Video Editor
Developer: VSCO
Price: Free
VSCO is a popular and powerful camera and photo editor application. The camera feature is a little simple and not as powerful as the phone's native camera app or some of the other apps on this list. However, the photo editor is one of the best on Google Play. It has many filters, effects and settings. In addition, the application has a lot of content to create beautiful videos. Perhaps its most unique feature is the ability to emulate many other cameras. This app is quite expensive and many of its cool features come with a subscription — 19.99 dollars per year.
Thanks for reading! Read this:
If we missed any of the best yf Android camera apps, tell us about them in the comments! See all of our top apps and game lists.