Canon camera wifi connect
Canon Camera Connect on the App Store
Description
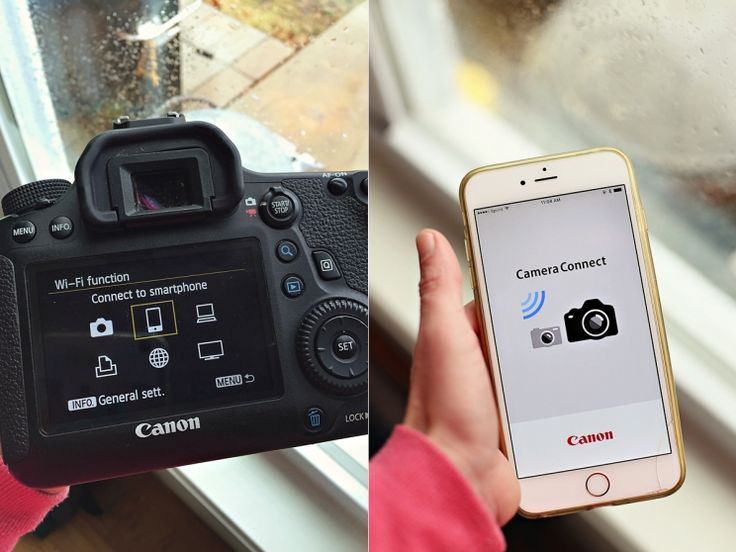
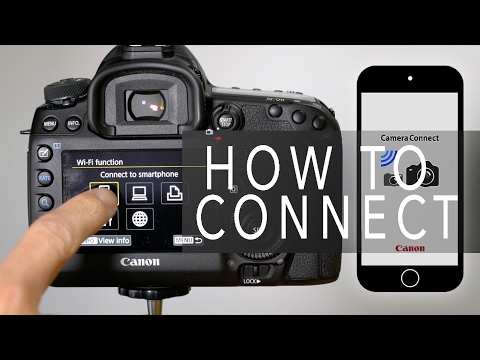
Canon Camera Connect is an application to transfer images shot with compatible Canon cameras to smartphone/tablet.
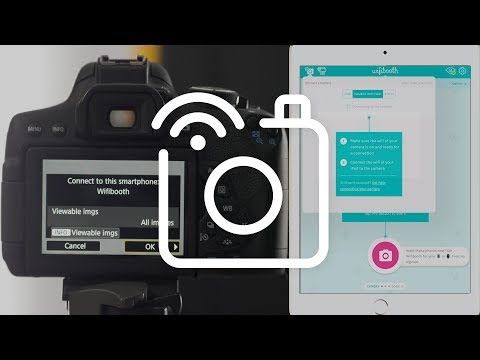
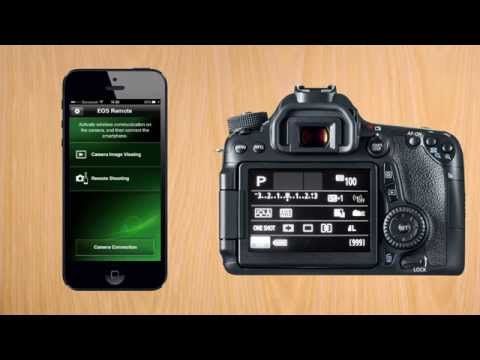
By connecting to a camera with Wi-Fi (direct connection or via wireless router), this application provides the following features:
・Transfer and save camera images to a smartphone.
・Remote shoot with live view imaging of the camera from a smartphone.
This application also provides the following features for compatible cameras.
・Acquire location information from a smartphone and add it to the images on the camera.
・Switch to a Wi-Fi connection from pairing status with a Bluetooth enabled camera.
・Remote release of the camera shutter with a Bluetooth connection.
*For compatible models and features, please refer to the following website.
https://global.canon/icc/
-Operating System
iOS 14.8 / 15.5
iPadOS 14.8 / 15. 5
-Bluetooth System Requirement
For Bluetooth connection, the camera needs to have a Bluetooth function, and your device needs to have Bluetooth 4.0 or later (supports Bluetooth Low energy technology).
-Compatible File Types
JPEG, MP4, MOV, CR3, CR2
・RAW (CR3/CR2) images can be imported as RAW format by selecting [RAW image save format] > [RAW format] from the [Images on camera] setting while connected to a compatible model (iOS 12.1 or later for CR3).
・ Importing RAW (.CR2) format is possible with wireless compatible EOS models and some PowerShot models (G1 X Mark III / G9 X Mark II / G7 X Mark II).
・RAW (CR2/CR3) images are resized and imported into JPEG by selecting [RAW image save format] > [JPEG format].
・RAW burst files cannot be imported to smart devices. Extract the CR3 images from the RAW burst file in advance on the camera side, and then import them to the smart device.
・HEIF (10 bit) files shot with compatible cameras and RAW images shot with [HDR PQ settings] enabled cannot be imported. (They can be saved between apps using the linked mode with the Canon image editing app Canon DPP Express.)
・MOV files and 8K movie files shot with EOS cameras cannot be saved.
・RAW movie files shot with compatible cameras cannot be saved.
・AVCHD files shot with Camcorder cannot be saved.
-Important Notes
・If application does not operate properly, try again after shutting down the application.
・Continued use of GPS running in the background can dramatically decrease battery life.
・In the case of using Power Zoom Adapter, please set the Live View function to ON.
・The images may include your personal information such as GPS data. Be careful when posting images online where many others can view them.
・Visit your local Canon Web pages for more details.
Version 2.9.22
Minor bug fixes
Ratings and Reviews
5. 4K Ratings
Bugged at best
Awesome WHEN it works. Buggy the rest of the time. The Smart Connect tutorial is a joke.
Use this app to connect to a Canon Powershot SXE530HS. Just an amateur photo guy but love the ability to grab the shot and shoot it straight to my iPhone 13 pro max to run it through touch-ups before posting to social media for work. Awesome concept especially when shooting product shots on the fly without running back to a desktop. But it almost never works unless I pull the phone off Wi-Fi and connect to the cameras Wi-Fi instead of seeing it on our network. So out in the field, literally in the woods I can connect to it since I am not accessing Wi-Fi but most of my reason is to use in my work environment. If you delete the access point between the phone and the camera while on your network it will work three out of four times. But why? Why must it be deleted and added back each time to POSSIBLY be able to make a connection with its own app.Granted my camera is about three years old but I know guys using five year old Nikons with no problems. At this point looking into memory cards with Wi-Fi capabilities instead of this headache Canon created.
Good but not perfect
I’ve been using the app for a couple months now and overall I’m happy with its functionality when it works. As others have mentioned the camera seems to connect and drop randomly. I found turning off the camera and waiting about 2 seconds and then turning it back on seems to fix that issue and it connects right away.
I’m currently using this on an iPhone 7+ with a canon 80D. I’m not sure if anyone else has noticed this but when I download my photos from the camera they’re in JPEG even though I’m shooting in raw. When I open the app to view photos I see that they are raw files. I select the pictures I want and download them but when I move them from iPhoto to Lightroom mobile they are all JPEG.
Not sure if this is an iPhone optimizing issue or not. I did test my theory using a third party camera app for iPhone that lets you shoot raw photos using the phones camera and imported those into Lightroom mobile and those remained in their raw format. I wish I could download the files to a folder vs only having the option to download to iPhoto to get around this issue.
Other than that everything else seems fine. I like using the app as a remote shutter when shooting at night.
Very Useful, but don’t expect perfection
This app is great if you don’t expect great things out of it. It is great at allowing you to quickly access and manage your photos through connecting with the camera. This feature helps me frequently when I want to quickly access the pictures I took at that time. You can download your pictures, even raw pictures, to your device and do with them as you please.
I found that videos are typically unable to be played in this app which can be upsetting, but remember, keep expectations modest. Lastly, the live view photo feature is useful and can be nice as a remote trigger for tripod use and pictures that require stability. Not great for fast tracking or professional use though as it is finicky and not perfect in some ways. Overall, the app is great for light to moderate use and for those who like to immediately or conveniently access their pictures on their device without needing to take out the card from the camera. I’d give the app 4 to 4.5 stars, but it’s current ratings aren’t accurate so 5 it is. :)
The developer, Canon Inc., indicated that the app’s privacy practices may include handling of data as described below. For more information, see the developer’s privacy policy.
Data Linked to You
The following data may be collected and linked to your identity:
- Identifiers
- Usage Data
Privacy practices may vary, for example, based on the features you use or your age.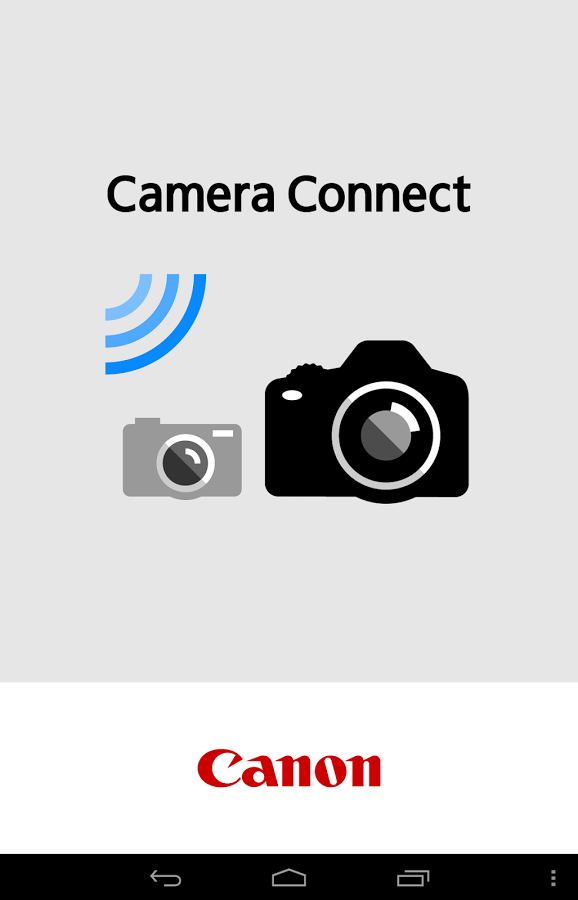 Learn More
Information
- Seller
- Canon Inc.
- Size
- 50.6 MB
- Category
- Photo & Video
- Age Rating
- 4+
- Location
- This app may use your location even when it isn’t open, which can decrease battery life.
- Copyright
- © Copyright CANON INC. 2022 All Rights Reserved.
- Price
- Free
- Developer Website
- App Support
- Privacy Policy
More By This Developer
You Might Also Like
Canon Camera Connect App - Canon Europe
Canon Camera Connect App - Canon EuropeCANON CAMERA & PRINTER APPS
Connect your camera to your smart phone via Wi-Fi or Bluetooth – and harness its true potential.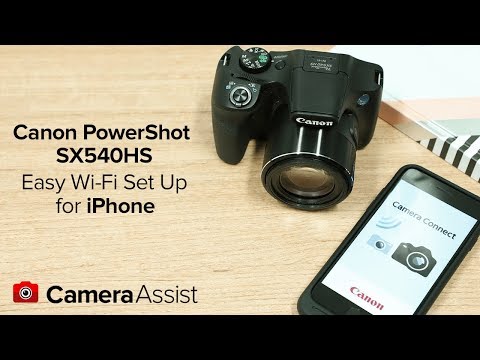
CANON
CAMERA CONNECT APP
- BENEFITS
- DOWNLOAD
- COMPATIBILITY
Get more from your camera with the Canon Camera Connect App
Connect and control your camera in creative and dynamic ways from a compatible smartphone or tablet and stay up-to-date and download1 latest firmware releases – all from one essential Canon app.
-
REMOTE CAMERA CONTROL
Fine tune and adjust
Frame the shot and make changes to camera settings and exposure values from the comfort of your phone.
-
DOWNLOAD
Download and share on the move
Connect to your smart device and select images or videos to transfer from your camera. Then share via social media or email to clients with no cables and no fuss.
-
FIRMWARE
Stay ahead with firmware updates
1Keep your camera and lenses working perfectly with latest firmware releases that often unlock new features.
 Update the firmware via your smartphone on the move or remotely with no PC required.
 -
BLUETOOTH REMOTE
Shoot and record remotely
Keep yourself out of the shot and fire your camera remotely via the easy-to-use Bluetooth remote function.
-
LOCATION INFO
Geotag your shots
If your camera does not have built in GPS, use your phone’s positioning data and add location information to your images for smart cataloguing and captioning later.
-
REVIEW AND TAG
Check your shots on the go
Connect to your camera while it’s in your bag and review images from your phone. Tag the best images from your phone or delete those that don’t work making downloading and editing quicker when you get home.
Look closely, the benefits are real
REMOTE CAMERA CONTROL
Shoot and record remotely
For shy wildlife, long exposure landscapes, a cheeky selfie or even vlogging, the remote control function adds new creative options to your photography and videos.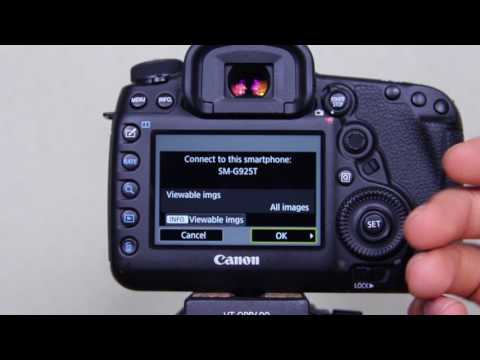 Watch the Live View on your device and view from a distance while being able to adjust many of the camera settings. Or in studio environments control flashes remotely using the ST-E10 Speedlite Transmitter. And for even longer exposures using Bulb mode, keep vibrations away from your camera by operating the shutter through the app instead.
DOWNLOAD
Download, rate and share
Connect your smart device and select images or transfer all images automatically to it. You can select to open images in other Canon apps such as Digital Photo Professional Express for editing or Canon Print app for printing. It’s easy to transfer videos from your camera too, with no cables and no fuss to streamline your workflow, movies are resized for easier sharing on the move. And once paired with your smartphone, you can check the images in the camera on the screen of your smartphone just by operating the smartphone – even if the power to the camera is off. Images can be transferred to your smartphone at original size or resized, so you can share them immediately to your social media feeds.![]()
GEOTAG
Accurate location information
By connecting your smartphone to the Canon Camera Connect app you unlock your phone’s GPS function so if your Canon camera doesn’t have it, you can still map and record your journey, wherever you may be. You can even set your camera’s clock easily when travelling to different time zones!
FIRMWARE UPDATES
Keep your camera up to date
Ensure you have the latest firmware for your camera and lenses by receiving notifications of new updates direct to the app. Download and install the new camera firmware via your phone with no need for a computer or to remove cards. This makes sure your camera is up to date with the latest firmware wherever you are, with the reassurance that you have all the latest features.1
-
IOS
App Store
Download on iOS
-
ANDROID
Google Play
Download on Android
Compatibility information
1Through the Canon Camera Connect App, users will be able to update the firmware on their Canon cameras.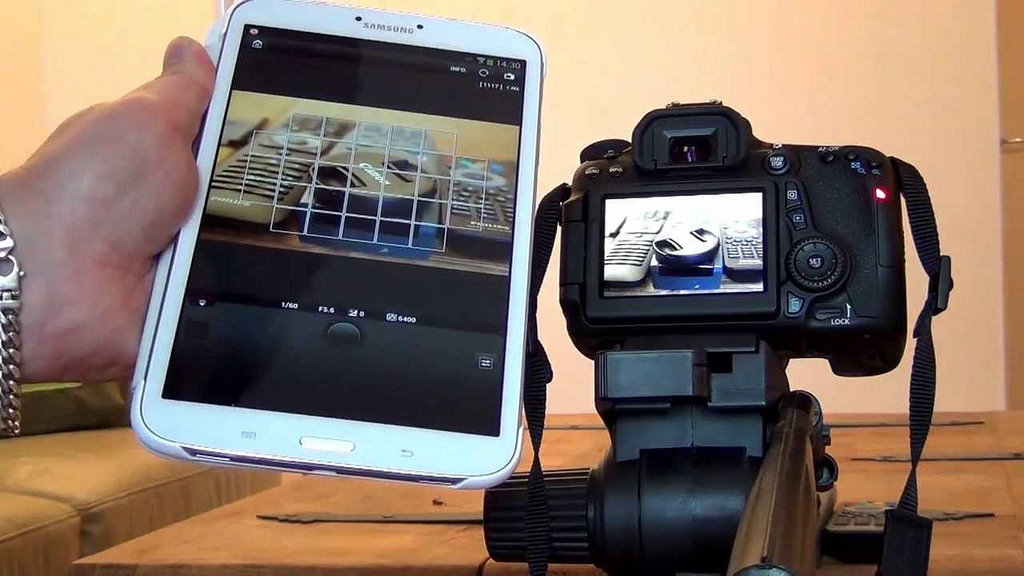 This function will only work on firmware updates for the EOS R3, PowerShot Zoom and products announced from 2022 onwards.
If you see this message you are browsing the Canon website from a search engine that blocks non-essential cookies. The only cookies that are being delivered to your device are essential (functional) cookies. These cookies are necessary for the website to function and cannot be switched off in our systems. For more information you can view our Cookie Notice.
Please remove an item or clear the [category] as there is an 8 product limit. Click Edit
Do you want to clear the entire selection?
Canon Camera Connect app - Canon UK
Canon Camera Connect app - Canon UKCANON CAMERA AND PRINTER APPS
Connect your camera to your smartphone via Wi-Fi or Bluetooth and unleash its true potential.
CANON
CAMERA CONNECT APP
- BENEFITS
- DOWNLOAD
- COMPATIBILITY
Canon Camera Connect app helps you get the most out of your camera
Connect your smartphone or tablet to your camera for dynamic creative control and 1 download the latest firmware, all in one Canon app.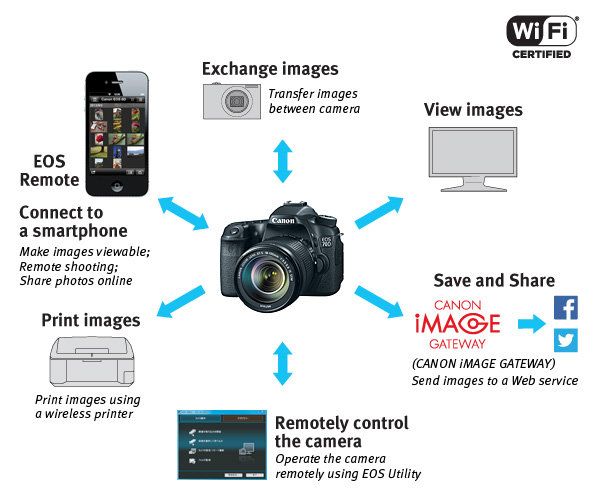
-
REMOTE CAMERA CONTROL
Fine tune and adjust
Fine-tune the composition, change camera settings and adjust exposure values on your phone.
-
UPLOAD
Upload and share files even on the go
Connect to a mobile device and select images or videos from the camera to send. Then share them on social media or email them to customers, all wirelessly and effortlessly.
-
FIRMWARE
Stay up-to-date with firmware updates
1Keep your camera and lens running at their best with the latest firmware versions, which often enable new features. Update firmware via your smartphone on the go, without the need to connect to a PC.
-
BLUETOOTH REMOTE
Remote shooting and recording
Stay out of the picture and control your camera remotely with the convenient Bluetooth remote control function.
-
LOCATION DATA
Add location tags to photos
If your camera does not have built-in GPS, use your phone's location data and add location tags to photos for easy sorting and captioning.

-
REVIEW WITH TAG FUNCTION
Instant access to pictures
Connect to the camera while it is in your bag and view images on your phone. Tag the best images on your phone or delete the ones you don't like to speed up uploading and editing later.
See the real benefits
REMOTE CAMERA CONTROL
Remote shooting and recording
When shooting wildlife, long exposure landscapes, selfies and vlogs, the remote control adds new creative possibilities. View live video on the selected device and adjust various camera settings remotely. In a studio environment, you can also control flashes remotely via the Speedlite ST-E10 transmitter. And in-app shutter control will help you avoid camera shake when you choose bulb exposure.
DOWNLOAD
Upload, rate and share
Connect your mobile device and select images or transfer all image files to it automatically. You can open images in other Canon applications such as Digital Photo Professional Express for editing or Canon Print for printing. In addition, you can easily transfer video from the camera without a wired connection for a more convenient experience. Videos are resizable, making it easy to share files on the go. After pairing with a smartphone, you can view camera images on the smartphone screen even if the camera's power is turned off. You can transfer images to your smartphone in their original size or resize them to share them on social networks immediately.
POSITION TAG
Accurate location information
By connecting your smartphone to the Canon Camera Connect app, you can unlock the GPS function on your phone, so if your Canon camera does not support location, you can add tags and map your journey wherever you are neither were. When you change the time zone, you can even reset the camera's current time!
FIRMWARE UPGRADE
Camera update
Make sure you have the latest camera and lens firmware and be notified of new updates directly in the app. Download and install the new camera firmware from your phone without a computer or memory card removal.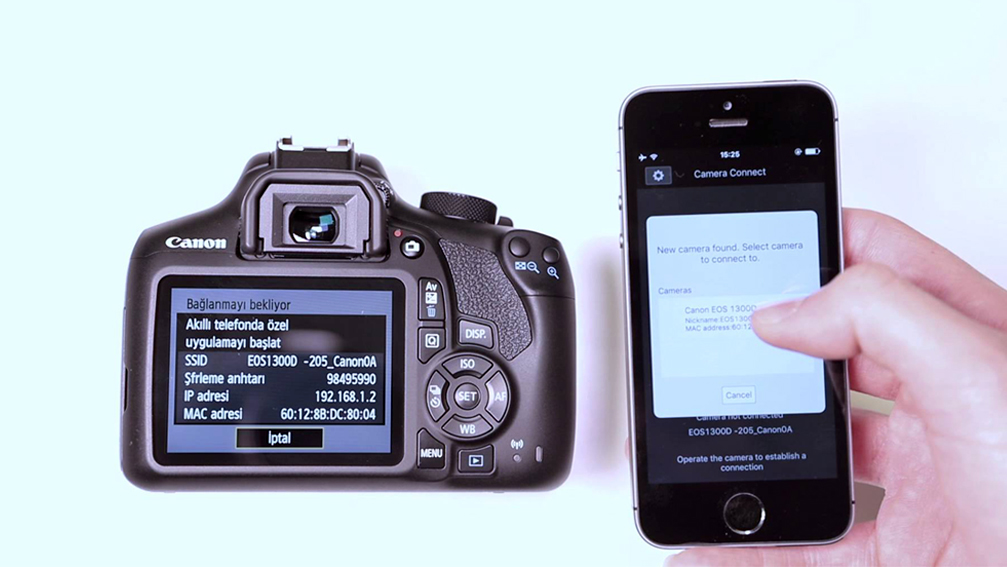 This ensures that your camera's firmware is updated to the latest version wherever you are, so you can be sure you have all the latest features 1 .
Compatibility information
1 The Canon Camera Connect app allows you to update the firmware of Canon cameras. This feature only works with firmware updates for EOS R3, PowerShot Zoom cameras and products released after 2022.
-
SPORTS PHOTOGRAPHY
Take extraordinary sports photos and stay one step ahead of the competition
Love sports but don't know how to photograph it? Five professional photographers talk about the techniques they used to create their favorite photographs.
-
MACRO PHOTOGRAPHY
Abstract Macro Photography: Bubble Photography
Learn how to create expressive and vibrant macro shots of soap bubbles with this simple step-by-step tutorial.
-
WILDLIFE
Wild at heart
Five factors make the PowerShot SX740 HS an ideal choice for wildlife photography.
-
PART
EOS R6, EOS R5 and EOS-1D X Mark III update
New features are available on Canon's top cameras with a firmware update. Richard Walch, Martin Bissig and Eddie Keogh put them to the test.
We use cookies to ensure you get the best experience with Canon and our website. Learn more about the use of cookies and change your cookie settings here . You accept our use of cookies on your device by continuing to use our website or by clicking Agree.
Delete item or clear [category] because there is a limit of 8 products. Press Change
Reset all selection?
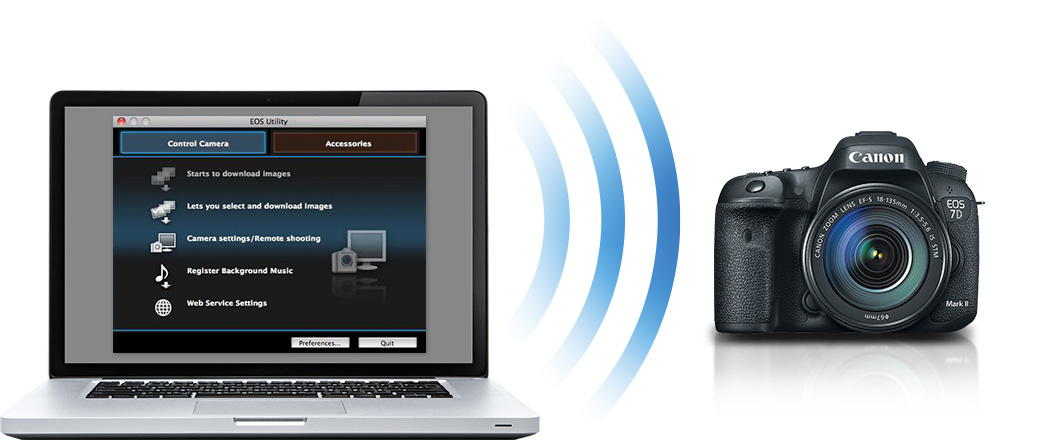
Manual for connecting cameras via Wi-Fi to the program
Manual for connecting cameras via Wi-Fi to the program - Helicon Remote All versions of Helicon Remote - for Android, iOS, Windows and Mac OS - provide a wireless connection to your camera. App version for iOS only supports Wi-Fi connection , you can't connect camera via USB cable if you use Helicon Remote on iOS device.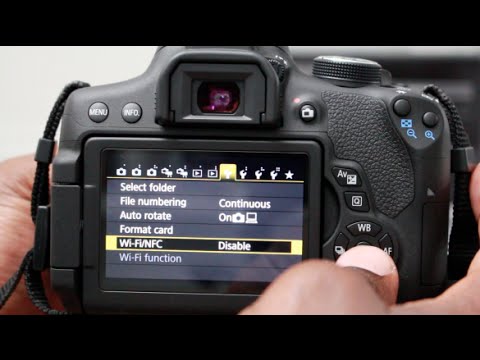
To be able to connect via Wi-Fi, the camera must have built-in Wi-Fi module . If it is not there, Wi-Fi connection will only be possible from external wireless adapter such as Wu-1a, WT-4a, WT-5A for Nikon cameras and WFT-4A, WFT-5A, WFT-6A/B, WFT-E7A, WFT-E8A for Canon cameras.
A complete list of compatible Wi-Fi cameras, both with built-in device and with external wireless adapter, can be found on our website.
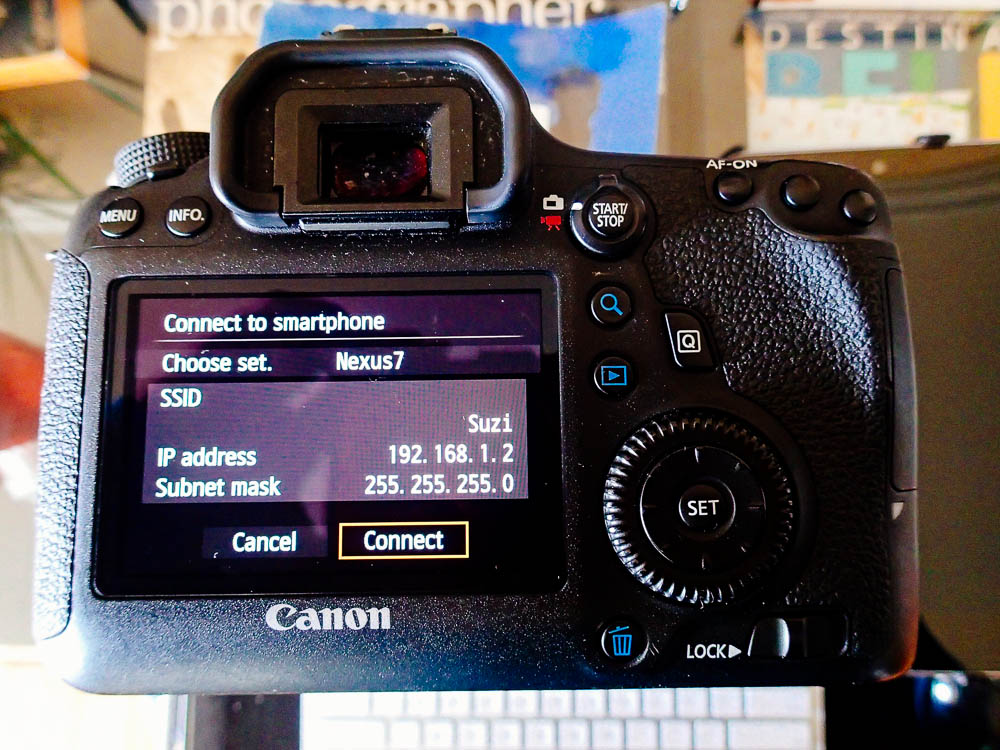
Connecting a Canon Camera with Built-in Wi-Fi
Connecting a Nikon camera with built-in Wi-Fi or Wu-1 external module
Connecting a Canon camera with WFT module
Connecting a Nikon camera with the WT
moduleUsage example: Connecting Canon 6D
Connecting a Canon Camera with Built-in Wi-Fi
- Make sure no other camera-related applications are running, especially Canon Connect. You may need to remove it if you have it (in some cases there is no other way to prevent the camera from "hijacking").
- Start Helicon Remote.
- Clear the Wi-Fi settings on the camera, then turn Wi-Fi back on. Select smartphone mode.
- Make sure the camera is turned on and Wi-Fi is active (look for the Wi-Fi icon on the camera screen).
- Connect your computer or mobile device to the Wi-Fi network created by the camera.
- Go back to Helicon Remote and click "Select camera". You should see "Canon camera auto-detect". Click once to pair.
Connecting a Nikon camera with built-in Wi-Fi or Wu-1 external module
- Make sure no other camera-related applications are running.
- Start Helicon Remote.
- Clear the camera's Wi-Fi settings: "Setup Menu / Wi-Fi / Network Settings / Reset Network Settings" menu. Then activate Wi-Fi (the same menu "Network connection: enabled").
- Make sure the camera is turned on and Wi-Fi is active (look for the Wi-Fi icon on the camera screen).
- Connect your computer or mobile device to the Wi-Fi network created by the camera.

- Go back to Helicon Remote and click "Select camera". You should see "Nikon camera auto-detect". Click once to pair.
Canon camera connection with WFT module
1. Set up the Wi-Fi module and connect the camera to the network.
For WFT-4A Wi-Fi module:
- Open the camera menu "Settings"
- WFT settings
- Connection wizard
- EOS Utility (this is the only mode Helicon Remote will work with)
- Select network media type
- Click "Contact Connection Wizard"
- If it is a wireless network, select the network name from the list. Please note that the WFT module may not detect networks that occupy a wireless channel above 7
- Select "Enter 8-63 ASCII characters", press OK
- Enter the network access key (password), press MENU to confirm
- Connect to the network. Automatic options will most likely work; if not, contact your network administrator.
Nikon camera connection with WT module
1. Create a profile to connect the camera to your network if you don't have one. To do this, you will need the Nikon Wireless Transmitter Utility:- Connect camera to computer with USB cable, turn on camera
- Run the Wireless Transmitter Utility, click Next
- Select the type of your Wi-Fi module (WT-4 or WT-5), click "Next"
- Select Add/Edit Profiles, click Next
- The utility will take some time to connect to the camera. A new "Select a profile" screen will be shown after the connection is established. Select "Add a new profile" in the list and click "Next"
- Enter a password if one has already been set. Otherwise, leave the password field blank or check the "Reset password" box and set the desired password
- Enter profile name, set connection type to "Computer" and interface type to "Wireless and Ethernet", click "Next"
- Select "Manual setup", click "Next"
- Fill in the Wi-Fi connection settings.
 SSID is the name of the network you are connecting to. Communication mode - "Infrastructure" to connect to a Wi-Fi router / hotspot, "Ad-hoc" to connect directly to the Wi-Fi adapter of a computer or laptop. Authentication - type of authentication in the target network, most likely - WPA2. Encryption - also according to the network settings, most likely AES. The encryption key is a symbolic network access password. Click "Next" after filling in all the fields.
 - Enter the IP address of the network gateway or check the "Obtain automatically" box (you will most likely need to select the second option)
- Make sure all information is correct and click "Next"
- Select Finish Wizard, click Next
A more detailed setup guide can be found on the Nikon support website.
Select your operating system, "Transfer Mode" and your network type (most likely "Infrastructure").
2. Connect the camera to a PC or Android device using a USB cable. Turn on the camera. Launch Helicon Remote and open the network camera setup tool ("Tools / Network Cameras"), then open the profile management tool by clicking the "Nikon Profiles" button. Click "Receive from Camera" and enter the password you provided in the Wireless Transmitter Utility (may be empty). A list of profiles saved on the camera should appear.
3. Select from the list the profile for the network you will connect to and press "Select" or double-click on the profile in the list (on Android, long press - "Make Active").
If you are using Helicon Remote on an Android device that does not have a USB host, do the following:
- Connect the camera to a PC and get the list of profiles as described in point 2 above
- Write down the profile ID for the required profile
- Launch Helicon Remote on Android device, go to "Tools / Network Cameras / Nikon Profiles"
- Click Add, enter the ID you received earlier, then click OK
- Select this profile as active (long press - "Make active")
4. Connect the camera to the WT using a standard USB cable.
5. Enter the camera body menu "Settings / Wireless Transmitter / Mode".
6. Select PC Mode. A list of profiles will appear. Select a profile for the network you are connecting to (the same profile you selected in Helicon Remote).
7. Turn on the WT unit, wait until it completes the network connection. You can monitor the connection progress in the camera menu "Settings / Wireless Transmitter".
8. Add the camera to the network camera list in Helicon Remote. This step is only required on Windows, the camera will be automatically detected on Mac OS X:
- Open network camera settings window ("Tools / Network cameras" menu)
- Click "Add"
- Enter the name of the camera (it will be displayed in the list of available cameras)
- Enter an IP address. It can be found in the control panel of your wireless router, in the list of connected devices.
 Ask your network administrator if this is not a private network
 - Set type for Canon WFT
- Click "Save"
- Close the network cameras window. The added camera should appear in the list of available cameras ("Select camera" button)
9. Connect to the camera by left-clicking on its name in the list of available cameras ("Camera selection" window).
10. If the connection was successful, the icon will change from gray to blue in the camera list and a blue checkmark will appear.
Usage example: Connecting Canon 6D
- Open the camera menu "Settings"
- Wi-Fi - Enable
- Enter the Wi-Fi function menu
- If there is an "Exit" option - select it and press OK, then re-enter the Wi-Fi function
- Select "Remote control (EOS Utility)" mode
- View / change settings
- Change settings
- Find network
- Select your network from the list, press OK.
 Please note that the Wi-Fi module may not detect networks that occupy a wireless channel above 7
 - Select "Enter 8-63 ASCII characters", press OK
- Enter the network access key (password), press MENU to confirm
- Select "Auto setup" and press OK. If an error message is displayed, either you entered the wrong network access key, or you need to enter the network settings manually (in this case, contact your network administrator)
2. The message “Starting Pairing Devices” will be displayed if the camera has established a network connection successfully. Click OK.
3. Start Helicon Remote. It should detect the camera in a couple of seconds. The "Select camera" button will become available, clicking on it will open a list of available cameras. The automatically detected camera will be called "Network Camera".
If the camera was not automatically detected, add it manually:
- Open network camera settings window ("Tools / Network cameras" menu)
- Click "Add"
- Enter the name of the camera (it will be displayed in the list of available cameras)
- Enter an IP address.
 It can be found in the control panel of your wireless router, in the list of connected devices. Ask your network administrator if this is not a private network
 - Set type to Canon WFT and click Save
- Make sure the new entry appears in the list
- Close the network cameras window. The added camera should appear in the list of available cameras ("Select camera" button)
4. Connect to the camera by left-clicking on its name in the list of available cameras (“Camera Selection” window)
5. The camera's LCD will display a new dialog "PC localhost found. Connecting to PC". Press OK
6. A dialog box appears to save the connection profile, select the profile number (or set the profile name on new cameras) for this computer and click OK to save. Saving a profile allows you to establish a connection with this computer without going through all the settings in the future.
If the connection was successful, the camera icon will change from gray to blue in the camera list in Helicon Remote and a blue check mark will appear
Note 1 : If the camera has previously connected with EOS Utility and the profile has been saved, the camera will not connect to Helicon Remote with the same profile (an error message will be displayed) without re-entering all network settings and updating the profile.