Convert to rgb color mode
Convert between color modes in Photoshop
User Guide Cancel
Search
- Photoshop User Guide
- Introduction to Photoshop
- Dream it. Make it.
- What's new in Photoshop
- Edit your first photo
- Create documents
- Photoshop | Common Questions
- Photoshop system requirements
- Migrate presets, actions, and settings
- Get to know Photoshop
- Photoshop and other Adobe products and services
- Work with Illustrator artwork in Photoshop
- Work with Photoshop files in InDesign
- Substance 3D Materials for Photoshop
- Photoshop and Adobe Stock
- Use the Capture in-app extension in Photoshop
- Creative Cloud Libraries
- Creative Cloud Libraries in Photoshop
- Use the Touch Bar with Photoshop
- Grid and guides
- Creating actions
- Undo and history
- Photoshop on the iPad
- Photoshop on the iPad | Common questions
- Get to know the workspace
- System requirements | Photoshop on the iPad
- Create, open, and export documents
- Add photos
- Work with layers
- Draw and paint with brushes
- Make selections and add masks
- Retouch your composites
- Work with adjustment layers
- Adjust the tonality of your composite with Curves
- Apply transform operations
- Crop and rotate your composites
- Rotate, pan, zoom, and reset the canvas
- Work with Type layers
- Work with Photoshop and Lightroom
- Get missing fonts in Photoshop on the iPad
- Japanese Text in Photoshop on the iPad
- Manage app settings
- Touch shortcuts and gestures
- Keyboard shortcuts
- Edit your image size
- Livestream as you create in Photoshop on the iPad
- Correct imperfections with the Healing Brush
- Create brushes in Capture and use them in Photoshop
- Work with Camera Raw files
- Create and work with Smart Objects
- Adjust exposure in your images with Dodge and Burn
- Photoshop on the web beta
- Common questions | Photoshop on the web beta
- Introduction to the workspace
- System requirements | Photoshop on the web beta
- Keyboard shortcuts | Photoshop on the web beta
- Supported file types | Photoshop on the web beta
- Open and work with cloud documents
- Collaborate with stakeholders
- Apply limited edits to your cloud documents
- Cloud documents
- Photoshop cloud documents | Common questions
- Photoshop cloud documents | Workflow questions
- Manage and work with cloud documents in Photoshop
- Upgrade cloud storage for Photoshop
- Unable to create or save a cloud document
- Solve Photoshop cloud document errors
- Collect cloud document sync logs
- Share access and edit your cloud documents
- Share files and comment in-app
- Workspace
- Workspace basics
- Preferences
- Learn faster with the Photoshop Discover Panel
- Create documents
- Place files
- Default keyboard shortcuts
- Customize keyboard shortcuts
- Tool galleries
- Performance preferences
- Use tools
- Presets
- Grid and guides
- Touch gestures
- Use the Touch Bar with Photoshop
- Touch capabilities and customizable workspaces
- Technology previews
- Metadata and notes
- Touch capabilities and customizable workspaces
- Place Photoshop images in other applications
- Rulers
- Show or hide non-printing Extras
- Specify columns for an image
- Undo and history
- Panels and menus
- Position elements with snapping
- Position with the Ruler tool
- Web, screen, and app design
- Photoshop for design
- Artboards
- Device Preview
- Copy CSS from layers
- Slice web pages
- HTML options for slices
- Modify slice layout
- Work with web graphics
- Create web photo galleries
- Image and color basics
- How to resize images
- Work with raster and vector images
- Image size and resolution
- Acquire images from cameras and scanners
- Create, open, and import images
- View images
- Invalid JPEG Marker error | Opening images
- Viewing multiple images
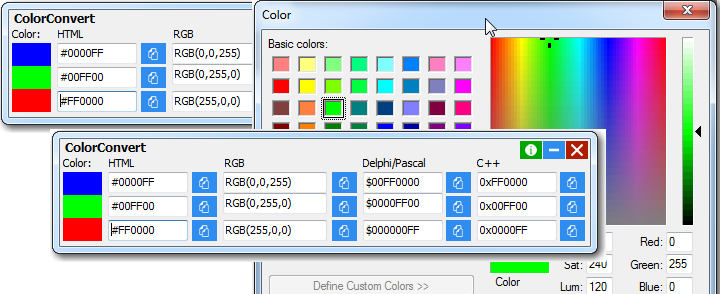
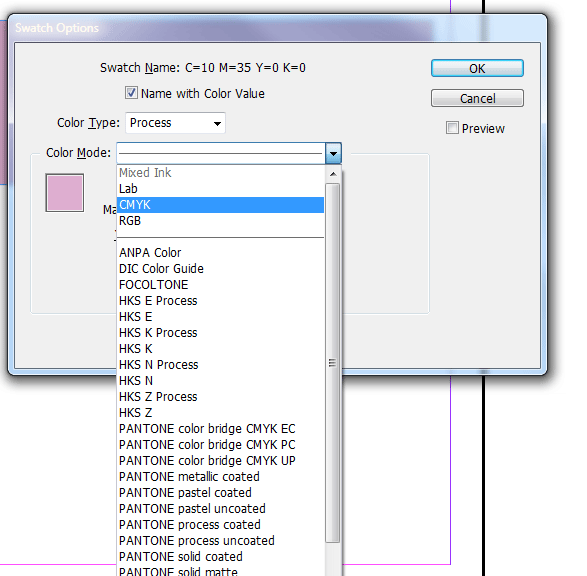
- Customize color pickers and swatches
- High dynamic range images
- Match colors in your image
- Convert between color modes
- Color modes
- Erase parts of an image
- Blending modes
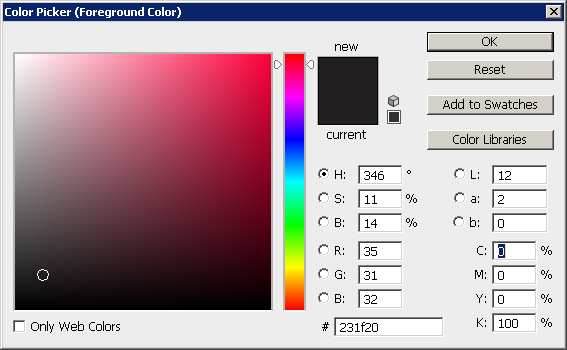
- Choose colors
- Customize indexed color tables
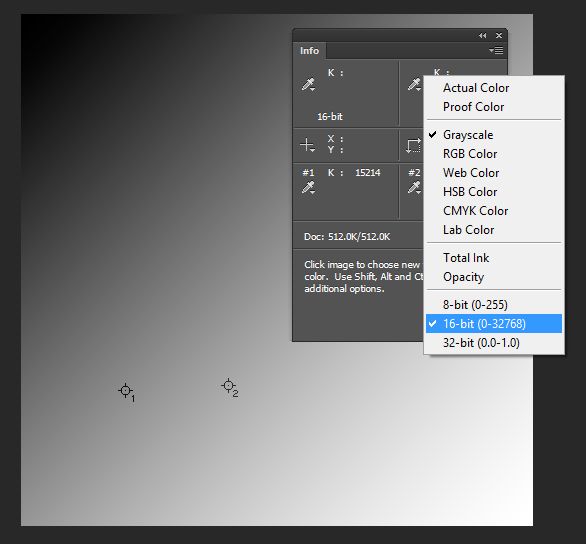
- Image information
- Distort filters are unavailable
- About color
- Color and monochrome adjustments using channels
- Choose colors in the Color and Swatches panels
- Sample
- Color mode or Image mode
- Color cast
- Add a conditional mode change to an action
- Add swatches from HTML CSS and SVG
- Bit depth and preferences
- Layers
- Layer basics
- Nondestructive editing
- Create and manage layers and groups
- Select, group, and link layers
- Place images into frames
- Layer opacity and blending
- Mask layers
- Apply Smart Filters
- Layer comps
- Move, stack, and lock layers
- Mask layers with vector masks
- Manage layers and groups
- Layer effects and styles
- Edit layer masks
- Extract assets
- Reveal layers with clipping masks
- Generate image assets from layers
- Work with Smart Objects
- Blending modes
- Combine multiple images into a group portrait
- Combine images with Auto-Blend Layers
- Align and distribute layers
- Copy CSS from layers
- Load selections from a layer or layer mask's boundaries
- Knockout to reveal content from other layers
- Layer
- Flattening
- Composite
- Background
- Selections
- Select and Mask workspace
- Make quick selections
- Get started with selections
- Select with the marquee tools
- Select with the lasso tools
- Select a color range in an image
- Adjust pixel selections
- Convert between paths and selection borders
- Channel basics
- Move, copy, and delete selected pixels
- Create a temporary quick mask
- Save selections and alpha channel masks
- Select the image areas in focus
- Duplicate, split, and merge channels
- Channel calculations
- Selection
- Bounding box
- Image adjustments
- Perspective warp
- Reduce camera shake blurring
- Healing brush examples
- Export color lookup tables
- Adjust image sharpness and blur
- Understand color adjustments
- Apply a Brightness/Contrast adjustment
- Adjust shadow and highlight detail
- Levels adjustment
- Adjust hue and saturation
- Adjust vibrance
- Adjust color saturation in image areas
- Make quick tonal adjustments
- Apply special color effects to images
- Enhance your image with color balance adjustments
- High dynamic range images
- View histograms and pixel values
- Match colors in your image
- How to crop and straighten photos
- Convert a color image to black and white
- Adjustment and fill layers
- Curves adjustment
- Blending modes
- Target images for press
- Adjust color and tone with Levels and Curves eyedroppers
- Adjust HDR exposure and toning
- Filter
- Blur
- Dodge or burn image areas
- Make selective color adjustments
- Replace object colors
- Adobe Camera Raw
- Camera Raw system requirements
- What's new in Camera Raw
- Introduction to Camera Raw
- Create panoramas
- Supported lenses
- Vignette, grain, and dehaze effects in Camera Raw
- Default keyboard shortcuts
- Automatic perspective correction in Camera Raw
- How to make non-destructive edits in Camera Raw
- Radial Filter in Camera Raw
- Manage Camera Raw settings
- Open, process, and save images in Camera Raw
- Repair images with the Enhanced Spot Removal tool in Camera Raw
- Rotate, crop, and adjust images
- Adjust color rendering in Camera Raw
- Feature summary | Adobe Camera Raw | 2018 releases
- New features summary
- Process versions in Camera Raw
- Make local adjustments in Camera Raw
- Image repair and restoration
- Remove objects from your photos with Content-Aware Fill
- Content-Aware Patch and Move
- Retouch and repair photos
- Correct image distortion and noise
- Basic troubleshooting steps to fix most issues
- Image transformations
- Transform objects
- Adjust crop, rotation, and canvas size
- How to crop and straighten photos
- Create and edit panoramic images
- Warp images, shapes, and paths
- Vanishing Point
- Use the Liquify filter
- Content-aware scaling
- Transform images, shapes, and paths
- Warp
- Transform
- Panorama
- Drawing and painting
- Paint symmetrical patterns
- Draw rectangles and modify stroke options
- About drawing
- Draw and edit shapes
- Painting tools
- Create and modify brushes
- Blending modes
- Add color to paths
- Edit paths
- Paint with the Mixer Brush
- Brush presets
- Gradients
- Gradient interpolation
- Fill and stroke selections, layers, and paths
- Draw with the Pen tools
- Create patterns
- Generate a pattern using the Pattern Maker
- Manage paths
- Manage pattern libraries and presets
- Draw or paint with a graphics tablet
- Create textured brushes
- Add dynamic elements to brushes
- Gradient
- Paint stylized strokes with the Art History Brush
- Paint with a pattern
- Sync presets on multiple devices
- Text
- Add and edit the text
- Unified Text Engine
- Work with OpenType SVG fonts
- Format characters
- Format paragraphs
- How to create type effects
- Edit text
- Line and character spacing
- Arabic and Hebrew type
- Fonts
- Troubleshoot fonts
- Asian type
- Create type
- Text Engine error using Type tool in Photoshop | Windows 8
- Add and edit the text
- Video and animation
- Video editing in Photoshop
- Edit video and animation layers
- Video and animation overview
- Preview video and animations
- Paint frames in video layers
- Import video files and image sequences
- Create frame animations
- Creative Cloud 3D Animation (Preview)
- Create timeline animations
- Create images for video
- Filters and effects
- Use the Liquify filter
- Use the Blur Gallery
- Filter basics
- Filter effects reference
- Add Lighting Effects
- Use the Adaptive Wide Angle filter
- Use the Oil Paint filter
- Layer effects and styles
- Apply specific filters
- Smudge image areas
- Saving and exporting
- Save your files in Photoshop
- Export your files in Photoshop
- Supported file formats
- Save files in graphics formats
- Move designs between Photoshop and Illustrator
- Save and export video and animations
- Save PDF files
- Digimarc copyright protection
- Save your files in Photoshop
- Printing
- Print 3D objects
- Print from Photoshop
- Print with color management
- Contact Sheets and PDF Presentations
- Print photos in a picture package layout
- Print spot colors
- Duotones
- Print images to a commercial printing press
- Improve color prints from Photoshop
- Troubleshoot printing problems | Photoshop
- Automation
- Creating actions
- Create data-driven graphics
- Scripting
- Process a batch of files
- Play and manage actions
- Add conditional actions
- About actions and the Actions panel
- Record tools in actions
- Add a conditional mode change to an action
- Photoshop UI toolkit for plug-ins and scripts
- Color Management
- Understanding color management
- Keeping colors consistent
- Color settings
- Work with color profiles
- Color-managing documents for online viewing
- Color-managing documents when printing
- Color-managing imported images
- Proofing colors
- Content authenticity
- Learn about content credentials
- Identity and provenance for NFTs
- Connect accounts for creative attribution
- 3D and technical imaging
- Photoshop 3D | Common questions around discontinued 3D features
- Creative Cloud 3D Animation (Preview)
- Print 3D objects
- 3D painting
- 3D panel enhancements | Photoshop
- Essential 3D concepts and tools
- 3D rendering and saving
- Create 3D objects and animations
- Image stacks
- 3D workflow
- Measurement
- DICOM files
- Photoshop and MATLAB
- Count objects in an image
- Combine and convert 3D objects
- 3D texture editing
- Adjust HDR exposure and toning
- 3D panel settings
In Photoshop you can easily create an image in one color mode and convert it to another, perhaps to get it ready for a specific print job.
You can change an image from its original mode (source mode) to a different mode (target mode). When you choose a different color mode for an image, you permanently change the color values in the image. For example, when you convert an RGB image to CMYK mode, RGB color values outside the CMYK gamut (defined by the CMYK working space setting in the Color Settings dialog box) are adjusted to fall within gamut. As a result, some image data may be lost and can’t be recovered if you convert the image from CMYK back to RGB.
Before converting images, it’s best to do the following:
Do as much editing as possible in the original image mode (usually RGB for images from most scanners or digital cameras, or CMYK for images from traditional drum scanners or imported from a Scitex system).
Save a backup copy before converting. Be sure to save a copy of your image that includes all layers so that you can edit the original version of the image after the conversion.
Flatten the file before converting it. The interaction of colors between layer blending modes changes when the mode changes.
In most cases, you’ll want to flatten a file before converting it. However, it isn't required and, in some cases, it isn’t desirable (for example, when the file has vector text layers).
-
Choose Image > Mode and the mode you want from the submenu. Modes not available for the active image appear dimmed in the menu.
Images are flattened when converted to Multichannel, Bitmap, or Indexed Color mode, because these modes do not support layers.
Converting an image to Bitmap mode reduces the image to two colors, greatly simplifying the color information in the image and reducing its file size.
When converting a color image to Bitmap mode, first convert it to Grayscale mode. This removes the hue and saturation information from the pixels and leaves just the brightness values. However, because only a few editing options are available for Bitmap mode images, it’s usually best to edit the image in Grayscale mode and then convert it to Bitmap mode.
Images in Bitmap mode are 1 bit per channel. You must convert a 16‑ or 32‑bits-per-channel image to 8‑bit Grayscale mode before converting it to Bitmap mode.
-
Do one of the following:
If the image is in color, choose Image > Mode > Grayscale. Then choose Image > Mode > Bitmap.
If the image is grayscale, choose Image > Mode > Bitmap.
-
For Output, enter a value for the output resolution of the Bitmap mode image, and choose a unit of measurement. By default, the current image resolution appears as both the input and the output resolutions.
-
Choose one of the following bitmap conversion methods from the Use pop-up menu:
50% Threshold
Converts pixels with gray values above the middle gray level (128) to white and pixels with gray values below that level to black.
 The result is a very high-contrast, black-and-white representation of the image.
Pattern Dither
Converts an image by organizing the gray levels into geometric configurations of black and white dots.
Diffusion Dither
Converts an image by using an error-diffusion process, starting at the pixel in the upper-left corner of the image. If the pixel’s value is above middle gray (128), the pixel is changed to white—if below it, to black. Because the original pixel is rarely pure white or pure black, error is inevitably introduced. This error is transferred to surrounding pixels and diffused throughout the image, resulting in a grainy, film-like texture.
Halftone Screen
Simulates the appearance of halftone dots in the converted image. Enter values in the Halftone Screen dialog box:
For Frequency, enter a value for the screen frequency, and choose a unit of measurement.
 Values can range from 1.000 to 999.999 for lines per inch and from 0.400 to 400.00 for lines per centimeter. You can enter decimal values. The screen frequency specifies the ruling of the halftone screen in lines per inch (lpi). The frequency depends on the paper stock and type of press used for printing. Newspapers commonly use an 85‑line screen. Magazines use higher resolution screens, such as 133‑lpi and 150‑lpi. Check with your print shop for correct screen frequencies.
Enter a value for the screen angle in degrees from ‑180 to +180. The screen angle refers to the orientation of the screen. Continuous-tone and black-and-white halftone screens commonly use a 45° angle.
For Shape, choose the dot shape you want.
The halftone screen becomes part of the image. If you print the image on a halftone printer, the printer will use its own halftone screen as well as the halftone screen that is part of the image. On some printers, the result is a moiré pattern.
Custom Pattern
Simulates the appearance of a custom halftone screen in the converted image. Choose a pattern that lends itself to thickness variations, typically one with a variety of gray shades.
To use this option, you first define a pattern and then screen the grayscale image to apply the texture. To cover the entire image, the pattern must be as large as the image. Otherwise, the pattern is tiled. Photoshop comes with several self-tiling patterns that can be used as halftone screen patterns.
To prepare a black-and-white pattern for conversion, first convert the image to grayscale and then apply the Blur More filter several times. This blurring technique creates thick lines tapering from dark gray to white.
Original grayscale image, and 50% Threshold conversion method Pattern Dither conversion method, and Diffusion Dither conversion method
-
Open the photo you want to convert to black-and-white.
-
Choose Image > Mode > Grayscale.
-
Click Discard. Photoshop converts the colors in the image to black, white, and shades of gray.
The technique above minimizes file size but discards color information and can convert adjacent colors to the exact same shade of gray. Using a Black & White adjustment layer increases file size but retains color information, letting you map colors to shades of gray.
You can convert a Bitmap mode image to Grayscale mode in order to edit it. Keep in mind that a Bitmap mode image edited in Grayscale mode may not look the same when you convert it back to Bitmap mode. For example, suppose a pixel that is black in Bitmap mode is edited to a shade of gray in Grayscale mode. When the image is converted back to Bitmap mode, that pixel is rendered as white if its gray value is above the middle gray value of 128.
-
Choose Image > Mode > Grayscale.
-
Enter a value between 1 and 16 for the size ratio.

The size ratio is the factor for scaling down the image. For example, to reduce a grayscale image by 50%, enter 2 for the size ratio. If you enter a number greater than 1, the program averages multiple pixels in the Bitmap mode image to produce a single pixel in the grayscale image. This process lets you generate multiple shades of gray from an image scanned on a 1‑bit scanner.
Converting to indexed color reduces the number of colors in the image to at most 256—the standard number of colors supported by the GIF and PNG‑8 formats and many multimedia applications. This conversion reduces file size by deleting color information from the image.
To convert to indexed color, you must start with an image that is 8 bits per channel and in either Grayscale or RGB mode.
-
Choose Image > Mode > Indexed Color.
All visible layers will be flattened; any hidden layers will be discarded.
For grayscale images, the conversion happens automatically.
 For RGB images, the Indexed Color dialog box appears.
 -
Select Preview in the Indexed Color dialog box to display a preview of the changes.
-
Specify conversion options.
When converting an RGB image to indexed color, you can specify a number of conversion options in the Indexed Color dialog box.
Palette Type
A number of palette types are available for converting an image to indexed color. For the Perceptual, Selective, and Adaptive options, you can choose using a local palette based on the current image’s colors. These are the available palette types:
Exact
Creates a palette using the exact colors appearing in the RGB image—an option available only if the image uses 256 or fewer colors. Because the image’s palette contains all colors in the image, there is no dithering.
System (Mac OS)
Uses the Mac OS default 8‑bit palette, which is based on a uniform sampling of RGB colors.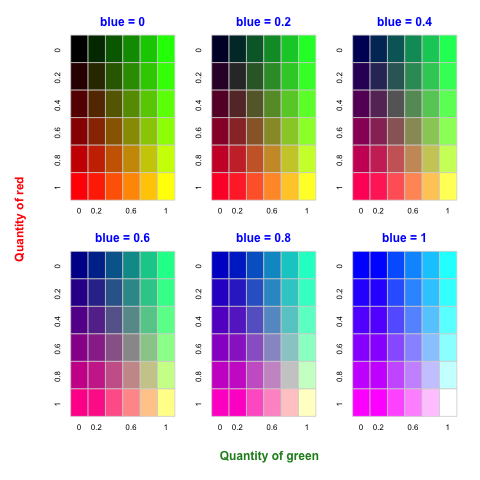
System (Windows)
Uses the Windows system’s default 8‑bit palette, which is based on a uniform sampling of RGB colors.
Web
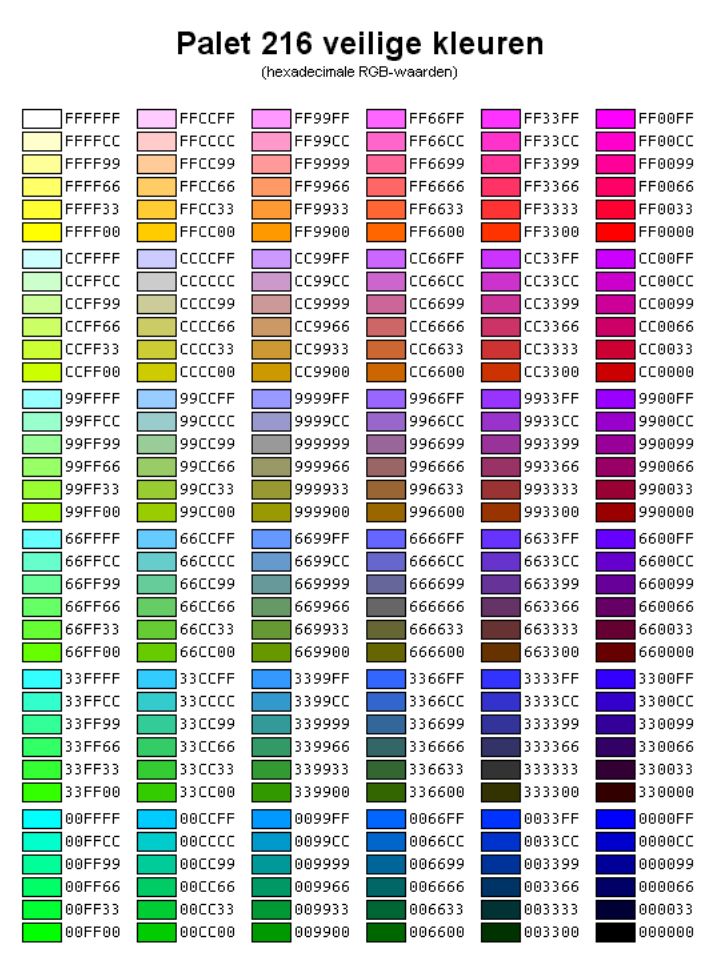
Uses the 216-color palette that web browsers, regardless of platform, use to display images on a monitor limited to 256 colors. This palette is a subset of the Mac OS 8‑bit palette. Use this option to avoid browser dither when viewing images on a monitor display limited to 256 colors.
Uniform
Creates a palette by uniformly sampling colors from the RGB color cube. For example, if Photoshop takes six evenly-spaced color levels each of red, green, and blue, the combination produces a uniform palette of 216 colors (6 cubed = 6 x 6 x 6 = 216). The total number of colors displayed in an image corresponds to the nearest perfect cube (8, 27, 64, 125, or 216) that is less than the value in the Colors text box.
Local (Perceptual)
Creates a custom palette by giving priority to colors for which the human eye has greater sensitivity.
Local (Selective)
Creates a color table similar to the Perceptual color table, but favoring broad areas of color and the preservation of web colors. This option usually produces images with the greatest color integrity.
Local (Adaptive)
Creates a palette by sampling the colors from the spectrum appearing most commonly in the image. For example, an RGB image with only the colors green and blue produces a palette made primarily of greens and blues. Most images concentrate colors in particular areas of the spectrum. To control a palette more precisely, first select a part of the image containing the colors you want to emphasize. Photoshop weights the conversion toward these colors.
Master (Perceptual)
Creates a custom palette by giving priority to colors for which the human eye has greater sensitivity. Applies when you have multiple documents open; takes all open documents into account.
Master (Selective)
Creates a color table similar to the Perceptual color table, but favoring broad areas of color and the preservation of web colors. This option usually produces images with the greatest color integrity. Applies when you have multiple documents open; takes all open documents into account.
Master (Adaptive)
Creates a palette by sampling the colors from the spectrum appearing most commonly in the image. For example, an RGB image with only the colors green and blue produces a palette made primarily of greens and blues. Most images concentrate colors in particular areas of the spectrum. To control a palette more precisely, first select a part of the image containing the colors you want to emphasize. Photoshop weights the conversion toward these colors. Applies when you have multiple documents open; takes all open documents into account.
Custom
Creates a custom palette using the Color Table dialog box.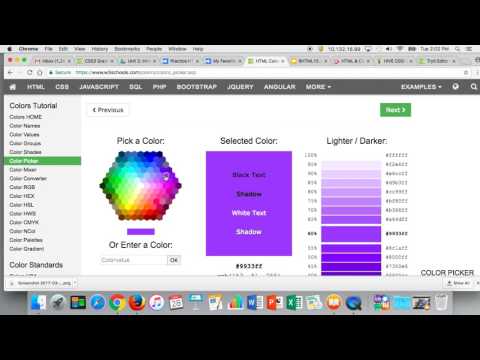 Either edit the color table and save it for later use or click Load to load a previously created color table. This option also displays the current Adaptive palette, which is useful for previewing the colors most often used in the image.
Previous
Uses the custom palette from the previous conversion, making it easy to convert several images with the same custom palette.
Number Of Colors
For the Uniform, Perceptual, Selective, or Adaptive palette, you can specify the exact number of colors to be displayed (up to 256) by entering a value for Colors. The Colors text box controls only how the indexed color table is created. Adobe Photoshop still treats the image as an 8‑bit, 256‑color image.
Color Inclusion And Transparency
To specify colors to be included in the indexed color table or to specify transparency in the image, choose from the following options:
Forced
Provides options to force the inclusion of certain colors in the color table. Black And White adds a pure black and a pure white to the color table; Primaries adds red, green, blue, cyan, magenta, yellow, black, and white; Web adds the 216 web‑safe colors; and Custom lets you define custom colors to add.
Transparency
Specifies whether to preserve transparent areas of the image during conversion. Selecting this option adds a special index entry in the color table for transparent colors. Deselecting this option fills transparent areas with the matte color, or with white if no matte color is chosen.
Matte
Specifies the background color used to fill anti-aliased edges that lie adjacent to transparent areas of the image. When Transparency is selected, the matte is applied to edge areas to help blend the edges with a web background of the same color. When Transparency is deselected, the matte is applied to transparent areas. Choosing None for the matte creates hard-edged transparency if Transparency is selected; otherwise, all transparent areas are filled with 100% white.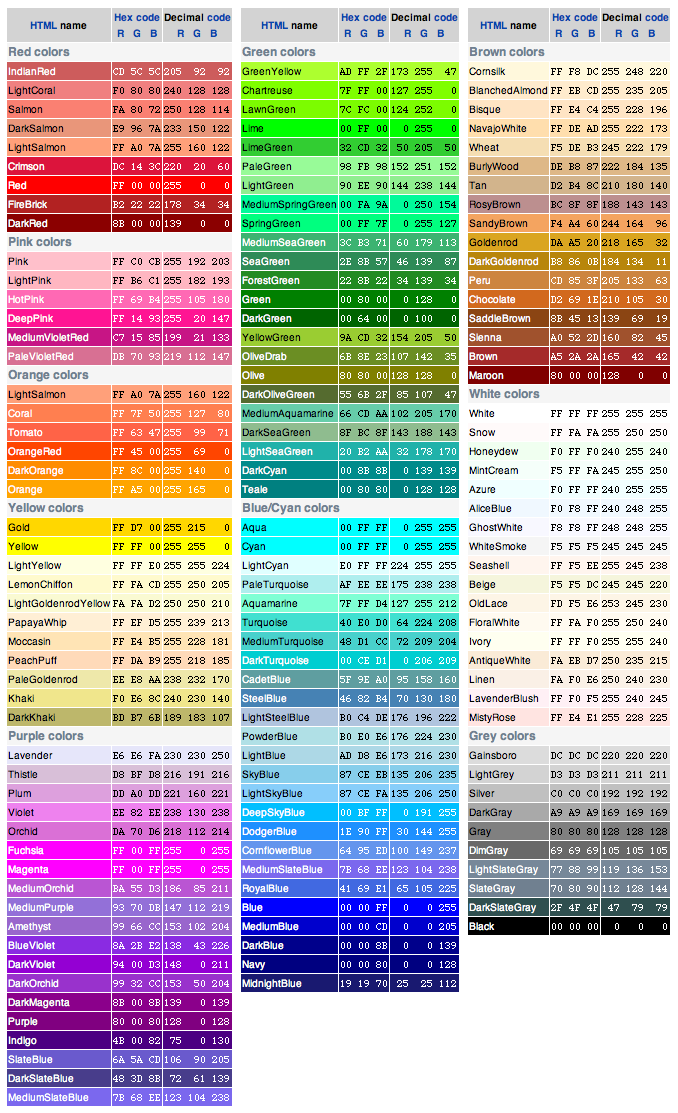 The image must have transparency for the Matte options to be available.
Dithering
Unless you’re using the Exact color table option, the color table may not contain all the colors used in the image. To simulate colors not in the color table, you can dither the colors. Dithering mixes the pixels of the available colors to simulate the missing colors. Choose a dither option from the menu, and enter a percentage value for the dither amount. A higher amount dithers more colors but may increase file size. You can choose from the following dither options:
None
Does not dither colors but instead uses the color closest to the missing color. This tends to result in sharp transitions between shades of color in the image, creating a posterized effect.
Diffusion
Uses an error-diffusion method that produces a less-structured dither than the Pattern option. To protect colors in the image that contain entries in the color table from being dithered, select Preserve Exact Colors. This is useful for preserving fine lines and text for web images.
Pattern
Uses a halftone-like square pattern to simulate any colors not in the color table.
Noise
Helps to reduce seam patterns along the edges of image slices. Choose this option if you plan to slice the image for placement in an HTML table.
More like this
- Color modes
- Customizing indexed color tables
- Adding a conditional mode change to an action
Buy Adobe Photoshop or start a Free Trial.
Sign in to your account
Sign in
Manage account
How to Photoshop Convert to RGB
Adobe Photoshop offers many interesting & useful features to edit photos. Professional photographers utilize this software to edit their captured images. If you too want your pictures to have a professional touch, then editing them in Photoshop is the best choice. You can download Adobe Photoshop and use it for free for a week. After that, you need to pay US $ 19.99 per month to continue using its services. Today, we will discuss how to Photoshop convert image to RGB color mode to edit. Also read How to Convert Image to Grayscale Paint.. Also read How to Convert Image to Grayscale Paint..
Contents
- How to Convert Image to RGB Mode using Adobe Photoshop
- Method 1: Use Adobe Photoshop App Settings
- Method 2: Use CMYK to RGB Shortcut Keys
- Method 2A: For Windows PC
- Method 2B: For MacOS
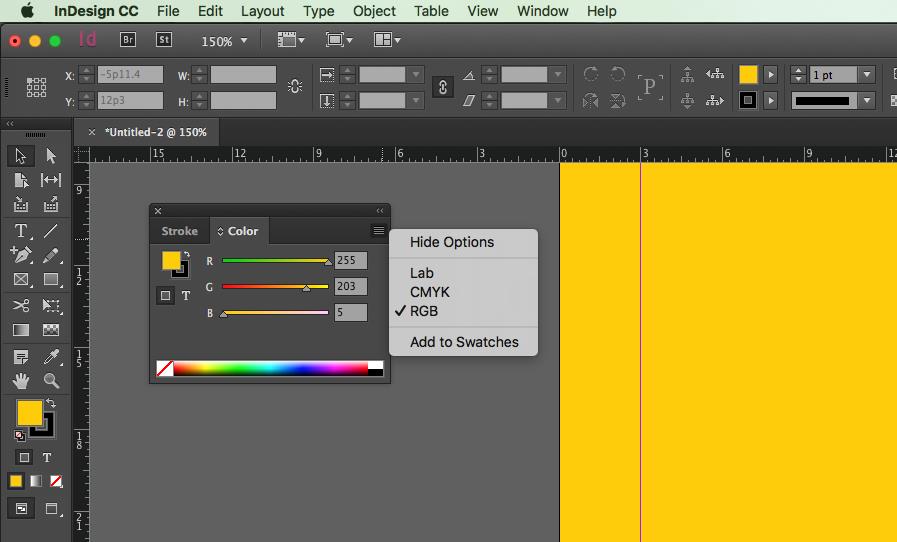
While editing an image in Adobe Photoshop, Photoshop convert to RGB is one of the simplest things to do. Here, you get only three color modes to edit an image. They are RGB, CMYK & Grayscale. Pictures that are to be published online are edited using RGB and photos that are for print are edited using CMYK. It makes your image bright and attractive. This mode utilizes the RGB model, selecting an intensity value for every pixel. In 8 bits per channel picture, the intensity values vary from 0 to 255 for each RGB (green, blue, red) segment in a color image.
Note: Here, Adobe Photoshop CC 2019 is used to illustrate the required steps.
Method 1: Use Adobe Photoshop App SettingsRGB images look great on digital media and websites. So, here are the steps to convert image to RGB color mode to edit these:
1. Launch Adobe Photoshop app on Windows Desktop.
2. Click on File at the top left corner of the screen.
3. Next, click on Open, shown highlighted.
4. Now, select the picture you want to convert to RGB and click Open.
5. Once the picture opens in photoshop, click on Image in the top menu.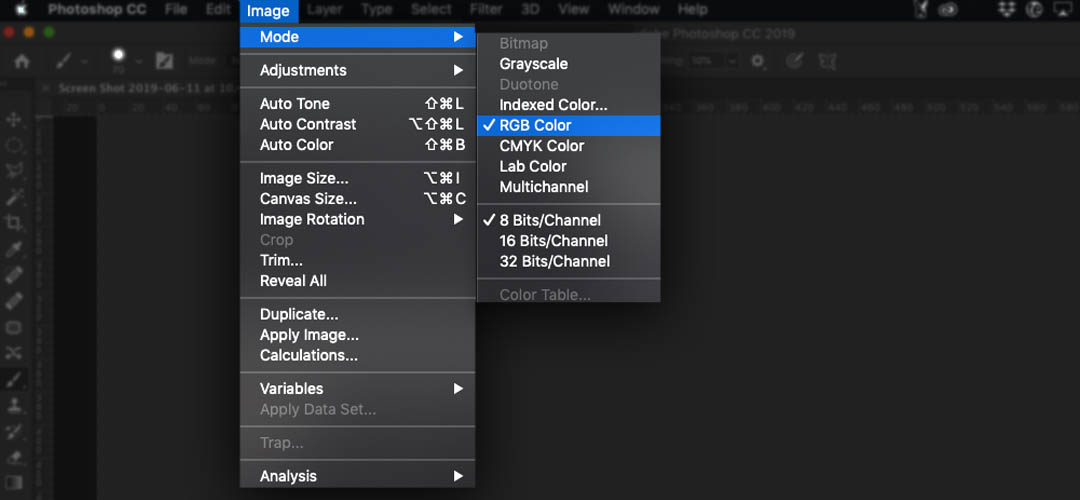
6. Select Mode > RGB Color as depicted below.
Note: You might see an on-screen prompt from Adobe Photoshop. Click on Flatten button to continue.
7. Next, go to File and click on Save As option from the list.
8. Now, choose File type (e.g. PNG,JPG, JPEG etc.) from Save as type drop-down menu. Rename the file if needed.
9. Lastly, click on Save.
Now, your CMYK mode image is successfully converted into RGB mode.
Also Read: How to Fix Scratch Disks Are Full Error in Photoshop
Method 2: Use CMYK to RGB Shortcut Keys
While editing a picture in Photoshop, it is tiresome to navigate to menus and options. So, using shortcut keys in Photoshop saves your time. Fortunately, there are shortcut keys to convert CMYK to RGB mode and vice-versa.
If you are using Photoshop on Windows laptop/desktop, then follow the steps listed below:
1. Click on File > Open, shown highlighted.
2. Select the picture you want to convert to RGB and click Open.
3. Once the CMYK Mode Image opens in Adobe Photoshop, press Alt + I + M + R keys simultaneously. This is Photoshop CMYK to RGB shortcut key.
Now, your CMYK mode image will change into an RGB mode image.
Note: To convert an image from RGB mode to CMYK mode, press Alt + I + M + C keys together.
Also Read: How to Convert PNG to JPG without Losing Quality
Method 2B: For MacOSIf you are using Photoshop on Mac, then follow the given steps:
1. Open CMYK mode image on your Mac.
2. Press Option + I + M + R keys Photoshop shortcut to convert CMYK to RGB mode.
Note To convert RGB mode to CMYK mode, press Option + I + M + C keys together.
Pro Tip: Check if the image has converted or not by repeating steps 5 & 6 of Method 1 and see if the option RGB color is ticked or not.
Recommended:
- How to Install Windows 11 on Legacy BIOS
- How to Use Emojis on Windows 10
- How to Remove Watermarks From Word Documents
- How to Add Subtitles to a Movie Permanently
We hope that this guide on how to Photoshop convert to RGB color mode was helpful. Let us know which method worked for you best. If you have any queries or, suggestions then feel free to drop them in the comment section below.
Converting Between Color Modes in Photoshop
- Photoshop User Guide
- Introduction to Photoshop
- Dream about it.
 Do it.
 - What's New in Photoshop
- Editing the first photo
- Create documents
- Photoshop | Frequently Asked Questions
- Photoshop system requirements
- Transfer of presets, operations and settings
- Introduction to Photoshop
- Dream about it.
- Photoshop and other Adobe products and services
- Working with Illustrator artwork in Photoshop
- Working with Photoshop files in InDesign
- Substance 3D Materials for Photoshop
- Photoshop and Adobe Stock
- Working with the built-in Capture extension in Photoshop
- Creative Cloud Libraries
- Creative Cloud Libraries in Photoshop
- Working in Photoshop using Touch Bar
- Net and guides
- Create transactions
- Cancellation and transaction history
- Photoshop on iPad
- Photoshop on iPad | General questions
- Introduction to the working environment
- System requirements | Photoshop on iPad
- Creating, opening and exporting documents
- Adding photos
- Working with layers
- Drawing and painting with brushes
- Select areas and add masks
- Retouch compositions
- Working with adjustment layers
- Adjusting the key of a composition using the Curves layer
- Applying transform operations
- Trim and rotate compositions
- Rotate, pan, zoom and restore canvas
- Working with text layers
- Working with Photoshop and Lightroom
- Getting missing fonts in Photoshop on iPad
- Japanese text in Photoshop on iPad
- Application parameter management
- Touch shortcuts and gestures
- Key combinations
- Image resizing
- Live stream your creative process in Photoshop on iPad
- Repair imperfections with the Healing Brush
- Creating brushes in Capture and using them in Photoshop
- Working with Camera Raw files
- Creating and using smart objects
- Adjusting the exposure of images with the Dodge and Burn tools
- Photoshop Web Beta
- Frequently Asked Questions | Photoshop Web App Beta
- General information about the operating environment
- System requirements | Photoshop Web Application Beta
- Keyboard shortcuts | Photoshop Web Application Beta
- Supported file formats | Photoshop Web Application Beta
- Opening and working with cloud documents
- Collaboration with stakeholders
- Limited cloud document editing capabilities
- Cloud Documents
- Photoshop Cloud Documents | Frequently Asked Questions
- Photoshop Cloud Documents | Workflow Questions
- Work with and manage cloud documents in Photoshop
- Cloud storage update for Photoshop
- Unable to create or save cloud document
- Troubleshooting Photoshop 9 cloud documents0004
- Collection of cloud document synchronization logs
- Cloud document sharing and editing
- File sharing and commenting in the application
- Working environment
- Basic information about the working environment
- Learn faster with the What's New panel in Photoshop
- Create documents
- Working in Photoshop using the Touch Bar
- Tool gallery
- Performance settings
- Using tools
- Touch gestures
- Touch Gestures and Customizable Workspaces
- Overview versions of technology
- Metadata and comments
- Default key combinations
- Touch Gestures and Customizable Workspaces
- Putting Photoshop images in other applications
- Installations
- Default key combinations
- Rulers
- Show or hide non-printing auxiliaries
- Specifying columns for the image
- Cancellation and transaction history
- Panels and menus
- File location
- Positioning of elements with referencing
- Positioning with the ruler tool
- Settings
- Customizing keyboard shortcuts
- Net and guides
- Web, screen and application content development
- Photoshop for design
- Artboards
- View on device
- Copy CSS from layers
- Dividing web pages into fragments
- HTML options for snippets
- Changing the arrangement of fragments
- Working with web graphics
- Create web photo galleries
- Understanding imaging and color
- Resizing images
- Working with raster and vector images
- Image size and resolution
- Importing images from cameras and scanners
- Creating, opening and importing images
- Image viewer
- "Invalid JPEG marker" error | Opening images
- Viewing multiple images
- Customize color palettes and color swatches
- HDR images
- Matching colors in an image
- Converting between color modes
- Color modes
- Erase sub-images
- Blend Modes
- Choice of colors
- Making changes to indexed color tables
- Image information
- Distortion filters not available
- Color details
- Color and monochrome corrections with channels
- Selecting colors in the Color and Swatches panels
- Model
- Color mode (or picture mode)
- Shade
- Add color mode change to operation
- Add swatches from HTML CSS and SVG files
- Bit depth and settings
- Layers
- Understanding Layers
- Reversible editing
- Create and manage layers and groups
- Selecting, grouping and linking layers
- Putting images into frames
- Opacity and layering
- Layer masks
- Application of smart filters
- Layer compositions
- Move, arrange and lock layers
- Masking layers with vector masks
- Manage layers and groups
- Effects and Layer Styles
- Editing layer masks
- Retrieve resources
- Display layers with clipping masks
- Generation of graphic resources from layers
- Working with smart objects
- Blend Modes
- Combining several fragments into one image
- Combining images with Auto Layer
- Alignment and distribution of layers
- Copy CSS from layers
- Load selections based on layer boundaries or layer masks
- Translucent to show the contents of other layers
- Layer
- Mixing
- Composite images
- Background
- Selections
- Select and Mask workspace
- Quick area selection
- Getting Started with Selections
- Selecting with the Marquee toolbox
- Selecting with the Lasso tools
- Selecting a color range in the image
- Pixel highlight setting
- Convert between contours and selection borders
- Channel Basics
- Moving, copying and deleting selected pixels
- Creating a temporary quick mask
- Save selections and alpha channel masks
- Selecting focus areas in an image
- Duplication, splitting and merging of channels
- Channel calculation
- Extraction
- Bounding box
- Image Corrections
- Perspective Warp
- Reducing blur due to camera movement
- Healing Brush Tool Examples
- Export color lookup tables
- Image sharpness and blur correction
- Understanding color grading
- Applying the Brightness/Contrast setting
- Shadow and Highlight Detail Correction
- Correction "Levels"
- Hue and saturation correction
- Juiciness correction
- Adjusting the color saturation in image areas
- Quick tone correction
- Applying special color effects to images
- Image enhancement with color balance correction
- HDR images
- View histograms and pixel values
- Image color matching
- Crop and straighten photographs
- Converting a color image to black and white
- Adjustment and fill layers
- Curves correction
- Blend Modes
- Target Imaging for Press
- Color and tone correction with Levels and Curves eyedroppers
- HDR Exposure and Toning Compensation
- Filter
- Blur
- Lighten or darken image areas
- Selective color correction
- Replacing object colors
- Adobe Camera Raw
- Camera Raw system requirements
- What's New in Camera Raw
- Introduction to Camera Raw
- Creation of panoramas
- Supported lenses
- Camera Raw Vignetting, Grain, and Haze Removal
- Default key combinations
- Automatic perspective correction in Camera Raw
- Reversible editing in Camera Raw
- Camera Raw 9 Radial Filter Tool0004
- Manage Camera Raw settings
- Processing, saving and opening images in Camera Raw
- Image enhancements with Camera Raw's improved Spot Remover
- Rotating, cropping and modifying images
- Camera Raw color correction
- Function overview | Adobe Camera Raw | Issues for 2018
- Overview of new features
- Processing versions in Camera Raw
- Making local adjustments in Camera Raw
- Fixing and restoring images
- Removing objects from photos using Content-Aware Fill
- Content-aware patching and relocation
- Photo retouching and correction
- Image Distortion and Noise Correction
- Basic troubleshooting steps to solve most problems
- Image transformation
- Object transformation
- Crop, rotate and canvas adjustment
- Crop and straighten photographs
- Creating and editing panoramic images
- Deformation of images, shapes and contours
- Perspective
- Using the Plastic filter
- Content-aware scale
- Transform images, shapes and paths
- Deformation
- Transformation
- Panorama
- Drawing and painting
- Drawing symmetrical ornaments
- Options for drawing a rectangle and changing the stroke
- Drawing details
- Drawing and editing shapes
- Paint tools
- Creating and modifying brushes
- Blend Modes
- Add color to contours
- Edit contours
- Painting with mix brush
- Brush Presets
- Gradients
- Gradient interpolation
- Fill and stroke selections, layers, and paths
- Drawing with the pen tool group
- Pattern making
- Creating a pattern with the Pattern Builder filter
- Circuit control
- Managing pattern libraries and presets
- Drawing with graphics tablet
- Creating textured brushes
- Adding dynamic elements to brushes
- Gradient
- Draw stylized strokes with the Artistic Archive Brush
- Drawing with pattern
- Synchronizing presets across multiple devices
- Text
- Adding and editing text
- Universal text editor
- Working with OpenType SVG fonts
- Character formatting
- Paragraph formatting
- Creating text effects
- Text editing
- Leading and letter spacing
- Font for Arabic and Hebrew
- Fonts
- Troubleshooting fonts
- Asian text
- Creating text
- Text Engine error when using the Type tool in Photoshop | Windows 8
- Adding and editing text
- Video and animation
- Video editing in Photoshop
- Editing video and animation layers
- Introduction to video and animation
- Video and animation preview
- Drawing frames in video layers
- Import video files and image sequences
- Create frame animations
- Creative Cloud 3D Animation (Preview)
- Create timeline animations
- Creating images for videos
- Filters and effects
- Using the plastic filter
- Using Blur Gallery group effects
- Filter basics
- Filter effects guide
- Adding lighting effects
- Using the Adaptive Wide Angle filter
- Oil Paint Filter
- Effects and Layer Styles
- Application of certain filters
- Image area feathering
- Save and export
- Saving files in Photoshop
- Export files to Photoshop
- Supported file formats
- Saving files in other graphic formats
- Moving projects between Photoshop and Illustrator
- Saving and exporting video and animation
- Saving PDF files
- Digimarc copyright protection
- Saving files in Photoshop
- Printing
- Printing 3D objects
- Printing with Photoshop
- Printing and color management
- Checklists and PDF presentations
- Print photos in a new image layout
- Spot color printing
- Duplexes
- Printing images on a printing press
- Photoshop Color Enhancement
- Printing troubleshooting | Photoshop
- Automation
- Create activities
- Creating data-driven images
- Scenarios
- File batch processing
- Operation playback and management
- Adding conditional operations
- About actions and the Actions panel
- Recording tools in operations
- Add color mode change to operation
- Photoshop UI Development Kit for plug-ins and scripts
- Color Management
- Understanding Color Management
- Accurate color assurance
- Color settings
- Working with color profiles
- Color management of documents for viewing on the web
- Color management for printing documents
- Color management of imported images
- Perform proofing
- Content Authenticity
- Learn more about content credentials
- Identity and origin of NFT 9 tokens0004
- Connecting accounts for creative attribution
- 3D objects and technical images
- 3D in Photoshop | Common questions about deprecated 3D features
- Creative Cloud 3D Animation (Preview)
- Printing 3D objects
- 3D drawing
- 3D Panel Enhancement | Photoshop
- Basic concepts and tools for working with 3D graphics
- Rendering and saving 3D objects
- Creating 3D objects and animations
- Image stacks
- 3D graphics workflow
- Measurements
- DICOM files
- Photoshop and MATLAB
- Counting objects in an image
- Combining and transforming 3D objects
- Editing 3D textures
- HDR Exposure and Toning Compensation
- 3D panel settings
Photoshop makes it easy to create an image in one color mode and convert it to another, for example, to prepare it for a particular print job.
An image can be transferred from its original (source) mode to another (target) mode. Selecting a different color mode for an image permanently changes the color values contained in the image. For example, when converting an RGB image to CMYK mode, RGB color values that fall outside the CMYK color gamut (as defined by the CMYK workspace setting in the Color Adjustment dialog box) are adjusted to fall within that gamut. As a result, some image data may be lost and not restored when changing back from CMYK to RGB.
It is best to do the following before converting an image.
-
Do as much editing as possible in the original image mode (usually RGB for images from most scanners and digital cameras, CMYK for images from traditional drum scanners or imported from Scitex systems).
-
Make a backup copy of the image before converting. Be sure to save a copy of the image that contains all layers so that you can return to editing the original version of the image after conversion.
-
Flatten the image before converting it. Changing the mode will change how colors interact between layer blend modes.
In most cases, you need to flatten all layers of a file before converting. However, in some cases (for example, if the file contains layers of vector text), this operation is not required and is not even recommended.
-
Select the Picture menu > Mode and then the desired mode. Modes that are not available for the active image are grayed out in the menu.
Converting an image to Multichannel, Bitmap, or Indexed Colors flattens the image because layers are not supported in those modes.
Bitmapping reduces the number of colors in an image to two, greatly simplifying its structure and reducing file size.
When converting a color image to bitmap, the image must first be converted to grayscale. As a result, the hue and saturation information is removed from the pixels, leaving only the brightness values. But since there are very few editing options available for bitmaps, it usually makes sense to edit these images in grayscale mode and only then convert them to bitmap.
Bitmap images contain 1 bit per channel. Before bitmapping an image containing 16 or 32 bits per channel, such an image must first be converted to 8-bit grayscale.
-
Do one of the following.
-
If the image is in color, choose Image > Mode > Grayscale. Then choose Image > Mode > Bitmap.
-
If the image is grayscale, choose Image > Mode > Bitmap.
-
-
In the Output field, enter the output resolution for the bitmap and select the unit of measure. By default, both the input and output resolutions are set to the current resolution of the image.
-
From the Use pop-up menu, select one of the following conversion methods:
Threshold 50%
Converts pixels with gray values above the average level (128) to white, and below this level to black.
 The result is a high contrast black and white representation of the image.
 Regular dithering
Transforms the image by creating geometric patterns of black and white dots from gray levels.
Random dither
Diffuses the image, starting at the top left pixel of the image. If the pixel value is higher than the average gray (128), it becomes white, if it is lower, it becomes black. Because the original pixel is rarely just white or just black, error inevitably occurs. This error is carried over to surrounding pixels and randomly distributed throughout the image, forming a granular, film-like grainy texture.
halftone screen
Simulates halftone dots in the converted image. The following values are entered in the Halftone Screen dialog box:
-
In the Lineature field, specify the screen lineature value by selecting the unit of measurement.
 The value can range from 1.000 to 999.999 lines per inch, or from 0.400 to 400.00 lines per centimeter. You can enter decimal values. The screen line defines the frequency of the halftone screen in lines per inch (lpi). Lineature depends on the brand of paper used in printing and the type of printing press. Newspapers usually use 85 lines, while magazines use 133 or 150 lpi. Check with your printer for the correct lineature value.
 -
Enter a screen angle value in degrees from -180 to +180. This value determines the orientation of the raster. Single color and black and white halftone screens usually have an angle of 45°.
-
In the "Shape" field, select the desired point shape.
The halftone screen becomes part of the image. If the image is printed on a halftone printer, then along with the halftone screen included in the image, the printer also uses its own halftone screen. As a result, moiré patterns may appear on some printers.
custom pattern
Simulates a custom halftone screen in the converted image. Select a pattern for which you can change the thickness, usually a pattern with many shades of gray.
To use this option, you must first define a pattern and rasterize the image in grayscale to apply the texture. To cover the entire image, the size of the pattern must be at least as large as the size of the image. Otherwise, the pattern will repeat the mosaic. Photoshop comes with several self-repeating patterns that can be used for halftone.
To prepare a black and white pattern for conversion, convert the image to grayscale and apply the Blur + filter several times. The result will be thick lines with gradual transitions from dark gray to white.
Original grayscale image and 50% Threshold conversion method Random Dither and Regular Dither conversion methods -
-
Open the photo you want to convert to black and white.
-
Choose Image > Mode > Grayscale.
-
Click Cancel. Photoshop converts the image colors to black, white, and grayscale.
The above method reduces the file size but ignores the color information so that adjacent colors can be converted to the same shade of gray. Using a Black & White adjustment layer increases the file size but retains color information, allowing you to map colors to grayscale.
A bitmap can be converted to grayscale for editing. Be aware that after bitmapping back, the edited image may not look the same as before. For example, suppose a black bitmap pixel is converted from grayscale to grayscale. When such an image is converted back to bit mode, that pixel is rendered as white if the gray value is above the average gray level (128).
-
Choose Image > Mode > Grayscale.
-
Enter a value between 1 and 16 as the reduction ratio.
This value is the reduction ratio for the image.
 For example, to reduce a grayscale image by 50%, enter 2. If you enter a number greater than 1, the program averages the pixels in the bitmap to get one pixel in the grayscale image. This allows you to get multiple shades of gray from an image scanned with a 1-bit scanner.
Converting to indexed color mode reduces the number of colors in an image to 256 or less, which is the standard number of colors supported by GIF and PNG-8, as well as by many multimedia applications. This conversion reduces the file size by removing color information from the image.
To convert an image to indexed color mode, it must be 8 bits per channel and be in RGB or grayscale mode.
-
Choose Image > Mode > Indexed Colors.
All visible layers will be flattened and all hidden layers removed.
Grayscale images are converted automatically. For RGB images, the Indexed Colors dialog box is displayed.
-
In the Indexed Colors dialog box, select Preview to display a preview of the changes.

-
Set conversion options.
When converting an RGB image to indexed color mode, you can set several conversion options (in the Indexed Colors dialog box).
Palette type
Several types of palettes are available when converting images to indexed color mode. For the Perceptual, Selective, and Adaptive options, you can choose to use a local palette based on the colors in the current image. There are the following types of palettes.
Accurate
Creates a palette based on the exact colors used in an RGB image. This option is available only when the image contains less than 256 colors. Since this palette contains all the colors present in the image, no color mixing will be performed.
System (Mac OS)
Uses the default 8-bit Mac OS palette, which is based on uniform RGB color sampling.
System (Windows)
Uses the default Windows 8-bit palette, which is based on uniform RGB color sampling.
web
Uses the 216-color palette that web browsers (regardless of platform) use to display images on monitors limited to 256 colors. This palette is a subset of the 8-bit Mac OS palette. This setting prevents diffuse color mixing in the browser when viewing images on a monitor limited to 256 colors.
Uniform
Creates a palette based on a uniform sample of colors from an RGB color cube. For example, if we take six equidistant color levels for red, green, and blue, the result will be a uniform palette of 216 colors (6 cubed = 6 x 6 x 6 = 216). The total number of colors in the image will match the closest full cube (8, 27, 64, 125, or 216) and be less than the value specified in the Colors field.
Local (perceptual)
Creates a custom palette, favoring colors that the human eye is more sensitive to.
Local (selective)
Creates a color table similar to the Perceptual color table, but favors large areas and retains web-compatible colors. Typically, this option produces images with the most accurate colors.
Local (adaptive)
Creates a palette based on a selection of spectrum colors that appear most frequently in an image. For example, for an RGB image that contains only green and blue, the palette will consist primarily of blue and green. In most images, colors are concentrated in certain areas of the spectrum. For more precise palette control, first select the part of the image that contains the colors you want to highlight. Photoshop size the transform according to these colors.
Main (perceptual)
Creates a custom palette, favoring colors that the human eye is more sensitive to. Applies when multiple files are open at the same time; affects all open files.
Main (selective)
Creates a color table similar to the Perceptual color table, but favors large areas and retains web-compatible colors..jpg?type=w2) Typically, this option produces images with the most accurate colors. Applies when multiple files are open at the same time; affects all open files.
Typically, this option produces images with the most accurate colors. Applies when multiple files are open at the same time; affects all open files.
Basic (adaptive)
Creates a palette based on a selection of spectrum colors that appear most frequently in an image. For example, for an RGB image that contains only green and blue, the palette will consist primarily of blue and green. In most images, colors are concentrated in certain areas of the spectrum. For more precise palette control, first select the part of the image that contains the colors you want to highlight. Photoshop size the transform according to these colors. Applies when multiple files are open at the same time; affects all open files.
Custom
Creates a custom palette using the Color Table dialog box. Edit this table and save it for later use, or click Load to load a previously created color table. This option also displays the current adaptive palette, which can be useful for viewing the most commonly used colors in an image.
Previous
Uses a custom palette from a previous conversion, allowing you to easily convert multiple images using the same custom palette.
Number of colors
For the Uniform, Perceptual, Selective, and Adaptive palettes, you can set the exact number of colors to display (up to 256) by entering the appropriate value in the Colors box. This field only determines how the indexed color table is created. For Adobe Photoshop, the image will still be 8-bit with 256 colors.
Inclusion of colors and transparency
To specify colors for the indexed color table or set transparency for the image, choose from the following options:
Forced
Contains options to force certain colors to be included in the color table. Black & White adds pure black and pure white to the color chart, Primary Colors adds red, green, blue, cyan, magenta, yellow, black, and white, Web adds 216 Web colors, and Custom » allows you to select custom colors to add to the table.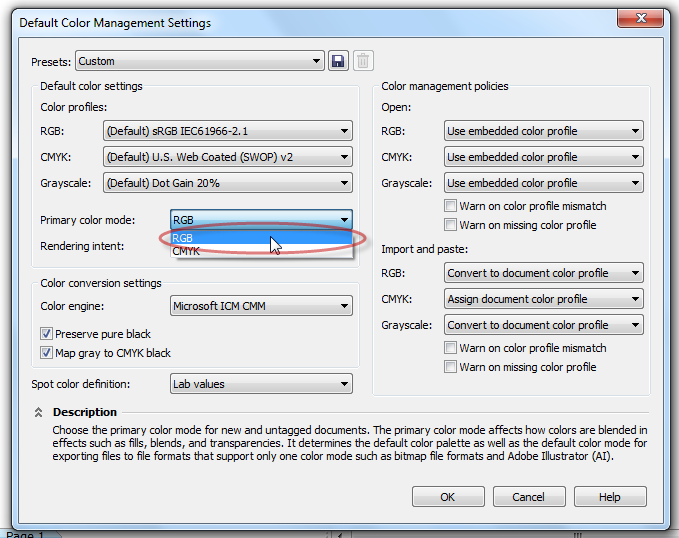
Transparency
Specifies whether transparent areas of the image should be preserved during conversion. Selecting this option adds a special index entry to the color table corresponding to transparent colors. If this option is not selected, transparent areas will be filled with a matte color (or white if no matte color is selected).
Substrate
Specifies the background color used to fill in smooth edges adjacent to transparent areas of an image. When Transparency is selected, a matte color is applied to smooth edges, which helps the edges blend into the web page background of the same color. If Transparency is not selected, the matte color is applied to transparent areas. If the "Transparency" parameter is activated, then choosing "None" will form a transparent area with a sharp border; otherwise, all transparent areas will be filled with solid white. The matte color options are only available when there is transparency in the image.
dithering
Except when Fine is selected, the color table may not contain all the colors in the image. You can use color mixing to simulate colors that are not in the table. Its essence lies in mixing pixels of available colors to simulate colors that are not included in the table. Select a blend option from the menu, and then enter a percentage value for the amount of dither. The higher this value, the more colors will be blended, but this may increase the file size. Choose from the following options:
Not
Color mixing is not performed, instead the color closest to the missing one is selected. This will result in sharp transitions between shades of colors in the image, which creates a posterization effect.
Random
Uses a diffusion method that produces less structured dither than the Pattern option. To protect the colors of an image contained in a color table from blending, select the Preserve Accurate Colors option. This is useful for keeping thin lines and text in web images.
Pattern
Uses a halftone-like square pattern to simulate colors not in the color table.
Noise
Reduces seams along the edges of sub-images. Select this option if you plan to cut the image to fit into an HTML table.
References for other products
- Color modes
- Modifying indexed color tables
- Adding a color mode change to the operation
How to convert RGB to CMYK
Has this situation happened to you? You printed an image from your computer and then saw that the colors printed on the paper were very different from those on the screen.
The fact is that on the screen you see an image in RGB, and on print in CMYK . Both names are color models or combinations of nuances and shades that create an image on your screen or on paper.
RGB stands for: Red (red), Green (green), Blue (blue) combinations of these colors are used to produce images on monitors that emit light, such as a TV or computer.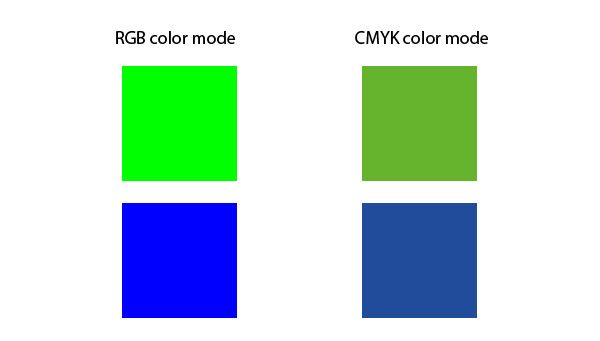 And paper does not produce light, so it uses a color combination model called CMYK : cyan (Cyan), magenta (Magenta) and yellow (Yellow). The letter K stands for black ink (BlacK), which allows you to achieve rich black color when printing.
When printing photos, there are a few differences between how RGB and CMYK images look. A computer screen uses light to recreate colors, so images look much brighter than when printed in CMYK. Therefore, if you are professionally engaged in computer design or want to print images as they look on an electronic device, then before printing you need to convert RGB to CMYK . Yes, you may think that CMYK images do not look as good as RGB images on the screen, but when printed, you will see the opposite!
Download and install Photo Converter to quickly and easily convert RGB to CMYK. Then select the image you want to convert, go to the main menu and select (Menu → Save Options → Save Format Options → Format Settings → JPG → Color Model → CMYK).