Darktable photo editor
Darktable Review | Free, Open-Source Image Editor
In this review, we’re going to take an in-depth look at Darktable – a free photo editing solution that many consider an alternative to Lightroom and other paid apps.
There are countless options for photo editing and file management software but all too often we fall into what I call the Lightroom Trap. I’ll explain what I mean in more detail shortly.
Adobe products dominate our consciousness due to their popularity, the company’s marketing strength, and the community bias towards them.
But, if you’re sick of paying for photo editing software and are looking for an alternative to Adobe, then Darktable may be for you.
(We already wrote a comparison of Darktable vs Lightroom.)
This probably raises quite a few questions for you – it did for me too! Questions such as, ‘How does it compare to what I currently have?’, ‘How good can free software be?’ and ‘Is it suitable for pro photographers?’.
Keep reading to find out the answers and much more in this Darktable review.
Table of Contents
What is Darktable?
Pros
- Excellent performance
- Wide range of functionality
- User-friendly design
- FREE!
Cons
- Confusing editing module groupings
- Could be stronger in managing shadow details
download
In a nutshell, Darktable is a free, open-source software solution for photo editing and file management.
Open source is a term used to describe software like Darktable that has been developed by a community of photography software nerds (said with the highest respect!)
Community members contribute to the development of the software as well as its ongoing functionality.
What’s more, this isn’t a closed community but an open one that encourages everyone to get involved if they have the skills. I find it quite a nice concept when compared to the alternative being a corporate monopoly.
While you may initially think that an open-source piece of software is going to be hack-built, think again! Darktable’s a great looking, robust, powerful and comprehensive post-processing tool.
Upon first glance, you’d almost mistake it for Lightroom thanks to its structured layout and appearance.
As for functionality, Darktable works as a non-destructive RAW image editing solution – meaning it makes completely reversible changes to your images. It features a full selection of functions and tools designed to support any level of a photographer.
Plus, it supports Mac OS, Windows and a bunch of other operating systems.
While Darktable is not an identical clone of Lightroom, there are a lot of similarities – most of which perform just as well and others that excel.
Plus, there are not many features that cannot compete with the performance of Adobe and other products.
All in all, Darktable is a one-stop-shop when it comes to comprehensive image editing.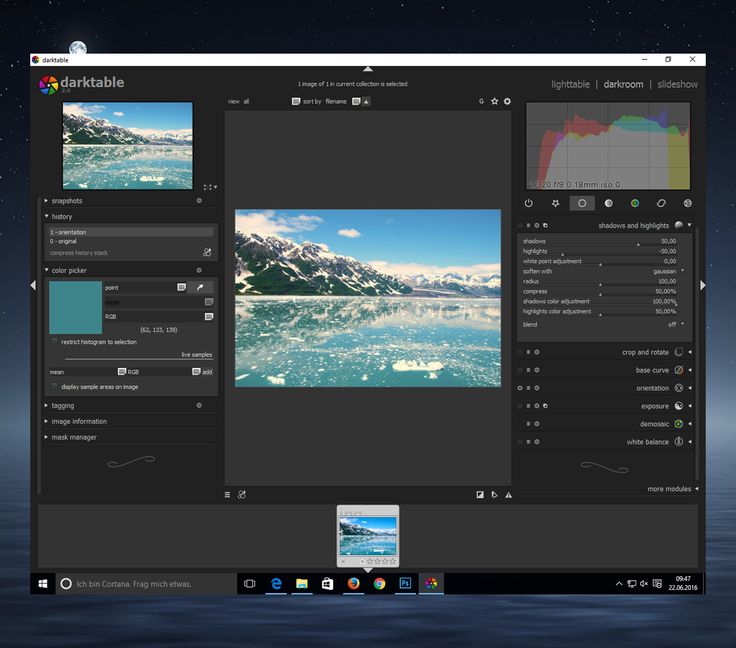
Features
- Lighttable Tab
The Lighttable tab within Darktable has a sensible layout with a comprehensive level of image information.
One of the most important elements of an efficient workflow is being able to manage your RAW files in preparation for editing.
Without this, finding your images and keeping them organised is tough and will likely result in spending far too much time searching for a lost image.
With Darktable, file management is straightforward and effective. The software has a very handy and user-friendly layout with core functions broken down into separate pages or tabs.
The first of these is the Lighttable tab that’s designated for previewing images with core information and file management.
Lighttable is broken down into three key fields on the screen. The first is the left-hand panel where you can choose where images are being imported from, how you want them to be collected in groups and core information about the image.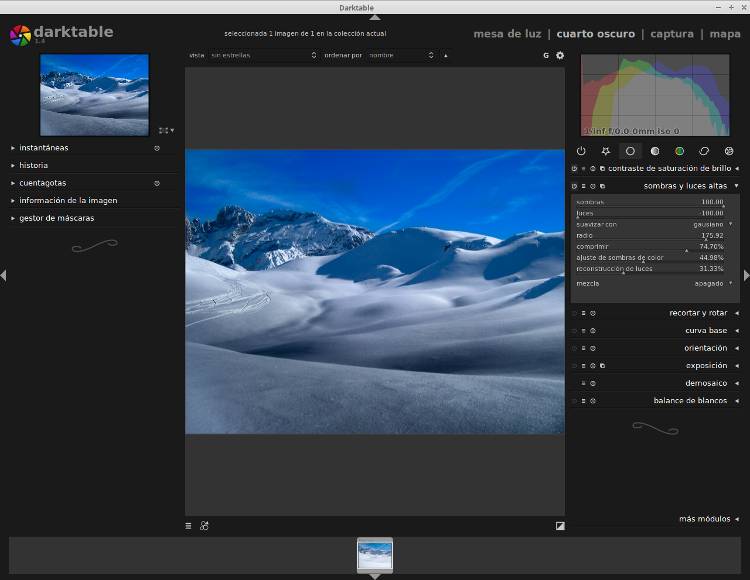
The central panel is where all of your selected images (your catalogue) will be displayed as thumbnails. You can select how many images you want to see in a grid based on the size you set the thumbnails at.
It’s in this section that you can assign a star ranking and also a colour tab to each image.
These kinds of simple flags allow you to quickly locate images or groups of images for editing or export.
To the very right of the screen is the panel with the export functions where you can control your outgoing images and information. In this panel, you have functions such as Image Selection, Metadata Editor, Tagging and Export.
The export function is incredibly important as that’s the last step in your Darktable workflow. Fortunately, the app handles export functions like a pro and allows you to select destinations, file formats and quality with ease.
Within the Lightable tab, all functions are stored within collapsable mini-menus making it easy to clean up the appearance of your desktop and only see what you need.
A small criticism here is that when hovering over a menu or function, there is no pop-up explanation. This would make it much easier for beginners learning the software.
Cataloguing and creating images is fairly minimal in Darktable compared to a lot of other RAW file editors. It could do with some increased functionality so you can create collections and drag and drop images into new collections.
I did like the ability to sort your imported files by a range of different filters.
- Darkroom Tab
The Darkroom tab within Darktable is an effective workspace for powerful image editing.
Where the Lighttable tab is all about file management, the Darkroom tab is all about RAW image editing.
This tab’s where all the action happens and is where you’re going to be spending most of your time. As a result, it’s important to get to know all the functionality of this tab.
I would highly recommend downloading the user guide – available in several languages – and take some time to get familiar with the editing processes you’re wanting to use.
While you’re on the Darktable site, take a look at the extensive list of included cameras to ensure that your camera’s colour profile is available.
In addition, the best learning tool with any sort of software is to test it out for yourself. Load up an image and start testing out what each of the editing modules does and what each area of the desktop is for.
To help out, let’s take a closer look at the Darkroom tab section-by-section as it’s broken up into key areas.
First up, the left-hand side of the screen is home to a panel that includes the image preview. Below this is a number of collapsable menus relating to image information, complete image history and the ability to add tags, to name a few.
One of the best tools on this panel is the Snapshot function. With this, you can click Snapshot and the screen will present your image split in half. One side shows the image before the current change and the other side shows the editing change.
Taking several snapshots as you progress through a thorough editing process allows you to quickly step back to see your progress.
Along the bottom of the Darkroom tab is a row of thumbnail images from the collection you’re working on. You can scroll these from left to right or hide them completely by collapsing this panel.
In fact, you can individually collapse all four sides of the tab so you only have the image in full screen.
Darktable’s full selection of editing modules will suit everyone from newbie to pro.
To the right of the Darkroom tab is the core editing panel. The workflow for the editing tools is a little confusing at first as you have to work from left to right across groups and then down to access each editing module.
The editing tools are referred to as modules, and even with trial and error, I didn’t find the layout to be as user-friendly as it could be.
The first group allows you to show active modules. This will present a list of every editing module you’ve used so far.
Further to this, you can choose to turn the module off so that the editing change literally disappears from the image. Fortunately, you can turn this back on again.
It’s another handy little tool to let you quickly see the impacts of past editing changes and determine if you want to proceed with them active.
Moving across to the next group you’ll find your favourite modules that you have selected. I especially like this option as you can build your own list of modules to really streamline your workflow when processing images.
Next, we have the meat of the operation with groups that are packed with a full complement of editing modules. The Basic group allows you to control functions like base curve, tone, exposure, crop, rotate and white balance – each of these is expandable to show controls.
The Tone Group includes contrast control and RGB level control while the Colour Group features controls for colour profiles and colour balance. Some of the modules and groupings feel a little muddled up to me.
The Correction Group is where you go to control noise, haze, sharpness and lens correction.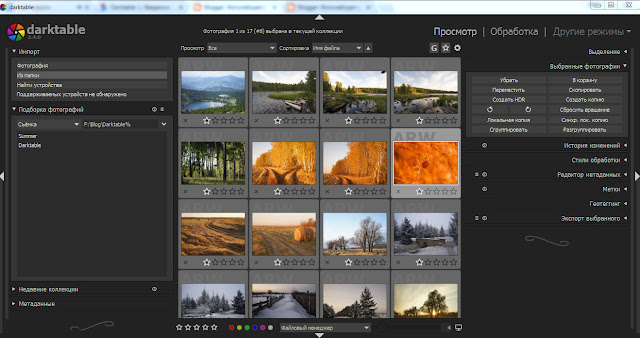 The final option is the Effects Group of modules where you can manage vignetting and masking.
The masking tools set up in Darktable are quite comprehensive with linear masking and a masking path tool for odd shapes. The latter means you can lasso a random shape and apply a mask to either the details on the inside or outside of the line.
A brilliant option in the user interface is the ability to use a parametric tool to mask an area based on its hue, luminance or brightness.
Finally, the software lets you combine masks to select sections of the image that are going to be impacted by editing changes.
Aside from the ability to build upon your own favourite group of editing tools from the existing groups, you can also add to the favourites from an extensive library of additional modules.
Overall, the collection of editing tools available in Darktable is comprehensive and delivers powerful and pro-level performance, although does have a bit of a learning curve, especially for first-time users of editing software.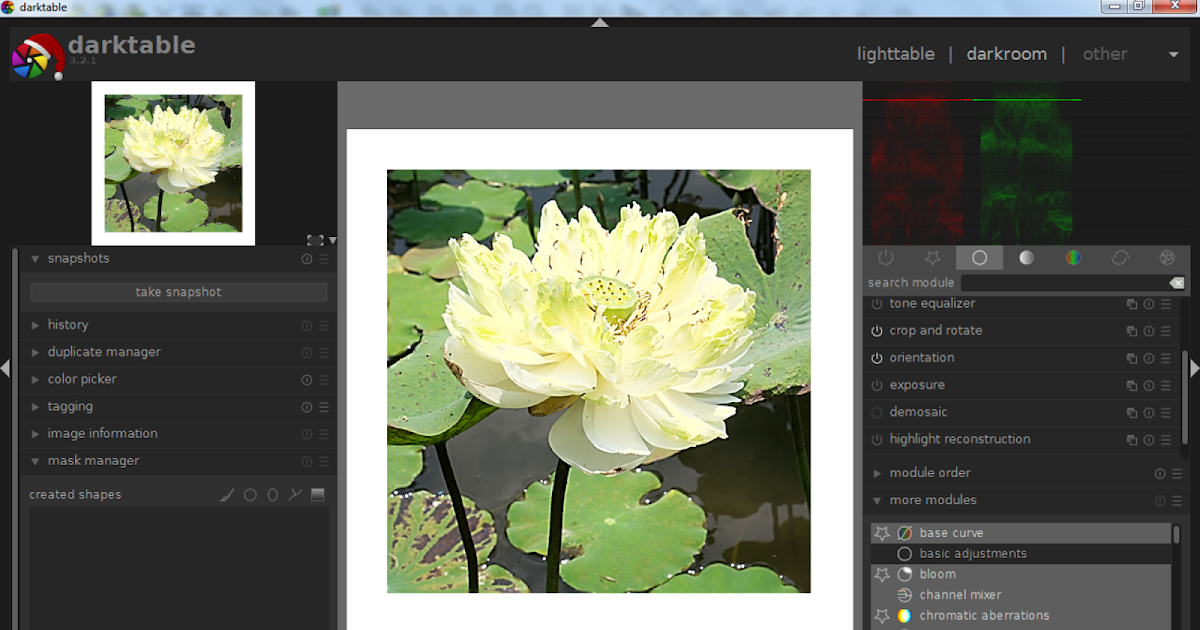
What’s more, by using features such as the Favourite group, you can create as simple or complex a workflow as you like.
The printing tab in Darktable grants precise control of printing your best images.
There is one last tab in Darktable that’s well worth a mention and that’s the one that groups Map, Print, Slideshow and Tethering. The titles are fairly self-explanatory but they’re also a great indication of just how well thought out this open-sourced software is.
The Map option will provide you with a map of the world and will show where your geotagged images were taken. This is great especially if you’re a travel photographer or want to more accurately document your travel pics.
As the name suggests, the Print option gives you full control of the Printer, Page and Print settings for those that like to print out their own work.
If you have a high-performance photo printer, then you can fine-tune the settings here to get optimal output and print quality.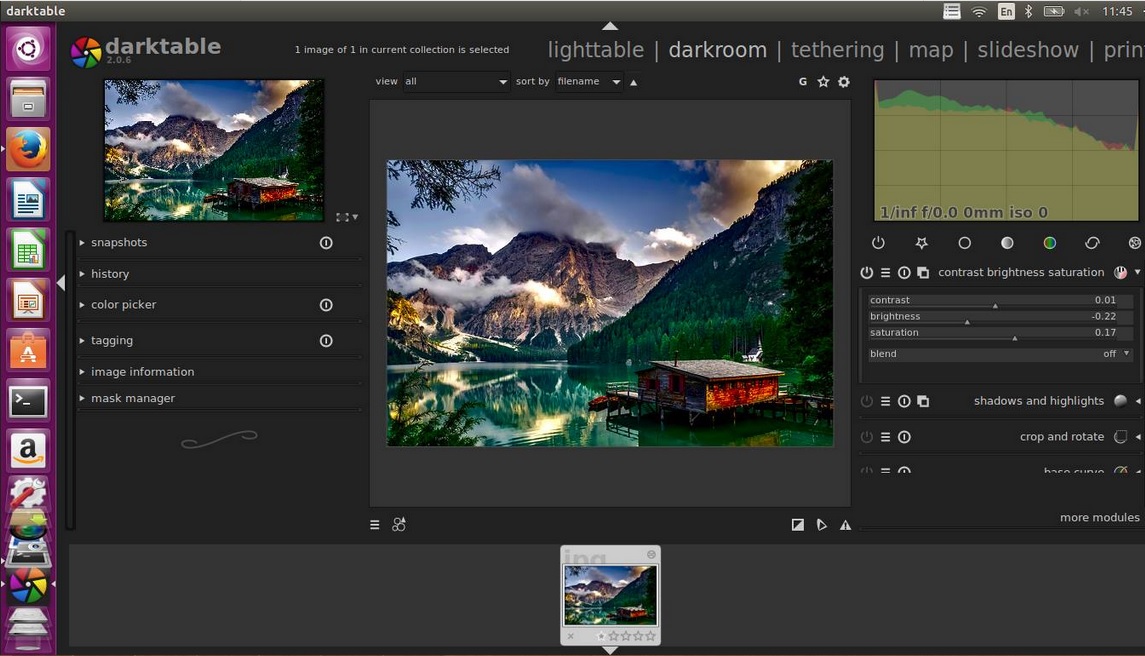
The Slideshow option will deliver a typical slideshow based on the selection or collection of images you’re working with. I was a little surprised that the software crashed twice when I was testing this function when I was only using a handful of images.
Finally, there’s the Tethering function which requires you to first connect your camera to your computer using a USB cable.
Being able to shoot live and have the images import directly into Darktable is a pro-level tool and it works much the same as importing images from a drive or SD card.
Additionally, you can use the software presets to capture time-lapse or even bracketing for HDR stacking.
Overall Performance
For a free open-source RAW image editor, Darktable is an impressive piece of software.
For a lot of professional photographers considering the jump to Darktable, one of their biggest questions is going to be about its performance. And that’s a fair question – especially when you’re editing photos for a living and need optimal performance to streamline your workflow.
Fortunately, I have good news to share about the overall performance of Darktable that will make pros think seriously about their choices.
For this Darktable review, I put it through its paces with importing, editing and exporting fairly large files out of my Fujifilm X-T3. I also tested its performance in managing batches of files in all the same situations.
Darktable handled everything I asked it to do without any noticeable issues that would have you tapping your fingers in frustration.
For reference, I am running an iMac with a 3.4 GHz Quad-Core Intel Core i5 processor, 16GB of RAM and a Radeon Pro 560 4 GB graphics card. My OS is the latest macOS Catalina.
As I discovered when I compared Darktable to Lightroom, there’s only a marginal difference in overall performance.
Outside of the comparison and for those that have never used Adobe or any other app, Darktable was fast and powerful with minimal lag time in loading images or updating them with changes.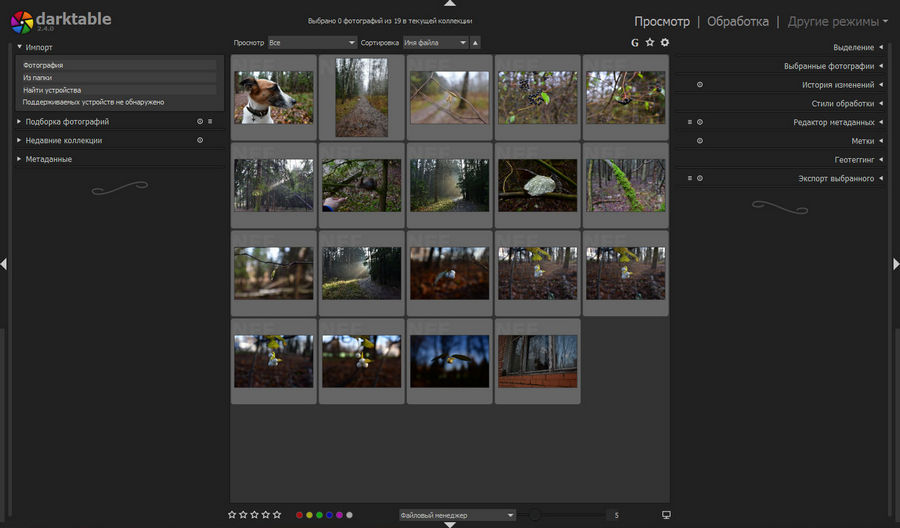
For free open-source software, that’s incredibly impressive – I take my hat off to the Darktable photography software nerds for achieving such a feat.
I promised to explain what I meant by the term Lightroom Trap. This is the state we find ourselves in when we have used a product like Lightroom for a long time and fear having to swap to something else.
However, with software like Darktable, the ability to break free from this state is made more attractive thanks to its comprehensive features and powerful performance.
Value for Money
Darktable is an open-source image editing tool that’s completely free to download and use.
The value for money analysis is pretty obvious and simple – Darktable is free! Pretty hard to compete with that even if it was a stinker…
But free doesn’t always equate to good and, in a lot of cases in life, we find that free often comes with caveats. Fortunately for you, Darktable’s list of excuses-because-it’s-free is pretty much non-existent.
As we’ve discovered, Darktable is a complete photo editing and file management solution with some powerful color correction tools to keep everyone from a beginner to an advanced photo editor happy.
Despite being free, Darktable goes toe-to-toe with most of Lightroom’s capabilities and in some cases punches above its weight.
What’s more, for those that are just starting out in photography, or those operating on a budget, Darktable is the perfect solution. Students and newbies alike can experience a fully-fledged post-processing tool that most pros would back.
Another consideration is that as Darktable is completely free, what have you got to lose?!
And this is the second reason to break from the Lightroom Trap. Like me, you probably feel that you’re paying for Adobe so you might as well make the most of it. And that may be true, especially if you also rely on Photoshop for its comprehensive features. But then again, there are alternatives for that too.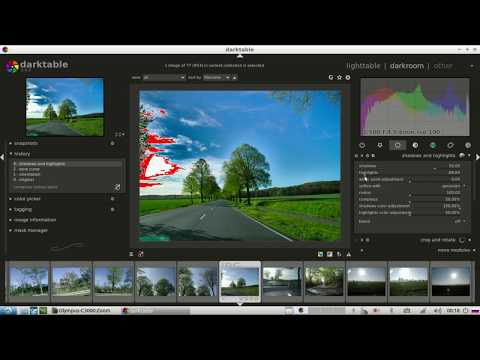
With Darktable, you can break free from monthly subscription services and have confidence that you’re getting just as good a RAW image editor for free.
Before you lay down your cash on a subscription service that includes products and benefits that you don’t want, you might as well give Darktable a shot.
Darktable Review | Conclusion
Darktable is a top-notch piece of RAW image editing software that makes a compelling argument for breaking free of the Lightroom Trap.
This comprehensive and powerful software is user-friendly, flexible and will suit those new to photography as well as seasoned professionals.
What’s more, and probably the best bit, is that it can confidently match some of the best editing platforms in the industry – all for free.
As I mentioned earlier, if you’re new to photography or looking for a change in editing tools, you’ve absolutely nothing to lose in downloading this free app.
Before long you’ll grasp and embrace all that Darktable has to offer and turn your photo editing game up a notch or two.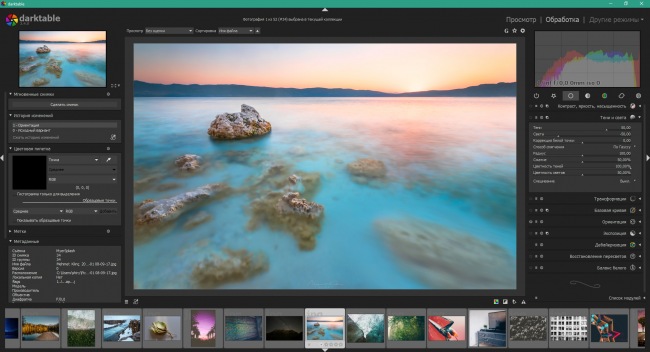
Plus, with all the money you save you can invest in more lenses – winner, winner, chicken dinner!
Darktable vs Lightroom (Is Darktable Really Just as Good?)
Today we look at Darktable vs Lightroom. In this review, I set out to see what Darktable 3.0 offers and whether it is a good Lightroom alternative.
I’m a Lightroom user, but not everyone wants to commit to an Adobe subscription package. And I can’t always get the results I want in Lightroom. So I’m always looking for a good, free photo editing program.
Image edited with Darktable.[Note: ExpertPhotography is supported by readers. Product links on ExpertPhotography are referral links. If you use one of these and buy something, we make a little bit of money. Need more info? See how it all works here.]
What is Darktable vs Lightroom?Darktable is an open-source photo post-processing program. Open source means that the software is downloadable on many operating systems. This includes Windows, iOS, and Linux. I’m a Mac user, so I’m looking at the iOS version. There are several platforms listed on the Darktable website available for download.
It is a free Lightroom alternative. It supports RAW files from over 400 cameras and opens a wide range of file types. And like Lightroom, it is non-destructive photo editing software. This means your original file is never changed.
The software manages your photos through a module called Lighttable. And the Darkroom module lets you edit photos.
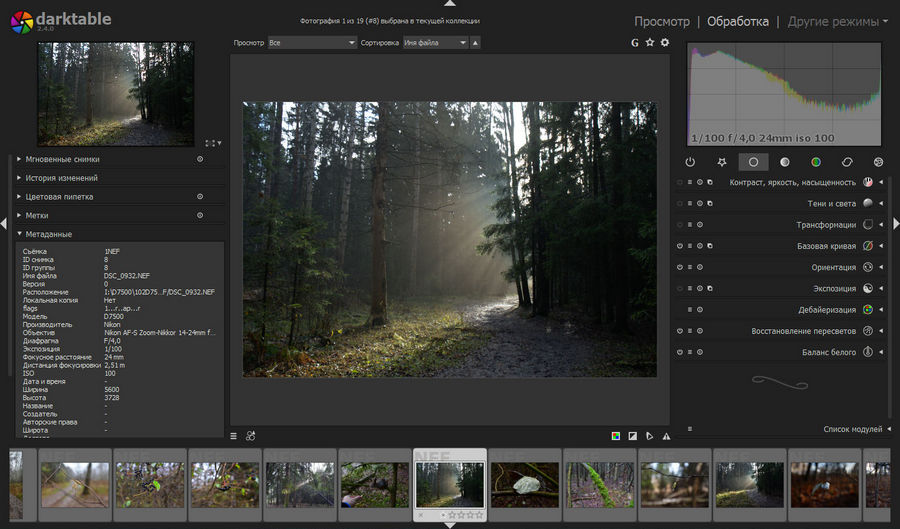
The Darktable Interface
In many ways, Darktable looks and feels like Lightroom. But there are some notable differences, which we’ll discuss later in the article.
The basic layout is familiar to Lightroom users. The image is shown on a central screen. And the left and right columns flank the central screen. These add functionality depending on the module.
History and other functions are in the left-hand column. Processing tools and a histogram are in the right-hand column.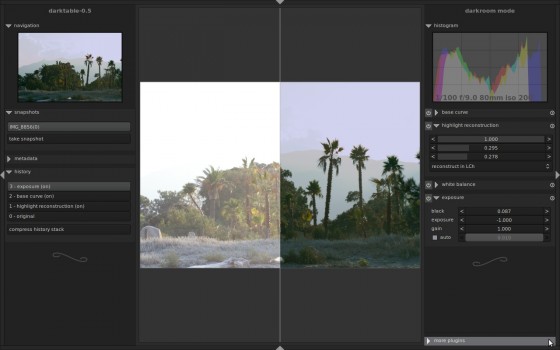 There is also an optional filmstrip below the central screen. The filmstrip may be image thumbnails of like images or a timeline of when you took the images.
I’ll focus on the Lighttable and the Darkroom modules in this review. These are alternatives to Lightroom’s Library and Develop modules.
Like Lightroom, the software is divided into modules. Lighttable is functionally like Lightroom’s Library module. This is where you can import, cull, and organize your files.
The Darkroom module is for image editing. Like Lightroom, you make changes using sliders to dial more or less of an effect. And there are further modules called Slideshow, Map, and Printing. These modules are also in Lightroom.
Darktable includes a Tethering module. This allows you to connect your camera directly to Darktable. The image shows up immediately in the program when you press the shutter button.
Lightroom also allows you to tether your camera directly to the program.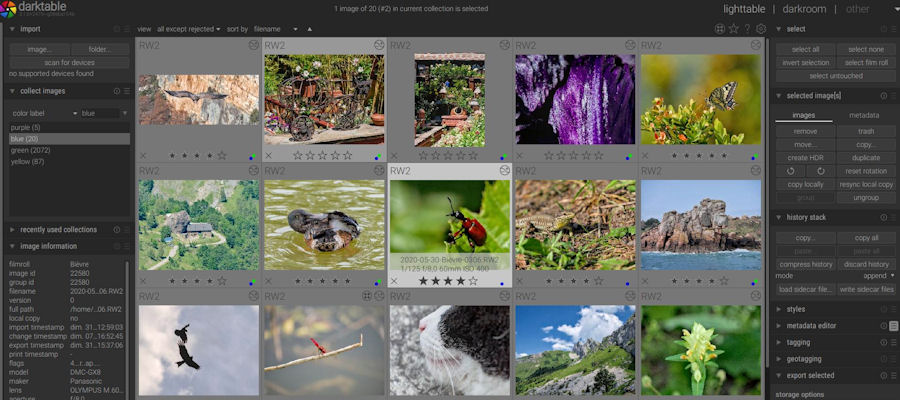 But the function is embedded under the File menu rather than a standalone module.
Lighttable vs Lightroom Library
In Lightroom’s library, catalogs, collections, and locations are in the left-hand column. Keywords and other metadata are in the right-hand column.
Screenshot of Lightroom’s Library module interface.In Darktable’s Library, metadata and collections are in the left-hand column. Functions like tagging, metadata editor, and export options are in the right-hand column.
Screenshot of Darktable’s Lighttable module interface.Importing images into Darktable is like Lightroom. There is an Import option on the top left of the Lighttable module. If importing from an SD card, you need to know exactly where your files are located.
Cataloging and Importing
Like Lightroom, Darktable only catalogs your images in the program. The files aren’t moved from where they are located on your hard drive.
Lightroom allows me to define an import location. I can move the files to different hard drives or folders within the software.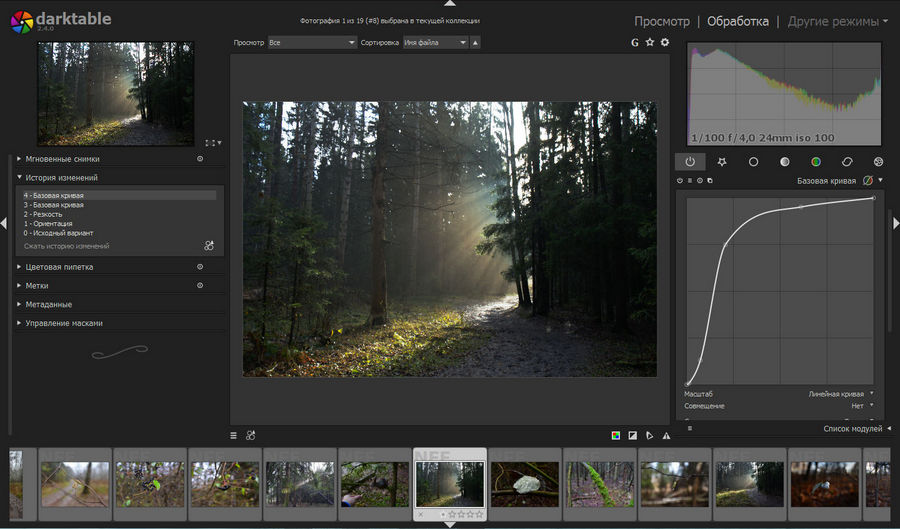 I haven’t yet figured out if this is possible in Lighttable.
When importing from my camera’s SD card, the files remain stored on the SD card. I first had to copy my camera’s SD card files onto my hard drive and then import them using Lighttable. The import seemed like Lightroom.
Rating and Tagging
Once I imported my files, I could rate the files and add keywords (tags) and metadata as I would in Lightroom.
There are hotkeys for ratings and color codings to speed up the process. I wasn’t as fast with my culling and keywording in Lighttable as in Lightroom. But this may simply be my familiarity with the software. The tools I commonly use in Lightroom seem to be available in Darktable.
The tagging function seemed a bit basic. I couldn’t find a way of tagging many images at once or copying tags across images. But that’s not to say this function doesn’t exist… just that I couldn’t find it.
Showing Focus Points
One cool feature I stumbled across in Lighttable was the ability to find focus points in your image.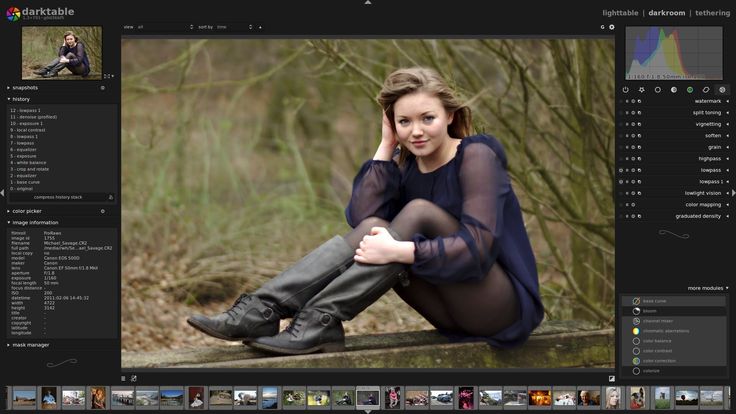 Pressing the “W” key allows you to see the image fullscreen. Pressing Cntl+W adds focus points. This could be really useful in deciding which images to keep.
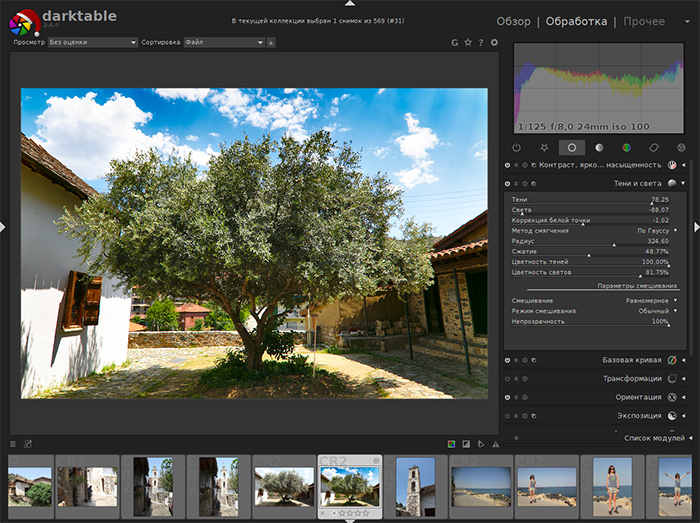
The Lighttable module seems a usable alternative to Lightroom’s Library module. Below is a screenshot of Darktable’s Lighttable screen. The parts of the image in focus are shown with a dashed red shape. Because I shot with an f/8 aperture, most of the scene is in focus.
Darktable vs Lightroom (Darkroom vs Develop Module)
Editing tools in Darktable are called “image operation modules.” I found this term confusing, so I will use the term “tools” to refer to features that change your image.
In the version I used, there were 61 tools. Commonly used tools are divided into groups designated by icons under the Histogram. The groups are Basic, Tone, Color, Correction, and Effects. The tools included in each group seem a little arbitrary.
A Favorites group (star icon) lets you place commonly used tools together.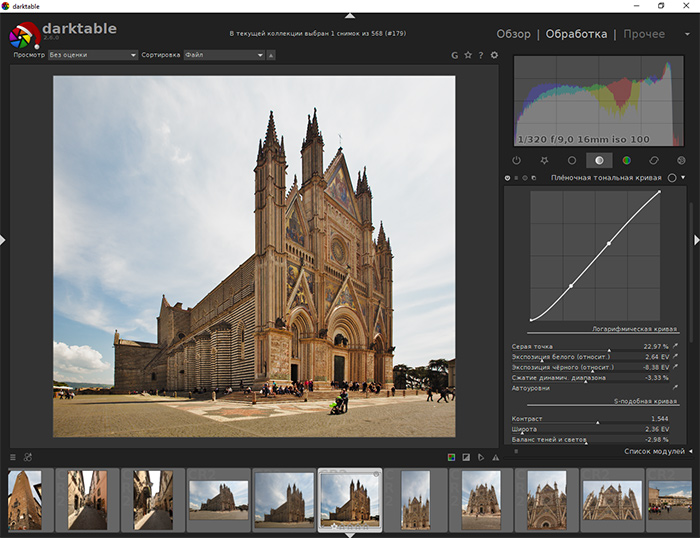 This is very useful in targeting your often-used tools. There’s also a search function that lets me get to the tools faster.
Many of the tools are familiar to Lightroom users. There are exposure control, white balance, tone curve, sharpening, and vignetting tools. Other tools will be familiar to Photoshop users. These include levels, color balance, high pass, liquify, and perspective correction.
Finally, there are a few new tools that I didn’t recognize from either Adobe program. I had fun playing with them:
- Bloom: Adds a soft light sphere over the entire image. It’s a bit like the Orton Effect.
- Framing: This lets you create a frame around my image. It is only available in Lightroom’s Print module.
- Zone System: This tool lets you edit as Ansel Adams might. You can selectively adjust nine zones of light. This tool works on color as well as black-and-white images.
One cool tool is denoise (profiled). This tool detects which camera you use and adjusts noise based on ISO. And there are blend modes for nearly every processing tool.
Image-Edit Comparison
I did a few basic edits that allowed me to compare the programs’ photo editing results directly. I kept the edits basic to allow as much image-to-image comparison as possible. Here are the edits in order:
- Lens correction
- Crop to 5:4 ratio
- Temperature: 5,500
- Contrast: +30 (+0.30)
- Highlights: -45
- Vibrance: +25 (25%)
- Exposure: +.25
This is a very rough photo edit. But it allowed me to compare the programs’ outputs. There were times Darktable tried to add other corrections. But I tried to keep the edits as fundamental as possible.
Most of the differences I saw came from the white balance edit and in the highlights. Darktable has a highlight reconstruction tool.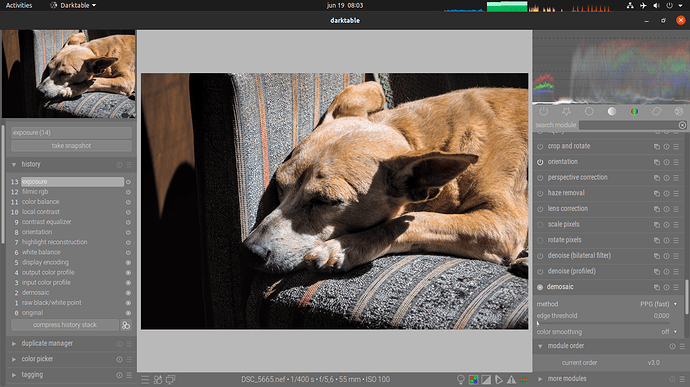 This seemed to fix the blown-out highlights better than lowering highlights.
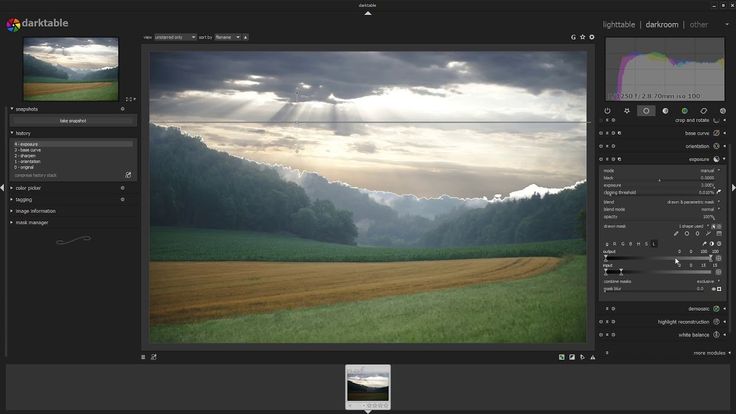
Darkroom is a viable alternative to Lightroom’s Develop module.
Image edit comparison between Darktable (left) and Lightroom (right)Darktable Usability Issues
There were a lot of things I liked about Darktable. Unfortunately, I did have some issues with Darktable repeatedly crashing. This marred an otherwise pleasant discovery.
I found Darktable easy to use, but I had to refer to the user manual quite a bit for help. There are a lot of functions you can access with keyboard shortcuts. But you’re not going to stumble upon these. You need to know what they are.
The manual is very easy to read. But the search function went to a 404 screen. So this limited usability. So I still need help figuring out how to reject an image during the culling process.
Darktable’s Sensitive Sliders
Darktable and Lightroom have a lot in common. You drag sliders left and right to increase or decrease the amount of the effect.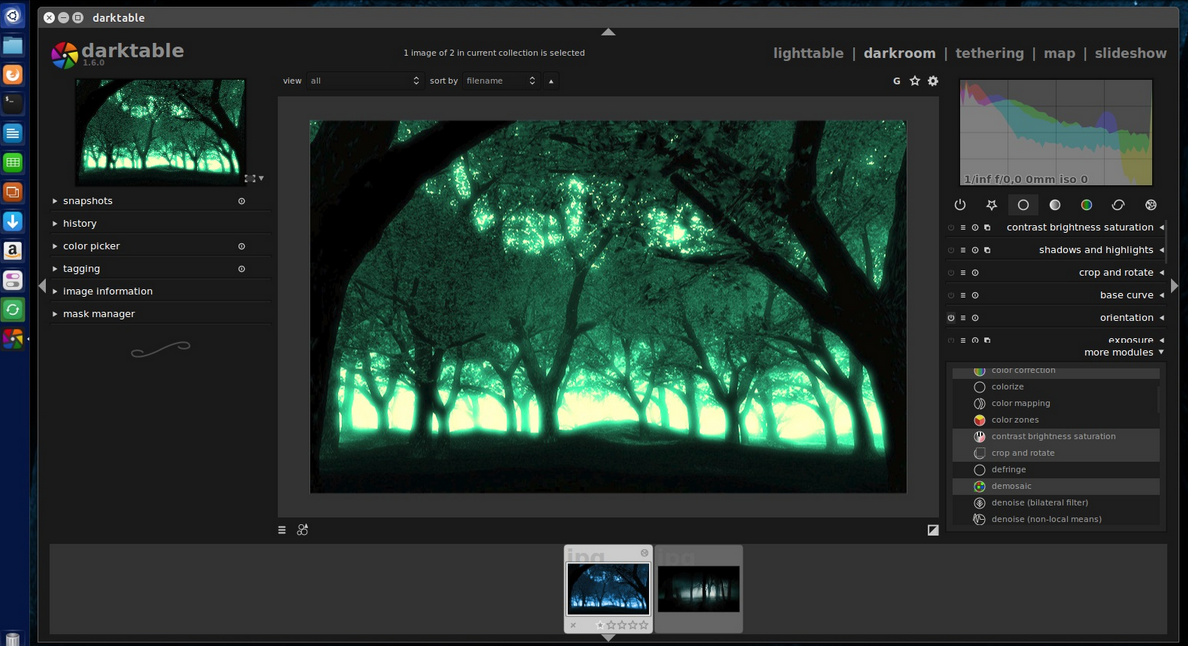 But sometimes, the values on the Darktable sliders didn’t seem to make sense, or they covered too much ground.
It wasn’t easy if I only wanted to tweak an effect by a point or two. The Darkroom slider is very sensitive. It was easy to over-adjust or under-adjust a setting.
I missed the ability to enter a value directly rather than use the slider, like in Lightroom. This was frustrating when I wanted, for instance, an exact white balance.
History Panel, Undo Command, and Rendering
The History panel befuddled me. Like Lightroom, Darktable is a non-destructive editor. At any point, you should be able to return to a point in the History panel and start again.
But sometimes, I couldn’t bypass the steps I wanted to erase. Nor could I directly delete them. I eventually figured out how to toggle effects on and off in the active module group.
Plus, the Undo command seemed to have a mind of its own. Sometimes it didn’t seem to work. Other times it went back in unpredictable partial steps.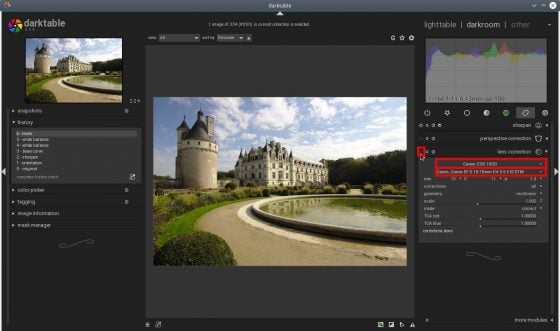 I’m sure most, if not all, of these usability issues would disappear with more time in the program.
Finally, I found Darktable took a while to render my edits. I upgraded my Mac in response to Lightroom lag, but I still had to wait to see the change… Two things might be confusing when using the tools in the Darkroom module—tool organization and choices.
Tool Organization
First, the tools are organized in unexpected ways. For instance, saturation is not located in the same place as vibrance. Also, different tools can control a similar edit.
For instance, Darkroom gives me four tools to control contrast. It seems to take this common post-processing edit to a new level.
Contrast options are embedded under other sliders, but let’s focus on these four:
- Contrast as part of the contrast, brightness, and saturation tool. This seems to be the general overall contrast slider that you’d find in Lightroom’s Basic panel.
- The local contrast tool lets you adjust contrast for highlights, shadows, midtones, and details.

- Color contrast works like color balance in Photoshop.
- The contrast equalizer tool is very cool, though I don’t fully understand what it does. In a way, it works similarly to the tone curve. It allows you to change relationships between luma, chroma, and edges.
It’s a different way of thinking about contrast. I use many sliders in Lightroom to control contrast, but most are in the Basic panel.
In Darktable, an underlying theory is probably determining which tools should be together. But I wasn’t always able to predict where I would find a tool. So this negatively impacts usability. But I’d probably get used to the tool organization.
Too Much Choice in Controls
Secondly, Darkroom gives you a lot of control. I mean a lot of control. This is not a negative for an advanced photographer. But for a beginner photographer, the amount of control may be overwhelming.
I mentioned the cool tool denoise (profiled) tool earlier. Three other tools adjust noise:
- Denoise (non-local means)
- Denoise (bilateral filter)
- Raw Denoise
For each, there are many options. In denoise (profiled), seven sliders are beside the sensor/ISO profile list. But if I wanted to clean my photo, I wouldn’t know where to start with all these choices.
This is a good example of having too many choices. Because I couldn’t decide among all the options, I chose to make no change.
Denoise (profiled) detects my camera and ISO and adjusts for noise in the image.Missing and Hard-to-Use Tools
A few tools are missing in Darktable that are included in Lightroom. It may be that I have yet to find the tools or know how to use them. So this may be more of a usability issue on my part.
I couldn’t find a tool like the HSL panel in Lightroom. So I don’t know how to alter colors selectively. I also struggled with the mask manager.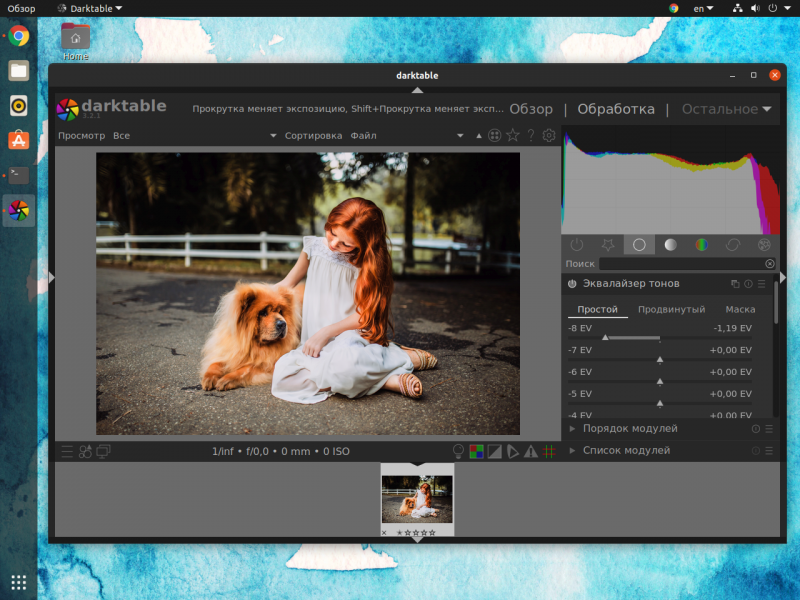 This is equal to the radial filter and gradient tools in Lightroom. I use these tools in Lightroom a lot for dodging and burning.
There is also a Spot Removal tool, but I have not yet figured out how to use it. Some tools weren’t very user-friendly, even with a good user manual.
Is Darktable as Good as Lightroom?
Let’s get to the key question I set out to answer in this article. Is Darktable as good as Lightroom? The short answer is yes.
In fact, Darktable may be better than Lightroom. It has more tools and more precise manipulations of the elements of those tools.
Longtime Lightroom users may wonder why Adobe hasn’t included some of these features. I’d vote for Adobe to immediately add the denoise (profiled) and framing options!
The processing tools are not always intuitive. But if you work with this software for a while, you’ll figure out where things are.
Is Darktable as Easy to Use as Lightroom?
This is a different question. Darktable has a learning curve. There are not as many video tutorials to help teach you how to use the program. The user manual is easy to understand, but you may need some post-processing background.
Many of the tools are broken down into parts. And you can control these independently. This is great if you’re an advanced photographer. But it was easy for me to go overboard and make a poorly edited photo. So Darktable may not be the best tool for a beginning photographer.
Conclusion
Darktable is a good Lightroom alternative for more advanced users. If you don’t want to buy into Adobe’s subscription model or use Linux, this program may also be for you. The bottom line is that this powerful program has a lot of bang for the buck… especially since the program is free!
In comparing Darktable vs Lightroom, the interface is similar. Both have a file management system, and both include image processing tools. Darktable comes out ahead in the number of tools available. But with more functionality comes more complexity.
If you’re the type who reads manuals to learn how to use a program, Darktable is for you. But for intuitive users like myself, Darktable may be a bit more frustrating at first. The tools are there. It’s just a matter of learning how to use them!
Darktable - free photo editor - an alternative to Adobe Lightroom for Windows, Mac and Linux
Any person involved in photography sooner or later must have heard the advice: you need to shoot in RAW. Once you follow it, over time you will find that files in this format are not like other traditional graphic formats. You will need special programs to open RAW and work with it. One such application is Darktable.
| Apple in Telegram and YouTube. Subscribe! |
♥ RELATED: How to take the right photo: 12 simple tips for those who want to improve the quality of their photos.
It's no secret that Adobe Lightroom is the most famous RAW image editing software.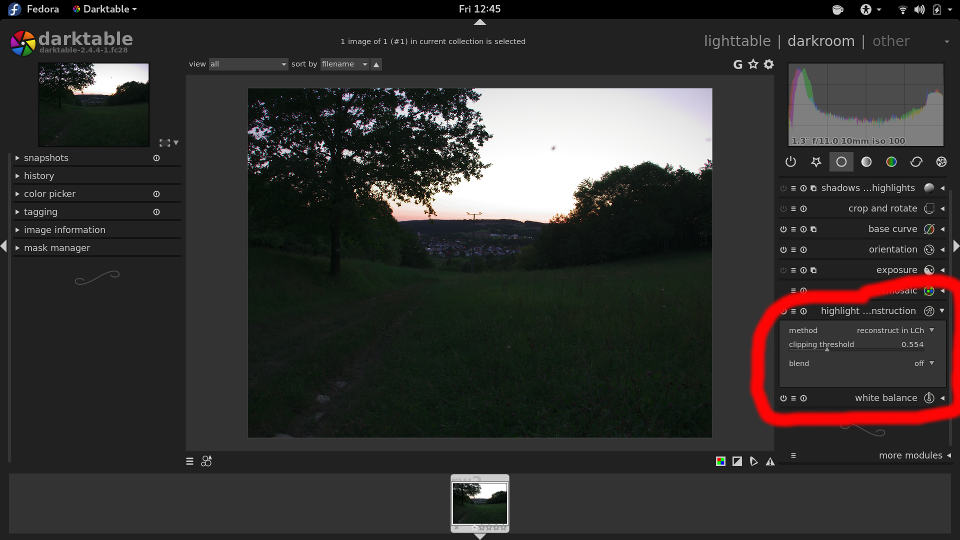 However, there are many reasons for choosing an alternative. Darktable looks like a good option - a free open source application that can act as a good replacement for Lightroom.
♥ RELATED: How to copy effects from one photo to another in Photos on iPhone.
What is Darktable?
Darktable (download for Windows, Mac and Linux here) is a program for viewing and editing RAW image files. It, in turn, is designed to store snapshot data that has not undergone any processing. The main difference from JPG is the absence of any data compression. You will not even be able to send this file to someone for later viewing.
RAW files look like a movie that hasn't been edited yet. Darktable is the place where you can do your digital photography work. This was the reason for the appearance of such a name. The main reason for using RAW and Darktable instead of the usual JPEG and GIMP is the ability to perform editing without making permanent changes to the original file. This processing of a photo is called non-destructive editing.
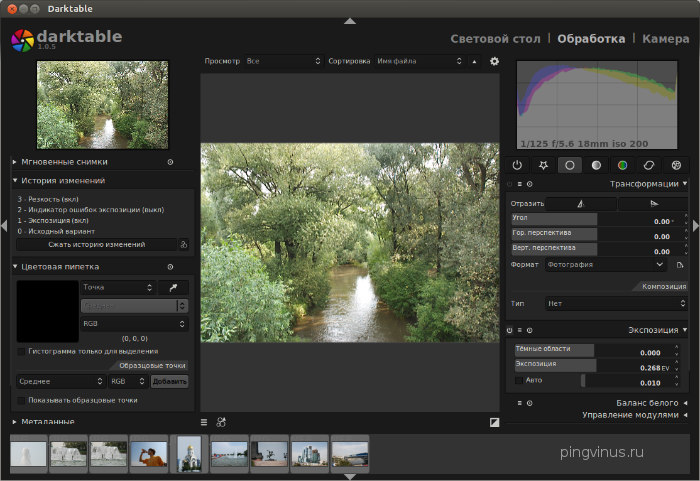
Darktable has two main workspaces: Overview and Editing .
♥ BY TOPIC: Levitagram, or how to create photos with the effect of levitation (flight) on iPhone.
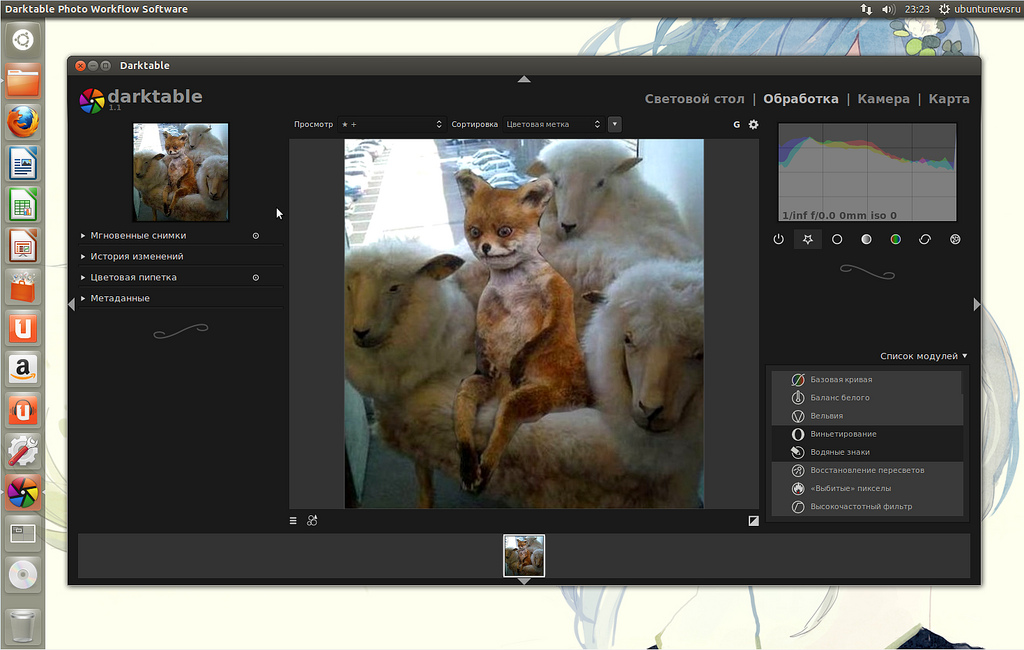
Browse Tab Features
In the Browse tab, you can export images, edit metadata, and apply tags. In this space, you can work with the names of your images and organize them.
The panel on the left side of the screen will help you import photos. You just need to take images from your camera and make collections of them. The program provides an opportunity to view detailed information about each photo.
This is only a short list of the main tasks addressed in the Review .
♥ BY TOPIC: How to find the GPS coordinates of a photo (the place where it was taken) on the iPhone.
How to export images from Darktable
A very important option of the program is its export from RAW format to a format that you can share. To do this, select the drop-down list Export images ). You can find many additional options in it, including the file name, where it is stored, format, compression level, and others.
And even if you do not change the default settings, you can still convert RAW files to JPG, which can then be sent to family members or uploaded to the Internet.
♥ BY TOPIC: How to change gender in Snapchat on photos and videos. Try it - very funny.
How to edit metadata
If you share your photos with others, it is useful to indicate the author in each picture. This is especially important if your hobby becomes a job.
In the Metadata Editor , you can create a title for each photo and put a description of what exactly is shown or happening in the picture. You can also add who took the photo, who posted it, and under what license the photo is available.
Removing metadata from photos helps protect your privacy, which is why it's so important to do this work before sharing pictures online.
♥ BY TOPIC: Free photo stock: 5 useful sites for legal download of copyright photos.
How to add tags to your photos
But for the internal organization of files, tags are very useful. With their help, you can mark which images have already been edited and which have remained untouched. Tags help separate portrait photos from landscape photos.
To add tags, go to section Tags . There are already several options available for use. But the program allows you to create your own tags or import those created earlier in another installed copy of Darktable. From this section, tags can be attached to selected photos.
♥ BY TOPIC: How to create a double in a photo (clone objects) on the iPhone.

How to geotag your photos
Many places in your travels may look the same. Using geotags, you can mark exactly where the photo was taken. You need to go to section Geotagging and add a GPX track to your image.
♥ RELATED: Color Accent: How to change individual colors in a photo to black and white on iPhone and iPad.
How to edit images in Darktable It is here that you can work on photographs, making them consistent with your visions.
On the right side of the window, you can select correction settings to improve imperfect images: sharpening blurry shots, correcting white balance, and trimming elements that may have accidentally entered the frame.
Or you can use your image and breathe new life into the frame. By adjusting the contrast, the subject can be made brighter. The sliders of the panel will allow you to experiment with colors, adjust the lighting. Effects such as motion blur and vignetting are also available here.
Darktable groups all these tasks into modules. Some of them are visible at default settings and are organized into sections: Favorites, Core Modules, Tone, Color Correction, Correction and Artistic Modules.
Section Module List lists additional solutions.
Clicking on one of the options will automatically add it to the above sections. Clicking the item again will remove it. This will allow you to easily access the features you use most and hide the ones you don't need. In this way, you can customize the application and organize the tools in it, eliminating the need to dig through the menu to complete any assigned task.
♥ BY TOPIC: How to take a photo with a plume effect (long exposure) on iPhone: 2 ways.
How to track changes
On the left side of the window, you can see a list of changes made to the current image.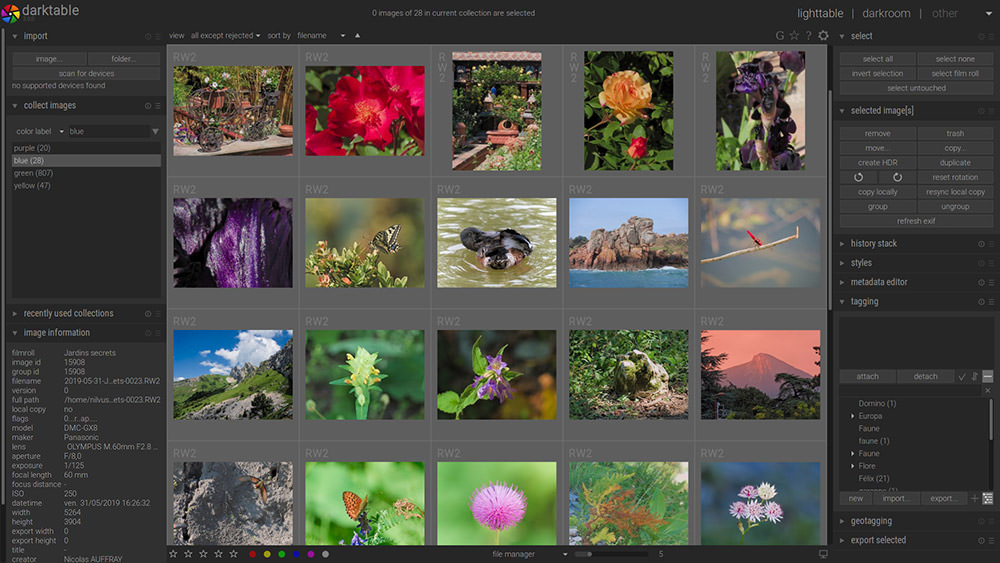 When you go to section Changelog , it may seem surprising that Darktable has already automatically applied several standard settings to your photo. But you can also cancel them by returning to the original. And while working, it is possible to create your own intermediate copies of the picture, snapshots.
♥ RELATED: 30 most famous fake photos you could believe.
More Darktable Features
Now that you've edited your photo and exported the file, you can select the Other mode, where a few more photo tools will appear.
♥ BY TOPIC: Online photo editor for free: 5 services for quick online photo editing.
Using the "Map" function in Darktable
In this section, you can use geotags to place photos on the map based on where they were taken. The card can be provided by various services. The default is OpenStreetMap, but optionally it is possible to use Google Maps.
♥ BY TOPIC: Where and how to sell photos, or how to make money on mobile photography? Top 5 photo stocks.
Using Darktable's print functions
This function allows you to print your image. Select your printer, set paper size, color profile and more. Darktable provides a preview of the picture, which allows you to see its location on a sheet of paper.
♥ BY TOPIC: How to remove red eyes from photos on iPhone or iPad without additional applications.
Using the Slideshow feature in Darktable
You don't need to download any other application to present your photo collection as a slideshow. Darktable does a great job of this. But don't expect a lot of customization options from this simple feature.
♥ BY TOPIC: Retouch on iPhone: Best photo retouching iOS apps.

Using the snap function in Darktable
Device linking in Dakrtable allows the program to connect directly to the camera. The app itself acts as a viewfinder to capture an image. Darktable uses the gphoto2 library to bind and manage devices. Keep this in mind if you encounter any problems or need to check the compatibility of the library with your camera.
♥ BY TOPIC: Bring photos to life on your iPhone: the Pixaloop app animates any photo.
Should I use Darktable?
Darktable is a great app, not only because it's free. Many other similar open source programs provide similar functionality, but do not have the same clear and simple interface.
Unlike some other applications, Darktable is a tool made by photographers for photographers. It allows you to adapt the interface to your workflow and do it in a new way every time.
This is not the only free and open source tool for photographers. And while Darktable is one of the best free RAW editors out there, there are plenty of other free apps out there to edit your photos.
See also:
- Max Asabin is a real “photoshop god”.
- How to photograph a portrait: 12 useful tips.
- Selfie2anime, or how to make an anime portrait out of a selfie.
Please rate article
Average rating / 5. Number of ratings:
No ratings yet. Rate first.
|
 The result can be exported to common formats such as JPEG and PNG. There is also the ability to control the camera, stitch panoramas, create HDR, edit geotags.
 11.2022 21:54