Define white balance in photography
What is White Balance in Photography?
Ever wondered why your subjects turn out yellow when photographing them in indoor environments? Or why your camera flash can make them appear blue? Thoroughly understanding the concept of white balance and how it works is very important in digital photography, because setting it incorrectly could ruin a picture, adding all kinds of unwanted color casts and causing skin tones to look very unnatural. In this article, we will go over the basics of white balance and color temperature, topics that can be a bit intimidating for beginners to understand.
Table of Contents
Introduction
No matter what you photograph, there is one thing you should realize about light. Not all light is created equal. I’m not talking about the quality of light, but rather the color of light. What you might see as white light from different sources can actually have different colors, or what are referred to as color temperatures. Direct sunlight at noon (which I’ll just refer to as sunlight) is considered to be a “normal” color temperature, so all light sources are compared to this as the standard. For example, light from an incandescent light bulb appears to be more orange than sunlight. On the opposite side of the spectrum, shady areas appear to be more blue than sunlight. In photography, we refer to these differences as being “warmer” (or more orange) and “cooler” (or more blue) than our neutral sunlight reference point.
So how does this apply to photography? Have you ever taken a photo that came out looking too orange or blue? When you looked at the scene with your eyes, it probably didn’t look orange or blue. It looked normal. That’s because our brains compensate for different color temperatures so that we just see normal colors.
If you are a skier or a snowboarder, try this quick experiment: put on your ski goggles and look at the snow – it should change in color tone. If you have ski goggles with a yellow tint, the snow will look yellowish. However, after you ski for a little bit, your eyes and your brain will adjust for the color and the snow should look white again. When you take off your ski goggles after skiing, the snow will look bluish in color rather than pure white for a little bit, until your brain adjusts the colors back to normal again. This example proves the fact that we are equipped with a very sophisticated color system that automatically adjusts colors in different lighting situations.
Our cameras, on the other hand, don’t automatically compensate for different color temperatures. Instead, unless you use a setting that compensates for different color temperatures (which we’ll discuss soon), cameras capture the light and color temperatures that are actually in a scene, not what your eyes see.
If an incorrect white balance setting is used in a camera, images turn out unnatural, with bad skin tones and color shifts. Here is an example of both correct and incorrect White Balance:
As you can see, the image on the left feels more natural and the skin tones look good, while the image on the right is way too orange.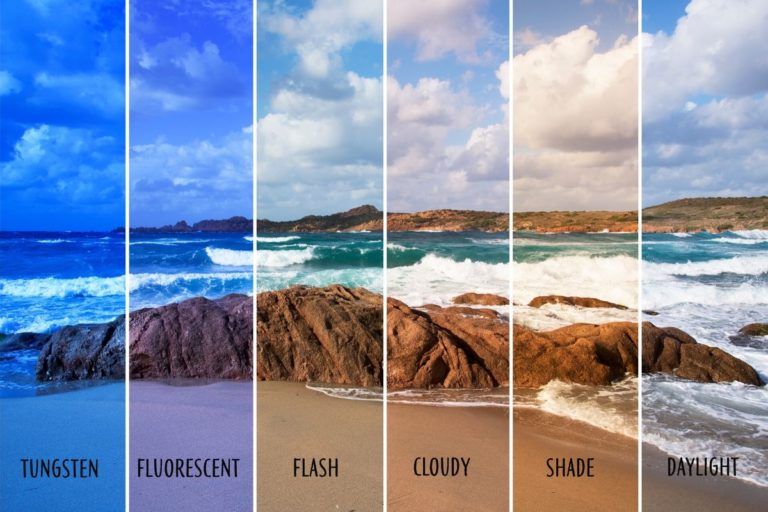 The second image clearly needs its white balance adjusted to eliminate the orange tones.
What Is Color Temperature?
Let’s talk a bit more about color temperature. Color temperature is measured in units of Kelvin (K) and is a physical property of light. There is a large margin for variance between different light sources, even if they appear to be exactly the same. For example, maybe you’ve been in a room with rows of overhead fluorescent lights and noticed that there were some bulbs that were a slightly different color than the others. Maybe they were older or a different brand of bulbs, but regardless of why, they had a different color temperature than the rest of the bulbs. Similarly, sunlight at noon can have a different color temperature than it does at sunset.
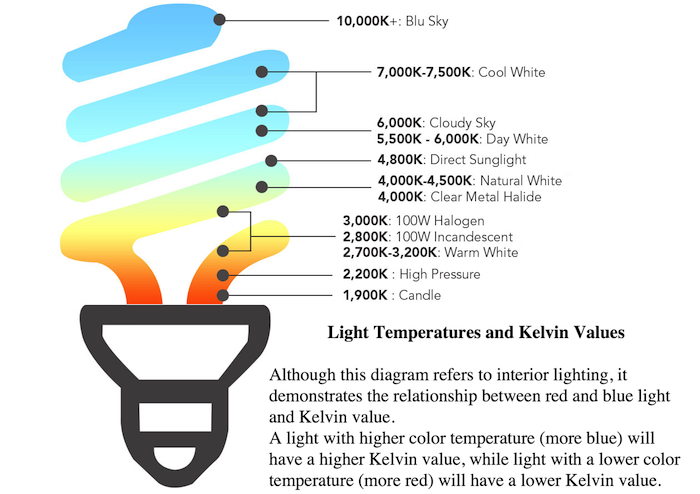
A neutral color temperature (sunlight at noon) measures between 5200-6000 K. You’ll find most external flash units come set from the factory in that range, which means they are basically trying to imitate sunlight. An incandescent light bulb (warm/orange) has a color temperature of around 3000 K, while shade (cool/blue) has a color temperature of around 8000 K. Here’s a chart that gives you a few different light sources and their typical range of Kelvin measurements:
| Light Type | Color Temperature in Kelvin (K) |
| Candle Flame | 1,000 to 2,000 |
| Household Lighting | 2,500 to 3,500 |
| Sunrise and Sunset | 3,000 to 4,000 |
| Sunlight and Flash | 5,200 to 6,000 |
| Clear Sky | 6,000 to 6,500 |
| Cloudy Sky and Shade | 6,500 to 8,000 |
| Heavily Overcast Sky | 9,000 to 10,000 |
Color Temperature of Different Light Sources
Photographically speaking, things get tricky when the scene you are photographing has multiple light sources with different color temperatures. This situation is known as mixed lighting. Take a look at the photo below:
This scene had chandeliers hanging over the tables that had incandescent bulbs in them, while indirect sunlight was coming through the windows behind me. After adjusting the white balance for the tungsten overhead lighting (which I’ll explain how to do in a bit), the sunlight that is lighting the side of the tablecloth and the flowers on the right looks blue.
Color Temperature of Different Light Conditions
It’s not just different light sources that can give you different color temperatures. Different lighting conditions can also have different color temperatures. Take a look at these two photos:
Sunlight – Sunny, Camera WB @ 5500 KSunlight – Cloudy, Camera WB @ 5500 KThey were taken only moments apart, but between the first and second image the sun went behind a cloud, creating shade and giving a cooler color temperature.![]() The light source (the sun) didn’t change, but the conditions did.
The light source (the sun) didn’t change, but the conditions did.
What is White Balance?
Now that you know what color temperature is, white balance should be fairly easy to understand. As the name suggests, white balance balances the color temperature in your image. How does it do this? It adds the opposite color to the image in an attempt to bring the color temperature back to neutral. Instead of whites appearing blue or orange, they should appear white after correctly white balancing an image.
In simpler language, white balance in digital photography means adjusting colors so that the image looks more natural. We go through the process of adjusting colors to primarily get rid of color casts, in order to try to resemble the colors in our images with reality.
The good news is, adjusting white balance is very easy. You can do it in your camera, as well as in post-processing software.
In-Camera White Balance
Most cameras come with the option to manually set or adjust white balance.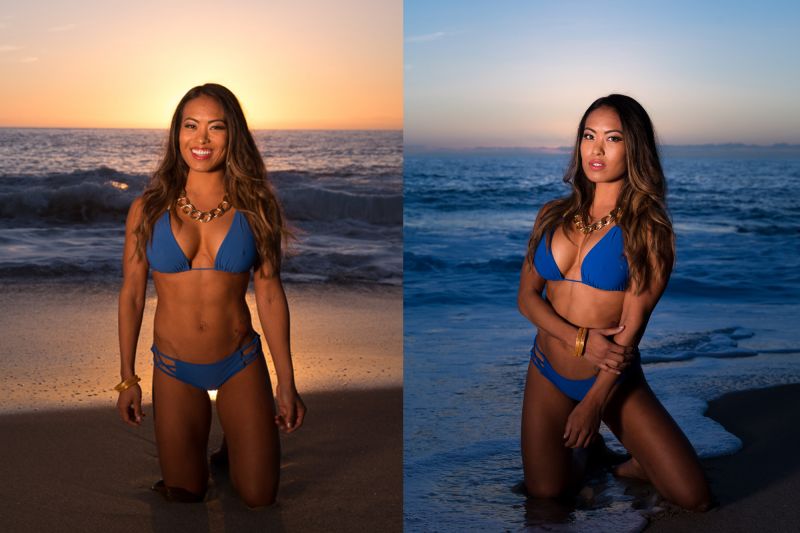 Typical settings include “sun”, “shade”, “tungsten” and “fluorescent”. Some cameras come with the option to manually set a color temperature by choosing a specific Kelvin value.
Let’s take a look at a few examples:
In the image on the left, you can see how orange the light bulbs look when I have my camera set to a neutral white balance, but once I change it to the color temperature of the bulbs (either manually or with a preset white balance), they look normal. Why is that? My camera is “cooling” down the color temperature of the bulbs by adding blue to the photo, giving us the appearance of white light. Notice that while the light bulbs now look white, the bokeh in the background now looks blue.
Still having trouble understanding what’s going on? Take a look at these images of the same scene that were taken in daylight:
Now that it’s daylight, you can see that 5500 K is the correct white balance for the color temperature. What happens if I set my white balance to 3050 K in daylight? The image turns blue! This is how much blue was added to the photo of the orange incandescent bulbs to balance the orange and make the color temperature of the incandescent light look normal.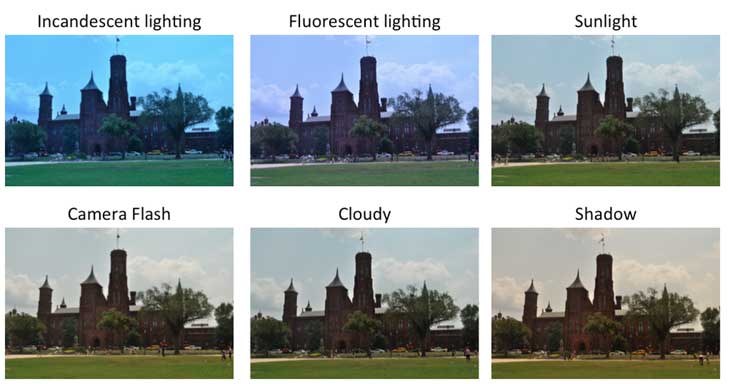
Changing WB in Camera vs In Post-Processing Software
One of the great things about digital photography is that we no longer have to use white cards and color-cast removing filters in order to get accurate colors. If you shoot in RAW format, you can easily adjust the white balance in post-processing software later (that’s because the original RAW image does not contain any colors – they get added during the RAW conversion process). The original image stays untouched and unprocessed by the camera. This means that as long as you shoot in RAW, you can simply ignore the white balance setting.
But what if you do not use RAW and shoot JPEGs instead? Then you will need to learn how to adjust white balance on your camera, since adjusting white balance later can be quite damaging to the image, and you might never be able to get the colors right. Again, in most circumstances, your camera will do a good job of guessing the correct color temperature, but there will be cases where the camera will be fooled by lighting conditions and give you bad colors.
Since I always shoot in RAW, I set my camera to “Auto White Balance” most of the time and I let the camera guess what the correct WB should be. If my camera is unable to guess the correct white balance, I simply change it in post-processing software like Lightroom later, and I can copy-paste my desired values to as many pictures as I need. This is explained in more detail further down in the article. So if you have your camera set to shoot in RAW, simply set it to Auto White Balance and you are good to go! And this is only one of the advantages of shooting in RAW. You can read about others in my RAW vs JPEG article.
How to Change White Balance in Your Camera
White balance can be changed very easily on most cameras. On most DSLR and mirrorless cameras, there should be a button that allows you to quickly change between different white balance presets. On Nikon DSLRs, for example, you will often find a “WB” button – holding that button and moving the rear dial will allow you to switch between different white balance settings, such as “Incandescent”, “Fluorescent”, “Direct Sunlight”, etc.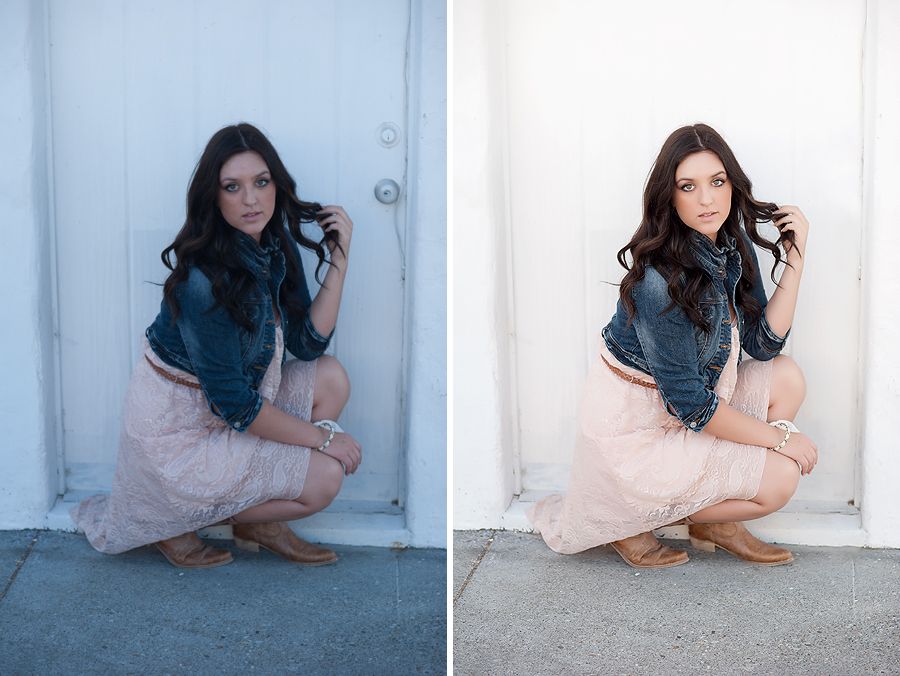 If you don’t have a white balance button, or you prefer to select white balance through your camera menu, you can often find that setting in the general “Shooting” menu. For example, if you have an entry-level Nikon DSLR, simply navigate to the “Shooting Menu” and scroll down until you get to “White Balance”. Once there, you will be presented with a number of different presets, as shown below:
Let’s go through these, one at a time.
Camera White Balance Presets
Most current digital cameras have white balance presets that are set to a certain Kelvin number by the manufacturer. These presets also vary depending on the manufacturer and camera model. Here is the list of common presets for most Nikon DSLR and mirrorless cameras:
- Auto (A) – Default WB setting and what I use all the time when I shoot RAW. The camera automatically guesses the WB depending on ambient light and use of flash. Some cameras have more than one auto setting for different environments / lighting situations.
- Incandenscent (Light Bulb) – Use it strictly under tungsten light bulbs or the image will look very blue.
- Fluorescent (Glowing Tube) – Use if photos look too green or when under fluorescent lights. Since there are many different types of fluorescent bulbs, some cameras provide several different selections for this setting.
- Direct Sunlight (Sun) – Used when shooting outdoors with the sun shining on the subject.
- Flash (Lightning Bolt) – Used when utilizing on-camera flash.
- Cloudy (Cloud) – Used in cloudy days or in shades. Will yield warmer images than sunlight.
- Shade (House with a Shadow) – Warmer than cloudy, adding orange colors to the photograph. Good for sunsets and shades.
- Choose Color Temperature (K) – Lets you manually change the Kelvin value (typically from 2,500 to 10,000).
- Preset (PRE) – Used for color matching with a white balance card.
Again, the above list might be different for your camera and I’m providing the information only as a reference.
The best way to obtain the correct white balance is through the “Preset (PRE)” setting, but you will need a white balance card (also known as “grey card”, or “18% gray card”), and your camera needs to be able to read it. If you visit your camera’s white balance menu setting, you should be able to see something that says “Preset” (Nikon) or “Custom White Balance” (Canon):
The process involves holding the white balance card in front of the camera lens in order to have the camera read the correct color temperature of the light that gets reflected from the card. Some cameras might require you to take a picture of the white balance card first, then read the colors off of it to determine the correct white balance.
Keep in mind that this is not a permanent camera setting – each time your light conditions change, you will need to re-start the process.
How to Change White Balance in Post-Processing Software
If you don’t want to worry about changing the white balance in your camera for different situations, as long as you are shooting RAW, you can always adjust the white balance of your images with post-processing software such as Adobe Photoshop or Lightroom.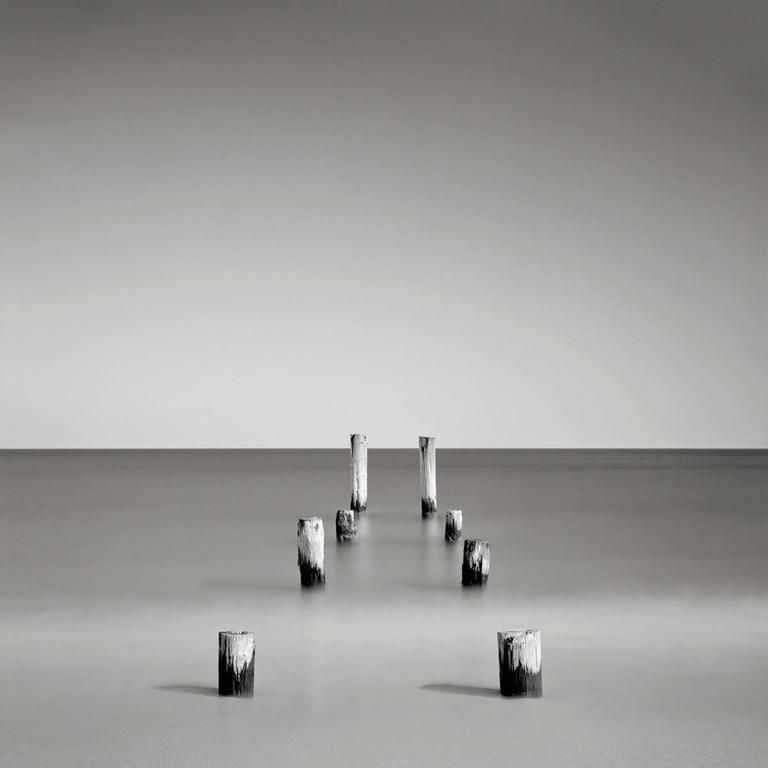 This is sometimes referred to as “color correction”. In your software you’ll probably see a panel that looks something like this:
Just like setting the white balance in your camera, you can manually set the white balance either by adjusting the temperature value or by using the eyedropper tool on the left side and clicking on a neutral or white part of the image. Similar to your camera, you can also choose a preset white balance:
Here is the same image from above, both straight out of camera and with the white balance adjusted in Lightroom. Compare it to the image where white balance adjustment was done in camera:
Remember, this is only possible if you are shooting RAW images. If you are shooting JPEG, you will be able to make slight white balance adjustments to your images but will not be able to make drastic corrections.
Here’s another example of adjusting white balance in post-processing. This photo was taken during an engagement session that started in daylight, so I set my camera to a white balance of 5500 K. As the sun started to set, the light got warmer and warmer, giving this image a very orange feel.
Now some people might like a sunset image to be this warm (it personally doesn’t bother me that much), but I thought it needed cooled down a bit to really bring out the pinks and blues in the sky, not to mention make their skin look a bit more normal. In Lightroom, I adjusted the white balance so that the temperature was at 4500 K, giving me this image which I feel looks more natural:
Sunset – Adjusted White Balance: 4500 KThe Relation Between Color Temperature and White Balance
Now that you know the difference between color temperature and white balance, you should be able to see the relationship between them. They are the opposites! Unfortunately, since photographers mainly work with white balance, we sometimes get confused when referring to color temperature values.
Personally, I almost always shoot at a fixed Kelvin of around 5500 K. When I photograph interiors that are lit by incandescent bulbs, my images all look orange. Since I shoot RAW, it’s not a problem! In Lightroom I just “cool them off” by changing my white balance to around 3000 K. For shade, I “warm up” my shady images by changing the white balance to around 6500 K. In my head, higher Kelvin values start to equate to warm light and lower Kelvin values start to equate to cool light.
But remember, I’m balancing the color temperature! What I’m actually doing is adding the opposite color temperature to my image. I’m so used to thinking of 3000 K as cool, when I see that the color temperature of an incandescent bulb listed as 3000 K, it takes me a minute to remember that the 3000 K I think of as a cool color temperature is actually a cool white balance.
So now for the big conclusion you can draw from all of this. If you set your white balance to the color temperature of the scene you’re photographing, it should look great! If you’re photographing light bulbs that have a color temperature of 3000 K and you set your camera’s white balance to 3000 K, the light should look white! Now here’s the bad part.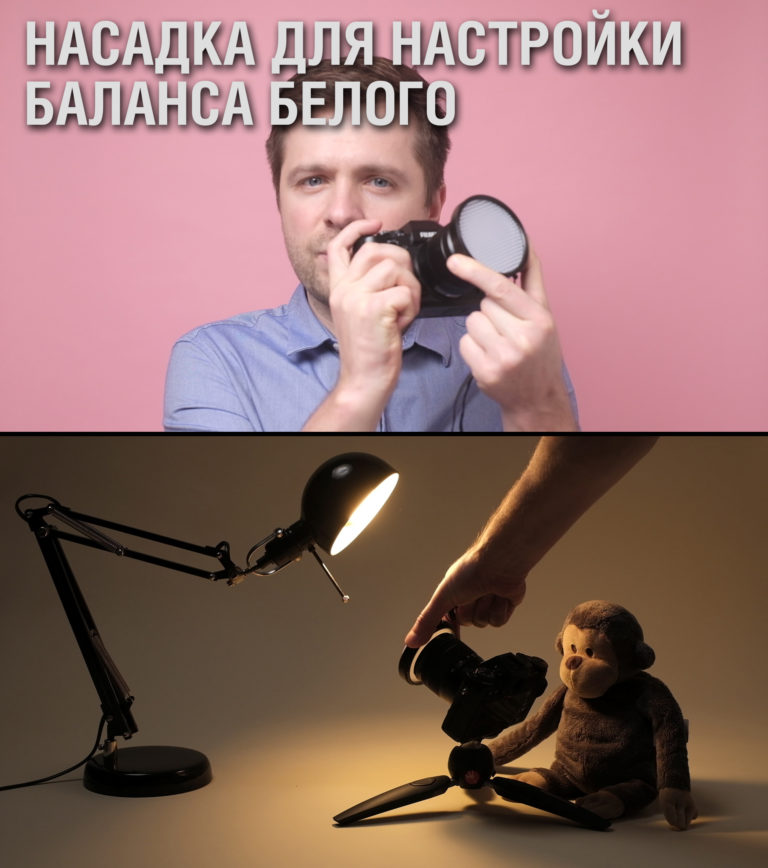 There’s really no way to measure color temperature, so you’re left approximating or adjusting in post-processing.
Using Auto White Balance
If you prefer shooting JPEG or just don’t want to worry about color correction after the image is taken, most (if not all) cameras and post-processing software come with the option to use auto white balance, or AWB. With AWB, your camera evaluates the scene that you’re photographing and decides on the best white balance to use. It will typically reference a neutral color in your scene such as white or grey to determine the correct white balance. Depending on your camera and the scene you’re photographing, your results will range from perfect to not close at all.
Using Auto White Balance In Camera
When using auto white balance in camera, your results will vary depending on the lighting conditions you’re shooting in. For example, if you’re shooting in daylight the white balance of your photos will typically look correct. Unfortunately, mixed lighting can really give AWB troubles, so you might still end up needing to adjust the white balance in post-processing software.
Even daylight can fool auto white balance. Here’s a set of images of an orange fox on a brown table that really demonstrate how inconsistent auto white balance can be without a neutral color in the image for your camera to reference:
Auto White Balance – As shot 3600 KAuto White Balance – As shot 2850 KAuto White Balance – As shot 5600 KAuto White Balance – Corrected 5600KAll of these images were photographed in the same light. You can see how much of a difference the background makes when using auto white balance. In the third image, simply adding a white background helped the camera get the correct white balance. You can see the last image is the same as the 2nd image, only with a correct white balance (adjusted in Lightroom).
Different cameras have different auto white balance capabilities. As with any technology, more recent cameras seem to be more accurate than older cameras. You’ll also typically have more advanced capabilities in more expensive cameras. That’s not to say that the AWB systems in entry-level cameras are not good. For example, my iPhone does a good job with AWB, but chances are my Nikon DSLR does a better job getting it right more consistently.
Using Auto White Balance In Post-Processing Software
Most, if not all post-processing software such as Lightroom and Capture One comes with an auto white balance option. In my experience, this is never as accurate as shooting with AWB in camera, but it can serve as a good starting point if you’re trying to adjust the white balance in your image and just can’t seem to get it right.
Here’s an example of using auto white balance in Lightroom on a simple, sunlit photo:
White Balance set in camera: 5400 KAuto White Balance in Lightroom: 4050 KI don’t know about you, but I personally don’t think Lightroom got the white balance right in this image.
Tint
In addition to color temperature, light can also have a tint. While color temperature ranges within the orange/blue spectrum, tint ranges within the green/magenta spectrum.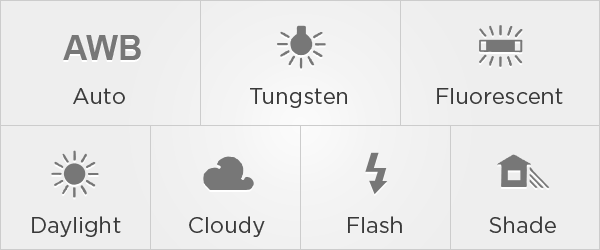 Major tint adjustments are typically not necessary when color correcting images taken in daylight. If you tend to photograph subjects that are lit by artificial light sources such as tungsten, fluorescent, LED or mercury vapor lights, you’ll find yourself adjusting tint much more than with natural light.
Here’s an example of a scene that was lit by fluorescent lights:
Fluorescent Light – Temperature: 4450 K, Tint: -5Fluorescent Light – Temperature: 4450 K, Tint: +50You can see that the first image has a very strong green tint. By changing the tint (adding magenta) but leaving the color temperature untouched, the white balance has been corrected.
Tint is not meant to compensate for color that is reflected onto your subject from nearby objects, such as in this image:
I photographed the model while she was facing a green door specifically to demonstrate this scenario. Although the white balance in the image is correct, there is a green tint to the shadow side of her face that has nothing to do with color temperature.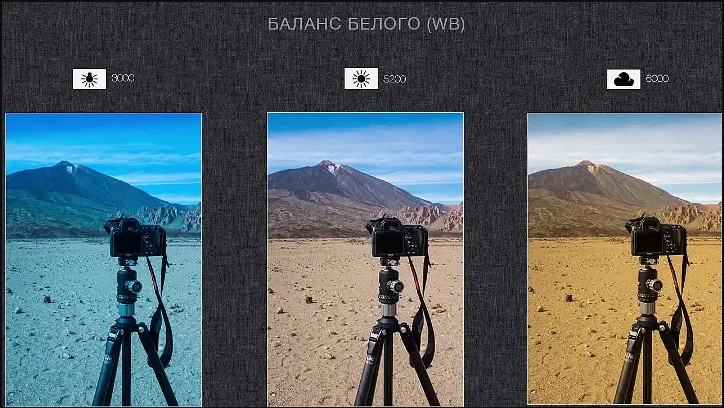 It is a reflection of light off of the green door and can not be corrected by adjusting the tint of the image.
Just like reflected light that has picked up a color cast, colored or gelled lights on your subject are also not easily corrected by adjusting the tint of your image. For example, this image from a New Year’s Eve wedding has everything you’d want in an image taken at the stroke of midnight: streamers, celebrating, happy green faces on the bride and groom… wait, what?
NIKON D810 + 35mm f/1.4 @ 35mm, ISO 1600, 1/160, f/1.4Unfortunately, this is not something that can be fixed by adjusting the white balance. Fortunately, it still looks pretty good in black and white.
NIKON D810 + 35mm f/1.4 @ 35mm, ISO 1600, 1/160, f/1.4Consistency (or lack thereof) Between Camera Makes and Models
As if getting the white balance correct between all of your images wasn’t difficult enough, using different cameras while photographing the same scene introduces a whole new dimension of complexity. This is something that wedding photographers know all too well since they typically work with another photographer who rarely has the same make and model of camera, but it’s something any photographer who works with more than one camera will encounter.
Take a look at these sets of images, taken in the exact same light but with different cameras:
Nikon D800 – Temperature: 7150 K, Tint: +14Nikon D810 – Temperature: 7150 K, Tint: +14Below each image, you can see what my white balance and tint were set to in Lightroom. Notice that, although they are identical, the images look completely different! This tells you that different camera models, even if they’re from the same manufacturer, affect the final look of the image. The reason for this lies in the software used for RAW processing. What does that mean for you if you use different cameras? It means that if you want to copy the white balance settings from one image and paste them onto another that was taken with a different camera make or model, your final images might not look the same.
Creative Uses
Keep in mind that as photographers, we get to decide what colors look more natural or more attractive to our eyes. This means that occasionally, you might want to practice your “artistic license” to give an image a completely different look and feel. For example, take a look at the below two images:
The image on the left is how it came out of my camera and the image on the right is how it looks after I changed WB to “Tungsten” in Lightroom. The image on the left looks a bit too dull for me, while the image on the right looks has plenty of color contrast. I like the blue color in the water and the fact that the mountains stand out, which gives the image a whole different look.
White Balance FAQ
What does it mean to white balance?
In photography, while balance is the process of adjustment of colors to make them appear more natural in images. These adjustments can be carried out in-camera, as well as during post-processing.
How does one change white balance?
Most cameras provide an easy way to change white balance. While higher-end cameras typically have a dedicated button for changing white balance, lower-end models might have a menu setting for adjusting white balance settings.
Why is white balance important?
Getting natural-looking colors and skin tones in images is very important because it might be impossible to fix it later (especially if the image was shot in a lossy format like JPEG.
How does white balance affect a photo?
White balance can significantly affect global colors in an image. If it is set incorrectly, it can either make the image look too cool (more blue), or too warn (more orange).
Should I use Auto White Balance?
If you shoot in RAW format, using the Auto White Balance setting is perfectly safe, because it can be changed later in post-processing software.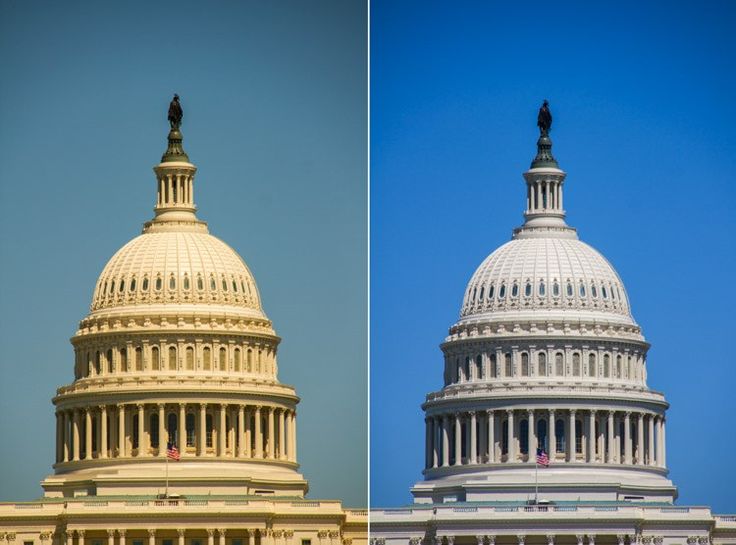 If you shoot in JPEG format, Auto White Balance should work well in normal lighting conditions when using a modern digital camera. However, when shooting in mixed light or in challenging lighting conditions, Auto White Balance might produce mixed results.
How do you get perfect white balance?
The best way to get perfect white balance each time is to use an 18% gray card with a camera that can measure reflected light off of it and accurately set white balance.
What should white balance be set at?
It depends on lighting conditions. If you don’t know what to set white balance to, set it to “Auto” (Auto White Balance).
Is white balance the same as exposure?
No. Exposure is how much light reaches your sensor and how bright or dark your photo ends up being, whereas white balance has to do with colors and how warm, cool, or natural your image looks. You might have a perfectly exposed photo that is also poorly white balanced.
Conclusion
As long as you shoot in RAW, knowing the color temperature of different light sources is not that important. Simply understanding the basic concept of color temperature should be enough for most photographers. What is important, is knowing how and when to adjust white balance, either in-camera before you capture it, or in post-processing software afterward.
Once you get comfortable adjusting the white balance of your images, you can start to use white balance creatively in your images, either warming them up or cooling them down to change the feel of the entire scene.
Understanding White Balance
White balance (WB) is the process of removing unrealistic color casts, so that objects which appear white in person are rendered white in your photo. Proper camera white balance has to take into account the "color temperature" of a light source, which refers to the relative warmth or coolness of white light. Our eyes are very good at judging what is white under different light sources, but digital cameras often have great difficulty with auto white balance (AWB) — and can create unsightly blue, orange, or even green color casts. Understanding digital white balance can help you avoid these color casts, thereby improving your photos under a wider range of lighting conditions.
→
BACKGROUND: COLOR TEMPERATURE
Color temperature describes the spectrum of light which is radiated from a "blackbody" with that surface temperature. A blackbody is an object which absorbs all incident light — neither reflecting it nor allowing it to pass through. A rough analogue of blackbody radiation in our day to day experience might be in heating a metal or stone: these are said to become "red hot" when they attain one temperature, and then "white hot" for even higher temperatures. Similarly, blackbodies at different temperatures also have varying color temperatures of "white light." Despite its name, light which may appear white does not necessarily contain an even distribution of colors across the visible spectrum:
Relative intensity has been normalized for each temperature (in Kelvins).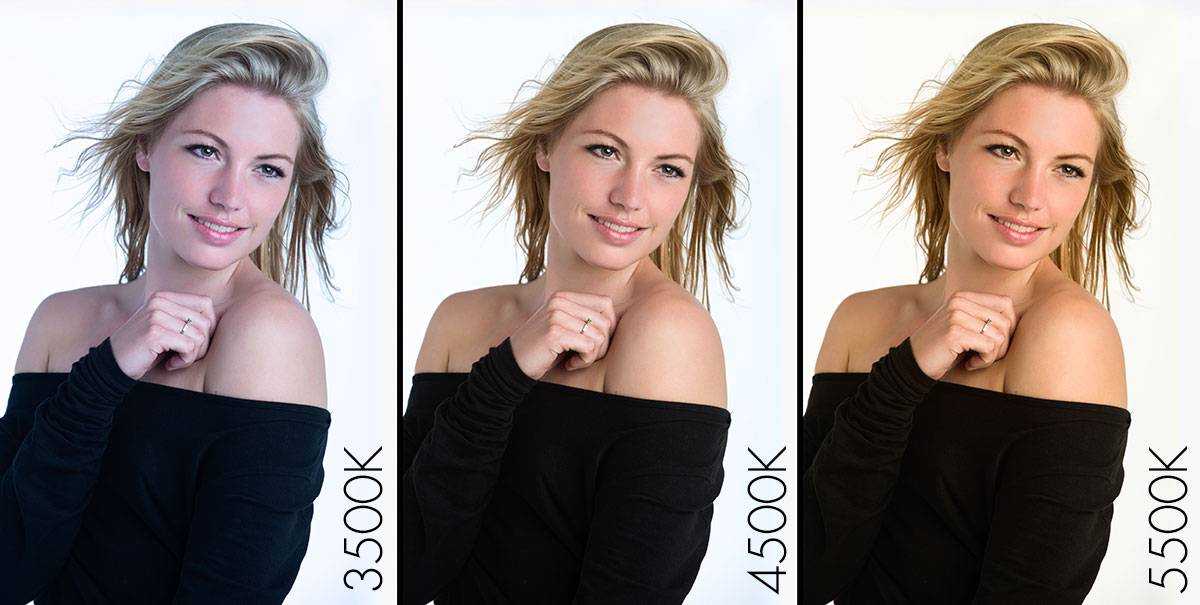
Note how 5000 K produces roughly neutral light, whereas 3000 K and 9000 K produce light spectrums which shift to contain more orange and blue wavelengths, respectively. As the color temperature rises, the color distribution becomes cooler. This may not seem intuitive, but results from the fact that shorter wavelengths contain light of higher energy.
Why is color temperature a useful description of light for photographers, if they never deal with true blackbodies? Fortunately, light sources such as daylight and tungsten bulbs closely mimic the distribution of light created by blackbodies, although others such as fluorescent and most commercial lighting depart from blackbodies significantly. Since photographers never use the term color temperature to refer to a true blackbody light source, the term is implied to be a "correlated color temperature" with a similarly colored blackbody. The following table is a rule-of-thumb guide to the correlated color temperature of some common light sources:
| Color Temperature | Light Source |
| 1000-2000 K | Candlelight |
| 2500-3500 K | Tungsten Bulb (household variety) |
| 3000-4000 K | Sunrise/Sunset (clear sky) |
| 4000-5000 K | Fluorescent Lamps |
| 5000-5500 K | Electronic Flash |
| 5000-6500 K | Daylight with Clear Sky (sun overhead) |
| 6500-8000 K | Moderately Overcast Sky |
| 9000-10000 K | Shade or Heavily Overcast Sky |
IN PRACTICE: JPEG & TIFF FILES
Since some light sources do not resemble blackbody radiators, white balance uses a second variable in addition to color temperature: the green-magenta shift.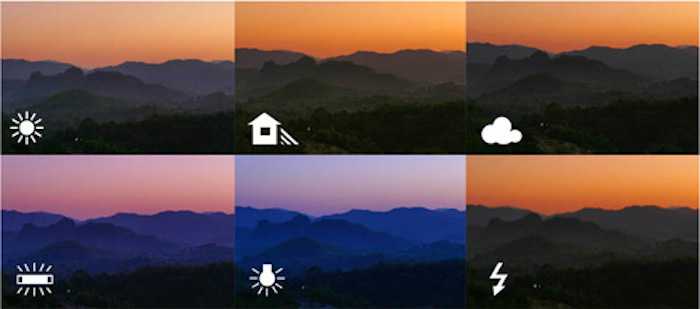 Adjusting the green-magenta shift is often unnecessary under ordinary daylight, however fluorescent and other artificial lighting may require significant green-magenta adjustments to the WB.
| Auto White Balance | |
| Custom | |
| Kelvin | |
| Tungsten | |
| Fluorescent | |
| Daylight | |
| Flash | |
| Cloudy | |
| Shade |
Fortunately, most digital cameras contain a variety of preset white balances, so you do not have to deal with color temperature and green-magenta shift during the critical shot. Commonly used symbols for each of these are listed to the left.
The first three white balances allow for a range of color temperatures. Auto white balance is available in all digital cameras and uses a best guess algorithm within a limited range — usually between 3000/4000 K and 7000 K. Custom white balance allows you to take a picture of a known gray reference under the same lighting, and then set that as the white balance for future photos. With "Kelvin" you can set the color temperature over a broad range.
The remaining six white balances are listed in order of increasing color temperature, however many compact cameras do not include a shade white balance. Some cameras also include a "Fluorescent H" setting, which is designed to work in newer daylight-calibrated fluorescents.
The description and symbol for the above white balances are just rough estimates for the actual lighting they work best under. In fact, cloudy could be used in place of daylight depending on the time of day, elevation, or degree of haziness. In general, if your image appears too cool on your LCD screen preview (regardless of the setting), you can quickly increase the color temperature by selecting a symbol farther down on the list above. If the image is still too cool (or warm if going the other direction), you can resort to manually entering a temperature in the Kelvin setting.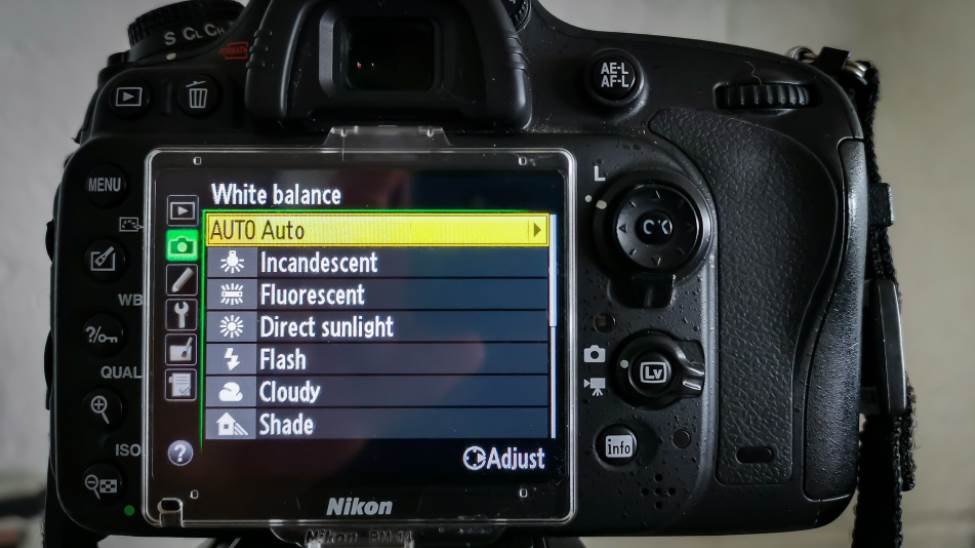
If all else fails and the image still does not have the correct WB after inspecting it on a computer afterwards, you can adjust the color balance to remove additional color casts. Alternatively, one could click on a colorless reference (see section on neutral references) with the "set gray point" dropper while using the "levels" tool in Photoshop. Either of these methods should be avoided since they can severely reduce the bit depth of your image.
IN PRACTICE: THE RAW FILE FORMAT
By far the best white balance solution is to photograph using the RAW file format (if your camera supports them), as these allow you to set the WB *after* the photo has been taken. RAW files also allow one to set the WB based on a broader range of color temperature and green-magenta shifts.
Performing a white balance with a raw file is quick and easy. You can either adjust the temperature and green-magenta sliders until color casts are removed, or you can simply click on a neutral reference within the image (see next section). Even if only one of your photos contains a neutral reference, you can click on it and then use the resulting WB settings for the remainder of your photos (assuming the same lighting).
CUSTOM WHITE BALANCE: CHOOSING A NEUTRAL REFERENCE
A neutral reference is often used for color-critical projects, or for situations where one anticipates auto white balance will encounter problems. Neutral references can either be parts of your scene (if you're lucky), or can be a portable item which you carry with you. Below is an example of a fortunate reference in an otherwise bluish twilight scene.
On the other hand, pre-made portable references are almost always more accurate since one can easily be tricked into thinking an object is neutral when it is not. Portable references can be expensive and specifically designed for photography, or may include less expensive household items. An ideal gray reference is one which reflects all colors in the spectrum equally, and can consistently do so under a broad range of color temperatures. An example of a pre-made gray reference is shown below:
Common household neutral references are the underside of a lid to a coffee or pringles container. These are both inexpensive and reasonably accurate, although custom-made photographic references are the best (such as the cards shown above). Custom-made devices can be used to measure either the incident or reflected color temperature of the illuminant. Most neutral references measure reflected light, whereas a device such as a white balance meter or an "ExpoDisc" can measure incident light (and can theoretically be more accurate).
Care should be taken when using a neutral reference with high image noise, since clicking on a seemingly gray region may actually select a colorful pixel caused by color noise:
Low Noise
(Smooth Colorless Gray)
High Noise
(Patches of Color)
If your software supports it, the best solution for white balancing with noisy images is to use the average of pixels with a noisy gray region as your reference.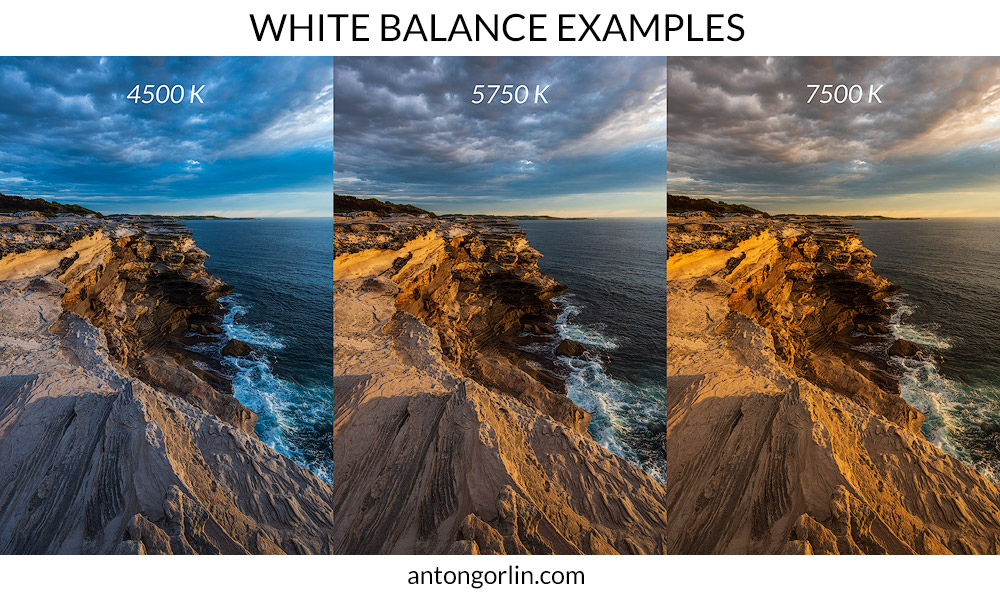 This can be either a 3x3 or 5x5 pixel average if using Adobe Photoshop.
NOTES ON AUTO WHITE BALANCE
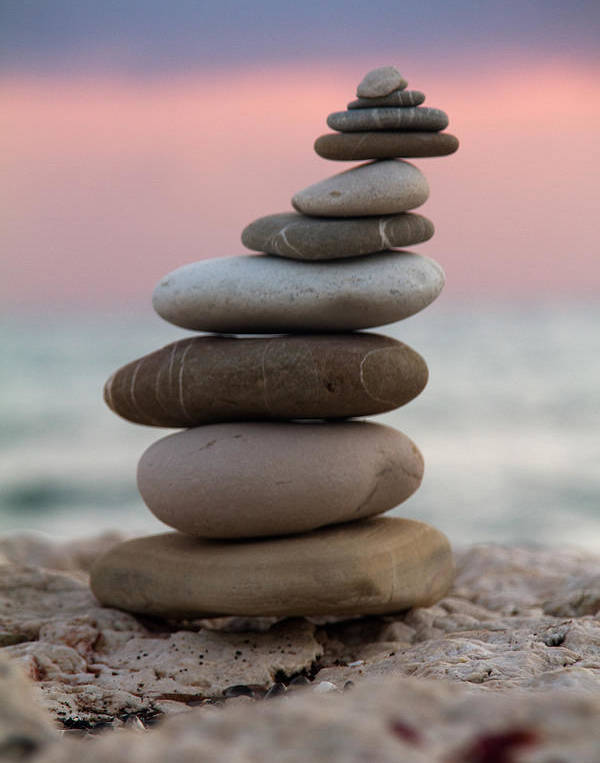
Certain subjects create problems for a digital camera's auto white balance — even under normal daylight conditions. One example is if the image already has an overabundance of warmth or coolness due to unique subject matter. The image below illustrates a situation where the subject is predominantly red, and so the camera mistakes this for a color cast induced by a warm light source. The camera then tries to compensate for this so that the average color of the image is closer to neutral, but in doing so it unknowingly creates a bluish color cast on the stones. Some digital cameras are more susceptible to this than others.
(Custom white balance uses an 18% gray card as a neutral reference.)
A digital camera's auto white balance is often more effective when the photo contains at least one white or bright colorless element. Of course, do not try to change your composition to include a colorless object, but just be aware that its absence may cause problems with the auto white balance.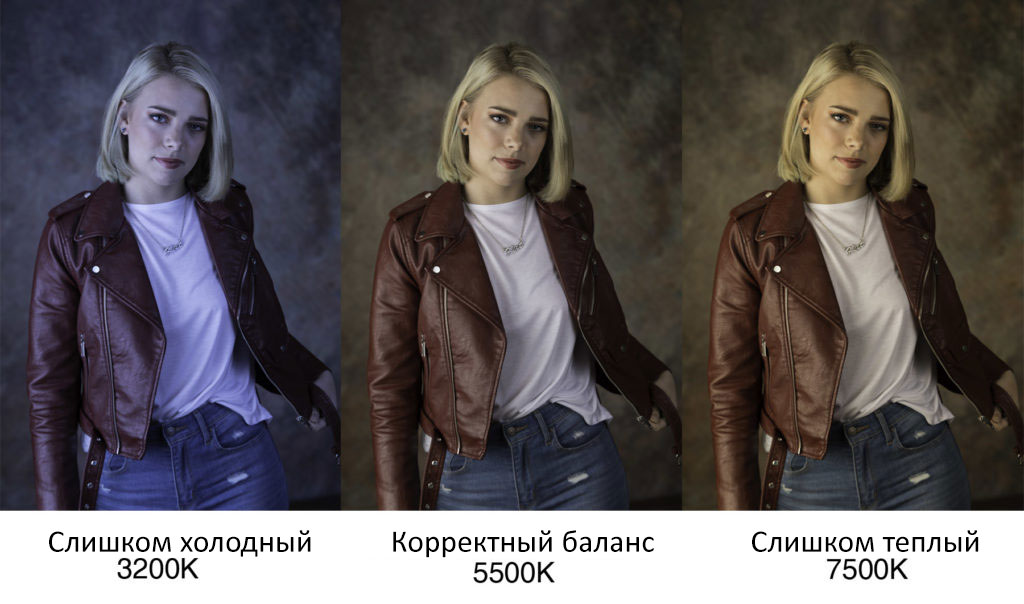 Without the white boat in the image below, the camera's auto white balance mistakenly created an image with a slightly warmer color temperature.
IN MIXED LIGHTING
Multiple illuminants with different color temperatures can further complicate performing a white balance. Some lighting situations may not even have a truly "correct" white balance, and will depend upon where color accuracy is most important.
| Reference: | Moon | Stone |
Under mixed lighting, auto white balance usually calculates an average color temperature for the entire scene, and then uses this as the white balance. This approach is usually acceptable, however auto white balance tends to exaggerate the difference in color temperature for each light source, as compared with what we perceive with our eyes.
Exaggerated differences in color temperature are often most apparent with mixed indoor and natural lighting. Critical images may even require a different white balance for each lighting region.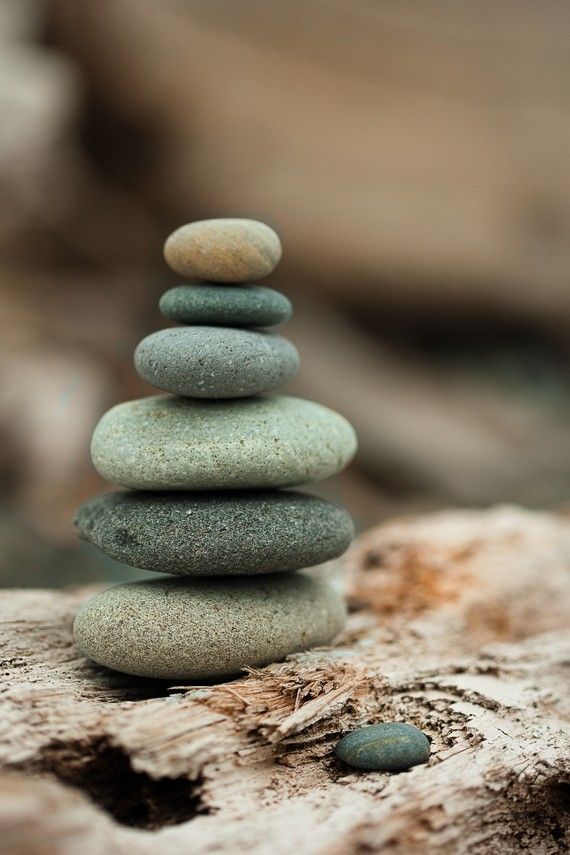 On the other hand, some may prefer to leave the color temperatures as is.
Note how the building to the left is quite warm, whereas the sky is somewhat cool. This is because the white balance was set based on the moonlight — bringing out the warm color temperature of the artificial lighting below. White balancing based on the natural light often yields a more realistic photograph. Choose "stone" as the white balance reference and see how the sky becomes unrealistically blue.
Want to learn more? Discuss this and other articles in our digital photography forums.
White balance: what is it, how to set it up on the camera and fix it in post-processing | Articles | Photo, video, optics
Is there a pronounced color in the photo that was not there in real life? The model's face turned yellow and flat like a pancake? For some reason, the white cat turned into pale pink? So you have the wrong white balance. Because of it, the snow can suddenly turn red, and the skin acquire an unhealthy bluish-purple or greenish tint.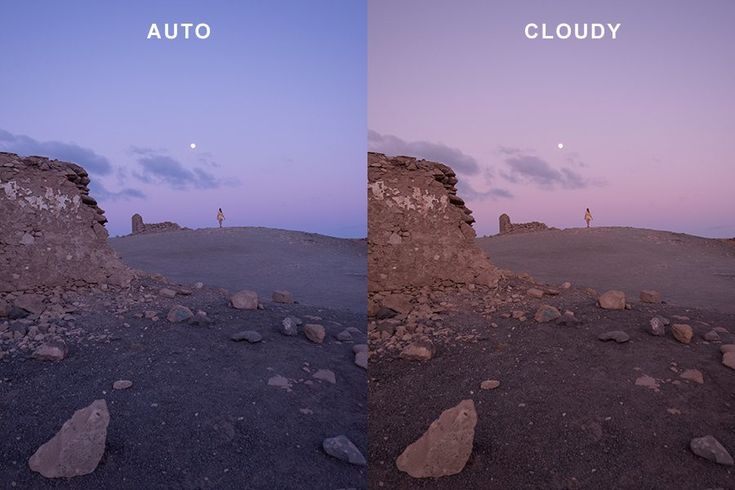 This often happens if you photograph by the light of street lamps, candles, on a sunny day in the shade of foliage.
We tell you what color temperature is, how to adjust the white balance when shooting on the camera and how to fix the white balance in Photoshop and Lightroom.
Illustration by the author
What is white balance and color temperature
White balance is a parameter that indicates a hue in a photo or its absence. You can understand that the white balance is wrong if you look at the blacks, whites and grays in the picture. They are called neutral. This means that they must be “clean”, without the admixture of foreign colors. But, if the white balance is off, they can get yellow, blue, green or magenta tints.
The white balance in the camera depends on its settings and the color of the light with which we shoot. The color of light is also known as color temperature. It is measured in degrees Kelvin or simply kelvins.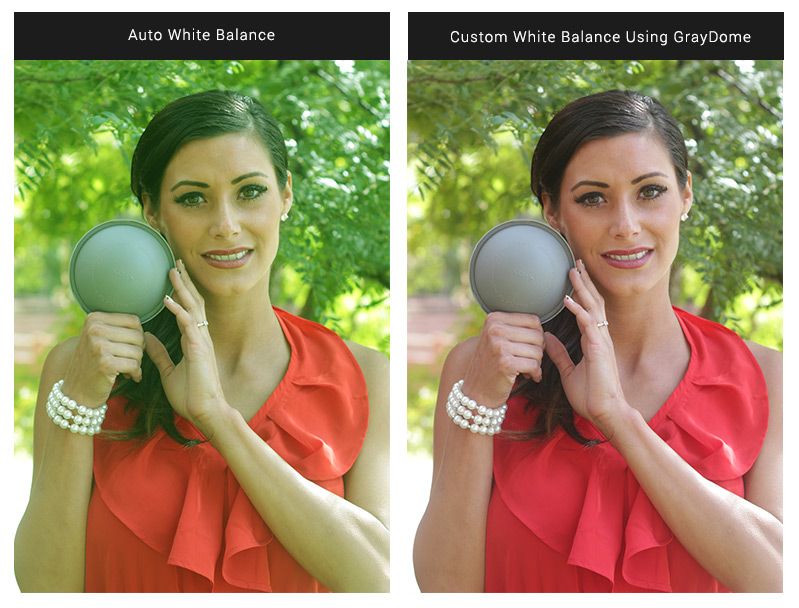
A high color temperature indicates a cool color, a low color temperature indicates a warm color. A color with a temperature of 6,000 kelvins and above is already considered cold, and less than 4,700 kelvins is considered warm. For example, the color temperature of a candle is estimated at about 1,000 degrees Kelvin, and an overcast sky is estimated at 6,500 Kelvin. At the same time, the neutral temperature at which the light is white, daylight, is considered to be the range from 4,700 to 6,000 kelvins.
That is, if you photograph a person by candlelight, the skin and everything around will be bright yellow in the photograph. At the same time, in life, the model will seem to be a completely normal shade.
In the process of evolution, we have learned to neutralize "stray" colors. The eyes themselves "rule" the white balance and bring white, black and yellow to a neutral value. Go into a room with warm incandescent lamps and observe - the longer you look, the less you will notice the color of the light. Soon it will appear white, neutral to you.
But a camera or smartphone is not as perfect as a person. They convey the picture as it is, without suppressing parasitic shades. That is why we must help the technique and set the white balance for it.
How to adjust the white balance on the camera
The white balance on the camera can be adjusted in three ways:
- select one of the automatic modes based on the lighting conditions;
- adjust by eye in manual mode;
- set manually using a neutral gray card or any white object.
Compact white balance cards / wikimedia.org
Automatic white balance modes
The camera itself corrects the frame, adding a hue based on lighting conditions. For example, at sunset, when the light is warm, the right mode will add a “chill” to the picture, balancing it. Because of this, the colors in the picture will become neutral, close to reality.
Types of modes:
1. Auto white balance
The camera itself finds the white color in the frame and tries to get rid of the stray cast. Works best in the color temperature range of 3,000 to 7,000 Kelvin.
Some cameras may have two sub-modes:
- ambient light priority. Keeps the yellowish tint of the lighting to convey the atmosphere of comfort and the color of the light source;
- white priority. Completely removes the warm tone, bringing the white to the reference.
If there is no white color in the frame, it is highly likely that the camera will mistake any other light color for white - and then color errors cannot be avoided.
Suitable for reporting where there is no time to change for each frame, and shooting conditions change quickly. Convenient and versatile, but get ready - the frames will have to be edited in post-processing.
2. White balance settings for natural light:
- Daylight. The color temperature is about 5200K. Can be used all day long when shooting outdoors.
 Best of all, this mode copes with the bright midday sun.
 - Shadow. The temperature is about 7000K. Suitable for shooting in light shade conditions. For example, if during a photo shoot in the sun, move into the shade of trees.
- Cloudy. The temperature is about 6000K. This corresponds to the uppermost limit of neutral white lighting. Ideal for cloudy weather.
3. White balance settings for artificial light:
- Incandescent lamps. Temperature 3200 Kelvin. If you select this mode, the camera will add a cool color to the photo to neutralize the warm color. In general, it is suitable for situations where the light is colored in a warm, yellow hue.
- Fluorescent lighting. The temperature is around 4,000 kelvins. Adds a magenta tint to the photo.
Shooting with fluorescent lights is one of the hardest things to set for white balance: the lights have different temperatures, there is no single standard. In addition, the color temperature of the lamp may change over time.
- Flash. The temperature is about 6000K. Suitable for both built-in and external flashes. Ideal mode for white neutral light. Also suitable for shooting on a sunny day.
Different cameras have similar automatic modes, but may be called slightly differently. For example, fluorescent lamps or fluorescent lighting.
The division of modes into those suitable for natural and artificial light is conditional. Nothing stops you from experimenting. For example, the mode for shooting with incandescent lamps is also suitable for shooting at sunset or sunrise.
Custom white balance
Allows you to choose the color temperature in Kelvin or set the hue. Suitable for experienced photographers who see and feel color and light well, as well as for experiments. Who said white balance always has to be right? Often in photographs and in films, it is deliberately shifted - then this is called "tinting". For example, in the first "Matrix" the scenes are specially painted in a greenish tint.
Interface inside the camera for manually adjusting the white balance. The dot shows what colors will be added on the next frame / wikimedia.org
Also, some cameras allow you to set the temperature in certain increments. That is, the camera will take three pictures - with the temperature you set, a little warmer and a little colder.
White balance gray card
Allows you to set the white balance according to the pattern. To do this, you need to photograph an object of a neutral color that has no shades. It is gray or white. Next, you need to select the resulting frame as a sample. The camera will now adjust the color temperature of subsequent shots based on it.
A special gray card is suitable for this. There are compact cards that can be taken for location shooting, as well as more bulky ones for studio work. You can also find a set of white balance cards, which includes both a gray and a white card.
Instead of a gray card, any white object will do.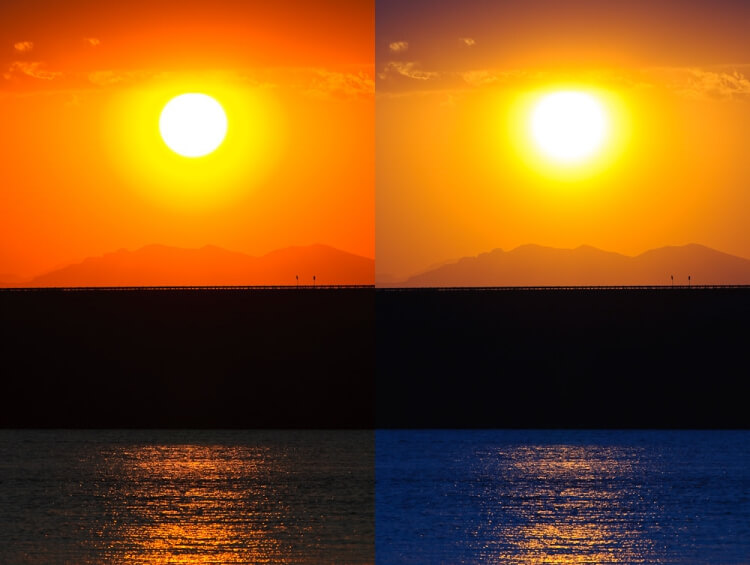 The simplest is a white sheet of paper or a white balance card / pixabay.com
White balance adjustment algorithm for a gray card:
- Take a picture of the card as close as possible. Ideally, there should be no foreign objects in the frame at all. You can even disable autofocus. Color is important here, not sharpness. This frame is auxiliary, working.
- Select this photo as a reference for custom white balance.
Important: this white balance will be correct if you are shooting in the same light as when photographing the gray card. If, for example, you photographed her in a studio in natural light, and then turned on the light or the sun began to shine through the window, you need to repeat the previous steps with new lighting.
Neutral grays and whites give the same result as both are free of color tints. There is no fundamental difference between them, but it is believed that if the scene is dark, then a white object can be seen better.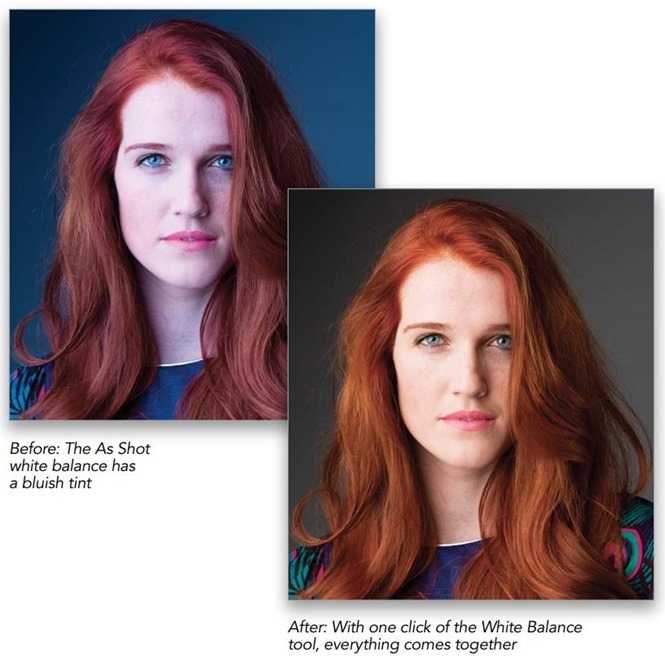
The standard to use a gray card (however, for measuring exposure, and not for editing white balance) originated in the 1930s and 50s. At that time, Kodak researchers determined that a standard scene with normal solar illumination is integrated with a reflectance of about 18%. Later, Kodak released a film box that they said reflects 18% of the light so that photographers can put it in the frame and set the exposure from it. So gradually the 18% gray card became the standard, but Kodak also released a white one, as the peculiarities of photographic equipment did not allow to correctly read the gray color in dark scenes.
How to set the white balance in graphic editors
The white balance is corrected according to the same principle in Photoshop, Lightroom and photo processing programs on the phone. Even when you put it in the camera on the set, the essence is the same.
You analyze the frame, understand what color is stray here, and add the opposite to it.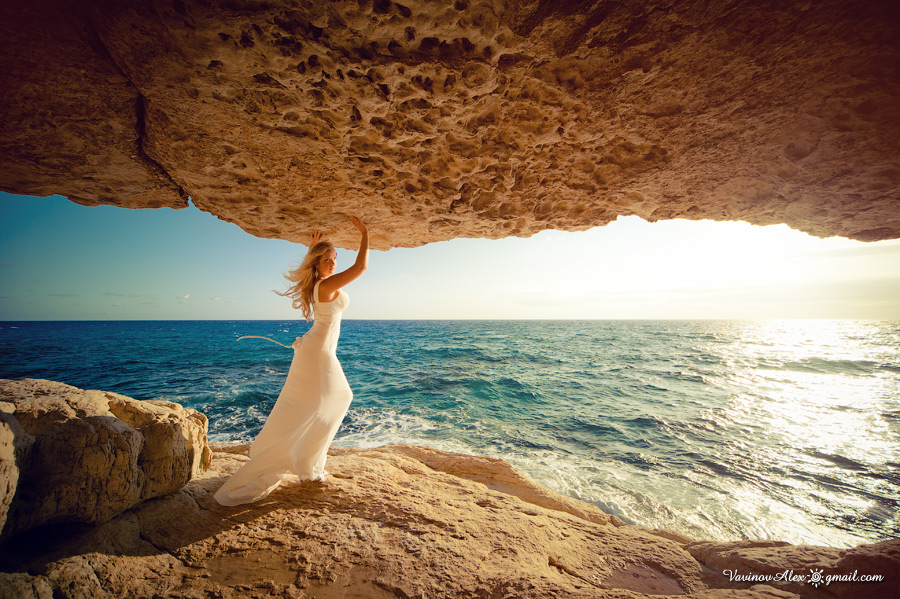 The camera, phone and graphic editor do the same when white balance is automatically corrected. Once you understand how to fix the white balance in Photoshop and Lightroom, you will understand how to do it in any other editor.
To set the correct white balance, you have two sliders:
- Color temperature (Temperature). It is blue on one end and yellow on the other. By shifting it, you make the photo warmer or colder. So, if you're shooting under incandescent light and want a cooler shot, move the slider to the left, toward blue.
- Tint. Fine-tune the hue of a photo. It's a slider with green and magenta on opposite ends. Moving it to the left adds green and takes away magenta, and moving it to the right adds magenta and takes away green.
White balance in Photoshop
White balance in Adobe Camera Raw (ACR)
If you are photographing in RAW format, then as soon as you transfer the files to Photoshop, the Adobe Camera Raw window will open.![]() This is an additional module, an analogy with a film processing room (we wrote about useful non-obvious features of this program here). Camera Raw allows you to fix the brightness of the entire frame or separately in the highlights and shadows without losing quality, change the color, and even adjust the white balance.
This is an additional module, an analogy with a film processing room (we wrote about useful non-obvious features of this program here). Camera Raw allows you to fix the brightness of the entire frame or separately in the highlights and shadows without losing quality, change the color, and even adjust the white balance.
White balance can be corrected:
- using the white point eyedropper:
- Find the white point eyedropper at the top left of the ACR.
- Press her on an area that was definitely white in real life. It can be white clothes, equipment, the white of the eye, a cloud, a dividing line on the pavement - anything.
- manual. Correcting the white balance in this way, you yourself move the sliders Color temperature (Temperature) and Hue (Tint), achieving the desired effect.
Automatic white balance eyedropper and sliders for manual in Adobe Camera Raw / Illustration by the author
Adjusting white balance in Photoshop
If you shoot in . JPEG format, the files will open immediately in the Photoshop workspace. There are two tools for editing white balance: Curves (Cruves) and Color Balance (Color Balance).
In both cases, the method is the same as in Camera Raw: using sliders or curves, you add the opposite color to the one you want to remove. The difference is that ACR had two sliders and four colors (blue-yellow and green-magenta), while Curves and Color Balance had three curves/sliders and six colors.
Adjustment layer Color balance allows you to correct the white balance in three areas - shadows, highlights and midtones. To switch between them, click on the drop-down line Tone (Tone) / Illustration by the author
Colors and their opposites in the Curves and Color Balance tool:
- Red and blue;
- Green and purple;
- Blue and yellow.
Curves white balance correction using Red, Green and Blue curves / Illustration by the author
There are also three pipettes in Curves: black, gray and white. They correspond to the three neutral colors and can be used to automatically correct the white balance. It is enough to select with a white pipette an object that was white in life, with a black one - black, with a gray one - gray. If the pipettes do not help and do not give an adequate color, you will have to adjust the white balance manually. By the way, working with a curve and pipettes also allows you to copy the toning from a photo or a frame from a movie.
For details on how Curves work and how to use them to tone and adjust white balance, read the link.
Lightroom white balance
- Open the photo and the Develop tab, which is on the top right.
- Use the first two sliders under the histogram in the Basic tab (Basic) - Color temperature (Temp) and Hue (Tint).
Add blue to remove yellowness, add purple to remove greenness. And vice versa / Illustration by the author
If you've photographed a gray card, a white sheet of paper, or know exactly which object in a photograph was white in real life, grab the eyedropper to the left of the white balance sliders and click on that object. The pipette is called White Balance Selector. You can quickly select it using the W hotkey.
Tips:
- To make it easier to adjust the white balance in Photoshop, Lightroom or your phone, take a picture of a person with a white balance card (gray card) or a white piece of paper. Then you will know exactly which object to set the correct color for.
- Temporarily raise the Saturation and Vibrance sliders to a maximum value of +100. So you can see exactly which color prevails in the picture. After adjusting the white balance, the Saturation and Vibrance sliders can be returned to their original values.
What is white balance
White balance (WB) is a color correction process that causes objects that the eye sees as white to appear white in your picture. The camera's white balance must take into account the "color temperature" of the light source, which refers to the relative warmth or coldness of white light. Our eyes are quite good at distinguishing white under various light sources, but for digital cameras, automatic white balance (AWB) often creates great difficulties. Incorrect white balance can produce bluish, waxy, or even corpse green hues that look unnatural and especially ruin portraits. Using WB in traditional film photography meant using different tint filters, each for different shooting conditions, but this is no longer required in digital photography. Understanding digital WB will help you avoid color distortion caused by your camera's AWB, and thereby improve the quality of your shots under a wider range of lighting conditions.
| Wrong white balance | Correct white balance |
The Basics: Color Temperature
Color temperature describes the spectrum of light that is reflected from a blackbody as a function of its surface temperature. Absolutely black is a body that absorbs any incident light, neither reflecting it nor passing it through. An approximate analogue of the radiation of a completely black body in everyday life can be a heated metal or stone: they say that they are heated (to "red heat") when they reach a certain temperature, and brought to a "white heat" at much higher temperatures. Similarly, black bodies at different temperatures will show luminosity at different color temperatures. Despite the name, light that may appear white does not necessarily contain the full visible spectrum:
Relative intensity normalized for each temperature (in Kelvin).
Note that 5000 K produces roughly neutral light, while 3000 K and 9000 K produce orange and blue shifted light, respectively. As the color temperature rises, the color distribution becomes colder. This may seem counter-intuitive, but follows from the fact that shorter wavelengths carry higher energy light.
Why is color temperature a useful description of light for photographers when they never deal with black bodies? Fortunately, light sources such as daylight or tungsten incandescent lamps produce light spectra that are almost identical to the luminosities of black bodies, although other sources, such as fluorescent or most energy-saving lamps on the market, differ significantly from them. Since photographers never use the term "color temperature" in relation to true black bodies, the term implies "correlated color temperature", with the corresponding color of the light source. The following table shows the correlated color temperature of some common light sources on the fingers:
| Color temperature | Light source |
| 1000-2000K | candles |
| 2500-3500K | Incandescent lamps |
| 3000-4000K | sunrise and sunset (clear sky) |
| 4000-5000 K | fluorescent lamps |
| 5000-5500 K | flash |
| 5000-6500K | daylight with clear sky (sun at zenith) |
| 6500-8000K | moderately cloudy |
| 9000-10000K | Shade or heavy cloud |
In practice: JPEG and TIFF files
Because some light sources are not identical to blackbody radiation, white balance uses a second variable in addition to color temperature: green shift. Green correction in normal daylight is most often not needed, but in fluorescent and other artificial lighting, white balance may require significant green correction.
| AWB | ||
| Own | ||
| Kelvin | ||
| Incandescent lamp | ||
| Fluorescent | ||
| Daytime | ||
| Flash | ||
| Clouds | ||
| Shadow |
Fortunately, most digital cameras have a set of white balance presets so you don't have to worry about color temperature and green shift when taking that important shot. Frequently used characters for each preset are shown on the left.
The first three options focus on color temperature ranges. Auto white balance is available on all digital cameras and uses a best fit algorithm over a limited range, typically between 3000/4000 K and 7000 K. Custom white balance allows you to take a gray reference image in a given light and use it as white balance for subsequent shots. "Kelvin" allows you to choose from a wide range of color temperatures.
The following six white balance options are listed in order of increasing color temperature, although shadow white balance is not available on many compact cameras. Some cameras also have a "halogen" setting, which is designed to work with the new daylight calibrated fluorescent lights.
The descriptions and symbols for the above white balances are only approximations of the lighting conditions in which they work best. In fact, depending on the time of day, altitude, or haze, it may be preferable to use WB for clouds instead of daylight white balance. Usually, if the image on the camera screen seems too cold (regardless of the settings), the color temperature can be quickly increased by selecting the next character from the list (one position below). If the image is still too cold (or warm when moving in the opposite direction), it may be wiser to set the temperature manually in Kelvin mode.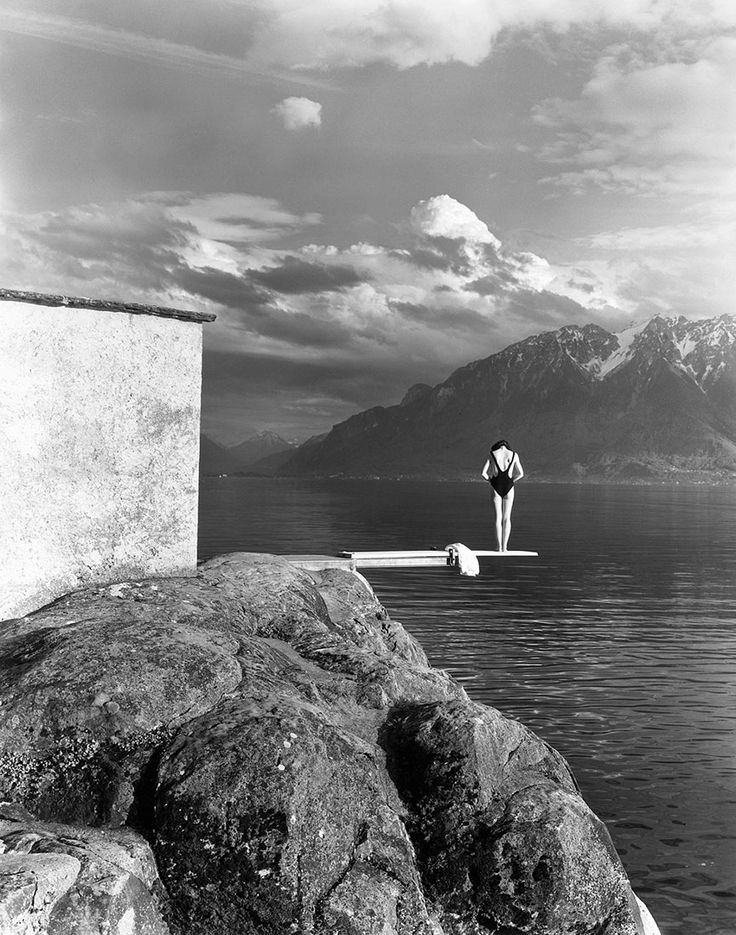
If all else fails and the image still has an incorrect WB later on the computer, it can be corrected to bring the colors back to life. Otherwise, you can use a colorless reference (see the section on neutral references) and "set the gray point" using "levels" in Photoshop or similar. Any of these methods should be avoided as they can significantly reduce the bit depth of your image.
In practice: RAW format
By far the best solution to the white balance issue is to shoot in RAW format (if your camera supports it), because it will allow you to set WB after after the picture was taken. RAW files will also allow WB to be set based on a wider range of color temperature and green shift.
Applying WB to a RAW file is easy and simple. You can either move the color temperature and green offset sliders until you get natural tones, or simply click on the neutral reference in the image (see next section). Even if only one of your shots contains a neutral reference, you can use the resulting WB settings on all other images (assuming the light didn't change).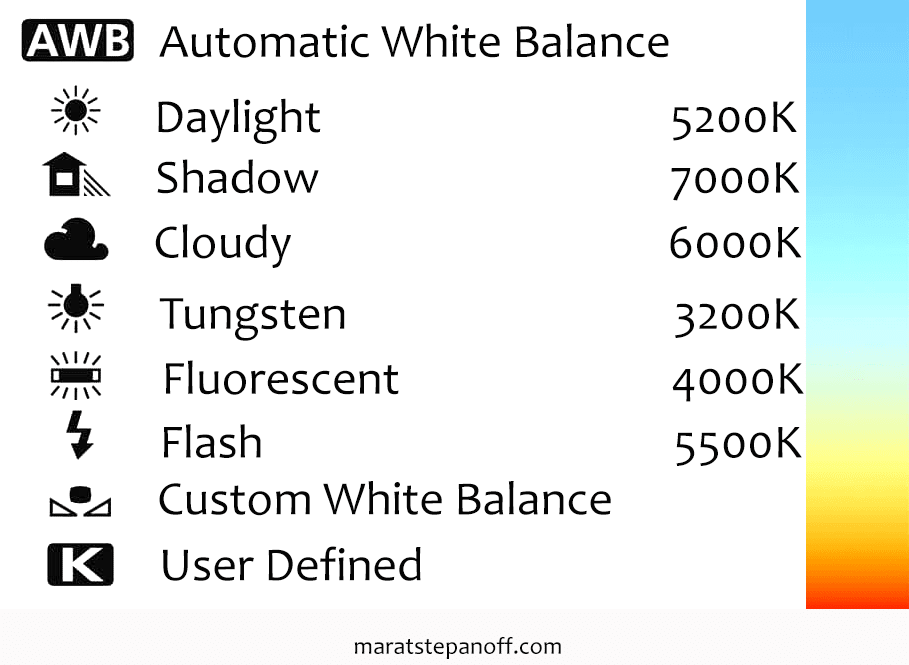
Custom white balance: Neutral reference selection
Neutral reference is often used for color-critical projects or for situations where auto white balance causes problems. Neutral references can be part of the scene (if you're lucky) or can be pre-stocked. Below is an example of a successful reference in an otherwise sunset blue scene.
On the other hand, specially made portable standards are almost always more accurate, since it is easy to mistake a neutral object for something that is not. Portable references can be quite expensive when specifically designed for photography, but can also include less expensive homemade ones. An ideal gray standard is one that reflects all colors of the spectrum equally and retains this ability over a wide range of color temperatures. Below is an example of a custom designed gray reference:
Typical hand-made references are the turnovers of coffee or chip lids. They are inexpensive and fairly accurate, although specially made photometrics (such as those shown above) are by far the best. Special instruments can also be used to measure the color temperature of incident or reflected light. Most neutral standards measure reflected light, while instruments such as a white balance meter or "expodisc" can measure incident light (and theoretically be more accurate).
Care must be taken when using a noisy image as a neutral reference, because by clicking on a seemingly gray area, you can actually select a color pixel created by chroma noise:
| Slight noise (uniform grey) | Loud noise (color spots) |
If the software allows it, the best solution to white balance noisy images is to average the pixels out of your noisy gray. If using Adobe Photoshop, you can apply 3x3 or 5x5 pixel square average.
Auto white balance
Certain subjects cause digital camera auto white balance problems even in normal daylight. One example is oversaturation with warm or cold tones due to the characteristics of the subject. The image below illustrates a situation where the subject is predominantly red, and as a result the camera perceives the light as warm. As a consequence, the camera tries to compensate for the warmth in order to bring the average color of the image closer to neutral, but as a result, it creates blue on the stones. Some digital cameras are more prone to this than others.
| Automatic balance | Own balance sheet |
(Used an 18% gray map as a neutral reference for own balance)
A digital camera's AWB is often more effective if there is at least one white or colorless bright element in the photo. Of course, don't try to recompose to include a colorless object, just be aware that its absence can create problems with auto white balance. Without the white boat in the image below, a digital camera's AWB will erroneously produce an image with a warmer color temperature.
In mixed light
Multiple light sources with different color temperatures can further complicate white balance.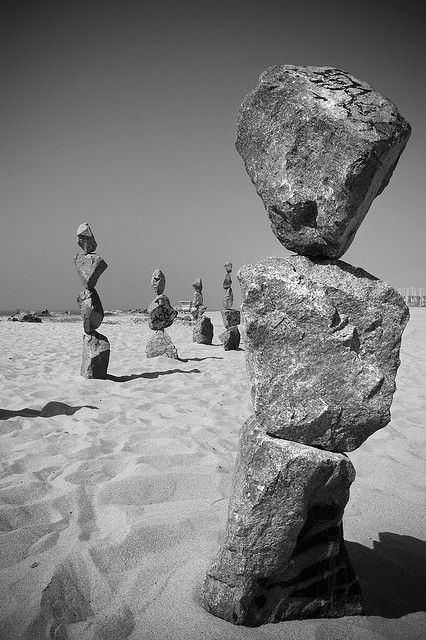 Some situations may not have a completely correct white balance at all, in which case it will depend on where color accuracy is more important.
| Reference: | moon | stone |
In mixed light, AWB usually calculates the average color temperature of the scene as a whole and then uses it for white balance. This approach is usually acceptable, however AWB tends to exaggerate the difference in color temperature of light sources relative to what is seen by the eye.
Excessive color temperature differences are often most noticeable when natural and artificial lighting is mixed. In some cases, you may even need an independent white balance for each light. On the other hand, someone will find it more interesting to leave everything as it is.
Notice that the building on the left looks quite warm, while the sky, on the contrary, is somewhat cold. This is because the white balance was set based on moonlight - thus revealing the warm color temperature of artificial lighting.