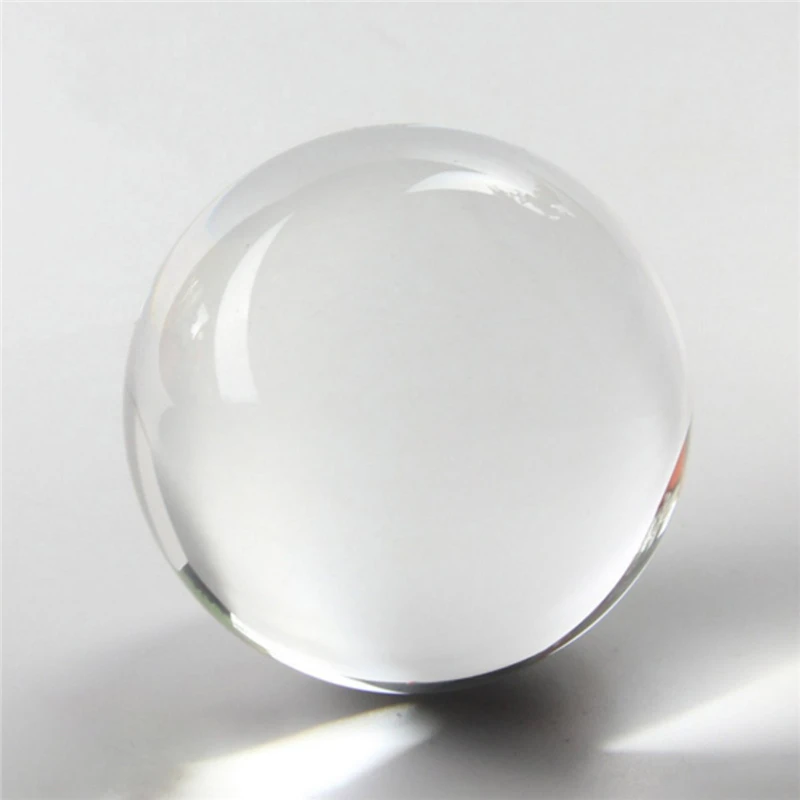
Glass balls for photography
7 Cool Ideas for Crystal Ball Photography
Crystal balls are one of our favorite not-necessary-but-cool gear items. Though it’s not really a professional tool – you probably won’t use it to shoot wedding photos or baby portraits – it’s still a fun object to play around with on dull, uninspired days.
Even the most cliché photography subjects can look interesting when photographed through a crystal ball. For this reason, we’ve put crystal balls on our list of unique gifts for photographers. It’s unexpected and a little strange, but also fun, perfect for a laid-back weekend photo shoot.
The most popular crystal ball used for photography is the Lensball. This brand is so well-known that some photographers call crystal ball photos “Lensball photography.” However, it’s not the only choice out there. You can find cheaper crystal balls of similar quality. They’re not specifically marketed for photography, but they work fine.
Before we get too far into this, I also want to recommend checking out prism photography using prisms in a similar fashion. They work well for concealing unwanted objects in the frame while also adding visual interest with reflections, light flares and more. Check out these 8 prism photography tips from our friends over at Adorama. Like crystal balls, prisms offer an affordable means to add a creative touch to your photography.
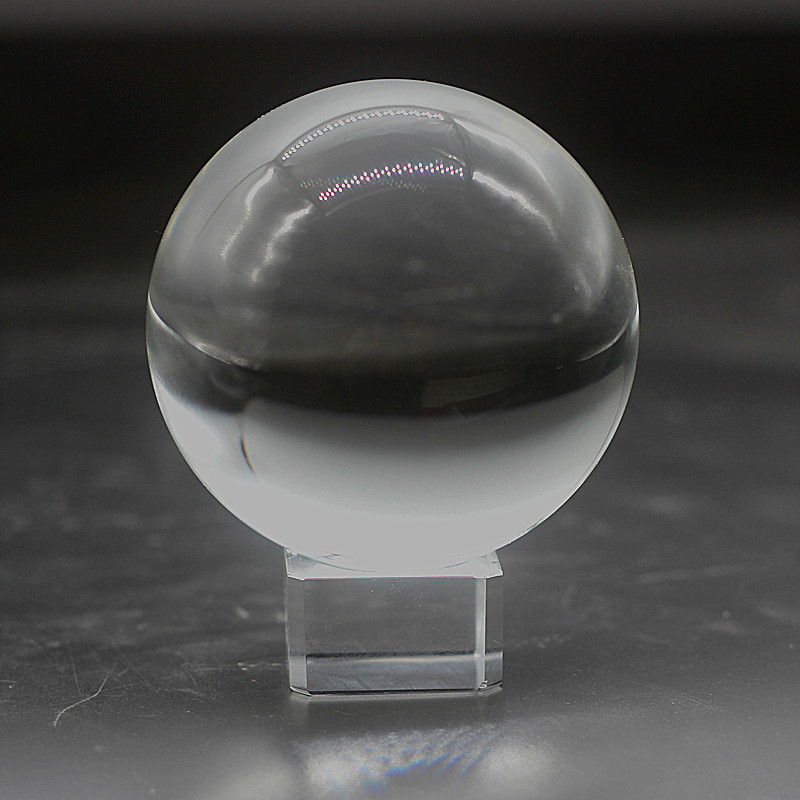
MerryNine K9 Crystal Ball
Neewer 100mm Crystal Ball
Crystal balls typically range in size from 50mm to 150mm, though you can go much smaller with clear marbles. Of course, the smaller the ball, the lighter and cheaper it will be. The main disadvantage of small crystal balls, though, is that they’re also harder to photograph. You might need to experiment with macro photography to get a good shot.
Bigger crystal balls are much easier to photograph but much heavier, too. A 100mm crystal ball weighs over 3 pounds and can be awkward to fit into a camera bag. But if you don’t want to delve into macro photography, a larger size will give you the sharpest images.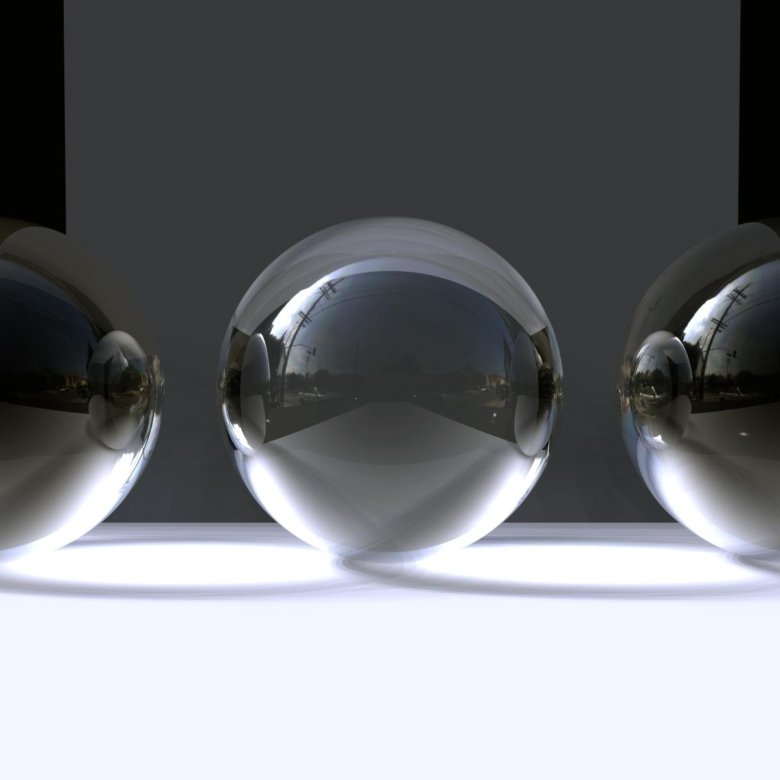
Regardless of the size you choose, try to keep the crystal ball out of direct sunlight. Like a magnifying glass, it will refract the sunlight and burn whatever is underneath it. You could start a serious fire or injure yourself, so keep it pouched! (Indirect sunlight, such as during twilight or dawn, should be fine.)
For inspiration, here are some awesome crystal ball images, plus some ideas to get you started.
Flip the horizon.
This is a classic shot for crystal balls. The concept is simple: you position the crystal ball against the horizon so that the sky and land are flipped within the ball. It’ll make the landscape look surreal yet still lovely.
Phil Dolby – A Sense of Perspective
Phil Dolby – Portal
jacinta lluch valero – Amapolas magicas * “Entre amapolas”
Shoot a sunset/sunrise.
The Golden Hour, which happens around sunset and sunrise, is an ideal time to photograph any subject, especially if you’re using a crystal ball.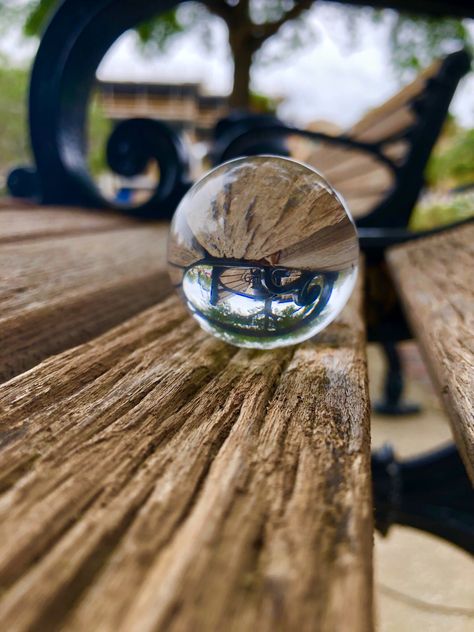 That’s because the colors surrounding the crystal ball will be beautiful yet vague, so they won’t distract the viewer. They’ll create a serene atmosphere, but the viewer’s attention will stay on the scene within the ball.
Just remember that you’ll need to flip the image during post-processing, so the sunset or sunrise won’t be upside-down.
Maurits Verbiest – One of the Universes
Alan Glicksman – Ramsgate westcliff sunset
Steven Worster – Sun Rise
Photograph a famous location.
Tourist sites can be challenging to photograph. Because they’ve been shot countless times, you’re up against a lot of “competition” or clichés. The bar is higher; you either have to take an awe-inspiring shot, or you have to think of something creative – like a crystal ball. Though it won’t work for every tourist site, it’s a nice tool to have when you’re stuck for ideas.
Yogendra Joshi – Antelope Canyon in a Crystal Ball
Rajeev Rajagopalan – Holding up the blue mosque
Yogendra Joshi – Grand Canyon inside Crystal Ball
Yogendra Joshi – Suggest a Title!
Make a familiar scene look unfamiliar.
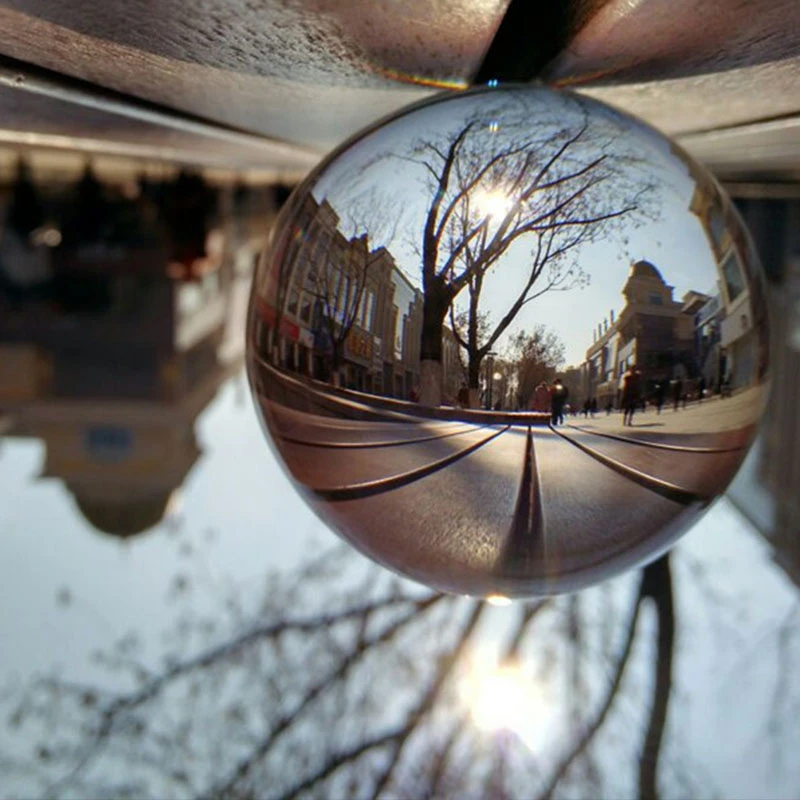
Like tourist sites, everyday objects and scenes can be uninspiring because of their ordinariness. After seeing the same thing thousands of times, you might start to ignore it or think it’s nothing worth photographing. But with a crystal ball, that subject transforms into something new and interesting, a shot worth taking.
For more ideas on shooting ordinary subjects, check out these 32 beautiful photos of everyday life.
Steven Worster – ME!
Phil Dolby – Reflections on a Christmas Morning
Max Goldberg – Van Patten Woods
Take abstract photos.
If you’ve never experimented with abstract photography before, crystal balls are an easy place to start. In a sense, all crystal ball photos are abstract photos. But there is a difference between a picturesque beach at sunset and a strange streak of light. Try anything, and see how it changes when viewed through a glass ball.
Nikk – Phantasm!
Christian Schnettelker – Crystal Ball / Glaskugel
Nikk – Got the blues? HSS!
Experiment with texture.
A glass ball can be a beautiful contrast to all kinds of textures. Because very few things in nature are round, smooth, and clear, you can use it as a counterpoint to nearly anything. The tricky part is making sure the reflection within the ball is interesting, too, so it adds depth to the texture.
Marco Verch – Himmel und See spiegeln sich in einer Glaskugel
Mark Bonica – Foss Farm Trail
Simeon Berg – Day 105 – Almost Summer
Use the crystal ball like a fisheye lens.
The optics of crystal balls and fisheye camera lenses are very similar. Both give extreme wide-angle views of a subject, creating sphere-shaped panoramas. While a fisheye lens is easier to work with than a crystal ball, it’s also a lot more expensive. You can expect to pay over $150 for a good fisheye lens. A crystal ball will cost you less than $50. It’s a little clunky, but it works.
Paul VanDerWerf – I See Photographers
Paul VanDerWerf – Arbor
Euro Slice – Nuremberg City, Germany
7 Tips for Gorgeous Glass Ball Photography
Glass ball photography is a fantastic way to create compelling images, the kind that will leave your audience both wowed and curious.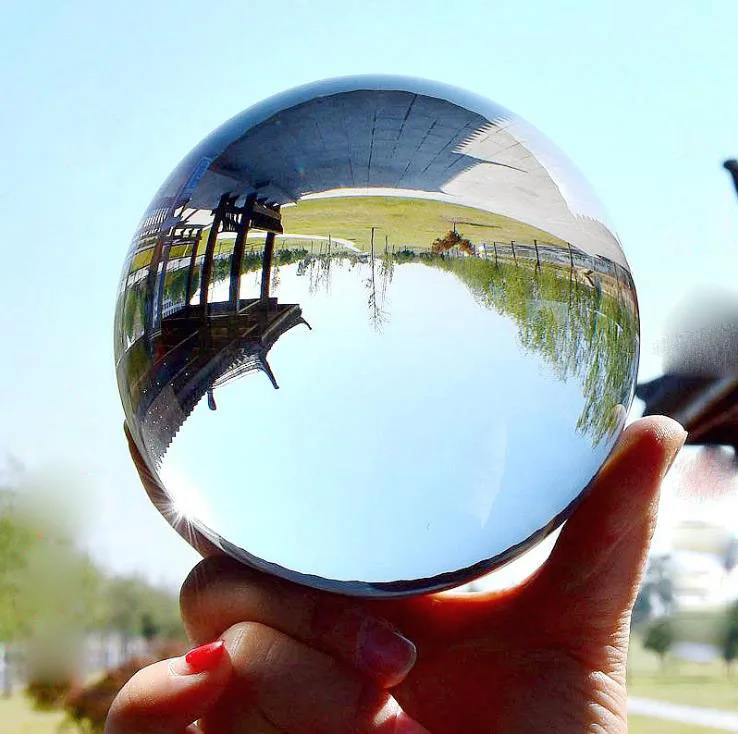
But how do glass ball photos work? How do you set up beautiful images? And how do you use a simple crystal ball to capture such striking effects?
In this article, I share everything you need to get started, including a lensball recommendation, plenty of tips, and even a few crystal ball photography ideas.
Let’s dive right in.
How does glass ball photography work?
Glass ball photography, also known as crystal ball photography, uses refraction to capture unique images. A crystal ball (lensball) is placed in front of a scene; the scene is then refracted in the ball. Thanks to the magic of physics, you end up with an inverted image in the ball, which you can then capture with your camera.
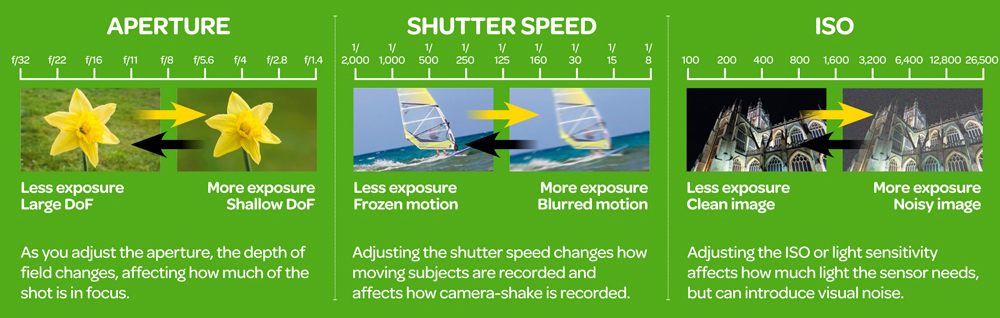
As the photographer, you have ultimate control over your lensball image. For instance, by repositioning the ball (and by repositioning the camera with respect to the ball), you’ll capture different perspectives. You can also adjust the aperture for shallow depth of field effects (where the ball is framed by a blurry background), and you can change the distance from the camera to the ball for an interesting close-up effect. I discuss these techniques in greater detail below.
1. Consider flipping the upside down image
Thanks to refraction, the image inside a glass ball is flipped. Which means you have two options:
- You can leave the inverted image and incorporate it into the composition. For instance, you can juxtapose the flipped image with the real scene in the background.
- You can rotate the image during post-processing, so that the ball’s image appears right side up. Here, you may want to blur out the background with a wide aperture; that way, the flipped background isn’t obvious.
As you’ll see throughout this article, I use a mix of techniques. Sometimes, I like to keep the inverted crystal ball image. Other times, I flip the image for a less disorienting effect.
By the way, if you want to create a sharp, right side up image but you don’t want to do any rotation in post-processing, there is another option:
You can use the ball to photograph reflections.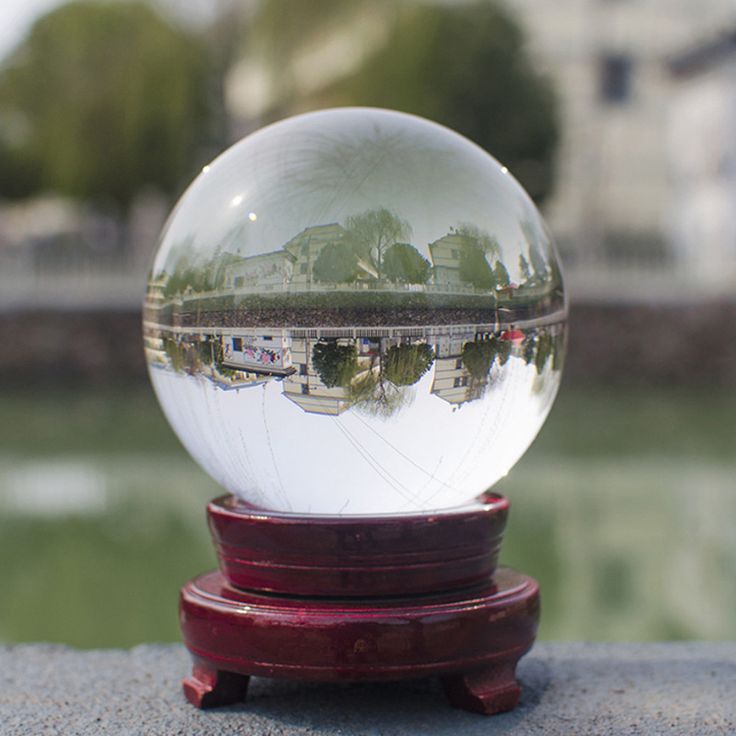 After all, reflections are naturally upside down, but the ball will invert them for a normal-looking result.
The image inside the ball will be upside down.
2. Get on a level with your subject
It might be tempting to put your glass ball on the ground and shoot into it, but this will actually cause significant distortion, plus it will create less compositional impact.
Instead, I recommend getting your ball up off the ground and on a level with your subject. The key here is to ensure your subject is centered in the ball, so feel free to move the setup around until you get the composition you’re after.
Note that you’ll want to keep your hands out of the frame, so you can either get up close and only photograph part of the ball, or you can perch the ball on an elevated platform, like a rock, a car, or a bench.
Of course, there are exceptions to this advice. Sometimes, it pays to place the ball on the ground, especially if you plan to photograph puddles or leaf beds.![]()
3. Fill the glass ball with your subject
Unless you get close to your subject, it will appear very small inside the ball. So do what you can to close the distance, until your subject looms large in the ball (and consequently the frame).
This might involve careful planning or even some creativity. The ball is like a wide-angle lens, so try to think about your shot as if you’re photographing it at 16mm or so. Would the scene fill the frame at 16mm? If so, you’re golden!
In this photo, the cityscape is captured inside the ball.
4. Choose the correct lens
Yes, you can do glass ball photography with literally any lens, from ultra-wide to super-telephoto. But if you want to maximize the impact of the ball, I’d really recommend using a macro lens (or a telephoto lens with significant close-focusing capabilities).
Thanks to a macro lens, you can get close to the ball, which does two things:
- It lets you increase the size of the ball in your shot (in other words, you can get close for lots of detail).
- It helps you create strong background bokeh, which is key if you want to flip the image and keep it natural looking (discussed in Tip 1).
A wide-angle lens can work, too, but only if the scene allows it. I recommend experimenting with a macro lens and a wide-angle lens to determine the effect you like best.
5. Choose the correct aperture
The aperture influences the depth of field (i.e., the amount of the scene that’s in focus).
Set an ultra-wide aperture, and you’ll end up with a beautifully blurred background and a sharp foreground. Set an ultra-narrow aperture, and you’ll end up with a crisp foreground and a crisp background.
Neither is obviously better than the other; it just depends on the effect you want. If you’d prefer to create a blurry background (for example, you want to flip the image without a disorienting result), you might try using an aperture of f/4 or so. This will generally blur out the background while creating a sharp image inside the ball.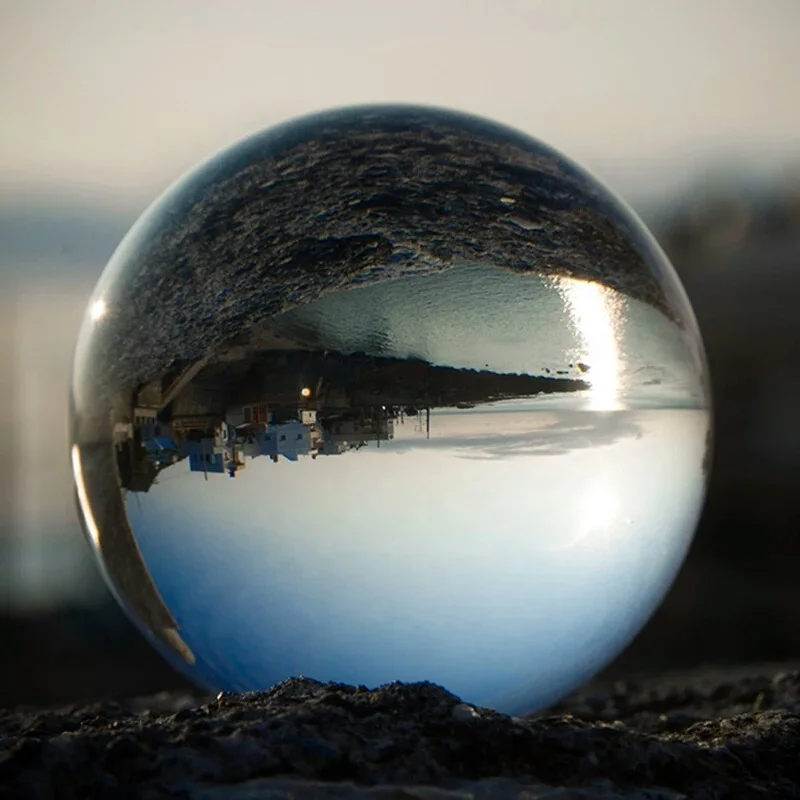
But be sure to review the image on your LCD afterward to make sure you get the result you want. If you go too wide, even the ball will be blurred, and everything will become an out-of-focus mess. Also, the depth of field depends on other factors as well, such as the distance between the lensball and the camera, so experimentation is always a good idea.
6. Find a safe place to position the ball
This is very important, especially if you are photographing from a high vantage point. Balls are, well, balls, which means that they like to roll, and you certainly don’t want your crystal ball rolling off a bench (or worse, a building). Best case scenario, it’ll end up with scratches – and worst case scenario, it’ll smash and you’ll need to buy a new one.
That’s why I recommend putting the ball on a flat surface, and a crevice is better (if you can find one). Place the ball carefully, then let it sit for a few seconds. Even if the ball seems stable, keep your (or a friend’s) hands nearby, and watch it like a hawk, especially on windy days.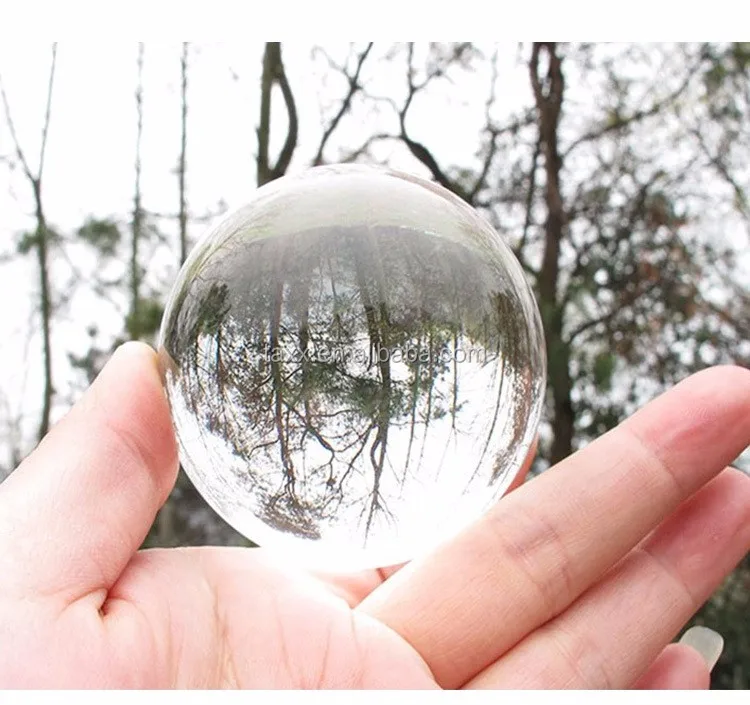 You do not want the ball to blow off in the middle of a photo!
If you can’t find a good resting place, you might just ask a friend to hold the ball for you. Or, with some practice, you can hold the ball yourself (though this is always tricky; unless you’re working with a tripod, you’ll need to hold the ball in one hand while focusing and firing the shutter with the other!).
In this photo of the Taj Mahal, there is a reflection in the background, and this reflected image is in fact upside down.
7. Make sure your subject is well-lit
Pretty much every photo can benefit from a well-lit subject, but it’s especially important for crystal ball photography.
Why? A strongly lit subject will shine through the ball while minimizing reflections. (Yes, those pesky reflections that come from in front of the ball and can show unwanted elements such as the camera lens!)
That’s why I recommend you photograph with the sun behind you and striking your subject directly.![]() Alternatively, you can photograph during the blue hour or at night, but aim to photograph buildings with brightly lit facades.
Alternatively, you can photograph during the blue hour or at night, but aim to photograph buildings with brightly lit facades.
(On the other hand, reflections can create interesting effects, so don’t be afraid to try out different lighting scenarios if you’re feeling creative.)
Glass ball photography vs standard photography
Are you wondering whether it makes sense to pursue glass ball photography? After all, do you really want to play around with a lensball when you could be capturing a beautiful wide-angle shot of the same scene?
In this section, I’ve put together a quick list of pros and cons – which will help you decide whether crystal ball photography makes sense for you.
Glass ball pros
- A glass ball is cheaper than a lens and allows you to create a unique fisheye effect
- A ball offers flexibility; you can move it to different positions in your scene
- You can use a large aperture in conjunction with the ball to create bokeh
- Scenes created with a crystal ball often have a more artistic feel
- The ball creates a natural frame for your scene
Glass ball cons
- Larger glass balls are heavy to carry (in an already heavy camera bag)
- You need a macro lens to get the best results
- The edge of a glass ball produces distortion
- Getting a sharp image inside the ball can be difficult
- The image in the ball is upside down, which gives you another problem to contend with
In fact, here’s a quick illustration of a crystal ball effect.![]() First, we have a standard wide-angle image of a scene:
First, we have a standard wide-angle image of a scene:
And here’s the same scene, but shot with a glass ball:
What do you think? Which shot do you prefer? The choice to use a glass ball is yours to make, though I highly recommend trying it out. Personally, I feel the pros majorly outweigh the cons (plus, you’ve made it this far in the article, which means you know all sorts of helpful tips!)
If you find crystal balls too heavy to carry all the time, you can try scouting scenes in advance, then returning for a second visit with only the equipment you need to get your photo.
Glass ball photography: final wordsWell, there you have it:
Plenty of tips to get started with crystal ball photography. You will, of course, need a crystal ball – which you can buy easily on Amazon for around $27 USD. Once the ball arrives, head to a local landmark and start experimenting. The list of subjects really is endless; you can start with a lone tree, a church, or even a cityscape scene.![]()
Now over to you:
Have you tried lensball photography? Do you think you’ll start? Share your thoughts and images in the comments below!
Natural landscapes look great inside the ball. This is a volcanic lake found in Indonesia.
90,000 glass balls - 68 photosart
Cars
Anime
Girls
Children
Animals
Games
9000Miscellaneous 1 872 February 18, 2020
1
Crystal Ball
2
Crystal Ball Magic
2 3
Glass 9000
8
Decorative glass ball
9
Glass ball
10
Magic glass ball
20
Glass transparent balls
21
Glass
22
Glass Balls
23
Smooth glass ball
24
SHY glass
2 25 9000 9000
glass ball transparent
28
glass ball sphere
29
Glass
30
Glass balls
2 31
Decorative glass ball
32
Large glass ball
9000 33Crystal 9000 9000 34000 001b julemun ball
35
glass ball
36
glass balls
37
glass ball
38
Glass balls
39
Glass magic ball
40
Glass Balls Transparent
41
900044
Decorative crystal ball
45
Glass ball
46
Glass balls
47
Souvenir Crystal ball
2 48
Beautiful ball
2 49
Glass
2 50
Glass Balls
9000 51
Huge glass ball
52
glass
53
Glass Shar
2 54
Glass Balls
2 55 9000 9000 Green Glass Balls
56
Beautiful glass ball
2 57 57
Glass
2 58
Glass Balls
59
Glass balls Transparent 9000 9000 60
9000 9000 9000 9000 9000 9000 900062
Glass Magic Ball
63
Magic Glass Ball
64
Flowers in Glass Ball
65
Christmas box snow globe 40233
66
Peha snow globe
67
snow globe Rate the photo:
Comments (0)
Leave a comment
Complaint!
More arts and photos:
Gorgeous wallpapers of the highest quality! Choose a wallpaper and save it to your desktop or mobile phone - there are all permissions! We have a huge collection on a variety of topics only with us! To quickly find the desired image, use the search on the site.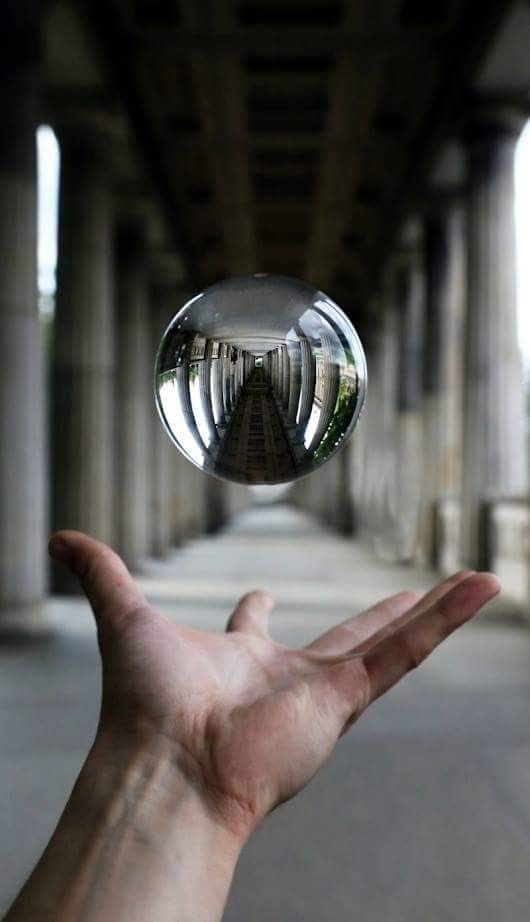 There are already more than 400,000 gorgeous pictures for your desktop in our database! Don't forget to leave reviews under the images you like.
- abstraction cars anime art girls children food and drink animals celebrities games the beauty places motorcycles men society nature post-apocalypse holidays plants different dogs textures technique fiction fantasy movies backgrounds
Crystal sphere - the world is in your hands!
Photographic equipment has now become so popular that photographers have renamed the crystal sphere the lensball. What is the best lensball size for shooting? Let's look at three balls: 60, 80 and 120 mm, which are on sale, and decide which one is best suited and for what purposes.
- Optical ball small
Lensball size less than 60 mm is considered small. What are the strengths and weaknesses of this particular size?
Benefits
Weight. It adds little to the weight of your camera bag, making it easy to use for handheld photography.
Size. Thanks to their small size, the balls will be easier to pack, giving more space for other packing items. The smaller size of the ball allows you to set it up for shooting in places where large balls will not fit.
Convenience. This size makes it easy to hold the ball between your index finger and thumb.
Disadvantages
The weight of is also a disadvantage in this case. A heavy ball is usually motionless, remains in the same place where it was installed. A small ball, on the contrary, can be moved, for example, by a gust of wind.
Focus and Distortion - This size of crystal ball will have a smaller sweet spot of focus and most of the proportions will be distorted. Using a smaller aperture can help a little here when more of the ball is in focus.
Lens requirements. If you want to fill the entire frame with a small lensball, you'll need a macro lens.
- Medium crystal ball
Applies to balls with a diameter of 80 mm. Many photographers consider this size to be ideal.
Benefits
Weight. It is slightly heavier than the small one, but still not too heavy or bulky.
Size is the normal size, although you may not be able to fit a sphere in a small space. To photograph through such a ball, a standard lens is enough, a macro is not needed here.
Focus and distortion. At this size, the in-focus area inside the ball dominates, and the distortion at the edge is much less noticeable.
Drawbacks
Size - This lensball size has very few downsides. However, if you want to take a picture where you focus only on the edge of the ball, it will be more difficult. Likewise, using a ball to cover up a background object will be more difficult because the ball is still too small.
- Large optical ball
Large balls are crystal lenses with a diameter of 100 mm or more. This size is not very common among most photographers. Although it has a noticeable weight, however, with its help, better images are obtained.
Benefits of
Optics - This ball size has better optical properties and most of the ball will be in sharp focus.
Comfortable - the right size to fit the ball in your own or someone else's palm. One of the classic lensball compositions is the hand holding the glass ball.
Size - this makes it much easier to fill the frame with your ball and even hide some background elements behind the ball.
Disadvantages The obvious disadvantage here is the weight. It makes the camera bag noticeably heavier.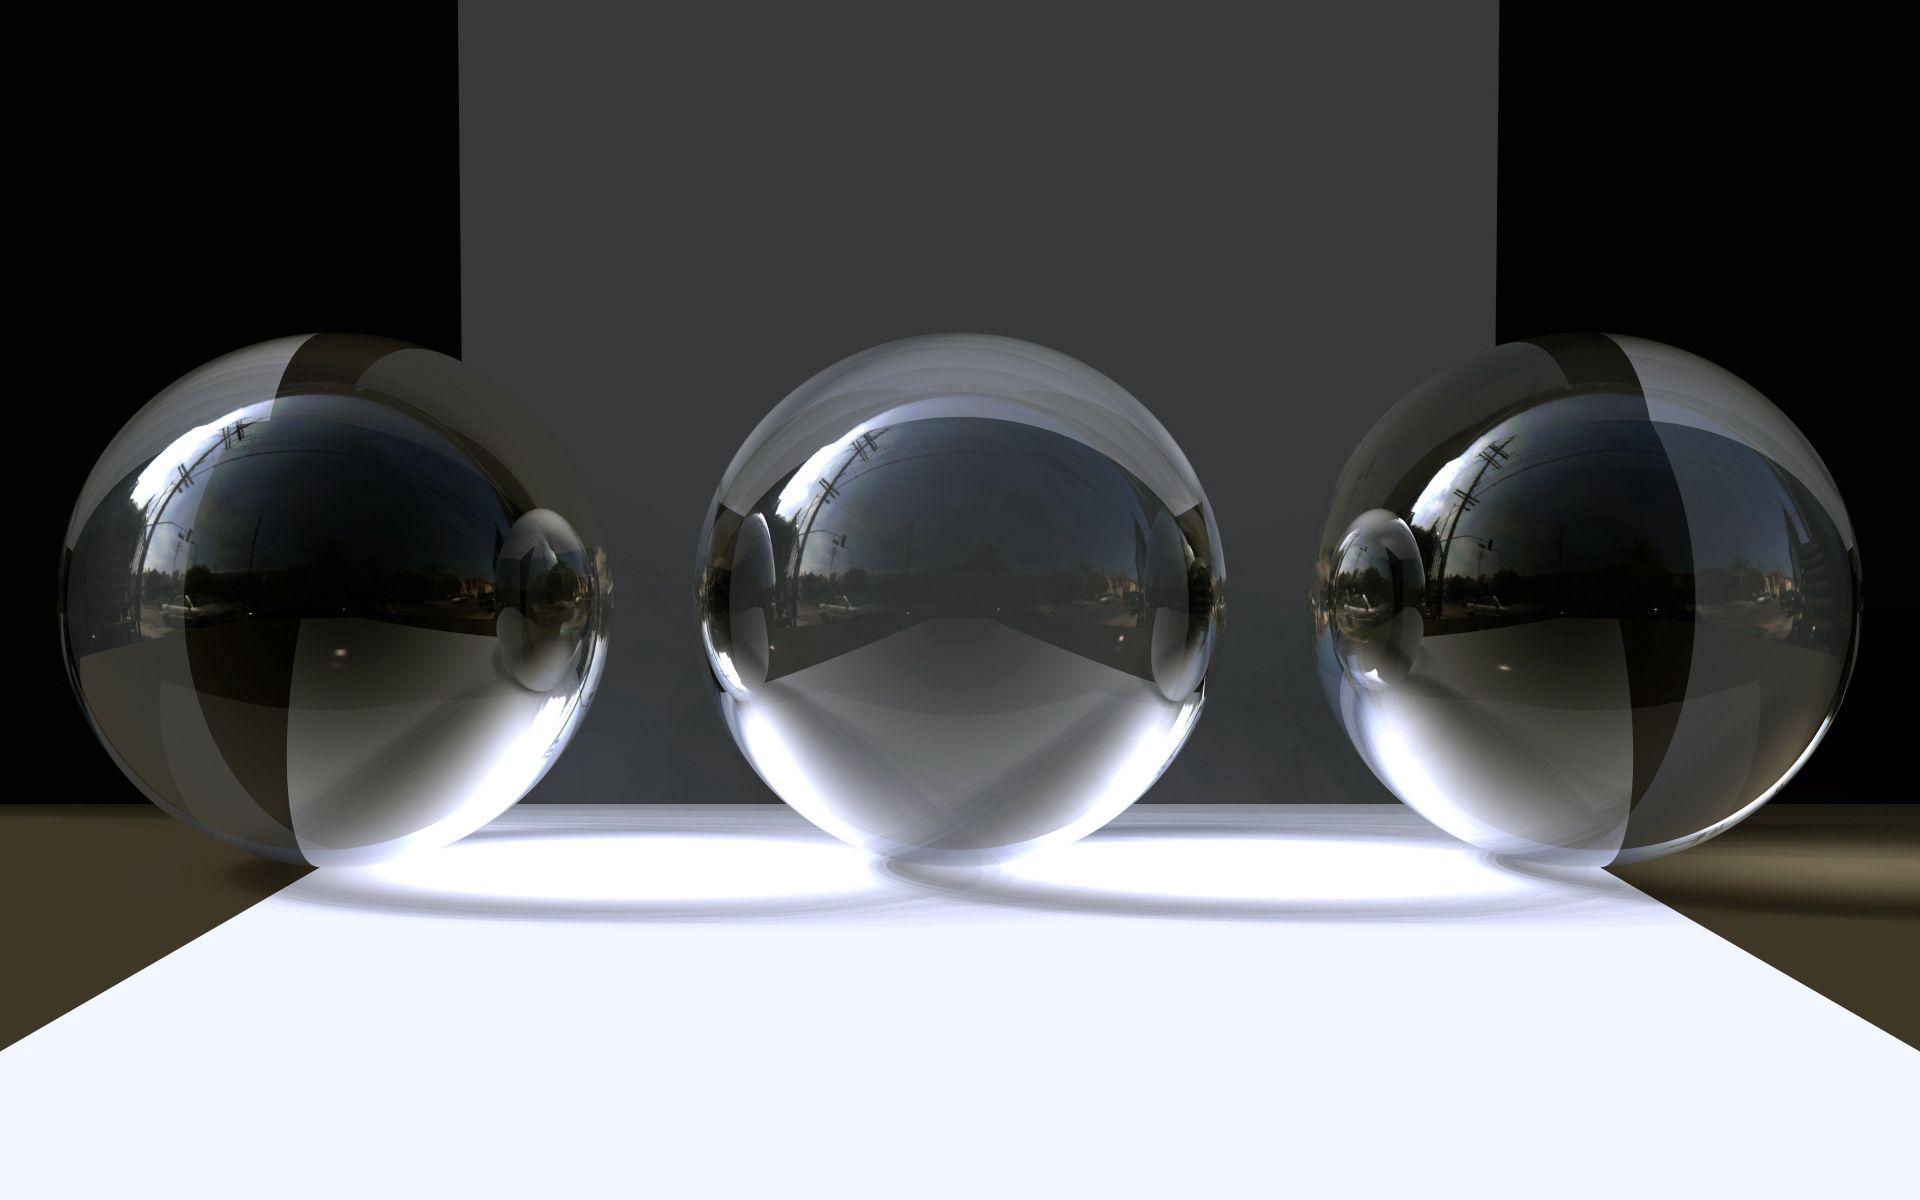 Its weight is equivalent to the weight of an additional lens, so the photographer will need to choose which one to take with him.
Size - this ball will take up a lot of space in your bag.
Security Issues
The crystal ball is indeed a great photographic accessory, however there are some safety issues associated with its use. You may find that the airport staff may consider the crystal ball to be a lethal weapon! This means that you will need to put it in your checked baggage, hand luggage will not work here.
So what are these security problems?
Fire hazard. Keep crystal balls away from the sun. The glass will act like a magnifying glass, focusing the rays, and may cause smoldering or even a fire. And by the way, you can burn yourself when you hold it in your hand, be careful.
Gravity - due to its spherical shape, the ball can roll. If he rolls off the edge of a tall building, he can damage anything he falls on.