How to avoid chromatic aberration
What Is Chromatic Aberration? How to Avoid or Fix It • PhotoTraces
Do your images show signs of chromatic aberration, also known as color fringing or purple fringing?
It’s a common problem. And it can easily reduce the quality of your images.
Fortunately, there are a few simple ways to deal with chromatic aberration so that your images are free from color fringing.
In this article, I’m going to explain how chromatic aberration occurs. And then I’m going to show you several easy ways to get rid of it.
Let’s dive right in.
What Is Chromatic Aberration?
What Is Chromatic Aberration? Chromatic aberration is color fringing that occurs in high-contrast areas of your photos. You’ve probably noticed it as purple fringes in your images (though it can also be red, green, blue, and more).
Look at the landscape photo:
Sony Zeiss 16-70mm f/4 lensDo you see the purple and green fringing along the edges of the trees?
Let’s zoom in:
300% magnificationThat’s chromatic aberration.
What Causes Chromatic Aberration?
Chromatic aberration occurs when light passing through your lens bends at different angles. You see, some wavelengths of light bend more than others when they pass through the lens. And this causes certain colors (especially purple, red, green, and blue) to appear in unwanted places.
Chromatic Aberration – Visual ExplanationChromatic aberration is a problem caused by your lenses, and basically every lens displays chromatic aberration to some extent.
But you don’t need to be afraid of chromatic aberration. Because there are methods of minimizing it while shooting–and, if it becomes a serious problem, you can remove it easily in programs such as Lightroom or Photoshop.
How to Avoid Chromatic Aberration?
1. Use High-Quality Lenses
The first way to minimize chromatic aberration is to buy high-quality lenses. The better the glass, the less chromatic aberration will be an issue. This is because the best lenses (Canon 17-40mm for example) are made to limit the separation of light when it passes through the glass elements.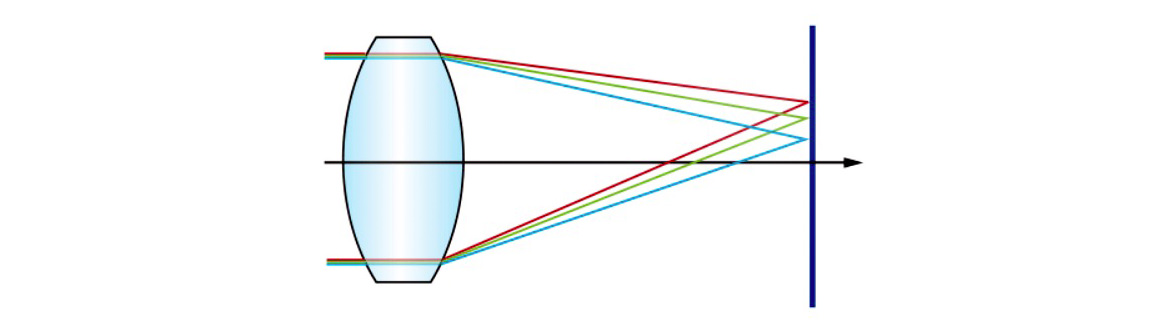 Look for lenses with low-dispersion elements. These are designed to significantly reduce color fringing.
But what if you can’t afford these expensive lenses? What then?
2. Avoid High Contrast Scenes
First of all, you can avoid situations that result in a lot of color fringing. The fact is that many scenes don’t trigger much chromatic aberration at all. The key is to keep things low-contrast.
Related: Wide Angle Lenses: The Ultimate Guide
So if you’re shooting a dark subject on a white background, change the background. Try to shoot your subject on a background that’s similar to its main colors. Instead of shooting a purple flower against a bright white background, shoot against a green background. And chromatic aberration will instantly become less of an issue.
3. Increase the Aperture Value
Another way that everyone can minimize chromatic aberration is by stopping down. That is, use an aperture a stop or two beyond your lens’s maximum. If you’re working with an f/2.8 lens, stop down to f/4 or f/5.6. A lot of the color fringing will disappear.
4. Keep Your Subject Close to the Center
You can also try placing your subject toward the center of the frame. One type of color fringing (lateral chromatic aberration) only occurs at the edges of the frame. By positioning your main subject at the center of the image, you reduce the effect that CA has on your photo.
But sometimes, chromatic aberration gets out of hand, and there’s nothing you can do about it in the field.
That’s where post-processing comes in.
How Do You Fix Chromatic Aberration With Post-Processing?
When editing out chromatic aberration, I like to use Lightroom or Photoshop, and I suggest you do the same. Both of these programs offer powerful tools to rid your images of chromatic aberration–without significantly damaging image quality.
If you prefer to use Lightroom (which is my go-to image editing program), then read on.
How to Remove Chromatic Aberration in Adobe Lightroom
There are two simple ways of getting rid of chromatic aberration in Lightroom.
Both require the Lightroom Lens Corrections panel.
- Step 1: Open Lightroom, then click on the Develop module.
- Step 2: Scroll down on the right-hand side until you see the Lens Corrections heading. Click to open the panel.
- Step 3: Simply check the Remove Chromatic Aberration box.
This generally does a good job of removing fringing
However, if you’re not satisfied with this method, you can remove chromatic aberration manually:
- Step 4: Click on the Color option in the Lens Corrections panel.
- Step 5: Then click on the eye-dropper tool.
- Step 6: Place the eye-dropper tool along the fringing and simply click – and watch as the fringing is removed (see image below).
You’re also free to adjust the removal levels manually via the sliders in the Lens Corrections panel. For instance, you can increase the purple fringing removed by pushing up the Amount slider.
See also: High Quality Fujifilm Lenses Today
You can even change the fringing hue with the Purple Hue and the Green Hue sliders. Just drag the sliders to alter the color you want to remove.
How to Remove Color Fringing in Photoshop
Based on my experience, the Lightroom chromatic aberration removal methods cover 99% of situations. And only in severe cases, I need to use Photoshop.
Go ahead and watch this video, which takes you through the color fringing removal process in Photoshop:
Conclusion
Now you know exactly what chromatic aberration is–and that it’s nothing to be worried about.
Because it’s easy to minimize by shooting with high-quality lenses, or by stopping down your lens.
And if you end up with an image full of unsightly chromatic aberration, you can always remove it with a couple of quick clicks in Lightroom!
At the same time, it is much better to choose the lens wich produces minimal chromatic aberration.
Articles Related to “What Is Chromatic Aberration? How to Avoid or Fix It“
by Jaymes Dempsey
Jaymes Dempsey is a photographer from Ann Arbor, Michigan. He’s obsessed with nature, and loves teaching people new photography tips and tricks. To see more of Jaymes’s work, check out his portfolio website (https://www.jaymesdempsey.com/) or his photography tutorial blog (https://www.jaymesdempsey.com/blog/).What It Is and How You Can Avoid It
Chromatic aberration is a huge image-quality killer – but many photographers don’t know what it is and how it can be prevented.
In this article, I’m going to share everything you need to know about chromatic aberration, including:
- Why it happens
- How to identify it
- Four simple strategies to minimize its effects
So without further ado, let’s discuss how to deal with that pesky chromatic aberration once and for all.
What is chromatic aberration?
Chromatic aberration (also known as color fringing or dispersion) is a common problem in lenses that occurs when colors are incorrectly refracted (bent) by the lens; this results in a mismatch at the focal point where the colors do not combine as they should.
Confused? Don’t be. To help understand this a bit better, remember that the focal plane is your sensor’s point of focus, where all the light from your lens should join together to be correctly captured and recorded. But depending on the construction of your lens, your chosen focal length, and even the aperture that you’ve used, certain wavelengths (colors) may arrive at points in front of or behind the focal plane.
Take a look at the diagram below. Do you see how the red, green, and blue light hits the sensor in different spots? That’s chromatic aberration at work.
When CA occurs, you end up with telltale color fringing around the edges of your photograph. Check out the photo below. The left-hand side shows red and green fringes along the sharp edges of the subject. As you can see, it doesn’t look so great.
But although you can edit out low levels of chromatic aberration in Photoshop and Lightroom, the reality is that it’s annoying to remove CA from each and every photo, plus every moment you spent touching up a photo is one moment less that you have for photography.
Why does chromatic aberration occur?
Chromatic aberration happens because your lens acts as a prism. It bends light, and much like the triangle-shaped prism made famous by Pink Floyd, colors passing through the lens are split at different angles.
Here, it’s important to remember that light is actually made up of several different wavelengths (colors). So for your camera’s sensor to detect the combined color of light, your lens needs to make all wavelengths of that particular ray hit the exact same point on your sensor.
It may sound simple, but various wavelengths (and thus various colors) strike your lens all at once, and each of these wavelengths will behave slightly differently depending on the lens glass that it is passing through.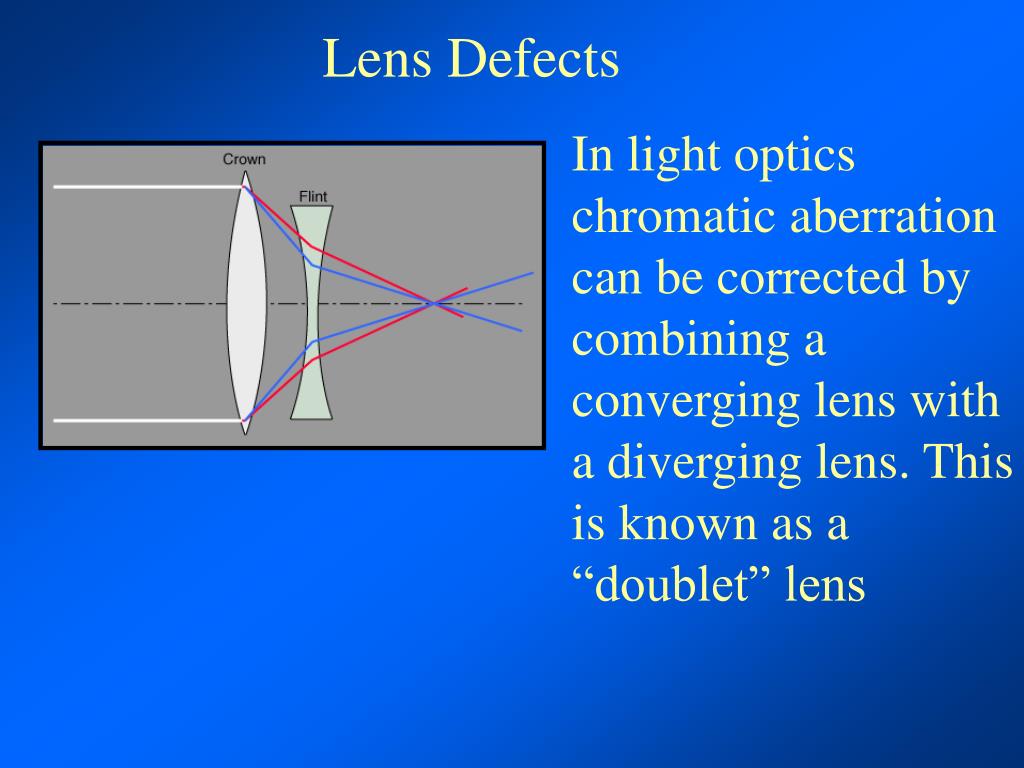
The feat of engineering required to correctly align all of these different light rays is usually achieved by the manufacturer’s use of a lens array. In fact, if you were to pull your lens apart, you’d probably find upward of 16 lens elements – all designed to correct for various things along the light’s journey between your lens and your sensor.
Unfortunately, this is also where chromatic aberration tends to rear its ugly head. Hidden within the design of these lens elements are defects – either in the glass or the design of the lens itself – which, under specific conditions, may cause your photos to exhibit CA.
Now, I’m not saying you need a pro-level lens. In fact, a key point is that all lenses suffer from chromatic aberration in one form or another, no matter the cost. What matters is whether or not your lens exhibits visible chromatic aberration, and whether the amount of visible CA is a dealbreaker for your particular needs.
Also, even if you’re stuck with a CA-prone lens, you can still take steps to prevent image-quality issues, as I discuss in the next section.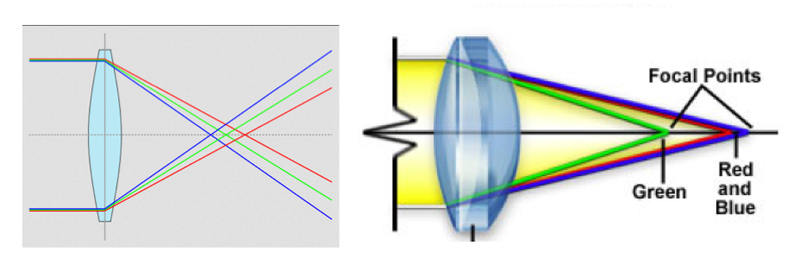
How to avoid chromatic aberration defects: 4 strategies
Chromatic aberration is a major problem, especially on cheap lenses. But the good news is that, if you are stuck working with a lens that exhibits some form of visible chromatic aberration, there are several easy-to-understand strategies to remove or minimize its effect on your photos.
1. Avoid high-contrast scenes
Chromatic aberration tends to flare up when shooting high-contrast scenes. Particularly problematic are darker subjects surrounded by white backdrops, landscapes against a bright sunrise, or – as in the example of the cheetah above – heavily backlit subjects.
There’s no easy in-camera method of avoiding contrast. So there’s often nothing you can do here except adjust your composition. Swap your backdrop out to something that more closely matches your subject’s tones, or simply wait for more favorable lighting conditions.
If you absolutely must capture an image as-is, then shoot in RAW and prepare for a touch-up in post-production.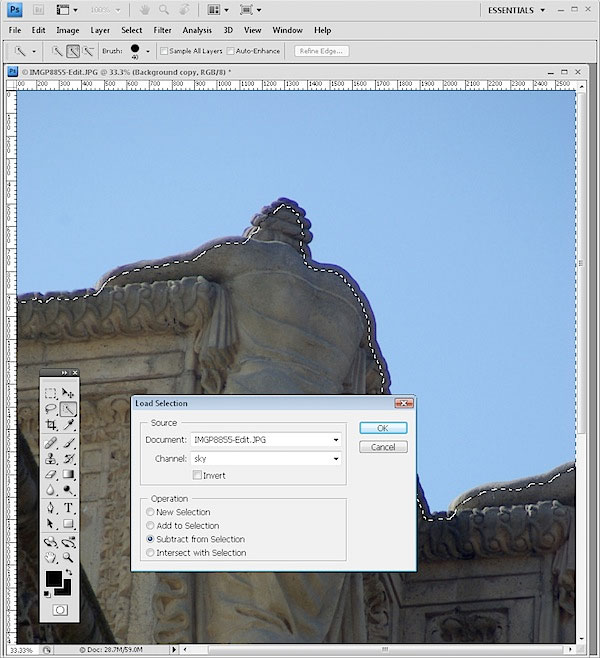
2. Adjust your focal length
Although it’s nice to have access to a wide range of focal lengths, the fact is that most zoom lenses exhibit chromatic aberration at their focal length extremes. So setting the focal length toward the middle of your lens’s range will usually help remove the offending CA.
Note that using a zoom lens at its widest will usually introduce various other defects in your image. So if you’re set on a wide-angle perspective, choose a prime wide-angle lens to handle the job, or make a panorama at a longer focal length, then join the photos in post-processing.
3. Stop down your aperture
Although the result will depend on the type of lens you are using, stopping down your aperture helps minimize most lens defects, including chromatic aberration.
(You’ll need to consider reducing the shutter speed or boosting the ISO to compensate for the light loss.)
So instead of using an f/2.8 or f/4 aperture, try going to f/8 or f/11 – then take a few test shots to see if the chromatic aberration has disappeared.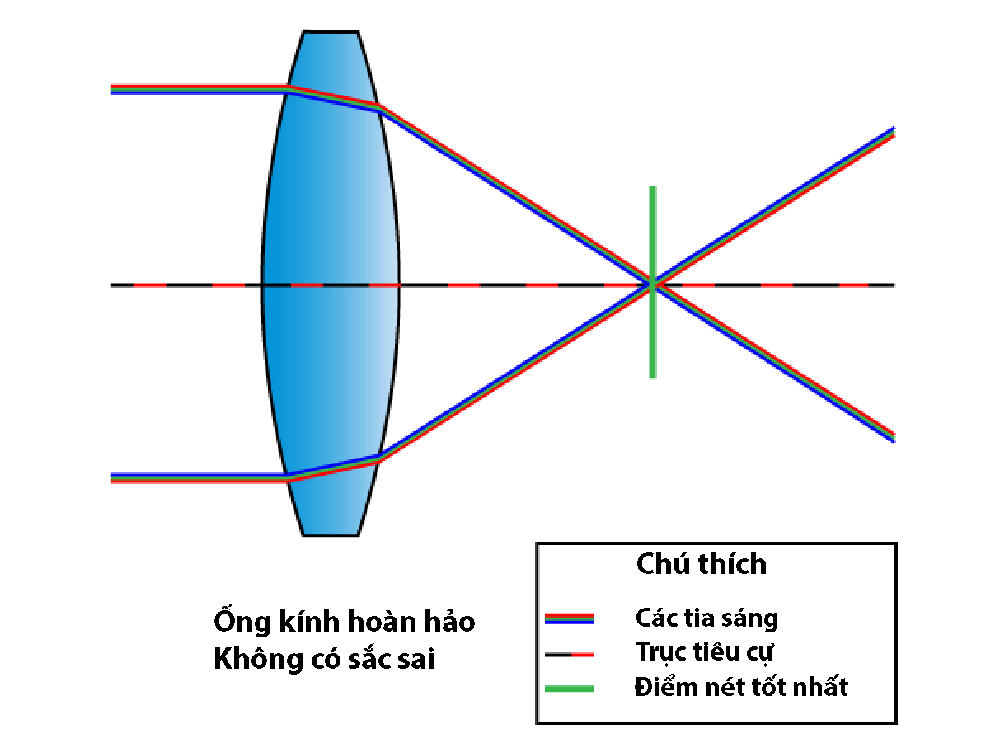
4. Reframe with your subject at the center of the image
Chromatic aberration is often more noticeable toward the edges of the frame, not the center.
(This is generally due to the curvature of the lens elements.)
Therefore, if you reframe your shot but put your main subject closer to the middle, you’ll often end up with little-to-no chromatic aberration on your subject.
Of course, you may still have noticeable CA around the edges of the frame, but you do have the option to crop this away. It’s not ideal if you need to retain every pixel in your photo (e.g., for large prints), in which case you should consider one of the other preventative measures discussed above. But if you’re creating small prints or you plan to distribute your photo online, cropping shouldn’t be a big issue.
Chromatic aberration: final words
Well, that’s it:
Everything you need to know about chromatic aberration, including what it is and how to avoid it.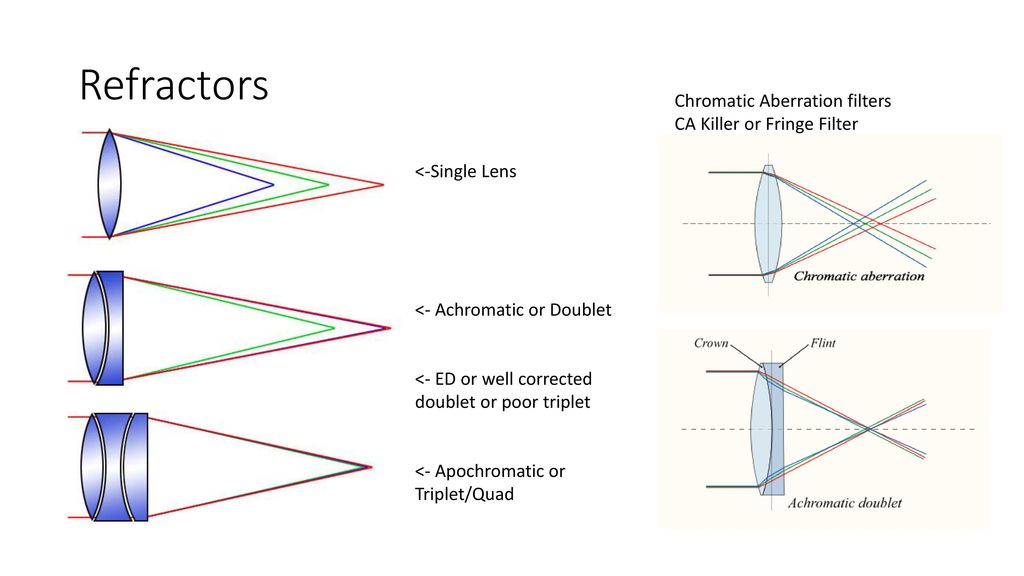
Now you know how to keep your images free of CA. And you can capture stunning photos – even with cheaper lenses.
Over to you:
Are you struggling with chromatic aberration in your photos? Have you tried any of the measures discussed above? Share your thoughts (and images) in the comments below.
Chromatic aberrations. What is it and what is it eaten with?
Chromatic aberrations (CA), or they are also called light dispersion or color fringing, are a problem in most optical systems due to the mismatch of focal lengths for light rays with different wavelengths (rays of different colors). As a result, their misalignment appears at the focal point of the lens. In this case, the image receives a colored border around the edges of the photo. And, although you can remove small levels of chromatic aberration in a graphics editor, the reality is that it cannot be completely corrected by software processing.
Why do HA occur?
Chromatic aberration occurs because your lens acts as a prism to refract light. But due to certain properties of glass, the rays of light passing through it, consisting of a large number of waves of different lengths (and, consequently, different colors), come out at different angles. Therefore, in order for the camera sensor to correctly render this color combination, your camera lens must focus all the rays of different colors at one point on the sensor.
The passage of light rays through lenses with the decomposition of light into a spectrum as a result of dispersion.
1. The distance from the lens to the point of intersection of the beam with the optical axis of the lens is different for each beam of the spectrum. Rays are not going to one point (there is no single focal length). Chromatism is observed - the difference in the focal lengths of the light components.
2. Reducing chromatism with an achromatic lens
Optics manufacturers typically use a large number of lenses to correct all these light rays. If you have seen the design of a lens, then you know that there are dozens of its constituent elements in its design, aimed at correcting the various components of the light source along the way through the lens to the camera sensor. Unfortunately, this is the weak point where chromatic aberrations tend to show up. Even slight deviations in the production of lens elements under certain conditions can lead to the appearance of a traitorous CA in your photographs.
This does not mean that you need to urgently buy a professional-grade lens (although, in principle, it will not be superfluous). In fact, all lenses suffer from chromatic aberration to some extent. What is more important is whether your lens suffers from CA visible in the pictures, and whether you have an effective means to combat them.
How to avoid chromatic aberration?
Chromatic aberration can be effectively removed by image processing in an editor if you shoot in RAW format. But it would be most correct to try to fix the problem in the original source - the camera. There are several easy-to-understand shooting techniques that will help you minimize the visible effect of HA. Let's take a look at them0003
1. Avoid high contrast scenes
Chromatic aberrations tend to appear in high contrast scenes. In particular, if the light source is behind the subject being photographed, especially in photographs taken against a white background, landscape photographs taken at sunrise. In such situations, you should try to recompose the scene being shot. Choose a different background that better matches the contrast of your subject, or wait for better lighting conditions. If the scene you are shooting needs to be captured in this way, or there is simply no other way to shoot, then switch to RAW format, in which case you will have to make adjustments in the post-processing of the final photograph.
2. Control the focal length of the zoom lens
It's nice to have a zoom lens for a wide range of focal lengths, but the reality is that CAs show up at the short and long end of focus. Therefore, the possibility of choosing a focal length close to the average, as a rule, helps to remove the issue of visible chromatic aberrations.
For example, taking a picture with a zoom lens at wide FRs results in not only chromatic aberration, but also various other artifacts in the image. Consider shooting a panorama in multiple frames at a focal length that does not show visible chromatic aberration, and then merge the images in the editor.
3. Increase the aperture value
As a general rule, "squeezing" the aperture helps to reduce noticeable defects in most lenses, including chromatic aberration. Keep in mind that you will need to increase your shutter speed or raise your ISO to compensate for the loss of light.
4. Position the subject close to the center of the image
Chromatic aberration is most pronounced as you move from the center of the frame to the edges. This is mainly the result of the uneven curvature of the objective lenses. Therefore, the location of the main subject closer to the middle of the frame being shot will help reduce or even completely eliminate CA, and then compose the frame in post-processing.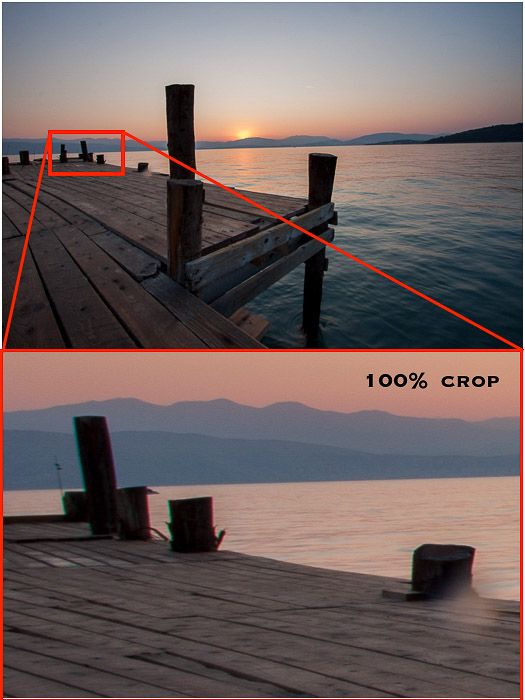
It should also be mentioned that in many modern cameras XA is corrected automatically. Correction is performed by the camera processor when converting the file to JPEG and does not reduce the clarity of the image.
Chromatic aberration: what it is and how to fix it | Articles | Photo, video, optics
How to make a photo pleasing to the eye? Ensure that it is not overexposed or too dark. Raise contrast and sharpness. And, of course, remove the flaws that optics introduce. These include distortion of the image due to the type of lens (for example, a wide-angle lens stretches the corners), vignette and chromatic aberration.
Understanding what chromatic aberration is, how to remove it in different graphic editors - Photoshop, Lightroom and Capture One.
Photo: Elizabeth lentils / Instagram.com/chechevic_a
What is chromatic aberration
The cause of chromatic aberration
How to avoid chromatic aberration
How to remove chromatic aberrations in the Photoshop
in the ADERTISITION in ADERTISITION in ADERTISITIA0093 How to Remove Chromatic Aberration in Lightroom
How to Remove Chromatic Aberration in Capture One
What is Chromatic Aberration
Chromatic Aberration is the distortion that occurs when light passes through an objective lens. Usually these are colored halos or stripes that were not in the photographed scene.
Most often, chromatic aberrations appear at the junction of contrasting borders. These are places where two different colors or brightnesses collide. For example, a model in a black coat against a bright winter sky.
Cause of chromatic aberration
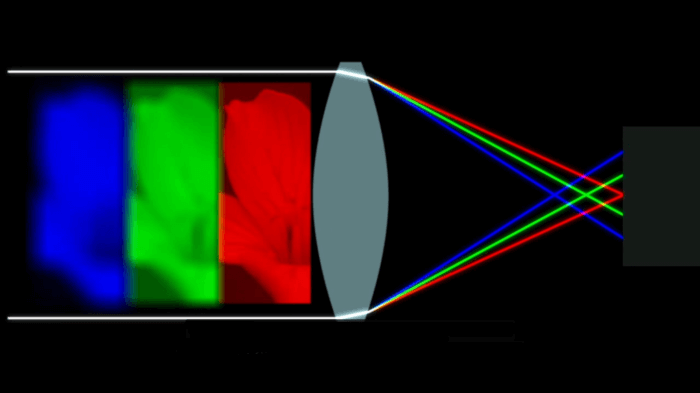
Chromatic aberration occurs when a light beam is refracted into a spectrum. That is, light enters the lens and is refracted there with the help of lenses.
We can see the refraction of light in the form of chromatic aberration in photography due to parasitic dispersion, when the focal lengths for rays of different colors do not match. This happens because colors have different wavelengths. It is because of this that chromatic aberration can be red, purple, yellow, and any other shade.
We are talking about the dispersion of light, which Newton discovered back in 1672. One of the simplest and most understandable phenomena of dispersion is the rainbow or flashes of light that play in cut gemstones.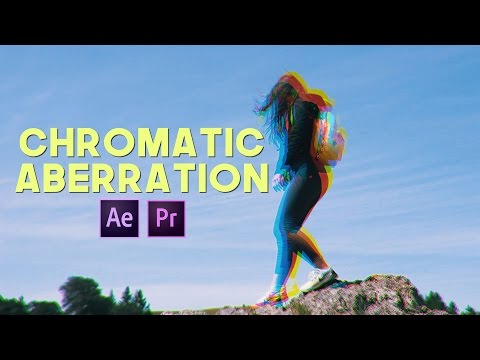
Illustration of Newton's experiment. A beam passing through a prism is decomposed into a spectrum of primary colors. Chromatic aberration is when we see one of these colors during refraction. Therefore, use high quality professional series lenses.
Or read detailed reviews before buying - a good review will always contain information about lens chromatic aberration and other optical distortions.
- Shoot at higher apertures. For example, around f4-f5.6. This is especially true for amateur-level optics.
Compensate for lack of light by raising ISO, fast shutter speeds, using external flashes. Here we tell you how to set up a camera flash.
- If you have a zoom lens, shoot at medium settings. So, if the lens is 24-70mm, then at 24mm the chance of getting chromatic aberration is higher than when shooting at 40mm.
If none of the methods helped and chromatic aberration still appeared, then it can be quickly removed in post-processing. Below we will tell you how to do this in different graphic editors.
How to remove chromatic aberration
Chromatic aberration is a colored halo or line around an object. It turns out that in order to remove this optical distortion, you need to find it and discolor it. The removal of chromatic aberrations in any graphic editors is based on this principle.
In the illustration on the left, purple chromatic aberration is visible on the building when zoomed in closely. In the photo on the left, chromatic aberration was removed using Photoshop / Illustration by the author
How to remove chromatic aberration in Photoshop
This option is best for those who shoot in .JPEG.
1. Open a photo.
2. Duplicate the layer. To do this, in the palette Layers / Layer click on the layer with the right mouse button on the layer and select Duplicate Layer .
You can quickly duplicate a layer using the hot key Ctrl+J / Illustration by the author
3. Select the duplicate you just made. Go to Filter / Filter - Blur / Blur - Gaussian Blur / Gaussian Blur . The blur radius depends on the size of the photo and is selected experimentally. But you can focus on values from 2 to 7 pixels.
4. Apply blur. After that set the blurred layer to blend mode Color/Color . Do not confuse with Hue.
How to remove chromatic aberration in Adobe Camera Raw
An option for those who shoot in .RAW. The first thing you'll see when you open Photoshop is the Adobe Camera Raw (ACR) module for developing RAW files.
1. Open the file in ACR and find the Lens Corrections tab.
2. Check Remove Chromatic Aberration.
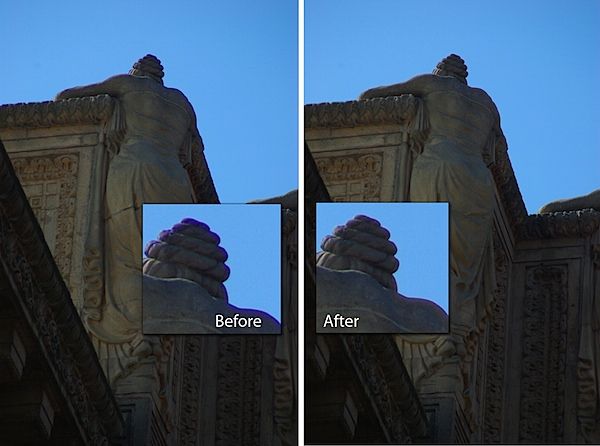
An example of chromatic aberration. On the left is the image before it was removed. It appeared in the form of blue and red halos along the contour of the tree / Illustration by the author
How to remove chromatic aberration in Lightroom
1. Import the desired file into Lightroom.
2. Go to the Develop tab.
3. On the bottom left side of the screen, find the Lens Corrections tab.
4. Click the Remove Chromatic Aberration checkbox.
An example of chromatic aberration. On the original, it appeared as purple and cyan halos around the branch / Illustration by the author
How to remove chromatic aberration in Capture One
Capture One removes chromatic aberration by default as soon as you open a RAW file in it. But, if for some reason the function did not work, then the algorithm is as follows:
1. Find the button Lens Corrections in the form of a circle.
Depending on your settings, the main editing panels can be on the left or right. In this case, they are on the left by default / Illustration by the author
2. Click the checkbox Chromatic aberration / Cromatic Aberration .