Intro into photography
20 Essential Photography Tips for Beginners
- Bob Books
- 1st January 2021
At Bob Books, we are dedicated to supporting both established and up-and-coming photographers with our professionals discount and logo-free software, ideal for creating client photobooks or professional portfolios.
If you’ve just purchased your first DSLR and want to learn the basics or are looking for simple ways to update your existing photography skills, the following tips should help you build a strong foundation.
Of course, photography is an art you’ll never really be ‘done’ learning. The best way to keep improving is to practice often, make mistakes and be open to learning from others, whether they’re well-established photographers or newcomers to the craft.
- 1.
Learn to hold your camera properly
- 2. Start shooting in RAW
- 3. Understand the exposure triangle
- 4. Wide aperture is best for portraits
- 5. Narrow aperture is best for landscapes
- 6. Learn to use Aperture Priority and Shutter Priority modes
- 7. Don’t be afraid to raise the ISO
- 8. Make a habit of checking the ISO before you start shooting
- 9. Be careful with your on-camera flash
- 10.
 Learn to adjust white balance
 - 11. Learn to read the histogram
- 12. Play with perspective
- 13. Understand the rule of thirds
- 14. Eyes should always be in focus
- 15. Pay attention to the background
- 16. Invest in a tripod
- 17. Shoot in the early morning and evening
- 18. Invest in some good photo editing software
- 19. Be selective
- 20.
 Learn from your mistakes
1. Learn to hold your camera properly
This may sound obvious, but many new photographers don’t hold their camera correctly, which causes camera shake and blurry images. Tripods are of course the best way to prevent camera shake, but since you won’t be using a tripod unless you’re shooting in low light situations, it’s important to hold your camera properly to avoid unnecessary movement.
While you’ll eventually develop your own way of holding the camera, you should always hold it with both hands. Grip the right side of the camera with your right hand and place your left hand beneath the lens to support the weight of the camera.
The closer you keep the camera to your body, the stiller you’ll be able to hold it. If you need extra stability you can lean up against a wall or crouch down on your knees, but if there’s nothing to lean on, adopting a wider stance can also help.
2.
 Start shooting in RAW
RAW is a file format like jpeg, but unlike jpeg, it captures all the image data recorded by your camera’s sensor rather than compressing it. When you shoot in RAW you’ll not only get higher quality images but you’ll also have far more control in post processing. For instance, you’ll be able to correct problems such as over or underexposure and adjust things like colour temperature, white balance and contrast.
One downside to shooting in RAW is that the files take up more space. Additionally, RAW photos always need some post processing so you’ll need to invest in photo editing software.
Ultimately, however, shooting in RAW can transform the quality of your images, so if you have the time and space, it’s definitely worth it. If you’re not sure how to switch from jpeg to RAW, check your camera’s manual for detailed instructions.
3. Understand the exposure triangle
Although it can seem a bit daunting at first, the exposure triangle simply refers to the three most important elements of exposure; ISO, aperture and shutter speed. When you’re shooting in manual mode, you’ll need to be able to balance all three of these things in order to get sharp, well-lit photos.
ISO: ISO controls the camera’s sensitivity to light. A low ISO setting means the camera will be less sensitive to light, while a higher ISO means it will be more sensitive to light. An ISO setting of 100 to 200 is usually ideal when shooting outdoors during the day, but when shooting in low light situations, such as indoors or at night, a higher ISO of 400 to 800 or higher might be necessary.
Aperture: Aperture is the opening in your lens and controls how much light gets through to the camera’s sensor. A wider aperture (indicated by a lower f-number) lets more light through, while a narrow aperture (indicated by a higher f-number) lets less light through. A wide aperture is great when you want to isolate your subject, but when you want the whole scene to be in focus, such as with group shots, you’ll need to use a narrow aperture.
Shutter speed: Shutter speed controls how long the shutter stays open when you take a picture. The longer the shutter stays open, the more light gets through to the camera’s sensor. A fast shutter speed is good for freezing action, while a longer shutter speed will blur motion. Read more about understanding shutter speeds on our blog.
4. Wide aperture is best for portraits
When shooting portraits, whether of people or animals, your subject should be the main focus of the picture and the best way to achieve this is to use a wider aperture. This will keep your subject sharp, while blurring out any distractions in the background.
Keep in mind that a smaller f/ number means a wider aperture and the wider the aperture, the more dramatic this effect will be. Some lenses can go as low as f/1.2, but even apertures of f/5.6 can do the trick. To better understand how the aperture affects your images, switch to Aperture Priority Mode (Av or A) and try taking some shots with different apertures. If you want to get some tips and inspiration about taking portraits, head over to our interviews with photographers Reme Campos, Sian Davey and Samir Hussein.
Images © Sian Davey
5. Narrow aperture is best for landscapes
Landscape photographs require a different approach, because everything from the rocks in the foreground to the mountains in the background should be sharply in focus. So any time you’re shooting a scene where you want everything to be fully in focus, you should select a narrow aperture rather than a wide one.
A larger f/ number means a narrower aperture, so go towards f/22 or higher, depending on what your lens allows. Again, using Aperture Priority Mode (Av or A) will allow you to experiment with different apertures without having to worry about adjusting the shutter speed each time. Take a look at our beginners guide to depth of field for more hints and tips.
6. Learn to use Aperture Priority and Shutter Priority modes
If you want to venture out of automatic mode but don’t feel confident enough to switch to manual yet, Aperture Priority Mode (A or Av) and Shutter Priority Mode (S or Tv) are two very useful options that are available on most cameras and will give you more control without being overly complicated.
Aperture Priority Mode lets you select the aperture you wish to use and then the camera adjusts the shutter speed accordingly. So for instance, if you’re shooting a portrait and want to blur the background, you could simply select a wide aperture and let the camera figure out what shutter speed is appropriate.
In Shutter Priority Mode, you select the shutter speed you want to use and the camera will select the aperture for you. So for example, if you want to get a clear shot of your dog racing towards you, you can select a fast shutter speed and let the camera choose the aperture for you.
7. Don’t be afraid to raise the ISO
Many photographers try to avoid ever shooting in high ISO as they’re afraid it will lead to grainy-looking photos or ‘noise.’ But while it’s true that using higher ISO can lead to lower image quality, there’s a time and place for everything.
If you can’t lower your shutter speed due to motion blur and a tripod isn’t an option, it’s better to get a sharp photo with a bit of noise than no photo at all, and you’ll be able to remove a lot of noise in post processing anyway. Moreover, camera technology has improved so much in recent years that it’s now quite possible to produce amazing photographs even at ISO 1600, 3200, 6400 or higher.
One way to minimise noise when shooting at higher ISOs is to use a wider aperture whenever possible. Slightly overexposing your image can also help, because making light areas darker in post processing won’t increase noise, whereas making dark areas lighter definitely will.
8. Make a habit of checking the ISO before you start shooting
Discovering that you’ve accidentally shot a whole series of images in ISO 800 on a bright sunny day can be extremely frustrating, especially if the photos were taken to document a special occasion such as a birthday, anniversary or other event that can’t be recreated.
It’s an easy enough mistake to make, though, so to avoid this unpleasant surprise, make a habit of checking and resetting your ISO settings before you start shooting anything. Alternatively, make a habit of resetting this every time you’re ready to put your camera back in its bag.
9. Be careful with your on-camera flash
If you’re not careful, using your camera’s built-in flash at night or in low light can lead to some unpleasant effects like red eyes and harsh shadows. In general, it’s better to crank up the ISO and get noisier photos than to use the on-camera flash and risk ruining the shot altogether.
Sometimes, however, there may simply not be enough light, and if you don’t have off-camera lighting, you’ll be left with no choice but to use the built-in flash. If you find yourself in this situation and don’t want to miss the shot, there are a couple of things you can do. First of all, find the flash settings in your camera’s menu and reduce brightness as much as you can.
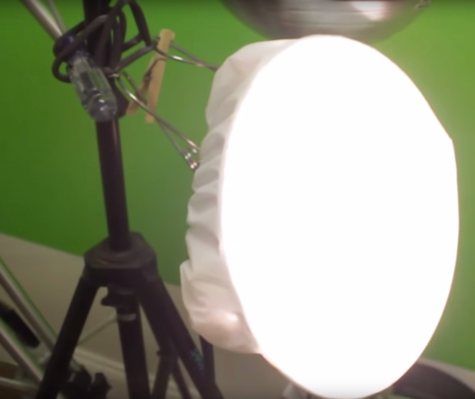
Second, you can try diffusing the light from the flash by putting something over it. Securing a piece of paper or opaque scotch tape over the flash, for instance, can help diffuse the light and soften it. Or you could bounce the light off the ceiling by holding a bit of white cardboard in front of it at an angle.
10. Learn to adjust white balance
White balance can help you capture colours more accurately. Different types of light have different characteristics, so if you don’t adjust the white balance, the colours in your photography may take on a slightly blue, orange or green hue or ‘temperature.’
White balance can be fixed in post processing, of course, but it can become a bit tedious if you have hundreds of photos that need slight adjustments made, so it’s better to get this right in the camera. Some of the standard white balance settings you’ll find on your camera include Automatic White Balance, Daylight, Cloudy, Flash, Shade, Fluorescent and Tungsten.
Each of these is symbolised by a different icon, so if you’re not sure which is which, check your camera’s manual. Automatic white balance works alright in some situations, but it’s generally best to change the setting according to the type of light you’re shooting in.
11. Learn to read the histogram
Although you probably glance at your camera’s LCD screen to see if you’ve correctly exposed an image, this isn’t a reliable way to assess exposure as images may appear brighter or darker on the screen than they really are. The best way to accurately check exposure at the time of shooting is to use your camera’s histogram, which is the little graph that shows up next to your images.
Learning to interpret the histogram will take some time and practice, but the brief explanation of it is that it gives you information about the tonal range present in your image. The left side of the graph represents the blacks or shadows and the right side represents the whites or highlights.
If the graph is skewed to the right, your image may be overexposed and you’ll have lost a lot of detail in the lighter areas of the photo. If it’s skewed to the left, it’s likely underexposed and will be too dark. For a more in-depth explanation of the histogram, check out Digital Camera World’s histogram cheat sheets.
12. Play with perspective
The best way to get a bit more creative with your photography is to experiment with perspective. The exact same scene can often look very different when approached from a different angle, and capturing your subject from above or below may change the whole feel of a photograph.
Not every angle will work for every photograph, of course, but you’ll never know what works and what doesn’t if you don’t experiment. When shooting animals or children, you can try getting down to their level and viewing the world through their eyes. If you’re shooting a portrait, why not stand on a bench and shoot your subject from above?
Image © Simon Jay
13. Understand the rule of thirds
The rule of thirds is based on the idea that pictures are generally more interesting and well balanced when they aren’t centred. Imagine a grid placed over your images with two vertical lines and two horizontal lines that divide the picture into nine equal sections.
If you were following the rule of thirds, rather than positioning your subject or the important elements of a scene at the centre of the photo, you’d place them along one of the four lines, or at the points where the lines intersect. Some cameras even have a grid option you can turn on, which can be useful if you’re still learning to compose your images.![]()
Of course, photography is all about creativity and personal expression, so you may sometimes choose to break this rule and place the points of interest elsewhere in your photo. This is absolutely fine, but before you start breaking this rule, it’s important that you understand it and are in the habit of consciously thinking about the points of interest and where you want to place them. We also have a list of compositional techniques to improve your photography, find out more.
14. Eyes should always be in focus
When shooting portraits, you’ll be focusing on a very small area so it will be more important than ever that you get a nice sharp image. The eyes in particular are an important facial feature, and they’re often the first thing people look at, especially when it comes to close-ups and headshots.
With this in mind, your subject’s eyes should be your main point of focus. To get both eyes nice and sharp, choose a single focus point and aim it at one of the eyes. Once the first eye is in focus, keep the shutter button pressed halfway down and move the camera slightly to recompose the photo and include the second eye.
15. Pay attention to the background
Generally speaking, the background should be as simple and clutter free as possible so that it doesn’t pull the viewer’s attention away from the main subject of the photo. Muted colours and plain patterns tend to work well, because you don’t want viewers to end up being more interested in the colourful building or church tower in the background than your model.
Fixing a distracting background can be as simple as moving your subject or changing your angle, but if that doesn’t work, it may be possible to obscure it by using a wider aperture and getting in as close to your subject as possible. Whenever you can, though, try to keep the background neutral, especially if you’re placing your subject off to the side of the photograph and the background is very visible. Find out some more tips with our guide to minimalist photography.
16. Invest in a tripod
If you want to get sharp photos in low light without raising the ISO too much, a tripod is an essential accessory. It will also allow you to experiment with long exposure photography, where you leave the shutter open for seconds or even minutes at a time, which can make for some amazing effects when photographing things like cityscapes or rivers and waterfalls.
When purchasing your first tripod, there are a few things to consider such as weight, stability and height. Weight is important because you’ll be carrying the tripod around with you and don’t want anything too heavy, but it also needs to be stable enough to support your camera and the lenses you plan to use. You can hear more about what we recommend for upgrading your photography gear with our blog.
17. Shoot in the early morning and evening
Lighting can make or break a photo, and the early morning and evening are widely thought to be the best times of day for taking photos. In photography, the hour just after the sun rises or before it sets is called the “golden hour,” because the sun is lower in the sky and the light is softer and warmer.
Whether you’re shooting landscapes, portraits or still life, using the early morning or evening light can give your photos a serene feel with its warm glow and the long shadows it casts. Of course, the golden hour is not the only time you can get good outdoor photos, but it does make it easier.
18. Invest in some good photo editing software
Once you start shooting in RAW, post processing will become a must rather than an afterthought, so you’ll need to invest in some photo editing software that will allow you to perform basic editing tasks such as cropping, adjusting exposure, white balance and contrast, removing blemishes and more.
Most professional photographers use programs like Adobe Photoshop or Lightroom, but if you want something a little less pricey to start with you can try Photoshop Elements, Picasa or Paint Shop Pro.
19. Be selective
It’s important to realise that every photographer, no matter how experienced or talented, gets some mediocre shots. The reason that their portfolios are so impressive, however, is that they only display their best work; they don’t bore you with ten photos of a nearly identical scene.
So if you want your work to stand out when sharing your photos on Facebook, Instagram or photo sharing sites, try to narrow it down to just a couple of very good photos from each shoot. You may have shot hundreds of photos at your friend’s birthday party or your son’s football match, but by displaying all of them, you’re obscuring the five or ten really great shots that you got.
Have a look at our guide to creating your own portfolio, and read our interview with photographer Felix Rome on creating a powerful photo series.
Image © Felix Rome
20. Learn from your mistakes
Getting overexposed, blurry or badly composed photos can be frustrating, but rather than letting such photos discourage you, use them as a learning tool. The next time you get a bad photo; don’t immediately hit the delete button. Instead, spend some time studying the photo to work out what went wrong and how you could improve it.
Most of the time there will be a simple solution such as trying a different composition or using a faster shutter speed, but if you see any recurring problems, you’ll have a chance to study up on specific aspects of photography and strengthen your weaker areas.
We have a wide range of photography interviews and guides to suit any type of photographer. Want to learn more about our professional portfolios and all year round discount? Then have a look at our professionals page.
10 Christmas Gift Ideas for Photographers
Championing Diversity and Inclusion through Photography: Interview with Anna Neubauer
Photography for Beginners (The Ultimate Guide in 2022)
Cameras are complicated, but photography for beginners doesn’t have to be. When I first started shooting, I was frustrated with my first DSLR. I couldn’t capture what I saw through my viewfinder. It took a ton of trial and error to improve my photography.
When I managed to work it all out, I started taking some pretty spectacular images. This photography for beginners guide will share with you everything that I’ve learned from my mistakes.
[Note: ExpertPhotography is supported by readers. Product links on ExpertPhotography are referral links. If you use one of these and buy something, we make a little bit of money. Need more info? See how it all works here.]
Photography for Beginners—How Do Cameras Work?
As beginner photographers, we tend to be visual learners. And it’s my job to make beginning photography as easy as possible for you.
So I thought to myself, “What better way to help beginner photographers learn how to use their cameras than by creating an infographic?” And that’s exactly what I did.
I collaborated with an illustrator friend of mine, and together we made these images. The following are something that will make understanding exposure, and how cameras work, a whole lot easier!
Check out what we came up with below.
For those beginning photography, exposure is key to capturing a great image.
Learning how exposure works will help you to take control of your camera and take better photos. Shutter speed, aperture, and ISO are the elements that combine to create an exposure.
As you’ll soon learn, these elements have an effect on more than the exposure. They also cause alterations in depth of field, motion blur, and digital noise.
Once you understand how each one works, you can start diving into manual mode. This is where you take control back from your camera.
The exposure triangle is a great way to remember the three settings. When combined, they control the amount of light captured from any given scene.
This will help you to understand that changing one setting will need a change in the others. That is if you are photographing the same scene with the same exact lighting conditions.
Read here for all the information you need on the exposure triangle.
Aperture
Exposure happens in three steps. We will start with the aperture. This is the hole inside the lens, through which the light passes.
It’s similar to the pupil of your eye. The wider the aperture, the more light is allowed in and vice versa. Simple? Not quite.
As the aperture widens, the f-number gets lower and more light is allowed into the camera. This is great for low light. But be aware that it’s going to make the depth of field very shallow. This is not ideal when taking landscapes photos.
This is a short summary, but I go into full detail about that in this post. The aperture is the preferred setting to set first, as it directly influences how much of your scene is in focus. But, if you are looking to create motion blur, then it is second to the shutter speed.
Exposure will be much easier if you can memorize the f-stop scale.
The scale is as follows: f/1. 4, f/2, f/2.8, f/4, f/5.6, f/8, f/11, f/16, f/22.
Shutter Speed
Once the light has passed through the aperture of the lens, it reaches the shutter. Now you need to decide how much of that light you’re going to allow into the camera.
Ordinarily, you only want a very small fraction of a second (for example 1/250 s) to prevent motion blur. However, different shutter speeds complement different situations.
Shutter speed can be anything from really fast (1/4000) for sports photography to really slow (30 seconds) for night photography. It all depends on what you’re shooting and how much light you have available to you.
Knowing how your shutter speed works is a key element in the basics of photography.
ISO
Once the light has passed through the aperture and been filtered by the shutter speed, it reaches the sensor. This is where we decide how to set the ISO.
As you turn the ISO number up, you increase the brightness. But, at the same time, the image quality decreases. There will be more digital noise or “grain.”
So you have to decide upon your priorities in terms of exposure versus the grain.
For example, I would reduce the image quality if it meant that I could prevent motion blur in my photo. There’s no possible way to fix that in post-production (yet, at least).
Exposure Summary
Once you’ve understood aperture, shutter speed and ISO, you need to learn how each of these elements of exposure work together.
For all those basics of photography, exposure is the most important.
If you don’t have this down, composition and framing become a moot point in beginner photography.
In this post, you will learn about the “stop” based system for measuring exposure. And you’ll also learn how to prioritize the aperture, shutter speed, and ISO for the best photo.
Understanding Your Camera
Metering Modes
Digital photography for beginners can be confusing. Exposure isn’t as simple as learning about aperture, shutter speed, and ISO. You also have to learn about how your camera looks at light.
Metering modes are there to tell your camera how you want it to look at a scene.
The picture below was taken on spot metering mode. If you were to take the same photo using the evaluative mode, you would end up with a completely different exposure.
This is also covered in my free video training. If you’re looking for an article that explains digital metering modes (including Canon) here it is.
Understanding this basic photography point might be the key to understanding why your photos are coming out underexposed or overexposed.
Histograms
The histogram shows you a mathematical review of exposure after the photo has been taken. It tells you how evenly exposed a photo is. New photographers often find it frightening to understand. But it is easy, and I tell you how.
LCD screens aren’t very good at showing you this information through their display of the image. This is because they are affected by the ambient lighting conditions you’re in and the brightness of the screen itself.
That’s why the histogram is such a powerful tool to utilize in beginning photography correctly.
Shooting Modes
Full-Auto, Program, Aperture Priority, Shutter Speed Priority, or Manual Mode. How do you work out which one you should be using?
There’s also a lot of misconceptions about which mode to use under which conditions.
When you understand what each mode does, the one that will be suitable for your situation becomes a lot clearer. This is also covered in my free video training.
Depth of Field
When you’re shooting in low light, you have to widen your aperture to allow enough light into the lens. But this has a major side effect. A shallow depth of field.
You can use this in a creative way. But it’s not the only possibility. There are many situations, such as landscapes, where you’ll want to use a narrower aperture. You want to use a narrow aperture so that the whole scene remains in focus.
This tutorial walks you through everything you need to know about choosing the right aperture (and the depth of field) for the right situation.![]()
When it comes to covering all of the basics of photography, depth of field is very important.
White Balance
White balance is something I wish I’d learned more about much sooner than I did. I look back on some photos now and wonder what I was thinking.
The white balance changes the color cast of the entire photo. It is responsible for the overall warmth. It can determine whether your photo appears blue or orange, cold or warm.
Auto white balance doesn’t often do a good job. Especially with tungsten light. The sooner you learn about this basic photography principle, the more accurate your photos will look.
This is also covered in my free video training.
Focal Length
Have you ever wondered what the “mm” on your lens means? Or why people use longer focal lengths for portraits?
It’s all discussed in this post. The focal length affects more than the “zoom.” It also influences the perspective.
I cover which focal length you would want to use in different situations. As well as their possible side effects.
It’s a really worthy read and one of my favorite tutorials to date.
Crop Factor
A lot of you may not realize but, unless you spend about $2000 on your camera, you’re shooting on a crop sensor.
This means that your sensor is much smaller than professional SLR cameras. It is cropping your image. The crop factor has a range of effects on your photos.
It creates a narrower viewing angle and will influence your lens purchases in the future. For those beginner photographers, research what lenses will help your field of photography first.
Polarizing Filters
Polarizing filters only allow light into the lens from a certain direction. This results in the removal of glare and reflections from non-metallic objects.
Water and glass are the most affected, as well as haze from the sky. Cutting out these reflections and anomalies will make for more naturally saturated colors.
This looks fantastic and it cannot be replicated in post-production. That’s why it’s so important to understand.
How to Take Sharp Images Like a Pro
Photography beginners, I will walk you through the 10 step process of taking sharp photos like a professional.
It covers everything from choosing the right aperture and shutter speed to shooting in RAW.
It’s pretty easy to make only a few small mistakes which will result in less sharp images. That’s why we cover all ten in order of importance.
The Nifty Fifty
What can I say about the nifty fifty? What’s not to love?
For those of you who are beginner photographers, when I talk about the nifty fifty, I’m referring to the 50mm f/1.8 (or faster) prime lens. This can be picked up very cheap for most DSLRs.
It’s a great introduction to buying better quality lenses. And an excellent way of getting to grips with aperture.
The article linked is a review and guide. I wrote it because I recommend this lens as the first upgrade for every beginner photographer to make.
It’s easy to use and, for the price, will yield some excellent results.
It’s important to understand exposure. But, if you can’t get to grips with basic composition, you’ll struggle to take really good photos.
I’m not saying that you have to follow every compositional rule. But it helps to learn these rules so they can help guide you in taking better photos.
Rule of Thirds
This is often the first compositional rule that any beginner photographer comes across. And that’s for an excellent reason—it’s simple and it works.
The basic premise is that you divide your camera’s frame into thirds. By planting key objects on these lines, the composition of the image works better.
This is a tool that always works. But it is easy to overuse it. If you’ve not learned much about photography yet, it’s a great way of improving your photos.
It will help to make them more exciting.
Visual Weight
Visual weight differs in size or weight as we know it. It’s all about what we’re drawn to when we look at a photo.
When you understand visual weight, you’ll start to understand how people look at photos. And how you can position certain elements in a frame to direct the viewer’s attention to where you want them to look.
It’s not so much a tool or a rule, but an understanding.
Triangles
Shapes are essential in photography. Triangles are in almost everything we see in one way or another. It’s only a case of distinguishing and knowing what to do with them.
Triangles make great compositional tools. They’re easy to make and manipulate and are quite common. These are a great way to use the simplest and most basic photography compositions.
They are also perfect for combining different compositional techniques. These include lines and paths to create a more interesting part of a photograph.
You can even use them to make a photo feel more stable or unstable.
Eye-Lines
If you take photos of people, you’re taking photos with eye lines. It’s important to understand the effect that eye lines have on how we view a photo.
Eye-lines are the direction your subject’s eyes are pointed in. The negative space in front of the subject’s face is known as “lead room.”
These have the ability to focus our attention on a particular part of the photo. They also produce tension and other photographic elements.
Although they’re not physical lines, they can be used as such to produce different elements. These will help make triangles and vertical lines.
Balance
Balance in a photo affects how we feel when we look at it. An unbalanced photo can make us feel uneasy. A balanced photo will make us feel more relaxed.
It doesn’t matter whether you choose to make the photo balanced or unbalanced. But you should understand why you’ve chosen one or the other.
Both affect your photos in different ways.
Again, it’s one of those situations where the more you know, the easier it will be to produce the desired effect.
Conclusion
So that’s a brief introduction to digital photography for beginners.
Of course, there are tons more you can learn about photography. I would encourage you to go and explore for yourself in my tutorial archive.
In the meantime, if you’re looking to get started with some free premium training for photographers, check out this video.
Want to get ahead of the beginner pack? Check out our Photography for Beginners course to master everything you need to know about taking photos!
Introduction to photography. Basic principles
Today you can purchase the entire lecture recording of this course for self-study or study with a teacher. In total, the full course contains a recording from the introduction and 6 separate lectures. As a result of the lectures, it is recommended to complete practical tasks that are necessary for the theory to turn into practice. Together with this course, individual online classes are recommended, where you can analyze the completed practical tasks and ask the teacher any questions. To receive the course, simply send an application using the form at the top of this page, or write to the mail: [email protected]
The course "Introduction to Photography" is the first of a large cycle of photography classes, and is the foundation for all other programs. Here, theory is mainly considered, but this is the theory, without understanding which it is very difficult to move on, understand and correctly use the practical techniques that we study and practice in the following courses. It is the foundation on which everything else is built. It is from an understanding of the basic principles of photography that the answers to questions are built: what to photograph, why something works and something doesn’t, what distinguishes a good photo from a bad one, how to achieve really lively and deep shots when shooting people, how to form your own style, what to strive for and many others. Photography, like everything else in our world, has a form and a content. This course is mainly about the content of photography, while all other classes are more about form.
Despite the fact that the course is called "Introduction to Photography", the information provided will be important and useful not only for novice photographers, but first of all for people who already know how to take pictures, have gone a certain way in photography and need further growth and development want to understand photography more deeply and the possibilities it offers to the thinking author.
In this course we cover the following topics.
- What and why are we filming. We define goals and objectives.
- A small digression into the history of the development of painting and photography, which will allow us to draw conclusions about the tasks that modern photography can solve.
- Portraits - who do we shoot? The interaction between the photographer and the model, especially when the model is not a model at all.
- Conflict in the frame or how to combine the incompatible.
- A defining moment in photography.
- Useful trends in modern photography, which should be adopted by every author.
Total 6 video lectures.
Student reviews
Svetlana. Course: "Composition in portrait photography".
I signed up for the Composition in Portrait Photography course out of sheer curiosity. I have been photographing people for a long time and, as it seemed to me, I had completely decided on the genre. I have more documentary and reportage photography, so it seemed to me that portrait photography is somewhat about something else, and therefore not so relevant for me, although it is still interesting, because it is also photography. On the course, the teacher repeatedly broke my stereotypes and gave me food for thought, presenting the material in a soft, simple and understandable way. Moreover, Alexey is famous for his exceptionally psychological manner of shooting, and when he explains composition theory from this point of view, you involuntarily begin to look at the shooting process and what you want to say and show with your photography differently. While debriefing the homework, the teacher remains very tactful and critiques the shots in a way that inspires rather than discourages. Therefore, I can safely recommend his courses to all photography lovers. Moreover, Alexey is famous for his exceptionally psychological manner of shooting, and when he explains composition theory from this point of view, you involuntarily begin to look at the shooting process and what you want to say and show with your photography differently. While debriefing the homework, the teacher remains very tactful and critiques the shots in a way that inspires rather than discourages. Therefore, I can safely recommend his courses to all photography lovers. Svetlana. April. 2019. |
Alexander Tsabel. Travel photography course
Thank you very much, Alexey. In fact, after this course, a qualitatively completely different understanding of photography appeared. It was as if the top layer had been removed, and now in any situation I began to see depth, to try to find meaning. I began to look in a completely different way not only at my own, but also at the work of other authors. Now my wife and I have planned trips to several photo exhibitions, it is very interesting for me to look at the works of the authors from a new position. The course was very useful and extensive, and you conveyed all the information very clearly and well. And I also want to say a big thank you to all the participants of our course, for their support and interesting work - as a result, we got a real community of people who are passionate about a common cause. Thank you!
Alexander. September 2019
Ekaterina Nevskaya. Course: "Psychological portrait".
Alexei! I would like to thank you for the course. It was extremely useful for me, interesting, exciting, I really hope that I was able to learn a lot from your lectures and from homework reviews. A small step forward for me and the hope that I can develop in myself what you wanted to convey to us with this training! Thank you so much again and I hope we don't say goodbye. Be sure to call for master classes in the studio, as we said at the beginning! Be sure to call for master classes in the studio, as we said at the beginning! Ekaterina. September 2020. |
Pavel Afanasiev. Course "Psychological portrait"
I have always been very skeptical about online learning. Maybe due to age. Maybe because very dubious courses and the same dubious "teachers" have gone nowhere further in recent years. Maybe because for many people learning for the sake of learning has become some kind of obsession, and those who do not share this point of view, by definition, fall into the category of retrogrades and mossy conservatives.
But, apparently, when you understand why exactly you need it, and at the same time there is unconditional trust in a person who transfers his many years of experience and knowledge to you, everything falls into place.
Now my studies on the course "Psychological portrait" with the wonderful photographer Alexei Terentyev are coming to an end. For several weekends in a row, I talked with an amazingly interesting person who shared his many years of experience in detail, consistently and thoughtfully. Of course, I learned a lot of new things for myself. But the main discovery was something else. I realized that my own perception of photography is akin to what Alexei was talking about. I'm interested in a person. His inner world, living, unprotected feelings and emotions. That's what matters to me.
Pavel Afanasiev. September 2020
About the course author
| Classes are conducted by Alexey Terentiev . Photographer, traveler, journalist, teacher. Behind more than 7 years of successful organization and conduct of photo tours and more than 20 years of independent travel around the world. To learn more about the author and his view of photography, read the following interviews with Rosfoto magazine. Also, more information can be found on the personal website of Alexei Terentyev: http://alexeyterentyev.ru/ |
 At the moment, the main destinations are Myanmar, India, Indian Tibet, Northern Thailand, Pakistan, Sri Lanka, China, Cambodia, Malaysia, etc.
 A brief introduction to photography: blur
I don't understand anything about photography, my horizon is always blocked, so don't listen to what I tell you and go study at the Department of Photography Theory. But as you go, here's a little note about the stain.
A person has two eyes: left and right. When they work together, the brain connects the two images from the eyes and gives us the illusion of a three-dimensional image. The main advantage of a three-dimensional picture is that we understand where the figure is and where the background is; where is the main thing, and where is the secondary.
Let's say a beige person is standing in front of sand dunes.
The brain receives this picture from both eyes, combines the distortions, checks the positions of each eye, solves the trigonometric equation and determines that we have a beige person in the background. At the same time, he clearly sees the figure and, in principle, does not pay attention to the background, because there is nothing interesting there. Although the picture itself is not very contrasting, the brain is able to process it and isolate the essential.
The brain ignored even a strip of sky, because for it the main thing here is the figure of another person.
When we look at a photograph on paper or a screen, we have no way of getting a stereo image, so our brain has to guess what was meant. And it will be easier for him to guess if he clearly sees the outlines of the figure. For example, if you shoot the same person not against the background of sand, but against the background of the sky:
Man, would you cover up
And vice versa: if a man stands in the shade under the nearest tree near the sandy wall, the shadow will create such a noisy spot in the photo, and the tree itself will attract attention to itself so much that it will be difficult for us to see a person there:
You can hardly see a person, because his spot was interrupted by a tree and his shadow
A person is not a fool: over millennia of evolution, our brain has learned to distinguish figures even by indirect signs: penumbra, highlights and familiar outlines. That is, in principle, if we strain, we will see a person here. Or rather, we will not tense up - the brain will do this work for us:
But anyway: if a contrasting figure (for example, an Arab sheikh) stands against the background of beige sand, then it will be much easier for us to notice him.
When we can easily and quickly distinguish this person in a photograph, we are dealing with a clear, contrasting spot. A spot is an area of an image of a certain tone and color. The spot is simple and uniform - like a white sheik. It can be fractional and complex - like a contrasting shadow from a tree. It happens that one object in a photograph consists of many different contrasting and fractional spots.
General rule: for an object to be readable in a photograph, it must be legible and not too speckled.
Now to the students of the School of Editors. Here you are making a page about a holiday agency and choosing, let's say, this photo. What is her stain? Scroll through:
Obviously, her spot is chaotic, unpredictable, noisy. We single out children in this photo only because we know what children look like, we are used to the outlines of faces, hair and heads; we know what balloons are and we haven't drunk vodka yet. And the problem with this photo is that the photographer made the background as active as the foreground. Everything about him is damned fractional, clownishly colorful and collective-farm eye-catching. If you just calm down the balls with an ax and superglue, the stain will work much better:
Now the problem is that the balls are completely unfriendly with the rest of the photo, and they should be removed altogether. But this is a problem that designers will work with. It is enough for the editor to say “SPINT!”.
In normal photography courses you will be told that before picking up a camera, you just need to learn how to work with a spot: take two sheets of paper, scissors and glue and depict, for example, aggression and calmness:
And already when you understand how If the shape of the spot affects the mood of the photo, you will already be able to design the photos you need according to the meaning - not only at the level of the plot, but also at the level of visual impact.
But first, I want you to just avoid too much fractional spots in your photos, and if your background beats the figure, fix it in Photoshop.
For example, you have this photo of a children's party. Obvious problems: the girl in the foreground fell into the wall, all attention is drawn to the girl on the right, because her spot is much clearer:
The solution is to save the spot of the main girl with some minimal strokes:
Or even fix the background altogether:
In short, cats, think about the spot.
I am, of course, a cormorant in that I suggested so radically recoloring a light background to a dark one. This creates a bunch of other problems: it changes the feeling of the picture, creates problems with light, and as long as you correctly clip the outline, you will curse everything in the world. That is, covering the wall with darkness is cool from the point of view of a stain, but it won’t work in a real project.
In a real project, you need to give the photographer a competent technical task: “Bro, it is necessary that the children have fun, show sincere emotions, hold Minecraft cubes in their hands and, like a brother, be read well against a uniform light or dark background.