Photo post processing techniques
10 Tips for Editing Travel Photos (Better Post Processing)
By Simon BondA- A+
Download as PDF
Subscribe Below to Download the Article Immediately
You can also select your interests for free access to our premium training:
Business Basics
Cheat Sheets
Child Photography
Colorful Cityscapes
Composition
Creative Photography
Creative Portrait Concepts
Digital Photo Collages
Fairytale Portrait Photography
Food Photography
Interior Photography
Landscape Editing
Landscape Photography
Lightroom Processing
Lightroom Presets
Long Exposure
Macro Photography
Milky Way Photography
My Camera and Photography
Organic Marketing
Pets
Product Photography
Sky Photography
Social Media
Still Life
Time-Lapse Photography
Travel Photography
Urban Photography
Wildlife Photography
Your privacy is safe.One of the most enjoyable aspects of photography is sitting down at the end of the day to choose your best photos. The simple selection of your favourite photos isn’t the end of the story though, there is still post processing to be done!
Every photo can benefit from extra work in your favourite editing suite, even if that’s just some basic enhancements. In this article you’ll discover ten amazing post processing techniques, which you can use to bring your travel images to another level!
What Editing Software Should You Use?
There is a plethora of programs you can use to edit your photos, and to some extent what you use will depend on the platform you’re using. It’s best to do your post processing on a computer, of course, as it will offer greater processing power for those operations that require some heavy lifting.
That said, on the go editing on tablet devices is becoming increasingly popular, and catered for by companies like Adobe.
Those looking to get the best out of their post processing should also be photographing in RAW as opposed to JPEG. The RAW format is considered the digital negative, and is much better for working with in post production. There are many programs you can use to edit your photos, here is a selection of six which you could choose to use.
Lightroom
Lightroom has been on the market for many years now. Originally marketed as a more user friendly tool than Photoshop, this is still nonetheless a very powerful program. Almost every photographer out there uses this program for the majority of their editing.
Photoshop
This is the most powerful editing program out there. Those wishing to make some simple edits to their photographs might not need to use Photoshop. However, you can really take your photos to the next level by learning the potential of this program.
When photographing in RAW the pre-Photoshop program of Adobe Camera Raw will also improve your travel images.
iPhoto/Photos
This comes standard with all Apple computers. The older version is iPhoto, which has now been superseded by Photos. This will allow you to cover all the basics like blemish removal, contrast, saturation and horizon line correction.
It is limited in what it can do though, so for better results it’s advised you use Photoshop or Luminar.
Luminar
This was made in response, and as an alternative, to Photoshop. It’s an Apple based program, so those with a Mac who want something with a bit more punch can look to Luminar.
This is a solid program that allows you to improve your photos. Whether you choose this or Photoshop is a personal preference.
Nik Collection
This is a great program, that was available as a free download through Google. It’s now been bought by DXO, and is available for a modest price. The fact that this is no longer free is actually great news, because it will be developed and supported as opposed to being allowed to die.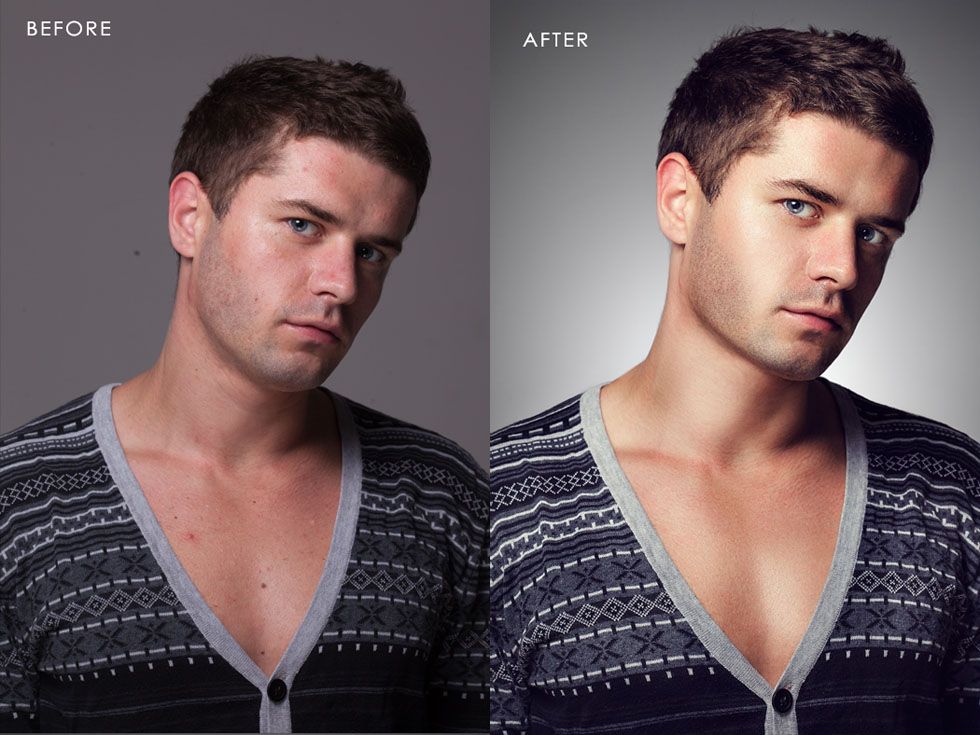
You can use it as a standalone, or as a plugin for other processing platforms such as Photoshop. This became a go to program for many photographers over the years, and is highly recommended.
Snapseed
Everyone knows Snapseed, it’s a great program for on the go tablet or phone based editing. It’s owned by Google, who bought the aforementioned Nik Collection to get that program’s algorithms, so it could be applied to a mobile app-based platform.
Those smartphone photographers out there will know this is a great application for their post processing work, and it’s simple to use.
Post-Processing Techniques
Now that you have a grasp on which post processing program to use, it’s time to move on to techniques. These range from simple fixes, to more complicated procedures that require a lot more time to learn, and care when applying them.
1. Cropping
Using the crop tool to adjust your travel images is a great way of drawing attention to the important part of the photo. The majority of the programs mentioned above have a cropping facility, which you can use for this adjustment.
You’ll use this for a number of reasons, let’s look at those.
- Zooming in – This is the result of lack of reach with your longest focal length lens. The framing of the photo might require a longer focal length than you have, and while not ideal, cropping in post-processing is a solution here.
- Square or pano – The crop most cameras give you is more or less a standard 6″ by 4″ photo. There will be times you’ll want to have a different crop though, so once again this can be produced in post processing.
- Remove elements – Cropping is a great way to remove elements that you no longer want in the frame. Of course it’s better to frame your photo in camera without these elements, but post-processing gives you another chance to get this right. The process of correcting your photos in this way will also help train your eye, so that next time you get it right in camera.

2. Sharpening
Sharpness in your photography is a desirable trait. Much time is used to discuss how sharp a lens is. Post production can also lead to even sharper images!
In general you’ll want to use this to sharpen up landscape and architectural photos, and local adjustments are also a good idea. Let’s look at three programs you can use to sharpen your photos. In all cases, sharpening your photos will add noise to the image, something you’ll want to remove later in processing.
- Nik Collection – This package has several options to sharpen your travel images. You can use the RAW pre-sharpener and then the output sharpener. These both allow for local adjustments through the control point options. Alternatively use Color Efex, and the detail extractor filter. The detail extractor is a strong filter, so moderate the level of adjustment you use with it.
- iPhoto – This program offers a simple slider to increase sharpness. It’s found under edit>adjust>sharpness.
- Photoshop – This program offers several filter options that you can use to increase sharpness. You can also use layer masking to add these effects only to the areas you wish to sharpen. An example of a filter you can use for sharpening is unsharp mask. To find this filter go to filter>sharpen>unsharp mask.
3. Noise Reduction
Have you photographed late at night with a high ISO? Perhaps you were taking a long exposure photo? In each case the chances are your photo will contain noise. Now camera sensors are improving all the time, so the newer your camera is the less work you will need to do to remove noise. The aim with your photo is to create a sharp image, without a lot of noise in it. While iPhoto has a feature in it to remove noise, you’re going to see three better options.
- Nik efex – This contains a program called Dfine2, which is a powerful noise reduction program. It allows you to make local adjustments. This lets you retain the sharpness of things like buildings, while removing noise from the sky.
- Noise ninja – A popular program among many photographers for noise reduction is noise ninja. This works as a plugin for Photoshop.
- Adobe camera RAW – This pre-editing program for Photoshop allows you to prepare your photos, prior to editing them. One of the functions is noise reduction.
4. Horizon Line Correction
Getting the horizon line straight is a basic prerequisite of any good photo. Taking the time to make sure you do this in camera will save time in post processing, and prevent you from losing image size.
When you need to correct the horizon line by rotating the image in post processing the program will automatically crop in for you, so you’ll lose the edge of your travel images. There are two instances when you will need to correct the horizon line, and they are as follows.
- Correcting a mistake – While not ideal, sometimes we all lose the horizon line when taking a photo. Correction by image rotation is an easy fix offered by all basic software editing programs.
- Wide angle distortion – This is a slightly more complicated fix, and the recommended method of fixing this requires Photoshop. This is caused when you use a wide angle lens, and it makes building bow due to distortion. Those wishing to learn this process can view this excellent video.
5. Vignetting
Adding a vignette can be a really great way to focus the eye on the important area of the photo, which you wish the viewer to concentrate on. There are various ways this can be done, with the most basic simply lightening the centre, and darkening the edges.
While there are many ways to achieve this effect, one of the best programs for doing this is Nik Color Efex. In this program you’ll need to select the filter “darken/lighten centre.”
This filter allows you more control over how the vignette is applied. Perhaps you want the vignette to be off centre? You can easily fix this by selecting the “place centre” option, and selecting the area you want the vignette to be centred on.
Are the edges too dark, or the centre too bright? Easily fixed by adjusting the sliders that control how strong your vignette will be. Finally are there specific areas of the image that need further work? Use the control points to selectively remove the strength of the filter from that portion of the image.
6. Saturation
This is the way you can add more punch to your photo, and make it more colourful. A word of caution though, adding too much saturation is a guaranteed way to ruin your photo. This all said, making your photo standout is the aim, so adding a little contrast is often a good idea.
Removing saturation is of course one way to convert your photograph to black and white, though this on its own won’t result in a strong black and white photo.
- Simple adjustment – Those wanting to make a simple adjustment can use their software’s saturation adjustment tool, often a sliding bar. It’s just a simple case of moving this back and forth as needed.
- More advanced – Nik color efex has some great filters that can be used in combination, and with local editing to produce great results. A combination of “pro-contrast” and “brilliance/warmth” will improve your photos a lot.
7. Highlights and Shadows
Light levels across a photo can vary, leading to areas of your image that are either too bright, or too dark. This can be fixed by using sliders that adjust highlights, or shadows.
Adjusting the highlights will make the bright areas of your photo less bright. Adjusting shadows will brighten up the darker parts of your photo.
All editing software will offer this as standard, but these are crude adjustments applied across the whole image.
A much better way to adjust highlights and shadows is through Photoshop, where you can apply layer masks. This method harks back to the old dark room technique of dodging and burning your photos. Dodging would reduce light from an area of the photo, while burning would ass more light.
Let’s look at how these can be applied to the digital age.
- Burning – In Photoshop select layer>new adjustment layer>curves. Now drag the curve upwards. This will brighten your image. Now you’ll need to hide this adjustment by going to image>adjustment>invert. Next your curve adjustment layer is black, and to bring back this adjustment you’ll need to use the paint tool. You’ll use the paint tool to paint the black layer mask white, and this will reveal the layer. You can adjust the strength of the brush, so you gradually brighten the area’s of the image that are too dark.
- Dodging – Once again select layer>adjustment layer>curves in Photoshop. To dodge you’re going to drag the curve downwards, and this will darken the image. After that repeat the above steps by inverting the layer, and using the paint brush to selectively darken area’s of your image as needed.
8. Contrast
Like adding saturation to a scene, adding more contrast can really make your photo shine. Adding too much, however, can have a detrimental effect on the photo, and how others receive it.
There are those photos that really work well with extra contrast, like silhouettes, and there are those that don’t work as well. Like many areas of post processing there are simple and more advanced techniques when it comes to adding or removing contrast.
- The simple fix – All editing software will have a way of adjusting contrast.
 The simplest and most straightforward of these is once again the slide bar. From the easiest to use programs like iPhoto all the way to advanced programs like Photoshop, they will all have this.
 - More advanced – Those wishing for a little more control over the way contrast is applied to a travel image should look to Photoshop. You’ll need to open a curve layer, and to add contrast you’ll make that curve into an S-curve. If you wish to make these adjustments more local then using the black or white brush to hide or reveal the curve layer allows you to do that.
9. Digital Blending
Anyone who does landscape, architectural, or interior photography really needs to know how to do digital blending. You’ll notice that HDR is not listed in the ten techniques here.
That’s because digital blending is essentially manual HDR, and when done well is a massive improvement on HDR. Now HDR will have its fans, but there are quite often flaws in the end result.
Digital blending allows you to address these issues, and creates stunning travel images. The process is too complicated to break down in a single sub-heading, it needs its own article. Those wishing to learn about this techniques should visit this site.
This technique is somewhat similar to number seven on this list, only the results are better. The gist of the technique is as follows.
- Take 3 or more photos on a tripod. These should have differing exposure values. The typical range will be +1EV, 0EV and -1EV. Taking more photos allows you to extend the range of exposure values you have.
- Now upload these travel images to Photoshop. These images will then be stacked together, typically the background image with be 0EV, with the other photos on top of that.
- The images above the background will then be hidden using a black layer mask.
- The next step is to apply luminosity mask to the background photo, so you can select specific areas of the photo that are either too dark, or too bright.

- Now use the white paint brush to reveal specific area’s of the +1EV photo, so you can lighten the dark area’s of the photo. The process is repeated for the over exposed parts of the photo with the -1EV photo, typically the sky, so you can darken this area.
10. Remove Unwanted Elements
Last and by no means least is the removal of unwanted elements from your frame. This could be a wire that cuts across the sky, or removing unwanted people from a photo as they make the frame too busy.
There are two approaches you can take. The first is to clone out the unwanted part of the photo. The second is to use the median tool in Photoshop.
- Cloning – This describes a process where you take a copy of one portion of you photo, and copy it onto an unwanted area of the photo. What you remove can vary, it could be sensor dust that shows up in your photo, or more complicated elements like people or wires.
 The trick is finding another area of the photo that directly matches the portion of the photo you want to edit.
 - The median tool – To do this you’ll need a tripod, and you’ll need multiple photos of your scene. As people move around they’ll change position in your frame. This allows you to remove all people from your photo, giving you a much cleaner image. Once again this is a complicated process, and it’s best explained in this article.
Which Editing Process Do You Use for Your Travel Images?
Everyone has their own way of processing their travel images. The above are just a selection of some of the many techniques you could use.
Have you tried infra-red, or perhaps split toning? Which technique do you like to apply to your photos? Do you ever use any of the techniques in this article?
Once again we love to hear from you, so please comment and post your photos in the comments section.
Looking for a photo editing alternative? Check out our post on Capture One vs. Lightroom.
5 Post Processing Techniques You Should KNOW!
5 Techniques ( And tips ) to help your post processingProcessing your digital images is a source of major enjoyment to some. To others, it is a painful task. Whatever the case may be, we can all agree that adding the “little extra” that post processing affords can really spruce up your digital images.
Below are 5 techniques and a few tips that can make your images come to life. Try them out and you will be very surprised just how much they really can add to your digital processing workflow.
1 – Dodge and Burn with 50% Layer(s)
Dodging and burning is a term that has been carried over from the old film days that is simply lightening and darkening portions of the image. In lightroom, this is done with an adjustment brush and you can alter the lightness (or darkness) values with the sliders within the Adjustment Brush panel. It works well and many choose to use this technique for its super simple and straightforward operation. There is exposure, highlights, shadows, whites, blacks, etc that can be altered within the adjustment brush.
Photoshop has it’s own set of dodge and burn tools built right into the application and they are in the tools panel and have been for many years. These two options let you select specific tonal regions (highs, mids, shadows) from within the options in the tool itself. This method is also a fairly straight forward technique and one that works well. Many like to use Photoshop for editing over Lightroom because it simply works smoother and you have many more tools at your disposal. It is considered an “old school” technique because it was and has been a tool inside of Photoshop for many years. Unfortunately It is also a destructive way of editing because you are working on a pixel based layer and that means you are actually altering those pixels instead of having a non destructive edit which can easily be altered or simply taken away if you decide the changes aren’t what you want.
There is a more advanced method of dodging and burning in Photoshop that allows you to change blend modes to get different looks from dodging and burning with the brush tool. The ability to alter the brush tips and angles of the tip is a feature in Photoshop that is not available Lightroom. Here is how to make these 50% grey dodge and burn layers.
- Create a New Layer by hitting CMD/CTRL+SHIFT+N
- Name this layer DODGE & BURN
- Choose “Overlay” for the blend mode and check the box to Fill with 50% Grey
This creates a layer that is fully grey but since it is in the “Overlay” blend mode, it appears as a transparent layer. When you apply brush strokes to this layer using the “B”rush tool, a white brush will brighten the pixels under this layer and a black brush will darken the pixels. These colors can be changed also. This allows you to dodge and burn in color, perhaps using the color picker tool (easily accessed while using the brush tool by holding down ALT/OPT when brush is being used) to grab colors from within the image. This can really be helpful when adding highlights to a scene and you want to take colors already in that image such as a golden hour photo.
You can also use the “Softlight” blend mode to get a similar effect but the dodging and burning isn’t as contrast rich as the “Overlay” mode. It is a more flat, evened out lighting and darkening of the pixels. It works best with darker colors as the blacks can sometime “block up” and create undesirable effects in the shadow area. Using Softlight blend mode lessens the contrast and gives you a more flat adjustment. These adjustments are EXTREMELY powerful when used in conjunction with selections that are based on luminosity values. Dodge and Burn methods that use luminosity selections can create some fantastic images.
Selective Dodging and Burning in Photoshop was done to bring color and life to the contrast rich flower.
Many people who use this technique, myself included, use two separate layers for Dodge and Burn. The Dodge layer set to “Overlay Mode” and the Burn layer set to “Softlight Mode” work very well. Experiment with this and make sure to use a brush with a low opacity or flow so that you are gradually adding the alteration in subtle strokes. A little goes a long way and can and will really change how an image looks.
If you make an error, there is a simple way to paint back the 50% grey on the later. Go to the layer and click the eyeball for that layer while holding down OPT/ALT. It will reveal this grey layer. Simply using the brush tool, press OPT/ALT to choose an area of 50% grey and now use this brush to paint back over the area you want to fix. A very simple way to repair these 50% grey layers. Click here for quick video!
2 – Luminosity selection
You may have heard the term “Luminosity” many times since getting into digital photography. It is a big word for tonal value – light – dark. There are 256 luminosity levels in any image within Photoshop. In the levels adjustment dialog box, you will see 0 is pure black while 255 is pure white. All the tones in between will be various shades of grey from very dark grey to extremely light. The Channels panel in Photoshop shows these values when selections are saved here along with the primary Red, Green and Blue Channels that make up all RGB images.
Many people learning Photoshop shy away from the Channels panel and that is a mistake. It is a place where the maximum control and benefit of photoshop truly lie. You may have heard the term “Luminosity Masks” in your photographic journey. It is simply a selection based on luminosity levels in the channels panel and then applied as a layer mask usually by brushing the selection in on a layer mask. They are used for an almost countless amount of ultra powerful adjustments from exposure blending, skin retouching, dodging and burning, hue and saturation, curves, etc – and on and on.
Selections Based on tonal values add a whole new dimension to photoshop and can take your images to a level you didn't think you had in you until you start working with them.
Do not let yourself think this is only for the “ADVANCED USERS” – it is not! Here is how you can make selections based on Luminosity values.
- In the Channels Panel, CMD/CTRL click on the RGB Channel.
- Go down to the “Save Selection As Channel” Icon and click!
Bingo! There is your “Luminosity Selection” which you can use as a mask. This is referred to by many using luminosity masks as a “Lights” layer. Why? When you make a channel based selection from the RGB Channel (Or RED, GREEN, BLUE) you are getting a “POSITIVE” of the image – simply meaning the lighter tones are selected more hence you see them as more WHITE in the selection. Remember, White is selected and black isn’t in the world of Photoshop. “White reveals and black conceals” is another popular way to recall this. Grey shows partially selected pixels – the darker the pixels the less selected while the brighter, the more they are selected.
But this is just a simple selection which isn’t much use. How do we make more of these selections? Simple. CMD/CTRL click on this new channel and you now have that selected. Holding CMD/CTRL+ALT/OPT+SHIFT while hovering over this selection will produce a little “X” which means “Intersect” selection. CMD+Shift Adds to selection. CMD+Option subtracts from selection. You want to “Intersect” the selection as it will taper in greater to even a more selected area of the brightest pixels.
You can now go down to the Save selection icon again and you will now have a more restrictive “Lights Mask.” This is best seen in a video so please click on the video link below. Jimmy does a fantastic job explaining this procedure.
I wanted to make sure as many people as possible who may read this page will get the benefit from these selections as they took my workflow quickly to a new level! SEE VIDEO HERE.
You will quickly see using ACTIONS in Photoshop is the way to go with creating these selections. Remember, Channels add to the size of an image and they can get REALLY large very quickly. If you are done with the selections you have made, make sure to delete them before saving file unless you wish to retain them for future edits. This is another reason why having actions to create these selections in Photoshop is a must. Jimmy McIntyre offers a free Panel that will create these selections.
Once you have these tonal selections available to you, you are able to make a countless amount of adjustments to your images in very selective ways. You will never work in Photoshop the same again once you experiment with these powerful selections.
3 – Frequency Seperation Retouching
Frequency Seperation in Photoshop is a super cool technique used by many retouchers in the world of digital editing and retouching. It is most known for the ability to correct blotchy issues with a persons skin and also to remove wrinkles, fine lines and imperfections on a persons face. It is very easy to go too far with this technique but you can get amazing results very quickly when utilizing this method. It can also be used in other types of photography such as landscape work. What it does is seperate the texture layer from the color layer and leaves you with the ability to edit the colors and textures without affecting each other. Really very useful. Here is how it works:
- Make two copies of the base layer you are working on.
- Shut off the top layer and select the middle layer.
- On this layer, go to Filters>Blur>Gaussian Blur. Select a blur that is enough to just eliminate details from someones face but not as to totally blur someone’s face out (Or the details in whatever image may be). You will have to experiment with this but the Radius setting shouldn’t be very high. This depends on your image resolution so there isn’t a set number.
- Now go to the top layer and go to IMAGE>Apply Image.
- Once here, make sure to have the layer set to the COLOR layer since we are subtracting that layer out.
 Blending mode in this apply image box should be on SUBTRACT. Scale should be set to 2 and Offset at 128. Don’t ask – it’s just the way it is. Hit OK.
 - You now can change the Texture group to “Linear Light” blend mode in the layers panel.
Now you have your color and texture layers separate. You can use various methods once here but one I and other like is using a lasso tool and selecting an area and then applying a Gaussian blur to that area. This will remove blotchy areas and leave skin smooth but with pores and textures in tact. This is done on the COLOR Layer.
I did this self portrait using dodging and burning with luminosity masks and also frequency separation. It is a dramatic photo indeed!
When on the texture layer, you can remove things like fine lines and cracks in skin using the (S) clone stamp tool. Just make sure you have it set to “Current Layer” in the tool menu or it will select from underlying layers and you DO NOT want that in this case. CLICK HERE for an excellent video on this topic.
4 – Overlay/Softlight Painting selections or masks
When trying to get really nice masks/selections made, we often use the black and white paintbrush to refine our selections. Using the Brush tool in either overlay or softlight BLEND mode (in the Brush tool menu) is a great way to restrict the brush from affecting the opposite tone. White brush will only brush on white areas and black will only affect black areas. This is great when creating alpha channels in the Channels panel to make extremely precise selections – assisting in making a perfect selection even with fine hairs! See video here!
Using the brush tool in Overlay (Or softlight) blend mode will allow you to apply paint selectively without having to worry about going over the “edges”
If you are not aware of this technique, it will totally change the way you work inside of Photoshop layer masks. You will love it!
5 – The Orton Effect
The Orton Effect is a term many people into digital photography may or may not know from where it originated. Here is a link in case you are interested in learning more. To make it simple, the Orton effect today is a digital process in Photoshop that allows us to add a blur or glow to our images and it really adds some feel and mood to the overall image. It is best done selectively by masking in certain areas or making out areas in which you do not want the effect applied.
As with many post processing techniques, the Orton effect is over used and over done in many cases. Please don't let this stop you from trying this wonderful technique. I have included another link HERE.
There are many different methods people use in Photoshop to achieve these looks. Do some research and you will see that it is almost endless how many different methods are utilized. I personally like this method:
Simple Orton Effect method that works GREAT- Duplicate Background or Merged copy in the layers panel.
- Go to Image>Apply Image (use above settings)
- Change the Blend Mode to “Screen” in the layers panel
- Go to Filters>Blur>Gaussian Blur
Set your radius depending on image size and taste.
In the video I linked to, he used another Apply Image method on the layer mask but I prefer to apply a Luminosity Mask as mentioned above to constrain the effect to only certain tones of the image. I then like to GROUP that layer with itself and then apply a layer mask on the group. You can then mask out (or in) how you want the effect to alter the feel of your image.
Experiment with these and other techniques inside Photoshop; It is all so very GREAT!
Link Disclosures
Top 5 post-processing mistakes to avoid
Post-processing is one of the most important elements of creating an image for a modern photographer. Of course, when you're new to digital photography, you're more likely to shoot in JPG format and let the camera decide things like color and contrast. But when you're ready to take control of your images, it's time to shoot in RAW and make the big decisions about how your final image will look.
When shooting in RAW for the first time, you may find that the images look gray and pale. This is because the decisions that the camera used to make for you are now yours. It can be a little tricky! But here are a few tips to help you avoid the most common post-processing mistakes and ensure that your post-processing makes your images better, not worse.
Remember that the purpose of post-processing is not to fix bad photos, but to make good images even better.
Mistake #1 - Over-Lightening Shadows
Always try to get the best exposure from the start. You'll get the best result by starting with a good exposure, rather than relying on balancing the highlight and shadow sliders in post.
However, sometimes you need to use the shadow slider to lighten them up and bring out more detail in the dark areas of the image. Just be careful not to overdo it or you'll end up with an image that looks unnatural.
Here the shadows are too light and look unnatural. Note that this also introduces noise into the sky region.
Shadow adjustment in moderation looks better.
If you're trying to even out the brightness in the highlights and shadows, not only will your photo look unnatural, but the lack of contrast will make it look dull. Contrast is good! This is especially true when there is a reflection in the scene. It should always be darker than the stage, as happens in nature.
Error #2 - Over-saturation
Another way to make an image unnatural is over-saturation. This is very easy to do, as increasing saturation and juiciness makes such a big difference. Again, don't overdo it.
Before you tackle these sliders, think about your image and the colors in it. Sometimes saturating the whole image is not the best idea, especially if the scene contains many different colors. Instead, using the HSL panel, select Saturation and a target tool to add saturation to a particular color. For example, you can increase the saturation of the main subject to draw attention to it.
When oversaturated, colors look strange.
Best saturation level.
Error #3 - Oversharpening
First of all, never try to fix an out of focus photo. This does not work. Sharpening does not correct blur. However, if your image is in focus, a little sharpening can make it look very crisp and lifelike.
Again, consider sharpening locally (on a selected area) rather than overall, especially if there are areas in the scene that are purposely out of focus, such as when you have a shallow depth of field. Also, the sky usually looks better when it's smooth, so don't sharpen it there. Remember that sharpening will increase the noise, which is another reason not to do it all over the image. It's better to add the effect only to the main object or part of the scene with a lot of details.
This image is over-sharpened, you can see artifacts all over the image.
Correct level of sharpness.
In Adobe Camera Raw, use the Details panel to add sharpness. Then hold down the option (or alt) key and use the mask slider. As you move the slider, areas that appear black will not be sharpened, but white will. This is an effective way to add sharpness to areas of the image that contain a lot of detail. Another way is to use an adjustment brush, which should be drawn where you want to sharpen.
Error #4 - Excessive crop
The crop tool is a very handy way to refine a composition, remove unwanted elements at the edges, and flatten the horizon. Don't use it to remove all the negative space in your scene.
It is not necessary to completely fill the frame with the object. The presence of free space will make the image interesting. Consider creating a balance between the space an object occupies and the space around it. It's not necessarily an equal balance.
Object clipping is excessive.
Cropped to leave negative space and allow the eye to move to the object.
Error #5 - Excessive noise reduction
Sometimes the nature of light requires high ISO values. You may need both a small aperture and a fast shutter speed for a scene, so increasing the ISO is your only way to get a good exposure. This is fine. Noise that appears at high ISO values can be reduced in post-processing using the Noise reduction slider.
But no one says that images don't need noise. Not all photos need to look flawlessly smooth. Especially if there are a lot of details and textures. Noise reduction can create blurry spots in areas that were previously sharp.
Excessive noise reduction has been applied here and the image looks washed out.
Reduced noise reduction effect.
You probably noticed a common feature in these errors. Do not overdo it! For fine adjustments, you need to carefully try to bring out the best features of your image. But by doing it excessively, you can ruin everything.
After you've processed the image, look away from it and look at something else. Maybe leave it until the next day. Then, when you look at it again, it will be more obvious to you whether you overdid it.
Author: Anne McKinnell
Translation: Tatyana Saprykina
Share with your friends!
What is the process of photo editing
As soon as you get serious about photography, you will increasingly have to process the resulting images. With practice, each photographer develops his own style in processing. At first, you just learn some basic things: how to lighten or darken a photo, how to process the skin or change colors, and so on. Once most basic functions are mastered photo processing , the fun begins - combining them in order to give a certain look to photographs.
Practical advice for beginners
repeat everything you are shown. It’s good if this is a lesson “from and to” - the entire cycle of photo processing from converting from RAW to final retouching and color correction in Photoshop. A very important caveat - choose only those lessons in which you like the end result!
Through methodical repetition, you will learn how to handle the basic tools, how to combine different techniques to achieve the desired result. As the saying goes, repetition is the mother of learning. After numerous repetitions of someone else's processing, you will gradually understand what you like and what you don't.
Eventually, with hours of practice, you will develop your own workflow for processing photos in Lightroom, Photoshop , or other image editors of your choice.
Breaking down the processing into steps
Sometimes it's easy to get caught up in the creative process and spend hours unnoticed editing a photo. If you're doing it for fun, no big deal. But if nights spent in Photoshop make you sleep deprived, because “yesterday” you had to give photos to a client, then you won’t last that long.
At first, I was very helped by a certain processing algorithm , which I developed for myself. It not only saves time, but also helps not to get confused and not to forget some important points.
Since I mainly photograph portraits, my post-production process is designed for photographs of people. Here are the main steps:
1. Copy photos from the memory card to the hard drive, import files into the Lightroom directory
2. In Lightroom, mark with black flags defective frames, which we immediately delete.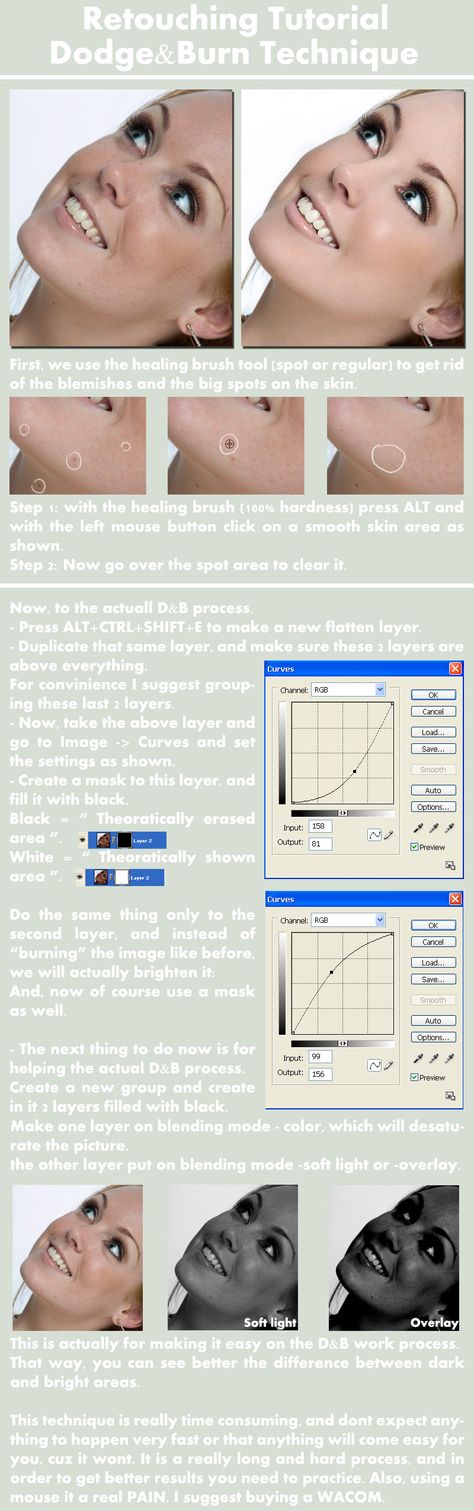
3. With white flags in Lightroom, we mark the frames we like the most - candidates for processing.
4. In Lightroom we batch process the series - adjust the basic settings for tones and colors and transfer them to photos from the series taken with the same settings. Thus, we alternately correct each group of photos.
5. As soon as the whole series is brought to some general form, we proceed to processing selected frames in Photoshop. Photos from Lightroom for further processing in Photoshop i I export in TIFF format (you can also choose PSD ), color space RGB, 300 dpi for maximum preservation of quality and color depth. To save disk space, I choose color depth 8 bit . In isolated cases, if there is a serious deep processing, I choose a color depth of 16 bit - it keeps the stretch uniformity in colors and tones great.
6. Opening the photo in Photoshop . I immediately duplicate the layer in order to work on the new layer and keep the original.
Algorithm for processing a portrait photo in Photoshop:
1. "Cleaning" a photo
- removing distracting elements (extra objects in the background, stains on clothes, disheveled strands of hair, etc.)
-
- cleaning skin - acne removal, wrinkle smoothing, if needed skin smoothing with Portraiture filter2. Dodge & Burn - A dodge and burn technique that accentuates the photo, gives volume. Apply as desired, the amount of Dodge & Burn depends on your personal preference and taste.
3. Change the proportions if necessary (lengthen the legs using the Transformation of the lower part of the image, remove extra pounds and align the proportions using the Liquify filter (Plastic)). This is not always appropriate, so try to comply with the measure.
4. Working with tone - darkening and brightening certain areas of the photo using Curves and Levels Curves, vignetting. I usually work on separate adjustment layers and use a mask to control where in the photo I need to make changes.
5. color correction in all its diversity - adding color contrast with Color Balance, working on individual color channels with Selective Color Selective Color, adjusting color saturation with Hue / Saturation, toning with Gradients and Solid Color Pure Color. Also at this stage, you can play with the filters of the Color Efex Pro plugin.
If you know exactly how the photo should look after processing (for example, bright juicy contrast, or vice versa with muted colors, sustained in one color scheme), then it's easier for you. It remains only to choose a combination of different Photoshop tools that will help achieve the desired result.
If you really do not know what you want to get, get creative with the processing - try different tools, techniques and techniques. Delete unsuccessful processing options and leave those layers and settings that you like.
6. Sharpen with the Smart Sharpen filter Smart Sharpen or Sharpen Mask Sharpen mask. I used to sharpen for every photo because that's how I was taught. Now I do it on rare occasions. You need to understand that everything very much depends on which lens you are photographing with. Usually, the better and more expensive your lens, the higher its resolution and sharper photos. Accordingly, it is not necessary to take already sharp pictures even sharper.
7. Save as JPEG , prepare photos for publishing on the web or for printing. For online publishing, I usually compress the image to 1000 px on the long side and 72 dpi, sRGB color space. The easiest way to do this is with Image Size and then Save for web. For printing, I save a full-size photo in JPEG with a resolution of 300 dpi.
8. To save space on my hard drive, I try to minimize number of layers in the final TIFF or PSD file .
Learn more