Scan stitch software
9 Best Photo Stitching Software in 2022 (Updated Weekly)
By Natalia Robert By Ingrid Paola Miranda MarinA- A+
Download as PDF
Subscribe Below to Download the Article Immediately
You can also select your interests for free access to our premium training:
Business Basics
Cheat Sheets
Child Photography
Colorful Cityscapes
Composition
Creative Photography
Creative Portrait Concepts
Digital Photo Collages
Fairytale Portrait Photography
Food Photography
Interior Photography
Landscape Editing
Landscape Photography
Lightroom Processing
Lightroom Presets
Long Exposure
Macro Photography
Milky Way Photography
My Camera and Photography
Organic Marketing
Pets
Product Photography
Sky Photography
Social Media
Still Life
Time-Lapse Photography
Travel Photography
Urban Photography
Wildlife Photography
Your privacy is safe.Using photo stitching software is essential for landscape and panorama photographers. It can deliver excellent results and save you a lot of time. The following list covers the best photo stitching software options.
To create a panorama, you have to stitch photos together. Once they are aligned, they will make one impressive view. A wide-angle lens is helpful, but you would still need to do some cropping. If you have a tripod, stitching together a panorama is a lot easier! A tripod helps you keep a consistent horizon when you take panoramas.
DepositPhotos[Note: ExpertPhotography is supported by readers. Product links on ExpertPhotography are referral links. If you use one of these and buy something, we make a little bit of money. Need more info? See how it all works here.]
9 Best Photo Stitching Software Options
There are a variety of photo stitchers available. So let’s take a look at the top 10 best photo stitching software options.
1. Hugin
Hugin is a photo stitching software capable of assembling a mosaic of photographs into a panorama.
Hugin’s interface is functional and user friendly. The software has great features. Some of them are control points or corrections of inconsistent levels. Manual adjustments of projections are also included.
Hugin offers a series of online tutorials in 9 languages. They show the different stages of the panorama stitching process. And they teach you how to use blend masks and create textures.
Hugin is an open-source initiative. It is available for free and is compatible with Windows, Mac, or Linux.
2. PTGui
PTGui is the best choice for professional-level photo stitching software. PTGui allows for stitching panoramas with many rows and columns.
PTGui has a less expensive option that will offer plenty for amateur photographers. The more expensive version, PTGui Pro, gives added features that any pro would love.
PTGui Pro includes features like Automatic Seam Placement and a Fill-Holes function. PTGui Pro also offers a Batch Stitcher, which can generate control points to set up a panorama.
You can also stitch and blend HDR source images into an HDR panorama with PTGui Pro. Viewpoint correction and masking are also included.
PTGui works with Windows, Mac, or Linux. There is a free trial version and a one-time license fee.
3. Panoweaver 10
Panoweaver 10 offers a standard and pro version. The standard version offers a good amount of features. They include gigapixel panoramas, little planet panoramas, and full manual adjustments.
For a bit more of an investment, the Pro version has added features. These include HDR processing, masking, and Dehaze.
One of the biggest benefits of Panoweaver 10 is that it offers the option of automatic stitching. This is great for those of us who sometimes want to be less hands-on.
Panoweaver 10 is available for Windows and Mac.
4. AutoStitch
Autostitch lets you stitch many photos into a seamless panoramic image.
This photo stitching software is the perfect solution if you want a program that will do it all for you. It requires no user input to sift through images. AutoStitch selects the images that match up. Then it pieces them together to create a panorama.
The downside to this is that if you do want to make individual adjustments, you cannot. AutoStitch is ideal for the photographer who doesn’t do too many panoramas. And it’s also good if you are not looking to control every aspect of its creation.
A demo version of this photo stitching software is available for free. As a standalone, AutoStitch is available for Windows and Mac OS X.
5.
PanoramaStudioPanoramaStudio is photo stitching software available for Windows and Mac. There is a standard and pro version. The latter offers a few more options, like support for ultra-wide-angle and fish-eye lenses.
This software offers interactive tools that allow you to add hotspots to panoramic images and create virtual tours.
PanoramaStudio allows you to export interactive panoramas to HTML5. It also offers multiple editing tools to correct flaws and enhance your pictures.
This software is perfect if you usually work with Adobe Lightroom. You can find it as a Lightroom plugin.
PanoramaStudio is a paid software. Yet, you can give it a try thanks to its free trial period.
6. Panorama Stitcher
This photo stitching software is a fantastic option for Mac users. A mini-version is available for free, but it can only stitch together up to five photos.
For panoramas of more than five photos, you will need to buy the full version of Panorama Stitcher. It doesn’t compare to the detailed control you have in other software options like PTGui. But in true Mac fashion, it is very user-friendly.
It is currently available for Macs only via the App Store.
7. PhotoStitcher
Another fantastic option for beginners in photo stitching is PhotoStitcher. It features a user-friendly interface and an entire suite of software to alter images.
PhotoStitcher is capable of stitching photos of different angles or resolutions. It also does automatic image completion.
This panorama stitching software also automates things like cropping and exposure balancing. This gives you the option to be as hands-off as you’d like.
A free trial download is available. The full PhotoStitcher software is affordably priced.
PhotoStitcher is available for Windows or Mac.
8. GigaPan Stitch
If you’re dedicated to taking photos of landscapes and panoramas, you may already own GigaPan Epic hardware. If that is the case, then you’re aware of GigaPan Stitch software.
GigaPan Stitch is a functional panorama stitching software. It combines photos across many rows and columns.
It is proprietary and only for use with GigaPan hardware. But it provides a great option to stay within the GigaPan product family. This software is basic. Yet, it is capable of stitching together panoramas with many rows of images.
Once you register your GigaPan hardware, you receive a license key for the stitching software. If you want to test it out before committing, a free 14-day trial available for download.
GigaPan Stitch is available for Windows or Mac.
9. Photoshop
While not a standalone panorama photo stitcher software, Photoshop is a good choice. It has powerful photo stitching capabilities within its arsenal of features. Photoshop’s Photomerge plugin is basic but handy for the occasional panorama.
You can access the photo stitching option in the menus (File > Automate > Photomerge). This will open a new window where can you add the individual photos to be merged. Also, choose the geometric projection, and select a few minor options.
The plugin will then do the stitching for you!
Once merged, the new file is a PSD file with separate layers for each image. One downside to using the Photoshop Photomerge plugin is that it’s not very detailed in its controls.
Since you are already working within Photoshop, you will have all the tools to finesse the image. You don’t need separate software.
Photoshop is not an ideal photo stitching solution if you offer many panoramas commercially. Yet, it is perfect for those of us who do the occasional panorama for fun.
Photoshop is available for Windows or Mac. You can access this cloud-based software with a monthly or yearly plan.
Conclusion
Finding the right photo stitching software can feel overwhelming… no matter if you do panoramas as a hobby or profession. But we have covered a variety of options to get you started. But there is something for everyone… whether you are ready to invest money in photo stitching software or not. With so many options at your fingertips, the photo stitching possibilities are endless!
Are you looking for a fun and easy way to master landscape photography? Check out our Simply Stunning Landscapes course. Take stunning images in the most average locations!
Autostiching scan with Hugin - David Revoy
Published on
About Hugin:
If you like drawing on large sheet of paper but decided you can't do it because you own only a small scanner, then this article about Hugin is for you.
What is Hugin? Hugin is a free/libre open-source software. With Hugin, you can assemble a mosaic of photographs into a complete immersive panorama, stitch any series of overlapping pictures and much more. I'm using Hugin since 2010. Hugin is a very technical tool with many options. The development team is doing big effort to simplify the process, and recent versions are really easier to use than the previous one, but still not really as intuitive as modern software: I still need my notes to get things done with it. But if you know your way and settings the tool is easy. Hugin can be really faster than doing the stitching manually and produce a perfect result. Convinced? Follow me.
Install Hugin:
On Ubuntu/Elementary/Linux Mint (Ctrl+C to copy line in your browser, Ctrl+Shift+V to paste on terminal. One line at a time).
sudo add-apt-repository ppa:hugin/hugin-builds sudo apt-get update sudo apt-get install hugin
On other Linux distro, Mac and Windows , check the download page of the project.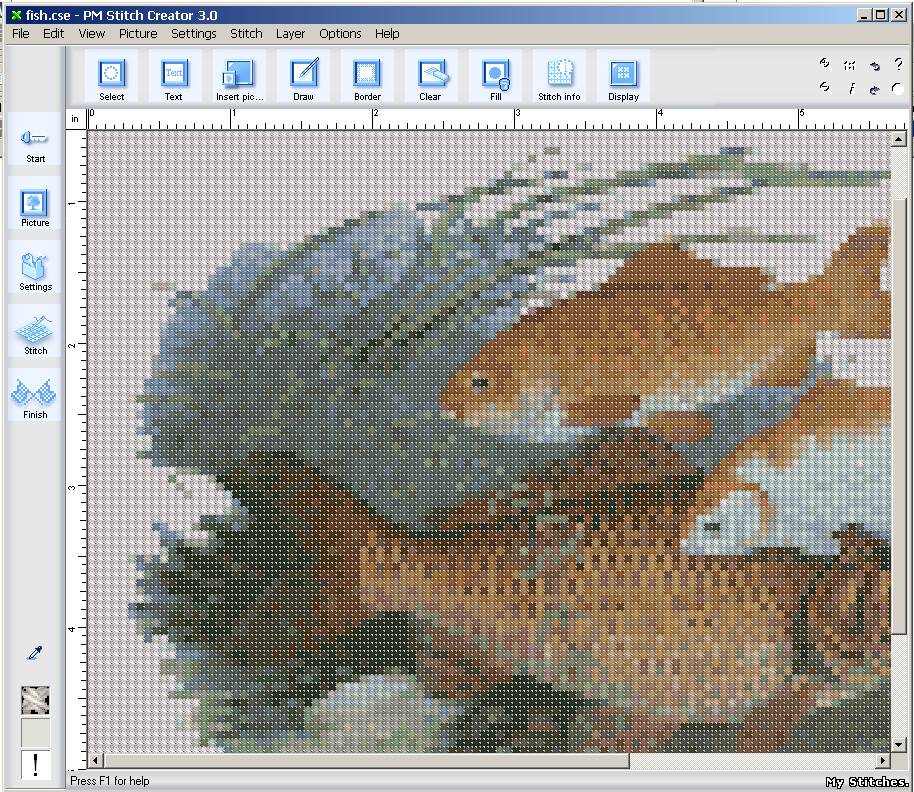
The process, step by step:
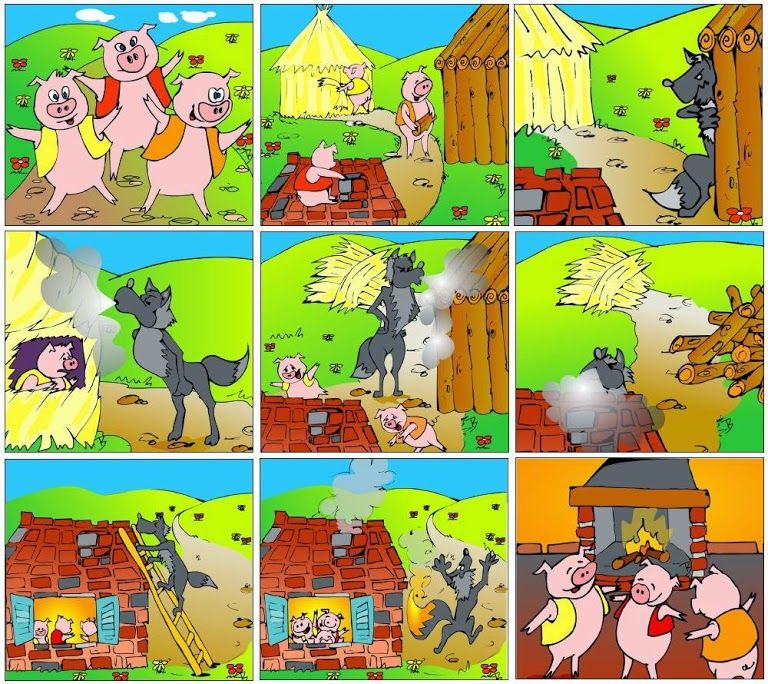
1. Here the problem start: I like drawing on A3 sized paper (29,7x42 centimeter / 11.69x16.53 inches), it's double size than A4 and have more room for drawings details.
2. But I don't have a A3 scanner at home : they are expensive and take a lot of room. I also have no idea where I could find a A3 scanner compatible with Linux. It's only problems, so I have to find a solution with my A4 scanner. A4 scanner are cheap and nowaday bundled with many printers 'all in one' devices. Here under my old Canon Pixma MP560 all-in-one printer scanner with a A3 sheet in the A4 scan top part. I'm scanning my big A3 artwork documents this way in two time, flipping the artwork upside down on the little scanner.
3. I scan them with Xsane on Linux Mint 17.3. I like Xsane because if you remove all unecessary panels and keep only the main user interface, it can just scan and auto-save the picture in a target folder. This way, I get two PNG files in sRGB , A4 sized with 300ppi quality (selected in blue here).
4. Here is the two scanned documents. I often have white margin all around the artwork, I rarely draw on all the surface of the A3. Only a central part of it. This way I need only two scans to get the full artwork scanned with an overlapping area. It's important to have overlaps. Hugin will use the informations in the overlapping area to match the document together and stich them perfectly.
5. Before feeding Hugin with our raw scans, we need to prepare them a bit. That's why I'm rotating the second scan at 180° thanks to the editing functions of the image viewer Nomacs.
6. The preparation is all about filenaming and alignement. The filenames must follow and images must have similar orientation. Hugin does a good job only if the images are ready this way.
7. We can finally open Hugin. Maybe in your operating system's menu, there is multiple entries for Hugin. Select the one named "Hugin Panorama creator" in this case then press the 'Load images. ..' button.
8. [1] Do a multiple selection to select your files ( holding Ctrl key ) then [2] press 'Open'.
9. After the files are selected, you'll see this unfriendly dialog prompting you for a 'HFOV(v)' number [1]. Don't ask me what a 'HFOV(v) number' is, I have no idea. Just remember for this field to enter '10' degrees. This magic number come from an outdated official tutorial. You'll be stuck at this dialog if you don't remember it. Too bad a simple 'scanner' preset don't exist here to make this step intuitive... When it's done, Then press [2] 'OK'.
2021 edit: Franz, in the comment section of this article, reports that '5' degrees is even more precise; and it makes sens after also reading the explanation of Zachary Vance, also in the comment section. Thank you both for the feedback!
10. Press the [1] 'Align' button, it should pop-up a console with computer output you don't need to read (it will auto-close itself anyway). Just check your picture properly aligned after that within the control screen [2].
11. The last step, is to [1] Press the 'Create Panorama...' button, [2] switch the format to PNG , [3] Select the only option available and [4] press OK.
12. You'll be prompted for saving two files. Just keep the default name and press OK. Then another console will pop-up with computer output, just wait it to finish, it will close itself. You should have a new dialog on screen indicating 'Status Completed'.
13. Check your files on your file explorer: your autostiched version should be done. You can then close all windows of Hugin and delete the two original half-scan and the *.pto files created by Hugin.
14. A last step is just a little rotation with the image viewer Nomacs and saving.
15. It's done : the two scanned parts of the picture were autostiched in a single picture thanks to Hugin. You can't notice the area where the two scanned were merged, even if you zoom on the paper texture itself. It's really perfect work.
★ You can find the hi-resolution result here .
★ The final colored artwork here (note: I removed the flute girl for artistic reasons.)
That's all for today and Hugin. If you practise, you can scan many large comic pages and stich them in no time with just clicking at the right button and fighting a bit with pop-ups and temporary files. I hope this tutorial will help you to draw on larger sheet of paper and take advantage of this great tool.
A big thanks to the Hugin developpers!
6 Free Document Scanning Software
August 28, 2021LikbezTechnology
Useful tools for iOS, Android, macOS, Windows and Linux.
Share
01. Adobe Scan
- Supported platforms: iOS, Android.
A functional mobile scanner that makes it easy to digitize any text, even when only a smartphone is at hand. Adobe Scan comes with presets for scanning documents, business cards, whiteboards, and forms. There is a function of automatic shooting and smart border detection. You can crop the image, apply color correction, and cover up personal data.
The application can be used free of charge or by subscription. The latter will unlock features such as export to Microsoft Office formats, merging multiple files, and OCR.
Download
Price: Free
Download
Price: Free
A simple and completely free scanner from Microsoft, whose strong point is integration with Office, OneNote and other products of the company. The application allows you to scan documents, business cards, checks and anything that contains text. Finished files can be saved in PDF or one of the office formats, and then edited in Word, OneNote, or using another Microsoft proprietary tool.
Download
Price: Free
Download
Price: Free
A minimalistic open source program that features high quality processing and speed.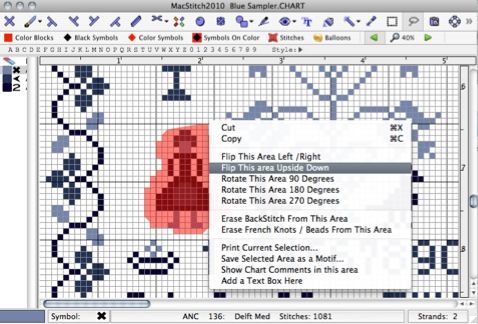 NAPS2 supports text recognition in over 100 languages, including Russian. The utility is compatible with WIA and TWAIN scanner drivers and allows you to create profiles with quick settings for various documents. In addition, NAPS2 boasts rich export capabilities in almost any format.
Download →
4. Winscan2PDF
- Supported platform: Windows.
An extremely simple and no-install tool for digitizing documents using a scanner that works on all current versions of Windows, including Windows 11. The program allows you to save files to PDF. It supports combining the results of several scans into one document, there are profiles with settings for repetitive actions, as well as exporting the title and last page of PDF.
Download →
5. Simple Scan
- Supported platform: Linux.
An easy-to-use scanner software that quickly converts a paper document into a file or image. No unnecessary features - just digitizing, basic editing and saving to PDF, PNG and JPG. On some Linux distributions, Simple Scan is even pre-installed as a standard scanning tool.
Download →
6. View
- Supported platform: macOS.
The built-in Preview app in macOS can, among other things, digitize paper documents and images from a scanner connected to a Mac or through an iPhone camera. At the same time, basic scanning settings, mode selection and color correction are available.
Read also 💿⚙️💻
- 10 programs for reading FB*2 books on a computer0016
- How to change the default installation directory for programs in Windows
- How to find past versions of the programs you need
- 17 useful programs for office workers
- 8 best programs for finding, installing and updating drivers
*Activity of Meta Platforms Inc.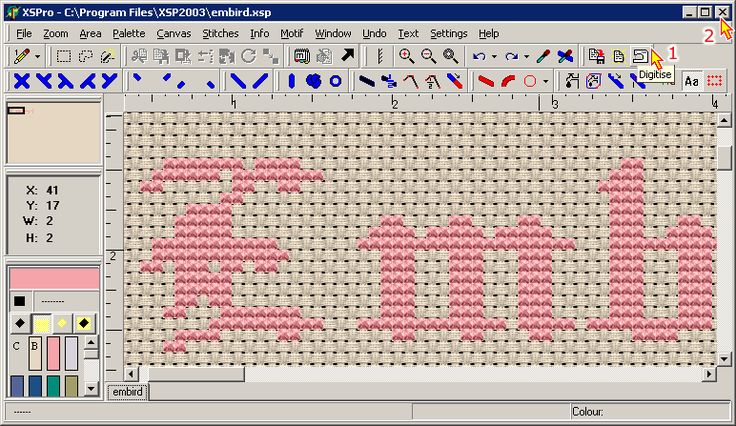 and its social networks Facebook and Instagram are prohibited in the territory of the Russian Federation.
9 Best PDF Scanning Apps for Android
Android smartphones and tablets equipped with high resolution cameras can be used to quickly scan any paper documents and convert them to PDF. Sometimes there is no dedicated scanner nearby and you need to quickly convert a physical document to PDF. What to do? There are many free PDF scanners for Android apps available on the Google Play Store with various features to meet the needs of users. Here is the list.
1. CamScanner - Phone PDF Creator
CamScanner is an application for scanning and sharing documents. This application can scan paper documents such as receipts, invoices and notes to PDF format. Because it has smart cropping and auto-enhancement features, the quality of the generated PDF file is high.
The main screen of the application is a library of objects that you have scanned. Clicking on an element allows you to view the contents of the PDF file. By clicking on the magnifying glass at the top of the screen, you can find the PDF file. To take a photo, all you need to do is tap on the camera icon located at the bottom of the screen. Options such as grid, flash, sound, spirit level, image orientation, and image size can be selected by clicking the gear icon while taking a photo. You can also choose from one or more pages. After taking a photo, the application automatically determines the boundaries of the document. Then you can select different modes such as auto, original, lighter, magic color, gray mode and black and white. You can also rotate the photo left or right. You can also adjust the contrast, brightness, and detail.
Benefits:
- CamScanner has a beautiful and clean design.
- It is very easy to use.
- The image enhancement function in the application allows you to create clear images.
- It contains many useful features that suit both personal and business users.
Disadvantages:
- Some features require a paid subscription. For example, Optical Character Recognition or OCR, a feature that extracts text from images, is only offered to premium users. Premium users need to pay $4.99/month or $49.99/year.
- PDFs created with the free version have a "Created by CamScanner" watermark at the bottom of each page.
- The app also includes ads.
2. Handy Scanner Free PDF Creator
Handy Scanner is a scan to PDF tool that allows you to scan documents using your Android phone or tablet. Export functions are available in the application. You have the option to choose whether you like the PDF or JPEG format when you share it via Dropbox, Google Drive, email, or Bluetooth. In addition, Optical Character Recognition is available when sharing documents in Google Docs.
After launching the application, you will see the main screen containing images of documents that have been previously scanned. To take a photo, simply click on the camera icon in the lower left corner. The application allows you to do multiple scans. Settings such as flash and grid can be found in the lower right corner when scanning a document. When the scan is complete, just click the scan button. The application then automatically detects the page boundaries. Post-processing filters are also available, such as print-ready, black and white, grayscale, color, and contrast.
Benefits:
- Once you take a picture and save it, you can edit the image by selecting borders and applying filters.
- In addition to taking photos in the app, you can also import photos directly from your gallery. Imported photos can be cropped and filters can be applied to make the images look better. These photos can be scanned to PDF using this scanner.
Drawbacks:
- The app contains distracting ads and you need to upgrade to the full version to remove them.
- In addition, the free application allows you to take pictures of up to twenty documents.
3. Droid Scan Pro PDF
Droid Scan Pro PDF is another Android PDF scanning app that turns your phone or tablet into a mobile scanner. The main screen of this application is a menu containing the following options: Import, Capture, Scan, Settings, About, Feedback. Import is used to add images from different sources. You can select files from Google Drive, Dropbox, or your device's gallery. It supports turbo import, allowing you to select multiple images at once. As the name suggests, Capture is where you can scan paper documents. After taking a photo, the application automatically detects the edges of the document to prepare it for cropping. You can also choose from low, medium, high, and ultra high resolution.
Scanning is a place where you can see all the images you have taken and view their contents. Here you can export the image to PDF or JPEG. You also have the option to re-edit the image if you wish by clicking the "Convert" button at the bottom. Finally, you can manage files by moving, deleting or reordering them.
Benefits:
- This app combines beautiful design with unique features. The app has a clean and visually pleasing user interface.
- The application accurately detects document boundaries.
Faults:
- The scanned photos are darker than the original. However, this issue may be fixed in a future update.
4. Quick PDF Scanner FREE
Another productivity app available on the Google Play Store, Quick PDF Scanner allows you to scan, export and share PDF documents. The main screen of the app displays two main functions, namely Import and Capture. The scanned documents below are grouped together for easy access. The application supports import from cloud services such as Google Drive and Dropbox. You can also import photos taken with your phone or tablet camera. Pressing the capture button takes you to the screen to take a photo of your paper documents. After the document is scanned, the application determines the edges to trim.
The scanner application has built-in editing tools available after scanning a document. The names of available filters are perforated, vintage, black and white, bleach, instant, latte, blue, litho, and x-process. Using advanced settings such as auto color, exposure, vignette, contrast and shadows can also be adjusted in the app.
Advantages:
- It is worth noting that the application has a nice modern design.
- Scanning documents is quick and easy with many built-in filters.
- The application supports images in BMP, GIF, PNG, WEBP and JPEG formats, so importing photos from other sources is not a problem.
Weaknesses:
- There are bugs that cause the application to sometimes crash.
- This application contains advertisements displayed at the bottom of the screen.
5. Genius Scan - PDF Scanner
Genius Scan allows Android smartphone and tablet users to quickly take photos of documents and send scanned images via email in JPEG or PDF format. The main features of Genius Scan are page frame detection and perspective correction. When you open the application, you see two tabs: Scans and Documents. Images are in the center of the screen. After photographing a document, it immediately goes to the Scans tab. You can then move it to the Documents tab.
The camera button is at the bottom of the screen. After scanning, the app automatically detects unwanted parts of the photo so you can crop them. In addition, you can perform black and white and color correction of the photo. It is also possible to rotate the photo left or right. In addition, the scanned document can be exported via e-mail in JPEG or PDF format.
Benefits:
- The application is easy to use with a beautiful user interface.

- It is not overloaded with editing features and is suitable for those who do not need too many additional features.
Drawbacks:
- Users who need advanced features such as Optical Character Recognition (OCR) should probably choose another application.
- Scanned document management settings are limited. Advanced options are not available in the app.
- The free version cannot export to cloud services such as Box, Dropbox, and Evernote.
- Ads are also present in the free version.
6. Tiny Scan: PDF Document Scanner
Tiny Scan is a free Android app that turns your smartphone or tablet into a document scanner. It has features such as multiple scan modes that help improve images. The main user interface displays all scanned documents. You have the option to choose a grid or list view. Images can also be sorted by creation date or title. There are two buttons at the bottom, one for the camera and the other for import. After the document is scanned, the application automatically determines the edges of the page for cropping. You then have the option to select the desired page size. Available page sizes: Letter, A4, Legal, A3 and business card. Similarly, you can choose from color, black and white, and grayscale filters.
Benefits:
- The application can quickly take a photo of a paper document and create a digital version of it.
- The resulting scans are of high quality.
- Unlike other free scanner apps, there are no ads or watermarks.
Disadvantages:
- The export function is limited to e-mail only. You cannot send the file to cloud services such as Dropbox, Evernote, Google Drive, and Box.
7. PDF Scanner FREE + OCR Plugin
PDF Scanner Free allows you to convert paper documents into digital files. It is available for free on the Google Play Store and is compatible with Android devices that have a camera. The user interface on the main screen displays scanned images. It has five buttons on the menu at the bottom. The first Recent button is for recently scanned images. With the second option button, you can set various options such as selecting the screen orientation and selecting the language used for OCR. The third button in the menu is for saving the image to PDF and exporting it. The fourth button is the open button, which is used to import images from your device's gallery. Last but not least is the capture button used to take photos of documents.
You can scan a document by simply pressing the capture button. The application then uses an algorithm to detect the document in the picture. Once you're happy with the borders you've chosen, you can crop your photo to remove unwanted parts. Filters such as original and black and white are available. Contrast and brightness settings are also available.
Benefits:
- The application is easy to use and produces high quality images.
 The text is also crisp and easy to read.
 - OCR is also a benefit of the app. It supports over fifty languages.
- There are many sharing options available for cloud services such as Dropbox, Google Drive and Box.
Disadvantages:
- It has poor document detection accuracy. Even with high contrast between the document and the table, the application cannot correctly detect the edges of the document.
- There are ads in the application because it is free.
8. My Scans, PDF Document Scanner
My Scans is a free scan and organizer tool for Android available on the Google Play Store. The application uses technology that detects the edges of a document and scans it to PDF. The main screen is a grid of scanned images. The plus sign in the upper left corner allows you to take a photo. After that, the application determines the page borders for easy cropping.
Benefits:
- The application manages files well.
 You have the ability to create folders to organize your files, which is useful when you have a lot of files to work with.
 - Also in the application there are high quality scans. It has an impressive algorithm that accurately detects page boundaries.
Weaknesses:
- Editing options are limited compared to other scanning applications. You only have the ability to rotate and crop the image. Additional settings are not available.
- The exported document also has watermarks. To remove them, you need to upgrade to the paid version.
- The application not only has banner ads at the bottom of the screen, but also contains full-screen advertisements. You have to manually click the close button every time an ad appears, which is time consuming and annoying.
9. Camera 2 PDF Scanner Creator
Camera 2 PDF uses your phone or tablet's camera to scan documents and convert them to PDF. Scanned documents are displayed on the main screen. By clicking on the "Add" button at the bottom, you can either add an image from your device's gallery or take a picture with the camera. After shooting, you can crop the image to remove unwanted areas. You can also switch from color to black and white with the click of a button. Finally, you can rotate the image left or right.
Benefits:
- It can classify and organize documents using folders.
- Security is another plus. You have the option to set a PIN to prevent other people from opening confidential documents.
- You can sync your files with unlimited cloud storage. This is done by registering for a free account at camera2pdf.com.
Drawbacks:
- When using the application, lags, crashes and freezes are noticeable. Sometimes it takes an app too long to respond after a button is clicked.
- Another disadvantage of the application is that there is no setting for turning on the flash when shooting.
Learn more