
Calibrate monitor online
Monitor Calibration Made Easy With These 5 Online Tools
Your new computer is ready and just waiting for that nudge of the mouse. Wait! Wasn't there something else? Monitor color calibration is one of the basic steps most of us forget or ignore.
Pixel perfect monitor calibration is a cardinal rule for photographers and graphic artists. If you are either of those, you know all about monitor calibration. Others should read on.
Why Is Display Calibration So Important?
A good monitor is expensive. But its impact will be lost if you don't take the pain to carefully (and intermittently) calibrate your monitor. The colors on the screen may not be the exact match of what they actually are.
Just imagine that you took a beautiful panoramic snap and downloaded it to your computer. Only to find out that the blue of the sky or the green of the grass doesn't resemble the one you saw through the viewfinder. Today, it's a lot about watching online movies, snapping digital photos and sharing image files. Color calibrating your monitor is important to get as close to the real thing as possible.
Graphics professionals will pick up serious color accuracy test tools for the job, like the Datacolor Spyder5Elite S5EL100 Monitor Calibration System. Some of you will go with the default monitor calibration software built into the OS. But we can also take some online help from these simple monitor calibration websites that have existed for a long time.
How to Calibrate Your Monitor in Windows
Conveniently, Windows comes with its down display calibration tool. Previously part of the Control Panel, Microsoft moved it to its own standalone app in Windows 11.
1. Calibrate Your Display
To open the Display Color Calibration tool, press Windows + S or open the Start menu, search for "calibrate display color," then open the matching result, and follow the on-screen instructions.
The tool will take you through basic color settings, brightness and contrast controls, and an RGB color balance adjustment.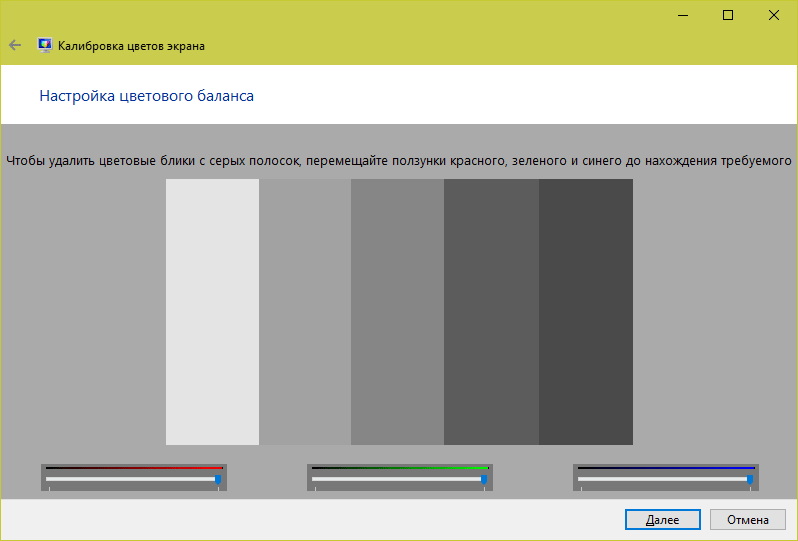 When you're done, you can opt to start the ClearType Text Tuner "to ensure that text appears correctly."
2. Tune ClearType Text
To manually open the ClearType Text Tuner, press Windows + S, search for "adjust ClearType text," then follow the on-screen instructions. On each of five screens, you'll select the text samples that look best to you.
5 Tools to Calibrate Your Monitor
1. Photo Friday
Photo Friday is a photography site. Think of the challenges involved in adjusting the brightness and contrast of a shot, and you get the reason you should calibrate your monitor. So, head to the link for their monitor calibration tool beneath the homepage, or hit the link above.
The site offers this simple one-page monitor calibration tool to adjust the brightness and contrast of your screen thanks to the gray scale tones. The idea is to tweak the monitor settings (or buttons) so that you can clearly distinguish the transition of tones from true black to true white. After calibration, the blacks should look black and without any hint of gray.
The instructions start off by telling you to dim the lights and hit F11 for viewing the gray scale chart in full-screen mode. Observe your monitor from your normal viewing distance.
2. The Lagom LCD Monitor Test Pages
The Lagom LCD Monitor Test Pages are a far more comprehensive set of tools than Photo Friday. The site includes a series of test patterns that start from checking contrast to checking for response times of your monitor. It is recommended to go through the tests in the order they are placed.
For instance, use the first few images to check brightness, contrast, and sharpness. With those set, use a latter test like the “Viewing Angle” to see if the display changes brightness or colors in the corners.
For a beginner, it might seem overwhelming. But, the test patterns come with helpful explanations. The developer also states that you can put the images on a USB drive and try them in the computer store when shopping for an LCD monitor. A 120 KB ZIP file download is included.
Fun fact: “Lagom” is Swedish for “moderate” or “just right,” which is exactly what you'll want for your monitor calibration.
3. Online Monitor Test
The Online Monitor Test website has a range of interactive tests to fix your screen colors. The menu appears when you move your mouse to the top. It starts off with a test that checks the brightness and contrast across the B/W tonal spectrum. It is similar to the test we covered on the Photo Friday website.
Next, the Color Range test checks if your monitor can smoothly produce color gradients. From the menu, you can pick different color charts. Look for “ghost images” or image trails in the Trailing test. Move the box across the screen and check if any trails are produced. The controls and options to change the color and shape of the box are placed at the bottom.
The Homogeneity test helps to pinpoint damaged pixels and faulty monitors with backlight bleeding. 1:1 Pixel mapping and testing for a blurring of Text are the last two tests on the lineup. While the former is not so much an issue with LCD computer monitors, the latter is worth a tryout if you feel that screen text is not crisp enough.
If you are setting up a dual monitor, try the Text Reproduction test across the connected displays and test for input lag.
Note: We linked to the test version that requires JavaScript above. Most browsers won't support the Flash versions of the test, but if you'd prefer to download the executable (no browser plugin required), visit the Online Monitor Test homepage
4. Monitor Calibration and Gamma Assessment
Remember, we were talking about Gamma values just a while back? Well, this whole page and the test associated with it is devoted to it. The importance and process are clearly laid out, and it's helpful for any tyro. The most important takeaway is that color saturation and hue change with gamma values.
The author also provides a series of “Gamagic” test patterns you can use to calibrate your monitor. Fall back on your eyes and adjust the gamma setting with the monitor controls until all the squares match up with their backgrounds as closely as possible.
If you want to skip the lectures and just get started testing, head to the Gamma page, and choose a target gamma from the list.
5. W4ZT
This single page screen calibration chart has few of the test images we have already covered in the earlier tools. Go through the color, gray scale, and gamma adjustments.
The one feature going for it is that it is easy to understand. Just follow the instructions, and you will be able to tune your monitor for optimum viewing.
How Is Your Own Color Perception?
All you need is a good eye. But, how is your own color perception? Take this quick (but fun) color challenge test to find out.
Also, before you start off fine-tuning your monitor, follow these three rules first:
- Turn on your monitor and allow it to warm up for 30 minutes or so.

- Set your monitor at the highest native screen resolution it supports.
- Get familiar with the display controls for your monitor.
Your monitor might also have a calibration software in your computer.
Windows 10 comes with the Windows Calibrate Display Color. You can access it from Start > Control Panel > Appearance and Personalization > Display. Or, simply search from the Cortana search box with a keyword like “calibrate.”
On the macOS Sierra, use the Display Calibrator Assistant. You can access it from Apple menu > System Preferences > Displays > Color > Calibrate. Or you can also use Spotlight.
Most users don't need to browbeat themselves over the steps or depend on third-party tools. Unless you are a professional photographer or a graphic designer who requires high-fidelity colors, these basic tools should be enough.
Image Credit: By Claudio Divizia/Shutterstock
LCD monitor test images
Welcome to the Lagom LCD monitor test pages. With the test images on these pages, you can easily adjust the settings of your monitor to get the best possible picture quality. Additionally, there are a number of test images that can help you to judge the image quality of a monitor. You can check the images on this webpage or put them on a usb stick and try them in the computer store like I did when I created these test patterns. These test images are much more revealing regarding monitor shortcomings than ordinary photographs.
I'm offering these pages for free. In return, I just ask you to respect my copyright. Do not place these images on other websites or web forums, and don't link directly to the images.
Monitor calibration
With the first few test images, you can calibrate your monitor by adjusting the brightness, contrast, clock/phase, sharpness, and gamma settings of the monitor. I recommend to go through them in the order they are presented. If you use this page in a shop, don't assume that the contrast and other settings are at reasonable values before making a judgement. The images are best viewed in a dim or dark environment and in full-screen mode. In most browsers, F11 switches to full-screen mode. If switching off the lights is not possible, try using a piece of cardboard to shield environmental light.
If you have any kind of color management system active in your operating system or video-card driver, then disable that first. First make adjustments to the monitor settings to let it behave as close to the ideal as possible, and only after that you can use the color management to compensate for any small deviations that remain.
Actually, calibration is not really the correct term. Calibrating a monitor would mean that you measure the response of the monitor and then compensate for non-ideal behavior elsewhere, for example in the video-card driver. Here, you are supposed to change the properties of the monitor itself to let it approach the ideal better. But then, who cares whether you call it monitor adjustment or monitor calibration. ..
..
Alternative views
- Single-page version
- If you already know how to use these images.
- Download
- For viewing the images off-line (120 kB ZIP).
- Without sRGB profiles
- All images, but with the color profiles stripped, in case you want to see the effect of your OS color management.
Assessing monitor quality
More towards the end of this page series are the inversion test, the response-time test, and the various viewing-angle tests. These tests can reveal monitor properties that cannot be changed.
Contrast
© Copyright Han-Kwang Nienhuys, 2008. The text and accompanying images may not be redistributed. This includes placing the images on other websites, either as a copy or through hotlinking. Read more...
Last modified 18 May 2008
- Home
- LCD calibration
- LaTeX
- Linux
- Web
- Misc
[Email]
Photo Monitor Calibration
Understanding the principles of monitor calibration is critical for any photographer who wants to achieve accurate and predictable photo prints. If your monitor doesn't reproduce shadows and colors correctly, then all the time spent editing and post-processing the image may actually be wasted. This chapter covers the basics of calibration for the average photographer, in addition to using calibration and profiling devices for highly accurate results. Further, it is assumed that throwing away the old monitor and buying a new one is not a solution. nine0003
| → | → | Monitor calibrated | ||
|---|---|---|---|---|
| Digital image file | Color profile |
Adjusting brightness and contrast
The simplest (but least accurate) way to calibrate your monitor is to adjust its brightness and contrast. This method does not require a color profile for your monitor and is therefore ideal for everyday use or when you need to make quick adjustments on someone else's computer. nine0003
The images below are designed to help you select the optimal brightness and contrast setting. A well-calibrated monitor should be able to pass both tests, but if it fails, you'll have to choose which of the two is more important. In any case, make sure the monitor is allowed to warm up for at least 10-15 minutes first.
1) Semitones . Well-calibrated midtones are often the highest priority task. The monitor should show the central square as being identical to the surrounding background in brightness, whether viewed with defocused vision or from a distance. The left and right squares should appear darker and brighter than solid gray, respectively. nine0003
© 2004-2011 Sean McHugh
Note: The above test assumes the monitor is set to 2.2 gamma.
If the center square is brighter or darker than the gray background, your monitor may be displaying images brighter or darker than expected. This will also have a noticeable effect on your print options, so this needs to be dealt with.
If you are using an LCD monitor, first set it to standard contrast (most likely either 100% or 50%) and then adjust the brightness until the center square blends in with the background. If you are using a CRT (the big "old-fashioned" type), set it to maximum contrast. In any case, make sure your monitor is set to 2.2 gamma if it has such a setting (this is the default setting for most modern monitors). nine0003
Note: Increasing the brightness of your monitor too much may shorten its lifespan. You probably won't need maximum display brightness if the room isn't too bright, if the monitor doesn't have backlighting (such as a window in the background), or if it's not too old.
2) Highlight and shadow details . If you performed the calibration in the previous step, the midtones on your monitor will now be displayed at approximately the desired level of brightness. However, it can also mean that shadows and lights are too bright or too dark, and vice versa. On each of the two following images, 8 steps should be distinguishable:
| Shadow details | Parts in the light |
The two extreme levels of shadows and highlights should be only slightly distinguishable. However, the examples shown above provide only a coarse adjustment that covers only a small part of the tonal range and does not correct chroma at all. There are slightly more accurate methods of visual calibration, but ultimately obtaining truly accurate results requires systematic and objective measurements using calibration instruments. The colors and shadows a monitor produces vary by monitor type, manufacturer, settings, and even age. note: in terms of this example, "standard color" is just Ideally, your monitor would simply translate the numbers from the file into a standard set of colors. 1) Calibration is the process of bringing the monitor to a desired and well-defined condition. This usually involves changing various physical parameters of the monitor, such as the aforementioned brightness, as well as creating a so-called look-up table (LUT). LUT takes an input value such as green=50 from the above example and then says "I know monitor X shows green=50 darker than standard, and if I convert 50 to 78 before sending it to monitor , the resulting color will be what green=50 should have been. In this way, the LUT translates the digital values from the file into new values that effectively compensate for the characteristics of the selected monitor:  Otherwise, you've probably reached the limit of your brightness and contrast settings. Otherwise, if maximum shadow and highlight detail is more important than midtone luminosity, you can ignore the midtone test. In this case, first use brightness to achieve the desired details in the shadows, then use contrast to adjust the details in the light (in that order). If the brightness is too high, completely black will turn gray, but if there is not enough detail in the shadows, several of the 8 shadow levels given will appear the same. nine0003
 Overview: Calibration and Profiling
 Unfortunately, unlike in the digital world, the same numbers don't produce the same results when it comes to monitors. As a result, green, for example, may turn out to be darker, lighter or of a different saturation than it was specified in numbers:
Digital value
green Monitor
"X" Standard
color 200 → 150 → 100 → 50 → ← Color different →
an example of a desired state that can be clearly defined in terms of
generic parameters such as gamma, white point, and brightness.  However, this is not always possible, so the monitor calibration process really consists of two steps: 1) calibration and 2) profiling. nine0003
Digital value
green LUT Compensated
digital values Monitor
"X" Standard
color 200 → 200 → 150 → 122 → 100 nine0007 → 113 → 50 → 78 → ← colors match →
2) profiling is the process of characterizing the calibrated state of your monitor using a color profile. These characteristics include the range of colors that your monitor is capable of displaying ("color space"), in addition to the location of intermediate brightnesses within that range ("gamma"). Other properties can be included in the profile. nine0003
Profiling is important because different devices are not always able to reproduce the same range of chroma and shadows ("gamma difference"). A perfect conversion from the color of one device to the color of another is therefore not always possible. Color profiles allow programs that support color management to reach a reasonable compromise in the process of imperfect transformations:
| Original image | Standard "A" | nine0250 Color management Standard "B" | Transformed image | |
|---|---|---|---|---|
| ← Gamma difference → | ||||
| Wide range of colors | Narrow color range | |||
In the example above, Standard A has a wider green range than Standard B,
so that the colors of the original image are compressed from a wide intensity range of
to a narrow one. For details on the principles of color space conversion, see chapter
Color Space Conversion.
Monitor Calibrator
Calibrator Application
Monitor Calibrator performs both calibration and profiling tasks. It usually looks like a computer mouse and is attached to the monitor screen. A special program then controls the monitor so that it shows under the calibrator a wide range of colors and shadows, which are measured and recorded in succession. nine0003
Common calibration devices include, but are not limited to, the X-Rite Eye-One Display, ColorVision Spyder, ColorEyes Display, and ColorMunki Photo.
Allow your monitor to warm up for at least 10-15 minutes before starting calibration. In this way, you will ensure the stability and reproducibility of brightness and color balance.
Immediately before starting the process, the program will ask you to set several parameters against which the calibration will be carried out (“target setting”). These settings can include white point, gamma, and brightness (we'll look at those in the next section). During the calibration process, you will also be asked to change various screen settings, including brightness and contrast (and RGB values if you are using a CRT). nine0003
The result is a matrix of color values and their corresponding dimensions. Sophisticated software algorithms then try to create a LUT that will reproduce, first, neutral, accurate, and appropriately graduated grayscale, and second, an exact match of hue and color saturation across the entire gamut. If they can't be perfectly rendered (and they never can), the program tries to prioritize them so that the inaccuracies are related to color and tint differences that our eyes can't quite see. nine0003
Calibration settings
Here is a brief description and recommendation for each calibration target:
White point . This setting controls the relative warmth or coolness of the lightest tone on the screen, according to the "color temperature". Higher color temperatures will produce cooler tones, while lower temperatures will appear warmer (yes, this is not intuitive at first glance).
| nine0083 | ||
| Warm color temperature | Color temperature of your monitor | Cold color temperature |
Although the above samples seem slightly colder and warmer, this is
because they are located side by side. If you place any of them separately, so that they are
the brightest spot on the screen, the eye adapts and you call each of them "white"
You will find material on this topic in the chapter on white balance. nine0003
For CRT monitors, the standard recommendation is a display color temperature of around 6500K (referred to as D65), which is slightly cooler than daylight. However, for LCD monitors, things are somewhat more complicated. Although many LCDs have a color temperature setting, their backlight always has its own color temperature. Any deviation from it leads to a narrowing of the gamma of your display. For this reason, LCD monitors are generally recommended to be left at their default color temperature unless you have a compelling reason to change it. Your eye adapts to the color temperature, and neither warmth nor coldness will be noticeable until they are compared directly. nine0003
Gamma . This setting controls the rate at which the brightness of the shadows fades from black to white (for each of the digital values). This makes the image look lighter for larger gamma values and darker for smaller gamma values, respectively, but the black and white points remain the same. Also gamma strongly affects the apparent contrast of the image:
| Gamma 1.0 | Gamma 1.8 | Gamma 2.2 | Gamma 4.0 |
Note: The above images assume that your screen is set to gamma 2. 2.
2.
Older Macs used a gamma value of 1.8 for a while,
but now they also use gamma 2.2.
Gamma 2.2 has become the standard for editing and viewing images, so this value is generally recommended. It also correlates best with how we perceive brightness variations and is closest to your display's default setting. nine0003
Brightness . This setting controls the amount of light your screen emits.
Unlike white point and gamma, the optimal brightness setting is highly dependent on the brightness of your working environment. Most set the brightness to around 100-150 cd/m 2 , but bright work environments usually require higher values. The maximum achievable brightness will depend on the type and age of your monitor, and thus can drastically limit the allowable brightness of your work environment. nine0003
However, higher brightness settings will shorten the life of your monitor, so it's always a good idea to dim your monitor a bit if you can afford it. Use the lowest possible brightness in the 100-150 cd/m range 2 where you can still see all 8 shadows in the sample above.
Calibration: Look-Up Table
The Look-Up Table (LUT) is either controlled by your graphics card or by the monitor itself, so it will be used whether or not your software is color-managed - as opposed to a color profile . The LUT is usually loaded immediately after the operating system boots and is used regardless of what is displayed on the monitor. nine0003
Whenever red, green, and blue numbers are equal, an accurate monitor should show this as neutral grey. However, you will be surprised at how often this is not the case (see below). The LUT*'s job is to keep the neutral gray tones in the correct gamut.
*Note: This is an example for the simplest linear 8-bit LUT,
which is most commonly used with CRT monitors.
| R,G,B input | Monitor "X" | Neutral gray | ||
|---|---|---|---|---|
| 200,200,200 | → | |||
| 159,159,159 | → | |||
| 100,100,100 | → | |||
50. 50.50 50.50 | → | |||
| ← difference → | ||||
An example of a LUT that fixes the display on monitor "X" is shown below. It essentially applies independent tone curves for each of the monitor's color channels:
| → | ||
| Uncorrected | Display table |
Note: The above table is linear and 8-bit; there are 90,004 more complex 3D LUTs that don't process each color independently.
However, the basic concept remains unchanged.
Without the above LUT, your video card sends the input color value 159 (from the digital file) directly to the monitor (no matter what color). Using the LUT, the video card substitutes the red, green, and blue values using tone curves. Input valueR,G,B=159,159,159 is sent to the monitor as 145,155,162 (which are now treated as neutral grey). Note also that a deeper color correction corresponds to a greater deviation of the tonal curve from a straight diagonal.
Often there are several LUTs in the display chain - not only in the video card. Another LUT that best matches your monitor's calibration is its built-in LUT (as discussed below). If your monitor supports the ability to change the built-in LUT (some models allow this), this usually achieves a more accurate calibration than using the video card's LUT. However, unless a calibration program has been developed specifically for your monitor, it will most likely use the video card's LUT. nine0003
Profiling: Chroma Profile
Chroma Profile specifies output parameters based on calibration, such as gamma, white point, and brightness, in addition to calibration measurements, such as the maximum red, green, and blue intensities your display is capable of emitting. These properties together define the color space of your monitor. A copy of the LUT is also included in the profile, but it is not directly used because it is already implemented in the monitor or graphics card. nine0003
A color profile is used to transform images so that they can be displayed correctly, taking into account the unique characteristics of your monitor. Unlike LUT, to use a color profile when viewing images, you need a program that supports color management . This won't be a problem if you're running the latest operating systems on PCs or Macs, as they all support color management. Otherwise, use Photoshop or any other common image editing or RAW file conversion program. nine0003
Whenever a digital image is opened that contains an embedded color profile, your program can compare that profile with that of your monitor. If the monitor has a similar tonal range as indicated in the digital image, the values from the file will be directly converted by the LUT to values that are correct for your monitor. However, if the color spaces are different (as they usually are), your program will perform a more complex conversion. This process is called color space transformation. nine0003
Monitor Calibration Test
Don't assume that just because you've done a color calibration your monitor will start to reproduce color accurately without any problems. It is also important to check the quality of this calibration. If you find that your calibration device was unable to correct some inaccuracies, you can at least take this into account when processing images with methods that affect color.
The easiest and fastest way to evaluate the quality of a color calibration is to look at a large black and white gradient in a program that supports color management. A sub-optimal monitor calibration can render this gradient with slight vertical color banding or sudden discrete jumps in tone. nine0069 Hover over the following sample to see what a low-quality monitor calibration might look like. :
An example of a smooth neutral gradient to diagnose monitor calibration quality.
This gradient is best suited for diagnostics when viewed in full screen and when the color profile is turned on and off. Photoshop allows this to be achieved by setting "Proof Colors" to "Monitor RGB"; CTRL+Y toggles the monitor profile on and off. If "Monitor RGB" is enabled, it means that the monitor's color profile is not is used.
If banding is visible in the gradient, your monitor may need to be recalibrated. It's usually recommended to do it monthly or so, depending on how important color accuracy is to your work.
Otherwise, the color reproduction of your monitor may be so far from optimal that the color profile will set an extreme correction. This may be due to the monitor calibration you are using, or it may be due to its age. In the latter case, the color profile will still be a big plus compared to its absence - but the color reproduction will not become sinless. nine0003
Monitor calibration limits
Unfortunately, there are limits to calibration accuracy. For a digital monitor, , the more you need to change your monitor's settings from the default settings, the more you lose out on the amount of color tones and shadows it can show . Fortunately, the bit depth of your monitor's built-in LUT can affect how well it is calibrated, as a monitor with a larger LUT can use a wider color gamut:0003
| → | or | |||
| Uncorrected | Small LUT | Multibit LUT | ||
| (4 output shades) | (2 output shades) | (4 output shades) |
Note: The increased bit depth of the built-in LUT does not mean that the monitor can show more shades of color is simultaneously , since the number of input values remains the same. That's why increasing the bit depth of the video card's LUT by itself will not allow you to achieve a more accurate calibration.
In the low-bit example, the brightest (4) and darkest (1) hues are forced to white (5) and black (0), respectively, as the LUT rounds to the nearest available output value. On the other hand, a multi-bit LUT may use additional intermediate values. This greatly reduces the likelihood of color banding and image posterization - even if the monitor is old enough and deviated significantly from the original color. nine0003
If you have a new precision monitor with an 8-bit LUT, you will probably get a good calibration; the role of the bit depth of the LUT begins to grow as the monitor ages. Most displays use an 8-bit LUT, although some have 6-bit LUTs and others 10-bit or more. Avoid using LCD monitors designed for gaming, as they often sacrifice the bit depth of their LUTs (or other aspects) for a fast refresh rate, which is of no importance when viewing still images. nine0003
Why monitor calibration is important and how to do it
If there's one thing absolutely certain about photos on the internet, it's that no one sees them the same way you do. In general, most monitors are too bright and have some sort of default color setting. Some are very good, others not so good. As a monitor ages, colors also change. This is more true of older tube monitors than LED monitors, but colors do change over time.
Why do you need to calibrate the monitor
There is also the concept of compliance in print. If you've ever printed your shots (you're missing out on a lot if you don't) and were frustrated, it's possible that your screen is deceiving you during the editing phase.
There is a way to bring your screen up to known standards, and by doing so you will have correct color and brightness reproduction, which will bring you closer to better quality prints. This method is to calibrate the screen or monitor. nine0003
To calibrate your monitor, you will need a puck-shaped device that fits onto the monitor and measures the displayed color. It's called a spectrophotometer. The name consists of what this device does: photo = light, spectro = spectrum means a range of colors, and meter = measure. So, it measures color. Do not worry that you need to buy one of these devices and select software for it, they come in a set, equipped with the necessary program. nine0003
What do you need?
Some examples of monitor calibration kits include X-Rite i1 Display Pro (like mine), Spyder Pro and Color Munki. The process for each of them is similar and quite simple. First you install the software and run it. Then attach the device. Initially, you need to set the settings, but usually the correct ones are already offered. Typically, this is 120cd/m2 or less in brightness, D65 or Native for light source and 2.2 for Gamma. At first, it may be necessary to adjust the brightness and contrast of the monitor through the monitor's own menu. Then you just run the program and as a result it will automatically create a profile. The only thing that matters is that your monitor needs to be on for a while before calibrating. It will take about 30 minutes to set up. nine0003
How to calibrate the monitor?
Let's look at this issue using the software that comes with i1DisplayPro, i1 Profiler. This is what you will see on the screen at the beginning (after registering the product).
Click on Display Profiling to start. The program will automatically detect the screen type and apply the recommended default values for the monitor. Click Next (below). nine0003
You are now at Screen Measurements (below). Select the option to manually adjust the brightness and contrast of the screen. The colored tiles you see on the right are the colors that will flash across the screen when the calibration starts. Click the Next button to get started.
In the following image below, you can see a cropped version of the screen you will see. Install the device on the monitor according to the instructions. Click Ok to continue. nine0003
Use your monitor controls to get the correct brightness settings (see below) for the profile. Click Next when you're done. The screen will cycle through a series of colors in the form of tiles. As each color is displayed, the entire screen changes to match it. This takes about two minutes.
Remove the unit and install it for ambient light even if you do not use this function. nine0003
Tiles now display the appearance of the color before and after changing it in the profile. Click Next.
Click Create and save profile to create a new monitor profile.
Once the profile has been created, you can compare the results using the test charts on the screen.
Results and questions
That's it.


