Nikon metering modes
Using the Highlight-Weighted Metering Mode
Intermediate
Featuring Nikon Ambassador Jerry Ghionis
When to use highlight-weighted metering
Glossary
Highlight-weighted metering is a new metering mode that is offered in select Nikon DSLR cameras, in which the camera meters the highlights to ensure that they are properly exposed and not blown out or overexposed. Use highlight-weighted metering to meter highlights when your subject is in motion, and to meter subjects lit by spotlights or colored lighting.
Highlight-weighted metering is the go-to choice when you’re photographing a spot lit bride in her wedding dress, a dancer or singer on stage, or whenever you’re faced with uneven lighting and a background that is much darker than the subject.
To select highlight-weighted metering, press the metering button on the far left dial on the camera body, and while holding it down, rotate the main command dial until the highlight weighted metering icon is displayed.
(l.) On the top of the D810 DSLR, at the far left are the buttons for metering, white balance, ISO and quality. Press and hold the metering button; and turn the main command dial (middle) which is at the top rear of the camera body until the highlight-weighted metering icon displays on the top LCD (r.). For other cameras, check your User's Manual to see where to set the highlight-weighted metering.
(l.) On the top of the D810 DSLR, at the far left are the buttons for metering, white balance, ISO and quality. Press and hold the metering button; and turn the main command dial (middle) which is at the top rear of the camera body until the highlight-weighted metering icon displays on the top LCD (r.). For other cameras, check your User's Manual to see where to set the highlight-weighted metering.
Using the Matrix Metering mode for this exposure, you can see that the highlights are overexposed. D850, AF-S NIKKOR 70-200mm f/2. 8E FL ED VR, 1/320 sec, f/2.8, ISO 4000, Aperture priority, Matrix metering.
© Jerry Ghionis
Using the Matrix Metering mode for this exposure, you can see that the highlights are overexposed. D850, AF-S NIKKOR 70-200mm f/2.8E FL ED VR, 1/320 sec, f/2.8, ISO 4000, Aperture priority, Matrix metering.
In this image the photographer used the Highlight Weighted Metering mode to correctly expose for the highlights. D850, AF-S NIKKOR 70-200mm f/2.8E FL ED VR, 1/800 sec, f/2.8, ISO 4000, Aperture Priority, Highlight Weighted Metering mode.
© Jerry Ghionis
In this image the photographer used the Highlight Weighted Metering mode to correctly expose for the highlights. D850, AF-S NIKKOR 70-200mm f/2.8E FL ED VR, 1/800 sec, f/2.8, ISO 4000, Aperture Priority, Highlight Weighted Metering mode.
Moving Subjects
Although spot metering targets a selected area, targeting can be difficult when your subject is in motion. Matrix metering balances exposure over the entire frame, including the background, and may consequently leave highlights overexposed, or washed out. You may also have to constantly adjust the exposure compensation when using Matrix metering. In contrast, highlight-weighted metering automatically detects and meters highlights for optimal exposure with less washout.
Solid Colors, Colored Lighting
Highlight-weighted metering takes the color of the light source into account to prevent overexposure, even in highlights with a strong color cast.
Matrix and spot metering tend to "wash out" highlights in subjects that are a solid color or lit by colored lighting, the former because it accepts limited washout if it ensures optimal exposure for the entire frame, the latter because it meters only brightness. Highlight-weighted metering takes the color of highlights into account so that they are always correctly exposed.
Highlight-weighted metering's first priority is to reduce washout, which may make pictures seem overexposed. Use exposure compensation to achieve the desired result.
Challenging Scenes
With a dark subject and bright background, if you use highlight-weighted metering, the exposure will be adjusted for the background, throwing the main subject into shadow. Highlight-weighted metering can be used for silhouettes, but matrix metering is a better choice if you want exposure optimized for the main subject.
When there is a bright light in the frame, the camera may treat the light as a highlight, leaving the main subject underexposed. Compose the shot with the light out of frame or use Matrix metering.
If desired, Active D-Lighting can be used with highlight-weighted metering to brighten shadows and reduce contrast.
111of0
Metering modes explained and how to know which one to use
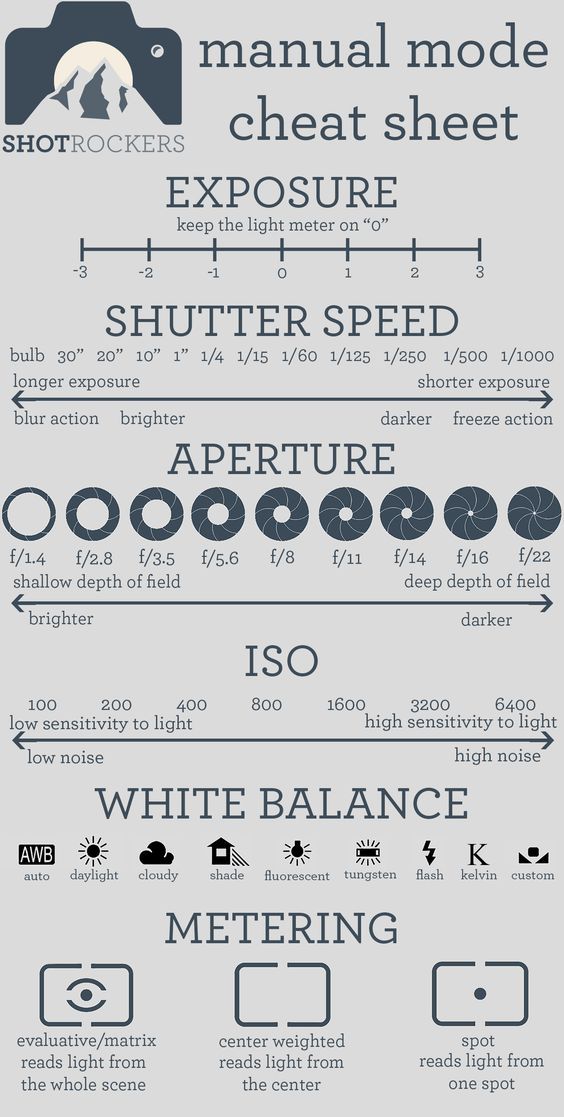
Choosing a metering mode can be as important as choosing an ISO or aperture when you need to nail your exposure.
Metering affects how your camera processes the scene, thus giving you a reading on your exposure in camera.
I know that with the ability to “chimp”, or stop and look at the back of your dSLR after each image, we can take our meters for granted. As a wedding photographer (and as a mother to two young children that don’t allow “do-overs”), however, I simply do not have the time to second guess myself after each frame.
Most of today’s modern cameras have at least three different metering modes to choose from; matrix (evaluative), center-weighted, and spot. Some cameras are also equipped with a fourth metering type called highlight-weighted metering mode. Both of my Nikon bodies have this newer mode and so I’ve included it here.
By default, your camera WANTS you to be at a center or zero on the meter. Zero on the meter equates to 18% gray (some may argue 12% gray depending upon camera), which is a happy mid-tone. This makes sense if you are measuring only mid-tones. My problem with this is that often what is most important to me in a scene is not that simple. Skin, for instance, gives completely different “correct exposure” readings on the meter depending on ethnicity. Your meter may also be fooled by the lighting you are using depending on which mode you have set. This is why it is important to learn the different modes and what results you can expect in each situation.
Matrix metering
Matrix metering mode, or evaluative metering as it is sometimes referred to, considers the largest portion of the scene when metering the light. The way I have always thought about this type of metering is an average. The camera’s sensor considers all available light in any given scene and comes up with the best suggested exposure. This can be a very simple and straightforward way to meter a scene when you are in nice even light and are not working with a scene that includes too many drastic shadows or highlights. It is, for all intents and purposes, the “auto” of the metering world.
Center-weighted metering
Center-weighted metering mode is a bit like matrix metering in that the camera considers a wide area of the frame, however, in this mode the camera gives greater consideration to the scene in the center of the frame, assuming that the person/place/thing in the middle of the photograph is the subject and should be properly exposed even if the outside edges would then be too light or too dark (depending on what you are shooting!). This mode is great for portraits with subjects that take up most of the frame, or when you have a good mix of tones in the center.
Highlight-weighted metering
Highlight-weighted metering is the newest metering mode to us Nikon shooters. In this mode the camera again gathers its information from the same area as matrix, but this time the greatest weight is given to the highlights that are present in the frame. This mode takes into account bright portions of your scene and tries to “save” them from overexposure. With Nikon cameras this is especially exciting as the bulk of our dynamic range is stored in the shadows allowing us to easily bring back shadow detail…but anyone who has shot with a Nikon knows that once you’ve blown a highlight there is very little you can recover.
I know that this mode is going to be useful in high-contrast situations that change quickly and dramatically, such as when you are photographing a concert performance, bright city lights at night, or just a kid in a bed with a flashlight.
Spot metering
Last, but certainly not least, we have spot metering. This is exactly what it sounds like. Your camera is looking at a specific spot within the frame and ignoring all else! In Nikon cameras the “spot” you are measuring will be the active focus point. In Canon cameras that spot is going to be the center focus point.
Because you are measuring only a very small portion of the frame, spot metering can be frustrating at first, and may not be useful in all situations. I tend to spot meter more than the other available modes simply because I feel like I have the most control in this mode. I like to meter off of skin to ensure that I am not over or under exposing by too much on what I consider to be the most important part of a portrait. This doesn’t work, however, in a situation where a bride is wearing a bright white dress! Obviously in that situation skin is not exactly the priority (in camera).
Now, I have a special guest who agreed to help me demonstrate the different metering modes in different lighting situations!
Her Majesty, The Queen, was looking out a bright window, which provided for the ever-challenging backlit photograph situation. Here you can see the four different metering modes in use, and the SOOC images.
Each image was metered to zero; the spot meter reading was taken from the area marked in red.
You can see that this is a tricky situation, the meter wants to average both the highlights and the shadows in matrix, center-weighted, and highlight-weighted metering modes, causing Her Majesty to be underexposed (but saving the highlights). When I spot metered I was able to bring her exposure up but I did sacrifice the highlights in the sky and on a portion of the ledge.
In this next example we were decorating for the holidays and have many small BRIGHT sources of light against an otherwise relatively dim background.
You can see in this series that the highlights of the lights caused the meter to read the entire scene as brighter than it actually was, specifically in the highlight-weighted metering example.
Metering, just like every other aspect of photography, is a matter of personal taste.![]() While one specific metering mode might suit one artist, it may not favor another. I suggest you challenge yourself to explore the different options in all the lighting situations you encounter to determine which works best for you and your shooting style!
While one specific metering mode might suit one artist, it may not favor another. I suggest you challenge yourself to explore the different options in all the lighting situations you encounter to determine which works best for you and your shooting style!
I’ll leave you with a quick list of some of the situations to use each metering mode for:
Matrix:
- Evenly lit scenes (either full sun or full shade)
- When using flash
Center-weighted:
- Portraits
- Macro
- When the important part of the photograph will stay in the center of your frame
Highlight-weighted:
- Concerts
- Mixed lighting
- Stage performances
- Situations where you know there will be bright highlights but are unable to spot meter on the fly
Spot:
- Backlit images
- Silhouettes
- High-contrast situations
- Snowy landscapes
- When your subject is not filling the largest portion of your frame
Save
Save
| In order for the camera to determine the right settings for shooting, first of all it needs to know how bright or dim the lighting of the area that you want to photograph. The exposure meter in the camera is responsible for this determination. The right exposure for a picture is one of the key tasks of any camera automation. Nikon 9 Metering Methods0095 All Nikon CCMs use reflected light metering, the so-called TTL mode . TTL means 'Through The Lens ' - through the lens (lens), that is, exposure metering is calculated using the light that is reflected from the subject being shot, passed through the lens (lens) and hit the exposure meter sensor. For example, in the photo below, the light from the sun reflected off the flower, passed through the lens, was reflected by the mirror, and hit the light meter. Matrix metering. Automation normally copes with exposure metering. The exposure meter itself is a rather complex device, basically, it is a CCD or CMOS type photosensitive matrix, which is divided evenly or unevenly into a large number of cells. Each cell receives light from the lens and calculates its strength in each individual area of the image. In fact, these cells calculate not only the brightness itself, but also the saturation of individual colors, the color shift. Further, information about each section of the future image is transferred to the camera processor for processing. The camera processor receives more information from the focus sensors to find out the focusing distance to the subject being shot. After that, according to complex algorithms that depend on the selected shooting mode, the processor calculates the parameters for the desired exposure - shutter speed, aperture, and sometimes ISO. Now the algorithms are so advanced that many cameras simply compare the information received from the sensors with the measurement base for several hundred thousand shots, find a similar one and immediately determine the optimal settings simply 'from memory'. For example, Nikon D70s takes into account a base of 30,000 shots, Nikon D700 a base of 300,000.
After I made this plate, I was surprised that Nikon only uses 5 exposure sensors in the CZK.
View of exposure meters. Top 1005 pixel, bottom 420-segment For Nikon digital SLR cameras, automatic exposure metering is carried out in 3 main ways:
Matrix metering has a number of modifications, for example, 3D Color Matrix Metering II , III but the meaning remains the same everywhere. Center-weighted also takes into account data from almost the entire image, but the main information that most affects the calculations is taken from the center of the frame. The diameter of the central part of the frame, which is most responsible for metering, can be changed in the camera settings. The default is 8mm. Personally, I have never configured this setting. Since the main part of the composition of interest to the photographer is usually located in the center of the frame, center-weighted metering can be used for scenes in which there are strong differences in illumination on the sides of the frame. Spot metering measures exposure at only one point, a point size of approximately 2.5% of the entire frame. In this mode, we accurately get a correctly exposed element in the picture where the metering point is located, the rest of the frame can be underexposed or overexposed, as shown in the example with the watch. In different auto focus modes:
Center-weighted exposure metering. In Live View mode, exposure metering works exactly the same, only information about brightness and color distribution is taken directly from the camera's sensor. Exposure change when different metering methods are selected. Spot metering made the watch correctly exposed, but the total exposure fell into the '+' Personal experience: Roughly speaking, the exact metering algorithms in each camera are different , since each camera uses its own exposure meter and its own matrix, which has different DD and ISO values and a number of additional settings like ADL. The operation of the exposure meter of each individual camera accounts for get used to . If the on-camera exposure meter for reflected light does not suit you, you can always buy an exposure meter for illumination. Personally, I just roughly know how the camera behaves in different conditions. Automatic exposure metering I take almost all the pictures in the matrix mode with the necessary exposure compensation, when the conditions are very difficult, I use spot metering, and when the automatic operation does not suit me, I simply use the manual camera control mode, in which I set exposure parameters by eye or by histogram. In general, the same can be said not only about Nikon, but also about other systems. Auto metering does a pretty good job Conclusions Understanding exposure metering is the foundation for a properly exposed photograph. If the learns to operate the with different metering modes, then you can easily shoot in any situation with difficult lighting. I advise you to conduct your own experiments on your CZK. Help for the project. Thank you for your attention. Arkady Shapoval. Add a comment:Add a comment | |||||||||||||||||||
 Matrix, Center-weighted and Spot metering
  2-F/1.4
  You can see how a modern digital SLR camera works here, and where the exposure meter itself is located can be seen here.
 All Nikon cameras (except the D100) use RGB color sensors for metering, allowing you to fine-tune exposure settings. The table includes Fujifilm FinePix digital SLR cameras, which were built on the basis of Nikon cameras with Nikon F mount and have many internals from Nikon cameras, including exposure metering sensors.
  The camera tries to determine the correct exposure by evaluating the parameters of almost the entire future image. That is, in this mode, the brightness of almost all details over the entire field of view is estimated. The mode is very convenient when there is a composition with uniform lighting in the frame, but even with complex scenes, matrix metering copes quite well.

 In automatic modes it is very useful to apply exposure compensation. Even if I didn’t keep track of the desired exposure on the camera’s display, I can always correct the levels when processing the RAW file. Metering is especially difficult when shooting with multiple flashes in i-TTL mode, in which case I still use matrix metering, but manual flash control using Nikon CLS.
 Exposure.
 Part 4 Metering Modes / Beginner Shooting / Photography Tutorials
 In the previous part of the lesson, we found out that the camera is equipped with a very accurate tool for measuring the brightness of a scene. To always get high-quality photos, you need to learn how to work with it.
The camera can measure exposure in different modes to suit different shooting situations.
Matrix metering
This icon indicates matrix metering on the camera.
Matrix metering measures the brightness of the scene across the entire frame.
The most suitable metering mode for beginners is matrix metering. It is also called estimated or multi-segment. Scene brightness is measured over the entire area of the frame, using the maximum number of sensors. The results from each sensor (recall that, depending on the camera model, their number can reach tens of thousands) are analyzed, and the camera determines the optimal exposure value. Methods for analyzing this data are constantly being improved and become more intelligent. The number of metering sensors is also growing. All this makes matrix metering more accurate with each successive generation of cameras.
Today, with matrix metering, it is almost always possible to obtain the correct exposure. Minor difficulties may arise in non-standard situations for automation. For example, shooting a person indoors against the background of a window. In this case, automation cannot accurately determine what we are shooting: a landscape lit by the midday sun outside the window or a person dimly lit by room light. It can solve this problem in different ways depending on the situation and the specific composition of the frame. Shooting on a white or black background can also cause difficulties: the automation will tend to equate the prevailing shades in the frame to gray. Therefore, frames on a white background will turn out too dark, and on a black background - too bright. Shooting trial shots and then applying exposure compensation or using other metering modes (for example, spot) will help solve this problem.
There are many light shades in the frame: snow and the dawn sky. When using matrix metering, I had to make positive exposure compensation so that the frame did not turn out too dark.
NIKON D600 / 50.0 mm f/1.4 SETTINGS: ISO 100, F5.6, 1/50 s
When to use matrix metering? This mode is suitable for most shooting situations. It will be optimal for active reportage shooting, photo walks, amateur family photo shoots and travel.
Spot metering
Symbol for spot metering.
The area of analysis for spot metering is a small dot. In older Nikon models, the dot area is only 1.5% of the entire frame area. The exposure metering point will be where the current AF point is. This is a very advantageous feature of Nikon cameras, which distinguishes them from many competitors.
Thus, you can measure the exposure not only in the center of the frame, but also in any part of it. This makes spot metering more convenient and flexible.
Quite difficult to use, but the most accurate metering mode is spot metering. The measurement of the brightness of the filmed scene takes place over a small area, a point. On Nikon cameras, this point will be located in the same place as the active AF area. Since the measurement takes place only in a very small fragment of the image, you need to correctly select the area for measurement. If you thoughtlessly poke this point into any place that comes across, the result will most likely not be the most successful. We get an incorrectly exposed frame. Spot metering should be done relative to the average brightness areas in the picture. After all, the camera believes that we are “showing” an object of average brightness to it and, based on this, measures the exposure.
For example, when photographing this house, you should measure the exposure not by its white wall (otherwise the picture will turn out to be too dark) and not by the dark forest (we will get an overexposed frame). It is better to use fragments of the plot that are medium in brightness. The ideal option would be a slate roof of the house.
Spot metering on the roof of a house.
Spot metering against a white wall. Result: The image is too dark.
Spot metering over forest. Result: The picture is too bright.
Spot metering is used by some in portrait photography. This is convenient if you are shooting with a Nikon camera and the metering point is the same as the focus point. Because people's faces tend to be of average brightness, face spot metering will generally work correctly. But if we are shooting a dark-skinned or black person, it is worth considering introducing a small negative exposure compensation.
Spot metered on girl's face. Since the background in the photo is quite dark, other types of metering would most likely give a different exposure and would require exposure compensation.
Exposure lock. It is often necessary to recompose the picture after metering exposure with spot metering. So that after recomposing the exposure does not go astray (after all, the device measures the exposure constantly until we take a picture), there is a special exposure lock button - AE-L (Automatic Exposure Lock). When you click on it, the camera fixes the current value of the exposure parameters. This function is useful not only when working with spot metering, but also when you need to take several shots with the same exposure without switching to manual mode. Often this is necessary when shooting panoramic shots.
On modern cameras, the exposure lock button is combined with the focus lock (AF-L). By clicking on it, we block both autofocus and exposure. However, we can configure these parameters in the camera menu, indicating what exactly this button will block.
In this shot, I used spot metering, metering the exposure against the rock in the foreground. After that, I held down the AE-L button and recomposed the frame the way I liked.
By the way, when you hold the shutter button in the half-press position, exposure metering is also locked. After you press the button to the end and the frame is taken, exposure metering will continue, which is not always convenient (for example, when shooting panoramic).
When to use spot metering? First of all, when you are sure that you can handle it. Indeed, for accurate measurements, you will have to carefully monitor which object in the frame is used to measure the exposure. Photographers often use this type of metering when shooting landscapes with complex (sunset, dawn) contrasting lighting. This type of metering can also be used in portrait photography, metering the exposure exactly on the face of the model.
Center-weighted metering
This is how center-weighted metering is indicated on the camera.
Measuring area for center-weighted metering.
Center-weighted type of metering is a classic type of exposure metering inherited from the very first film SLR cameras with a built-in exposure meter. Metering exposure in this mode is carried out over a large area in the center of the frame, in a circle of large diameter. At the same time, the area located directly in the very center of the frame has a higher priority (higher “weight”) when analyzing the received data. Today, this type of metering is a little outdated against the backdrop of, firstly, the intelligent and easy-to-use matrix metering, and, secondly, the accurate and flexible spot metering.
Just like matrix metering, this metering is easy to use. However, keep in mind that the exposure will not be measured over the entire area of the frame, but only in its central part.
Highlight metering
Symbol for highlight metering.
Highlight metering, as its name suggests, focuses primarily on the brightest parts of the frame. His task is to keep all the details on them.
This is the newest metering mode. It appeared in the most modern Nikon devices: D750, D810. Experienced photographers know how unpleasant overexposure in pictures is. In places with overexposure, there is a complete loss of detail; in the picture, the overexposed area looks just like a white spot.