Resizing photos to print
How to Resize a Photo for Print Without Losing Quality
A problem with modern amateur photography is that it is predominantly digital-based. Most camera phones of today by far outperform professional-level cameras of the past. Each year, the gap closes between camera phones and standalone cameras. However, most of the photos we take with our phones are designed to be posted on social media platforms and websites.
When photos are taken from these sources, they can be difficult to print well while maintaining a high-quality image. For printing, the most critical factor is dots per inch (DPI). The higher the concentration of dots, the better quality your image will be. For high-quality printed photos, around 300 DPI is desirable. Quality ink or Canon toner cartridges can also help produce high-grade prints.
If you’re struggling to print a photo of adequate quality, you’re most likely encountering sizing issues. Fortunately, there are several ways to resize a photo for print without losing quality. The following guide takes you through the steps to achieve great-looking prints.
If DPI is the issue, your computer’s standard photo editing software should be sufficient to adjust the DPI. Here are the key steps:
Open the image file in preview mode.
Click on “Tools” on your menu bar.
In the dropdown, find “Adjust Size” and click on it. From here, you should be able to see different options for adjusting, such as “Width,” “Height” and “Resolution.”
Select “inches” for height and width. Choose “pixels/inch” for Resolution.
Ensure the “Resample Image” box is unchecked.
Set the Resolution to 300 pixels/inch or the highest possible number. The maximum width and height dimensions will adjust automatically.
When the image is resized to your desired dimensions, click “OK.”You can then save the file.

It is important to note that the aspect ratio doesn’t have to be perfect, as the image can be cropped easily.
Depending on the maximum DPI, you can experiment with different levels to determine how large you can make the image without losing quality. Find a balance between your desired size and quality before printing.
The Scanning TechniquePrinting a smaller image at the highest possible DPI, and then scanning and printing, is a trick for enlarging a photo. This can be a highly effective way to maximize the size of a print while maintaining quality. However, it is dependent on the resolution of your scanner. A high-resolution scanner is capable of quadrupling the size of an image.
Similar to digital images, resizing with scanners comes down to DPI capabilities. Many regular scanners found in people’s homes can scan images at up to 1,200 DPI. This allows them to create quality images of much greater size than the original.
While many scanners are capable of 1,200 DPI scanning, they’re unlikely to be set to this number by default. You must first adjust the settings to 1,200 DPI. When you scan the file, you’ll have to alter the resolution of the digital file. This process is the same as the native computer editing method.
In addition to a high-quality scanner, it’s also important to have a printer with good native resolution. Otherwise, it won’t be capable of printing at high quality, regardless of the image size. Invest in good photo ink such as Canon ink cartridges for maximum quality.
For downsizing images, you never need to reduce the resolution.
Photoshop MethodIf you have access to Adobe Photoshop, this is perhaps the best way to resize a photo or print. However, this software can be tricky to use, so you may want to familiarize yourself with it before attempting Photoshop editing. The following steps will help you to resize your photo exactly how you want to.
Open your image in Photoshop.
Click the size dialogue box to bring up the “Width,” “Height” and “Resolution” options.
Set the resolution to 300 DPI, and then adjust the “Width” or “Height” to your desired size. Photoshop automatically adjusts to maintain the correct aspect ratio.
If enlarging the image reduces the DPI, you may have to upsample it to increase the quality.
Note that resizing an image will likely result in the file changing size. This is important if you have limited storage space and are editing multiple photos.
Upsampling involves increasing the quality (DPI) of the image manually. While all images have a maximum ceiling for quality, many photos can be upsampled effectively. Here are the key steps
Under the “Resolution” section in the dialogue box, tick the box next to “Resample.
 ”
” Enter your desired resolution. Ideally, this should be 300 DPI. However, you may be happier with a slightly lower quality print.
After upsampling, make sure to double-check the “Height” and “Width” settings in case there is an issue or automatic adjustment.
When an image is resampled, Photoshop adjusts the number of pixels. This is called interpolation. Multiple interpolation options can affect the end quality of the photo. The default automatic setting often gets the best-quality image, as Photoshop chooses what’s most suitable.
However, when enlarging images and upscaling the quality, the interpolation method called “Preserve Details 2.0” is the recommended setting, and it doesn’t get selected when interpolation is set to automatic. This setting is only available on Photoshop software from 2018 and onward.
Changing the Aspect RatioYou may want to adjust the aspect ratio of your photo to fit a particular frame or space. This can be done through cropping:
Close the size dialogue box.
Select the “Crop Tool.”
In the “Options Bar,” enter your ideal aspect ratio into the “Width” and “Height” boxes.
Photoshop automatically reshapes the photo border, but you can resize it by dragging the outer handles of the image.
Once you have completed these steps, your photo or print is ready to save and print.
Create the Perfect Collage from HomeWith the right software, printer and ink, you can create professional-level photos from home. Although it can take some tinkering, basic photo editing is relatively straightforward, allowing you to restore and resize your favorite memories.
It’s important to be realistic, however. Some old, grainy photos simply don’t have enough pixels to resize effectively. There must be a minimum resolution level for each photo to resize without losing quality.
How to Resize Images for Print with Photoshop
Learn all about resizing images for print with Photoshop! You'll learn how print size works, how (and when) to enlarge your photos, how to resize for different frame sizes, and how to get the highest quality prints every time!
Written by Steve Patterson.
In this tutorial, the third in my series on image size, I'll show you how easy it is to resize an image for print with Photoshop! Resizing for print is different from resizing for the web or for screen viewing. That's because there's often no need to change the number of pixels in the image.
Most of today's digital cameras capture images that are already large enough to print at standard frame sizes, like 8 x 10 or 11 x 14, and get great results. So rather than changing the number of pixels, all we need to do is change the print size. And as we'll see, we change the print size just by changing the photo's resolution. I'll cover what resolution is, and how much of it you need for high quality prints, in this tutorial.
If you do need to print the image at a larger size, then you'll need to enlarge it by adding more pixels. Also, if you want to fit your image to a frame size that doesn't match the aspect ratio of the photo, you'll first need to crop the image before resizing it. I'll be covering both of these topics as well.
To follow along, you can open any image in Photoshop. I'll use this cute little fella that I downloaded from Adobe Stock:
The original image. Photo credit: Adobe Stock.
This is lesson 3 in my Resizing Images in Photoshop series.
Let's get started!
The Image Size dialog box
To resize an image for print in Photoshop, we use the Image Size dialog box. To open it, go up to the Image menu in the Menu Bar and choose Image Size:
Going to Image > Image Size.
In Photoshop CC, the Image Size dialog box features a preview window on the left, and options for viewing and changing the image size on the right. I covered the Image Size dialog box in detail in the previous tutorial:
The Image Size dialog box in Photoshop CC.
Getting a larger image preview
The first thing you'll want to do is increase the size of the preview window, and you can do that by making the Image Size dialog box larger. Just drag the dialog box into the upper left of the screen, and then drag its bottom right corner outward.
Once you've resized the dialog box, click and drag inside the preview window to center your subject:
Resizing the dialog box for a larger image preview.
Viewing the current image size
The current size of your image is displayed at the top. The number next to the words Image Size shows the size of the image in megabytes (M). And below that, next to the word Dimensions, we see the image size in pixels. Neither of these tell us the print size, but we'll get to that in a moment:
The current image size is displayed at the top.
Resizing vs resampling an image
Before we look at how to resize the image for print, we first need to know the important difference between resizing an image and resampling it.
What is image resizing?
Resizing means that we're not changing the number of pixels in the image. All we're doing is changing the size that the image will print. We control the print size not by changing the number of pixels but by changing the image resolution. I covered image size and resolution in the first tutorial in this series, but we'll look at it again in a moment.
What is image resampling?
Resampling means that we're changing the number of pixels. Adding more pixels is known as upsampling, and throwing pixels away is called downsampling. Downsampling is used when you're reducing the size of an image, whether it's for email, for uploading to the web, or for general screen viewing. But you won't need to downsample an image for print.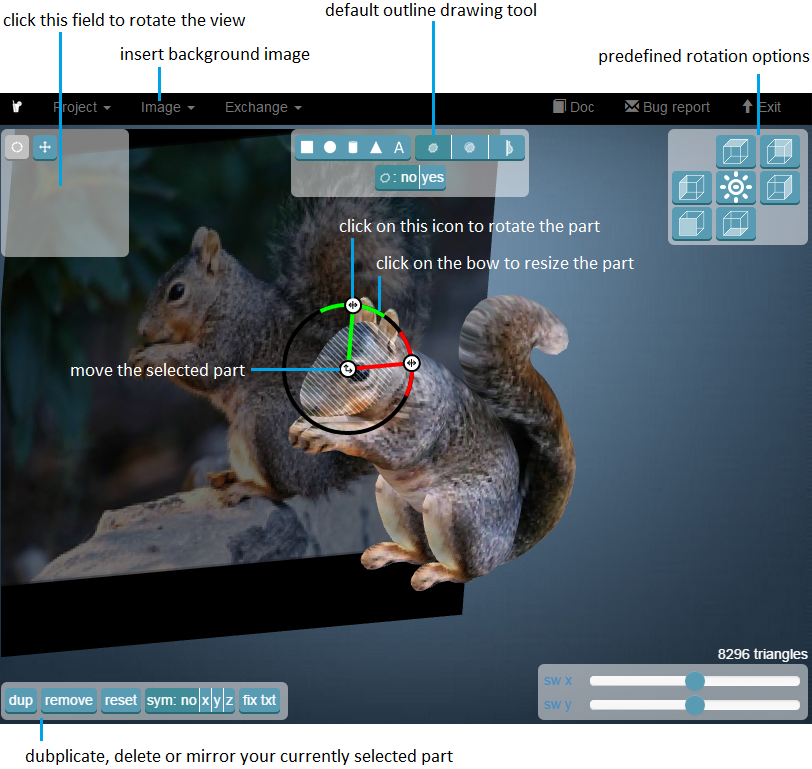 You may need to upsample it, though, if the current pixel dimensions are too small to print it at the size you need. I'll show you how to upsample the image a bit later.
How print size works
To see if your image already has enough pixels to print it at your target size, start by turning the Resample option off. You'll find it directly below the Resolution option. With Resample off, Photoshop won't let us change the number of pixels. All we can change is the print size:
Turning the Resample option off.
Where is the current print size?
The current print size is shown in the Width, Height and Resolution fields. In my case, my image will print 10.747 inches wide and 7.163 inches tall at a resolution of 300 pixels per inch:
The current width, height and resolution.
What is image resolution?
The width and height are pretty straightforward. But what is resolution? Resolution is the number of pixels in your image that will print in one linear inch of paper. Since the image has a limited number of pixels, the more pixels you print per inch, the smaller the image will print. And likewise, printing fewer pixels per inch will give you a larger print size.
Since we're not changing the number of pixels in the image, changing the resolution has no effect on the file size or on how the image looks on screen. Resolution only applies to print.
Learn more: The 72 ppi web resolution myth
With my image, the resolution is currently set to 300 pixels/inch. This means that 300 pixels from the width, and 300 pixels from the height, will print inside every inch of paper. That may not sound like a lot. But if you do the math, 300 x 300 = 90,000. So this means that 90,000 pixels will print inside every square inch:
The Resolution value is for both the width and the height.
How does resolution affect the print size?
To understand how resolution affects the print size, all we need to do is divide the current width and height of the image, in pixels, by the current resolution. In my case, my image has a width of 3224 pixels:
The current image width, in pixels.
If we divide 3224 pixels by 300 pixels/inch, we get 10.747 inches for the width:
The pixel width, divided by the resolution, gives us the print width.
And my image has a height of 2149 pixels:
The current image height, in pixels.
So if we take 2149 pixels and divide it by 300 pixels/inch, we get 7.163 inches for the height:
The pixel height, divided by the resolution, gives us the print height.
How much resolution do you need for high quality prints?
Now that we know how resolution affects the print size, the real question becomes, how much resolution do we need for the print to look good? I'll answer that one question with three different answers. First, I'll tell you the official answer. Then, I'll explain why many people think the official answer is nonsense. And finally, I'll share what I consider to be the best answer and the one I agree with.
Answer #1: The industry standard resolution
First, the official answer. The long-held industry standard for high quality printing is a resolution of 300 pixels/inch. This means you need at least 300 pixels per inch if you want your image to look crisp and sharp with lots of detail when printed. There's nothing wrong with this standard, and printing at 300 pixels/inch will definitely give you great results.
Answer #2: The "good enough" resolution
But there's a couple of arguments against the industry standard resolution. The first is that it only considers pixel count as a factor in print quality. It doesn't take other important factors, like viewing distance, into consideration. Generally speaking, the larger the print, the farther away people view it. You may hold a 4" x 6" print up close, but you're more likely to stand a few feet back from a 24" x 36" or 30" x 40" poster. And a billboard off the highway is usually viewed from hundreds of feet away.
Since our eyes can't resolve the same amount of detail at farther distances, the argument goes that it makes no sense to print everything, no matter the viewing distance, at the same resolution. 300 pixels/inch may be what you need for smaller prints viewed up close, but larger prints with lower resolutions can look just as good when viewed from far enough away:
Resolution becomes less important as you move farther from the image.
Another argument against the industry standard is that while 300 pixels/inch will give you the highest print quality possible, it raises a question. Do you really need the highest quality? Or, is there a lower resolution that's "good enough"? Many professional photographers settle on 240 pixels/inch as being the sweet spot for resolution. Sure, a 300 pixels/inch print will look slightly better in a side-by-side comparison. But 240 pixels/inch still produces a sharp and detailed image that most people would be perfectly happy with. And by not having to upscale the image to 300 pixels/inch, the file size remains smaller.
Answer #3: Your printer's native resolution
While the arguments against the industry standard resolution of 300 pixels/inch are strong, they leave out one very important detail. In fact, it's such an important detail that it tends to make the arguments against the industry standard rather pointless.
The fact is, your printer has its own native print resolution. And it expects to receive your images at this native resolution. Most printers have a native resolution of 300 pixels/inch, which matches the industry standard. If you send the printer an image with a lower resolution, like 240 pixels/inch, the printer will automatically upsample it to its native resolution for you. In other words, it's simply not possible to print an image at anything less than your printer's native resolution. If you don't enlarge the image, your printer will.
Epson printers, like my Epson Stylus Pro 3880, use an even higher native resolution of 360 pixels/inch. So with Epson printers, any resolutions lower than 360 will automatically be upsampled to 360. Other printer manufacturers (Canon, HP, etc) stick to 300.
Which answer is right?
So what does all of this mean? What's the correct resolution for high quality prints? The answer, for most inkjet printers, is 300 pixels/inch. That's the printer's native resolution. For Epson printers, it's 360 pixels/inch. Anything less and your printer will upsample the image anyway. But Photoshop can do a better job of upsampling than your printer can. So if your image's resolution drops below 300 pixels/inch, you'll want to upsample it in the Image Size dialog box before sending it off to print.
The best resolution is your printer's native resolution.
Is there such a thing as
too much resolution?What if your image resolution is higher than your printer's native resolution? Do you need to downsample the image to make it smaller? No, you don't. It's perfectly okay to send the printer more pixels than it needs, and it will help to make sure your image looks as sharp as it possibly can.
How to change the print size
So now that we know how image resolution affects print size, and the minimum resolution we need for high quality prints, let's look at how to change the print size. To change it, with the Resample option turned off, just enter the new print size into the Width and Height fields. Since the Width and Height are linked together, changing one will automatically change the other.
Matching the aspect ratio and orientation of the image
Note, though, that you'll only be able to enter a size that matches the current aspect ratio of the image. So for example, if your image uses a 4 x 6 aspect ratio, as mine does, you won't be able to print it as an 8 x 10. The aspect ratios don't match. To print the image to a different aspect ratio, you'll first need to crop it, and I'll show you how to do that later.
Along with the aspect ratio, you'll also want to be aware of the orientation of your image. If the image is in portrait orientation, where the width is smaller than the height, then you'll want to set the width to the smaller of the two values. And if it's in landscape mode, where the width is larger than the height, set the width to the larger value.
Changing the width and height
For example, let's say I want to print my image as a 4" x 6". I know that it's in landscape orientation, with the width larger than the height, so I'll set the Width value to 6 inches. Photoshop automatically sets the Height to 4 inches, or in this case, to 3.999 inches, to match the aspect ratio:
Entering a Width value automatically sets the Height value.
If I wanted the height to be exactly 4 inches, I could change the Height value to 4 inches, which would then change the Width to 6.001 inches. So the aspect ratio of my image isn't exactly 4 x 6, but it's close enough:
Changing the Height automatically changes the Width.
Checking the image resolution
Notice that the Resolution value is also linked to the Width and Height. And by lowering the width and height, the resolution has increased, from 300 pixels/inch up to 537.25 pixels/inch. That's because we need to pack more pixels per inch in order to print the image at the smaller size. But, since the new resolution is much higher than the minimum resolution we need (300 pixels/inch), there's no need to upsample it. This image will look great just the way it is:
Lowering the width and height raised the resolution.
Checking the image size
Also, notice that changing the print size had no effect on the actual image size, in pixels or in megabytes. It's still the exact same image, and all we've done is changed the size that it will print:
The print size has no effect on anything else.
When to enlarge the image
But let's say that, instead of printing it as a 4" x 6" (or 6" x 4", in this case), I need to double the width and height so that it prints at 12" by 8". I'll change the Height value from 4 to 8 inches, and Photoshop automatically doubles the Width, from 6 to 12 inches. Notice, though, that by doubling the width and height, we've cut the Resolution value in half, and it's now below the minimum resolution we need of 300 pixels/inch:
Increasing the width and height dropped the resolution below 300 ppi.
Going back to what we learned earlier, some people would say that any resolution over 240 pixels/inch is fine, and so our new resolution of roughly 268 ppi is okay. But, since your printer's native resolution is 300 ppi (or 360 ppi for Epson printers), and the printer will upsample the image on its own if we don't do it ourselves, there's no reason for us not to upsample it here in the Image Size dialog box. Doing so will give us better results than if we left it up to the printer.
How to upsample an image
To upsample the image, turn the Resample option on:
Clicking the Resample checkbox.
Then enter the resolution you need into the Resolution field. Again, for most printers, it's 300 ppi, or 360 ppi for Epson printers:
Entering the new resolution.
Checking the width and height
Notice that with Resample turned on, the Resolution field is no longer linked to the Width and Height fields. So even though we've increased the resolution, the image is still going to print 12" wide and 8" tall:
Changing the resolution had no effect on the width and height.
Checking the image size
What has changed this time is the actual size of the image, both in pixels and in megabytes. With Resample turned on, increasing the resolution forced Photoshop to add more pixels. If you remember, my image was originally 3224 px wide and 2149 px tall. But after resampling it, the width has increased to 3601 px and the height is now up to 2400 px.
Also, because we've added more pixels, the size of the image in memory has increased as well, from 19. 8 megabytes to 24.7 megabytes:
Upsampling the image increased the pixel dimensions and the file size.
The Interpolation method
Whenever we resample an image, Photoshop adds or removes pixels. And the method it uses to do that is known as the interpolation method. There are several interpolation methods to choose from, and the differences between them can have a big impact on the quality of the image.
You'll find the Interpolation option to the right of the Resample option. By default, it's set to Automatic. Interpolation only applies to resampling. So when the Resample option is turned off, the Interpolation option is grayed out:
The Interpolation option. Only available when Resample is checked.
Choosing an interpolation method
If you click on the option, you'll open a list with all the different interpolation methods to choose from. Some are for upsampling, and others for downsampling:
The interpolation methods.![]()
Learning how each one works would take an entire lesson on its own. But luckily, you don't really need to know anything about them. By default, the Interpolation option is set to Automatic, which lets Photoshop choose the one that will work best. Leaving it set to Automatic is a safe choice.
Preserve Details 2.0
However, in Photoshop CC 2018, Adobe added a new upscaling method known as Preserve Details 2.0. This new method is now the best choice for enlarging your images. But the problem is that, for now at least, Photoshop will not select it if you leave the Interpolation option set to Automatic. So if you're using CC 2018 (or later) and you're upsampling your image, you'll want to change the interpolation method from Automatic to Preserve Details 2.0:
In CC 2018, choose Preserve Details 2.0 when upsampling an image.
If you're not seeing Preserve Details 2.0 in the list, you'll first need to enable it in Photoshop's Preferences. I cover how to do that, and why it's the best choice, in my Best Way to Enlarge Images in CC 2018 tutorial.
How to resize an image for print - Quick summary
Before we continue and look at how to resize an image to a different aspect ratio, let's quickly summarize what we've learned.
To resize an image for print, open the Image Size dialog box (Image > Image Size) and start by turning the Resample option off. Enter the size you need into the Width and Height fields, and then check the Resolution value. If the resolution is the same, or higher, than your printer's native resolution (300 ppi for most printers, or 360 ppi for Epson printers), then there's nothing more you need to do.
If the resolution is less than your printer's native resolution, upsample the image by turning the Resample option on. Then set the Resolution value to 300 pixels/inch (or 360 for Epson printers). Leave the Interpolation method set to Automatic, or in Photoshop CC 2018 (or later), change it to Preserve Details 2.0.
How to resize to a different aspect ratio
Earlier, I mentioned that you can only choose a print size that matches the current aspect ratio of the image. But what if you need a different aspect ratio? For example, what if I need to print my 4 x 6 image so that it will fit within an 8" x 10" photo frame?
The problem with different aspect ratios
We can already see the problem. With the Height set to 8 inches, the Width is set to 12 inches, not 10, so that's not going to work:
Setting the height gives me the wrong width.
If I try changing the Width to 10 inches, the Height becomes 6.666 inches. Still not what I want:
Changing the width gives me the wrong height.
And if I change the Width to 8 inches, Photoshop sets the Height to 5.333 inches. There's no way for me to choose an 8" x 10" print size while my image is using a 4 x 6 aspect ratio:
No matter what I do, I can’t get the size I need.
How to crop to a different aspect ratio
To resize the image to print at a different aspect ratio, we first need to crop the image to the new ratio. Here's how to do it.
Step 1: Cancel the Image Size command
Close the Image Size dialog box without making any changes by clicking the Cancel button at the bottom:
Canceling and closing the Image Size command.
Step 2: Select the Crop Tool
In the Toolbar, select the Crop Tool:
Selecting the Crop Tool.
Step 3: Set the new aspect ratio in the Options Bar
Then in the Options Bar, enter your new aspect ratio into the Width and Height boxes. Don't enter a specific measurement type, like inches. Just enter the numbers themselves. I'll enter 8 and 10:
Entering the new aspect ratio in the Options Bar.
Step 4: Resize the crop border if needed
Photoshop instantly reshapes the crop border to the new ratio. You can resize the border if needed by dragging the handles, but I'll just leave mine the way it is:
Cropping the image to the new aspect ratio.
Step 5: Crop the image
Back in the Options Bar, make sure the Delete Cropped Pixels is turned off. This way, you won't be making any permanent changes:
Leave Delete Cropped Pixels turned off.
Then, to crop the image to the new ratio, click the checkmark in the Options Bar:
Clicking the checkmark.
And here’s the image, now cropped to the 8 x 10 aspect ratio. It still won’t print at 8” by 10” yet, but we know how to fix that, which we’ll do next:
The cropped version of the image.
Step 6: Resize the image in the Image Size dialog box
At this point, to resize the image for print, just follow the same steps we've already learned. First, open the Image Size dialog box by going up to the Image menu and choosing Image Size:
Going to Image > Image Size.
Uncheck the Resample option, and then enter your new print size into the Width and Height fields. This time, I have no trouble choosing an 8" by 10" size, although the Width value is just slightly off at 8.004 inches. Still close enough.
Notice, though, that the Resolution value has dropped below 300 pixels/inch, which means I'll need to upsample it:
Turn Resample off, enter the new Width and Height, and then check the Resolution.
To upsample it, I'll turn the Resample option on, and then I'll change the Resolution value to 300 pixels/inch. Or again, if the image was heading to an Epson printer, I would enter 360 ppi instead:
Turning on Resample, then setting the Resolution to 300 ppi.
Finally, for the Interpolation method, I could either leave it set to Automatic, or since I'm using Photoshop CC 2018, I'll change it to Preserve Details 2. 0:
0:
Setting the interpolation method.
When you're ready to resize the image, click OK to accept your settings and close the Image Size dialog box:
Click OK to resize the image.
And there we have it! That's everything you need to know to resize images for print in Photoshop! In the next lesson, we'll learn how to resize images for email and sharing online!
You can jump to any of the other lessons in this Resizing Images in Photoshop chapter. Or visit our Photoshop Basics section for more topics!
Resize photo in centimeters for printing with DPI online
The main thing is to specify a photo on your computer or phone, enter the desired size in centimeters, millimeters or inches, press the OK button at the bottom of the page, wait a couple of seconds and download the finished result. The rest of the settings are set by default. On this site, you can also change the size in: pixels, megapixels, percentages, megabytes, enlarge a small picture, and pre-crop or rotate with Exif. nine0003
The photo will be resized according to the specified size in centimeters (millimeters, inches), as well as the specified size in DPI, according to paper printing standards. Dimensions in cm, mm and inches can be specified with an accuracy of thousandths, for example, instead of the 15x10 format, you can set 15.201x10.203 cm. cm)
(for printing 300 dpi )
(Landscape)
 4)
4) Standard paper size A4 size is 21x29.7 cm or 2480x3508 pixels at 300 dpi. The dimensions of other sheet formats can be seen on the Wikipedia page, but just do not forget that the dimensions are listed there in millimeters and inches, i. e. in the settings on this page, you need to select the appropriate value.
If you need to resize a photo without taking into account DPI (dots per inch), that is, only respecting the proportions of the specified format, then for this you need to set the "Size in DPI" parameter to "0" in the settings. nine0003
The original image is not changed in any way. You will be given another processed picture.
1) Specify image in BMP, GIF, JPEG, PNG, TIFF format:
2) Enter the desired photo format in centimeters, millimeters or inches
Required format: X in millimeters (mm) centimeters (cm) inches (inches)
(The default format is 15x10 , which is suitable for landscape (horizontal) photography, for a portrait (vertical) photo, these values should be swapped, that is, specify 10x15 , as indicated in the table)
Size in DPI: (0 = "ignore DPI, render proportion based on specified format")
(The size of the original jpg-image in DPI can be found here by reading the metadata)
Type of resizing exactly to the specified dimensions:
Proportionally trimmed with excess edges
Rubber stretch or taper, no cropping
Without cutting, with addition redpinkpurpleblueturquoiseskylight greengreenyelloworangeblackgreywhite edges
Contact: top left center right bottom of image
3) Additional settings
Interpolation: No (nearest neighbor method) Cubic (Mitchell) Lanczos (Lanczos) Automatic (algorithm for qualitative resizing in pixels)
4) Output aspect ratio
JPEG standard progressive with quality (from 1 to 100)
PNG-24 (no compression, transparent background will be replaced with white color)
Copy EXIF and other metadata? Not really
Treatment usually takes 0. 5-30 seconds.
Resize image online | Visual Watermark
Our online Resize Tool allows you to quickly and easily resize your images. You can process up to 10 photos of absolutely free of charge within one day. The application supports JPEG, PNG, WEBP, HEIC, GIF, BMP formats. Works on any operating system, you just need to have an internet connection. nine0003
Resize photo
How to resize photos using our app:
To upload your photos to the app, you can use the button “Add photo” at the top left of the screen, click “Select images” in the center of the screen or just drag and drop all files with the mouse. After clicking on these buttons, you will see a dialog box with the ability to select the location where you want to transfer images from: “From my computer”, “From Google Drive”, “From Google Photos”, “From Dropbox”. nine0003
You can upload photos of any size, as long as it does not run out of free space on your computer or mobile device.
If you clicked on “From My Computer” , select the desired folder in the window that appears and select the images you want to resize. Pressing Ctrl+A on Windows or Cmd+A on Mac will select all the photos in the folder at once.
Immediately after clicking on one of the following options - “With Google Drive” , “From Google Photos” or “From DropBox” a window will pop up asking the application to access your online storage. You should click on “Allow access” .
The “Add photo” button also allows you to add additional photos to those already uploaded. Button "Clear" allows you to delete all photos from the application.
After you have uploaded all the images to the app, click “Resize Images” on the top right. You will see a window with output settings. nine0003
From the drop-down list, you can set the desired reduced copy format by selecting one of the options “Source format”, “Convert to JPEG” or “Convert to JPEG and compress”. It is worth remembering that reducing the quality may remove some details and add noise to the image, but the file size becomes more compact.
Next, you need to choose how the image will be resized.
If you choose option “By Width” , you must specify the width in pixels below. In this case, the height will automatically adjust to the desired value. Similarly, you can select “Fit to height” and specify the size. Then the application will calculate the required width.
Option “Fit to Rectangle” will be useful if you are interested in specific photo width and height dimensions in pixels. Accordingly, you should enter them below.
Option “Percentage” allows you to specify the degree of image reduction. For example, if you specify 70%, this means that the width and height of the original image will be reduced by 30%. nine0003
All your output settings will be saved in the application memory. This is very handy if you are constantly resizing images in the same way. In this case, you will not have to enter the data again.
All that's left to do is click "Resize Image".
You can upload edited photos to your computer, Google Drive or Dropbox.
Our online application allows you to process up to 10 images per day. If you are interested in resizing a large number of photos at once, then you should purchase the paid version of the program. It will allow you to download at the same time to 2000 images .
Resize a photo
Why resize an image
With the advent of high resolution cameras, we have to deal with a lot of data. For example, a standard good quality JPEG photo can weigh up to 5 MB and measure 4200 x 2800 pixels wide and high. This highly detailed image is ideal for print applications or when fine details need to be shown on screen. nine0003
But for normal use on the pages of various Internet resources, as a rule, photos of the highest quality are not required. What's more, 's smaller files have the significant benefits of 's: faster network transfer, easier opening, viewing, and storage. To do this, you should have a handy image processing tool at hand that will help you prepare files for publication in a matter of minutes.
The three most common situations where we need to resize a photo. nine0003
When posted on a website
Standard monitor resolution, like image size, is defined in pixels. At the same time, the most popular sizes, such as 1024 x 768, 1152 x 864, 1280 x 960, can be 2 or more times smaller than the width of a high-quality photo. If the original photo is uploaded to the site without resizing, the browser itself will compress it to the desired width and height, which can significantly slow down its work .
Heavy files, not pretreated, takes extremely long time to open . They are more difficult to download from the site to the user's computer. All this can scare away a significant part of web page visitors. In addition, the image quality after compression by the browser will be significantly inferior to the quality of the photo after processing in a special editor.
It is also worth considering that pages that are large in weight are indexed worse in search engines due to their workload. And incorrectly chosen proportions lead to the fact that when visiting the site from a mobile phone, all the pictures go astray. nine0003
Thus, in order to achieve the optimal ratio of photo quality without reducing the download speed, it is necessary to properly prepare the images before adding them to the site.
When posting on social networks
When creating visual content for social networks, it is very important to consider the recommended sizes for different types of images - posts, ads, profile headers or avatars. If the original image is smaller than the specified parameters, it will be stretched and become fuzzy. If more, it will be compressed programmatically, due to which it will lose quality either will be truncated at the wrong place .
The most important parameters of the main social networks.
Image for external links: 500 × 261 px. Picture for the post: 1200 × 630 px. Page cover: 820 × 312 px. Profile photo: 170 × 170 px.
Post image: 1080 × 1080 px. Picture for Instagram Stories: 1080 × 1920 px. Profile photo: at least 110 × 110 px.
Tweet image: 1024 × 512 px. Cover: 1500 × 500 px. Profile photo: 400 × 400 px.
YouTube
Image over video: 1280 × 720 px. Channel cover: 2560 × 1440 px. Profile photo: 800 × 800 px.
If you don't want to deal with all possible parameters, you can use one universal size 1024 x 512 px. In most cases, such an image will be displayed correctly.
When sent as an email attachment
As you know, mail services have their own limits on the size of transferred files. For example, the maximum Gmail attachment size for incoming emails is 50MB. When it comes to downloading a file and sending an email, the upper limit is 25 MB. The larger the image size, the more difficult it is to send it by mail, especially if there are several such files.
Therefore reducing the size of the picture may be one of the solutions to problem . If you need to batch send, you can first adapt the width and height of the images while maintaining image quality, and then additionally send all files to a compressed folder (.zip). nine0003
Resize photo
Main advantages of our online application
If you think that working in an online application requires special skills and knowledge, then you are wrong. We have developed the program in such a way that the entire interface is as simple and clear as possible.
Our free application allows you to reduce the size of pictures in just three clicks.
Here's why you should use the app from Visual Watermark:
-
Simplicity and convenience .
 You don't need to be a professional image editor to master the program. The interface is not overloaded with functionality. Only the essentials for you. Complete lack of advertising. Nothing will distract you from photo processing. If you have any questions, please read the detailed instructions for use above.
 -
Can be used on any device. Our application works directly in the browser. You don't need to download or install anything. Visual Watermark Resizer works on any operating system and any device - Windows, Mac, Linux, iOS and Android. Just go to the application page and start working. nine0003
-
100% safe . All your pictures are processed only in the browser. They do not come to our server. We do not have access to your files. Your images are securely protected.
-
Free access . On our site you can resize images online and for free. But there is a small limitation. You can process up to 10 photos per day.
 If you do not need to batch process a large number of images, then our free service is ideal for you. nine0003
Resize Photo
Frequently Asked Questions
Below are answers to the most frequently asked questions.
1. How can I resize a photo without losing quality?
It is almost impossible to resize a photo without any loss of quality. Of greater importance is whether this loss is noticeable after image processing. Modern applications allow you to reduce the size without degradation. Thus, the resulting image will look just as great as the original. nine0003
Another thing is when you want to increase the size of a small low resolution file. In this case, the image will definitely turn out blurry and unsharp. You can experiment with different photo sizes in our free online application and choose the one that suits you best. Visual Watermark never changes the original files. You only receive modified copies.
2. How can I reduce the photo size?
First, upload your images to our Visual Watermark Resizer application. Next, set how exactly you want to resize. You can specify exact dimensions in pixels for width or height, or both. nine0003
In addition, it is possible to reduce the photo in percentage if you do not have the exact size of the desired image in front of you.
3. How to resize a photo online and for free?
This is easy to do in our online application. Go to the top of the page, upload the images, enter the required parameters and click "Resize Images". Processed copies of original photos will be ready in seconds.
The Visual Watermark Resizer online tool is free and available to everyone. It does not require registration and entering personal data. You also don't need to install anything. Just go to the application page and get started. nine0003
4. How to resize an image correctly?
The most important thing to keep in mind is the aspect ratio of your image. For example, if you have a landscape photo with a 3:2 aspect ratio and 6000x4000 pixel dimensions, then your resized copy cannot be 5000x3500px because that's a different ratio of width to height.
If you enter incorrect parameters, in which, for example, the height is greater than the width for a landscape photo, our application will place a new photo in front of its enlarged blurred version. To avoid this, make sure you didn't change the aspect ratio when you entered the settings. nine0003
If you need to correct the proportions of the original photo first, use our online photo cropping tool.
5. How can I resize an image to reduce the file size?
You need to understand that with any change in the size of the photo to a smaller side, the weight (ie file size) automatically decreases. For example, if the original image was 6000 x 4000px, and after processing in our application - 4000 x 2000px, then the file size has also decreased. nine0003
If you still don't like the size of the file, you can simply compress it. To do this, use our Compress Photo tool, which will solve the problem while maintaining high image quality.
5. How to resize photos for Instagram?
The easiest way to resize photos for Instagram is to go to the page of our online application "Crop Photo", upload all the necessary images, choose a ready-made cropping template for this particular social network and crop photos.