Taking pictures of fire
How to Capture Stunning Fire Photography (Safely)
By Taya IvanovaA- A+
Download as PDF
Subscribe Below to Download the Article Immediately
You can also select your interests for free access to our premium training:
Business Basics
Cheat Sheets
Child Photography
Colorful Cityscapes
Composition
Creative Photography
Creative Portrait Concepts
Digital Photo Collages
Fairytale Portrait Photography
Food Photography
Interior Photography
Landscape Editing
Landscape Photography
Lightroom Processing
Lightroom Presets
Long Exposure
Macro Photography
Milky Way Photography
My Camera and Photography
Organic Marketing
Pets
Product Photography
Sky Photography
Social Media
Still Life
Time-Lapse Photography
Travel Photography
Urban Photography
Wildlife Photography
Your privacy is safe.Fire photography is an exciting genre that can help you take powerful photos of fire, people, and landscapes.
In addition to photographing the beauty of fire, you can use something as simple as a candle flame. This will light up your subject, create atmospheric photos, or add a pop of color to a simple image.
Important Safety Tips for Fire Photography
Fire photography is one of the most dangerous photography genres. This means you need to take all the necessary precautions before you even plan your photoshoot.
Here are some of the most important tips you must keep in mind before, during, and after your photo session:
- Avoid locations with dry grass and other flammable objects.
- If you’re a portrait photographer, never ask your models to get too close to a fire. Make sure their hair is neatly tied back and their clothes aren’t too loose.
- Invest in a small fire extinguisher. Even if you’re a very careful person, it won’t hurt to have something to rely on in case a fire gets out of control.

- If you’re an absolute beginner, experiment with small fires like candles and sparklers first.
- Make sure you take photos in an area with lots of space and air.
How to Photograph Fire in Different Forms
Fire can be photographed in many ways. Whether you love capturing details, atmospheres, or beautifully-lit portraits, you can use fire to turn your ideas into powerful photos.
How to Take Sharp and Detailed Fire Photos
Even an f-number like f/4.0 will let you take relatively sharp photos.If you know how to take sharp photos, you’ll be able to take atmospheric landscape photos and unique closeups of sparks.
To capture as much detail as possible, use a narrow aperture (a large f-number) like f/8. The larger your f-number, the darker your photos will be. This won’t be a problem if you’re simply photographing fire.
If you want to include other subjects in your photo, make sure you increase your ISO to add more light to your image.
How to Take Blurry Photos of Fire
The photographer used a shutter speed of 6. 7 seconds to take this photo.
Photos created using long exposure photography will help you emphasise movements and manually create letters or shapes like the ones above.
To achieve this effect, use a slow shutter speed. The slower your shutter speed, the more time you’ll have to move your light source around. You can manually select your shutter speed in Shutter Priority Mode.
This will ensure that your shutter speed stays the same while the camera automatically changes all the other settings for you.
If you want to capture random fire movements, you can take photos of bonfires and fireworks. If you want to create your own shapes, you’ll need a sparkler and a model.
Avoid using lots of fire unless your subject is a professional fire dancer!
How to Photograph Flames With No Background
There are two simple ways you can photograph a flame without a background. You can either use a black piece of cardboard or you can shoot in a dark room.
If you use a piece of cardboard, make sure it’s a significant distance away from the fire.
The safest and easiest method is simply taking photos in a dark room. If you want a simple photo of the flame alone, you can remove the candle in your editing program using the clone stamp or the brush tool.
How to Create Perfect Portrait Lighting Using Fire
The background in this photo is relatively detailed, which means the photographer used a large f-number. If you want to separate your subject from their background, use a small f-number like f/1.8.The warmth and brightness of a fire works well with portrait photography. You can use bonfires, lighters, sparklers, and candles to create moody, atmospheric photos of people.
The brighter the fire, the harder it will be to take properly exposed photos. This is why many photographers, like Julia Trotti, use small light sources like candles to add a touch of warmth to their portraits.
When you light your subject, make sure an even amount of light is on their face. For instance, if they hold a candle right underneath or above their head, the light will cast unflattering shadows on their face.
Knowing various light patterns will help you take the best possible photos of your models.
Powerful Fire Photography Ideas
Now that you’re familiar with the safety tips and techniques associated with fire photography, you can play around with different ideas.
9. Capture a Friendly Bonfire Atmosphere
If the fire is too bright compared to your models, mute the highlights in an editing program. This will make the brightness less distracting.One of the best ways to experiment with both fire and portrait photography is to take photos of a bonfire party. Since your models won’t be focusing on you all the time, you can use this opportunity to take candid photos as well.
If you want to add more light to your images, make sure you don’t overexpose them. If you accidentally underexpose your shots, you’ll be able to recover the shadows when you edit your results.
But if you overexpose them, your photos will lose a lot of image data and look unflattering.
8.
 Create a Mysterious Silhouette by Standing in Front of a Fire
You can use the silhouette technique to take mysterious photos or photograph people who don’t want to show their faces.
You can create a silhouette by photographing your subject in front of a bright source of light.
A large bonfire is perfect for this. If you take photos at night, your silhouette will stand out even more.
7. Capture Details Using a Zoom Lens
It’s a given that getting too close to a fire will put you and your camera at risk. It’s also a given that closeup shots of fire are breathtaking.
The solution? A zoom lens.
A zoom lens will allow you to zoom in without getting too close to your subject. This is ideal for portrait, pet, and fire photography, where distance helps avoid either discomfort or danger.
6. Use a Wide Aperture to Create Bokeh
Sparklers are great for creating small, sharp bokeh.Bokeh will complement your subject and make your photos look dreamy.
You can create it using a wide aperture, also known as a small f-number. The smaller your f-number, the larger your bokeh will be. Examples of wide apertures are f/1.2, f/1.4, and f/1.8.
The higher you go, the sharper your photos will be.
5. Create Contrast With Lots of Candles
The stark contrast between the lit and unlit candles makes this image stand out.Fire can be used to create interesting conceptual images like the one above.
If you’re feeling extra creative, take photos of fire sources in different stages. This will challenge you to work with different color tones and exposures.
It might also inspire you to start a new fire-related photography project.
4. Take Photos of Professional Fire Handlers
Event photography is a fun way to experiment with subjects that may not be accessible in our everyday lives. If you have the opportunity to photograph a professional fire handler or dancer, you’ll improve the following skills:
- Action photography – no one will wait for you to prepare your settings, so you’ll have to think quickly to take sharp photos.

- Lighting – event lighting is unpredictable, especially when fire shows are involved. You’ll have lots of time to play around with exposure, ISO, and camera modes.
- Portrait photography – you’ll get to experiment with different angles and poses without being able to give instructions to your model. This will also strengthen your candid photography skills.
3. Take an Adventurous Photo in the Dark
If you’re a fan of adventure stories, you’ll love using fire as a prop in your photos.
For the best results, take photos in a location with beautiful, non-flammable architecture. If you shoot in the dark, most of the focus will be on your subject and the fire, which will make your results more powerful.
Make sure your light source is bright. If you use a small lighter, you won’t be able to put the spotlight on your subject’s surroundings.
If you use something larger, like a fire torch, you’ll be able to take impressive photos.
2. Use a Lighter to Create a Light Leak
You’re probably familiar with light leaks, bursts of color that sometimes appear in analog photos. As beautiful as they are, not every photographer can afford to experiment with them. Fortunately, there’s a cheap alternative to this.
Light leaks can be recreated with the help of a small flame. Focus on your subject and hold a flame in front of your lens, making sure you cover only a part of the lens.
Don’t get too close to the lens or else you’ll damage it. The wider your aperture, the blurrier the flame will look and the more it will resemble a light leak.
1. Look for Fire in Unique Places
The next Lantern Festival will be on the 19th of February. This festival marks the end of the Chinese New Year and is an incredible event for photographers who love light and bokeh.Though fire is often associated with bonfires, fireworks, and lighters, it exists in many other places.
If you want to experiment with fire safely, use sparklers to add a pop of brightness to your photos. If you want to create fiery bokeh, take photos during a lantern festival.
Conclusion
As long as you approach every photoshoot safely, there won’t be a limit to what you can do with fire photography.
Fire photography will encourage you to get to know your camera settings better, think quickly, and be open to a variety of creative ideas.
The more you experiment with it, the closer you’ll get to creating your very own powerful fire photos.
How to Capture Fire Photos Like a Pro
Fire photography doesn’t have to be scary, and it can be a lot of fun, too – if you know what you’re doing.
As an experienced fire photographer, I’ve discovered all the tips, tricks, and techniques that will guarantee you gorgeous results, including:
- The proper fire photoshoot settings
- How to stay safe while photographing fire
- How to include fire in your compositions
By the time you’re done with this article, you’ll know how to photograph fire like a pro (and you’ll hopefully be inspired by dozens of example images).
Let’s get started.
1. Make sure to photograph fire
safelyIn the wise words of Frankenstein’s monster, “Fire bad!”
And this is especially true for photographers.
If you want to do fire photography, you must take fire seriously. The heat and smoke can damage your equipment, the flames can quickly get out of control and burn things down, and – most importantly! – fire can flat out kill you.
Plenty of great fire information can be found on this website, but here are some basic safety tips you should memorize immediately:
- Think ahead and plan your shoot from beginning to end, so you know exactly what will be on fire at any given time and how you’ll be photographing it
- Have a plan for putting out the fire should it get loose
- Do not work near anything that you don’t want on fire
- Work in a well-ventilated area
- Be sure you’re working in a location where, if the worst happens, everything will be okay
Got it? Please, I beg of you: Take proper safety precautions before capturing fire photos. You might believe the rules don’t apply to you, that you’ll be fine, and so on…but that type of thinking is a disaster waiting to happen.
2. Photograph fire as your subject
Fire photography can be done in three main ways:
With fire as the subject, with fire as an accentuating element, and with fire as the primary light source. (Of course, you can mix several of these elements together, but it’s important to understand them individually first.)
And I recommend you start by photographing fire as your subject, simply because it looks really, really cool.
With such fire shots, the main focus is on the flame (or the effects of it) and the detail that is shown within it. I’m talking about shots like this, which feature clear flame detail:
So how do you capture such well-exposed, crisp flames? First, you’ll need to use a fast-enough shutter speed to freeze the flame’s motion. What counts as “fast enough” is relative to what you’re shooting, but start around 1/250s, then take some test shots and boost the shutter speed as necessary.
(Note: As your shutter speed increases, you’ll need to use wider apertures and higher ISOs.)
Exposure can be difficult, as your camera will often want to underexpose the flames to compensate for their incredible brightness. So don’t be afraid to overexpose by a stop or two for perfect flame detail.
I’d also recommend you take a handful of test shots at the beginning of your fire photoshoot. Don’t think about composition, not at the start; instead, focus on nailing the exposure for the flames.
Then, once you’ve determined the perfect flame exposure, you can bring in helpful composition techniques, like the rule of thirds, to position the most prominent flames and to position any subjects in the flames, like this:
While a fast shutter speed is good for freezing flame motion, you may notice that the fire emits interesting sparks (especially if you’re photographing a sparkler!). If that’s the case, slow your shutter speed way down and consider using a tripod.
Slower shutter speeds were key to capturing this photo (it’s a 1.6-second exposure):
And here’s another shot that required an insanely long (30+ second!) exposure to create an interesting abstract effect:
Bottom line:
Fast shutter speeds are good, but slow shutter speeds can work, too. It’s all about what you want to achieve.
3. Photograph fire as an accent
Instead of shooting fire as the primary subject, you may want to try shooting the flame as one element in a larger scene, like this:
These types of shots can be difficult, because you must show both the flames and the surroundings. (Notice how you can see the Hot Wheels reflection in the image above?)
The key here is to expose for the flame and then add light to the rest of the scene. So meter off the flame (here, spot metering is the way to go), take some test shots to make sure you get the result you’re after, then add in light to brighten up the surrounding elements.
If you’re not able to control the lighting situation (e.g., you’re photographing outdoors), then you’ll need to look for shooting angles where you can put the flame against a contrasting background. A darker, solid area is preferable, but anything that offers some contrast should work.
Note how the gray smoke offers a clean, neutral background to highlight the flames:
4. Use fire as a light source
Fire offers soft shadows and warm color, so it makes for a wonderful light source – especially in campfire situations like this one:
Notice how the fire beautifully illuminates the surrounding trees.
But how do you photograph fire with such a magical result? Here are a few quick tips:
- Use a long shutter speed. While fire looks gorgeous, it’s not very bright. To compensate, you’ll often need to work at 1 second, 5 seconds, or even 30 seconds.
- Widen your aperture. Again, the goal here is to compensate for the lack of light.
 If needed, push your aperture to its maximum setting.
 - Boost your ISO. It’s generally a good idea to start with a low ISO – but if you’ve taken some test shots and they’re just not bright, then push your ISO (and keep pushing your ISO until you get the result that you’re after).
- Pay careful attention to where the light falls. If you’re shooting around a campfire, you can get interesting lighting on subjects a dozen feet from the flames – so don’t feel compelled to crop tight. Instead, get creative with your surroundings.
Also, when working with a wide aperture and therefore a narrow depth of field, try setting your focus on objects with high-contrast edges (like the silhouettes of stationary subjects) instead of the main subject. You’ll technically miss focus, but that’s okay; the shifting fire light will blur edges and soften the shadows of the objects it illuminates, so you should do what you can to nail the hard edges.
Oh, and take advantage of the interesting colors that fire offers…
…and consider emphasizing them in post processing!
Speaking of which:
5.
 Learn to control the color of your flame
 Take a close look at a flame, and you’ll see multiple colors, gradients, and intensities depending on temperature, fuel type, oxygen quantities, how well the oxygen is mixed with the fuel, and more.
It sounds complicated, and it kind of is. But when it comes to fire photography, a few simple tips should help you control the color of your flame – and get the shots you’re after.
See, when photographing fire, the most influential factor is the fuel being burned. Wood, paper, clothing, or anything else that puts off a lot of unburned particles (smoke) will probably burn yellowish-orange. Butane lighters, propane torches, liquids with high alcohol content, or other fuels that can more easily mix with the available oxygen will burn more on the bluish side.
Blue and yellow don’t satisfy you? Never fear; there are additives (pyrotechnic colorants, to be precise) you can buy to change the color of the flame at will. I found some pre-packaged powders at my local camping store, and they worked pretty well. Or if you’re into chemistry, this article describes which compounds can be used to create which colors.
And you have yet another option: Simply change the color of the fire in post-processing. Because fire colors are so dominant, it’s easy to select the color and adjust it throughout the entire image. I used post-processing to achieve this interesting green flame:
6. Have fun photographing smoke
Smoke can look very cool, but unless you’re taking steps to make sure it appears in your scene, you’ll probably end up with smokeless shots (or totally underwhelming smoke photos, which is almost as frustrating).
Here are three things you can do to highlight smoke and capture gorgeous results:
- Be certain your fire is making smoke. Fuels that burn efficiently (like some gas torches and alcohols) may not emit much smoke at all. Use inefficient fuels like wood or paper to maximize your smoke output.
- Light the smoke.
 A light source shining into the smoke can solidify those lines and help them stand out. Use backlight to create the most powerful effect, while sidelight is better for a mysterious look.
 - Use a fast shutter speed to freeze the smoke trails (start at 1/100s, but increase this if necessary). Slower shutter speeds will make the smoke appear like haze, not well-defined wisps.
Also, be sure to take plenty of images. Smoke is constantly changing shape and direction, so it’s generally not enough to capture one shot and call it a day; instead, take dozens of shots, delete the mediocre ones, and keep your best.
7. Start with a candle
If you want to get started with fire photography but you’re not quite ready to dive in feet first, I recommend you photograph a candle.
Candles are simple, relatively safe, and easy to work with – so you can do plenty of shooting without any high-stakes compositions.
To practice, try to accomplish the three primary types of fire shots I discussed above (fire as a subject, fire as an accent, and fire as a light source).
Then have some fun experimenting. And as you go along, make sure to write down your settings. In particular, determine the shutter speed you need to freeze the flame, as well as the shutter speed you need to illuminate a subject on a table. Finally, use an artificial light source to photograph both the flame and the surrounding environment in a single frame.
How to photograph fire: final words
Well, there you have it:
My favorite tips and techniques for fire photoshoots. Now that you’ve finished this article, you should know how to photograph fire, and you should be inspired and ready to shoot on your own!
Now over to you:
Which of these fire photography techniques is your favorite? Which do you plan to try? Share your thoughts in the comments below!
Jon Beard is an adventurer from the mountains of southwestern Virginia. He organizes the regional photo club, leads photography workshops and guided shoots, and has a passion for shooting in the dark. See photos, workshop dates, and more at http://JonBeard.com.
How to photograph fire, or Flame as a subject, accent and light source
1/320 f/8 ISO1000 105mm
Fire is an interesting thing. We have a very deep and instinctive relationship with it, so it's no surprise that adding flames to a photo can have quite a strong impact on the viewer. This article provides a few examples and explains how the shots were taken, as well as a vector for creating your own fire photos.
Safety first
1/15 f/16 ISO200 105mm
Follow the words of wisdom from Frankenstein's monster: "Fire is bad!.." Heat and smoke can damage your equipment, flames can quickly get out of control and burn some things, and most importantly, fire can kill you yourself. Follow the basic safety tips for this type of shoot that you should already know (and be sure to follow!)
- think ahead and plan your shoot from start to finish; nine0016
- make a plan to put out a fire just in case;
- do not work near objects that you would not like to be damaged in a fire;
- work in a well ventilated area;
- make sure you work in a place where the worst is not so bad.

You will find that fire is used in photography in many different ways. It can play the role of the main object, emphasizing element (accent) or the main light source. As a rule, you get a combination of these three options, but it is better to analyze them separately to begin with. nine0003
Fire as an object
The images below focus on the flame (or its effect) and the details that can be reflected in it.
In most cases, you'll want to use a shutter speed fast enough to stop motion so you can see details in the flames. As always, "fast enough" is close to what you're shooting, but a good starting point is a shutter speed around 1/250 or faster. As it increases, you will have to use a wider aperture and higher ISO values. nine0003
1/2000 f/5.6 ISO2000 105mm
1/250 f/13 ISO400 105mm
Sometimes it's interesting to show what the fire emits - for example, sparkling paths or fiery flashes. Slower shutter speeds are the key to shooting in this case.
1.6” f/40 ISO100 105mm
38” f/ 36 ISO100 105mm
Fire as an accent
In this type of shot, flame is one of the many elements of the big picture. The difficulty in this case is that it is necessary to use additional lighting to show the fire, while not forgetting to shoot the environment. The key here is to expose the flame and then add light to the rest of the painting. If you can't control the lighting, you need to look for angles where you can put the flame in the background of the frame to make it stand out. A darker, solid background is preferable, but in principle, anything that will contrast should work. nine0003
1/2500 f/5.6 ISO1250 110 mm
1/60 f/11 ISO1000 105 mm
1/250 f/7.1 ISO200 105 mm as the main light source
Fire can be a great light source with its soft shadows and warm color. For campfire photography, slower shutter speeds, wider apertures, and higher ISOs are often the right choice. You can use medium or slower shutter speeds as you get closer to the fire, when the subject gets more light and is generally stronger. nine0003
When working with a shallow depth of field that is accompanied by a wide aperture, try focusing on objects that have contrasting edges (such as the silhouettes of stationary objects) rather than what you might think of as the main subject. This can give you an overall sharper image, as the fire's shifting light will blur the edges and soften the shadows of the objects it illuminates.
25” f/4.5 ISO3200 14mm
30” f/8 ISO200 20mm
1/10 f/3.5 ISO200 50mm
1/100 f/4 ISO800 50mm
Flame color
1/60 f/8 ISO800 500mm
Look closely at the flame and you will see several colors, gradients and intensities, so it goes without saying that the color of the fire is a difficult question. It depends on the temperature, the type of fuel, the amount of oxygen and the degree of its mixing with the fuel, as well as many other factors. With that said, when it comes to photographing fire, a few simple ideas should help you control its color. nine0003
In a photograph of a flame, the color of the flame will be most influenced by the fuel being burned. Wood, paper, clothing, or anything else that emits a lot of unburned particles (smoke) is likely to burn yellowish orange. Butane lighters, propane torches, high alcohol liquids, or other fuels that can more easily mix with available oxygen before burning will burn with a more bluish tint. There are campfire additives (pyrotechnic dyes to be exact) that you can buy to change the color of the flame. Although, of course, the easiest way to get control over the color of the flame is to achieve the desired color in post-processing. nine0003
1/2500 f / 8 ISO200 105mm
Showing smoke him in the frame.
First, make sure the fire produces smoke. Fuels that burn efficiently (such as some gas burners and alcohols) may simply emit little fuel. Using inefficient fuels such as wood or paper will maximize smoke emissions. nine0003
Secondly, you can highlight the smoke. A light source falling on the smoke can strengthen its lines and make them stand out more.
Also use a shutter speed fast enough to freeze the smoke trails. Slower shutter speeds will make the smoke appear to be a light haze, rather than conveying it in beautiful and expressive wisps.
An easy way to get started.
Left: 1/8 f/8 ISO800 50mm --- Center: 4” f/8 ISO800 50mm --- Right: 1/8 f/8 ISO800 50mm + Flash
A candle is an easy and relatively safe way to learn how to photograph flames. In practice, see if you can capture the three main types of fire shots that we covered in the article - as a subject, accent, and light source. Try shooting a series similar to the one described above and note down what settings are required to "freeze" the flame and what is needed to illuminate the object next to the candle. Then use an artificial light source and take a picture where you can see in detail both the flame and the well-exposed object next to it. nine0003
Fire Photography - Canon Europe
Fire Photography - Canon EuropeFIRE PHOTOGRAPHY
Whether it's flickering candlelight, dancing campfire flames or festive sparklers, with the right shooting techniques, settings and equipment, you can create the best photos.
Fire is an incredibly beautiful subject with many creative possibilities. Not only the fire itself is beautiful, but also the environment, shrouded in the warm glow of the flame. This means that fire is not only an attractive subject, but also an atmospheric light source for portraiture. nine0003
However, fire can be difficult to capture properly. Photographers face the problem that the light source appears too bright in the images and the surroundings appear too dim. Such a high contrast makes it so easy to capture the details in the light and dark areas of the composition. However, with the right camera setup and a couple of easy-to-learn skills, anyone can create excellent flame photos.
Knowing how to photograph fire will help you shoot effectively in any season, but will be especially useful for creative work during the New Year holidays. Here we will tell you how to beautifully photograph fire this winter holidays. nine0003
1. Be safe
When shooting around children, it's best to have another adult nearby to watch over them while you take pictures. Taken on camera Canon EOS R6 with lens Canon RF 50mm F1.8 STM at 1/160 sec, f/3.5 and ISO 4000.
Like photography, fire can grab people's attention for a long time, but fire is not at all harmless. It's easy to get lost while shooting, but you should always keep safety in mind. It is important not only to avoid injury, but also to keep the flame under control. Have a bucket of water or a fire extinguisher nearby to put out the fire, and use your headlamp to find your way in the dark. In addition, we recommend that you keep an eye on the weather, as strong winds can lead to an uncontrolled spread of fire. nine0003
2. Choose the right equipment
When using the camera with a tripod, a flashlight can provide additional lighting and balance a bright fire with the environment. A small piece of orange gel will help give the light a tint similar to that of a flame.
The light from a flame is usually quite dim, so if you are using fire as a light source for nearby objects, it is worth turning to equipment that is effective in low light. The Canon EOS R6, for example, is perfect for you, with an ultra-responsive 20.1MP full-frame sensor designed specifically for capturing wide dynamic range scenes and low-light compositions effectively. nine0003
A fast prime lens such as the Canon RF 50mm F1.8 STM will also help you achieve the desired result, as prime lenses usually have a wider aperture than zoom models. This allows you to shoot at faster shutter speeds and lower ISOs even in low light, resulting in sharper, less grainy shots.
A tripod, while optional, can be very useful for shooting fires and candles, as it allows you to shoot at slower shutter speeds and create a blur effect for flickering flames. nine0003
3. Shooting by candlelight
When exposed to a flame, the rest of the subject in the composition is very dark, making the candle lights look like they are floating in mid-air. Taken on a Canon EOS R6 with a Canon RF 50mm F1.8 STM lens at 1/1250 sec, f/4 and ISO100.
Exposure to the surroundings creates a very different creative effect: the candles themselves show through, but the fire looks washed out and washed out. Taken on a Canon EOS R6 with a Canon RF 50mm F1.8 STM lens at 1/20 sec, f/4 and ISO100.
Candles can form the basis of an atmospheric image, but they are also quite difficult to photograph because a very bright candle light does not illuminate the surroundings enough. This means that when exposed to a flame, all other elements of the composition will turn out to be almost black, but when exposed to the environment, the fire will turn out to be overexposed. Choose a priority setting depending on the desired result.
It's usually better to expose for the brighter subject in the frame, since it's easier to increase shadow detail in post than to remove the highlight effect. In addition, you can adjust the exposure slightly to brighten the dark areas of the frame a little without overexposing them. If your camera has a zebra pattern feature for movies, try activating it - in this mode, the camera marks overexposed areas of the image with a stripe pattern, which allows you to increase the detail in the shadows without blowing out the already bright areas. For photography, the highlight alert in playback mode will help you understand if there are areas of blown out in the image. When shooting in RAW format, you can more freely adjust image settings in editing software such as Canon Digital Photo Professional (DPP). nine0003
Set the camera to manual mode (M) to give priority to automatic firing of the built-in flash. This will avoid glare from the soft light of the candle flame. Set the aperture to f/4 and ISO 100, and then adjust your shutter speed between 1/20 and 1/2000 sec to see how the candle flame image gets the desired effect. Alternatively, you can use fill-flash, also known as daylight flash, which is a bright light that complements the illumination of dark areas of the frame, providing the necessary detail to the subject. In the Canon Photo Companion app, you can find an article on taking portraits by candlelight, which describes this shooting technique in a more professional way. nine0003
4. Birthday cake with candles
When a person leans towards the candles, the flickering flame will provide a pleasant warm glow on their face. Taken on a Canon EOS R6 with a Canon RF 50mm F1.8 STM lens at 1/200 sec, f/2 and ISO1600. precise focus. A camera with eye-detection AF, such as the Canon EOS R6, makes it easy to get the right result, even when shooting people in profile. nine0003
There is no better time for photography than a birthday party. When it's time to blow out the candles, you can create beautiful portraits by using the warm light from a candle flame to illuminate the happy face of the birthday boy or girl. Try setting your camera to manual mode (M) and the following exposure settings: f/1.8 (or wider if you use a faster lens), shutter speed 1/200 sec. and Auto ISO mode. This will allow the camera to automatically adjust the ISO value for perfect exposure. nine0003
A fast prime lens such as the Canon RF 50mm F1.8 STM is ideal for this type of portraiture, as the wide aperture allows for portraits even in dark environments. When shooting at a wide aperture, it also delivers smooth bokeh to create a pleasing background blur.
5. Photographing a campfire
Long exposure blurs the movement of the flame and turns any flying sparks into bright streaks of light. Fanning a fire can create bright lighting effects, but be careful and be safe! Taken on camera Canon EOS R6 with lens Canon RF 50mm F1.8 STM at 1 sec, f/8 and ISO 100.
Use a tripod and set a shutter speed of one second to capture the trail of sparks from the fire. Be sure to ask all people to remain still while the camera is exposure to avoid blurring the frame. However, you can also do the opposite to create an image with an intentional blur effect (see image above), where people appear as ghosts and sparks turn into flickering light streaks.
Is there anything more attractive than a fire on a cold and dark night? A bright flame can be a spectacular subject for shooting against the background of darkness surrounding it. After sunset, you will have some time when the ambient light is enough to make the campfire stand out against the twilight, but the environment is still bright enough to capture details, including in the sky. It is this segment that is ideal for shooting a fire and the whole scene at twilight hours, since at nightfall there will be pitch darkness around the fire in the photographs. Try using manual mode for this shot with a shutter speed of 1/100 sec, f/1.8 (or whatever the maximum for your lens) and Auto ISO. Use exposure compensation to lighten or darken the image, and choose a low angle to capture a campfire against a twilight sky. nine0003
6. Taking portraits near a fire
When shooting portraits near a fire, try setting the camera to manual mode (M) and the following exposure settings: aperture f/1. 8 (or even wider if you use a faster lens), shutter speed 1/ 200 sec. and Auto ISO mode to capture blur-free subjects even in low light.
Create portraits near a fire using warm light or silhouettes. Taken on a Canon EOS R6 with a Canon RF 50mm F1.8 STM lens at 1/125 sec, f/1.8 and ISO 25600.
Bonfires create a special atmosphere that can also be transferred to portraits. Campfire gatherings, couples cuddling and children watching the flames all make the perfect subject for a Canon camera. Be sure to fan the fire before shooting, as the size of the flame greatly affects the light level. It happens that the fire does not give enough light, so ask people to get close to the fire (but do not forget about safety) in order to use all the available light from the flame. nine0003
7. Shooting sparklers
Set the camera to manual mode (M) to shoot sparklers. Use an aperture of about f/3.5–f/5.6, shutter speed 1/125 sec. and Auto ISO mode. You can also apply exposure compensation for experimenting with the results of shooting.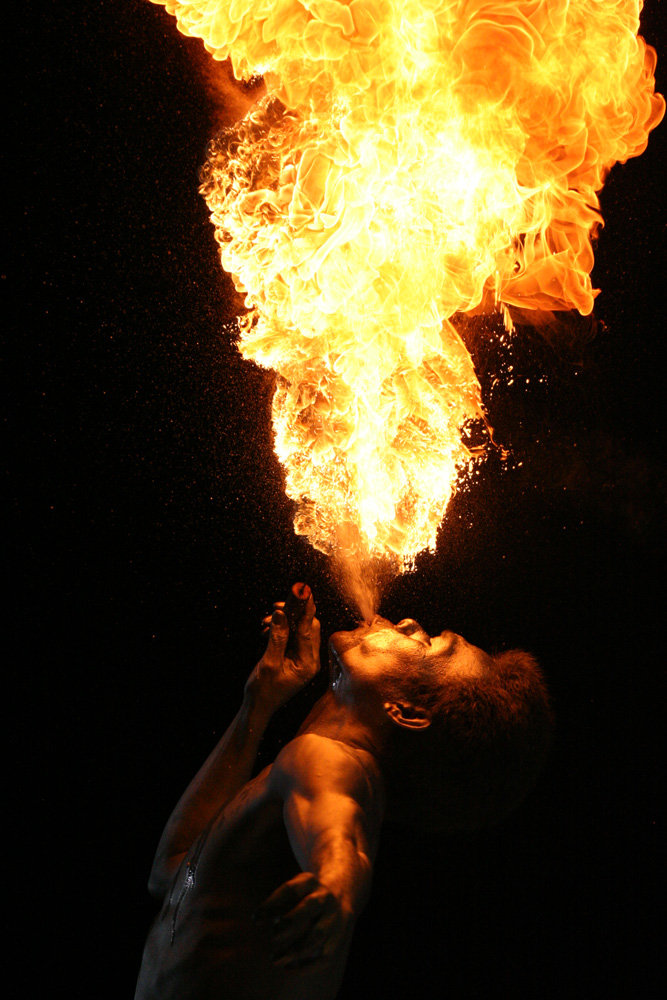
Taken on camera Canon EOS R6 with lens Canon RF 50mm F1.8 STM at 1/200 sec, f/2.5 and ISO 640.
Not only do bright sparklers look great in photographs, but they are also a safer way to learn creative fire photography skills in bad weather or with young children. Sparks fly in all directions at high speed, so they look like streaks of light in the photo, even when shot at a relatively fast shutter speed. If you are already familiar with creating and editing RAW files, this will help you a lot, as you can get more detail in the light and dark areas of the frame in post-processing. You can also choose a slower shutter speed - you will see how the sparks from the sparkler leave light streaks throughout the frame. The choice is yours! nine0003
What's more, you can capture the light streaks from holiday fireworks - check out our creative fireworks photography tips and techniques for more inspiration.
And when the fire is out, you can try your hand at photographing smoke using the skills described in the Canon Photo Companion exercises.
By James Paterson
-
Mirrorless cameras
EOS R6
Whatever you shoot, the EOS R6 lets you unleash your creativity in new ways. nine0003
Shop now
Learn more EOS R6
-
Mirrorless cameras
EOS RP
A compact, lightweight and easy-to-use full-frame mirrorless camera designed for travel and everyday photography.
More details EOS RP
-
Wide Angle Lens
Canon RF 16mm F2.8 STM
Compact and affordable 16mm ultra-wide-angle full-frame lens for EOS R-series video creators and content creators. nine0003
Buy now
More Canon RF 16mm F2.8 STM
-
Standard Lens
RF 50mm F1.8 STM
Compact, quiet, and lightweight with a wide f-8-mm RF-fix 50 perfect for bringing your creative ideas to life.

Buy now
Learn more RF 50mm F1.8 STM
-
Lenses RF
RF 35mm F1.8 MACRO IS STM
A fast f/1.8 35mm macro lens with a wide-angle perspective, close focusing distance and Hybrid IS.
More RF 35mm F1.8 MACRO IS STM
-
Lenses RF
RF 85mm F2 MACRO IS STM
The RF 85mm F2 MACRO IS STM offers close-up and subtle compression telephoto image stabilization in a compact, lightweight body.
Read more RF 85mm F2 MACRO IS STM
-
PHOTOGRAPHY OF FIREWORKS
10 Fireworks Photography Tips
Fireworks Photography Tips and Composition Best Fireworks Photography Tips.
-
LIGHTING TECHNIQUES
Low Light Photography Tips
Learn how to shoot in low light and discover Canon's most effective equipment for night photography.

Learn more