What controls depth of field
How to Control the Depth of Field
Several factors determine the “look” of your photos. Composition is the most obvious factor, but camera focus and depth of field are also very important. They can change the entire atmosphere and emphasis of the photo.
For example, you can keep everything in a photo sharp, like a flat wall, or you can draw attention to a specific subject, like a bottle on the grass. You control this perspective by changing the depth of field, making objects in the foreground/background appear sharper or more blurred.
Paul Shears – Window Watchinng
jordan parks – and a smile
There are three ways to control the depth of field: lens aperture, distance from camera to subject, and lens focal length.
1. Lens Aperture
Photographers often use aperture to control the depth of field. You can sharpen a entire scene by setting the aperture (f-stop) as small as the lighting will allow. To single out a subject, do the opposite; set the aperture as large as possible. In both cases, you’ll have to change the shutter speed to compensate for the difference.
The aperture ranges from f/1.4 (a super fast lens) to f/22, with increments in between: f/2, f2.8, f/4, f/5.6, f/8, f/11 and f/16. Each f/number up or down represents one “stop” of light. In other words, when you move from f/4 to f/5.6, you’re letting in half as much light. When you move from f/16 to f/11, you’re letting in twice as much light. This number ratio stays the same across all lenses, regardless of focal length, which makes it easier to understand.
Elizme – Refrains of Nature
2. Distance from Camera to Subject
Changing the distance between your camera and the subject is another way to affect the depth of field. To increase the depth of field, just move back. To reduce it, move closer. Your camera works exactly like your eyes, becoming more focused as it gets closer to the subject.
Of course, changing your distance will also change your composition. To fix this problem, you can change the lens or focal length to maintain the composition you want.
Corrie White – Galerina marginata
3. Lens Focal Length
If the focal length of the lens is long, the depth of field will be shallow, and vice versa. The depth of field you get for a specific f-stop varies with distance. In other words, a small f-stop (like f/11) on a 35-70mm zoom set to 35mm gives a deep depth of field, from 6 – 20 feet when the lens is focused at 9 feet. However, if the lens is zoomed out to 70mm, you’ll have a relatively shallow depth of field, from 8 – 11 feet when the lens focused at 9 feet.
It might sound easy, but adjusting the focal length to control depth of field can actually be difficult. Just like changing your distance to the subject, adjusting the focal length will change the composition of your image.
For this reason, it’s often best to use the f-stop to control the depth of field. Then, you can shoot at any distance with the focal length you want. Just remember to alter the shutter speed (and use a tripod and cable release) to compensate for large f-stops.
Roelof de Hoog – Through blue and green
These photos were selected from our Flickr group. Next time you experiment with depth of field, share your photo with the group so we can admire your work!
How to use depth of field to take better pictures
When photographers talk about the “depth of field” in an image, they’re referring to how much of the picture they choose to have in focus. You may think “but don’t I want all of my image to be in focus?” Frequently you do, but sometimes you can bring more attention to your subject by reducing the depth of field in a scene, making the background soft and blurry.
If you own a DSLR but aren’t experimenting with your aperture settings, you’re missing out on one of the most useful tools in a photographer’s arsenal. Here’s a primer to get you started.
What is depth of field?
The upper image has deeper depth of field than the lower image. Click on the picture for a closer look.By choosing how much depth of field to have in your shot, you can focus the viewer’s attention in a specific place. This makes depth of field control one of the most important creative decisions that a photographer makes. This example shows the same image shot with deep depth of field (top), and shallow depth of field (bottom).
In the lower image with the soft background, the depth of field is about two or three inches deep. That doesn’t mean that only the two to three inches in front of the lens are in focus—the depth of field in a scene is always measured around the point of focus. I focused on her eyes, so the depth of field extends from an inch or so in front of her eyes, to an inch or so behind. Everything closer and farther than this small area gets progressively softer.
How depth of field works
Depth of field is controlled by changing the aperture setting on your camera. Like your eye, a camera lens has an iris inside that can open or close to let in more or less light. You control the size of this hole, or aperture, by changing the aperture setting, which is measured using a scale of f-stops.
The first rule for understanding aperture and depth of field is very simple: the larger the aperture, the shallower your depth of field will be, meaning a smaller portion of your image will be in focus. The smaller the aperture, the deeper your depth of field will be, resulting in more of your image being in focus. Now here’s the tricky part: aperture size is denoted by a number, and the smaller the number, the larger the aperture. Setting your aperture setting to f2.8 will yield shallower depth of field than setting it to f11. Another way to think of it is that a smaller number means less depth of field.
Smaller f-numbers denote larger apertures, which mean less depth of field.
Control your camera’s settings
To change your aperture, you must have a camera with an aperture priority or manual mode. (Most cameras with aperture priority also have a full manual mode). On most cameras, Aperture Priority mode is indicated on the mode selector by an A, though Canon cameras use Av. When in aperture priority mode, you choose the aperture you want, and the camera automatically picks a corresponding shutter speed to yield a good exposure. For details on changing modes and using the aperture priority mode, consult your camera’s manual.
If your camera doesn’t provide a mechanism for controlling aperture, then you won’t be able to choose a particular depth of field. These days, all SLRs have priority and manual modes, as do Micro Four Thirds cameras, and some advanced point-and-shoot cameras, such as the Panasonic Lumix LX3 and Canon PowerShot S90. However, a camera with a smaller sensor has inherently deeper depth of field. What this means is that it’s difficult to achieve extremely shallow depth of field with a point-and-shoot camera, even if you have manual controls.
Choose the right aperture
Once you know how to control your aperture, you’ll need to figure out how much depth of field you want in your photo. For example, in a portrait it’s nice to have a shallow depth of field so that the focus is on the person’s face. But shallow depth of field is also handy any time you need a way to separate a subject from a busy background—street shooting, event shooting, and many other situations can benefit from a reduction in depth of field. This image has very deep depth of field. Everything from the foreground to the horizon is in focus. You’ll usually choose deep depth of field for landscape shots.
There are times when you’ll want to ensure a deep depth of field. Landscape images, for example, can work better when everything in the frame is in focus, so you’ll want a deeper depth of field. To do this, choose a small aperture, which will be denoted by a larger f-number. Product shots, certain types of still life images, and any shot where you need to see both foreground and background details will also benefit from deep depth of field.
The landscape photo tradition is for images of vast areas, with great detail in every part of the picture. Achieving such detail requires deep depth of field. Similarly, if you’re shooting an object that you’re going to put on eBay, you’ll want every part of the object in focus, so deep depth of field will be necessary.
Note that every lens has a set aperture range, and some lenses can open to a wider aperture than others. Your lens should list its aperture range on the ring on the front of the camera. For example, the markings on this PowerShot G9 indicate that it has an aperture range of f2.8 at its widest angle to f 4.8 at it’s most telephoto.
Tips for shooting shallow depth of field
If you have a lens that can open up very wide (also called a fast lens), you’ll want to think about how shallow you want the depth of field to be. If you have a very fast lens, and you open it up to its largest aperture, you might have a difficult time focusing. This will make your backgrounds go too soft and make it difficult to keep the correct parts of your image in focus.
The depth of field in this image is so shallow that her eyes are in focus while her eyebrows are not.This is a portrait shot with an f1.2 50mm lens opened all the way. Here, the depth of field is so shallow, that the girl’s eyes are in focus but her eyebrows are not, meaning the depth of field is only a fraction of an inch deep. When shooting with depth of field this shallow, focus becomes especially critical.
While you control depth of field using your aperture setting, camera position is also critical for achieving a shallow depth of field. While you might have your aperture set to a nice wide opening, if there’s nothing visible in the background, then you won’t be able to tell that the image has shallow depth of field. In other words: the perception of depth of field in an image is dependent on the size of the objects in the background.
When you shoot with a wide angle lens, objects in the background are very small, so it can be difficult to see that your image has shallow depth of field. If you want to show that there is a shallow depth of field, be sure to compose your shot so that there’s something big in the background to reveal the shallow focus.
Tips for shooting deep depth of field
As mentioned earlier, when you shoot landscapes, you’ll usually want to choose a deep depth of field. But, there are two important factors to keep in mind when shooting deep focus.
First, it’s tempting to just dial in the largest f-number you can, but this is usually a bad idea. As aperture size gets smaller, your image can suffer from an optical effect called diffraction, which reduces the sharpness in your image. I typically find that once I go smaller than f11, I see a noticeable drop in sharpness. If you’re shooting a landscape, and you dial in f22 to try to ensure deep depth of field, there’s a good chance you’ll have an overall soft image, because of the diffraction problems introduced by your small aperture choice.
Second, remember that depth of field is centered around your point of focus, with some of the range in front, and some behind. When shooting a landscape, if you focus on the horizon, then some of your depth of field will actually fall behind the horizon. In other words, you won’t be making the best use of the depth of field that’s available, so your foreground might end up out of focus.
A good rule of thumb is to focus about one third of the way back from the horizon. This will include more of the foreground in your depth of field range. (You can do a much more refined calculation of depth of field and focus distance, but this rule of thumb is a good place to start.)
Until you get better at judging distance, you’ll want to bracket your focus. Focus bracketing means that you shoot a series of frames, focusing at different distances. If you bracket, there’s a better chance that one of your resulting images will be properly focused.
Practice using your new tool
Depth of field control is one of the most important tools in your creative arsenal. With it, you can reduce the distraction of busy backgrounds, or ensure that everything in your image is razor sharp. As you look at other photos, and watch TV shows and movies, pay attention to depth of field, and take note as to when the decision has been made to go shallow or deep. As you shoot, you may find that your current lens or point-and-shoot camera can’t go as shallow as you’d like. If this happens, you’ll want to go shopping for some new gear that can open to a wider aperture. Practice and experimentation are the best ways to learn depth of field control, and exploring depth of field is one of the few times in your life where it’s okay to “lose focus.”
[Macworld senior contributor Ben Long is the author of Complete Digital Photography, fifth edition (Charles River Media, 2009). More of Ben’s work can be found at Complete Digital Photography.]
What is depth of field
Depth of field (DOF) is a range of distances in the image in which objects are perceived as sharp. Depth of field varies with camera type, aperture size, and focus distance, although print size and viewing distance can alter our perception of depth of field. This chapter aims to provide a better intuitive and technical understanding of photography and provides calculator DOF to demonstrate how it depends on your camera's settings.
Image sharpness does not change suddenly, it decreases gradually. Essentially, everything that is closer or further than the focus distance gradually loses sharpness - even if it is imperceptible to the eye or to the resolution of the camera.
Circle of confusion
Since there is no well-defined boundary, a more precise term called “ circle of confusion ". When a circle of confusion becomes perceptible to our eyes, that area is considered to be out of depth of field and is not "acceptably sharp". The above circle of confusion has been enlarged for simplicity; in fact, it is a tiny fraction of the area of the camera's sensor.
When does a circle of confusion become visible to the eye? A reasonably sharp circle of confusion is defined as one that will remain imperceptible when enlarged to print at a standard size of 20x25 cm and viewed from a standard distance of about 30 cm.
At this viewing distance and print size, camera manufacturers consider a circle of confusion to be indistinguishable if it is no larger than 0. 025 mm in diameter (after magnification). As a result, camera manufacturers use this standard when marking depth of field on lenses (for example, f/22 on a 50mm lens). In fact, a person with perfect vision can see 1/3 of this size or even less, so the circle of confusion must be even smaller to provide acceptable clarity.
The circles of confusion will be different for each combination of print size and viewing distance. In the blurry dot example above, the circle of confusion is actually smaller than your screen resolution for the two dots on either side of the focus distance, and so they are in depth of field. In other words, depth of field can be based on the moment when the circle of confusion exceeds the pixel size of your digital camera.
Note that depth of field only specifies the maximum size of the circle of confusion and does not describe what happens to out-of-focus areas. These areas are called "boke" (the word is of Japanese origin). Two images with the same depth of field can have significantly different bokeh, and it depends on the shape of the lens aperture. In reality, the shape of the circle of confusion usually differs from being round, but approaches it as long as it remains negligible. When zoomed in, for most lenses this will be a polygon with 5-8 edges.
Controlling Depth of Field
Although print size and viewing distance are important factors that affect how large the circle of confusion appears to our eyes, the main factors that determine how large the circle of confusion will be on your camera's sensor are exposure aperture and focusing distance. A larger aperture (smaller f-stop) and shorter focus distances will create a shallower depth of field. The following depth of field test was performed at the same focusing distance with a 200mm lens (320mm field of view on a 35mm camera), at different apertures:
| f/8.0 | f/5.6 | f/2.8 |
Explanation: focal length and depth of field
Notice that I didn't mention focal length as a factor in depth of field. Even though telephoto lenses seem to create a much shallower depth of field, this is mainly because they are often used to magnify a subject that cannot be approached closer. If the subject occupies the same area in the viewfinder (constant zoom) on both the wide-angle and telephoto lenses, the depth of field will be almost* independent of the focal length ! Of course, this would require you to get much closer for a wide angle lens, or noticeably further away for a telephoto lens, as shown in the following depth of field table:
| Focal length (mm) | Focus distance (m) | Depth of field (m) |
|---|---|---|
| 10 | 0.5 | 0.482 |
| 20 | 1.0 | 0.421 |
| 50 | 2.5 | 0.406 |
| 100 | 5.0 | 0.404 |
| 200 | 10 | 0.404 |
| 400 | 20 | 0. 404 404 |
Note: Depth of field calculations are based on f/4.0 on the Canon EOS 30D
(crop factor 1.6) using a 0.0206mm circle of confusion.
Note that there is indeed a slight change for minimum focal lengths, however this effect is negligible compared to both aperture and focusing distance. Even though the overall depth of field is virtually unchanged, the proportion of depth of field ahead and behind the focus distance changes with focal length, as shown below:
| Depth of field position | ||
|---|---|---|
| Focal length (mm) | Behind | Front |
| 10 | 70.2% | 29.8% |
| 20 | 60.1% | 39.9% |
| 50 | 54.0% | 46.0% |
| 100 | 52.0% | 48.0% |
| 200 | 51.0% | 49.0% |
| 400 | 50. 5% 5% | 49.5% |
This shows the limitations of the traditional DOF concept: it only takes into account the range itself and does not take into account the distribution of depth relative to the focal plane, even though both factors can affect the perception of sharpness. Wide-angle lenses provide greater depth of field behind the focal plane than in front of it, which is essential for traditional landscape and landscape photography.
On the other hand, at a constant point of view and focusing distance, a lens with a longer focal length will give a shallower depth of field (even though there are significant differences in the final image). This is more visible in everyday use, but this is due to the degree of magnification, and not to the focusing distance. It seems that for longer focal lengths the depth of field is reduced - because they compress perspective. This places the background much closer to the foreground - even if the details don't come out sharper. Depth of field also appears to be shallower on DSLRs than on compact digital cameras, as DSLRs require a longer focal length to achieve the same angle of view.
*Note: we describe depth of field as is almost is constant because there are a number of cases in which this is no longer true. For focus distances that result in significant magnification, or in the area near the hyperfocal distance, wide-angle lenses can provide greater depth of field than telephoto lenses. On the other hand, for high magnification situations, the traditional depth of field calculation becomes inaccurate for another reason: the magnification factor. This actually shifts the depth of field on most wide angle lenses and increases it on tele and macro lenses. In another particular case, near the hyperfocal distance, the increase in DOF is apparent because wide-angle lenses have a large rear DOF and therefore more easily achieve acceptable sharpness at infinity for any given focus distance.
DoF calculation
To calculate the depth of field, you must first determine the maximum allowable circle of confusion. It depends on the type of camera (sensor or film size) and on the combination of print size and viewing distance.
Depth of field calculations basically assume that for acceptable clarity the size of the circle of confusion should not exceed 0.025 mm (as discussed above), however, people with perfect vision are able to distinguish a third of this size. If you use 0.025 mm as your standard for human perception, be aware that the depth of field border may not be sharp enough. The depth of field calculator provided here is based on this standard, but I also have a more flexible depth of field calculator.
| IPIG calculator | ||
|---|---|---|
| Camera type | digital, crop factor 1.6digital compact with sensor 1/3"digital compact with sensor 1/2"digital compact with sensor 1/1.8"digital compact with sensor 2/3"digital with sensor 4/3"digital, crop factor 1.5APS digital, crop factor 1.335 mm6x4.5 cm 6x6 cm6x7 cm5x4 in.10x8 in. | |
| Diaphragm | F 1. 2F 1.4F 1.8F 2F 2.8F 4F 5.6F 8F 11F 16F 22F 32F 64 2F 1.4F 1.8F 2F 2.8F 4F 5.6F 8F 11F 16F 22F 32F 64 | |
| Lens focal length | mm | |
| Focus distance (to subject) | meters | |
| Near end of acceptable clarity Far end of acceptable clarity DOF | ||
Note: The crop factor is often referred to as the focal length multiplier
Depth of Focus and Aperture Visualization
Another consequence of the circle of confusion is the concept of depth of focus (also called focus space). It differs from depth of field in that it describes the range over which light is focused camera sensor , as opposed to the amount of image in focus. This is important because it limits how horizontal/vertical the film or digital sensor must be in order to achieve the required focus in all parts of the image.
Diagram showing depth of focus versus aperture. The purple lines show the maximum angles at which light can potentially enter the aperture. The area in purple shows all possible angles. The diagram can also be used to illustrate depth of field, but in this case the lens elements should be moved instead of the sensor.
The key idea is this: when the subject is in focus, light rays from one point converge to one point on the camera's sensor. If the beams reach the sensor at other positions (forming a disk instead of a dot), the object will be out of focus, and defocus will increase with distance.
Other considerations
Why not just use the smallest aperture (maximum f-number) to achieve the best possible depth of field? Apart from the fact that this would require shutter speeds that are unattainable without a tripod, too small an aperture blurs the image, generating a large circle of confusion (or " diffraction circle ”) due to an effect called diffraction - even in the focal plane. As the aperture decreases, diffraction quickly becomes a more serious limiting factor than depth of field. Despite their incredible depth of field, stenopes have limited resolution for this very reason.
For the macro (high magnification), depth of field is actually affected by another factor: magnification. The magnification factor is 1 for internally symmetrical (normal) lenses, but for wide angle and telephoto lenses it will be greater or less than 1, respectively. Depth of field greater than calculated is achieved when the magnification factor is less than 1, and less than the calculated one when it is greater than 1. The problem is that manufacturers usually do not specify the lens magnification factor, and it can only be estimated visually.
Depth of field - Canon UK
Depth of field - Canon UKCAMERA FEATURES
Depth of field, that is, the area of apparent sharpness of an image, is one of the main creative tools in photography and videography. In this article of the Information bank you will find all the necessary information.
When the lens is focused on a point, there is an area in front of that point (closer to the camera) and behind it (farther away from the camera) that looks sharp. The extent of this area of apparent clarity is known as the depth of field, and can be reduced or enlarged for artistic effect.
Depth of field is one of the photographer's most important creative tools, as it gives you control over image clarity and blur effect. In a portrait, for example, depth of field can be limited so that the subject's face appears sharp and distracting backgrounds are blurred. Conversely, landscape photographers often use a large depth of field to make everything in the foreground and background look sharp.
An example of a shallow depth of field - only a small area of the image is in focus, and all other areas of the scene are blurred. Taken on a Canon EOS 80D with a Canon EF 24-70mm f/4L IS USM lens at 67mm, 1/12 sec, f/4 and ISO6400.
A relatively large depth of field means that most of the image looks sharp, although only a small area is actually in focus. Taken on a Canon EOS 80D with a Canon EF 24-70mm f/4L IS USM lens at 67mm, 0. 5 sec, f/11 and ISO6400. our eyes cannot tell the difference between a dot and a very small circle of light. When the lens focuses, each point of the object on the plane of focus is projected as a point onto the camera's image sensor. All these points create a clear image of the object. If the subject were flat, such as a cardboard figure that is exactly perpendicular to the lens, the whole figure would be in focus.
However, areas of the scene that are not on the focus plane do not form image points on the sensor. Light rays from these points converge at a point in front of or behind the sensor, which means that when they hit the sensor, they form a circle of light.
As with focusing the sun's rays on a piece of paper with a magnifying glass, with the ideal distance the cone of light is focused at the desired point, but otherwise you get a circle of light of different sizes, as if you cut off the tip from the cone.
If the circle on the image sensor is so small that the eye sees it as a dot, that part of the object will still appear sharp in the image. If the eyes see that it is a circle, that part of the object will look blurry. The largest circle, which is still perceived as a point, is called the diffuse spot and is a key factor in determining the depth of field.
Size of the circle
So what is the diameter of this circle? It is this question that generates some confusion, since it is worth considering several factors at once. For example, the vision of a person who looks at an image. As well as viewing distance.
With perfect vision, ideal lighting and normal viewing distance, the stray spot will be about 0.06 mm. But these are too unrealistic conditions, and usually in photography, the size at which the circle will be perceived by viewers as a point is considered to be 0.17 mm.
However, there is another factor to consider. You may have noticed that when viewing a thumbnail of a digital image or when viewing it on the screen on the back of the camera, it looks sharp, but when you open the file on the monitor screen, it does not look as sharp as you thought.
The problem is the screen size. The actual image corresponds to the size of the image sensor - for a full-frame sensor this value is 36x24mm and is equivalent to a 35mm film negative, but is rarely considered the original image size. Typically, these photographs were printed in 13x18 cm format. This means that the original image was enlarged 5 times, respectively, the scattering spot increased from 0.17 mm to 0.85 mm, as a result of which most people saw it as a circle. So if we want a circle to be perceived as a dot when working with this traditional viewing image size, it would be worth defining a circle on the image sensor that is five times smaller than 0.17mm. After simple calculations on the calculator, we get a value of about 0.034 mm.
The scatter patch is based on perception and cannot be accurately calculated. Therefore, different tables and depth of field charts often offer different values - they are based on different values of the blur spot. For full-frame cameras, Canon uses a value of 0. 035mm to calculate depth of field. On EOS cameras with APS-C (smaller) sensors, the original file must be enlarged more to produce an image in 18x13cm format, which means that the stray spot on the image sensor must be even smaller. Canon uses 0.019 in its calculationsmm.
The camera lens can only focus accurately on one plane (shown here in red). This is the only area of the scene that actually has high definition. However, a wider area of the scene (a little closer to the lens and a little further away from it) may also appear sharp. The extent of this area of apparent clarity, shown here in blue, is called the depth of field.
When light rays are precisely focused on the camera's image sensor, they form a dot (top). However, when the rays come from an area of the image that is out of focus, such as an object in the foreground or background, they may converge at a point in front of or behind the sensor (center and bottom). As a result, a circle of light (shown in red) is formed on the image sensor instead of a dot. If this circle is small enough, it is still perceived as a point. The largest circle, which is still perceived as a point, is called the scatter spot.
Depth of Field Perception Factors
There are several factors that determine depth of field or how it is perceived:
Aperture
Lens aperture is the easiest way to control depth of field. The rule is very simple: the smaller the aperture (that is, the larger the f-number), the greater the depth of field. For example, f/16 gives more depth of field than f/4.
This is because a smaller aperture allows a narrower beam of light from anywhere on the object to reach the image sensor. This means that even without changing other aspects, the circle of light from the out-of-focus area will be smaller, resulting in that part of the image looking sharper than when shooting wide open.
As a rule of thumb, for portraits where you want to blur the background, you should use an aperture between f/2. 8 and f/8. Use an aperture between f/11 and f/22 for landscapes where everything in the foreground and background should look sharp.
Distance to the subject
The greater the distance between the lens and the subject, the greater the depth of field. This is because the farther you are from the subject, the more perpendicular to the sensor and less divergent the light entering the lens becomes. This means that out-of-focus areas form a smaller circle on the image sensor than when focusing on a closer object.
Closer objects reflect more divergent light towards the lens, which, after passing through the lens elements, forms a relatively large circle on the image sensor.
Anyone who has tried to shoot close-ups will find that the depth of field becomes shallower when shooting close up. At life-size magnification, the subject in the plane of focus will appear sharp, and the point you focus on is critical to successful capture.
Opening the lens aperture creates a large blur (shown in red) in an out-of-focus area of the subject (as shown above). A closed lens aperture creates a small blur from the same area (as shown below).
Shooting a subject from a very close distance results in a very shallow depth of field (as shown at left). To get more of a small subject in focus (as shown on the right), macro photographers shoot at a greater distance or use techniques such as focus stacking to stack multiple images in which different parts of the subject are in focus. These merged images can be created using the focus bracketing feature on cameras that support it, such as EOS R5, EOS R6, EOS RP, EOS 90D, EOS M6 Mark II, PowerShot G5 X Mark II and PowerShot G7 X Mark III. With this feature, the camera takes a series of shots, automatically changing the focus point in very small increments each time to bring different areas of the frame into focus. After working with this feature or manually shooting multiple images, you can use the Depth Compositing tool in Canon Digital Photo Professional (DPP) software to combine component images into a final image with greater depth of field.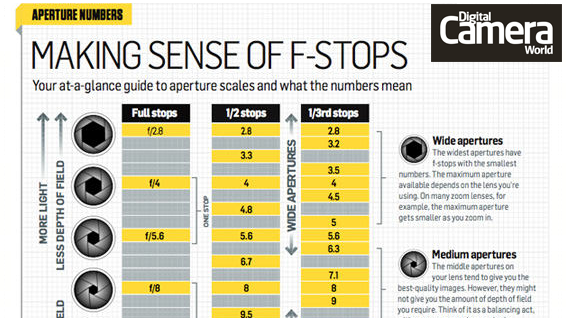
Focal length
Most photographers tend to choose the lens focal length according to the subject or shooting conditions, not the depth of field. However, the accepted rule of thumb is that you get more depth of field when using wide-angle lenses than when using telephoto lenses. In fact, this rule is misleading. In fact, a wide-angle lens has a lower magnification factor than a telephoto lens, resulting in a sharper image.
A simple test is to take two photographs of the same subject from the same position, one with a wide angle lens and the other with a telephoto lens. Then zoom in on the center of the wide-angle image to match the perspective of the telephoto lens. You will see that the depth of field will be the same.
However, depth of field is an acceptable level of clarity, and wide-angle shooting produces sharper images.
Or try to compose the same shot with a wide angle lens and a telephoto lens. When using a wide-angle lens, you need to get closer to your subject to achieve the same framing as when using a telephoto lens - as a result, the depth of field at similar aperture values will be almost the same.
In general, wide-angle lenses are well suited for landscape photography where high definition is required across the frame. A medium telephoto lens (about 100mm or 135mm) is suitable for portraits if the photographer wants to blur the background.
The aperture value has a significant effect on the depth of field. At f/1.8, the subject remains sharp and the background is beautifully blurred. Taken on camera Canon EOS 1300D with lens Canon EF 50mm f/1.8 STM at 50mm, 1/60 sec, f/1.8 and ISO 250.
At f/8, a lot more detail is shown in the background, and our subject doesn't stand out from other objects in the frame. Taken on camera Canon EOS 1300D with lens Canon EF 50mm f/1.8 STM at 50mm, 1/50 sec, f/8, and ISO 3200.
At f/4, our subject still stands out against the background, but there is more detail in the background plan become distinguishable. Taken on camera Canon EOS 1300D with lens Canon EF 50mm f/1.8 STM at 50mm, 1/85 sec, f/4 and ISO 1250.
By the time f/16 is reached, the background is almost as sharp as the main subject. Depth of field captures objects both in the foreground and in the background of the image. Taken on camera Canon EOS 1300D with lens Canon EF 50mm f/1.8 STM at 50mm, 1/12 sec, f/16 and ISO 3200.
Depth of Field Adjustment
As you can see, the definition of depth of field is quite subjective. How can you manage the results obtained with the camera? Here are some options.
Approximate guideline
If you need a large depth of field, choose a large lens aperture (large f-number), such as f/16 or f/22. When using a small aperture, a slow shutter speed may be required for proper exposure, so use a tripod to compensate for camera shake. Also, use a wide-angle lens for maximum effect.
If you need a shallow depth of field, choose a wide aperture (small f-number), such as f/2.8 or f/4, and use a telephoto lens for maximum effect.
If depth of field is not critical to your composition, choose an aperture value around f/5.6, f/8, or f/11. At these settings, the lens usually delivers optimal results.
Basic modes
You might think that using one of the basic modes available on EOS cameras would save you time and trouble. For example, that in the "Landscape" mode, the depth of field will be much greater, and in the "Portrait" mode, the background will be blurred. Unfortunately, it is not. Basic Shooting Modes are beginner-friendly configurations that prevent extreme aperture and shutter speeds from being used to give free rein to the creative process. For relatively easy depth of field control, we recommend working in Aperture Priority (Av) mode.
Depth of field preview and focus peaking
On digital SLR cameras, the image you see in the viewfinder usually corresponds to what the frame looks like at the widest aperture of the selected lens, so you cannot visually judge the depth of field before shooting . However, if the camera is equipped with a depth-of-field preview button, pressing this button will apply the current aperture value to the viewfinder. In this way, you can view the depth of field using the viewfinder, or even track it more accurately on the LCD screen in Live View.
If there is no depth-of-field preview button on the camera, this function can be assigned to the
Hyperfocal
Depth of field extends some distance in front of and behind the focus point. Except when the subject is very close to the lens, the depth behind the subject will cover twice as much as in front of it. This means that when focusing on infinity or the horizon, you will lose some depth of field and not get an image with the maximum area of definition.
Hyperfocal focusing is a technique that allows for the greatest possible depth of field. Your task is to create a frame in such a way that the far edge of the depth of field is equal to infinity (or the most distant object in the scene). The point at which you need to focus in order to achieve this goal is called the hyperfocal distance.
Hyperfocal distance is the near end of the depth of field when focusing at infinity. And with hyperfocal focusing, the depth of field extends from about half the hyperfocal distance to infinity.
You can find depth of field charts on the internet that list the hyperfocal distance for certain lens/camera combinations, but hyperfocal distance is not lens-specific—it varies with aperture and focal length, so the easiest way to determine it is to use a depth of field calculator and hyperfocal distance in the free Canon Photo Companion app. It can be found under Skills -> Calculators. Then set your camera lens to manual focus (the AF/MF switch is located on the side of most Canon lenses) and select the resulting distance using the focus ring.
If you don't have time to calculate, use the basic rule and focus on about 1/3 of the total depth of the scene.
Many landscape images are best suited for foreground-to-horizon clarity. To achieve maximum depth of field, photographers can use a relatively wide-angle position and a relatively closed aperture (large f-number). But there are other factors involved, including the optical performance of the lens, and this f/10 shot looks sharp from the trees in the foreground to the distant coastline in the background. Taken on a Canon EOS RP with a Canon RF 24-240mm F4-6.3 IS USM lens at 83mm, 1/500 sec, f/10 and ISO400.
Diffraction
A smaller aperture provides greater depth of field, but it is important to remember that this also makes the effect of diffraction (bending of light as it passes through the edges of the aperture blades) more noticeable.
You may notice it if you carefully evaluate a series of images taken from the same position but at different apertures. Although shooting at a smaller aperture can help produce sharper images, when viewing photographs, even those taken at a close aperture, you may notice that they are not sharp even at the point of focus. This is due to the fact that when deflected, the light cannot be focused to a point of small size.
Canon's diffraction correction feature can offset some of the effects of diffraction to produce sharper images when the aperture is closed. It is available on some cameras when shooting in JPEG or HEIF, but when shooting in RAW, it can be applied in post-processing with Canon's Digital Photo Professional (DPP) software. Diffraction correction is also part of Canon's DLO digital lens optimization technology on compatible cameras and in DPP.
Written by Angela Nicholson
-
Find out how they affect your images and improve lens performance.

Learn more
-
PHOTO EDITING / POST PROCESSING
Editing RAW images in DPP
Learn how to edit, enhance and enhance your RAW photos in Canon's DPP software.
Learn more
-
ARTICLE
Increasing Depth of Field with Focus Stacking
Three Canon landscape and macro photographers share how to use focus stacking to achieve full image focus.
Find out more
-
CAMERA FEATURES
Viewfinder and LCD screen
Viewfinder or LCD screen? Learn about the differences between DSLR and mirrorless cameras, as well as new information about the optical and electronic viewfinders.
Learn more
-
Mirrorless cameras
EOS RP
Compact, lightweight and easy to use full-frame mirrorless camera designed for travel and everyday shooting.
Read more EOS RP
-
Mirrorless cameras
EOS R6
Whatever you shoot, the EOS R6 lets you unleash your creativity in new ways.

Learn more