White box photography
TOP 10 White Box Sets for Product Photography
When it comes to successful product photography, the right lighting or white box set up is essential. You want to have flawless lighting and a seamless, clear background to make the products truly stand out. There are a variety of white boxes, tents, and sets that can help you achieve your desired look. These are the top 10 white box sets for product photography that are perfect for all types of photographers!
This is a large and versatile white box. It is ideal when you are shooting large products or using a mannequin to shoot different clothing and accessories. What is also valuable about this white box is that live models can also be posed inside the box so you can use real models to showcase the products or you can easily set this up for portraits as well.
This white cube set is portable and easy to store for those who don’t have a lot of space to keep a product set constructed in their studio. It comes equipped with a dimmer to have more control over lighting. The cube can also unfold so you can shoot a variety of different products. Learn more or get yours here.
This box does a fantastic job of eliminating unwanted shadows and glares which can make your products look unattractive. You can use this lightbox with any type of light source and still maintain even and attractive lighting. Check out this white box here.
This all in one white box set some packed with accessories that can help you create extraordinary product images. It features an easy to assemble design that you can take down quickly and carry with you on the go. It also features a triple LED lighting system with dimmer control to give you full control over the lighting. Get yours here.
This desktop white box set is ideal for smaller product images. It allows you to get up close to showcase the details of the product. The manual turntable will allow you to rotate the product so you can capture all sides with ease. Learn more about it here.
The unique design of this white box makes it ideal for products that are small and reflective. The lens fits through an opening in the front panel that helps you capture your products from multiple angles. To learn more check this lightbox out here.
What makes this white box stand out among the others on this list is, it is truly a continuous white background. Unlike the other designs, that fold or collapse this studio photography set up offers a seamless background, you can also bu additional colored background rolls to use. It features a daylight fluorescent light system that provides soft and even lighting on your products. Learn more here.
This lighting tent allows you to softly light your product from all the sides. This is the perfect size to medium-sized products, or use a small stand to place smaller items. The Westcott Photo Basics DigiTent provides you with an easy to assemble and collapse studio product photography set up that will allow you to shoot a number of products without fear of glares or poor lighting.
If you are just beginning in product photography this is a highly affordable and efficient option. This light tent is ideal for smaller products and those that are highly reflective like jewelry, accessories or glass and metal products. You will also be provided with 4 different colored background sweeps to make your products stand out. Learn more about this light tent kit here.
This white box kit comes with a square shooting booth, light stands, and colored backdrops. It offers a simple design that is perfect for beginners but allows those experienced product photographers more freedom, flexibility, and control over their product shoots. Learn about all you can do with this kit here.
Keep Reading
Alzo, booth, box, camera, glow, JTL, led, light, Mystudio, OrangeMonkie, photographer, photography, portable, product, professional, Pyle, sets, Smith Victor, studio, Westcott, white
Share this postDIY Light Box: Improve Your Product Photography
How can you help customers feel confident that they’re buying the right item? Sure, there are reviews, testimonials, and product descriptions. But good product photos are probably the most important part of your online store.
Below, we’ve put together some of the basic techniques that will improve your online store product photography, as well as step-by-step tips to create your own DIY light box and DIY product photos.
Start selling your products online with Jimdo.
Start Now
The basic setup for your product photography
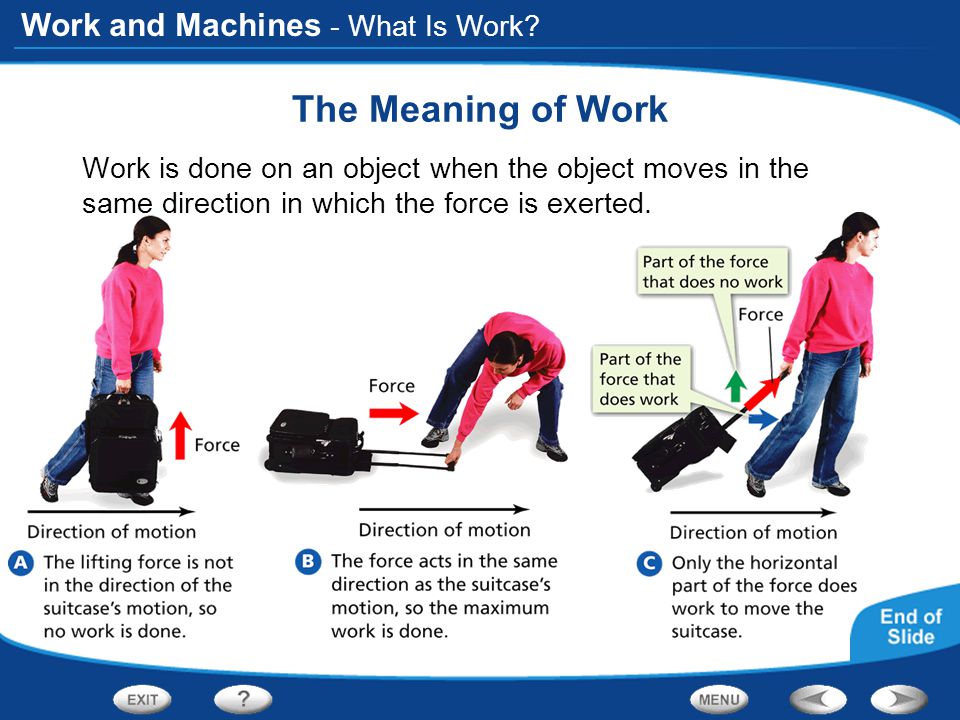
One easy way to make your products look more professional and more desirable is to photograph them inside of a light box.
What is a light box? A photo lightbox (also known as a white box or light tent) is an empty box with translucent white sides and a smooth, white backdrop. Put your product in it, take a picture, and you get a professional product photo with good lighting, no shadows, and a plain background. DIY light boxes are easy to make yourself with a few simple tools.
You could spend anywhere between $20 and $4,000 to purchase a pre-made light box, or you can make one yourself at home for (almost) free! Best of all, you don’t need an expensive digital camera. A light box can improve your product photos even if you’re just using the camera on your mobile phone.
Start selling your products online with Jimdo.
Start Now
This DIY light box cost $3.70 and took 10 minutes to build. The tools you will need are:
- a cardboard box
- packing tape
- a box cutter
- white tissue paper
- white poster board
Step 1: Cut out your cardboard light box
Step 2: Trim the white tissue paper to the same dimensions and tape it to the box.
Step 3: Snip the poster board to the same dimensions and drape for a white background.
Learn how to start your own website today!
Learn More
Just follow these steps to make your own photo light box:
Step 1: Cut out your light boxUse the box cutter to cut the top flaps off of the box. Next, cut out three sides of the box, leaving about a 1-inch border on each side. You don’t have to worry about making this perfect—as you can see, mine is free-handed and a bit messy.
Cut the tissue paper to the approximate size of the sides of the box (leaving edges that can be taped down). Then tape the tissue paper to the outside of the box, covering each hole. The tissue paper will act as a light diffuser, softening the incoming light and removing harsh shadows.
Step 2: Trim and tape the tissue paper to the box.Step 3: Drape the poster board for a white backgroundCut the poster board to the width of the box. Make sure the poster board is long enough so that it extends out of the box. Tape the top of the poster board to the top of the back of the box, then let it drape down and out of the box to create an “infinity” white background without corners. You can tape the bottom of the poster board to the bottom of the box so it doesn’t curl upwards.
You light box is done!
Now you can place your products inside the light box and take some photos. Put the light box in a naturally well-lit area, like near a bright window. Or place a desk lamp above the light box if you don’t have enough natural light. For this example, we found a corner of our office with lots of natural light, so we didn’t use any additional lighting.
Making your own light box for product photography takes just a few minutes.How to take product photos with a DIY lightbox
- Natural light is always preferable to artificial light. Unless you want to add dramatic shadows, in which case you can simply angle a lamp to shine towards the left or right side of your light box.
- Make sure that you turn off your camera’s flash.
- Get close. Using a light box and a close-up photo is a great way to showcase the details of your product without any distracting backgrounds.

- Photograph your product from different angles so your customers know exactly what they’re getting.
More product photo set up tips for online stores
Here are more ideas for taking your own product pictures and getting the right set up.
Lighting:
The top priority is a product that’s easy to see, and that’s why the photo lightbox is such a great tool. But that doesn’t mean that you have to illuminate your product in a boring and sterile way. But you can also play with light and shadow—especially if more dynamic lighting goes well with your product.
Some products photos look great with more dramatic shadows, like this example from Candice de Rijcke JewelryWhite balance:
Our eyes naturally adjust the white balance when we look at something—white appears white, not blue or orange. But cameras have more trouble. If you take a picture of a product, the color might look “off”, just like snow in a photo sometimes looks blue or an object by candlelight looks orange. By adjusting the white balance on your camera, you can fix this and make your product photos look more true-to-life.
Depth of field:
When you see a photo with a sharp foreground and a blurred background, you’re seeing an image with a “shallow” depth of field. When a larger area of a photo is in focus, that’s a “longer” depth of field. A shallow depth of field puts the focus on the close-up details of your product, while the background fades out. This makes the product details stand out.
A shallow depth of field put the focus on the details and lets the background fade away, like in this example from Glasstudio Schmidsfelden.Getting creative with product photo backgrounds:
The photo lightbox is a great tool for improving your product photography, but it doesn’t have to be the only kind of product photo you take.
Customers also like seeing a product in its natural environment. This gives them a feel for how they can use the item in their own home, making them more likely to purchase it. So make sure to throw in a photo of the product nestled into an attractive background.
You can also use backgrounds and compositions to show a certain mood or atmosphere for your product.
Make sure to include a photo of the product in a real-life background, too.Photograph from multiple perspectives:
Take pictures from different perspectives in order to depict your product as comprehensively as possible. Think about what could be important for your customers: Are there important details that your viewers should absolutely see? Then treat them to a close-up. Can you show a person using the product in action? Does scale matter? Then place your product next to an everyday object so that your customers can better judge how big it is.
These details are also something to mention when you write better product descriptions.
Choose a high resolution for your product pictures:
When it comes to resolution for product photos, we recommend shooting at the highest quality you can.![]() It’s always possible to reduce the resolution of an image after the fact. But increasing the resolution never works, and the results will be pixelated and grainy. Here’s more on optimizing your website images.
It’s always possible to reduce the resolution of an image after the fact. But increasing the resolution never works, and the results will be pixelated and grainy. Here’s more on optimizing your website images.
Can you take good product pictures with a smartphone?
Yes, taking professional product photos with your smartphone is absolutely possible. Many smartphone cameras are so good these days that they can easily compete with more expensive digital SLR cameras, especially if you are a beginner. Keep in mind the following tips:
- Color temperature and white balance: On a smartphone, you can adjust the color temperature after the fact in a free photo editing program or use a third-party camera app. Some smartphones offer a kind of “Pro mode” that let you adjust certain settings manually, or choose from various specifications like “daylight” or “artificial light.”
- Depth of field: Creating a shallow depth of field is harder on a smartphone, but possible.
 You can try using an external lens, or use a photo app that can create the effect of a blurred background.
 - Resolution: If you take photos with your smartphone, you should always take photos with the aspect ratio that offers you the highest resolution. That way enlarging, cropping and other photo effects will still be possible afterwards.
Learn how to start your own website today!
Learn More
Product photography FAQ
What do you need for product photography?
Nowadays, you don’t need professional equipment in order to take great product photos. All you need is a camera or a smartphone with a decent camera. For lighting, just use natural light (e.g. from a window), or use photo lamps in combination with a soft box. You can often rent these quite cheaply. Use a seamless backdrop for a neutral background.
What should you watch out for in product photography?
Always make sure your product is clearly visible. It should be central in the photo, well lit, and sharply in focus. Of course, you can still be creative with your photos and play around with light and depth of field, but your product should always be the centre of attention.
Which lighting is best for product photography?
In most cases, natural light works best. If you have a big window, for example, position your product so that the daylight falls on it from one side. This gives you soft lighting. Photo lamps combined with a soft box also work well. Whatever you do, don’t put your flash on. That never looks good.
What’s a product image?
A product image is a photo in which your product is the centre of attention. It doesn’t matter whether only the product itself is shown or whether it’s shown in action alongside other objects or people. What’s important is that the product is always presented well, and that it impresses your customers. They should instantly know what the purpose of your product is, whether it appeals to them visually, and whether they’d consider purchasing it.
How does a light box work?
A light box evenly distributes light so that your product photography has soft lighting. A seamless backdrop made of white poster board creates a neutral background, while the light falls through the white tissue paper or fabric sides. If you photograph the object from the front (without flash!), you’ll get a neutrally lit product image.
What do I need for a photo box?
To set up your own photo or light box, all you need is: an old cardboard box, sellotape, a box cutter, white tissue paper, and a large white poster board. First, use the box cutter to cut out three sides of the cardboard box, and cover the openings with tissue paper. Then insert the white poster board as a seamless backdrop. That’s it!
White Photo Box Posing Cube
White Photo Box Posing Cube
White Photo Box Posing Cube is one of the most familiar and popular photography subjects. This white box photo posing cube has a long history. Since the beginning of photography, this object has been seen all over the world. This white posing cube is used in all photo studios. But most of all people use these objects in the field of modeling. Male and female models depict their poses with this white box cube.
Philippines Photo Editor is a trusted name when it comes to any photo editing job. We create amazing and amazing photos and we have been doing it for ages. All of our photo editing services are top class, so we suggest you check out our services. You can send us your photo of a cube in a white box.
us any type of photo to edit and we are going to fix the image in the best possible way.
Previously, photography with different subjects was not so well known because people did not know about this concept. But nowadays everyone sees the importance of using objects in photography. Therefore, people, especially professional photographers, use different subjects for shooting. If you look at the same photo of a white box with cubes and no objects, you will see the difference. Here in the photography or modeling industry, people look at every object with different eyes. Thus, not only a photo of a white box with posing cubes, but any other posing object has a different meaning in the photography industry. Buy our Jewelery Photo Retouching Services
Now you can ask how Philippines Photo Editor
is going to help with that. Just because we're not in the fashion industry doesn't mean we don't work with models. We are one of the most famous photo editing website that has been providing image editing services for many years. So, with a white box photo, posing cubes, or any posing object, we can provide you with the best image to edit. For more information, you can take a look at our website where you can find all of our services in one place.