Aperture for low light
The Best Camera Settings For Low Light Photography
The amazing thing about your camera is that it can literally see in the dark. Your camera can capture things in low light situations that you wouldn’t think were possible. When you find yourself shooting in a dimly lit situation, that doesn’t mean it’s time to pack up the camera. It means that it’s time to take a new approach to your camera settings! With the right settings for low light photography, you’ll be able to capture beautiful photos no matter how dark your scene is.
The Best Camera Settings For Low Light Photography Are:
- Mode: Manual
- Shutter: 1″ – 1/60
- ISO: 1200 – 1800
- Aperture: F/2.8 or wider
- Focus: Manual Focus (MF)
- White Balance: AWB
- Drive Mode: Single Shot
- Image Type: RAW
- Tripod: Yes
Now let’s break down the reasoning behind these camera settings to help you get better exposed photos in low light conditions.
What Is Considered As “Low Light” Photography?
Low light photography is considered as any type of situation that has a lack of available light. This could be while outside right after sunset or in a room with only one light source. Low light environments are where you can see a small amount of detail with your eyes, but aren’t yet completely dark.
Whatever the situation, low light photography offers a unique set of challenges with camera settings. This style of photography often requires a wider aperture, a slower shutter speed, and a higher ISO setting.
Since you need to let exponentially more light into the camera compared to mid-day, it can be tricky to get the settings you want. Especially when taking pictures of movement, getting a fast enough shutter speed is difficult. To help your camera out, you need to alter your settings to let as much light in as possible. For example, if you needed a faster shutter speed, you could compensate by increasing your ISO and opening the aperture.
Although more challenging, the types of photos you can capture in low light are always worth the effort. There’s a totally different feel to low light photos that you can’t capture in any other lighting conditions. With a solid understanding of the right camera settings to use, you’ll never be limited by the times of day you can shoot!
Breaking Down The Best Camera Settings For Low Light Photography
If you’re a beginner photographer, your first reaction when shooting in low light might be to use a flash. Whether that be the one built into your camera or an external flash, it seems like a reasonable option to brighten your scene. The problem with a flash is that it can wash out and completely change the look of your photos. To make things look as natural as possible, you can use the right camera settings and never need to rely on a flash again! Let’s break down each of your three exposure settings and how they play a role in low light photos.
Best Aperture (F-stop)
The aperture is one of the most important exposure settings for low light photography. Since it only changes the depth of field, it’s ideal to use your aperture as your main attack against low light conditions. Unlike ISO, which increases noise and shutter speed, which can produce motion blur, your apertures effects aren’t as detrimental. That’s why it’s the first exposure setting to adjust when shooting in low light.
Although I’ve talked about this setting extensively in my guide to aperture settings, let’s go over a bit of a review. The aperture is a small donut-shaped hole inside your lens that becomes wider or smaller, depending on your f-stop (aperture) setting. As the aperture changes diameter, it also affects how much of your photo can be in focus at once. This is known as depth of field. With a wide-open aperture, you will get a shallow depth of field that will limit how much is in focus. When you want to blur your photo’s background, this is the easiest way to do it.
For low light photography, the wider the aperture, the better. After all, it’s creating more space for light to pass through your lens. Although every lens will have a different aperture range, an optimal aperture to use in low light is F/2.8. With this wide of an aperture, you can let in twice the amount of light compared to F/5.6. Whether you’re shooting a dimly lit scene or in complete darkness, F/2.8 will get the job done for you.
Now it’s important to note that F/2.8 is a very wide aperture, which, in turn, means there’s a shallow depth of field. When you’re shooting in low light conditions, you don’t always have the luxury of having the perfect depth of field for your photo. Since you need to brighten your exposure by any means necessary, this is your best option to do it. Luckily, if you’re shooting a wide-angle shot, you likely won’t notice much of a difference in the focus.
– Is F/2.8 Fast Enough For Low Light Photography?
Although there are many lenses much faster than F/2.8, it’s still perfectly suitable for low light photography. With the help of a higher ISO and a slightly slower shutter speed, you can still capture plenty of fantastic low light images at F/2. 8.
8.
To give you some examples, my main lens is the Canon 24-70mm F/2.8. I’ve used this lens in countless low light scenarios and never had a problem with aperture. Below are a couple images I’ve taken at F/2.8 in a variety of situations.
Although having the extra few stops of light with F/1.8 or F/1.4 is nice, it’s not totally necessary. You can still capture fantastic low light photos with F/2.8.
Best ISO Setting
The next setting you have to combat low light is your ISO setting. In a nutshell, this setting increases your sensor’s sensitivity to incoming light. With more sensitivity comes a bright photo.
At first glance, ISO seems like the best camera setting ever created. Unfortunately, there is a crucial drawback that should make you think twice before cranking your ISO. This drawback comes in the form of grain.
Looking closely at this image, you can see the heavy amounts of grain from a high ISO.Grain looks like static that’s built into your photo. It can look distracting and make small details harder to differentiate. As you increase your ISO setting, the grain will become more and more noticeable. That’s why you don’t want to just max out your ISO setting and call it a day while shooting in low light. There’s a little more thought required than that.
For most situations, I find using an ISO between 1200 and 1800 is suitable for many low light situations. On most cameras, the grain levels at this range are still acceptable and don’t distract from your image too much. However, depending on your camera, you may be able to use much higher ISO ranges than this without worry. My suggestion is to be used as more of a broad suggestion for any level of a photographer with any camera.
If you’re ever curious about how much grain your particular camera captures at varying ISO ranges, take a series of photos with your lens cap on. As you increase the ISO, you’ll start to see more and more grain until it eventually discolors the black of your photo.
– How To Shoot In Low Light Without Grain
If grain is a big worry of yours, you can use a wider aperture and a slow shutter speed to compensate for a lower ISO. Although you may have a harder time freezing motion, it’s a worthwhile option if your subject stays still.
Especially in extremely low-light situations or even night time, it’s not uncommon to encounter a bit of grain at the very least. It’s not the end of the world, and it won’t ruin your photo in small amounts. If you feel concerned about the amount of grain in a certain photo, you can always use noise reduction in Lightroom or Photoshop!
Best Shutter Speed For Low Light
Finally comes the shutter speed. As I talked about in my shutter speed for beginners post, shutter speed controls how motion is captured. Since it is in charge of how long your sensor is exposed to light, it also will determine whether an object is blurred or frozen in motion.
For example, if you were to photograph a speeding car with a slow shutter speed of 1″ (second), it would appear blurry. Since the car moved positions during the time your shutter was open, the car creates a streak in the photo.
If you took the same situation and used a faster shutter speed such as 1/2000, the car would be frozen in time with all its details perfectly sharp. This is because your sensor was exposed to light for a shorter period of time, giving less time for the object to move across the frame.
Now when you’re shooting in low light, you’re never going to be able to use a shutter speed of 1/2000. Since the shutter would open and close within 1/2000 of a second, there needs to be a lot of light to properly expose the photo. In low light, there’s an insufficient amount of light, which means your camera needs more time for light to hit the sensor.
That’s why a good shutter speed setting to start with should be between 1″ and 1/60. Although a relatively broad range, this gives you the option to get a good exposure even in low light environments. The shutter speed you choose will all depend on what you’re trying to photograph.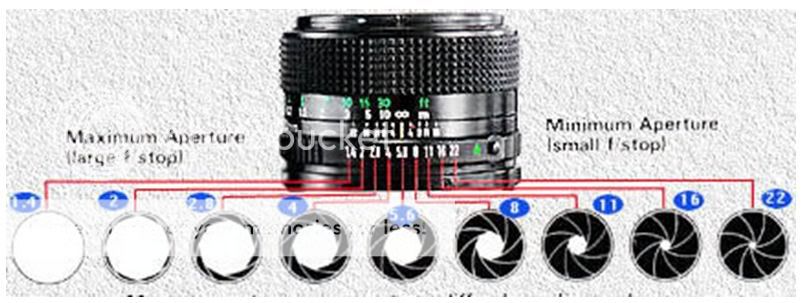
If your subject is moving, you’ll need to use a faster shutter speed. If your subject is still, like a mountain, for example, then it doesn’t matter how long your shutter is open for. Since the subject never moves, you could use a shutter as slow as 30″ without a problem.
Why Shoot In Raw?
Without question, RAW is the best image file type to use in low light photography. Since you’ll have extremely dark shadows, shooting in RAW gives you the flexibility to adjust things later in post.
A RAW file has far more dynamic range than a JPEG file, which helps it hold more color and exposure information. While working in your editing software of choice, you can push a RAW file much further without losing quality. From exposure adjustments, contrast, or color, you can completely transform a RAW file, and it will still look as crisp as it did in-camera.
Since you can push these files so much further with photo editing, it’s the best choice in low light. Odds are that your exposure will look a little bit dark while shooting in low light environments. However, after using a few basic image adjustments, you can correct your exposure with ease. Although it shouldn’t be relied on to “fix” your photo, it can definitely help solve any problem areas that appear too dark.
If you’re using a JPEG file for low light photography, you can still capture reasonable images, but you won’t have the ability to edit them as much. Since a JPEG file is more compressed with less information, a photo editing software won’t be able to nicely lift your shadows.
If you’re new to using RAW files, it’s important to note that this file type will need to be converted to JPEG before you can share it anywhere. Most websites and social media platforms don’t recognize RAW files as a valid format, which is why everything needs to get converted. Even though that sounds complicated, this is just a part of the photo editing process. Luckily it can be done in seconds no matter what kind of editing software you use.
Check out my guides on how to edit photos in Lightroom or Photoshop to get started!
Do You Need A Tripod For Low Light Photography?
Whenever you’re taking pictures in low light, having a tripod is going to be very helpful. Even though it’s not always necessary, it’s worth having with you just in case. Since you’ll be using slower shutter speeds, it’s possible that you start to use a shutter speed that too slow to use while shooting handheld. Believe it or not, no matter how still you think you’re being, the small micro-movements of your hands can translate into blurry photos. To prevent this, a tripod will keep your camera perfectly still.
As a general rule of thumb, any shutter speed slower than 1/60 will require a tripod. That means if you use a shutter speed like 1/5, you’ll need a tripod to capture a sharp photo. With the ability to keep your camera perfectly still, using a tripod makes shooting in low light incredibly easy. Rather than fussing around with your camera settings so that you can shoot handheld, just using a tripod and set any shutter speed you want. Whether it be 1/5 or 4 minutes, you’ll still get a crisp, well-exposed photo!
If you have yet to get a tripod, I share a list of my top picks on my recommended gear page!
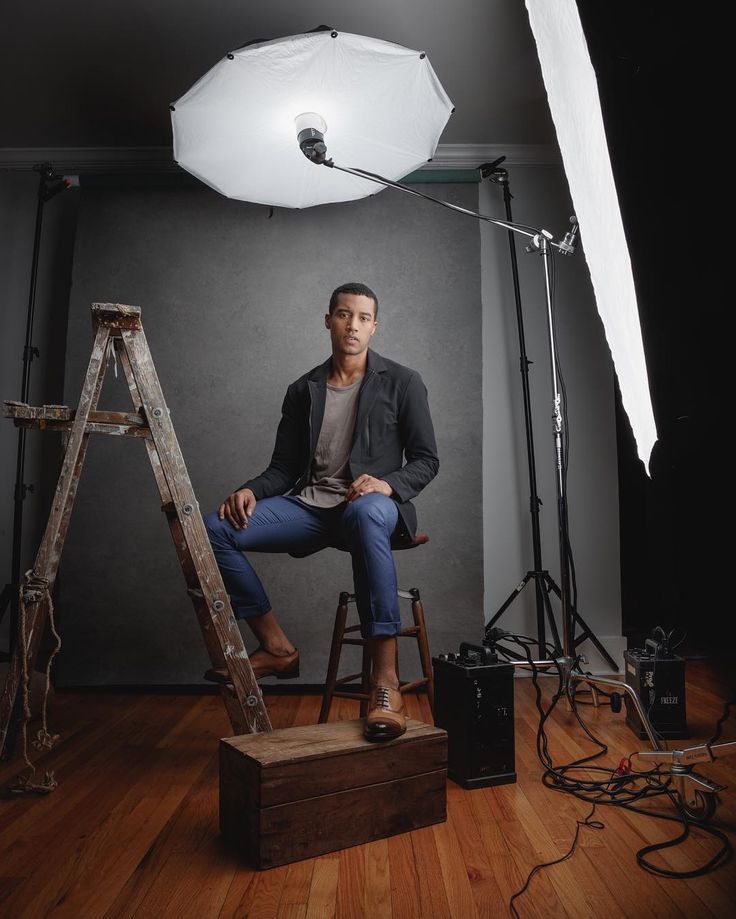
How To Take Low Light Photos Without A Flash
Especially when you’re taking pictures of people, it can be hard to illuminate them well in a low light setting. That’s why many photographers will opt for a flash, but it’s not always necessary. By using a few simple techniques, you can better light your subjects with totally natural lighting!
– Place Your Subject Near A Light Source
One of the biggest challenges of low light photography is portraits. Since there’s already a severe lack of light, it makes it that much harder to illuminate your subject’s face. Luckily you can work around this in most situations by placing them near a light source. The light source could be anything from a street light, car headlights, a phone screen, or whatever else you can think of. By better orienting your subject towards a light, you can work with the small amount of light available to make them easier to see.
The advantage of using a natural light source is that you can use faster shutter speeds while shooting. Rather than struggling to see enough detail in your subject, the extra light helps to brighten things up. No fancy camera setting adjustments necessary!
With that said, you might be in a situation where there isn’t any available light nearby. For example, if you were on a hike and the sun had just finished setting. Even during blue hour (the time after sunset), there’s a fair amount of light left on the horizon. By making your subject face towards the brighter part of the sky, it will help to cast a little more light on their face. This is a simple trick you can use to help your exposure without the need for a flash.
– Adjust Your Camera Settings To Brighten The Exposure
If you’re not photographing people, then the shutter speed you use isn’t as important of a consideration. For this example, let’s say you want to take a picture of a mountain at dusk or the interior of a poorly lit room. In both these scenarios, the subject isn’t moving. Nothing in your frame will suddenly get up and leave. So there’s no reason why you can’t just use a slower shutter speed to allow more light into your camera! Rather than using a flash to try to illuminate parts of your scene, brightening your exposure will work equally well.
The same thing goes with any type of photos you’re shooting in low light. Rather than using a flash, there are often ways you can adjust your camera settings to brighten the photo. Whether it be slowing your shutter, opening the aperture, or increasing the ISO, you have plenty of options.
Unless you’re in complete darkness, consider how you can alter your camera settings rather than breaking out the flash.
– Use A Headlamp
The final option is to use a headlamp. Although this method only really applies to outdoor photos, it’s still worth considering. Let’s first talk about how you can use a headlamp to illuminate your scene.
When you’re using a slow shutter speed, very shadowed areas can remain completely dark. No matter what camera settings you change, these parts of your photo will still look dark. Using a headlamp, you can briefly shine a light on these dark areas to illuminate more of your frame. This works great to help improve how much detail you can see in darker areas, without the harsh hard-light of a flash.
Alternatively, when you’re photographing people, they can wear a headlamp to help shine a light on their bodies. This will only really make sense when shooting hiking photography, but it’s an easy trick that I love using. By wearing the headlamp, it helps to illuminate their face while reflecting light that will illuminate their whole bodies. In the above example, the climber would be pretty hard to see without the light reflecting on the rock. By creating some extra ambient light, you no longer require a flash!
How To Take Sharp Photos In Low Light Conditions
With all your camera settings sorted out, we can’t forget about one of the most important parts of any photo: focus. Without a sharp photo, it’s not going to matter how perfect your camera settings are. Since autofocus doesn’t work very well in low light, it’s best to switch over to manual focus (MF). Now that you’re in charge of making the photo sharp, what’s the best way to do this? Just use this easy 3 step formula for setting focus in low light!
Step 1: Go Into Live View And Digitally Zoom In
The best way to set focus is by using Live View and zooming into the image on your LCD. If you’re unfamiliar, Live View is the mode that lets you see a real-time display of what your camera sees via the LCD screen. In this mode, you can magnify the image to better see certain parts of your frame.
Step 2: Find A Bright Light Source In Your Frame
While in Live View, find and zoom into any light source in your frame. This should be anything that you can see clearly enough to get focus on. Ideally, this will be some kind of light that sits nearby your subject. That way, your focus will be set properly for your photo.
If there aren’t any light sources to zoom into, try using the flashlight on your phone to light up parts of your scene. This will help to show more details that you can use for focus points.
Step 3: Manually Set Your Focus To The Bright Area
With a light source or from the help of a flashlight, adjust your focus ring until the area looks sharp on your camera screen. Once this is done, zoom out of Live View and begin taking photos! After taking a few shots, it’s a good idea to double-check the photos to see if they are actually sharp. Sometimes your focus can be just slightly off the first time. Luckily it’s an easy fix if you catch it early in your shoot!
Low Light Photography Ideas
Your camera settings are set, your photos are in focus, and now it’s time to start taking amazing low light pictures!
But wait, there’s a problem… what is there to take pictures of? Here are a few easy (and fun) ideas to practice your low light photography with.
1. Light Painting
Light painting is created by using a slow shutter speed while moving a light through your frame. With a glow stick or a flashlight, you can move around your frame to create different shapes or even text with the light. Since this effect requires a slow shutter speed, a low light environment is perfect for this. Just make sure to use a longer shutter speed to give yourself more time to paint!
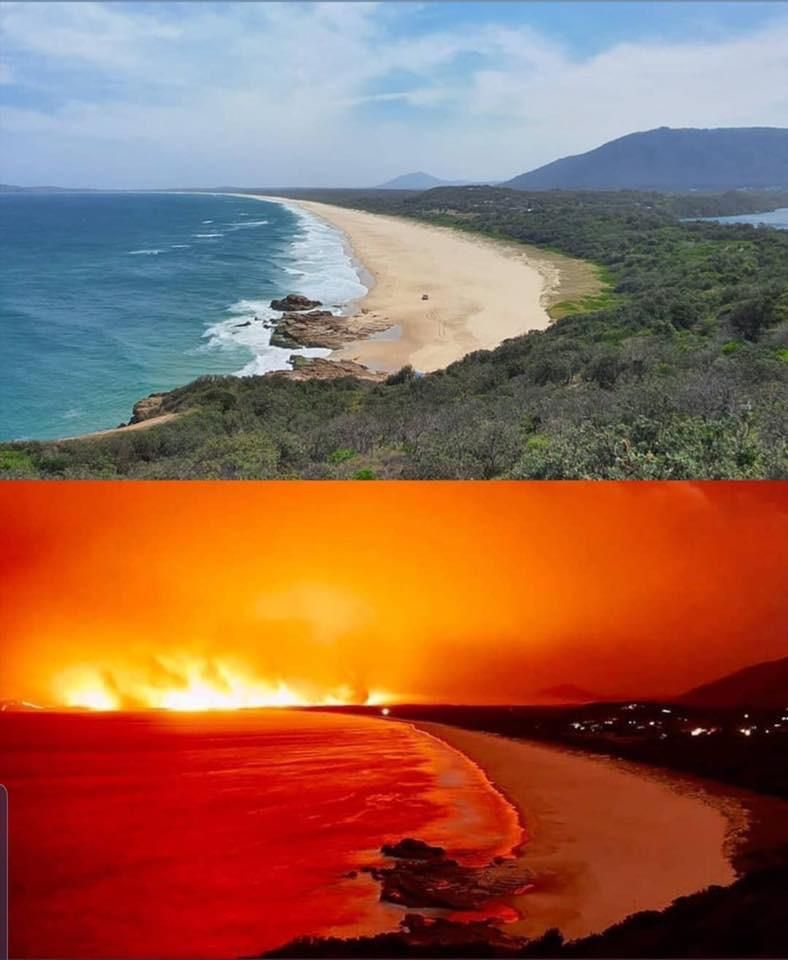
2. Fireside Portraits
One of my favorite low light photography ideas is fireside portraits. There’s nothing that beats the warm glow of a fire in portraits. It creates a feeling to your photo that’s hard to replicate in any other way. Next time you have a fire with friends, break out your camera and start snapping some great low light portraits!
3. Lantern Photos
Lantern photos are another fun idea that work well as portrait styled images or just of the lanterns themselves! Since they create such a widespread glow, they work as the perfect light source to include in your low light photos. You can find a lot of these kinds of lanterns at a local antique shop or used online. They’re definitely a fun prop to experiment within your photos.
4. Traffic Trails
If you live near a city, traffic trails are another fun, low light photography activity to try your hand at. With the help of a slow shutter speed, you can blur the headlights of passing cars into continuous streaks of light. This looks great with landscape or cityscape photos!
Learn More: Best Camera Settings For Traffic Trail Photography
5.
 Capture Bokeh
Since you’re already using a wide aperture, try to capture some bokeh! Bokeh is the light orbs created by out of focus lights sources. This looks exceptionally nice in portrait photos and adds a unique look to any background.
With a solid understanding of the best camera settings for low light photography, all that’s left is to get out there and shoot! With more practice shooting in low light, it will become easier to nail your exposure in every shot. Above all else, always try new things and see what happens. That’s the fastest way to learn and is a surefire way to improve your low light photography.
Happy Shooting!
Brendan 🙂
Take Great Pictures Without a Flash – Posterjack
It’s not always desirable to use a camera’s built-in flash, as doing so can create images that appear flat, unnatural, overexposed, and contain harsh and unwanted shadows. With that being said, photographing in low light situations without a flash can be a challenge if you don’t know what you’re doing and can result in photos that are too dark, blurry, or grainy. Lucky for you, there are several things you can do in order to get excellent shots in low light situations without the need for your camera’s flash.
Adjusting the ISO on your digital camera will determine how sensitive your camera’s image sensor is to light. For example, if you increase the ISO to 400 or 800, you will allow more light to reach the camera’s sensor than if the settings were at ISO 100 or 200. So then, why not have higher ISO settings all the time? A lower ISO will produce sharper images, and the higher the ISO, the more image noise (grain) will be present. For low light photography, try setting your ISO to 800 and adjust accordingly.
If you end up capturing a photo you love but it includes a lot of image noise, all is not lost! Try printing it on a product that has a unique and artistic feel to it, like a Wood Print or a Classic Silver Metal Print. Because your photo is printed directly onto the wood or brushed aluminum, the raw material your photo is printed on will show through in areas where the image includes white or low saturation, helping to soften the imperfections in the photo.
Related: How to Print Low Resolution Photos and Get Results You Love!
2. Use Slower Shutter SpeedsA longer exposure time will allow more light in. However, in order to get a crisp, clear photo in low light using a slow shutter speed and no flash, it is crucial you keep your camera as still as possible. Any sort of movement will result in blurry images, so be sure to follow tip #4 if you plan to use slower shutter speeds.
3. Adjust the ApertureWhile ISO determines the speed of which light reaches your camera’s image sensor, the aperture determines how much light it allows in – because if this, a wide aperture (small f-stop number) can also help you capture decent low light photographs without the use of a flash.
4. Reduce Camera ShakeWhen dealing with slow shutter speeds, in order to get sharp photos in low light situations, it is imperative to eliminate camera shake entirely. You can do this by using a tripod and either setting your camera’s timer or using a shutter release cable. You can also eliminate camera shake by using your camera’s built-in stabilization features. Depending on your camera, this option may be found on the camera body or the camera lens. What brand of camera you use will also determine what the image stabilization features are called: Nikon is Vibration Reduction (VR), Canon is Image Stabilization (IS), Sony is SteadyShot INSIDE, and so on.
Low light photography doesn’t mean no light photography. To get as sharp of an image as possible without the use of a flash, try to incorporate as much light as you can. If your subject isn’t stationary, position it near the light source or, if possible, move the light towards your subject. Do not, however, position the light behind your subject if it’s the only source of light unless your goal is to create a silhouette.
6. Use a Faster Lens
If you’re shooting with a DSLR camera and are considering purchasing a new lens to help accommodate your low light photography, you’ll want to buy a fast lens. A fast lens is that which has a wide aperture—typically f/1.4, f/1.8, or f/2.8—and is great for low light photography because it enables the camera to take in more light. A wider aperture also allows for a faster shutter speed, resulting in minimal camera shake and sharper images.
7. Adjust the White Balance
Shooting in low light conditions can result in your photographs looking washed out, or lacking in detail and colour. By customizing your digital camera’s white balance, you’re essentially telling your camera what white should look like in your image, so the camera can adjust accordingly to try to capture colours as accurately as possible. To prevent your images from having a yellow, orange, or blue shade to them, adjust the white balance to coordinate with the type of light you’re using.
8. Shoot in B&W
If you want to get great low light images without a flash but you really don’t feel like messing around with your camera’s white balance, you can capture your photos in black and white, which will do away with poor colour issues all together.
9. Shoot in RAW
Of course, shooting in RAW will create higher quality, sharper images than shooting in JPEG format, so if you can shoot in RAW, do it. Also, you’ll have more post-processing options if you shoot in RAW.
Related: The Ultimate Guide to Photo Enlargements
10. Post-ProcessingUsing photo editing software can help enhance your low light photography, but don’t expect miracles. You can post-process your images to reduce image noise caused from shooting with a high ISO, to convert to B&W, to adjust the contrast, brightness, shadows, highlights, sharpness, etc. Just keep in mind that if it’s a bad photo to begin with, you’re not going to be able to edit it to be something amazing.
11. Experiment and PractiseUnless you’re some sort of prodigy, you’re not likely to master low light photography immediately. Like anything, to become great at something, you need to experiment and practise. Start by shooting non-moving subjects (to reduce your chances of getting blurry images) and take all of the photography tips listed above into consideration. If something doesn’t work for you, try again with different camera settings. With a lot of practise and experimenting, you should become fairly comfortable shooting low light photos and will have crisp, clear shots—without the use of a flash—in no time.
Let’s See Your Low-Light Photos!
We would love to see how you’re working your low-light photography skills. Feel free to share your photos with us on Facebook or Instagram! If you’ve already turned your photos into Posterjack art, sharing your photos can win you $150 in free prints every month!
Still trying to decide how you’d like to print your photo? You can see a summary of all our photo art product here, or check out some of the following blog post to help make your decision.
- Matte vs. Glossy: Deciding Which is Best for Your Pictures
- HD Metal Prints vs.
 Canvas Prints
 - Metal Prints vs. Acrylic Prints
- What is An Acrylic Print
- 7 Creative Ways to Include Canvas Prints in Your Decor
- Better Than Vinyl: Personalized Your Space With Peel & Stick Prints
As always, we’re more than happy to answer any questions you have. Please feel free to get in touch with our amazing support team!
7 tricks for the correct setting of the aperture of the camera | Articles | Photo, video, optics
Photo: pixabay.com
Aperture is a dark horse for beginners in photography. Many of them get confused in the values and do not understand what specifically changes because of them (“f / 1.4 or f / 5.6 - what's the difference??”). In this article, we'll explain, without getting too technical, how aperture works, as well as a few interesting uses for it.
What is the diaphragm: in simple words about the complex
To make it easier to navigate when setting the parameter, it is enough to know about the technical device of the diaphragm that this is a hole in the lens that transmits light to the matrix. The diaphragm works like the human eye: when we look at something in the dark, our pupils dilate, while in the light they constrict.
The aperture in a lens is almost like its pupil, which can be manually adjusted to suit the situation. The values of this parameter are capable of introducing a novice photographer into a stupor, since the lower the number, the wider the hole is open. nine0003
The finest “petals” are responsible for changing the size of the diaphragm, which move and form a multifaceted hole for transmitting light to the matrix. Photo: adobe.com
For example, f/1.4 is much larger than f/8. This is a little inconvenient, but there is one elementary explanation that will make the indicator more understandable. Imagine, for example, that f/10 is a fraction of something whole (like 1/10). It turns out that at f / 10 the aperture in the lens will be smaller than at f / 2 (after all, 1/10 of the circle is much smaller than 1/2). nine0003
We figured out the aperture values, so we can proceed to the methods of using it in practice.
1. Exposure, shutter speed and aperture - how to set it
Adjusting the aperture changes the exposure. The wider the petals of the lens are moved apart, the more the light-transmitting hole in it is open and the more the matrix will be exposed. As a result, we get a brighter frame. Try it out by taking a series of shots of the same subject under identical lighting, changing only the aperture (shutter speed and ISO sensitivity). In this case, you will see how brighter photos are obtained with smaller apertures. nine0003
Accordingly, the wider the aperture is opened, the slower the shutter speed must be to achieve the correct exposure. It is also necessary to select the sensitivity (ISO value), although for inexpensive lenses there is always a rule: the lower it is, the less grain and noise in the picture. It is better not to set the ISO above 200-400 units. With professional lenses, you can work at higher values without noticeable deterioration in quality.
Thus, the exposure is controlled by the aperture, although this is not its main purpose. The main property of the aperture is to change the depth of field, or DOF. nine0003
2. DOF and camera lens aperture - how to achieve the desired blur
Depth of field (DOF) determines the areas of sharpness and blur from the foreground to the background. Have you seen portraits where the background is completely blurred? All of them were shot with a shallow depth of field (or processed in a graphics editor, but that's another story). When both the foreground and the background are clearly visible in the picture, it means that the photo was taken with a high depth of field.
To achieve bokeh, where the main subject is sharp and the background is out of focus, open the aperture as wide as the lens can. This is especially appropriate for portrait photography, when you need to “blur” the entire environment and focus on the main character. nine0003
The background blur effect is suitable not only for portraits, but also for product photography. Photo: stuckinplastic.com
But there are also reverse situations when a small aperture is required (remember, these are high values). For example, it is necessary when shooting architectural objects or landscapes. We will talk about this further.
3. Aperture value in the camera when shooting moving objects
By changing the aperture, you can "freeze" or "blur" the movement, depending on the situation and the idea of the picture. A hole in the lens opens - more light enters the matrix. As a result, the camera, in order to maintain the previous exposure, shortens the shutter speed. This makes it possible to photograph fast-moving objects with maximum detail. This technique creates an interesting effect, as if moving objects in the camera are static. Although it is not always appropriate, as it is not able to emphasize the dynamics. nine0003
There is also a reverse situation, when you need to "blur" the movement. In this case, you can use the technique of shooting an object with panning: you focus on an object and follow the camera in the direction of movement, and then take a picture. With proper skill, very dynamic shots are obtained: the main object is sharp, and the surrounding background is blurred. In this case, the aperture must be closed in order for the shutter speed to increase.
4. Opening the Aperture in a Camera in Low Light
When shooting in low light conditions, the ability to open the aperture wide can be very useful. For example, if you are photographing actors during a performance in a theater or shooting indoors with insufficient lighting, you will need to set the aperture lower. nine0003
Fast lenses from f/2.8 and below are suitable for such situations. They literally help the camera to see in the dark almost better than the human eye. With budget photography equipment, this effect cannot be achieved. For example, the aperture of a Nikon or Canon camera in kit lenses does not drop below f / 3.5, so it is more difficult to shoot in dark conditions with them than with high-aperture fixes.
Most kit lenses have an aperture range of f/3.5 to f/5.6. This is always indicated by appropriate markings. Photo: wikimedia.org
5. How to set the best aperture and shutter speed for family reporting or shooting children
If you are a beginner and you are faced with the task of photographing active children, you can give the aperture setting to automatic. The fact is that when moving objects in the frame, shutter speed plays a more important role. Set it so that the image of running children is not blurred in the picture (average value is from 1/125 to 1/500 s).
If you still want to control the aperture manually, get a depth of field deep enough to fit all the characters in it first. Experience is important here: for example, it will be difficult for a beginner to shoot active children with a prime lens with an aperture of f / 1. 4 or f / 1.8. But an inexpensive whale lens is much better for this: its depth of field will be quite enough (its aperture ranges from f / 3.5 to f / 5.6). nine0003
6. Which digital camera aperture value to choose for landscape or architectural photography
In these situations, we start from the depth of field. If you need both the foreground and the background, we select a sufficient depth of field so that it covers all the key elements. In this case, we cover the hole to f / 11 - f / 16. If set even lower, sharpness may deteriorate.
With a wide aperture in this landscape, only the near part of the fence and the tree would be in focus, and the image of everything else would be blurry. Photo: wikimedia.org
When there is no foreground and the subject is far away from you, it is better not to use the widest aperture. Instead, adjust the exposure by lowering the ISO. A tripod will also help to achieve the best result.
7.
 Camera portrait mode and aperture, or how to create a bokeh effect with it
 When working with a posing model, you can safely “play” with the settings, thus choosing the best ones for an aesthetic shot. To get a beautiful portrait, isolate the subject from the background with a minimum depth of field and a blurred background. To do this, on a whale lens, open the aperture to the limit f / 3.5. If you have a fast prime lens, you can even close the aperture a little. For example, if it allows you to set f / 1.4, even f / 1.8 may be enough for you. This way you will increase the detail and get rid of chromatic aberrations. nine0003
Aperture in plain language. Exposure Options for Beginners / Shooting for Beginners / Photography Tutorials
Aperture is one of the three key camera settings (along with shutter speed and ISO) that every photographer needs to learn how to work with. We have already prepared articles about exposure parameters and depth of field. The same lesson is designed for beginner photographers who want to get the basic information in a concise and accessible language.
What is aperture in photography
The aperture mechanism is a series of blades in the lens. Tapering and expanding, they form a hole through which light enters the matrix.
The aperture blades in the lens form holes of various diameters.
NIKON D850 / 70-300 mm f/4.5-5.6 SETTINGS: ISO 64, F8, 1/8 s, 260.0 mm equiv.
The number of aperture blades affects the pattern in the blur area. A small number of them (6–7) gives glare in the form of polygons in a blurred background. Advanced lenses are equipped with rounded aperture blades. As a rule, there are more than 9 petals in modern optics. Due to this, even at covered aperture values, even circles are obtained against the background. However, "nuts" as a variant of the "wrong" blurring of the background also have their fans. It's all subjective. Pictured above is a Nikon AF-P NIKKOR 70-300mm f/4.5-5.6E ED VR telephoto lens with a nine-blade rounded aperture: when aperture is closed to f/8, bokeh highlights remain round.
The same scene, shot with a lens with a 7-blade non-rounded aperture: heptahedral highlights appeared instead of circles in the blurred background. nine0003
NIKON D850 / 70-210 mm f/4-5.6 SETTINGS: ISO 64, F8, 1/13 s, 210.0 mm equiv.
How aperture is marked on a camera
Aperture is usually denoted by the letter F (or f). The number after the letter F (f) will be the aperture value. For example, F3.5 (f / 3.5) is an open aperture (large aperture in the lens), and F16 (f / 16) is closed. When designating the aperture, the inverse proportion works, because in reality the aperture value is a fraction, just the first part of it is discarded. nine0003
It is important to remember this in order not to repeat the classic mistake of a novice photographer, when, wanting to open the aperture as much as possible, he sets the largest of the available values. At the same time, of course, it does not open the diaphragm, but, on the contrary, closes it all the way. Remember, the smaller the number after the letter F (f) - the more the aperture is open .
Nikon D5600 camera display. Here, the main exposure parameters are large-scaled. The aperture is now set to f/3.5. nine0003
Aperture f/11 is set. On amateur Nikon DSLRs, when the aperture is closed, we observe visualization with closing petals. This helps not to get confused in the settings.
The aperture value is always indicated on the camera display and in its viewfinder, regardless of the mode in which the picture is taken. If you use auto mode, watch how auto changes aperture depending on the shooting conditions - this is a good practice!
Modes in which you can manually adjust the aperture value
In auto mode, the camera controls the aperture. But it is quite possible to take this parameter under your control. So, by switching to aperture priority mode (A), you can adjust it. In this mode, the automatic will adjust the shutter speed and ISO (if the Auto-ISO function is enabled) to the aperture you have chosen in order to get a sufficiently bright picture. Therefore, keep an eye on shutter speed: if you close the aperture, and the shutter speed becomes too long, there is a high risk of getting a blurry frame. nine0003
The shooting mode dial on the Nikon Z 50 mirrorless camera
In manual M mode, we control all the shooting parameters ourselves. Although this is the most difficult shooting mode, many photographers choose it precisely because they are in control of everything, and not automatic. Scenes are shot in M mode, where it is important to clearly set all exposure parameters: shutter speed, aperture, and ISO. These types include studio shooting with flashes, landscape, architectural and interior photography, product photography. In dynamic shooting with natural light, it is still better to use mode A. In general, when it comes to shooting fast movement, first of all, you need to control not aperture, but shutter speed. In this case, it is better to switch to S mode (shutter priority) and choose the value at which the movement in your scenes is transmitted clearly.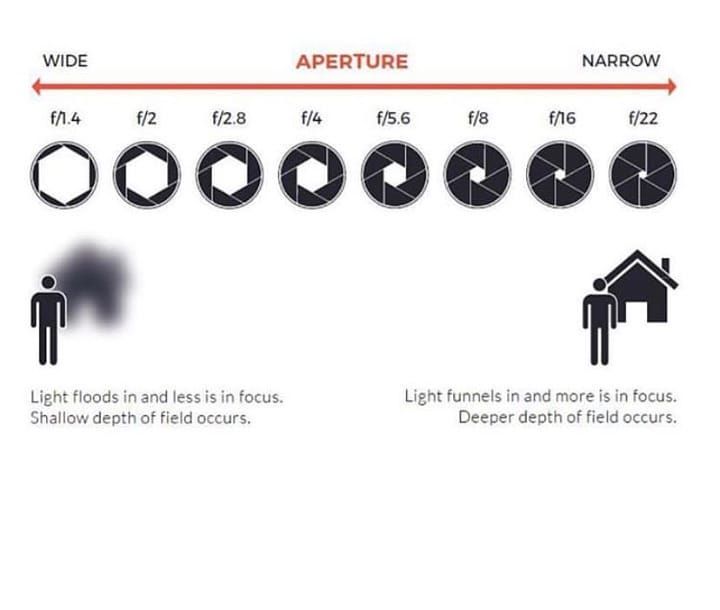 nine0003
NIKON D850 / 70.0-200.0 mm f/2.8 SETTINGS: ISO 31, F5.6, 1/200 s, 165.0 mm equiv.
How aperture affects the image
- Brightness in manual shooting mode . Obviously, more light will enter through the lens through a wide aperture than through a small one. Therefore, the aperture can adjust the brightness of the image. For example, on a sunny day, you may need to cover the aperture so as not to overexpose the frame. In low light, on the contrary, it is better to open the aperture wider so that as much light as possible passes through the lens and the picture is bright and of high quality. nine0120
It is important to remember that aperture is in balance with shutter speed (shooting time). Therefore, by manually adjusting the aperture in A mode, you can see how the camera's automation selects the appropriate shutter speed. To get a bright shot at a closed aperture, automatic will increase the shutter speed so that enough light enters the matrix through a small hole for a longer time. And, conversely, opening the aperture in mode A, we will see how the automation will begin to shorten the shutter speed.
In low light, an open aperture is required to get a good picture.
NIKON D3500 / 50.0 mm f/1.4 SETTINGS: ISO 400, F1.4, 1/125 s, 75.0 mm equiv.
- Depth of field . Everything would be very simple if the aperture only affected the brightness. But it also affects the Depth of Field of the Rendered Space (DOF). DOF is that distance on the axis between you and infinity, which will be sharp in the picture. Details outside the depth of field will remain blurry. The wider the aperture is opened, the smaller the depth of field, other things being equal. Recall also that the depth of field depends not only on the aperture value, but also on the shooting distance (the smaller the distance, the less the depth of field) and the focal length of the lens (the longer the focal length, the less the depth of field).
 Our site already has a detailed article on depth of field. nine0120
Wide aperture - shallow depth of field, blurry background.
NIKON Z 7 / 50.0 mm f/1.4 SETTINGS: ISO 110, F2, 1/160 s, 50.0 mm equiv.
With a shallow depth of field, we can highlight the main object in the frame - then we need an open aperture. But sometimes you want to sharpen everything in the photo; in this case, the diaphragm should be closed. And here the difficulties begin: a closed aperture can cause the shutter speed to become too long for shooting, the photos will be blurry. The critical value is approximately 1/60 s - at shutter speeds longer, the risk of getting "stirring" is very high. nine0003
There are two exits. You can increase the sensitivity. The higher the ISO, the faster the shutter speed, but the more digital noise. Or you can act like a real pro and use a tripod, shooting at low ISOs without digital noise. Having installed the device on a reliable support, we will make even shutter speeds of several tens of seconds available - everything will remain sharp in the photo, because the camera will not shake in the hands. This option is suitable for shooting still subjects.
Both the foreground and background are out of focus. To achieve such a large depth of field, I had to close the aperture to f / 16. Pay attention also to the shutter speed: 1/2s. To shoot at such a slow shutter speed, you need to put the camera on a tripod. It was required in order to shoot on a closed aperture at a minimum ISO to get a high-quality picture without digital noise. nine0003
NIKON D850 / 18-35 mm f/3.5-4.5 SETTINGS: ISO 64, F16, 1/2 s, 35.0 mm equiv.
Aperture
Aperture can be opened up to a certain value. It is different for different lens models. For some, it opens up to f / 3.5, for some it opens up to f / 2.8, and there are those who can open it up to f / 1.4. The value of the maximum open aperture is called aperture by photographers.
Aperture is always written in the name of the lens. If we have a zoom device in front of us, it may have a variable aperture. For example, at the minimum zoom, the maximum open aperture can be f / 3.5, and at the maximum - already f / 5.6. This is also reflected in the name of the lens. nine0003
The wider the aperture on the lens, the more light it lets through. By the way, do not confuse aperture and ISO sensitivity - these are different parameters!
The newly released NIKKOR Z 58mm f/0.95 S Noct is f/0.95! This is the fastest lens among all modern lenses of the company. Of course, such a high aperture means that the device itself will be large.
A fast aperture lens capable of shooting in low light without having to raise the ISO too much. So, if an f / 5.6 lens for shooting in room lighting and a shutter speed of 1/60 s needs ISO 6400, then an f / 1.4 lens will cope with this task at ISO 400. Between these ISO values \u200b\u200bis a huge difference in amount of digital noise! Pictures at ISO 400 will be much better. No wonder photographers love fast optics and are sure that there is never too much aperture. nine0003
But remember that the wider the aperture, the shallower the depth of field. Therefore, you will have to learn how to work with a fast lens, you will need to master the most accurate focusing. If you just got a camera, do not rush to immediately switch to fast optics, shoot with a whale lens first. They usually have a low aperture (usually f / 3.5-f / 5.6), which means that the photographer will have to shoot at a relatively narrow aperture. In this case, focusing errors will be leveled by a sufficiently large depth of field. So the low aperture of whale optics is a kind of help for a beginner, with such lenses it is not necessary to focus perfectly. nine0003
Image taken with Nikon AF-P DX 18-55mm f/3.5-5.6G VR kit lens NIKKOR
NIKON D3500 / 18.0-55.0 mm f/3.5-5.6 SETTINGS: ISO 100, F9, 3 s, 27.0 mm equiv.
Aperture and Lens Sharpness
Let's take a look at how aperture affects image detail. Absolutely any lens, especially a fast one, at an open aperture gives the image quality a little weaker than at values in the region of f / 5. 6-f / 11. This is due to the design features of optics and the laws of physics. However, in the case of modern optics, the drop in sharpness at an open aperture can be almost imperceptible, as happens with Nikkor Z lenses. All of them have excellent sharpness at an open aperture, but at hidden values, if you look closely, they are still sharper. But old and inexpensive lenses in such situations can give a frankly blurry, “soapy” image. It is most correct to change such a lens to something more perfect, but if this is not possible, just try to close the aperture a few stops. nine0003
NIKON D7500 / 85.0 mm f/1.8 SETTINGS: ISO 100, F11, 3 s, 127.0 mm equiv.
Let's say if your lens is f/2.8, stop it down to f/5.6. At a closed aperture, the detail of any lens increases. And at the same time, distortions such as chromatic aberrations - colored contours around contrasting objects - also go away. All of the above confirms the test of any lens in our magazine.
Fragment of a shot taken with an f/1.8 lens at maximum aperture: “soft” picture. Such softness is good for portraiture, but in general it is a technical drawback. nine0003
NIKON D7500 / 85.0 mm f/1.8 SETTINGS: ISO 100, F1.8, 1/8 s, 127.0 mm equiv.
A fragment of a shot taken with an f/1.8 lens at an aperture closed to f/2.8: good sharpness.
NIKON D7500 / 85.0 mm f/1.8 SETTINGS: ISO 100, F2.8, 1/3s, 127.0 mm equiv.
Detail taken with f/1.8 lens at f/5.6 aperture: excellent sharpness
NIKON D7500 / 85.0 mm f/1.8 SETTINGS: ISO 100, F5.6, 1 s 127.0 mm equiv. nine0003
Affordable f/5.6 wide-aperture zoom lens with soft image.
NIKON D7500 / 18.0-140.0 mm f/3.5-5.6 SETTINGS: ISO 100, F5.6, 1 s, 150.0 mm equiv.
Budget zoom lens down to f/8: we see sharpening.
NIKON D7500 / 18. 0-140.0 mm f/3.5-5.6 SETTINGS: ISO 100, F11, 3 s, 150.0 mm equiv.
Stopped down to f/36: Sharpness decreased due to diffraction. nine0003
NIKON D7500 / 18.0-140.0 mm f/3.5-5.6 SETTINGS: ISO 100, F36, 30 s, 150.0 mm equiv.
But around f/11, the reverse process begins: under the influence of the diffraction effect, the sharpness of the image begins to drop, and by closing the aperture “all the way”, you risk getting a blurry image devoid of small details. This is true for almost any lens.
English-speaking photographers have the concept of Sweet spot - the aperture value at which their lens gives the sharpest picture. Find this value on your lens and set it when you need perfect sharpness. nine0003
NIKON D850 / 70.0-300.0 mm f/4.5-5.6 SETTINGS: ISO 100, F11, 5 s, 70.0 mm equiv.
How to set the aperture
In conclusion, we will give some simple and specific tips for setting the aperture in various scenes.
- Family reporting, amateur photography of children . Here it is better to give the aperture setting under the control of automation. Recall that when there is movement in the frame, it is not the aperture that is more important, but the shutter speed. Determine its values at which the objects of the survey are not blurred from their own movements (approximately 1/125–1/500 s). If you want to tightly control the aperture, then first of all you need to get enough depth of field to put the main actors there and hedge against small focusing errors. In such situations, without the necessary experience, it is better not to use apertures in the region of f / 1.4-f / 1.8 on fast prime lenses. A whale lens with a low aperture allows you to forget about setting the aperture for the first time - just leave it open at f / 3.5–f / 5.6, the depth of field on them will be quite enough for shooting. Don't forget that a good photo shoot starts with choosing good lighting conditions.
 The best shots are taken outdoors during daylight hours. If you absolutely must shoot in a poorly lit room, use an external flash pointed at the ceiling. nine0120
NIKON D810 / 35.0 mm f/2.0 SETTINGS: ISO 80, F2.8, 1/800 s, 35.0 mm equiv.
- Group portrait . If you want all participants to be in focus, ask them to stand about the same distance from the camera and stop down to f/5.6-f/11 so that there is enough depth of field for all faces.
NIKON D810 / 85.0 mm f/1.4 SETTINGS: ISO 140, F1.8, 1/320 s, 85.0 mm equiv.
- Staged portrait shooting . The model is posing for us, which means you can safely work with the aesthetic component of the photo. To create a beautiful portrait, it is often necessary to separate the model from the background. Here you need a shallow depth of field and a blurry background. You can shoot at the widest aperture.
 If you are using a fast prime lens, you can stop down the aperture a bit to increase image detail and reduce chromatic aberration.
NIKON D850 / 70.0-300.0 mm f/4.5-5.6 SETTINGS: ISO 64, F8, 120 s, 165.0 mm equiv. nine0003
- Landscape, architecture, interior . Here, firstly, it is necessary to build on the desired depth of field. If we are taking a shot with a foreground and a background, the depth of field should be sufficient to include all the elements of the composition. Therefore, the aperture will have to be covered up to f / 11–f / 16. No longer needed due to sharpening due to diffraction. If there is no foreground and you are shooting just a very distant object, you still should not use the widest aperture. Find Sweet spot on your lens and use this value to get the best sharpness. In this direction, shooting uses the minimum ISO to get the perfect picture quality. Therefore, shooting at a closed aperture will require the almost mandatory use of a tripod.

Learn more