Auto light optimizer
Auto Lighting Optimizer - Canon Central and North Africa
Auto Lighting Optimizer - Canon Central and North AfricaCAMERA FEATURES
Discover Canon's Auto Lighting Optimizer (ALO) feature, which evens out high-contrast images by selectively adjusting the highlights and shadows.
Auto Lighting Optimizer (ALO) was introduced as a feature on the EOS 450D in 2008 and is included on all Canon EOS DSLR and mirrorless cameras since. The aim of ALO is to improve the look of your images through in-camera processing.
ALO is designed to reduce excessive contrast by selectively adjusting areas of the image. In this way it differs from exposure compensation, which can be used to brighten or darken the whole image. ALO is especially useful when you're using flash or shooting backlit subjects because it can detect faces in the frame and brighten those areas to achieve a more evenly-lit result and reveal more detail in shadowed areas.
ALO analyses the contrast in captured images and applies a tone curve adjustment to modify both the shadows and highlights in order to minimise loss of detail in high-contrast situations. There are three strength settings to choose from: Low, Standard and Strong. Any of the ALO settings can be used at any ISO setting. It's also possible to switch off the ALO system.
ALO can be useful when you're shooting backlit or heavily-shadowed subjects, particularly because it can detect faces. It can also be less complicated than attempting to set up remote flash units to provide fill-in flash.
ALO has lightened the darkest parts of this portrait, revealing detail in shadowed areas without over-brightening lighter areas as exposure compensation would have done. It can be very helpful for those who don't have the time or confidence to apply a tone curve adjustment manually.
Even if you set a strength value, there's a user-selectable option to automatically disable ALO when you are shooting in Manual (and in some cases Bulb) exposure mode. This prevents the ALO system from brightening areas that you have deliberately made dark through your choice of manual exposure settings. If you choose not to enable this automatic option, you can always decide whether to apply ALO or not, whatever the exposure mode.
In other exposure modes, if you have selected exposure compensation or flash exposure compensation settings in order to make the image darker, ALO may counteract these, with the result that the image comes out brighter than you intended. In this case, either reduce the ALO strength or set it to Disable.
In some cases, noise may become more visible in the areas brightened by ALO, and the apparent resolution of the image may change. Because it reduces contrast, it can make a scene look washed-out.
Like Picture Style and white balance, ALO is a processing effect that is applied to JPEG images before they are saved to your memory card. It is not applied to RAW files, but if you use Canon's Digital Photo Professional (DPP) software, ALO can be applied during post-processing to RAW images.
Although ALO was initially found on consumer-level cameras, it is worth experimenting with for professional applications as well. If you are working to deadline, for example, it can help reduce the time needed in post-production before sending images to a client or picture desk.
Written by Angela Nicholson
-
CAMERA FEATURES
White Balance
Find out about White Balance (WB), the WB settings on a camera, how to use them to get accurate colours, and why you don't always need to do so.
Find Out More
-
CAMERA FEATURES
Exposure Compensation
Exposure Compensation helps your camera deal with unusually bright or dark scenes. Find out how to use it for better exposure.
Find Out More
-
Mirrorless Cameras
EOS M50 Mark II
Create great-quality content for your audience and add your own creative flair – whether it’s photos, videos or live stream
View details
-
Mirrorless Cameras
EOS RP
A small, lightweight and intuitive full-frame mirrorless camera designed for travel and everyday photography.

-
DSLR Cameras
EOS 850D
Take the next step in creative control, capturing beautifully detailed photos and stunning 4K movies with a lightweight and connected DSLR that inspires and rewards.
Get the newsletter
Click here to get inspiring stories and exciting news from Canon Europe Pro
If you see this message you are browsing the Canon website from a search engine that blocks non-essential cookies. The only cookies that are being delivered to your device are essential (functional) cookies. These cookies are necessary for the website to function and cannot be switched off in our systems. For more information you can view our Cookie Notice.
Please remove an item or clear the [category] as there is an 8 product limit. Click Edit
Do you want to clear the entire selection?
How to Use Canon Auto Lighting Optimizer for Best Results
By Hillary GrigonisA- A+
Download as PDF
Subscribe Below to Download the Article Immediately
You can also select your interests for free access to our premium training:
Business Basics
Cheat Sheets
Child Photography
Colorful Cityscapes
Composition
Creative Photography
Creative Portrait Concepts
Digital Photo Collages
Fairytale Portrait Photography
Food Photography
Interior Photography
Landscape Editing
Landscape Photography
Lightroom Processing
Lightroom Presets
Long Exposure
Macro Photography
Milky Way Photography
My Camera and Photography
Organic Marketing
Pets
Product Photography
Sky Photography
Social Media
Still Life
Time-Lapse Photography
Travel Photography
Urban Photography
Wildlife Photography
Your privacy is safe. I will never share your information.
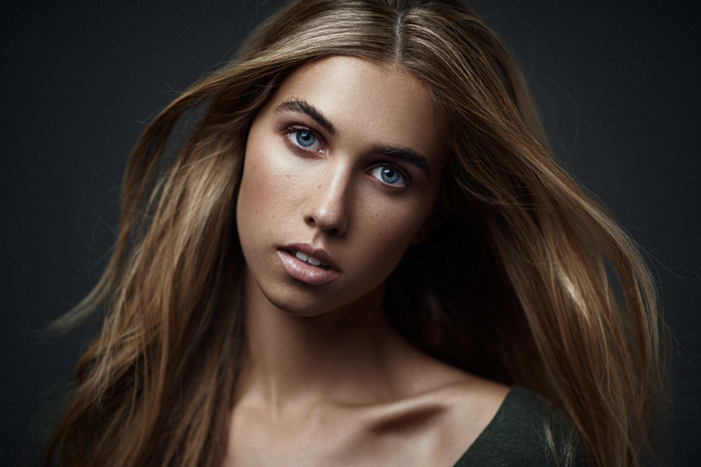
 Camera sensors can only capture so much light. When the camera’s dynamic range fails, the software can offer a boost. Canon’s Auto Lighting Optimizer or ALO does just that.
The Auto Lighting Optimizer helps to adjust the photograph’s darkest and lightest areas. For photographers working with JPEGs, the tool can help bring out more detail in a photograph. But, at other times, the tool can create a negative effect.
Learn what the auto lighting optimizer does, when to use it, and how to use it in this quick guide for Canon users.
Canon EOS 7D Mark II
This powerful DSLR camera is ideal for capturing stunning images with its advanced auto lighting optimizer.
Shop 2 Offers
×
Canon EOS 7D Mark II
Amazon
$2,042.69
Buy Now!
KEH
(second hand)
$789.11
Buy Now!
[ExpertPhotography is supported by readers. Product links on ExpertPhotography are referral links. If you use one of these and buy something, we make a little bit of money. Need more info? See how it all works here.]
What Is the Canon Auto Lighting Optimizer?
Canon’s Auto Lighting Optimizer is a camera setting. It adjusts a JPEG photo to bring out more detail in tricky lighting. ALO is in-camera processing that the camera does automatically. Once you turn it on, you don’t have to make the adjustments.
The difference is often subtle, but most visible in the darkest areas of the image. The setting is on most Canon cameras launched after 2008, including Canon DSLRs.
Other brands have similar tools that go by a different name. Nikon’s, for example, is called Adaptive D-Lighting.
ALO makes selective adjustments to the photograph’s curves. Curves are a map of the image’s tones. Adjusting the curves tweaks the images darkest areas while leaving other tones intact.
Designed for use with backlit subjects or when using flash, ALO lightens the shadows. That helps prevent details in the darkest areas of the photograph from being lost.
The result, for images in tricky lighting, is a photograph with a bit more detail than if the ALO settings were off. ALO is also available in Canon’s Digital Photo Professional photo editing software, where it can be applied to RAW photos.
But, the ALO isn’t designed for every photograph and should be disabled for some types of photographs.
Canon Auto Lighting Optimizer disabledCanon Auto Lighting Optimizer on highWhen to Use the Auto Lighting Optimizer
ALO selectively edits the tone curve, so the setting is ideal for backlit subjects.
When the light is coming from behind the subject, you will likely end up with a subject that’s in shadows. ALO lightens up those shadows to prevent a silhouette and keep those details intact. For the same reason, the setting is also good to use with flash.
But, because the ALO lightens shadows, it reduces a photograph’s overall contrast. In a photo that’s lit from the front, or that has soft light, ALO may actually reduce the image quality.
In a photo that doesn’t need lighter shadows because the lighting was already great, ALO will give photos a little less pop. Another downfall of allowing the camera to adjust those curves is that the image could end up with noise.
ALO should be turned on for backlit subjects and when working with flash. But, with good lighting, the setting should be turned off to avoid reducing the image’s contrast or adding noise.
Photographers that shoot in RAW should also leave the setting off. ALO does not have an effect on RAW images but could skew the image preview. With RAW, you can manually recover details in post-processing and get better results than with ALO. You can also use Canon’s photo editing software, but manual recovery gives better results.
Photo by Kaique Rocha, PexelsHow to Use Auto Lighting Optimizer
Using the Canon Auto Lighting Optimizer is a matter of turning the tool on and off inside the camera menu. While the process is similar across most Canon cameras, every camera model may have some variation. If you cannot find the ALO option, consult your camera’s user manual.
First, look for the option in the quick menu for the fastest access. Press the Q to bring up the quick menu, then look for the icon that looks like a person inside of a square that’s half colored. The ALO is also found in the full camera menu. Press the menu button, then navigate to the shooting settings sub-menu and look for the Auto Lighting Optimizer option. It may be on page two of the menu.
Whether you access the ALO from the quick menu or the full menu, the choices are the same. Disabled or off leaves the image unaffected by ALO. Low has the smallest effect and high the most effect on the image. Standard is between the two. Choose a setting based on the image.
You may want high for a severely backlit photo. Standard will work for most images and low if you are worried about losing too much contrast. Remember to disable the ALO when you are no longer taking photos in tricky lighting. The difference in ALO is often subtle and can be a personal preference. Feel free to experiment and see which setting you prefer.
Common Questions
What Is Highlight Tone Priority?
Highlight Tone Priority does the opposite to ALO. Highlight Tone Priority keeps details in the highlights and brightest areas intact.
It works by manipulating the image curve to underexpose the highlights. This setting limits the ISO range, and you cannot have both HTP and ALO on at the same time. Like ALO, HTP can increase the noise in an image.
How Do I turn on the Auto Lighting Optimizer on Canon 7D?
On the Canon 7D, go into the menu, then navigate to the second page of the shooting sub-menu. Choose the Auto Lighting Optimizer, press set, then choose from disable, low, standard, or strong.
Photo by Freestocks.orgConclusion
Canon’s Auto Lighting Optimizer helps keep the detail in shadows intact. The setting is ideal for JPEGs and tricky lighting scenarios but is best left off when the lighting is good.
The Highlight Tone Priority does the opposite and preserves the highlights. RAW photographers should leave these settings disabled.
Canon EOS 7D Mark II
This powerful DSLR camera is ideal for capturing stunning images with its advanced auto lighting optimizer.
Shop 2 Offers
×
Canon EOS 7D Mark II
Amazon
$2,042.69
Buy Now!
KEH
(second hand)
$789.11
Buy Now!
Ashampoo® Photo Optimizer 8 - Image Optimization
Enhance your photos with a simple click
Ashampoo Photo Optimizer enhances your photos with a simple click of a button! The program fully automatically adjusts colors, contrast and exposure settings to the ideal for both individual images and entire collections. Visual imperfections are detected and eliminated through careful image analysis. But you can also make manual adjustments: straighten the horizon, correct perspective distortion, or apply a variety of effects. Minor imperfections such as red eyes, skin imperfections or blemishes are removed without any problem. A simple user interface saves time and nerves on the way to impressive results! nine0005
- Brilliant perspective correction for natural lines
- Significantly improved automatic image optimization
- Super fast access to functions thanks to favorites
- Manual color temperature setting
- Tuning Curves
- Improved memory management for best stability and speed
- Optimized for 64-bit OS nine0023
- Virification
Examples of the use of viration. 
Professional and amateur photographers sometimes use this technique to give a photograph a special mood. It takes its name from chemicals used for similar purposes in black and white photography, and consists of giving the entire image a tint of some kind, such as tan to stylize an old photograph, or blue, as in the adjacent illustration. In that case Photo Optimizer Pro will not try to return the color balance to normal levels.
- Sunset or Sunrise
The Pro Photo Optimizer recognizes the shift in color balance towards yellow-red tones typical of landscapes against a setting or rising sun.
The sky in this landscape will look much more realistic if you use the Photo Optimizer Pro . - Yellow background compositions
When an image contains large areas of yellow, a general increase in brightness is needed so that the highlights (the brightest areas) return to their original white color and the shadows (the darkest areas of the image ) became less contrasting.
2 made it possible to preserve the white color in the photograph of the woman, as well as to convey the natural color of the child's hair. - Bright background correction
In cases where the central subject of the composition is against a very bright background, its details may not be sufficiently developed due to an error in determining the exposure when shooting. Photo Optimizer Pro corrects image data for "underexposed" areas of an image.
In this image, the bright background correction restores the contrast of the trees and the clock face, photographed against the light.
By downloading this video, you agree to YouTube's privacy policy. Find out more
Download video Do not block YouTube
The importance of perspective!
Shooting buildings often results in unpleasant, easily noticeable perspective distortion due to the position of the photographer. Buildings and other tall objects appear to fall, giving a comical effect to your photos. Other times you forget to take a tripod and you can't hold the camera straight. Take advantage of Photo Optimizer's new perspective fixes! Correct vertical or horizontal distortion with just a few clicks and save pictures that would otherwise go straight to the trash. Give your photos a second chance and always get the right perspective! nine0005
More ease of use with favorites
We all have favorite features that we use more often than others. Now you no longer have to go through different menus and categories to get to them. Ashampoo Photo Optimizer introduces a customizable Favorites menu that you can populate with your favorite features for instant access in one place. Need to quickly straighten the horizon after automatic correction, correct perspective, or crop? Now you can. Brilliant, isn't it? nine0005
Unsurpassed automatic image optimization
The secret of the new Photo Optimizer lies in its unique image optimization. Each individual image is carefully optimized for potential issues and possible improvements. Hastily taken pictures on the phone can now be easily restored! Dull colors, low light or contrast issues - Photo Optimizer's advanced algorithms will detect it all! After analysis, your photos seem to rise full of life and brightness - just the way good photos should look. We've gone through thousands of parameter combinations to find the ones that work best for everyone. After two years of development and countless hours in our test lab, we are proud to bring you the next level in image optimization - Ashampoo Photo Optimizer! nine0005
Even more fine-tuning options
As good as automatic optimization is, sometimes there comes a point when you want to make a few manual changes. Version 8 offers even more fine-tuning options, such as color temperature, that can completely change the nature of a shot - powering up those "cold" phone shots we're all so familiar with. Tone curves are a sure way to improve shadows, mids and highlights, especially when you're working with RAW images! Feel free to experiment - the built-in backup system will help you undo any changes and restore the original image in the blink of an eye. nine0005
Improved memory management
When necessary, Ashampoo Photo Optimizer uses all available system memory to get the most out of your PC. This means that even huge images or giant collections are optimized at the speed of light. Try the fastest and most reliable Photo Optimizer of all time!
Improve white balance and enhance contrast
White balance plays a key role in the temperature of your images. Digital cameras often suffer from dull colors and terrible blue tint. From this, the photos seem absolutely lifeless and devoid of the magic of the moment. Images with low contrast, often due to low lighting, are another common problem. By manually adjusting white balance and contrast, Photo Optimizer can breathe new life into even the worst shots! Both features are part of the auto-optimization feature and will automatically turn on when needed! nine0005
Photo editing with just a few clicks
Photo Optimizer's interface truly speaks for itself. The features are broken down into intuitively named categories and are just two clicks away. When other photo editors make you wade through manuals, Photo Optimizer gets you the results in no time! Everything is simple and logical, training is not required. Whether you're a beginner or an advanced user, or you just don't want to spend hours adjusting your images, Ashampoo Photo Optimizer is the program for you. nine0005
Universal export functions
Good photos must be seen. That's why we offer several ways to transfer your photos from Photo Optimizer. This is e-mail, and the free Ashampoo Web portal, as well as setting an image as a desktop background. If you prefer the traditional way and print your photos, you will love the feature-rich print function that allows you to create not only high-quality but also compact printouts. nine0005
Functions for perfectionists and creatives
Many sophisticated functions are also available outside of automatic optimization. Whether you need to add sharpness or softness, Photo Optimizer has great tools for every occasion. Reduce annoying image noise, adjust color temperature or crop images. And for the artist within you, we've added a variety of effects such as waves, swirls, and even explosions and collapses. Plenty of room for experimentation. nine0005
Improvements for natural-looking portraits
Faces are at the center of many photos, but they are rarely perfect! Automatically or manually enhance your portraits with Photo Optimizer. Fix red eyes and whiten teeth for a dazzling smile. Fix minor mistakes with the clone tool and remove blemishes and other blemishes like a pro. Create perfect yet natural looking portraits with just a few clicks! nine0005
Add some color!
You can't have great photos without great colors. This is where Photo Optimizer's powerful color correction comes in. Add personality or enhance the sense of realism in your photos. You only need a few swipes to improve contrast, saturation, and more. See your changes in real time through the built-in preview, and walk through the backstreets of memory with a nostalgic sepia effect. You don't like what you see? Get back the original image with just one click! nine0005
Convenient Batch Processing
Since Ashampoo Photo Optimizer does many things automatically, we've added batch processing to save you the time and hassle of processing an entire collection of photos in one pass. Select individual images from multiple sources or entire folders and let Photo Optimizer do its magic. Each image is carefully analyzed and qualitatively optimized taking into account its features. Process an entire vacation in one go, polish your wedding or birthday shots, and bring the sparkle back into photography. nine0005
Spacious room for experiments
Thanks to the convenient backup function, you are free to experiment in any way without fear of losing your original images. Restore your images to their original state with the click of a button. And the built-in before-after view ensures that there are no nasty surprises along the way to your perfect photos. You seem to be looking into the future - bright, colorful and brilliant!
Image Optimizer™
In recent years, more and more image data has been downloaded from the Internet. As a rule, the resolution level used there is suitable for display, but extremely small for printing. Canon offers new software that uses the Image Optimization Technology to improve the quality of low-resolution printed graphics. The printer driver will smooth out the "torn" contours of the image and thereby improve its visual perception. nine0005
| |
Where the lines of the drawing look stepped, the image optimizer "fills in" new points or "erases" unnecessary ones to improve the quality of the print. |
Pro Photo Optimizer is a correction feature built into Canon BJ printer drivers. It analyzes the hue and brightness spectrum of digital images and automatically corrects parameters such as color, exposure, and saturation for optimal print results. Task Photo Optimizer Pro is to approximate the characteristics of the original color image to the most familiar to the human eye ( Photo Optimizer Pro is not designed to correct black and white images).
Photo Optimizer Pro includes a number of features:
3D color correction is required for images that have defects that appear in the predominance of a color tint (often this is due to the subject being shot was illuminated fluorescent or incandescent lamps, or one of the items in the composition casts a strong reflection on neighboring ones). nine0005
Applying a 1D adjustment to the entire image shifts all colors by the same amount. The further the colors are shifted from ideal values, the worse the color balance will be in the resulting picture. Therefore, for compensation, the value corresponding to the color with the smallest deviation is taken. Thus, the image will still show a color defect, although to a lesser extent.
| | |
| Pixel A needs to be corrected by 120 units, while pixel B needs to be corrected by 60. However, the image can only be corrected by one of two amounts. Point A correction introduces a significant amount of color balance distortion, so the lower value selected for pixel B is applied. However, the overall color balance of the image is still unnatural. | |
The 3D Color Correction method corrects even the most severe color distortions. Analyzing each pixel, Photo Optimizer Pro determines the angle of deviation from the "ideal" color on a three-dimensional scale and calculates the amount of correction that does not violate the overall color balance or ratio of RGB components.
| | |
| and B, respectively). The overall color balance of the image is perfectly preserved! nine0106 | |
Automatic tint control is required to compensate for inconsistencies that occur when converting the RGB color model (image on screen) to CMYK (for transfer to a printer). It gives the printout brighter, richer hues, and also provides better nuance in the dark (possibly underexposed) areas of the photographic image. Making adjustments to saturation and color contrast, Automatic Hue Control , however, does not change the settings for photographs taken in special lighting conditions, as this may interfere with the perception of the scene that the author of the picture was trying to achieve. In the event that not a photograph is being prepared for printing, but, say, a color chart, the automatic tint control function recognizes it as a presentation graphic and makes the image sharper and more contrast.
| | |
| The histogram clearly shows how the automatic hue control expands the color range towards clearly missing shadows and poorly developed midtones. | |
The Light Condition Recognition System prevents unwanted "correction" of color balance when the photographer deliberately used an unusual color palette in order to convey a special mood of his subject. nine0005
The color "noise" reduction function evaluates digital image data in terms of color and brightness, distinguishing "noise" (significant differences in these parameters compared to neighboring pixels) from natural sharp color transitions, for example, on the outlines of objects. Strictly speaking, a similar definition can be given to the contours of image objects. The contour, or edge, of an object or any of its areas is characterized by a sharp change in the brightness and color of neighboring pixels. additional image correction algorithms include color enhancement function . Due to the peculiarities of the color perception of the human eye, clouds in landscapes containing large areas of the sky or the sea surface, the blue color seems more saturated and dark, and white, on the contrary, turns out to be whiter than necessary. The problem of color "noise" when printing images obtained with scanners and digital cameras based on CCDs (charge-coupled devices) has been created by the rapid spread of these devices. The “noise” that appears in a photograph looks like randomly arranged colored dots on a uniform, often dark, background. nine0005
Areas where "noise" is likely to appear are highlighted in the figure by former circles. The color noise reduction function in the printer driver compares the parameters of each pixel with its neighbors. The discrepancy between them is defined as "noise" if it exceeds a pre-calculated threshold.  However, their digital data may be completely different than when "noise" occurs. Aligning the colors and brightness of neighboring points in this case could lead to blurring of all contrasting lines and, as a result, to a significant deterioration in the quality of the original photograph. nine0005
In this example, the contours of the threads that make up the tassels of the scarf are definitely not color "noise". When such an image is printed using the Pro Photo Optimizer , it will not be recognized by the Color Noise Reduction function as areas in need of correction.