Best monitor calibration tool for photographers
Best monitor calibration tools for 2022
We may earn revenue from the products available on this page and participate in affiliate programs. Learn more ›
Written By Abby Ferguson
Published Sep 14, 2022 5:14 PM
Monitor calibration tools are essential for anyone looking for precision and consistency in their photography. All monitors will produce slightly–or sometimes drastically–different colors, contrast levels, and degrees of brightness. Left uncalibrated, it could negatively impact your edits and prints. For example, if you are editing on an extremely warm monitor, you may overcorrect and end up with overly cool images, only noticeable when viewing on your phone or other displays. Or, you could go to make prints for a client and end up with dramatically different colors and contrast from what you saw on your screen.
Monitor calibrators are devices that sit on your monitor and measure the colors and brightness of the display. Some will also read ambient light to suggest how bright your monitor needs to be to see accurately in that environment. The best monitor calibration tools will help you get better and more consistent results in your photo editing, video editing, and printed work.
- Best overall: Datacolor SpyderX Pro
- Best budget: Calibrite ColorChecker Display
- Best kit: Datacolor SpyderX Capture Pro Kit
- Best for pros: X-Rite i1Basic Pro 3 Plus
- Best for Wacom displays: Wacom Color Manager
Why it made the cut: The SpyderX Pro has long been the standard for photographers. It provides highly accurate results and allows you to calibrate multiple monitors.
Key features:
- Compatible devices: Laptops, desktop monitors, and front projectors
- Connector type: USB 1.1, USB 2.
 X, USB 3.X, and USB Type-A
 - Ambient light sensor: Yes
Pros
- Easy to use
- Supports multiple monitors
- Ambient light sensor monitors light throughout the day for precise adjustments
- Quickly provides results
Cons
- Not compatible with 14″ and 16″ 2021 MacBook Pro Liquid Retina XDR displays
Datacolor, one of the most well-known calibration companies, released its SpyderX range in 2019. It claimed it was its fastest and most accurate monitor calibration tool yet, and indeed, it improved on the Spyder5 significantly. The SpyderX utilizes a new lens-based sensor system which is highly accurate, providing better white balance, color, and shadow detail. And it has a before and after feature, so you can see how much of a difference it makes.
It’s also much faster than previous versions. The first time using it may take about 20 minutes, but after that, calibration should only take around five minutes each time. You’ll only have to go through the process every couple weeks under normal circumstances. The software is easy to use and guides you through the process in an intuitive way. You’ll be able to focus on your edits instead of fussing with calibration.
This tool has an ambient light sensor that can monitor the room you’re working in throughout the day and suggest appropriate brightness and contrast. The software can either warn you to calibrate or automatically adjust brightness and contrast based on custom profiles. It supports multiple monitors, so if you have dual monitors and your laptop screen, you can ensure all three are correct. You’ll also have access to Datacolor’s StudioMatch™, which creates a target to share between monitors for consistency across all your workstations.
Best budget: Calibrite ColorChecker DisplayWhy it made the cut: Though more affordable than other options, the ColorChecker Display provides highly accurate calibration and works with laptops, desktops, and projectors.
Key features:
- Compatible devices: Laptop, desktop monitors, projectors
- Connector type: USB-A
- Ambient light sensor: Yes
Pros
- Easy to use
- Affordable
- Color matches up to four displays
Cons
- Doesn’t monitor ambient light
- Slower results
Formerly the X-Rite i1Display, this entry-level monitor calibrator offers a lot of value. It comes at a lower price than alternative options though it still has plenty of features and is very accurate. It works with laptops, desktops, and even projectors and can color match up to four displays. So whether you have multiple displays at your desk or your bounce between locations, it will allow you to ensure your entire setup is accurate.
The ColorChecker Display has an ambient light sensor to determine the best brightness level for comparing prints to your display. But, it does not constantly monitor ambient light like the SpyderX Pro, so you will need to do that manually if you work in a room where the light shifts significantly throughout the day. But it will remind you on a regular schedule to re-calibrate, which helps keep your display accurate over time.
Why it made the cut: This kit includes all you need to calibrate your entire process, from shooting to post-processing.
Key features:
- Compatible devices: Monitors and projectors
- Connector type: USB 1.1, USB 2.X, USB 3.X, and USB Type-A
- Ambient light sensor: Yes
Pros
- Includes tools for calibrating camera settings
- Easy to use
- Highly accurate
- Monitors ambient light
Cons
- Not all users will need all tools
For serious photographers who want to fine-tune every aspect of their photography, this kit from Datacolor provides all the tools you need. It includes a Spyder LensCal, which allows you to precisely measure and adjust your DSLR and lens autofocusing. It helps ensure that you miss focus less and that the camera and lens focus exactly where you want them to. Because mirrorless cameras use the main camera sensor to focus, they don’t require calibration. But, it can tell you if your lens isn’t focusing properly.
The kit also comes with the SpyderCUBE for getting accurate exposure and white balance settings by providing white and black values. And the Spyder Checkr helps achieve consistently accurate colors across different shots, days, and even cameras. As a result, your raw files will be in a much better place before you even start editing, cutting down on the time you need to sit in front of your computer.
Finally, the kit comes with Datacolor’s impressive lens-based colorimeter, the device that calibrates monitors. It works with multiple monitors and provides access to SpyderX Elite for unlimited calibration controls. The software is easy to use, guiding you through the calibration process. You can also use Datacolor’s Softproof to preview how a photo will look as a print or on different devices like tablets. You’ll be able to ensure things are accurate before you hit print or walk away from your edits.
X-Rite
SEE IT
Why it made the cut: It offers excellent precision, video support, and the ability to calibrate unlimited monitors.
Key features:
- Compatible devices: Monitors, projectors, scanners, printers, cameras
- Connector type: USB
- Ambient light sensor: Yes
Pros
- Calibrates and matches colors on different displays
- Supports high brightness levels
- Ideal for video work as well
- Can also calibrate printers and cameras
Cons
- Very expensive
Serious professionals need to ensure their entire kit is calibrated for utmost accuracy and consistency. This calibration kit from X-Rite offers an impressive set of features and accessories to meet those requirements. The software allows you to calibrate every step of the process, from your camera to the printer. It has presets specifically for video production, making this ideal if you do a lot of color grading on your monitor. And the included XL ruler enables you to color calibrate even large format printers.
The included polarization filter helps cut down hot spots from reflective surfaces, resulting in better blacks and richer colors. It’s ideal for scanners, allowing you to reproduce artwork at a higher quality. Plus, the spectrophotometer has an 8mm aperture, allowing it to provide accurate results on a wide range of surfaces.
The i1Basic Pro 3 Plus allows you to create profiles for up to four displays that are connected to a single computer. And if you work in a lab setting, you can calibrate unlimited monitors that are connected to different computers. It also has a Kensington Lock port to keep it safe in public or communal settings.
Why it made the cut: Since it’s specifically designed for Wacom devices, you’ll be able to get much more accurate results on your Cintiq screen.
Key features:
- Compatible devices: Wacom products, monitors, mobile devices
- Connector type: Not provided
- Ambient light sensor: None
Pros
- Designed by X-Rite for Wacom products for better results
- Can also calibrate mobile devices
- Works with multiple monitors
Cons
- Can be more complicated to use than other devices
Though other calibrators will work on Wacom devices, Wacom collaborated with X-Rite to design this to work specifically with its products, such as the Cintiq 27QHD Creative Pen Display. It will provide results tailored explicitly to your tablet as a result. You can also use it to calibrate other monitors and displays and even use it on mobile devices.
It allows you to save profiles for your different displays, and you can create custom colors to suit your needs. Everything is very customizable, so while you can adjust based on its recommendations, you can also fine-tune settings as you see fit.
Wacom’s monitor calibration tool allows you to check the quality of your display and monitor its health over time. That way, you can know if it might be failing before things get too bad. It also provides profile reminders to keep your display accurate.
Things to consider before buying monitor calibration toolsScreen type
Displays use different types of technology to project an image, from backlight LED to LCD or various types of technology in projectors. While most of the monitor calibration tools we’ve listed here are compatible with a wide array of displays, double check that whichever instrument you are considering will work with your particular display.
Ambient light sensor
The amount and type of light in the space that you have your monitor will have a significant impact on how you view your screen. For example, if you are in a room with lots of natural light, you will need different settings than if you work in a room with minimal windows. Likewise, if the artificial light in your space is very warm or cool, it will change your perception of the colors on the screen.
An ambient light sensor reads all that data and factors it into your screen calibration. Some calibration tools will not have these, however. So, if you want the utmost accuracy, be sure to look for one with an ambient light sensor.
And if light shifts throughout the day in your workspace–which it likely does–you may want to invest in a calibrator that is able to monitor ambient light and suggest settings throughout the day. Otherwise, you can manually take readings at different times of the day and create profiles based on that, but it will take more time.
Speed
How fast a calibration tool can provide results may not matter to some, but it will be essential for others. It may be especially important if you are calibrating multiple displays on a regular basis. Unfortunately, many manufacturers will not provide speed data in the product specs, but some will. If speed is important, be sure to look closely for that information.
Customizability
Some entry level systems will only allow you to make automatic adjustments without much insight into the process. That’s fine for the average person who is just looking to improve their monitors out-of-the-box experience, but falls short in high-end professional settings. That’s especially true if you’re doing custom printing work or doing work in less-than-optimal conditions.
FAQsQ: How much do monitor calibration tools cost?Most monitor calibration tools will cost anywhere between $150 and $400. But, there are some premium, professional-level calibrators that will run you upwards of $5,000 or even $7,000. The more expensive options are highly-specific and very feature-rich, and more than what even most professional photographers need.
Some high-end monitors also come with their own integrated calibration tools that don’t require extra hardware to keep color and brightness in-check.
Q: Do I need to calibrate the monitor for photo editing?Need is perhaps a strong word in this situation. Whether you need to calibrate your monitor for photo editing truly depends on what your end goal of the photos is. If you are a casual photographer taking pictures for fun, calibrating your monitor really isn’t necessary. But, if you want to up your game and have full control over your work, then yes, you should calibrate your monitor. And if you are editing photos for prints, you definitely need to calibrate your monitor for accurate and repeatable print results.
Q: Can all monitors be calibrated?Most, but not all monitors can be calibrated. In order for a monitor to be calibrated, you’ll need access to RGB controls, brightness and contrast, and the ability to set profiles on that monitor.
All monitors will shift in brightness, colors, and contrast as they age, which is why it’s essential to calibrate regularly. Broadly speaking, you should calibrate your monitor about every month. But, this somewhat depends on the display. Some are more stable–especially newer monitors–and once every two months will be enough.
Q: Are monitor calibrators worth it?Monitor calibrators are worth it for certain photographers, graphic designers, and videographers, but not everyone. Spending money on a calibration tool will not be worth it if you are only posting to Instagram or taking photos casually.
But calibration is worth it for those who want complete control over their images. It is especially essential if you print your photographs. Calibration will help ensure your photos are printed with accurate colors, improving your prints. And if you aren’t printing, calibration tools are worth it if you simply want to ensure consistent quality across your work. It is also crucial if you work with a team and want colors to be reliably accurate across all team members.
Despite being rather technical pieces of equipment, the best calibration tools are easy to use and provide accurate results. For those serious about their photography or video, it is an essential tool that will make a difference. You’ll get better photos, videos, and prints with less work and will have more consistent results over time.
Methodology: How we picked the best monitor calibration toolsThe writers and editors here at Pop Photo have decades of experience in photography and have worked with most major equipment manufacturers, including monitor calibration tools. I have spent the past 10 years or so either working to oversee consistency across a group of editors or printing my own photographs, which has provided me with experience calibrating screens.
When selecting the best monitor calibration tools, we looked at important features such as ambient light sensors and the ability to match multiple monitors. Ease of use was also critical, as calibrating your screen shouldn’t be overly challenging. Lastly, we aimed to provide products at different price points and experience levels to suit different users.
Our Top 6 Picks to Enhance Your Display
If you’re a photographer, designer, or graphic artist, you need a monitor calibrator. But how can you choose the perfect calibrator for your needs?
In this article, we share our list of the six best monitor calibrators – no matter your budget. So if you’re ready to start working with stunningly accurate colors, then read on!
Images from Amazon
Datacolor SpyderX Pro Our Pick
One of the absolute best on the market.
CHECK PRICE
X-Rite i1Display Studio Bang for Your Buck
The best value for your money, calibrating computers and printers
CHECK PRICE
X-Rite ColorMunki Smile Best for Beginners
This is the easiest color calibrator available on the market
CHECK PRICE
When you buy through links on our site, we may earn a commission at no cost to you. We evaluate products independently. Commissions do not affect our evaluations.
The Best Monitor Calibrators for Photographers
1. Datacolor SpyderX Pro
Our Pick
Image from AmazonDatacolor SpyderX Pro
The best option for the professional photographer
This color calibrator might look like an alien sucking on your screen, but it’s a quick, powerful, and incredible efficient tool for accurate colors.
$144.99 from Amazon
Pros
Lens-based calibrator for more accuracy
Very fast calibration
Multiple screen support
Ambient light sensor
Cons
Expensive
Not the most friendly for first-time users
A name that rings quite loudly in the photography community, Datacolor has been helping photographers ensure their color accuracy since the 1970s – and the SpyderX series is especially prevalent. The SpyderX Pro expands significantly upon the company’s previous SpiderX 5 version while still maintaining the confidence-boosting accuracy Datacolor is known for.
Looking like something out of the Alien franchise, the SpyderX Pro is a lens-based calibrator that takes a very close look at your monitor display and helps adjust the colors accordingly. The lens-based system is touted for increasing accuracy and doing so at a very efficient speed.
Datacolor SpyderX ProIncredibly easy to use, all you need to do is install the software, hang the SpyderX Pro over the monitor, and let the product work its magic. The system offers a range of options depending upon what you’re looking to do, such as quick and snippy one-click calibration all the way to advanced step-by-step modes.
Additional helpful features include the integrated ambient light sensor also helps ensure that the lighting in your office space isn’t impacting its color detection and a before/after view once the calibration has concluded. The multi-monitor support also lets this useful tool be used on all of the computers you have, from laptops to desktops.
2. Datacolor SpyderX Studio
Image from AmazonDatacolor SpyderX Studio
An full color calibration kit
The SpyderX Studio is a full kit, featuring three helpful color calibration tools: a colorimeter, a spectrocolorimeter, and the SypderCube.
$495.00 from Amazon
Pros
Includes three tools for calibrating monitors, printers, and RAW images
Keeps colors consistent all around
Cons
Large and bulky
Very expensive
The name may be similar to the SpyderX Pro above, but the The SpyderX Studio is a very different version. The Studio is more like a full kit, consisting of the SpyderX Elite monitor colorimeter, the SpyderPrint spectrocolorimeter, and the SpyderCube. Each tool does something different to help the working photographer or visual artist.
The SpyderX Elite monitor colorimeter functions the same as the Pro we spoke about above, but one could argue that the color calibration is slightly different. However, with the assurance of the additional tools used in combination, your colors will absolutely come out the same in a print versus the computer screen.
Datacolor SpyderX StudioThe spectrocolorimeter helps calibrate your printer along with the computer. This tool assesses the color of printouts! The system will prompt you to make a print with about 225 color patches that the spectrocolorimeter then analyzes. This may sound intensive, but it’s a rather painless process.
The patented SpyderCube is a tool that helps set several settings when shooting RAW images, including the white balance, exposure, blacks point, and brightness. What looks like a weird keychain, the SpyderCube simply needs to be placed in the area you will be photographing. Take a photograph of the cube and view the result. This helps you measure your settings and help colors come out right in-camera.
The SpyderX Studio is quite large and bulky to store, unlike the compact little SpyderX Pro. However, if you’re a full-time professional photographer with a slew of print outputs, this is a worthy investment to keep in your studio. If you’re something who dabbles in prints less frequently, no one would blame you if you skip over purchasing this product.
3. X-Rite i1Display Pro
Image from AmazonX-Rite i1Display Pro
The fastest calibrator on the market
This is an absolute hero for those in a hurry, able to calibrate monitors in under two minutes! Also a must-have for those with bright display screens.
$329.99 from Amazon
Pros
Extremely fast calibration
Supreme accuracy for bright screens and HDR screens
Approved by industry leaders Pantone, Munsell Color, and MacBeth Lighting
Cons
No ambient light sensor
Quickly following Datacolor, the X-Rite i1Display Pro is another industry favorite in the visual arts world. Compared pretty heavily to the Datacolor brand, technically the two really do the same exact thing – just different variations of achieving the result you want.
Started in 1958, X-Rite is heavily driven by color-obsessed scientists and tends to rank highly in accuracy through their collaborative work with Pantone, Munsell Color, and MacBeth Lighting- three industry leaders in color accuracy determinations.
This particular model is a must-have for bright displays (I’m looking at you laptop users!) and HDR displays as it tends to outperform competitors in that regard. Many professional monitors for photographers are now very brightly lit, which some calibrators have not adapted to. This tool is also a proclaimed speed demon, able to calibrate in a very shocking one minute and thirty-six seconds!
4. X-Rite i1Display Studio
Bang for Your Buck
Image from AmazonX-Rite i1Display Studio
This is the best package value
Similar to the SpyderX Studio, the X-Rite version is significantly less expensive and offers the same tools
Buy from Amazon
Pros
Offers tools for printer and screen calibration
Cost-effective
Great color accuracy score
Cons
No ambient light sensor
Slow at monitor calibration
In the same vein as the Datacolor SpyderX Pro and Datacolor SpyderX Studio, the difference between the X-Rite i1Display Pro and the The X-Rite i1Display Studio is the addition of printer calibration tools. Running a system very similar to the Datacolor SpyderX Studio, we don’t need to explain how the monitor and printer calibrator works here as it’s the same type of tool.
What is worth mentioning is that this calibration tool scores a whopping Delta-E score of 0.89, which is considered super-good (and one of the highest). Delta-E is a system that observes the accuracy and consistency of color in reference to the human eye.
X-Rite i1Display StudioAlthough the monitor calibration aspect is slower than competitors, its printer calibration is wicked fast. You don’t actually need to stop at every color swatch, you can just slide your tool across them! This saves quite a bit of time and effort.
The X-Rite i1Display Studio does lack an ambient light sensor, which depending on your workspace, may or may not make a difference. But, the price is much better than the Datacolor SpiderX Studio which makes this option much more budget-friendly for users.
5. X-Rite ColorMunki Smile
Best for Beginners
Image from AmazonX-Rite ColorMunki Smile
Super easy and simple to use
The ColorMunki was made with enthusaists and beginners in mind, a very straight to the point monitor calibrator.
Buy from Amazon
Pros
Easy, intuitive, and simple to use
Very well priced
Calibration reminders
Cons
No advanced features
X-Rite seemed to understand that new photographers and artists in the industry need monitor calibration tools as well, but may be overwhelmed or frustrated with complex calibrators. The X-Rite ColorMunki Smile seemed to have been born as a result, a calibrator that is often recommended for beginners!
This tool is very simple and to the point and does not require any sort of additional skill or complex color knowledge to use. Built for computer monitors, the ColorMunki Smile is pretty accurate and can be well trusted. All you do is plug the ColorMunki directly into your computer’s USB output, launch the calibrator software, and place the ColorMunki and press go. It’s that simple!
X-Rite ColorMunki SmileThe X-Rite ColorMunki Smile even has a calibration reminder notification helping you remember to calibrate your monitor after a certain period of time. This is great for both the professional who may forget and the newbie who wasn’t aware recalibration is necessary.
But in order to keep the price lower, some compromises had to be made – one such caveat is that it can be quite slow to process (not as time-efficient as the others on our list). This monitor calibrator also has no real adjustments or advanced features, but to be fair, most users don’t need a lot of options.
6. Wacom Color Manager
Image from AmazonWacom Color Manager
Designed for mobile screens
Really only intended to be used for Wacom Cintiq products, some have been able to use this to calibrate mobile screens
$159.20 from Amazon
Pros
Ability to calibrate mobile screens
Lightning fast to use
Cons
Technically only accurate for Wacom Cintiq products
Expensive for such a niche device
A unique option on our list, the Wacom Color Manager monitor calibrator isn’t actually for computers – it’s originally designed for Wacom’s graphics tablets! However, some users have quickly begun using this on mobile devices as well, helping keep color accuracy consistent amongst all of their devices.
At the end of the day, this product is specifically designed for Wacom’s Cintiq line of devices, so bear that in mind when considering its accuracy on non-Cintiq screens. But with Wacom being industry standard as a graphics and arts tablet, there truly is a substantial market for such a niche product.
It is a lofty price for a rather specialized tool, but if you’re a frequent user of mobile devices or have clients that prefer their images as digitals, it can be worth the investment. With a response time of just a minute, the Wacom Color Manager is quick and to the point!
Why You Should Be Using a Monitor Calibrator
There are several reasons why you should be using a monitor calibrator for your visual work. As a photographer or graphic artist, having the right color palette is key in your editing and design process. This is especially true for photographers who offer prints – you want to ensure the color grading you applied to the images ring true to the products you send your clients! This truly is the difference between a happy client and a very unhappy one.
Your eyes also cannot always achieve proper color accuracy. They’ve found that each individual sees color differently, so having a precise foundation is helpful for a more universal color grade. Even with top vision, you can never be one hundred percent sure that you are viewing each color with precision.
As varied as our eyes, every monitor displays colors differently. Believe me, even the photography-graded color monitors aren’t perfectly calibrated right out of the box! Monitor colors can also change depending on the length of time you’ve had them, so doing maintenance calibration can be important.
Lastly, monitor calibrations open the door to giving you true to life and precise image coloring. The consistent whites, grays, and detailed shadows can surely take your retouching work to the next level.
Which Monitor Calibrator Is Right for You?
The calibrators that adorn our list are the best of the best, helping narrow down the seemingly endless options on the market. Each one on the list will deliver accurate colors, but its use does tend to depend on what kind of photographer or digital artist you are. For the best all-around product, the SpiderX Pro is our pick, delivering top-notch performance every time.
For the budget-conscious photographers that need a huge bang-for-your-buck, the X-Rite i1Display Studio is hands down what you need (helping calibrate prints too!). For those new to the world of color calibration, the X-Rite ColorMunki Smile is there to lend a helping hand.
As an Amazon Associate, we earn from qualifying purchases. Certain content was provided "as is" from Amazon daily and is subject to change or removal at any time.
Improving your skills • Monitor calibration for photography
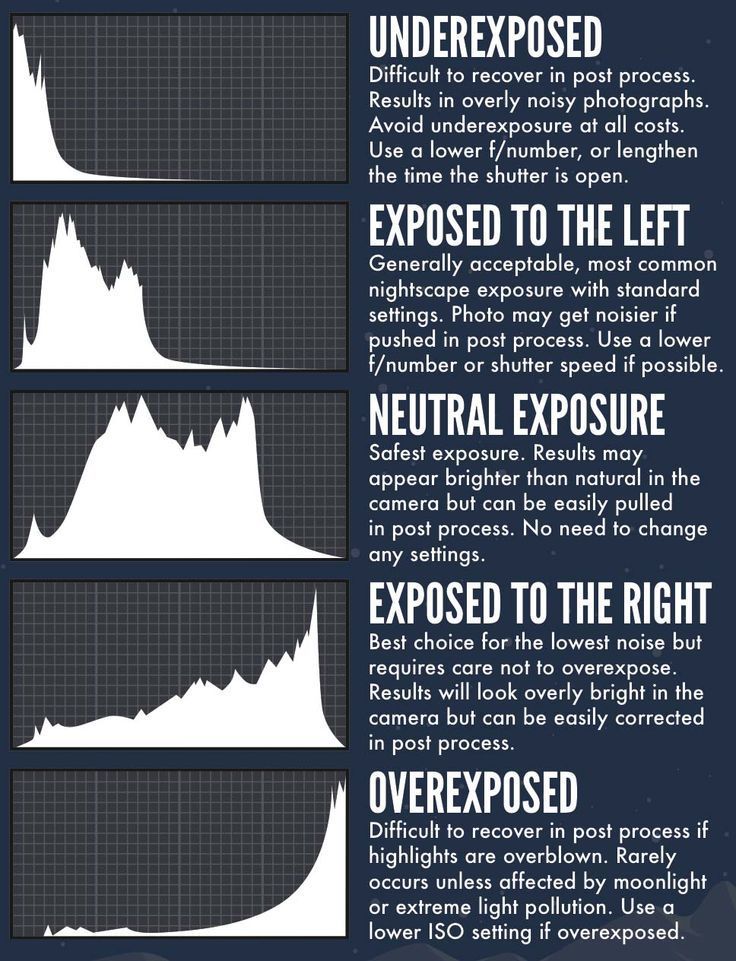
With a good monitor setup from a distance of 60-70 cm, you should see a uniform gray gradient in the pictures below, without extraneous color casts. If you see colored bands, then your monitor is not calibrated.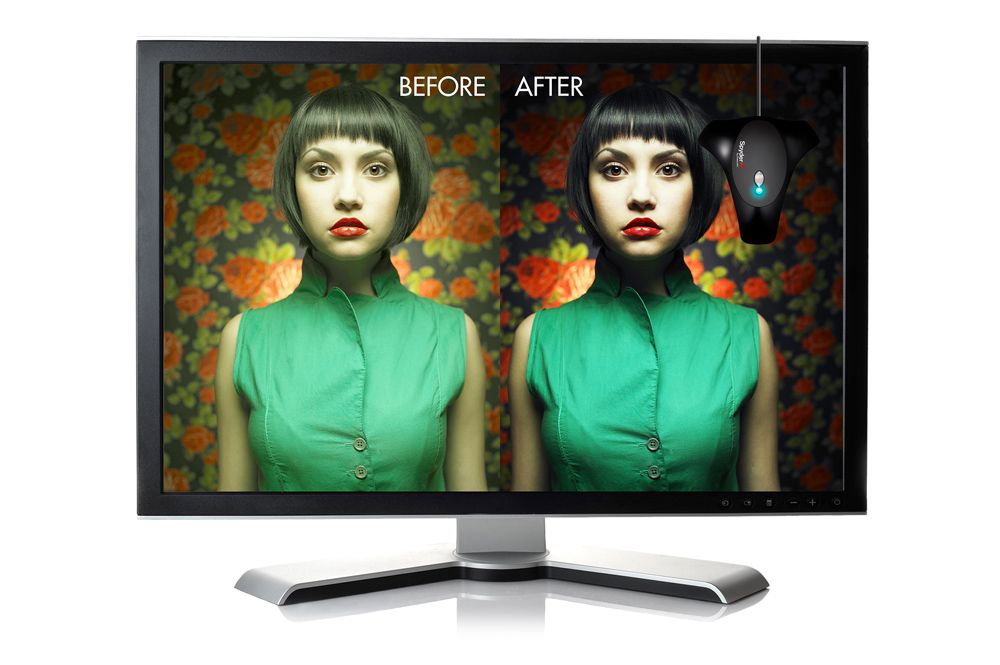
Now that you're a little frustrated by the multi-colored stripes and circles, I suggest correcting the situation with self-calibration. In 30 seconds you can check the correctness of the gamma curves, and after spending about 5-10 minutes, you can put the gamma curves in order. Nothing complicated, believe me! nine0003
1. CHECK GAMMA CURVES
We warm up the monitor, preferably at least an hour. We set the profile on the monitor to "Standard" (if there is one), sRGB, or, if the monitor is new, the one that stood by default ("Native"). Remember - the bright lighting of the room, the dustiness of the monitor surface makes it very difficult to set up.
Magic-Color(s) and other "enhancers" only interfere with the calibration, they must be completely disabled. The quality of testing suffers especially if the monitor adds sharpness (for example, NEC 1970NX) or blur.
Run CLTest.exe.
If the picture in the window of the running program looks like a solid gray vertical gradient - congratulations, the monitor has the correct gamma curve settings, and it makes no sense to do anything further. If not (extensive colored "areas" are visible), then proceed to the setting.
Monitor does not require calibration
2. BLACK LEVEL ADJUSTMENT
The CLTest.exe application is running and is in the default mode: in the menu gamma 2.2, Result, All, the slider is in the center)
we find ourselves on the step (Step -1). At the same time, rectangles of 3 primary colors and gray levels 10..1 are displayed on the screen on a black background.
If 7-9 rectangles in each column are visible on a black background, then no adjustments are required in this paragraph. nine0003
If less than 7 rectangles are distinguishable, then you need to raise the black level (the "Up" button), but you need to do it carefully - the visibility of the rectangles is required on the verge of distinguishability, otherwise, by sorting with the black value, you can worsen the black itself, but how The result is contrast.
If when setting up in one or two channels, all 10 rectangles differ, and the rest are less than 7, then in this case, per-channel monitor settings are required (point 5 of the lesson, see below). nine0003
For a CRT monitor:
Go to the Mode->Calibtate fast menu and find yourself on the step (Step -1). Next, we try to adjust the brightness of the monitor, achieving the visibility of 8-10 rectangles in each column.
If when adjusting in one or two channels, all 10 rectangles differ, and the rest are less than 7, then in this case, per-channel monitor adjustment is necessary (point 5 of the lesson, see below).
3. ADJUSTING THE WHITE POINT
Being on the step (Step -1), go to the step (Step 0) by pressing the "right" button, or by selecting the menu Mode-> Set White. At the same time, rectangles are displayed on the screen -Purple-Yellow-Ser on a white background
If 7-9 rectangles are distinguishable in each column, then no adjustments are required in this paragraph, except to correct the white balance. then you need to reduce the white level.You can try to reduce the contrast on the monitor - if the contrast was too high, this helps. If the visibility appears only with a very strong decrease in contrast, as a result of which the picture on the monitor becomes dull, it is better to use the CLTest adjustment (the "Down" button , mouse wheel)
If, when setting up in one or two channels, all 10 rectangles differ, and the rest are less than 7, then in this case, per-channel monitor settings are required (point 5 of the lesson, see below).
Now we need to check the white balance - the white should be really white (or gray if the brightness / contrast is too low), without color casts.
If white goes into some color (or the sum of two colors), this color (these colors) must be reduced. The best way to do this is from the monitor menu, Color submenu. But you can do it in CLTest. To do this, in the "Color Channel" menu, select the appropriate color and reduce it until the white returns to normal.
4. Settings of gamma feces
We move to the 1st step (STEP 1) by pressing the Mode-> STEP menu (1)
9000 STEP 1: buttons on the keyboard "Up-Down" (or the scroll wheel) we achieve a gray picture. If the image looks red-green-blue (R-G-S) RGB - increase the Out value, if (G-L-G) CMY - decrease.
When we have achieved neutral gray, click on the "Right" button (or CLTest "NextStep" ) and find ourselves on the next step (Step 2). Step 2…14: repeat everything as in step 1.
Check the result on CLTest Mode ->Result (gradient). If everything worked out, save the CLTest ->Curve->Save color profile. That's all! At the same time, we skip the channel-by-channel method (next point 5).
5. DISTRICAL SETSION OF THE MONITER
If the Monitor’s gradient is not purely gray, you will have to configure doll: in the Mode-> Calibtate Slow RGB
and we find –11.1 (RED) (RED) . If it is distinguishable less than 7 rectangles, then it is required to raise the level 0 for this channel (up button, mouse wheel). nine0003
Same as -1.2 (Green), -1.3 (Blue). Set white in the same way (Step 0.1…0.3) – 9-7 rectangles should differ. Plus, at the end, we control the white balance.
Next, adjust the points of the gamma curve (Step 1.1…1.3). Use the Up-Down buttons to adjust the colors on the color bar to the color of the rest of the background.
Next Step 2.1 … ~14.3. Check the result on Mode ->Result (gradient).
If everything worked out - do not forget to save the CLTest ->Curve->Save color profile in order to use it in the future (you can think of a name, "RivaCLTest" by default) + added profile loading at system startup.
And repeat the setting.
Check the changes by saving and loading the result of the gamma curve transformations into the CLTest->Curve->Save and set startup registry and restarting the computer. nine0003
That's it, your monitor is now calibrated, congratulations! All photographic to you!
Datacolor Celebrates 50th Anniversary SpyderX Photo Kit at a Significantly Discounted
2020-06-12
12. 06.2020 / Konstantin Birzhakov
tweet
Datacolor , the specialist in color customization and management for digital content production, has released Kit 9 especially for photographers.0186 SpyderX Photo Kit , which brings together three of its most popular color calibration tools, and this kit will be sold at a significant discount. The kit includes the SpyderX Elite Monitor Calibrator, the Spyder Checkr 24 Camera Calibrator, and the universal cube-shaped gray card called the Spyder Cube.
SpyderX Photo Kit Color Calibration Kit
In honor of Datacolor's 50th anniversary, the SpyderX Photo Kit will be sold for €200, while the regular undiscounted price is around €400. As you can easily calculate, Datacolor was founded in 1970, and today is one of the leaders in the field of color management and its calibration in the production of digital content.
SpyderX Elite
SpyderX Elite
Accuracy, speed and ease of use - this is how you can characterize the calibrator, which takes only a few minutes to calibrate the monitor well. It runs on 64-bit operating systems and will cope with all types of screens, all kinds of resolutions and gamuts. nine0003
Spyder Checkr 24
Spyder Checkr 24
This calibrator is designed to work with cameras and is also able to adjust various combinations of multiple cameras for accurate color reproduction in Adobe Lightroom, Photoshop and Hasselblad Phocus. Includes 24 color samples and software to fine-tune color temperature and all other camera color settings while providing a wide dynamic range. nine0003
Spyder Cube
Spyder Cube
To fine-tune white balance, exposure and black and white point levels, brightness and contrast, the company suggests using this small device in the form of a cube. It is enough to take a reference picture in those lighting conditions. in which the shooting will take place, after which, when working with RAW in Photoshop or Lightroom, you can use the resulting profile by applying it to the entire series of images.