Overexposed film photos
How Exposure Affects Film Photos
One of the things about film photography is that exposure on film, unlike in digital photography, is not equivalent at all to overall brightness of an image.
For example, in the digital photography world when someone speaks of an overexposed image, you instantly imagine a bright, all-white image with (probably) clipped highlights. In the film world this is not necessarily so.
Color film’s latitude is huge… like 2 to 3 stops for underexposure and up to 6 stops for over-exposure (depending on the film stock). Also, clipped highlights are literally impossible on film (straight from the scanner). What’s more, brightness can be controlled during the scanning process.
Now this “overexposed equals bright all-white” and “underexposed equals dark black” rules of thumb start to make less sense right?
So then what’s the big deal with all that “overexposed 1 stop” film talk you read everywhere on the Internet?
To answer these questions, we decided to shoot some stuff and show you guys how this thing works. Here is a shot of our colleague Héctor we shot on Fuji 400H film and a Contax 645 medium format camera.
We metered with our handheld (incident) light meter below his chin with the bulb out facing the shooter. That shot will be considered our “anchor” or “box speed” example, meaning it was shot at 400 ISO not over or under-exposing.
From there we shot in one stop increments down to 6 steps under (all the way to the left) and up to 6 steps over (all the way to the right… yeah, 1/15 handheld at f/2 right there!). We then scanned these on our Fuji Frontier SP3000 at the same brightness level (important).
Here’s the full spectrum of the 13 stops of the test:
Now zooming in on the overexposure side:
And finally the underexposure side of the test:
We did the same thing for these shots of our colleague Gloria, but this time in a totally different light situation and on Kodak Portra 400 film. The properly exposed shot:
The full spectrum of 13 stops:
Zooming in on the overexposure side:
The underexposure side:
What conclusions can be made from this test?
Well, first of all… 6 stops overexposed? And it still looks amazing? That’s pretty sweet. Overall, there seems to be a higher number of usable shots on the overexposure side than on the underexposure side. So what does this tell us?
Film loves overexposure.
Unlike what happens in digital photography, overexposed film gets a little more saturated and you get more details on the shadows, but definitely no clipped highlights or “all-white” burnt images. That’s why it’s totally safe to say that if you’re in doubt between two possible camera values for your exposure you’ll always be safer on the “over” side than on the “under” one.
It must be noted also that underexposure brings out grain and colors shifts, and that extreme overexposure will make images flat, contrast-less and with magenta or yellow highlights.
So again, remember that for these tests we scanned all images for equal brightness, so that’s why you get a -6 image full of grainy shadows and a +6 image that’s less bright than you’d expect. So underexposed images can be brightened by “bringing up” grainy shadows (hello VSCO look!) and overexposed images can be “brought down” so they don’t look hyper white-ish.
Also bear in mind that these were scanned and then posted unedited. It goes without saying that with very basic edits, the -1 shot can be made to look maybe similar to the correctly exposed one. And, for example, the -3 can be scanned darker and slightly edited to look more “chiaroscuro”-like.
That’s a lot of info to digest! Hope this clarifies some doubts that we’ve heard so often, and that it helps you somehow to be more confident when you’re shooting and getting you closer to the look you want out of your scans.
About the author: Carmencita Film Lab is a film lab based in Valencia, Spain, that’s dedicated to delivering outstanding-quality processed and scanned film to its clients. You can find out more about the lab and connect with it on its website, blog, Twitter, Facebook, and Instagram. This article was also published here.
What is Overexposure in Photography & How to Fix It
Overexposed Meaning
Overexposed photography definition
In photography and film, exposure is the process of using light to create an image. In the days of film, exposure was achieved with a chemical process between the light and the celluloid. Now in the digital age, exposure is achieved with light hitting the camera sensor, which digitally translates that information into the images we see.
The short answer to "What is overexposure in photography" is that in either scenario (digital or film), too much light was registered. Let's talk more specifically about that result and how to eliminate it (or use it creatively to tell its own story).
Overexposure Definition
What is overexposure?
Overexposure is when an image appears brighter than it should, or brighter than neutral exposure. When too much light hits the camera’s sensor, it results in an extremely bright image that is now overexposed. Overexposure limits detail in the photo and reduces any opportunity for shadowing or distinguishable highlights in the image.
In order to reduce that possibility of an overexposed picture or overexposed film, the photographer controls the amount of light that gets into the camera. There are two settings that control exposure — aperture and shutter speed. These two settings allow the photographer to collect light and bring that light into the camera.
ISO is another setting that can be adjusted to help regulate brightness, but because it doesn’t function to let light in, it doesn’t regulate exposure.
How to fix overexposed photos:
- Adjust aperture, shutter speed, and ISO settings
- Use bracketing as you’re taking your shots
- Use exposure sliders in Lightroom or other post program
As we explore the world of exposure in photography, there is much more to it than what we're covering in this article. For a complete breakdown of exposure and the techniques photographers use to be able to work in any lighting scenario, download our free E-book: The Ultimate Guide to Exposure.
Free downloadable bonus
FREE Download
Ultimate Guide to Exposure
The Exposure Triangle is something every photographer and cinematographer needs to master. Download our FREE e-book to get in-depth explanations and tutorials on topics like aperture, ISO, shutter speed, and how to balance these settings to nail perfect exposure every time.
What is Overexposure in Photography
Overexposed photography examples
Before we get into how to fix overexposed photos, what does overexposure look like? Well, for starters it’s noticeably brighter than it should be.
Overexposed image
The brightness overpowers any distinguishing details we might see. No shadows exist and there aren’t any highlights other than the blobs of light all over the image.
Quite often, you can tell with the naked-eye when an image is overexposed, underexposed, or just right. Underexposed is simply the opposite of overexposed, where the image appears too dark.
Under, correct, and overexposed image
So now how do we go from overexposed photo to correct exposure?
How to Avoid Overexposure
Camera settings for exposing photos
When you snap a photo or film a scene, lighting obviously plays a major role. But you don’t have to be a lighting expert to nail the exposure of those shots.
With just a simple understanding of how aperture, shutter speed, and ISO work together, you can trust those shots will be properly exposed.
Quick Reminder
Aperture adjusts how wide or narrow your lens opening is. The wider the aperture, the more light is let in, and the narrower, the less. Let's review how aperture works in the process of exposing images.
What is Aperture? • Subscribe on YouTube
Shutter speed is how fast or slow your camera’s shutter opens and closes will determine how much light gets let in when you snap a photo. Let's review how shutter speed works in the process of exposing images.
What is Shutter Speed? • Subscribe on YouTube
ISO is the setting that controls brightness. So it’s not what allows light to enter, but it works in unison with the two other settings. Let's review how ISO works in the process of exposing images.
What is ISO? • Subscribe on YouTube
These three pieces are what’s known as the Exposure Triangle.
The Exposure Triangle • The Key to Avoid Overexposed Photos
How do they all work together? Knowing this, is the best preventative against unwanted overexposed photos.
Fixing Overexposure
Tips on exposing photos
If you’re in a well-lit room using a wider aperture (say for a different reason like wanting a shallow depth of field), you’ll likely need to use a faster shutter speed so too much light doesn’t overexpose your shot. Because ISO controls brightness you’ll also want to keep this at a lower setting.
Perhaps you’re in a dim-lit space, and you want a really deep depth of field for a sharp and clear image, you’ll need a narrower aperture here — but what about the light? In this situation, a higher ISO setting and slower shutter speed might work best.
Remedying Blown Out Photography
How to fix overexposed photos
First things first. Learn how to take a properly exposed photo. No matter how well you know how to edit photos, having a strong understanding of how the Exposure Triangle works, can help eliminate your problems before they begin.
Manual mode gives you more control over your photos than auto modes. Learning manual, means learning how to properly expose your shots.
Mess around with this until you’re comfortable. A great way to practice working with proper exposure while shooting is with a technique called bracketing.
Bracketing
Bracketing means taking two (or more) extra photos with different settings so you have three all together, with more opportunities to get a properly exposed shot.
The two extra photos are +1 and -1 exposure value than the shot you originally took, or what you deemed as best. Here's a great explanation of how to use bracketing while shooting and a tutorial on how to fix overexposed photos in Lightroom by combining multiple exposures into the final "perfect" image.
How to bracket your shot
So if you’re shooting in manual mode, test this out.
Take your shot with the settings that you believe work. And then raise and lower one of the settings we discussed in the Exposure Triangle.
Your settings are ISO 200 with an aperture of f/5.6, and a shutter speed of 1/500th. That’s the photo you took. Now for the second photo, pick one setting to change. And let’s do the -1 value first. We’ll change the shutter speed to 1/1000th. And then for the +1 value, we’ll change it to 1/250th.
Most cameras do this automatically with internal settings, but you can of course do this manually. If you choose to do this manually, make sure you’re on a tripod to get the identical composition of your initial shot.
Now in post, you can blend these three images together to create that perfectly exposed image.
You can also do +-2 or +-3 values. HDR or high dynamic range is a technique that reproduces a greater range of luminosity than what’s possible with standard photography. Stacking photos that are +/-3 is considered HDR.
Don’t forget that the shutter speed doesn’t just affect light. It affects the movement of the object. And aperture will affect your depth of field and the sharpness of the foreground and background. Change the setting that makes most for your scene.
Knowing how to fix overexposure in post-processing in programs like Adobe Photoshop and Lightroom is essential.
Exposure Slider
The Exposure slider adjusts the overall brightness of your image. The numbers on these are the number of stops you can increase or decrease. Remember that this affects your entire photo, so go slow. It’s a good place to start but isn’t best for those final details.
More local details or exposure changes, you can use the Adjustment Mask. Here's how that process works in Lightroom.
How to use Lightroom’s sliders to avoid overexposed images
Whites and Highlights Sliders
The Whites slider adjusts the mid-tones in your image. The mid-tones hold a ton of contrast. Be careful not to go too far, as you can remove the majority of detail from a lit area.
Highlight sliders adjust the brightest areas of your photos and can help remedy any details you need to pull out.
Overexposing with Purpose
Overexposure in films (that work)
Now that we’ve got the fundamentals out of the way, we can talk bending those fundamentals. Like everything else, once you know the rules, you can break them. And overexposing your shots with purpose and intention goes a long way, not only for the shots themselves but sometimes for the film as a whole.
In Close Encounters of the Third Kind, blindingly bright spaceship lights completely light up the shot and here, overexposure makes sense! It fits the scene but more also creates tension.
Overexposed UFO lights
Both major motion pictures and obscure indie films, sometimes use overexposure to complement the story.
It works well in dream sequences like in Run Lola Run...
Overexposure in
Run Lola Run (1998)Other instances when overexposure could work would be characters “seeing the light,” some representation of “Heaven,” or even films with ghosts and paranormal beings. And of course other times, overexposure has more to do with how the scene is lit.
You can do a lot with film lighting techniques, but one type that is prone to overexposure is called High Key lighting. High Key lighting is virtually shadowless and is often produced with front lighting.
Movies that use High Key in shots, can run the risk of being overexposed. Below is an example from Harry Potter and the Deathly Hallows Part 2.
Overexposure with lighting techniques
Whether you’re a cinematographer or photographer, understanding the qualities of light and how to harness and control that light, is a requirement for consistency, creativity, and well, “correctness”!
Up Next
What’s Underexposure?
Okay, fine. It’s the opposite. I know you get it. But is that all? What are some unique examples of underexposure in photos and film that really work? We’ll get into them next.
Up Next: Underexposure →
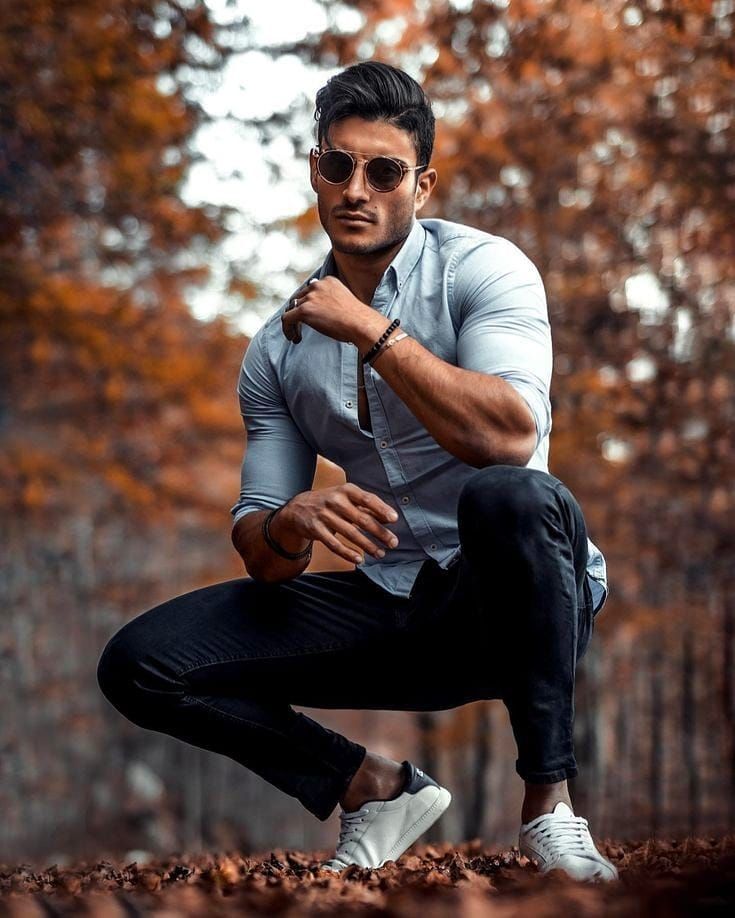
how to take pictures on film correctly
Share with friends!
I didn't see this information in one place. Collected from disparate sources and tried personally. Works!
Attention!
I am Sergey Vesnin, film photographer. Here is my online film store Filmoza.
Avito: https://www.avito.ru/volgograd/fototehnika/fotoplenka_tsvetnaya_i_chb_kodak_fuji_ilford_foma_2107419222
Summary article: which film to choose.
Film photography problems:
- Incorrect exposure (correct time that the shutter is open). Photographic film needs a precise time to form an image on the emulsion. It can be overexposed or underexposed a little and it will not greatly affect the quality. But the best image quality is obtained with the correct exposure. And the best scan is if the film is slightly overexposed. Photo labs are advised to set the exposure correction to +1 stop.
- Incorrect focusing. Film cameras often have dark viewfinders, very often manual lenses (manual non-automatic focusing).
- On film cameras, there are almost always fast (and super-fast) lenses.
 And yes, this is a problem! I'll tell you why below.
How to solve these problems:
Exposure
Exposure problems on film cameras arise from two causes:
- Aged built-in exposure meter.
- The camera does not process the shutter speed correctly.
I can't help you if your camera is out of order. Incorrect shutter speeds, a faulty shutter, a dried seal and other technical misfortunes are not solved in this article.
I'll tell you what to do if you have an old film camera with a light meter and you set the aperture / shutter speed according to the readings of this light meter.
Stop using the built-in exposure meter. With old cameras, he himself does not know what he is showing. As a rule, built-in exposure meters lie positively and cheerfully. That is, they show that there is more light than in reality. If you follow their indications, then you underexpose the film. Your negative will be light and difficult to pull out. I have to pull from the shadows, a terrible noise creeps in and the color degrades. You won't like these photos! Film, unlike digital photography, is better to be slightly overexposed than underexposed. A dense, juicy negative produces excellent photographs. Almost all films are tolerant of overexposure (within 2-3 stops) and terribly dislike underexposure. But, of course, the best result is obtained with proper exposure.
Download the exposure meter app to your smartphone to measure the scene illumination correctly. The interface of such applications is intuitive. I use an android app called Lightmeter. I don't remember why them. Used to. There are others.
fig. 1There are three indications that you are interested in. The first is film speed. Set the ISO field to the value that corresponds to the number of units of your loaded film. For example, the Kodak Portra 400 has a sensitivity of 400 units.
The second field is aperture. There you enter the aperture value that is currently set on your lens.
Now point your smartphone at an object and press the button in the application. A value will appear in the shutter speed field, which, under the given conditions, with this film and aperture setting, you must set.
If you do as the light meter app recommends, you will expose your frame as correctly as possible. And if you didn’t make a mistake anywhere else and don’t make a mistake when developing, then your frame will be perfect in these conditions.
Sharpness
A sharp photograph is when the subject is in focus. I sometimes see film photos out of focus. It's passed off as creative. Although it is clear that the photographer simply screwed up.
Focusing on old film cameras is difficult for objective reasons. First of all, because there are almost no autofocus lenses.
You have to focus while looking through the optical viewfinder. And here the second problem lies in wait - as a rule, the viewfinders of rangefinder (and SLR) film cameras are small, dark and you can’t see a damn thing in them. The exception here are a few brands, one of Leica. Which are the exception, to confirm the rules.
And here you are squinting into this tiny window. And there you need to connect Doden wedges or microprisms (focusing screens on SLRs). Or make one out of two circles. And at that moment you have a lens with an aperture of F1.8 ...
The third focusing problem is fast lenses for film photographs. Film loves light. And in those days when your camera was released, there were no films with a sensitivity of 400 units or more. And there were films for 60, 30, 20 (!) and even 10 (!!) units. Such films need a lot of light. High-aperture lenses helped out here.
But now films are modern, highly sensitive. And I will give you advice that will save you many meters of valuable celluloid. So!
Always stop the aperture as far as the shooting conditions allow.
If you are shooting on film, then it is better to forget about the digital “artistic” technique “blur the background into mush”. It's time to grow up: those blurry backgrounds are already pop. If every iPhone has learned to emulate it, we photo artists should boycott gaudy blurry backgrounds.
But seriously, holding down the aperture solves the focusing problem almost completely. How? Will explain. Imagine you have a 50mm lens at its widest aperture of F1.8 and focus on a person's face. At a distance of 1 m from the object, the field of sharpness will be approximately 1.5 cm. If the eye is in focus, then the tip of the nose is already blurred. Such a focus is controversial from an artistic point of view. And on the film it is completely meaningless, because the grain, defects and general “blurring” of the film further exacerbate this focus defect. But this is even in a perfectly focused photo. And how can you focus here when you can see a little shish in the viewfinder?
Wide open your film photos are more likely to be out of focus. This is marriage.
Besides, what is the fashion to do portraits when the face is cut out, and there is porridge around, so you don't understand where they are shooting? This option is definitely not suitable for travel. You don't want to save your face against a uniform colored background instead of the sights behind you, do you?
In general, keep your aperture down and even if you didn't focus properly, the photo will be sharp. Because the zone of sharpness at a closed aperture is much larger than at an open one. If you are interested in this topic, google about hyperfocal distance . This is generally an interesting thing. If you master the hyperfocal distance, you can generally forget about focusing on manual lenses!
What is the best aperture for film photography? I consider the F5.6-F11 range to be the most comfortable. From aperture F8.0, most lenses give maximum sharpness across the entire field of the frame.
If you follow this advice, your photos will be 90% (10% I reserved for your really wild focus mistakes) sharp and your subject will be in focus.
Remember the algorithm for working with a clamped aperture. We return to the exposure meter application on the smartphone:
- We set the film speed and forgot about this field.

- We set the aperture value to 5.6.
- Measured shutter speed.
- If the shutter speed is acceptable for you and your lens (I hope you know the maximum shutter speed for your camera, on which there is no blur from hand shake yet!), Then set these values on the camera and go ahead.
- If the shutter speed is much faster than you can afford, then set the aperture value field (smartphone app) to already F8.0 and measure the shutter speed again.
I usually take 2-3 measurements and come up with the optimal aperture / shutter speed pair. At fifty dollars, I try not to shoot at shutter speeds longer than 1/60 sec. But shorter than 1/250 is also useless for me on portraits. In good light, my working aperture is F4.0-F11. Notice! Even if the maximum aperture of my lens is F1.4, I still twist it. Because I want sharp high-quality pictures. If the situation requires me to open my aperture (anything wider than F2.8-F4.0), I refuse such a shot.
You ask: why then does the manufacturer make fast lenses at all? If they still need to be clamped? The answer is simple: aperture is the ability to take a picture when there is not enough light for the clamped aperture. If it gets dark outside, and you need a shot from your nose, albeit with the risk of defocus, that is a lifesaver. Open your aperture and try to focus. Did not work out? Well, apparently not fate. But you had the opportunity ...
Donat to the author in gratitude: https://www.donationalerts.com/r/vesnin_sergey
Summary
To ensure you get 100% confidence in film photos, follow these simple rules:
- Use only external electronic exposure meters (smartphone app).
- Stop down the aperture as much as possible under the given lighting conditions.
On the second point, a separate tip: stop perceiving an open aperture as an artistic technique and switch to mastering artistic photography with a closed aperture. You will open a new wonderful world of adult mature photography in addition to making your photos sharp and professional.
Donat to the author in gratitude: https://www.donationalerts.com/r/vesnin_sergey
If you care about film photography, read the instructions on how to take pictures on popular films to get the most.
If you are in Volgograd or Volzhsky, you can develop and digitize your films here.
Share with friends!
aperture, buy film, buy film in Volgograd, film, correct exposure, advice, film, film speed, metering
Overexpose film in camera then push process?
Usually requires to push processed film that has been underexposed. For an overexposed film, needs to be pulled into processing to get the "correct" exposure.
Let's talk about push and pull for a moment.
When shooting a movie, if someone sets a film speed that is faster than the actual film speed, technically pulls (underexposes) film. The film must then be pushed in the other direction (more unfolded) during processing. But many photographers say that they push their film while underexposing during shooting, when what they really mean is that they pull (underexpose) their film during shooting because they intend to push ( re-develop) film when processing .
On the other hand, overexposure of the film during shooting results in increase the exposure brightness . This needs to be countered by by pulling back in development time to compensate.
Like many things in photography, it's about relationships and relationships. If I expose the film to three halves (3/2) as much light as possible, then I need to develop the film to two thirds (2/3) of typical development. If I expose the film to half (1/2) the required "normal" amount of light, I need to double it (2/1) of the "normal" development. (Note that development time is not linear - double development does not necessarily mean development exactly twice as long. )
)
For example, if I have an ISO 100 speed camera in the camera and I choose an ISO 400 speed film exposure, I underexpose by two stops. It's true that ISO 400 film is more sensitive (and therefore brighter) than ISO 100 film. loading ISO 100 film! What I'm doing is reducing the amount of light that the camera meter says my film needs to be "properly" exposed. So my film is underexposed by two stops.
When this film is being developed, it needs to be pushed two stops brighter to get a more or less "correct" exposure. But the result will be lower contrast (brighter shadows) and coarser grain than if the film was measured and exposed to ISO 100 and developed normally.
If you overexpose your film, you usually pull by processing it, developing it in less time than usual. This will result in increased contrast in the midtones and dark areas and washed out shadows, but fully blown out highlights will show no detail, they will just appear as a uniform bright gray when printed.