
Photo light painting
35 Beautiful Examples of Light Painting Photography
Many photos focus on capturing a scene or subject that actually exists. Unless you’re working with photo manipulation, photography tends to be about real things, captured artfully. One exception to this generalization is light painting photography. When photographers paint with light, they manipulate the subject rather than editing the photo. Using a slow shutter speed with simple tools like flashlights and light wands, they create scenes from their imagination. Though the light actually exists, the effect of light painting turns it into something fantastical. Here are some great ideas for photos of light painting to get your creativity going.
- Draw or Write Something
- Make the Inside of Something Glow
- Add Drama to a Still Life Photo
- (Carefully) Create Sparks with Steel Wool
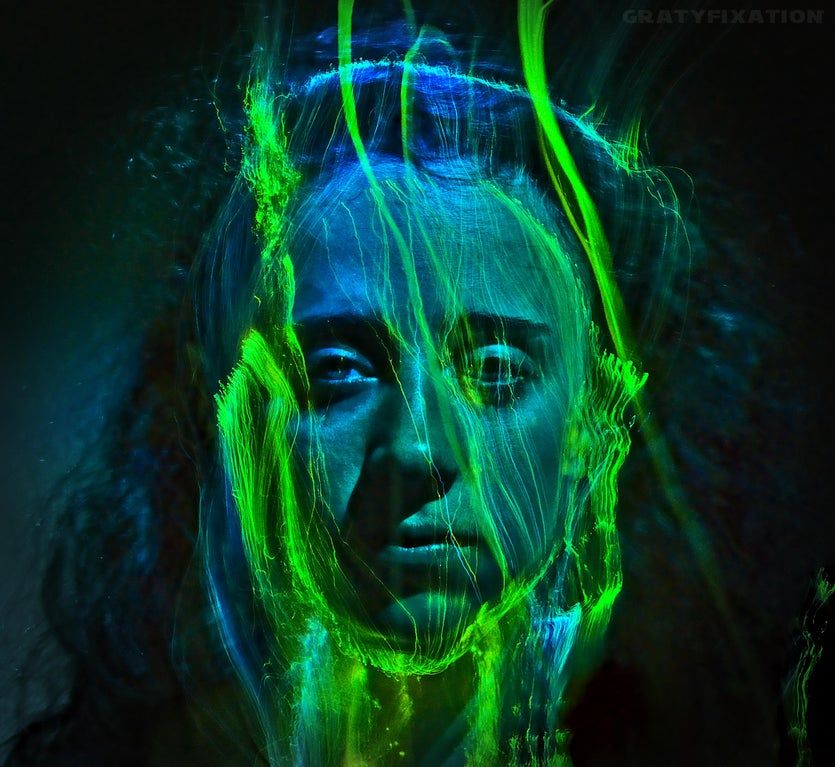
- Mix Portraiture with Light Painting
- Take a Surreal Portrait
- Use Light Painting as a Background
- Play with Silhouettes
- Get a Reflection of the Light Painting
- Work with a Crystal Ball
- Combine Light Painting with Astrophotography
- Shine a Flashlight at the Sky
- Give Landscapes an Otherworldly Vibe
- Think About Patterns and Symmetry
- Experiment with Abstract Photography
First off, for a light painting tutorial, check out this quick one from SLR Lounge or this in-depth one from MasterClass. Since those tutorials cover everything you need to know about light painting, we won’t get into the technical details here. It’s super simple to do, though, so even if you’re a beginner, you can find inspiration in the following ideas.
Draw or write something.
This is often where photographers begin with light painting. Although drawing a picture or writing a word with a flashlight is actually more challenging than some of the other ideas on this list, it’s undeniably fun, too.
Hemzah Ahmed – I Love U
Devin Roberts – Here is a Heart
Make the inside of something glow.
This idea is much easier than drawing or writing, since you won’t need to move the light while taking the picture. You just need to place the light inside an object or building. Then, with a slow shutter speed, the light will fill the space with a strange glow.
cover of darkness – Phonebox
Simon Pankoski – Tee Pee playing with lights
Linda Pepper – Silo Halo
Add drama to a still life photo.

Still life photos are another way to use a static light with light painting. Though subtle, shining a light on a still life subject in a dark room can make a huge difference in the mood and drama of your photo.
KvonK – Dancing the Night Away…
Velmerc – Still Life…late night contemplation.
(Carefully) create sparks with steel wool.
Want even more drama? Try working with steel wool that’s been set on fire. (Note: this can be dangerous, so be careful, and stay away from flammable locations!) For details, check out this guide to steel wool light painting from Lomography.
Olga Chaplin
Tony Bent – Light Painting
Ralph – Sparkling rain
Mix portraiture with light painting.
If you want to try something new as a portrait photographer, light painting is a good technique to play with. Since you might already need other people to assist you with the light painting, taking their portraits can be a nice way to repay their help!
Christopher – Kristin & Phil: {engaged}!
Stephen Orlando / Al Orlando – Drum Solo
Take a surreal portrait.
Light painting always adds a surreal element to a photo, but you can choose to lean into that surreality even more. Instead of trying to capture a normal portrait, try creating a portrait that’s a bit bizarre, like a dream instead of reality.
Alexandro Valcarcel – Invitation to Light
Graydon Wood
Use light painting as a background.
Often, light painting is the main subject of a photo, but you can also use the technique to create cool backgrounds. It’s a great way to instantly make a simple portrait or still life photo more interesting.
Amir Loshakove
Malgorzata Kapustka – light painting…
Eva Kristensen
Play with silhouettes.
When you’re using light painting as a background, you can go a step further and create silhouettes against the light. For tips on composing photos with silhouettes, check out our post about silhouette photography.
Manuel Palma – B&W Light Painting
Valerie DeBiase
Mark MacKenzie
Get a reflection of the light painting.

To double the size and impressiveness of your light painting, shoot it over a reflective surface like a quiet pool of water. It’s an easy way to make your photo more dramatic!
Michalis Ppalis
Britta Günther
Sheldon Reich
Work with a crystal ball.
Like reflections, crystal balls can bring an unexpected element to a picture of light painting. Especially if you combine the crystal ball with a reflection, you can end up with a fascinating image.
sure2talk – psychedelic dreams
Robert Smith – Crystal ball light painting
Combine light painting with astrophotography.
A starry night sky can be so spectacular that it’s tempting to focus on it alone. But in fact, the most captivating shots in astrophotography often have an interesting foreground, such as a lovely landscape or cityscape. If your foreground isn’t interesting enough or needs more lighting, you can use light painting to make it more intriguing.
Rodolfo Lara de la Fuente – Luces Desierto
Pete Wilson – Brayshaws Hut
Shine a flashlight at the sky.

While many pictures of light painting look a little weird (in a good way), you can also use light painting to show normal beams of light. For instance, flashlight beams don’t always show up in a photo, especially when they’re shining against the night sky. With a longer exposure, you can “paint” these flashlight beams onto the picture.
Depending on the flashlight’s angle and how long your exposure is, the flashlight beam will either glow subtly or shine brightly against the sky. Both can look beautiful.
Stephen Humpleby – Alien hunters
Grant Ordelheide – Denali National Park and Preserve
Give landscapes an otherworldly vibe.
Even without a clear night sky, you can get awesome landscape photos at night with light painting. Even if the landscape is plain and unremarkable, the light painting will make it strange and eye-catching.
The same effect can be used with architecture, too. For example, look at these surreal photos by Xiao Yang, which combine light painting with abandoned buildings and monuments.
Colleen Galvin – Light Painting
Stephen Humpleby – Wire Wool Cervantes
Think about patterns and symmetry.
If you hit a creative block while shooting light painting photographs, try going back to the foundation of good photography: composition. For example, you can work with patterns or symmetry to create a well-composed photo.
Leon Ritchie – Shelter Of Light!
Stephen Humpleby – St John Orbs
Experiment with abstract photography.
Still stuck for ideas? Try letting go of perfection, and have fun with abstract photography. It might look chaotic at first, but those chaotic photos can help you flex your creativity and discover what kind of light painting you like the best.
Enio Godoy – Light Paint
Bernie – Lightpainting
Light painting photography - Canon Come and See
Light painting is a photographic technique where light is “painted” or “drawn” into the photograph using a hand held light source during a long exposure. Painting with light is a popular photographic activity mostly because it is fairly easy to achieve great results, requires little specialist equipment and you can get some really interesting results.
To get started you will need:
- A camera with manual or bulb exposure control - to achieve the long shutter speeds necessary.
- A sturdy tripod or sit your camera on a sturdy surface - the exposure will be measured in seconds so handholding is ruled out
- A light source - this can be a wireless flash, torch, led tubes, anything that emits a bright light, the more variations in size and colour the better
- Other useful items - a cable release, extra batteries
- A dark place or scene - can be indoors or out
Start with a simple shot to ensure the exposure settings and shutter length are correct
How to setup:
- Decide on your shoot location and place your camera on the tripod or a sturdy surface
- Switch your camera to manual mode and set your ISO to 100, a small aperture, such as f/11 or higher f number and shutter speed to between 10-30 seconds
- Fix your white balance depending on your light source, try “incandescent” or “tungsten”
- Your camera won’t focus in the dark so pre-focus on the area you wish to shoot, switching your lens to manual focus
- If using a shutter release attach that now, alternatively use the 2 or 10 second timer to prevent camera shake when pressing the shutter
Experiment with multiple people and light sources to bring variety and creativity to your light painted photographs
Ready to shoot:
- Be conscious of where your light is pointing, shining the light onto yourself or others will result in ghostly figures in the final image
- Always review the shots on the back of the camera, adjust aperture or shutter speed to correct the exposure and effect
- Remember, the closer the light is to the subject the smaller the spread and more intense the light.
 For smooth even light stand further back and paint the light onto the subject with slow even sweeping motion
 - If using a bright torch avoid shining it directly at the lens as this may cause flare, low powered coloured LEDs are fine and are great for painting lines
- Let your friends know where the frame ends, there is no point painting light outside the frame, use markers on the floor so people know where to paint
Make sure everyone knows what’s in the frame to get a good composition
It really is as simple as that, so keep experimenting:
- Try out different subjects and locations as possible
- Take turns to come up with more and more creative designs
- Paint onto objects; trees, bushes and man made objects can produce really interesting night images with the addition of light painting
Light painting and light photography
What is light painting?
Light painting, sometimes referred to as light painting or light graffiti, is a photographic technique for using a moving light source such as a flashlight, glow stick, light brush, or even a smartphone to alter an image when shooting at a slow shutter speed. Instead of just fixing the image as it is, lighting artists add another element by highlighting the subject or by creating streaks, colors or flashes within the image.
What settings are good for drawing light?
As with any specialized form of photography, you'll want to play with your camera settings to figure out which ones to use to achieve the desired effect. But there are some features that will help you start painting with light.
The most important thing that makes this method different from most of the photographs you are likely to take is that you will need a slow shutter speed. When we say very long, we mean a minimum of 30 seconds, if not more, depending on what you are creating. A slow shutter speed allows your camera to capture movement in a blur while still objects remain sharp. In the case of light paintings, the source of light will be movement.
Here are the most basic settings you will need to set on your camera in order to successfully get such a slow shutter speed and create a bright picture:
- Mode: manual or lamp
- Exposure : 30 seconds
- Diaphragm or Diaphragm : 8 or 10 ISO
- : 100
How to set up your camera
Determine your base exposures. You need to determine the base exposure of the ambient light before you even add any new light painting elements. Since you're working with long exposures, setting the ISO six stops higher than the ISO you'll be using initially can help. If you're using ISO 100, that means you'll set it to ISO 6400. With ISO, figure out how many seconds you need to expose the ambient light. One second at ISO 6400 equals one minute at ISO 100. Once you've calculated the exposure in seconds, set the ISO back to 100 and check the exposure in minutes. If it matches, you have a base soak time.
Focus the image. Before you start painting with light, it is important to focus the image, but in the dark it can be difficult. This is where the manual focus setting comes in handy. If you have the ability to turn on the overhead light, you can do so to focus the camera. But if you don't have an overhead light - for example, if you're shooting outside - you can simply aim your light at the part of the scene that you know should be in focus. Leave this light on while you focus and turn it off once you find focus.
Start exposure. This is the fun part! It's time to start exposing and start painting. Most cameras allow shutter speeds up to 30 seconds, so if you want a longer shutter speed, set your shutter speed to manual. Bulb mode means the camera will take a picture until your finger leaves the shutter button (or remote shutter release).
What equipment is needed for light painting?
You will need some basic lighting photography equipment, as well as a few more advanced camera setups. We will go through all. Let's talk about the hardware first.
Camera . The manual DSLR offers the customizable accessories and accessories you need to get the best light painting results. However, you can also use the iPhone to create light paintings. This is a good way to access art at a lower cost since most people already have phones. But if you decide to go that route, you'll need an app designed specifically for painting with light, and many of the other tips listed here won't matter.
Tripod. In a long exposure photo, the shutter is open for a long time, which means that any movement, no matter how small, can result in a blurry image. When painting with light, some blurs are really desirable - the ones you create with a light source. However, blurring due to camera shake will result in a fuzzy image. To avoid camera shake, make sure you have a good and sturdy tripod. The only exception to this tripod requirement is if you are painting with kinetic light, which we will discuss below.
Light sources. You can use almost any tool as a light source to draw light, but each one will have a different effect - and even a different color. Examples of popular light sources for light painting include light painting brushes, flashlights, lasers, glow sticks, strobe lights, candles, LED lights, and even string lights. It's worth experimenting with different light sources to see which ones work best to achieve the desired effect.
Remote shutter release. When shooting at slow shutter speeds, even the slightest movement can blur the image. This means that unless you're painting with kinetic light, you really don't want to touch the camera or tripod. Instead, buy a remote shutter release or cable release for your camera. These tools allow you to take pictures without even touching the camera! If you're not ready to invest in a remote shutter release or cable release, then the timer feature on your camera will also work.
Stopwatch. A stopwatch can be useful for drawing lights, especially if you're moving the lights yourself. You will need to keep the shutter open long enough to complete the light painting, and counting the seconds in your head can be distracting and difficult. Instead, use a stopwatch to time your movements, and then make any necessary adjustments to your shutter speed or movement speed.
Color gels. Color gel is a transparent colored material that coats the lens and changes the color of the captured image. You can buy them online, at photo shops, or even make your own from colored pieces of clear plastic. Colored gels are great for changing the tone of the light you're working with. Use them if you want certain effects, but you probably won't need them every time.
3 main types of light sources
There are three main types of light sources for light painting:
- On-camera light source. The light source on the camera means that the element that emits the light is a visible object. With this technique, you actually enter the frame of the image and use the light source to "paint". If you choose this technique, it is recommended that you wear dark clothing so that you yourself do not appear in the image.
- External light source. With an off-camera light source, you will be directing light outside the frame of the photo onto part of the subject you are photographing. Off-camera lights are great for highlighting certain objects or for changing the overall tone of an image.
- Kinetic light painting. When painting with kinetic light, you will actually be moving the camera, not the light source.
 So, for example, you can create a candle-lit painting using the light emitted by a candle.
Light painting tips and tricks
There are a few light painting tips to keep in mind:
- Painting from different angles. Instead of directing light from behind (or directly at) the camera, try painting surfaces from the side or top to highlight their textures. Light a light source at ground level to add surface dimension and detail - this effect is especially good for grassy areas.
- Wear suitable clothing. If you're using an on-camera light source, make sure your light is in the focus of your photo (and not the person holding it) by wearing dark, non-reflective clothing.
- Use a red filter for testing. When setting up shots, it's important that your eyes get used to setting up in low light. Instead of using traditional flashlights that will ruin your night vision, try attaching a red filter to your test lights.
- Experiment with different surfaces.
 Reflective surfaces such as metal, glass, and mirrors can create amazing effects when painting with light. For other uses, rougher surfaces like plaster and wood absorb more light, while transparent materials like fabric can filter the light source in interesting ways.
 - Experiment with movement speed. How bright your light pattern will be depends on how fast you move the light source. For example, the longer you hold a light source in a particular location, the longer it takes for the camera's sensor to absorb it, and the brighter it will appear in the finished photo. Experiment with fast and slow motions to create shading effects that will complicate your photos.
3 Light Painting Experts
Although light painting has been around for almost as long as photography has existed, digital cameras have made light painting easier than ever. Some of the very first light paintings were created when a pair of French motion photographers attached incandescent light bulbs to one of their assistants in 1889. The resulting light painting looks simplistic compared to the work artists create today, which tends to be psychedelic.
Here are some contemporary photographers known for their light painting work:
LAPP-PRO . The man behind LAPP-PRO is Jan Leonardo and he is one of the most famous light photographers at the moment. His work combines choreographic manipulations with light, performance, time and photography.
Hannu Huhtamo. Hannu Huhtamo is known for his colors and textures that look like they could be CGI creations.
Michael Bosanco. There is a playful, whimsical mood in Michael Bosanko's work. He uses light to create otherworldly scenes that can include people, animals, and well-known motifs.
Get Creative
Finally, the most important thing to remember when painting with light is to experiment, have fun and develop your own style. Light painting is a medium that provides so many ways to express yourself, so immerse yourself in it and see what grabs you.
Light painting - how to make a drawing with light at a slow shutter speed
PHOTO
Turn a flashlight into a brush:
use a slow shutter speed
and photography with a light trail.
* Do it like a pro! Creative courses
07/01/2022 | ~3.5 min.
The credo of every ecologist is “leave no traces”.
In this sense, light painting is an ideal option for creativity in nature. And a good opportunity to explore beautiful places without too much impact on the environment. This is enough to make graffiti on the background of landscapes without harming them.
We will learn to draw unusual light pictures together with photographer Darren Pearson. In the night mode of the Samsung Galaxy S22 Ultra, he created images of animals against the backdrop of the beaches, forests, plains and desert of his native California. The phoenix in these works symbolizes fire, the killer whale the ocean, the cheetah the wind, and the deer the forest.
Anyone can become a light photographer
Light painting is as old as photography itself. For example, Pearson was inspired by picture 1949, in which Pablo Picasso depicts a centaur with a flashlight. “To make a light painting, all you have to do is set up the camera on a tripod in the dark, and then move the light source in front of the lens with the shutter open,” Pearson explains. If you wear black at the time of shooting, you will almost disappear from the final long exposure shot.
To make a light painting, you need a smartphone that allows you to manually change the camera's shutter speed, focus, and ISO. An old phone flashlight can be used as a “brush”, although Pearson himself prefers multi-colored LEDs. “The main thing is that you feel comfortable using the tools,” he says.
Go with the plan
Since the light painting needs to be laid down in less than 30 seconds, it's worth simplifying the picture as much as possible. Rehearse the movements so you can accurately reproduce them when it's time to take the picture. Pearson practiced on the Notes app using an S Pen.
Once you've finalized your design, you'll need to find a suitable background. It is better to choose remote, not too lit places and take into account the weather. Avoid shooting in bad weather or in windy conditions as gusts can move your tripod and ruin your shot.
It's all about the settings
"You can't have a great photo without a great idea, just as you can't have a good photo without the right exposure settings," Pearson says. If you've thought of everything, it's time to open the camera and switch to Pro mode.
Depending on the amount of light in the background, Pearson recommends choosing an ISO between 400 and 800. Now set the focus manually: the photographer finds 0.8 to be adequate for most situations. But the most important parameter is the speed, which determines how long the shutter stays open. Write down how long it takes you to sketch your painting, and then set the speed value as close to the desired number of seconds as possible.
Three important "K"
So, it's time to take a picture. If you don't have an assistant, before you stand in front of the lens, set the camera's timer or grab your Galaxy S22 Ultra's S Pen to remotely release the shutter. Then paint the image with the light source pointing at the camera.
It may take a few tries to get it right. On the other hand, photographs created by the light painting method do not require further processing. Experiment, Pearson says, and keep the three principles in mind: concept, composition, and camera settings. Everyone can make a light painting that becomes a work of art.


