Photographers pricing guide
Photography Pricing Guide - How Much to Charge in 2023
“How much should photographers charge?” Questions about photography pricing can be both reasonable and complicated to answer. A good answer might be $100-300 per hour or $75-350 per image for professional photographers in the United States. But photography pricing is a bit more complicated than that.
First of all, it depends on what kind of photography you’re talking about. Also, how much experience do you have, what are your expenses, and how much time are you working? Let’s take a look at these questions and more!
Note: All pricing in this article is in USD.
Profit from Portraits
Learn how to make a profitable living from your portrait photography with this comprehensive guide.
Buy from ExpertPhotography
×
Profit from Portraits
[ExpertPhotography is supported by readers. Product links on ExpertPhotography are referral links. If you use one of these and buy something, we make a little bit of money. Need more info? See how it all works here.]
Photography Pricing for a Successful Photography Business
First, more people are taking pictures with cameras and smartphones. And there are so many professional photography services out there. So it’s harder for professional photographers to make a living.
As such, we have to diversify our sources of income. Personally, I’ve tried pushing at quite a few different doors to see which ones would open:
- Photoshoots
- Competitions
- Photography lessons
- Framed prints
- Stock photo websites
- Books and articles (like this one!)
- Talks and podcasts
- Affiliate earnings
- Greetings cards
- Wallpapers (for iPhones, iPads, and computers)
- Equipment rentals
But for this guide, we will focus on pricing for photoshoots.
Photoshoot Pricing Model for Photographers
Pricing can vary from one location to another and between different types of photography. But the first task is to estimate the market rate and what your annual operating costs will be.
After that, you can divide your costs by the number of weeks you intend to work. Then you can determine how much money you need to earn every week to make a profit.
If you then make a few assumptions about the number and value of jobs you get at your chosen rate, you have the beginnings of a business plan. Let’s have a look at all that in more detail.
How to Estimate the Market Rate
A quick Google search for photographers in your area will yield many results. But be sure to look for those who offer the same type of service.
Each genre also has different photography prices, so it pays to be specific. For example, if you live in Los Angeles and photograph families, search for “Los Angeles family portrait photographers.” Or, if you want to get into wedding photography, look for “local wedding photographers.”
Be aware that it can be challenging to find photography prices online. Many professional photographers don’t show their rates on their websites.
In most cases, it’s not that they want to keep everything a secret from other businesses. In general, the needs of their clients vary a lot. It makes sense for them to set their fees according to the particular services people need.
The good news is that many photographers share their starting rates. That will at least let you know where you should start your pricing.
Experienced Photographers Can Charge More
Your experience in the field also vastly affects your rates. What if you only have one year of experience as a professional photographer? You can’t compare your photography prices to someone with ten years of experience.
Professional photographers can charge way more than amateur photographers. But if you set your pricing to student rates, it can be challenging to earn a living.
How much should you charge for photos if you don’t have any experience at all? Set your pricing closest to the lowest rates. Doing so will allow you to attract customers in the early days.
It will also allow you to expand your photography portfolio. You can then show your work to future clients. As you get more experienced, you can increase your rates accordingly.
Useful Websites to Establish Photography Pricing
What if you still don’t get much information about the photographers in your area? Consider looking at a paid website like Payscale (you can price one job for free). Simply type in “photographer,” and you see an income scale in your area.
Apart from that, free recruiting sites such as Glassdoor and Indeed also offer pricing information. Plus, you could always search online for a “photography pricing calculator.” The National Press Photographer’s Association has a helpful calculator to input expenses and desired income.
As a go-between business for clients and customers, Fash.com questioned many photographers in the States. They came up with the following pricing model for hourly rate and price per image. You can use this photography pricing list as a guide to beginner and professional photography prices.
| Level | Per Hour (USD) | Per Image (USD) |
|---|---|---|
| Beginners | 0-50 | 10-25 |
| Amateur | 25-100 | 25-50 |
| Student | 50-100 | 25-100 |
| Semi-pro | 75-150 | 50-150 |
| Professional photographers | 100-300 | 75-350 |
| Top professional photographers | 200-500+ | 400-1,000+ |
How to Determine Operating Costs
Remember that setting your prices to match your competitors isn’t enough. You should also consider your operating costs, both fixed and variable. These should include everything you can think of:
- Cameras, lenses, and other equipment costs
- Salaries (including your own!)
- Monthly rent for your photography studio (or home office if applicable)
- Utilities
- Internet
- Subscriptions for editing software, your website, email hosting, etc.
- Travel expenses
- Advertising costs
- Insurance
- Debt repayments
Besides your operating costs, look at how many hours you invest in each job. Include time communicating with clients before the shoot.
You should also consider location scouting and commuting to and from the location. Furthermore, you need to factor in your photo editing time after the shoot.
Finally, don’t forget to account for taxes when setting your photography pricing. The percentage will vary based on where you live. Be sure to check your local and federal tax rates. For example, there’s a self-employment tax besides the standard income taxes in the US. We recommend putting aside 25-30% of your income for tax purposes.
Your tax will also vary depending on your type of business. Sole proprietors typically pay the highest percentage. To make sure you’re clear on your area’s requirements, you can always speak to a tax specialist for guidance.
Karl Taylor provides the following example*. It’s how much you need to earn every week to cover the typical costs of running a successful photography business. You can adjust the numbers to suit your particular business model.
*Adjusted for generic pricing.How to Structure Freelance Photography Rates
Depending on your photography business, there are different ways to structure your pricing. First, let’s discuss what the types of photography are.
There are plenty of genres and businesses connected to photography. We’ll talk about events, portraits, real estate photography, commercial photography, product, and food photography.
Photography Rates Per Hour at a Glance
Photography rates per hour vary enormously in different photography services. High-end photographers charge far more than amateur photographers, for instance. But this quick guide will show you the average price ranges per hour.
- Event Photography—Rates range between $150-500 per hour.
- Wedding Photography—Rates range between $50-250 per hour. Packages range between $2,000-5,000.
- Portrait Photography—Rates range between $150-350 per hour. Packages range between $250-1,500.
- Real Estate Photography—Listing rates range between $150-500.
- Commercial Photography—Day rates range between $800-5,000. Licensing fees range between $250- 10,000.
- Product Photography—Rates vary between $35-175 per image.
- Food Photography—Rates range from $50-500 per project.
Apart from the prices stated above, there are other variables to consider. For instance, the pricing for a group portrait per hour may be different from a portrait photography photoshoot for one person. And in commercial photography, there are licensing fees to consider apart from your day rate.
How to Price Your Photography in Each Genre
As you can see, it’s difficult to be too specific about a photography pricing template. Pricing varies too much to create an accurate guide.
So let’s look at a breakdown of various photography businesses. That way, we better understand each niche’s typical photography pricing model.
Event Photography Pricing Guide
For event photographers, having an hourly rate is standard. Prices vary from at least $150-$500 per hour.
Many photographers require a minimum number of hours for a session. If the client doesn’t meet that limit, they may have to pay more. The reason for this is to ensure they’re not taking an event job for only $200. It also encourages clients to go with a bit more session time.
You might charge $300 per hour if it’s less than five hours. But for five hours or more, you might be a lower rate of $200 per hour.
Hourly rates also depend on the location and type of event. Plus, you can include other fees for any special requests from clients.
The number of images you can include with your hourly rate may vary. Some event photographers have all their best pictures included in their hourly rate. Others limit how many photos they provide for each hour.
Photographers may also offer packages that include physical copies of the images. And remember, event rates include editing. So make sure that your hourly rate leaves room to allow for editing time.
Wedding Photography Pricing Guide
Couples want memorable photos from their wedding photographer above and beyond standard event photos. In most cases, they ask for special requests that vary by client.
Some may like large prints, while others only need a single album. Some may want to include engagement photos, while others want you to focus on the wedding. Whatever requests they make will affect your wedding photography prices.
Wedding photography contracts often include the number of hours you need to cover the event. Furthermore, you have the option to set the number of photos you give your clients.
Do you want to send them everything you took for the entire event? Or would you instead select the best ones yourself?
As mentioned, your local market and the quality of your work are the two main factors that determine your rates. To help set your price structure, look at what the other photographers around you offer.
Setting Prices for Wedding Packages
Specifically, do your research on other photographers’ packages. What do they include? How much do they charge? Can you provide the same services competitively?
Of course, you shouldn’t copy other people’s packages. Instead, figure out what a wedding photographer may lack and fill that void with your service. That way, you can offer your customers a complete, unique experience.
If you create pricing packages, you can tailor your rates according to the services your clients may need. Your photography prices should include physical products such as albums and prints. Combining these items with your package creates a personal touch. Not to mention that you can earn more if you offer such add-ons.
But pricing shouldn’t end there. You should also consider other photography opportunities, such as engagement photoshoots. After all, why should a couple hire another wedding photographer for those events when you could do them yourself?
The more you provide at a much friendlier price, the more likely you get clients. Of course, you also shouldn’t go too low on your pricing. Stay competitive!
Beginner wedding photographers may price their packages as low as $500. In general, many businesses charge up to $5,000. But rates can be as high as $20,000 for professional photographers. (These higher rates tend to be from renowned professional photographers.)
Portrait Photography Pricing Guide
Portrait photographers offer packages like wedding photographers. So, what are the factors you need to consider when setting your portrait photography pricing?
In most cases, you need to know how long the session will be. Then you need to find out how many people will be in it.
Remember that time is money. So setting limits to your session will help you earn more. The longer they want to pose in front of the camera, the more they have to pay.
The same goes for the number of people they can include in group sessions. Working with large groups takes a lot longer. If even one person blinks at the wrong time, you have to take the shot all over again!
Including Extras In the Pricing
Your photography pricing should also include a set number of photos you can deliver. To make your business more lucrative, give them access to digital images and prints.
While some people simply like to post their images on social media, others love to have physical copies of their portraits. Diversify your services and offer them different options. That way, you earn from digital copies and the albums you create from prints.
Like most photography businesses, portrait photography session prices vary. But most professional portrait photographers start at no less than $250 for a basic package. For that, they may offer up to three hours of work plus digital files of all the pictures.
Pricing for corporate portraits can be in the thousands. Again, it all depends on your market and skill level. As always, look around on the internet and see what rates other portrait photographers offer.
Pricing for Social Media Portraits and Ads
One popular kind of portrait is the one destined for social media. It has become more and more popular in the past couple of years. So, if you’re a photographer getting into this business, how much should you charge for Instagram pictures?
Pricing varies depending on the type of photography business you run. In general, photographers send image files to clients and let them decide what to do.
Typically, photographers only charge clients if they want prints and other physical images. But people can use digital photos in almost any manner they want without fees.
This pricing model is acceptable for most photography businesses. But pricing for social media is entirely different than commercial photography.
Since companies will use the images for marketing, they have to pay for licensing. The only difference is that the rates for an Instagram campaign are often significantly lower than a print ad.
The pricing for social media also varies a lot. It can be a few hundred dollars for one small company ad. But it can reach up to $10,000 or even $20,000 for some high-profile Instagram campaigns!
Real Estate Photography Pricing Guide
Real estate photography is always in demand and offers opportunities for entry-level photographers. It’s easier to start here than in other businesses.
So what makes real estate photography attractive to entry-level photographers? It’s the fact that you don’t need to have an extensive portfolio to start. And it’s easy to learn and doesn’t need a long list of equipment.
Many real estate businesses hire new people all the time and train them. Some only require a camera, a wide-angle lens, and a computer. That’s it! But, that’s not to say it doesn’t have its own set of challenges.
Flat-Rate Pricing
Unlike other businesses, the pricing for real estate photography isn’t per hour. Instead, you get paid per house listing. And in most cases, clients expect you to deliver 20-25 photos.
The size of the property also determines photography pricing. If it’s a larger house, you need to charge more. Why? Mainly because you have a bigger area to photograph.
It would take you more time to take pictures of every building feature. Furthermore, you may also have to deliver more than 30 images to make sure you include every room and facility.
Real estate photographers in most markets begin at $125 per listing. It can go up to $250 or more for more prominent properties. Because you’re dealing with flat rates, it doesn’t matter if you’re new in the field for the most part. Clients will give you the same amount they pay veteran photographers as long as you can prove your skills.
But the pricing can go up to about $500 for more experienced professional photographers in higher-priced markets. Clients need the quality of the photographs to reflect the property’s value if they have a multi-million dollar home. So, most of these real estate brokers may prefer hiring veterans in the business instead of beginner photographers.
Online Platforms and Growing a Business
Online platforms for home listings dictate the number of files you need to deliver. In the US, they allow up to 25 photos.
Turnaround needs to be quick for real estate clients. In most cases, you need to deliver the files within 24 hours. So you need to account for that in your rate calculations as well.
With so many online opportunities, starting in the real estate photography business can be easy. Still, it’s essential you build your online portfolio as you gain experience.
You should also invest in better equipment, including lighting, as you grow. That way, the quality of your real estate photos also improves. If you’re an employee with a real estate company, you can eventually transition to a full-time business owner or contractor.
Commercial Photography Pricing Guide
Commercial photographers work for companies rather than individuals. It is one of the most challenging niches. It requires years of training and experience before you get any acknowledgment in the industry. But once people recognize your work, you have a chance to earn a lot of money.
Commercial photographers often get the highest salaries when it comes to photography businesses. Most of them get hundreds if not thousands of dollars per hour.
Apart from that, they also earn from licensing their photos for commercial use. Licensing can yield tens if not hundreds of thousands of dollars. So, it’s tough to set pricing for commercial work.
Questions to Ask Beforehand
You need to ask many questions before you can even determine the costs. For instance, is the project for a small or international brand? Is it for social media or a billboard campaign? How much is the budget?
Those are some questions and a few factors you need to consider. Then, of course, you should also think about hiring a crew, necessary equipment, and production costs.
Pre-production alone may take weeks or months. Then the photo session itself can vary from one day to a few weeks. After that, you need to set aside time and money for post-production.
Standard Commercial Pricing
A standard pricing model for commercial photography pricing is the day rate. But some people charge per hour or project. The fee often includes a set number of final images.
As we mentioned, there are also licensing fees for the photos on top of the day rate. Even though companies pay top dollar for the photoshoots, the photographers still own the pictures. The clients need permission to use those files for marketing.
Licensing is a way for photographers to ensure their clients can only use the photos for a specified period. It can be as short as one season—like a few months—or last for a few years. Then clients have the option to stop or extend it for an extra fee when their license expires.
Since commercial projects can vary so widely, photographers often don’t create set pricing at all. Small jobs for new photographers may be as low as $500 per project. But a large business can easily charge hundreds of thousands of dollars for a campaign.
Photo from JumpstoryProduct or E-Commerce Photography Pricing Guide
One form of commercial photography that deserves a separate mention is product photography. It’s also known as e-commerce photography. It is generally priced on a per-image basis. Typical rates can range between $35-170.
Again, it’s essential to be aware of all your cost drivers. Details like how long does it take to set up each product? Is special lighting needed? How much post-processing is expected?
Food Photography Pricing
Food photographers generally charge from $150-500 and more for jobs. But the work can vary enormously. It can be a handheld shot of a beef wellington to a comprehensive catalog of everything on the menu. There’s no such thing as an “average” job.
You can do some jobs on your own in less than an hour. Others might need a whole day’s work in a professional studio with an assistant and the cooperation of the entire kitchen staff!
That makes setting your photography prices a bit tricky. You need to know all the details. That includes the location, the shot list, and third-party costs such as studio hires and assistants.
You also need to agree on the output format—whether digital images or prints—and how much photo retouching they expect.
Once you’ve done a few of these sorts of jobs, the pricing should get a bit easier. In the meantime, you need to make sure to think of as many costs as possible upfront.
Plus, do some research online to find out your competitors’ pricing policies. As long as you’re in the ballpark, you should get a few gigs that allow you to build up your food portfolio.
When to Reevaluate Your Rates
It’s not enough to decide on your photography rates. You also need to reevaluate them regularly. They should always reflect your level of expertise and quality of work.
Early on, you may want to review your rates and consider price hikes every three months. As you become more experienced, you may change your rates only once per year.
One issue that many photography businesses have is caused by having set increases. In other words, they always add a certain amount without figuring out how much they truly need.
Don’t increase your photography pricing using an arbitrary amount. You can’t say you’re adding $100 to your fees without a good reason. You need to know where every penny of the money goes. That way, you see what you need to charge.
So before you set new photography rates, calculate your costs. Then come up with a number that you think will sustain your income and allow growth. But at the same time, you should also remain competitive with other businesses. If your fees are too high, you’ll probably lose customers.
Seek Professional Business Advice
So, how much should photographers charge for their services? As a freelance photographer, it’s understandable your business knowledge is limited.
As you gain more clients, consider hiring a financial consultant. They can help you make sound decisions as you earn more money. Of course, it’s not fun that you have to pay for it. But at least you get a better handle on your business resources in the long run.
And sometimes, internet research isn’t enough. In most cases, it’s way too hard to see your competitors’ photography rates. If that’s the case, consider business coaching from professionals.
Business Coaching
Business coaching is a relatively new trend among photography businesses. But it’s pretty valuable, especially if you’re just starting. You can begin by searching for coaching in your particular niche. It could be anything from newborn photography to portrait photography.
Once you find an excellent coaching service, consider booking a session. Although you pay a fee, you get professional advice on anything about your business. That includes setting photography rates. Apart from that, you can also ask how to deal with invoicing and other financial matters.
Coaching can sometimes be expensive. But it’s a good option if you want to know the specifics of running a thriving photography business. So if you’re stuck for reliable feedback, give it a try.
Self-Study and Learning
If you think you have an entrepreneurial spirit, consider studying the ins and outs of your business yourself. After all, no one knows what you do better than you do yourself.
Most photographers choose this route. Student photographers take marketing courses along with photo courses. The only problem is that not everyone is very good at running a business!
But if managing money is your talent, then this is your opportunity. Manage everything yourself. It may be tiring. But at least you don’t have to hire a consultant. Plus, you gain total control over your photography business. And there’s nothing like seeing your earnings grow through your work.
Conclusion
As creatives, we often find it challenging to price our talents. But as photography business owners, our rates must sustain our business and our lives.
So do your research. Find out if your photography pricing is on par with the rest of the industry. Always increase them as your reputation grows. That way you can develop a thriving photography business as a freelance photographer.
It’s also essential to figure out a pricing model that’s easy to understand. That means your clients should know what they have to pay and what they get for it. Do you charge per hour, per day, or per project? It helps to be transparent so that people can trust you—and avoid arguments with angry clients!
Setting photography pricing can be intimidating. But as you gain experience, you begin to understand how it all works. So, be patient. Everything will come more easily as you learn more about your business and how much photographers make.
Check out our Organic Marketing for Photographers e-book to help your photography business thrive!
Profit from Portraits
Learn how to make a profitable living from your portrait photography with this comprehensive guide.
Buy from ExpertPhotography
×
Profit from Portraits
How to Price Your Photography
If you’re wondering, “How much should I charge for my photography?” then keep reading. Pricing can be a complicated topic but you can keep it simple when you’re just starting out. The #1 thing to avoid: spending more than you make. This guide will help you make money, rather than lose it.
To be a successful photographer, it’s important to price your images based on your time, effort, and market value. Use a cost-plus pricing model to determine how much to charge to cover your costs and make a profit. Remember to include production costs, shipping charges, and overhead in your pricing, and make sure you’re making enough to support yourself. This guide can help you quickly calculate your rates.
Here’s an example of a cost-plus pricing calculation:
This pricing calculation has two steps because it’s important to figure out your total cost before adding a profit percentage. Without knowing how much it costs to stay in business, you run the risk of miscalculating too much money as profit. You want to avoid costly surprises like expensive printing, broken equipment, or unpaid assistants.
Don’t forget about costs associated with digital files. Keep track of your expenses when it comes to hard drives, cloud storage, and client gallery hosting. For clients that don’t want physical prints but need digital space, remember that you still have billable items.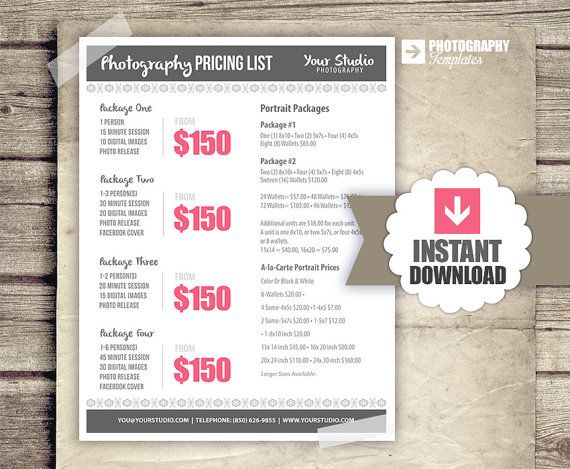
Because you’re an expert, you might have some ideas for cutting material costs. Clients will always appreciate your advice, and it can be a great relationship-building tool. If you have recommendations that will save them the cost of materials, they’ll be grateful and likely to send more clients your way.
Reducing the cost of your materials is an easy way to adjust your pricing model to include more profit. If you source materials from the same retailer, reach out to see if you can become partners. They might give you a discount if you use their product exclusively and help them promote it.
Buying in bulk also helps, but make sure you really need the materials. For new photography business owners, the last thing they need is a stack of materials without any clients in sight.
The trick is to find the right place to sell your digital prints. There are online marketplaces for photographers and artists that will let you start selling your images relatively easily. However, they often charge commissions, and you end up competing with the many photographers whose images get listed alongside yours. That kind of competition tends to drive prices down and further complicate the question of how to price your photography.
For those reasons, it’s best to set up your own online store. And doing it using Format is the easiest way to get started.
Using Format, you can set up an online store as part of your portfolio. That means you’ll have a single place you can direct potential clients to, have them check out your work, and make it easy for them to place a purchase. There are no added expenses to include in your cost-plus pricing model because the option to set up an online store is included in every Format plan.
In addition, as opposed to an online marketplace, you have complete freedom over how your images are displayed and they aren’t shown side by side with your competitors.
Build your professional portfolio website with Format
Cost of Labor
When you love your work, you can unintentionally undervalue the cost of your labor. That’s the flip side of building a creative career. Just because you enjoy it doesn’t mean that it isn’t work. The time and labor you put into your work, whether that’s on a photoshoot or retouching afterward, needs to be reflected in your total cost.
For every piece of work, a photographer needs to know how much time it will take him or her to deliver this product. Count up the hours and be realistic. Don’t count the thirty-minute break you took to scroll through Instagram, but definitely count all the time you spent at a photo shoot waiting for everyone to get into place. When you’re on the job, you’re on the job, and you should be paid.
Consider all the time you need for pre-production (setting up your equipment, ensuring you have what you need for the shoot) and post-production (any editing or uploading of photos), including the time spent traveling and meeting with your client.
Photographers should ask themselves, “How much is my time worth?” and your photography pricing should reflect that. The more experience you get, the more you can increase your cost of labor. Ultimately you’re worth what a client will pay for your time. What makes them agree to pay more? If you are professional and deliver high-quality images on time.
Freelance Photographer Tip: It can feel great to get lots of jobs but be wary of small gigs that chew up time with low profit. Instead, focus on booking fewer bigger jobs. One big job can be worth several smaller ones (and save you from burning out!).
Overhead Costs
Overhead costs can be scary for an entrepreneurial photographer. You want to start making money, but you need a lot of equipment to get started. In the photography business, the tools you use can affect the quality of your work and the management of your time.
This is a cost you just can’t cut. Maintaining software, post-production equipment, lighting, backdrops, and buying camera lenses are all part of our overhead costs, plus the wear and tear. How often will you have to replace your camera?
If you choose to get some photographer insurance to cover damage to your equipment or business liability, the insurance fees are another overhead cost. Also, remember to include in your overhead costs any professional services you need to run your photography business, such as an accountant.
Advertising is an additional overhead cost. Depending on your photography business, you might need business cards and a spending budget for digital ads. These costs can contribute to the overall success of your business but you need to make sure you’re getting a return on your investment.
Keep track of how many new clients or gigs your advertising costs are generating and consider if it’s worth it. If it’s working, maybe it’s time to up the ante.
To cover your overhead costs in your pricing structure, add up your expenses for the year. Take that total number and divide it by the projected amount of jobs you’ll work in a year. Add that percentage of the total cost to a photography job, and you’ll start covering your total overhead, bit by bit.
Freelance Photographer Tip: If you’re just starting out, an effective way to offer affordable prices is to lower your overhead costs. Decide what’s really necessary to do a good job and stick to the basics.
A little bit more about expenses…
There are two types of expenses for a photographer: Fixed and Variable.
For example, if you are a wedding photographer, some bookings may have you spending money on travel, hotel, consultation, rental gear, and/or an assistant. Alternatively, suppose you are a fashion photographer. In that case, you may have to account for the expenses of location shooting fees or studio space, lighting, make-up, styling, casting, assistant fees, and retouching.
Photography pricing is more straightforward when you understand what it actually costs to run your business. This will get you to how much you’ll need to charge to earn a profit. If the pricing for your product or service doesn’t cover costs, consider yourself at a loss.
It is also essential to gauge the costs of specific photography services that you might offer. For example, how much does a photoshoot cost to arrange? Will you be buying or renting your equipment? This will help you set a professional photoshoot price that works for both you and your clients.
Photography session prices should be calculated based on the number of hours, standard photography rates, and the equipment required. Use packages as a basis for pricing, but be flexible. Keep your photographer pricing list current by monitoring your costs.
By following this photography pricing guide, your final pricing model should:
- Cover the hard costs
- Pay for your time creating the final product
- Leave room for overhead expenses and profit
Adding your profit can be very subjective. You need to have an accurate understanding of your photography’s worth. Here are some points to consider when you’re calculating your profit percentage:
- The quality of your work and how you package your finished product
- The perceived value of you and your products in the marketplace
- How confident you are in your skills
Freelance Photographer Tip: To demonstrate that you are an active photographer, update your online portfolio frequently with current projects.

Industry-Specific Pricing Considerations
Commercial Photography Pricing
When it comes to pricing commercial photography clients, costs are above a basic and creative fee. These costs are unique to each client and cannot be applied to all clients.
It’s possible to make $20k, 45k, $85k or more from a single commercial shoot. The rates differ greatly, and this is because photographer’s fees should be based on their own expenses, resulting in variation.
Fees must be calculated based on the costs associated with doing business instead of averaging or pulling a number out of the air because it sounds good to you.
When setting your photographer day rate, speak to other local commercial photographers to get an idea of what companies are willing to pay. However, regardless of the competition, don’t be afraid to be transparent about your photography day rate, as companies need this information to enlist in your services.
Consider what you bring to the table: the equipment, lighting, backup equipment, expertise and more. Bringing these factors into the conversation upfront will help determine how much for a photographer event organizers might be willing to pay.
Event photography is a fun and rewarding way to earn money as a photographer. However, it’s important to not get too carried away with the joy of being part of a fun event, and also set your photography prices per hour at a profitable level.
To understand the total cost, we have to factor in all the variables. Specific items to be aware of when setting your portrait photographer’s pricing sheet are installation costs and the time involved with setting up. If you spend too much time setting up without getting paid, you could end up losing money.
Knowing how much to charge for portrait photography is crucial if you want to win over clients while making a good income. It is common for portrait photographers to offer industry-specific deals such as corporate, family, and/or school packages. Considering all of these into several different pricing scenarios will help you also determine how to price portrait photography packages.
How much to charge for graduation photos depends on what packages you’re able to offer and if you have the equipment to provide the value expected per tiered package. It’s common for a graduation package to include a graduation gown, cap, tassel, online proofs and digital images.
For higher tiered packages, the location and studio matters to the client and more photo options to choose from. The length of time spent at the studio to capture the perfect shot is part of the experience seniors expect from the shoot.
A simple gauge would be to speak with the school to find out how much they have paid photographers in the past. Given that schools are generally quite price-sensitive, it is recommended that you set your rates somewhere in line with their expectations.
Vendor’s experience, level of expertise, event guest count, date, and geographic region are some of the factors that influence pricing.
Wedding photographer prices typically include between six hours and unlimited coverage. The more time you need for your event, the more you should charge. Some photographers include prints in their wedding photography rates. In addition to the initial pricing, wedding photographers’ packages may include expenses such as equipment, employees, marketing, and liability insurance.
In the end, your pricing model can take into account multiple approaches. The cost-plus pricing model will tell you the minimum you should charge to reach your desired profit, and these value-based pricing methods will help you determine if you can ask for more.
For instance, if the photos are going to be used in a national campaign, you can ask for more money than if they were to be used in a local newspaper. Also, this model takes into account how long your photos will be used, such as whether they’ll appear once or be reused again and again over a certain period. If your photos are going to be shown to a wider audience, this is often a smarter move than simply charging photography rates per hour.
The Association of Photographers has an image usage calculator that can help you figure out how to price photography based on usage. It lets you input a base amount and then select the usage details such as the licensing period, types of media, and the territory where your photos will be used.
If you decide to go down this route, think carefully about the photography prices per hour you wish to charge. Have a look at the average hourly rate for photographers in your area, so as to not price yourself out of the competition. Remember that your final charge can also include time spent before and after the event, such as for travel, client meetings, preparation, and post-production.
It’s also standard for portrait photographers to offer a flat rate for a photo session. This helps you factor the professional photoshoot cost into the rate. Sometimes these sessions will be sold as packages based on the number of images. Have a look at how much are photo shoots in your area for guidance on this. As long as the photographer knows how long it takes them to capture and retouch that number of images, they can offer a flat rate with confidence.
However, there’s more to it than just knowing how long it takes you to complete tasks. Do some market testing and discover how much photoshoots are currently being charged art in tour areas. This will help you set a pricing model that is both competitive and profitable.
Whenever you charge a flat rate for a project, it’s essential that you and the client agree on what’s involved beforehand. That includes things like the number of images, the number of client feedback rounds, whether the client wants prints, etc. If you don’t take the time to outline the scope of the project, it’s impossible to know what to charge. You could end up finding out halfway through the project that the client wants you to do much more work than you expected.
For this reason, you should write up a simple contract that outlines all of the work you plan to do for the project. It’s the only way to ensure you get properly compensated and the client gets exactly what they want.
Beginners: Amateur photographers typically offer their services for between $25-$75 per hour. That’s for taking photos that appear on blogs, small websites, or in local advertisements. However, these photographers usually lack basic photography knowledge. So if you understand at least the fundamentals and standard practices of photography, you’re ahead of this group.
Students: There are a ton of photography students out there who are eager to start working. These photographers can usually ask for more money than hobbyists since they have some formal training. The typical hourly rate is between $50 and $100 an hour, depending on which school they attend, how far along they are in their studies, and whether they have any professional experience.
Entry-level photographers: Those who are just getting started in the world of professional photography after taking some formal education typically charge $50-$150 per hour or $25-$125 per image. Since their amount of professional experience is probably limited, the same factors that affect the rates of student photographers also apply here.
Professional photographers: Photographers who have some real experience under their belts can typically charge $75-$250 per hour. With the higher pay, clients expect these photographers to know all the ins and outs of the craft, including having great pre-production and post-production skills.
Top photographers: Those who climb their way to the top of the field to become high-end photographers can charge way more, from about $250-$500 per hour ranging up to as much as $10,000 per day.
But by developing expertise in a specific type of photography, specialized photographers have their work valued higher than general photographers. There are many different areas photographers can specialize in, here are just a few examples.
- Documentary
- Portrait
- Sports
- Product
- Fashion
- Wedding
Some specializations are valued higher than others. Typically, the more specialized the skills required for the job, the more you can earn doing it. For instance, experienced wedding photographers tend to make more than general portrait photographers. That makes sense as weddings are one-time events where the photographer often has one chance to capture important moments. So there is little room for error. Since not every photographer is up to the task, skilled wedding photographers are always in demand and can ask for higher rates.
Also, when you choose a specialization, consider how many projects you’ll be able to take on per year. This will help you determine how to price your photography. If you are a wedding photographer, work tends to come in seasonally, so you’ll have to make sure you’re earning enough to cover your costs and keep you going during the offseason.
One way to test your pricing model is by putting up photography pricing list examples on your website and measuring the response from customers. For instance, if you offer photoshoots as one of your services, try placing a photoshoot pricing list on your photographer site. If you are struggling to make bookings, this could mean that your pricing model needs to be revised. Likewise, if your photoshoot costs end up being higher than what you make, you definitely need to rethink your rates.
Sometimes the model is fine, but you just haven’t accounted for additional client requests and changes further down the line. In this case, be clear about your photographer’s cost per hour rate so that your client is fully aware of the additional costs associated with the extra work. A well-developed contract can make this easy for both parties. You can also set fixed photographer fees for location work so that overheads don’t eat into your profit margin.
If you perform a number of different photography services, there also could be certain elements of your pricing list that are eating away at your profitability. For example, your event photography rates per hour could be too low, or portrait photography cost simply too high. Whatever it is, try to pinpoint the problem and act upon it before these costs mount up and hurt your business.
Depending on your photography business and location, your competitors could favor à la carte solutions, custom packages, or add-on options. What are your competitors charging? What are you offering? What does your pricing model look like in comparison? Just remember, photography cost is only one element of your model; you must also factor in distance, time, and your esteem value.
For some concrete examples of what pay rates other photographers are earning, check out this photography price list for beginners. It provides examples of how much photographers have been paid for various projects.
Don’t feel obligated to copy your competition’s photography pricing, though. While determining the average photoshoot prices of your competitors can help, don’t be too afraid to value your talent, experience, and charisma for what it is. If you feel what you offer is worth more than your competitors, by all means, set the bar high with a photoshoot price list to match. The importance of market research is for you to at least be aware of your local market.
In some cases, your competitors’ model will be “best practice” and indicate how it should be done. In other cases, you can develop a better way to be more disruptive in the marketplace. Regardless, photography pricing will vary depending on what kind of business model you are using as well as how many other players there are in the market. You need to be realistic and relevant to your local market. Do your research!
Freelance Photographer Tip: Determining your local market is vital to becoming a working photographer. If your photography pricing is too high, you will need to convince your clients of the value of your work enough to pay that price.
📚 Tips for a beginner photographer: 43 tips for a photographer
Taking the first steps in a new activity, whether it's a job or a hobby, every person will certainly encounter difficulties. It seems that you are doing everything as it should, but the result is still not the one you expect. And at such moments one often wants to quit everything and become very, very sad...
The main problem for a beginner in anything is the lack of knowledge or necessary information. And then everyone decides for himself what to do: learn from his own mistakes or take the advice of those who have been “in business” for a long time - they have already filled their bumps and know how to act in certain situations. nine0003
When I first started taking photographs, I naturally did not know everything that I know now. I made mistakes (many mistakes, very many...), and looking back, I understand how they could have been avoided. But this is what helped me become a professional in my field.
In the photograph, I lament that ten years ago, when I was just learning to photograph, there were no such valuable tips 😊and wrote me a short guide on how to avoid mistakes as a beginner in shooting, communicating with customers and in many other situations ...
But today I can already tell myself about what a beginner photographer should and should not do. I based these recommendations solely on personal experience: on the mistakes that I made, and on those situations that often baffled me as a beginner. In this article, you will find 43 tips for a beginner photographer to help you get started.
By the way, I also have a photography school where there are a lot of theoretical and practical lessons for beginners and professional photographers, and also where I hold online workshops every month, where you will see live how shooting takes place, what camera settings are, how cool photos and where else I answer all the questions! nine0010 And all this for the price of two cups of cappuccino😊
General
Always take your camera with you
It is with this banal but very valuable advice that I want to start this article. Yes, today everyone has mobile phones, but today the phone models are not yet as perfect as even the cheapest cameras with decent optics.
And at the same time, mirrorless cameras, like my Fujifilm X-T2, fit easily in the hand and even in a small women's backpack.
What if something interesting happens and you don't have anything to film it with? Or you saw a location of stunning beauty, but in the absence of a camera, you will have to capture it only in the depths of memory ...
So again: always take your camera with you.
Read instructions
The camera requires the same treatment as any other technique. Therefore, the first thing after purchasing a camera is to inquire about its functions. The instructions were created for them to be read and learned about all the intricacies of using the equipment and about its functionality. nine0003 You can't even imagine how much useful information you can get from your camera manual.
And don't take this point lightly. In any manual for the camera there are basics that are given out as copyright information in any local scale photography school.
If you threw away your manual in a fever, or if it's in a language you can't read, don't worry. Your way is to go to the manufacturer's website and literally in three or four steps you will be the happy owner of the instructions for your camera. nine0003
Shoot in RAW format
Think of a JPG as a printed image from the era of film cameras. The maximum that you can do with it is barbarically draw mustaches on happy faces with a marker.
RAW is the negative. It allows you to adjust the color, contrast, brightness, shadows without losing image quality. With this format, you can save even a completely hopeless shot.
The only nuance, and you will soon get used to the fact that there is not a step without nuances in photography, is that the RAW format is very heavy. Approximately one megapixel in your camera is equal to one megabyte in a raw format file. nine0003
Accordingly, if your camera has the ability to set the raw + jpg option, use it. Jpg for photo selection, raw for processing.
Buy a tripod wisely
Do you need a tripod? You can understand this only when you understand what style of photography you will dedicate your time to. A tripod is essential for nature, night scenes and still life photography.
In the photo, I'm engrossed in the process of making a video. This is one of those cases where it's impossible without a tripod But in portrait or travel photography, he will be a burden. I only use a tripod when shooting food or videos. And when I walk the streets of Rome or Barcelona, my tripod stays at home. I do not need such a heavy burden in my walks.
Therefore, once you start your journey in photography, don't rush to buy a tripod. Better get a friend who has one. And don't forget, there are tripod legs and heads for every type of photography.
Disable camera effects. No, turn
Remember that if you are only shooting in jpg, the effects must be turned off. You will not be able to correct them later during processing. At the same time, if you photograph in raw + jpg, you can turn on any filter, be it sepia or black and white film from the era of Helmut Newton.
In Adobe Photoshop and Lightroom, in one second you can return your raw color to its original color or change the effect to a completely different one. And add a preset. For example, VSCO or any other.
Choose a camera with manual settings for all parameters
In my photography school, I make it mandatory for students to switch to manual mode. Most often, it is marked with the letter M. This approach allows you to better understand the exposure and shoot creative photos without trusting the camera's processor.
Yes, you will not always want it, yes, it will not always be convenient. But if you really want to be a pro, learn to shoot in manual mode. And only then, if necessary, switch to semi-professional modes, for example, when shooting children or a reportage. nine0003
Lens selection
Lenses can be divided into wide angle, portrait and telephoto lenses. Each of them serves its own tasks. Do you remember that without nuances in photography you can’t go anywhere?
Choosing a lens is a process. For example, before I found the perfect portrait lens that I liked the design of, I changed about 15 models. No, I didn't buy them all. Some I rented, some I borrowed from friends. Choose a lens based on what or whom you are going to shoot. Wide-angle lenses are used when shooting nature and interiors, portrait lenses are used for shooting people. Therefore, first decide on the subject of shooting, and then with the equipment you need. nine0003
And remember, you don't have to buy the entire line of lenses first. A standard 18-55 basic lens will suffice (almost all manufacturers have it, it is cheap and usually included in the starter kit) and a creative fixed lens 50mm with aperture 1.4. It is on the latter that you can make beautiful portraits with a blurred background.
And only then, after a while, you will independently understand what kind of lens you need to shoot your preferences. And, I repeat, find yourself a friend who is unfortunate enough to read this article and who has the entire line of lenses, and from whom you can borrow wide or telephoto from time to time. nine0003
Learn the functions of the lens
Stabilization, macro photography, etc... Knowing what you can do with a particular lens will make it much easier for you to take beautiful pictures.
Lenses are available for various tasks, from shooting molecules to photographing exploding galaxies and black holes.
By the way, would you like to know how a food photographer lives? In this short video, I talk about my profession and shooting around the world:
Exposure
Shoot wide open
Remember this abbreviation: DOF. It's not a virus, it's Depth of Sharply Rendered Space. It can be from one millimeter to infinity. Roughly speaking, it is the depth of field that is responsible for the beautiful blurry background. Rather, when the background is blurred, this is called shallow depth of field or small depth of field.
There are four factors that govern depth. And one of them is an open aperture. The wider the aperture, the shallower the depth of field. And secretly, lenses with open apertures are quite expensive. But they also give a beautiful picture. Use
Set the correct white balance
To avoid taking pictures that are excessively yellow or blue, you need to set the white balance correctly, depending on where and how you shoot.
This photograph illustrates how the mood and meaning of a photograph changes with changes in white balance temperature. In this case, the most correct temperature is 6500K. P.S. I hope my wife doesn't kill me for using her pictures so brazenly 😊
Most white balance can be left to the camera's automatics, and it does a great job in a wide range of different situations. Difficulties can arise only in a few cases: there is no white, black and gray colors in the frame, you are shooting at values up to 3000 or above 7000 Kelvin.
This is the flame of a burning candle and dawn and sunset in the early stages on one side and fog on the other. But don't worry, if you shoot in raw, then you can fix the white balance in a few seconds in Photoshop and Lightroom. nine0003
Light
Avoid bad lighting
Good lighting is vital to getting perfect shots. therefore, poorly lit rooms or ugly artificial light are not your story.
Learning the art of controlling light is the main task of any photographer. It is light that creates the pattern, and light is part of the composition. If you like the photo, it means that most likely the photographer set the light correctly.
In my photography course for beginners, I devote two large sections to light, and in many other sections I talk about how light can affect color and composition and the subject and meaning of a shot. And below I will look at the most common mistakes of novice photographers and how to avoid them.
Direct lighting kills volume
Built-in camera flashes often do this. Cover them with blue duct tape and never turn them on. Flat, not voluminous and ugly. This is how you can describe direct light from a built-in flash or a flash put on the camera and aimed at the subject. nine0003 In all of these photos, I created a separate side light. Agree, thanks to such a light-shadow pattern, volume is better felt.
Use side light and side-to-back light of the photographer. But do not forget, light creates shadows, and if you don’t need deep shadows according to the shooting plot, they can be softened either with a built-in flash or a reflector.
By the way, direct lighting from a large window is good. Soft, enveloping and almost shadowless light is loved by many photographers. Try to position your model so that you are between the large window and the subject. And enjoy the beautiful black and white pattern. nine0003
Use the mode light
The mode time is half an hour before and after sunrise and one hour before and after sunset: it is divided into “blue” and “gold”. Half an hour before dawn and an hour after sunset, the light is soft and bluish.
After sunrise and an hour before sunset, golden time comes - the sun gives a soft golden color. This is good for atmospheric and portrait shots, as well as for landscapes. nine0003
This is the favorite time of any photographer. After all, at other times of the day it is difficult to get such beautiful photos. Try to position your model so that the sun shines from behind the subject's back and enjoy the cool result.
Use a detachable flash
Many photographers do not like the camera's built-in flash. And in professional models there is simply no built-in flash. Therefore, they use a removable one. On-camera or ring flash...
On-camera flash is worn on top of the camera and is often used in reportage photography. Shooting events, weddings, birthdays - that's what it is for. If you don't plan to shoot such events, you probably don't need to buy a camera flash. nine0003
Ring flash is worn on the lens and encircles it. It is used for macro photography. For small objects, the ring flash acts as a large window from the previous section, creating a beautiful and soft light and shadow pattern.
Use studio light
The best way to study light is with controlled sources. Agree, you can’t control the sun, but studio light is easy. To do this, you just need to take a loved one or friend as a model and rent a photo studio. nine0003 Don't be scared. For this picture, I collected almost all the light that was available in the studio. Just for a pretty picture. I usually use one or two flashes. And if you are still not at odds with how to properly expose the light, studio staff will help you with this problem.
Often in many large studios there is a special person who knows the magic of proper lighting 😊
Don't shoot indoors with mixed light
We've already talked about white balance in photography. So, each light source has its own color temperature. It is measured in Kelvin.
An incandescent bulb has a temperature of 3200 Kelvin, the sun at its zenith is 5200 K, an overcast sky is about 7000 K. The higher the number, the colder the color. Therefore, when shooting indoors, you may encounter mixed light.
An incandescent lamp (3200K) is on in one corner, an LED strip (4500K) is on in the other corner, and the light from the window has a temperature of about 6500K. Accordingly, when shooting, you will encounter the fact that one part of your model's face will be yellow, the other blue. nine0003 For this shot, I asked for all the lights in the café to be turned off and only worked with light from the window. And this photo is from a tutorial on shooting with natural light indoors from my course for beginner photographers.
How to avoid this? In the photography course for beginners, I talk about the method used in filmmaking and complex staged photography. These are conversion filters that change the color temperature of a light source.
But for a beginner photographer, this method is difficult. So just turn off all the lights and move closer to the window - shoot with natural light from the window. Unless, of course, the shooting takes place during the day. nine0003
In the video below I show and tell you how to work with light from a window
Composition
Composition, along with light management, is one of the most important pillars in photography. There are over hundreds of different rules, laws, principles and properties of composition.
But, the composition is first of all not the rules, it is the ability to observe and see. We photographers call this vision. You have two ways to learn composition. The first is to learn the rules and follow them. The second is to watch. Paintings, other photographs, art objects, architecture, natural masterpieces. nine0003
Naturally, you need to combine both. And also understand psychology. After all, the main task of the composition is to create a plot, to convey meaning. And this is psychology.
In photography school, I devote more than 60% of my time to composition, because there is such a rule in photography: you will learn how to work with exposure in three months, learn how to set the light in half a year, and you will study composition all your life.
Each photo has a subject center
Each photo must have a subject center. And this center should be one. This is an axiom of photography that all professional photographers follow. nine0003
The human brain is designed in such a way that we grasp all the details in the image and combine them into one whole. And if you use several scenes of the same importance in your frame, then there is a chance that the viewer's attention will be defocused and he will become irritated.
The story center is the main part of the image that focuses the viewer's attention. Properly built composition helps to see the subject and present the story embedded in the picture. nine0003
But once you start to understand the psychology of the composition, you can add a few sub-plots, complicating the meaning of the shot and giving you something to think about.
The rule of the golden section
The rule of the golden section is the basic geometric rule for the arrangement of objects in the frame. It is used to achieve harmony in the frame. It is considered ideal for perception by the human eye.
Whether you are shooting nature, interiors or architecture, the golden ratio will be your basis for composition. The basis, but not the only rule. nine0003 Although I rarely work with the golden ratio, this frame is a great illustration of this rule. The main focus is our silly faces with my wife. And I placed them at the intersection of lines
How does it work? In photography, we need to divide the frame into three parts, equal in aspect ratio as 3/8, 2/8 and ⅜. Horizontal lines place horizontal objects, vertical lines - vertical objects. Intersection points are points of semantic objects, where we place the most important thing in the picture: faces, eyes, plot centers. nine0003
PASS THE MARATHON AND WIN A PATRIOTIC T-SHIRT
Learn in 14 days to create photos that will take first place in your portfolio. Get feedback. And win a patriotic T-shirt from the Ukrainian creative brand Benya&Zubrik.
P.S. We hold a drawing every 2 weeks
Start for free
When shooting a moving object, leave a place in front of it in the frame
When shooting a runner, leave a place in the frame in the direction of movement, so you will make the photo more voluminous and logical. A picture in which a person is moving “to nowhere” will cause dissonance in the viewer. nine0003
This rule is rather from the psychology of perception, but you remember that psychology is a composition. If you asked your model to look to the side, or is it a moving car, a runner, or something else, leave room in front, so our brain harmonizes the process.
My flight was delayed and I took pictures of the landing planes to keep myself busy. This one is the best shot. And look, leaving a place in front of the plane, I thereby created calmness. “Ladies and gentlemen, we landed at Milan airport. Stay where you are and don't unfasten your seat belts…”But if you want to create dissonance, stop attention, cause irritation, do the opposite. For example, a moving car, in front of which there is no space, creates a feeling of braking, anxiety.
The best way to explain this rule is to imagine a ball against a clear blue sky. There is nothing in the frame. Only the sky and the ball.
If the ball is in the center of the frame, it appears to be hovering. If there is more room above the ball, it appears to be flying upwards. If there is more space under the ball, it seems that it falls down. You can see that there are many nuances in photography. nine0003
Keep your eyes in focus
When we look at a person, the first thing we find is the eyes. The eyes are the most expressive part of the face. We see “eyes” even in the cracks in the pavement and in the shadows.
No matter how big I shoot, I try to focus on the eye closest to me.So again, psychologically, it's best to always focus on them when shooting portraits. On the eyes.
Practice
Shoot regularly
Without constant practice, any knowledge is forgotten. If you learned English a year ago, and then did not practice it, your knowledge could obviously deteriorate. It's the same with photography...
The ability to take a beautiful picture depends on constant practice. So shoot regularly.
It would seem that this is such an obvious rule, it is written in all motivational books and articles, that I didn’t even need to talk about it. But I don't just want to give you some advice and breathe easy, that's not my way. nine0003
I would like to invite you to try my hand at my beginner photography course. Namely, to receive homework, as my students do.
You will receive your homework twice a week. It will include several interesting stories that you can complete at your level of knowledge, a selection of photos for this story and a set of tips on how to shoot these stories. And many more useful photography tips that will increase your level of photography by several orders of magnitude. nine0003
When photographing someone, imagine yourself in the place of the client
What kind of pictures would you like to get after the photo session? Of course, successful and super-beautiful. Such that they are not ashamed to post on social networks. Those that will collect a lot of likes from friends.
Each client has his own ideas, needs and wishes. Each client has their own tasks. The task of the photographer is to figure out these tasks and complete them with the help of a photo session.
Here's an example. A girl approached me with the aim of doing an erotic photo shoot. I invited her to a preliminary meeting and talked to her for several hours. nine0003
We chatted about various topics, looking at inspirational nude photos on Pinterest, discussing locations and details. In the end, when she began to trust me a little, she admitted that with the help of this photo shoot she wants to return her boyfriend. With a message: look what beauty you have lost...
It was an obsession that I had to gradually move to another topic. I offered her to be her boyfriend for a second, who saw her naked photos on social networks. Would he want her back after that? nine0003 Unfortunately, I can't show you a photo from that photo session. Therefore, just a cute cat being squeezed by a girl 😊
Of course not. And we did a completely different photo shoot, where Masha, that was the name of the girl, appeared in a completely opposite image. Not accessible, but mysterious. Not naked, but stylishly dressed. Still sexy, just as desirable, but not at all in the way she wanted to appear in front of her ex-boyfriend.
Make a list of the shots you would like to shoot
This can be done in many ways. It’s convenient for someone to just save a photo on their phone, for someone to write it down in a notebook by hand ... This is a matter of habit.
I personally find it convenient to plan frames on Pinterest - this is an aggregator site for all kinds of ideas for photos (and not only). Its convenience is also in the fact that there you can create separate boards for each topic. You can also make them private so that only you can see what's saved there.
By the way, I also show my clients boards on Pinterest to find inspiration and develop the plot of the frame. nine0003
Think over the idea and props in advance
In general, planning is a very good habit. By carefully thinking through the idea and deciding what is needed to bring it to perfection, you can make a successful shoot.
Don't expose yourself and your client - get ready to shoot in advance.
Don't review every photo you take
Of course, not every shot will be perfect. Therefore, it is pointless to review each photo immediately after you have taken it. This will only take your time and the client's time, and it will also get on their nerves. nine0003 Although I advise you not to be distracted by watching, it is still sometimes necessary to break this rule. For example, in order to show your model how beautiful she is in the photos
It is best to shoot each frame several times in a row, in case you accidentally get into focus or the client closes his eyes and then, already at home, upload all the photos to Adobe Lightroom and make a selection already right there.
Go shooting in a good mood
Good mood is the key to successful shooting. No, of course, one mood is not enough, but it plays a huge role in the filming process. A cheerful photographer will not only win over the model, but also charge her with a good mood, which will contribute to excellent shots. nine0003 Be cheerful and charge your models with your optimism. But do not overdo it, not everyone will understand the jester photographer
But if your goal is dull shots from a dull photo shoot, then forget what I just told you.
Show only your best work
Why would someone see your bad shots? Leave them for a personal archive, or better yet, delete them altogether. Especially if you're in the habit of giving away all your footage to the client.
After all, who will give a guarantee that he or she will not post the entire photo session, even with the most terrible shots, on social networks and will not sign the album in large letters - VASYA PUPKIN PHOTOGRAPHED ME (Substitute your name)
I had such a case in practice: I forgot to remove bad takes and gave the shoot to the client. He also chose the worst and ugliest photographs, posted them on Facebook and signed: this is how one of the best photographers shoots, blah blah blah ...
What motivated him, I don’t know. But now you know that such people exist on this planet.
Interaction with clients
Interaction with clients
When I photographed people, I almost never scheduled a photo session without first meeting with the client. First, you need to get to know the person, find out “what he breathes”, and win him over. nine0003
Secondly, after discussing all aspects of the shooting, you will know exactly what the customer needs.
And thirdly, with the help of a preliminary meeting, you will put your client to yourself and it will be easier for her (or him) already at the photo session itself.
Prepare for the weather
If you plan to shoot outdoors, be sure to consider the weather. Yes, the weather can change very quickly, so you should always be prepared for force majeure situations. nine0003 In 2011, when this backstage was made, I didn't have the experience to follow the weather. Looking at these photos, do you think I started doing this later?
You obviously don't want your equipment to be flooded with rain, and the list of desires of a model does not include ruining makeup and hair in a downpour or wind.
Time it right
Always leave yourself some time in reserve. So that later you do not rush and do not panic in case of force majeure. nine0003
Don't schedule multiple shoots on the same day
A photo session is a creative process. When working with a model, you seem to connect with it in one impulse and it is quite difficult to switch back.
Therefore, by scheduling several photo shoots a day, you run the risk of not creating such a “connection” with your other model. And, of course, your second client may not get such successful shots.
Create a mood board
Also known as an inspiration board. You can make it both yourself, based on the wishes of the client, and together with the customer. Of course, the second option is better - because then both of you will be one hundred percent sure that the result will satisfy both parties. nine0003
Moodboards are practical to create using the Pinterest service, which we talked about earlier.
Don't be intrusive (when shooting at events, etc.)
Nobody likes intrusive people. And obsessive people with a camera are disliked even more. Therefore, if a person at an event does not want to get into the frame, pose for you ... do not force him.
Otherwise, the photos will be unsuccessful. After all, a person will be constrained or annoyed. No one wants to receive such photos. nine0003
Pay attention to details
Always pay attention to the background - to those objects that are located behind the person and near. And then you can get a picture where everything is perfect for a person - hairstyle, facial expressions, posture, but lying far away, for example, a garbage bag will make you put an end to the picture.
Correct shooting height
Shoot children and adults differently. If your model is shorter than you, shoot at her level so as not to spoil the proportions of a person. By the way, many often take pictures of children from above - and this is not always good. Therefore, make an effort and sit down - squats are useful! :)
This is my friend Anton photographing a portrait of a stranger in Nice from chest level. Be like Anton. Shoot right.A universal tip: if you are shooting a portrait, take it from the model's chest level. If you shoot ¾, shoot from the waist level, if you shoot at full height, lie down on the floor. nine0003
Wear comfortable clothes
During photography, you will have to wallow on the floor, hang from trees, kneel in puddles and sprinkle ashes on your head. And don't forget, the photographer is always on his feet during the photo session. For several hours in a row.
Therefore, do not wear high heels and a tight miniskirt. Loose-fitting clothing and comfortable flats are best.
My record is 35 kilometers in Singapore in one day. In second and third place are Rome and Berlin. There I went out for 26 km. I, like no one else, know the price of the right shoesP.S. Just do not be surprised that I am in the frame without a camera. They take me on it.
And this advice does not apply to reportage photographers. After all, if you are filming an event where the dress code is “Black Tie” or “Festival attire”, you should at least know what it is, and at the very least, dress accordingly. No one will take seriously a photographer in a sweaty T-shirt among tuxedos and evening dresses.
By the way, another important factor is the bag for the photographer. Watch a short video on how to choose the right bag for you:
Plan the key subjects
Decide on the number and locations of the main subjects of your photo session. This will make it easier for you and your models to act during the shooting process.
And don't forget to set the timing. What time does it start, how much time is needed to prepare and what time is it to move to a new location.
Proper timing will eliminate the fuss, show you as a professional and also allow you to estimate the amount of time needed for a photo shoot and correctly set the price. nine0003
Build relationships not with the camera, but with the subject
Anton is in the frame. I filmed it in Hong Kong in 2014 by order of a modeling agency. We built friendships during the photo shoot and are friends to this day.Become a friend of your client during the photo session. Talk to him, make him laugh, do everything possible to make him feel free in front of the camera - this is the key to an excellent result.
Get better
Get inspired by other people's work
Remember that being inspired and copying are two different things. Copies are forgivable at first, but then you have to find your own style.
You can have as many sources of inspiration as you like. Now it is not difficult to find an interesting idea for photography. Sign up on Pinterest - this is an aggregator site for ideas on any topic. And as I mentioned above, it is also convenient to make mood boards on it and select the shots that you want to embody.
Learn to edit photos
Adobe Photoshop costs only $10 per month. And it gives you a huge number of possibilities. Practice processing. Learn new things. Get inspired by how other photographers edit their shots. Look for what's right for you.
And with Lightroom, which is included in one package with Photoshop for $10, you can edit photos even from your phone. It's incredibly convenient.
Always delete ugly photos
No, you don't need them. No, you won't fix them by processing. And no, they will not set a bad example for you in the future. Although, here you need to make an amendment: they will serve, but you still have to remove them. nine0003
Don't clutter your memory with bad shots. Delete them without the slightest regret.
If the photo is uninteresting, there is no point in making it black and white.
Yes, black and white pictures really look impressive and in certain cases even outperform photos in color. However, this is only possible when the frame is initially successful.
A boring photo “about nothing” will not become a masterpiece if it is made in black and white. So such pictures should also be disposed of without regret. nine0003
You will spend much less time shooting something new than fixing a bad old one.
Keep learning
You get better with every new shoot. Your skills develop when you pay attention to them. Invest your time and money in education.
These are photographs that I took in the early days of my career as a photographer. At that time I knew little, understood little. I'm ashamed to show them, honestly. But without them, you will not appreciate my progress in the future. nine0009
 Learn from other photographers. Choose the most convenient learning format for you. You must like what you are doing, otherwise there will be no positive result.
And these photographs are from later years. I studied a lot, read books, attended courses and workshops, webinars and took private lessons. Compare these photos with the previous ones. Be like me, keep learning.And finally:
1. If you liked the article, rate it below
2. If you have any questions, write them in the comments below, I will be happy to answer them! nine0003
3. I suggest you familiarize yourself with my photography school where I have a lot of theoretical and practical lessons for beginners and professional photographers, as well as where I conduct online workshops every month where you will see live - how the shooting takes place, what camera settings are, how they are created cool photos and I answer all questions.
Don't forget to subscribe and get a lot of useful content:
Alexander Slyadnev - Facebook | Instagram
Photo school of Alexander Slyadnev - Facebook | Youtube
My Real Estate Photo Pricing Formula
As an Amazon partner, we earn on qualifying purchases.
Getting the price right allows real estate photographers to focus on running their real estate photography business efficiently and making a profit. However, there are different ways and factors to consider when real estate photographers decide how to charge for their work. Let's discuss how real estate photographers Although there are many factors such as the experience of the photographer and the location of the property that can affect the cost of real estate photography, the following pricing template will help you understand industry averages. nine0550 Professional real estate photography prices depend on the product or service of the real estate photographer. He is an offer. While for real estate work it can cost a few hundred dollars for professional photography alone, then thousands of dollars for high end or premium add-ons. One of the best parts of running your own real estate photography business is being able to have more control over how much you earn and how you spend it. Whether it's a small residential home or a large commercial real estate building, a basic photo shoot can start at $100 and go up to $15,000 or more for complex one-day shoots for some real estate photographers. Another option for the professional photographer is to set a base rate per square meter. For example, real estate photographers may charge $80 for 500 square feet, which is also covered by Post Processing. Therefore, a house of 2,000 square feet will bring you $400, then professional photographer may increase the price depending on the style, extras, time and place. Aerial photography prices may vary by equipment and location. Some places require a permit to fly a drone, so consider this an additional fee. In addition, professional pilots are usually licensed, which means that their talent rewards will be higher than amateur operators. In general, real estate photographers can charge between $150 and $350 an hour. Some real estate photographers are even offering up to $5,000 for long-term aerial photography using high-resolution drones. nine0003 Some clients have asked if a real estate photographer can also take portraits for their real estate agents or team members. While this is a different area of specialization, offering a head-to-head photo shoot allows real estate agents to make the easy decision to hire you for all their needs rather than going to someone else. real estate photographer. Professional portrait photography can allow real estate photographers to earn between $100 and $1,200 an hour. Rates may increase depending on the basic inclusions of the package, such as the number of photos edited, real estate agents, time, location, storage, shipping, and usage rights. nine0003 Offering 3D, staged and virtual tours is a great way for real estate photographers to get high paying clients as these premium products become more and more popular. For example, a real estate photographer might offer a monthly subscription fee of $50 per month for Matterport. In the meantime, real estate photographers can try charging a $300 flat rate for properties up to 10,000 square feet if they use iGUIDE. nine0003 Having a consistent and well-planned price list is what separates a professional real estate photographer from an amateur. As with other photography niches, it is important that real estate photographers consider fixed and overhead costs when determining how to charge clients for your real estate photography business. Average fee covers the expected number of sessions a real estate photographer will have per year. nine0003 For example, if you charge $150 for a photo shoot and you only have 90 sessions per year, that means you will only earn $13,500 per year. Also, real estate photographers don't really bring every penny home because such a job is costly. As you can see, just using the same average price for all sessions per year is not ideal; real estate photographers should calculate it according to other factors, which we will see next. nine0003 As with a company, your industry time and experience can affect your income. The same goes for real estate photographers. A novice photographer with a year of experience will earn less than a top-rated photographer despite doing the same job. While properties can have flaws as well as beautiful aspects, an experienced and trained real estate photographer can highlight the most desirable parts of a property. Clients pay for this skill, and not just for your ability to use the camera. nine0003 Your experience as a real estate photographer will showcase your expertise in real estate photography, styling and post-production. This is why a real estate photographer who knows how to edit real estate photos with virtual staging can earn more than someone who can only do basic retouching. Since the real estate photographers market covers a wide range of properties, the type of property a property photographer will photograph can also affect how you price your property photography. Think of it this way: shooting a tiny house can take significantly less time than a multi-story commercial building. nine0003 When dealing with large properties, a real estate photographer may consider providing a complete photography package that covers interiors, exteriors and even some types of real estate. headshots for agents. For example, a two-day shoot of a mid-rise apartment might cost $3,000, while a one-day shoot of a one-story office building would only cost about $1,000. The difference depends on the number of floors, amenities and the cost of the building. That's why it's important for a real estate photographer to determine the type of property first. nine0003 Like any shoot, keep it consistent, the more property photos clients want, the more time you need to shoot and edit, making it reasonable to negotiate a higher asking price. For example, a real estate photographer can charge a flat rate of $150 for 12 real estate photos within 48 hours of the photo shoot. However, be careful as some customers may find the price per image slightly higher. Although this is the best option for real estate photographers who usually accept urgent work. While all professional photography niches require basic shooting equipment, listing photography will also require a real estate photographer who invests in some sort of specialized equipment. These are the basic tools that a real estate photographer needs to offer real estate photography services. nine0003 The use of these gadgets inevitably comes with a certain wear and tear risk, so the real estate photographer should set aside a budget for insurance or repairs. Suppose a real estate photographer spends $3,500 a year on maintenance or equipment upgrades. If you have 400 sessions a year, that means you need to get $8.75 per shoot for your gear budget.} Some real estate photographers may not notice this right away, but your gear will make a big difference in value. Not all clients know or understand the need to invest in reliable editing and client management software for real estate photographers. As a real estate photographer, you know how important it is to have updated and licensed editing software if you want to use all the tools and features available. nine0003 It is common for editing software such as Adobe Photoshop, Adobe Lightroom to have a monthly subscription fee. It's also much better to invest in client management programs than to spend time writing everything down on paper. Especially when the real estate photographer and team members, using online applications, allow the real estate photographer to communicate with his team at any time. nine0003 Business mileage is also one of the most important parameters to consider when pricing. Think about how long it will take you to travel. For example, ask for an extra $200 round trip if you travel 100 miles from your home to the photo shoot location. If you own a car, you also need to consider gas, maintenance and depreciation. Let's say all this costs up to $4,000 per year and you get 250 sessions per year, then that's equivalent to an additional $16 per photo session. nine0003 On the other hand, you can waive the fare if the shoot is within your service area. Turnover of end products can also affect your prices for professional real estate photography. Let's say your typical editing and digital delivery times are around 3-5 business days. For clients who need prints, the real estate photographer can extend the turnaround time. up to 7 business days. nine0003 With that said, a real estate photographer can charge a rush fee if real estate agents want their property photographs to arrive earlier than the standard schedule. As a real estate photographer, you automatically own the rights to the images you take, which gives you the right to reproduce, distribute or display them as you see fit. However, the client may want to get exclusive rights to the images and this is where a real estate photographer can make huge amounts of money. nine0003 One way of pricing is to offer usage rates based on the type of listing. For example, a real estate photographer sells the rights for $2,000 per photo, which also includes permission to use it for their web marketing plans for up to 6 months. Another option is to sell the rights to each photo, which is better if clients only need a few images. With this type of pricing, the real estate photographer needs to calculate the cost of a real estate photo for a file. For example, if the work and materials cost $300, real estate photographers can multiply that amount by a markup factor of 2.50 to end up with $750 per photo. nine0003 Professional real estate photography management is not just about real estate photography; Real estate photographers also need to think like business owners in order to handle the non-creative aspects and keep their jobs thriving. This includes planning, arranging, coordinating and overseeing all the necessary resources for real estate photographers to do the base shoot and deliver the products. Business operations also cover the financial, marketing and legal aspects of running a real estate photography business per year. All of this would require time, money and resources, which is why real estate photographers must consider the cost of doing business when developing prices for real estate photography. The simplest formula for real estate photographers to price real estate photography is to add the cost of the photo shoot, while taking into account the possible costs you may incur. Take a look at this example scenario: A company calls you and asks how much it would cost a real estate photographer to shoot 15 real estate photographs of a 2,500 square foot home. TOTAL: $921 Although the basic calculation may look like this, real estate photographers may add additional factors or products. Real estate photographers can either use the number 9$21 as an exact rate for this kind of shoot, or change it to a $920 or $915 package. Even with formulas, templates, or pricing guidelines for real estate photography pricing, it can feel like you're drowning in numbers and a lot of technical details. Keep these key points in mind when it comes time to work out your property photography pricing. While the residential and commercial real estate market is a year-round industry, real estate photographers may experience downtime due to competition or local market season. In such situations, real estate photographers can do things like monetize a blog, teach photography classes, or sell stock photos. Some property managers and agents have offices where they would like to display in large print the property they are selling.
Real Estate Photography Pricing Template
$225 Drone aerial photography of properties up to 2,000 square feet. 
$150 Drone aerial photographs of properties over 5,000 square feet. $ 300 10 photos of the exterior of the house with air drone $ 250 Fixed board 5 photos of the exterior from the air from the air $ 150 fixed board Drone video $300 fixed fee Drone aerial photography per hour $150  Since there are different niches, take a look at these sample rates, which you can change to suit your work requirements. nine0003
 Interior and Exterior Photography
Aerial photography

Photos and portraits for real estate agents
3D products
 However, the price usually depends on the 3D camera and real estate software. photographer would use.
 Average fee

Experience

Type
Number of Images
 .
. Shooting gear
 In addition, the real estate photographer and take into account the overhead associated with the possibility of purchasing new camera bodies, lenses with different focal lengths or spare batteries. nine0003
 Client editing, storage and management software
 Storage services like Dropbox or Google Drive also charge for storage expansion.
 Transfer
Turnover
 as it depends on the complexity of the shoot as well as the delivery method.
 Usage rights

business activities
 nine0003

Final Reminders When Creating Price Lists

 nine0476
 Frequently Asked Questions
What can I do to increase my real estate photography income?
Should I sell prints or digital images?
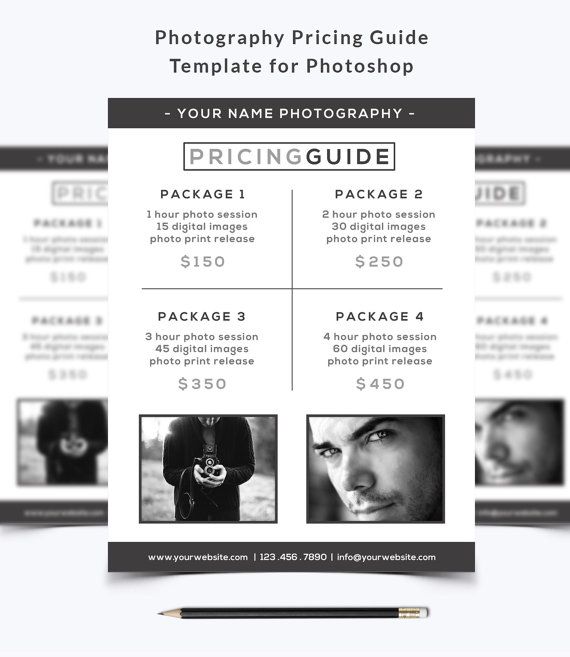
Learn more