Understanding stops in photography
What is a "Stop" of Exposure in Photography?
In photography, a "stop" is a widely misunderstood concept, feared by many because it sounds so complicated. However, it's actually very simple:
A stop is a doubling or halving of the amount of light let in when taking a photo.
For example, if you hear a photographer say he's going to increase his exposure by 1 stop, he simply means he's going to capture twice as much light as on the previous shot.
A stop is a measure of exposure relating to the doubling or halving of the amount of light. Image by Hamed Saber.
The amount of light captured while taking a photo is known as the exposure, and it's affected by three things - the shutter speed, the aperture diameter, and the ISO or film speed. These are all measured using different units, so the concept of "stops" was invented as a convenient way to compare them.
Stops and Shutter Speed
Shutter speed measures how long your camera's shutter is left open during a shot. The longer it's open, the more light it lets in, and the greater your total exposure will be. Doubling or halving your shutter speed produces an increase or decrease of 1 stop of exposure.
Common shutter speed stops.
For example, changing from 1/100 of a second to 1/200 lets in half as much light, so we can say we've decreased the exposure by 1 stop. Similarly, going from 1/60 to 1/30 lets in twice as much light, giving a 1 stop increase in exposure.
Most cameras allow you to adjust shutter speeds in increments of 1/3 of a stop, so 3 turns of the dial either way will adjust your exposure by 1 stop.
Stops and ISO Speed
ISO speed describes how sensitive your camera's sensor is to the light that hits it. A more sensitive sensor will produce the same overall exposure from less light, meaning that you can use a narrower aperture or faster shutter speed in the same conditions.
Common ISO speed stops.
ISO is measured using values that correspond to the ASA scale for film, with a higher ISO number relating to a more sensitive sensor. As with shutter speed, doubling the ISO number gives an increase of 1 stop, while halving gives it a decrease of 1 stop.
For example, switching from ISO 100 to ISO 200 doubles the sensor's sensitivity, producing a 1 stop increase. Moving from ISO 800 to ISO 400 is a 1 stop decrease. Most cameras let you change ISO speed in increments of 1 stop.
Stops and Aperture Diameter
Aperture is measured using the "f-number", sometimes called the "f-stop", which describes the diameter of the aperture. A lower f-number relates to a wider aperture (one that lets in more light), while a higher f-number means a narrower aperture (less light).
Common aperture stops.
Because of the way f-numbers are calculated, a stop doesn't relate to a doubling or halving of the value, but to a multiplying or dividing by 1. 41 (the square root of 2). For example, going from f/2.8 to f/4 is a decrease of 1 stop because 4 = 2.8 * 1.41. Changing from f/16 to f/11 is an increase of 1 stop because 11 = 16 / 1.41.
As with shutter speed, most cameras let you control your aperture in 1/3 stop increments.
Stops are Interchangeable
The great thing about stops is that they give us a way to directly compare shutter speed, aperture diameter, and ISO speed. This means that we can easily swap these three components about while keeping the overall exposure the same.
Let's say you're shooting a scene using a shutter speed of 1/60 of a second, an aperture of f/8, and an ISO of 200. You find that while the scene is well exposed, your subject is turning out a bit blurry, so you decide to increase the shutter speed to 1/120 of a second.
This change of 1 stop will result in the next photo coming out dark, because you're now letting in half the total light as before. In order to correct this, you need to reclaim that 1 stop reduction from somewhere else. Now that we have a way of comparing settings, this is simple.
You could open the aperture wider to let in more light - moving from f/8 to f/5.6 is an increase of 1 stop, so we've got back to our original exposure. Alternatively you could double the ISO speed from 200 to 400, again resulting in a 1 stop increase.
As you can see, stops are a really easy way of adjusting our camera's settings while making sure we don't ruin the photo's overall exposure.
Considerations when Adjusting Exposure
When adjusting the three components of exposure you should be aware that each one affects your photos in other ways, which may not always be desirable:
Shutter speed - If your shutter speed is too slow your photo may blur, either from movement of the camera or movement of the subject.
Aperture - A wide aperture produces a narrow depth of field, so if you make it too wide you may have trouble keeping everything in focus. On the other hand, a narrow depth of field can help to isolate the subject, and is often something that you want; if so, you need to avoid using a narrow aperture.
ISO speed - The more you increase your camera's ISO, the more digital noise your photos will exhibit. This can make your image look grainy and reduce its sharpness.
As with everything in photography, adjusting these three settings is a balancing act. You need to decide what effects you want in your shot and choose settings that will produce them while minimising the potential downsides. Exposure stops are a really useful tool for doing this, helping you swap settings around with ease and giving you more control over your scene.
Exposure Stops in Photography - A Beginner's Guide
There is so much duality in photography. On one hand, it’s the light and the subject, it’s the story we tell and the story the viewer sees, it’s a feeling, an emotion, a state, a symbol, a metaphor. Sounds poetic, doesn’t it? On the other hand, it’s pure science, every single bit of it – from the said light traveling through a complex lens design, all the way to the scene being imprinted whether on a piece of light-sensitive film or, temporarily, on a digital sensor. And that scientific part of photography brings all sorts of terms with it, terms that may not be necessary for the creative process, but as far as skillful execution goes, you can’t do without understanding them for very long. A painter needs to know his brushes at some point, right?
And so we are back to covering basics, something you surely must have noticed. In this article, I will talk about yet another, confusing-at-first-encounter term used in photography, more specifically – exposure stops. I will try to explain what they are and how stops of different exposure triangle parameters – shutter speed, aperture and ISO sensitivity – correlate, as well as give you examples of what are considered to be regular stop values of each parameter, and what are full, half and third-stops.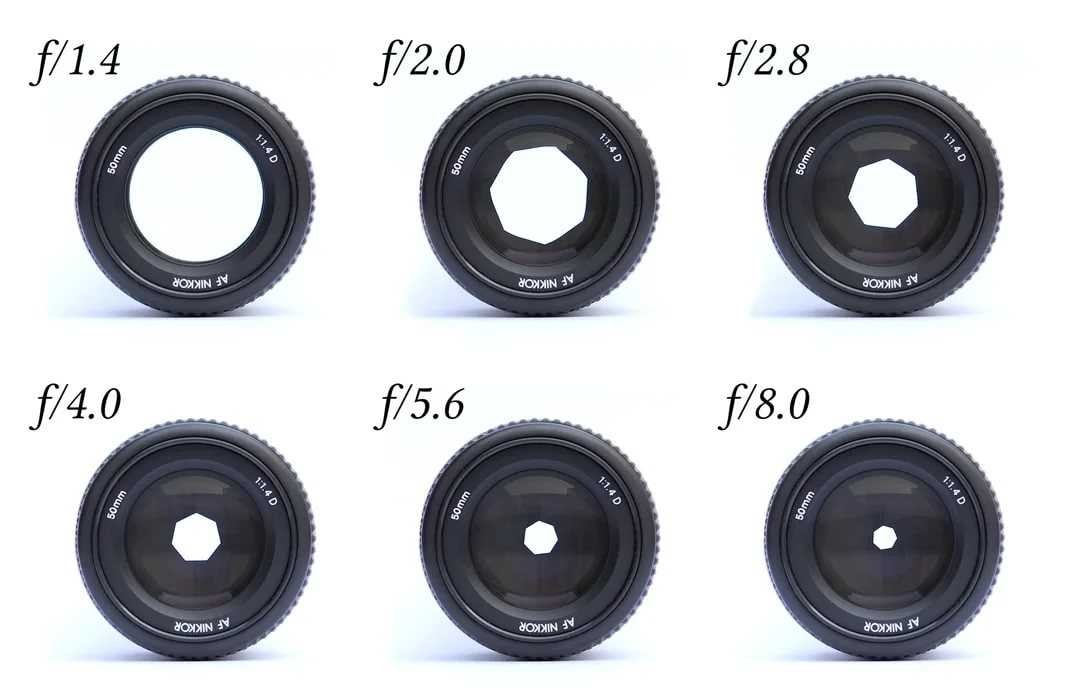
Table of Contents
Let’s Start From the Start
As most of you know, how much light or information a digital sensor or film receives during exposure to light (capture of an image) depends on three things – the shutter speed, aperture size and light sensitivity of the surface on which the image is captured. More than that, every one of these parameters is exactly as important. To make them directly comparable and to be able to compensate a change in one parameter with a change in another easily, something common had to be found between how long the light-sensitive surface is exposed to light (shutter speed), how much light is hitting the sensor at any given moment (aperture) and how sensitive the surface is to light in the first place (ISO value). A number, a measuring unit needs to be assigned. In other words, there has to be some sort of correlation between the three parameters, where a certain increase of one must equal a certain decrease of another in order to preserve the same overall exposure or brightness of the photograph captured.
Now, I say “needs to be found”, but it’s really quite obvious. You see, if you expose a piece of film of a certain sensitivity through an aperture of a certain diameter for, say, one second, and then expose another piece of the film under the same circumstances of the same sensitivity through the same aperture diameter for two seconds, the second piece of film will receive twice more light, simply because it was exposed to light two times as long. Likewise, if you expose two identical pieces of the film under the same lighting conditions for one second, but use a twice-as-big aperture (area-wise) for one of the pieces, that piece is, again, going to be twice as bright as the first one. Finally, if you expose two pieces of film through the same aperture for one second under equal lighting conditions, but with one piece of film being twice as sensitive to light as the other, the more sensitive piece of film will contain an image that is – you guessed it – twice brighter.
Have you noticed a pattern? Increasing any one of the parameters twice increases the amount of light hitting the surface twice (and, although technically changing sensitivity does not change the actual amount of light hitting the surface, it still has pretty much the same effect on exposure). And it doesn’t matter which parameters you change for the two pieces of film, too – increasing the size of the aperture twice for one piece of film is the same as exposing another piece of film for two times as long, and the resulting exposure of the image, all else being equal, will be the same. It’s not like compensating for a 2x increase in exposure time requires a 7.4-or-any-random-number times smaller aperture, correct?
That is the correlation we are looking for and a clear answer to what exposure stops are. So, a stop is two times the increase or decrease of light gathered during exposure. Adjusting any one of the three exposure parameters by one stop results either in twice more or twice less light captured. As such, a stop is a very convenient way of relating three different parameters that have different measurement units assigned to them by emphasizing not the measuring units, but the effect on exposure.
Making Sense of Numeric Values
Now that we know what a stop is in theory, it’s time to get acquainted with the numeric values and learn to compensate for a change in one parameter with a change in another.
Aperture Stops
To those of you who are yet unfamiliar with the definition of aperture or f-stop, in photography, reading our article on the subject is the very first step to take before continuing. Simply put, the aperture is the opening that the light goes through before reaching the sensor or film. The size of the aperture (its diameter) is controlled with diaphragm blades. The lower the numeric f-stop value, the larger the aperture, and the more light goes through at any given moment and vice versa.
Aperture size is defined by the so-called f-stops (as I’ve already mentioned, the lower the f-stop number, the larger the aperture opening). Now, the physical size of the aperture depends on the focal length of the lens as well as the actual f-stop, but for the purposes of this article that is largely irrelevant. What is important is that, in order to double the amount of light coming through, the area of the opening and not the diameter must be doubled. That is why calculating numeric aperture stop values is a tiny bit more difficult than that of shutter speed or ISO sensitivity, as you will see, and memorizing the numbers is perhaps more practical (if, arguably, unnecessary in most cases). Just as with shutter speed and ISO, there are certain f-stop values that are considered to be “default”, “round” or “standard”. Here is an illustration showcasing standard full-stop, half-stop, and third-stop values as well as a graphical representation of the size of the opening itself:
The illustration shows standard full-stop apertures values ranging from a very-large f/1.4 to really-rather-tiny f/32, with f/2, f/2.8, f/4, f/5.6, f/8, f/11, f/16 and f/22 in-between the two values. In total, the diagram spans the range of 10 full stops, but that does not mean that is all the stops you get. One stop wider than f/1.4 is f/1, go further than that and you will reach f/0.7, which is extremely large. Lenses with such parameters are extremely rare and exotic, however, so including them in the illustration really is not necessary. The same goes for the other end of the scale where aperture size gets smaller – f/44 or f/64 (not to mention even smaller apertures) are hardly ever applicable in today’s photography and there are few lenses that even allow such a setting (those that do are mostly designed for medium or large format film cameras).
Given that a difference of one-stop results in twice more or less light going through, calculating the difference in the amount of light going through between the two extremes of the scale is quite simple – f/1.4 opening lets in twice more light than f/2, eight times more light than f/4 and 512 times more light than f/32, at any given moment. Yes, that is a lot.
Shutter Speed Stops
I will not go into too much detail when talking about shutter speed and what it is, exactly – we already have a great article for that purpose and if you are yet unfamiliar with the term, I recommend you read it before continuing. In short, shutter speed defines the period of time during which light is allowed to go through the optical element (the lens) onto the light-sensitive surface (a digital sensor or a piece of film). Think of a beautiful mansion with a fence and a gate where a party is hosted: the sensor or film is the mansion itself, the light – guests flooding through the gate into the mansion, aperture – the width of the road leading to the gate while shutter speed is how long the gate remains open and allows the guests through so as to enough guests attend, but the place does not become overcrowded.
As you would imagine, shutter speed is measured in seconds or, rather more often, in fractions of a second. Much like with aperture, there are standard full-stops, half-stops, and third-stops. Here is an illustration showing a shutter speed range of 10 stops with values from one second all the way to 1/500th of a second:
Notice how the first shutter speed marking of the scale has a quotation mark – 1“. The quotation mark means that the marked shutter speed is in seconds and not fractions. It is necessary for distinguishing purposes because fractions are not marked as fractions – so the 250 stop is actually a shutter speed of 1/250th of a second. All this has been done purely for convenience.
It is also important to understand that, with today’s digital photography, the shutter speed scale is much larger than the ten stops shown in the illustration – photographers often use speeds as low as 30″ (seconds), which is 5 stops slower than 1″ shutter speed that I started with; and as high as 8000 (fraction of a second), which is another 4 stops higher than 500 shown in the graph. Certain cameras can go higher still. In other words, the range of practical shutter speed stops is much wider than that of aperture. Also notice that calculating stops is much easier with shutter speeds than it is with aperture – you just have to multiply or divide the number by two to get the value of the next or previous stop.
ISO Sensitivity Stops
Finally, we get to the last exposure parameter, and its stops. As with the other two parameters, we have a comprehensive article on the subject – there is a lot to know about ISO sensitivity. In this article, however, we are talking about exposure stops, so going too in-depth is not necessary. For our purposes, the following explanation is quite enough (but I do suggest you read that article if you want to learn more) – ISO is the level of sensitivity of your camera sensor (or film) to available light. The lower the ISO number, the less sensitive it is to the light, while a higher ISO number increases the sensitivity of your camera. The component within your camera that can change sensitivity is called “image sensor” or simply “sensor”. It is the most important (and most expensive) part of a camera and it is responsible for gathering light and transforming it into an image. With increased sensitivity, your camera sensor can capture images in low-light environments without having to use a flash. But higher sensitivity comes at an expense – it adds grain or “noise” to the pictures.
Ever sensor has a “base” ISO – a value when it does not need to increase or decrease its sensitivity to light. Some cameras start at ISO 200, like older Nikon models and current Fujifilm mirrorless cameras. Others start at (arguably more preferable) ISO 100, and that is where our ISO sensitivity stops illustration starts:
As with shutter speed stops, calculating ISO sensitivity stops is very easy – one just needs to divide or multiply the value by 2 to add a stop or go one stop down. The standard stops are also very easy to memorize.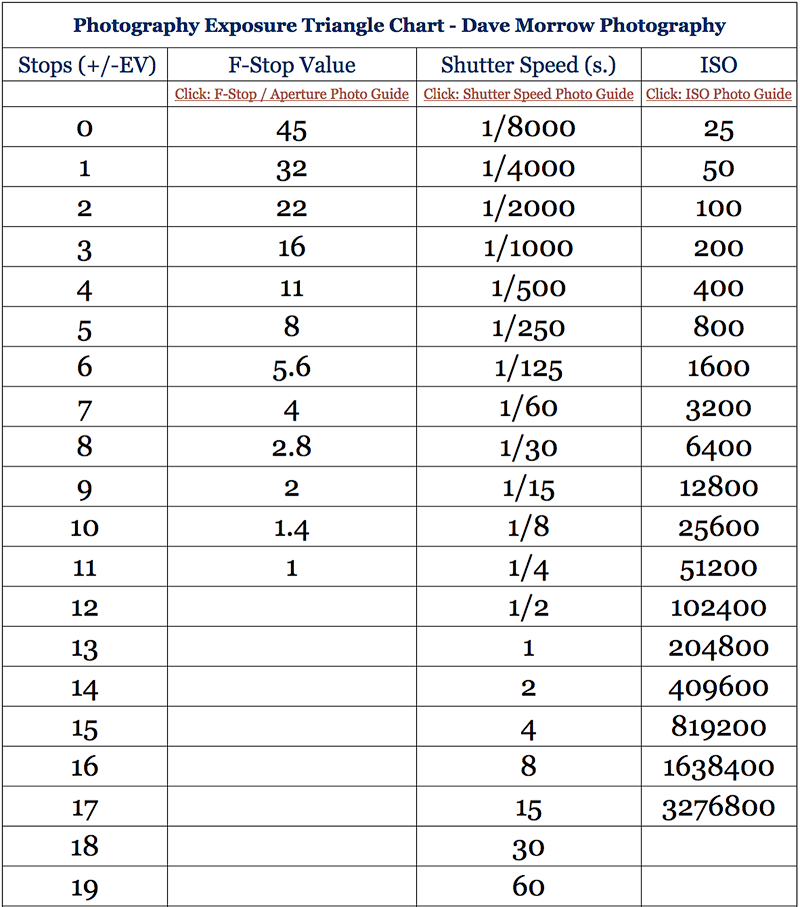 While most modern cameras can go lower than ISO 100 or higher than 51,200, because of the limitations that are imposed when increasing sensitivity too much, the illustration shows the most useful and usable ISO stops with the last two or three highest full-stop values bordering on hardly-ever-used for most photographers.
As with the previous two illustrations, this one also shows half- and third-stop values. I’ve not talked about them yet for one reason – there is a caveat.
Standardization
If you take a look at one of the illustrations again, but focus this time not on the full-stop values, but rather on half-stops and third-stops, you will probably notice that the scale contains some inconsistencies. For example, the half-stop between f/11 and f/16 is f/13, but then the first third-stop is also defined as f/13. How could it be, if a third is less than a half? Shouldn’t the value be less, too? Well, theoretically, yes. But from a practical standpoint, manufacturers chose differently.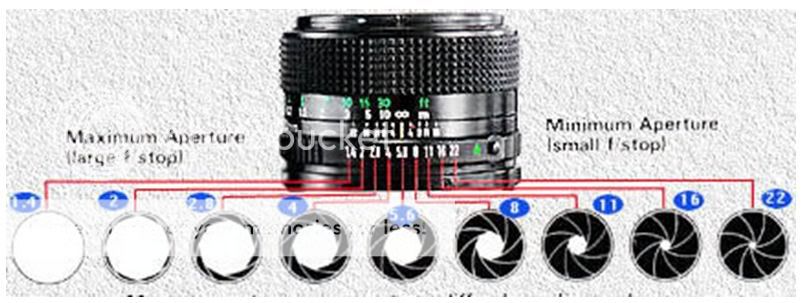
You see, only the full-stops are completely standardized and manufacturers are doing their best to stick to such full-stop values, be it the ones you see in the aperture, shutter speed or ISO sensitivity illustrations. But for third- and half-stops, some rounding up was unavoidable. More than that, different camera manufacturers choose to round up differently, too. For example, the first third stop between f/5.6 and f/8 on my Nikon D700 is specified as f/6.3, as shown in the illustration, but my Fujifilm specifies f/6.4 instead. In this particular case, the margin of error appears because, mathematically, you need to multiply an f-stop value by the square root of 2 to add a stop to it, and square root of 2 is not a round number (1.414 is just the start). So, theoretically, the third stop between f/11 and f/16 should actually be marginally less than f/13, while half-stop should be marginally more. For convenience, manufacturers round up the values, and so the marked values are the actual values used during exposure. In practice, this is hardly relevant. Bottom line is, third- and half-stops may appear differently in your camera than in these illustrations. That is perfectly normal.
Compensating One Parameter Change With Another
All three of the parameters have exactly the same effect on exposure. Increasing either one by one stop will let in twice more light to the sensor (not strictly true with ISO sensitivity, but you get my meaning), while decreasing will have an opposite effect. This also means that an increase of one parameter by a stop can be compensated by decreasing another by the same stop, or two others by half-stop each. So, for example, if you are doing some sports photography and coming up with slightly blurry images while your current settings read f/5.6, 1/250, ISO 400, you need to speed up the shutter to capture quick motion more crisply, but keep the overall exposure the same. What’s the best way to do it? Provided that the lens allows this in the first place, opening up the aperture by one stop to f/4 and bumping up the ISO value by another stop to ISO 800 will let result in four times more light coming in, which in turn gives you two full stops to compensate with shutter speed and normalize the exposure of the image. So by opening up the aperture by a stop, increasing sensitivity by a stop, and increasing the shutter speed by two stops as a result of that, you end up with f/4, 1/1000, ISO 800, sharply captured images and correct exposure, at the expense of a slight increase in noise and slightly shallower depth of field. There is always some trade-off, but it’s not always a meaningful one.
From Theory to Practice
Now that we have the whole theory before our eyes, time to do some basic experiments to see if it really does work that way. Coming up with unpretentious photographs for illustrative purposes proved to be simple – I found an immeasurably cool, green and old Land Rover Defender to show what a roughly two-thirds of a stop and over one stop of difference in shutter speed does to exposure, and some archways to help me out with compensating a change in one setting with another. Let’s start with the latter.
The following image was taken at f/1.4, 1/800, ISO 200:
X-E2 + XF23mmF1. 4 R @ 23mm, ISO 200, 1/800, f/1.4
Here is how it compares to the same scene (don’t mind the slight framing changes, I shot hand-held) captured at f/2, 1/800, ISO 400:
As you can see, after compensating a one-stop increase in ISO sensitivity with one-stop decrease in aperture size, the overall exposure (or brightness) of the photograph remained exactly the same. Even though closing down the aperture by a stop ensured twice less light was making its way onto the sensor, a one-stop increase in sensitivity did the exact opposite. Now, let’s make a comparison with shutter speed change:
The before image was captured at f/1.4, 1/800, ISO 200, while the after image was captured at f/1.4, 1/1600, ISO 400. Again, compensating a one-stop faster shutter speed with a one-stop increase in ISO sensitivity proved to render the exact same exposure.
It is important to understand that, in practice, photographers (and the cameras, too) rarely stick to full stops. It is not too likely that the correct exposure for a particular scene will require standard full-stop values from every parameter, is it? And so the sample images that you will see now will showcase larger or smaller adjustments than a full-stop.
A side note: I took these sample images without using a tripod. Any weird perspective changes you might notice are a side-result of using Photoshop’s Layer Align tool.
The following photograph is what I (and the Fujifilm X-E2) consider to be well-exposed:
X-E2 + XF23mmF1.4 R @ 23mm, ISO 400, 1/680, f/1.4X-E2 + XF23mmF1.4 R @ 23mm, ISO 400, 1/680, f/1.4[/caption] X-E2 + XF23mmF1.4 R @ 23mm, ISO 400, 1/680, f/1.4[/caption]
Now let’s see what a shutter speed change from 1/680 to 1/1700 (roughly 1.3 stops of difference) does to the brightness:
The difference is significant – the sensor definitely received over two times less light due to the shutter being open for a much shorter period of time. Now let’s see what happens if we decrease the shutter speed by two-thirds a stop instead – from 1/680 to 1/420:
The difference is, again, clearly noticeable, although nowhere near as prominent as before. Still, this proves that even two thirds of a stop is a lot. What it also proves is that “correct” exposure is very subjective – one could prefer any of the three images in terms of exposure.
Understanding depth of field in photography
In this article, we will tell you about several important points that allow you to unleash the creative potential of every photographer. Proper lighting, composition, and focus (which also includes depth of field) are the basic elements that will help you create a beautiful, memorable shot. Focus allows you to highlight the object in the frame, drawing the viewer's attention to certain moments. The first thing to understand when creating memorable photographs is depth of field. nine0003
Depth of field
Depth of field (DOF) is the area in a photograph where elements of the frame will be as sharp as possible. If an object falls outside this area, it loses its sharpness, while the farther from the focus area the object is, the more blurry it will be. In any zone of sharpness, there is a point at which the object will be the sharpest. If the depth of field is shallow, then most of the image will be out of focus, and vice versa, the greater the depth of field, the more of the frame will be clear and sharp. Depth of field is determined by three factors - the size of the aperture, the distance to the lens, and the focal length of the lens. Let's see how each of these factors works. nine0003
Controlling the depth of field in photography
Aperture
An aperture is a hole in a lens that allows more or less light to enter the camera's sensor. The size of an open aperture is measured in f-numbers. The f-number is the ratio of the focal length of the subject to the size of the aperture opening. The larger the aperture opening, the smaller the f-number will be. The larger the aperture, the shallower the depth of field will be. If the aperture is almost closed, then the depth of field will be large. nine0003
Comparison of large and small apertures
Changing the aperture value is the simplest and most commonly used method of adjusting the depth of field. If you want to create more depth of field in your image, you should set your aperture to f/11 or higher. Usually a large depth of field is set when shooting in bright daylight. In this case, the camera will usually set the aperture to f/16 or higher, so that almost the entire frame will be in focus, which means that almost all the space will be sharp. nine0003
Let's take these two photos as an example. The photo on the left has a large depth of field, most likely taken at lunchtime (note the short but contrasting shadows), aperture value is f/22. The photo on the right has a very shallow depth of field, probably set to f/2.8. However, in order to achieve the correct exposure, it is necessary to correctly set the shutter speed. With an aperture around f/2.8, at noon, the shutter speed will be around 1/1000.
Aperture range
Aperture range defines the range from the smallest aperture of the lens, i.e. f/1.4 (on the fastest lenses) to f/32, with additional values located in this range (F/2, f/2.![]() 8, F/ 4, f/5.6, f/8, f/11, f/16, etc.). Each aperture value represents a "foot" or "step". Each such step determines the amount of light that will enter the lens, regardless of the length of the lens. Each time the f-number is increased (for example, from f.2 to f.2.8), the amount of light will be halved, while at the same time, if the f-number is reduced by one stop, the amount of light will double. It is important to understand this principle and how it affects exposure. The aperture works in tandem with the shutter speed, so every time you change the aperture, the shutter speed must also change. When you change the aperture size by one stop, you must also change the shutter speed by one stop in the opposite direction. Each change in aperture changes the depth of field accordingly. nine0003
8, F/ 4, f/5.6, f/8, f/11, f/16, etc.). Each aperture value represents a "foot" or "step". Each such step determines the amount of light that will enter the lens, regardless of the length of the lens. Each time the f-number is increased (for example, from f.2 to f.2.8), the amount of light will be halved, while at the same time, if the f-number is reduced by one stop, the amount of light will double. It is important to understand this principle and how it affects exposure. The aperture works in tandem with the shutter speed, so every time you change the aperture, the shutter speed must also change. When you change the aperture size by one stop, you must also change the shutter speed by one stop in the opposite direction. Each change in aperture changes the depth of field accordingly. nine0003
Fundamentals of Photography - Lenses, Vignetting, Aperture and Depth of Field, Red Eyes
Lens Distance
Another element that affects depth of field is the distance from the subject to the lens. The depth of field can be changed by changing the distance. For example, the closer an object is to the lens (and the focus is set on that object), the shallower the depth of field will be. Changing the distance to the subject is the least practical way to change the depth of field. In addition, changing the distance of the object from the lens, the composition of the frame will also change. To maintain the compositional integrity of the image, by changing the depth of field, you can change the focal length of the lens. nine0003
The physical properties of the lens at focal length also affect the depth of field. A short focal length (say 27mm) focused at 5 meters at F/4 has a greater depth of field than a long focal length (say 300mm) at the same distance at the same F/4 aperture. 300mm has a surprisingly shallow depth of field. By the way, in order for you to better understand this issue, each lens model has a manual with a DOF chart for each aperture stop and focusing distance. nine0003
Conclusion
Depth of field control is a good way to change the mood of your photo. Working with aperture is an ideal way to control depth of field, as changing the f-number only changes the DOF without affecting the composition of the image. To change aperture settings, you just need to change the shutter speed to compensate for changes in exposure. Changing the distance to the subject and the focal length of the lens also affect the depth of field, but this method is not as successful in terms of composition. From this we can conclude that changing the aperture will be the best way to control the depth of field, without changing the composition of the frame as a whole. nine0003
Telegram
Exposure basics: aperture, shutter speed and ISO
[adrotate banner="2"]
There are fundamentals in photography, without knowing which it is impossible to learn how to take high-quality and beautiful pictures. One of those things is understanding the exposure of a frame. In our article we will talk about shutter speed, aperture and sensitivity. It is these things that form the exposure and an understanding of their work is necessary to get good shots. We will explain what shutter speed, aperture and sensitivity are and how to work with them effectively. nine0003
Introduction.
Before writing what shutter speed and aperture are, a small digression. Each frame requires a certain amount of light (exposure). The camera has three options to dose the light output: aperture, shutter speed and sensitivity. Sensitivity is used only when the situation does not allow changing the shutter speed and aperture. In addition to controlling the amount of light entering the sensor, shutter speed and aperture are effective artistic tools. First you need to understand them, and with time and experience, ease of use will come. An experienced photographer uses these tools on a subconscious level. nine0003
Diaphragm.
(diaphragma - partition, Greek), in English "aperture" (aperture, English)
Diaphragm - an element of the lens design, responsible for the diameter of the hole that transmits light to a light-sensitive surface (film or matrix).
For a simple understanding of the diaphragm, I will give an analogy with a window. The wider the window shutters are open, the more light comes through the window.
Aperture, denoted as f/2.8 or f:2.8, is defined as the ratio of the diameter of the lens' entry hole to the focal length. Very often, the concepts of an open, large aperture (f / 2.8) and a large f / 16 aperture are confused. The smaller the number in the designation of the aperture, the more it is open. nine0003
By changing F by one value, the amount of light entering the camera changes by 2 times. This is called the exposure stage. Any changes (according to the scales of the camera) exposure occur in 1 step increments. For accuracy, the step is divided into thirds, if necessary.
Aperture is a very powerful visual tool. The maximum open aperture gives a very small depth of field (depth of field of the imaged space). Small depth of field visually highlights the object against a blurred background.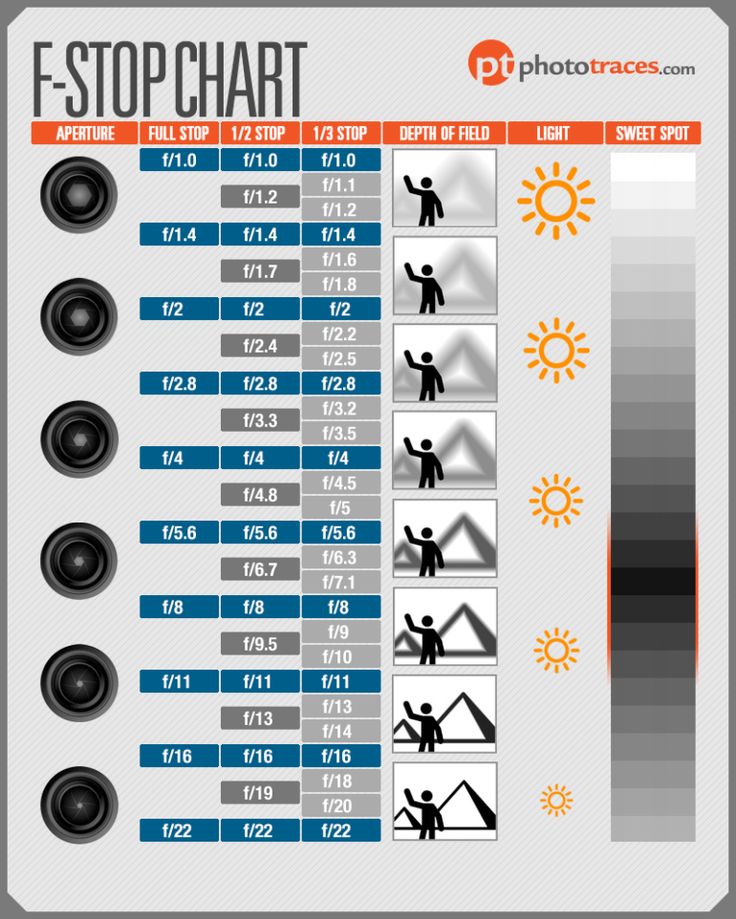
To obtain a large depth of field, the maximum closed aperture is used. To get a greater depth of field in your frame, use f-number 8 or larger. However, when playing with the aperture value, remember that there are the following dangers when approaching extreme aperture values. When open - the worst sharpness readings, and when closed, all the dust on the matrix will be visible on the frame (for digital cameras).
Large depth of field is more suitable for landscape photography, when the viewer will be interested in seeing all the details of the photo. nine0003
Excerpt.
Shutter speed - the time interval for which the shutter opens to transmit light to the photosensitive element.
Again, the open window analogy will help. The longer the shutters are open, the more light will pass through.
Shutter speed is always measured in seconds and milliseconds. Indicated as: 1/200, only the denominator is displayed in the camera: 200. If the shutter speed is a second or longer, it is indicated as 2″ i.e. 2 seconds. nine0003
The minimum shutter speed when shooting handheld (to get a sharp shot) is not constant and depends on the focal length. The dependence is inverse, i.e. for 300 mm it is better to use shutter speeds shorter than 1/300.
Long exposure emphasizes the movement of objects. For example, panning - at slow shutter speeds, 1/60 and longer, the camera follows the subject, so the background is blurred and the subject remains sharp.
Long exposure turns the flowing water into frozen figures. nine0003
Very fast shutter speeds, use to stop a moment, such as a spray of a falling drop or a car flying by.
ISO sensitivity.
Sensitivity is a purely technical term for the sensitivity of a matrix (or film) to light. Imagine sunbathing people on the beach. Those with more sensitive skin will tan faster; he needs less light for that. The other, on the contrary, needs more light to tan, because he has low sensitivity.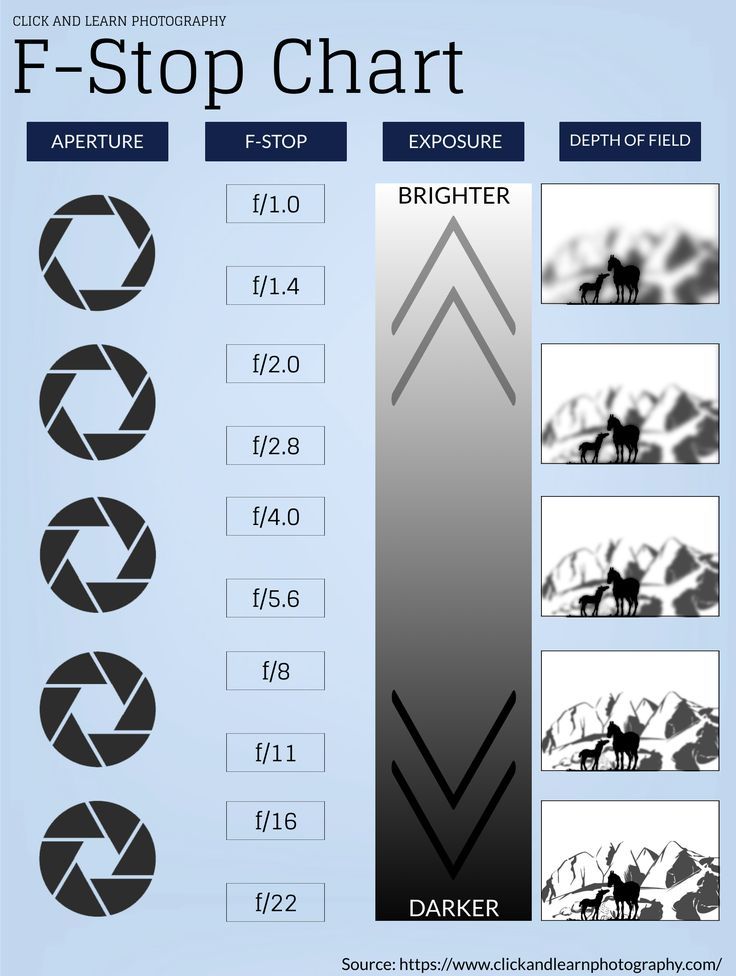 nine0003
Sensitivity is directly related to the amount of noise. The higher the ISO, the more noise, and the grain size of the film. Why? Purely technically, in general, this is the topic of an extended article.
At ISO 100, the signal is taken from the matrix without amplification, at 200 it is amplified by 2 times, and so on. With any gain, interference and distortion appear, and the greater the gain, the more side effects. They are called noise.
Noise intensity varies from camera to camera. At minimum ISO, noise is not visible and is also less apparent when processing a photo. Starting with ISO 600, almost all cameras are quite noisy, and to get a high-quality frame, you need to use noise reduction programs. nine0003
Total
Together, the shutter speed and aperture values form an exposure pair (the optimal combination of shutter speed and aperture for the given lighting conditions). Expopara determines the exposure of the frame. Previously, exposure meters were used to determine the exposure, which determined the shutter speed based on the amount of light and aperture.
