When is the best time to take pictures
Best Time of Day to Take Portrait Photos in Natural Light
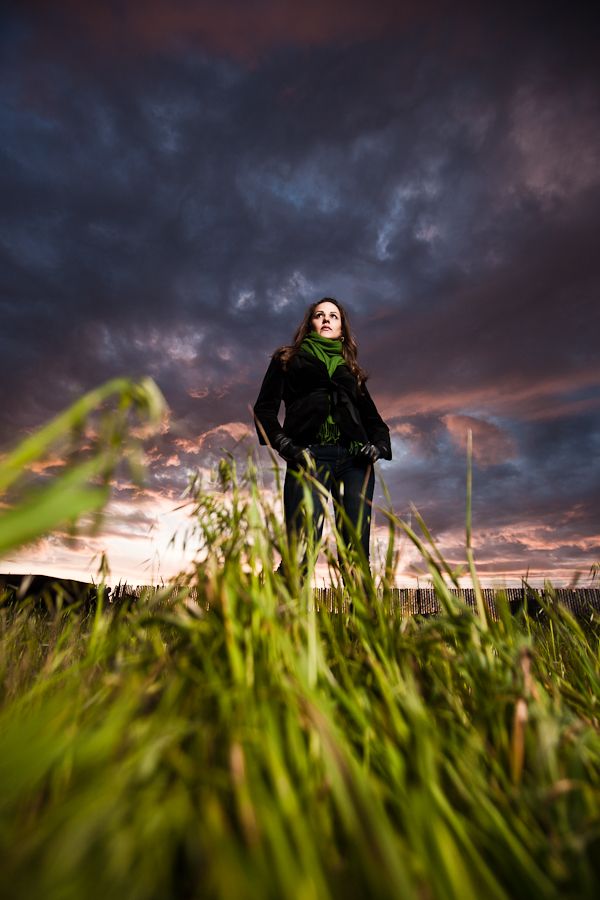
Photo by Christopher MowersWhen planning a portrait shoot, I've been asked, “what's the best time to take our portaits?” Some have heard that you should shoot at sunrise or sunset, some have heard that a cloudy day is best, and still some have heard other advice.
The best time of day to take portrait photos is in the couple hours after sunrise and the couple hours before sunset. Within that time, it is better to shoot after the morning golden hour or before the evening golden hour.
What is golden hour?
Golden hour is a time of day when the sun is low in the sky. It happens twice a day, at sunrise and at sunset. Despite the name, it can last longer than an hour depending on where you are on the earth and what time of year it is. Because the sun is low in the sky, shadows are softer, and the angles and length are more flattering. As the name implies, the warm colors are more prominent at this time of day, which gives a flattering look to portraits.
Why is the best time not golden hour itself?
Golden hour is a great time to make portraits, but there are a few reasons why you are probably better off focusing on the time immediately after morning golden hour, or immediately before golden hour.
- Golden hour is a time of extreme dynamic range: When the sun is overhead, there isn't usually a big difference between the brightest brights and the darkest darks in the scene (dynamic range). When the sun gets low in the sky, this changes. One of the reasons why photographers love golden hour is because of this very phenomenon. The trouble is that cameras struggle in this dynamic range. Some of them are much better than they used to be, but none are as good as the human eye. Choosing a time where the sun is a little higher in the sky will help give the look of soft light, but without as much trouble with dynamic range.
- Fill light can be harder to obtain: With a lower light source, everything will feel much more directional.
 There is less light just bouncing around to fill in shadows on faces. You can mitigate this by using a reflector, but this is a little easier when the sun is a little higher. Don't underestimate the effect that a low sun can have on your subject as well. Having a low sun means that every time the sun is in their view, they are going to have to work hard not to squint.
 - Light changes quickly during golden hour: Golden hour is a fleeting moment, especially when doing a portrait shoot, and it is a time of constantly changing light. Shooting during golden hour requires that settings are changed frequently, and it can be easy to spend too much time on the technical details and to not have time for the artistry. Choosing a time where the sun is a little higher in the sky gives a pleasant light, and one that is more consistent and predictable.
- It can be very early or very late: This may not always be a problem, but golden hour does come early and late in the day, especially in summer.
 It is possible that your client may not be up for meeting you at 5:30 A.M. to take those senior portraits. It can also be hard to get access to some of the places you might want to shoot very early or very late in the day.
 - The color can be too much: Colors at golden hour are beautiful, but they can be overpowering and distracting. In portrait photography, your goal is to focus on the person or people that are your subject. A crazy, explosive sunset in the background is not always a complimentary choice. You want nice color and interesting sky, sure, but if the sunset is more interesting than the subject, you have a problem.
- You can run out of time: As mentioned above, golden hour is typically pretty short. If you aren't on your game, you will run out of time. In the morning, you can just continue shooting, but in the evening, you will be out of luck.
Choose the time after morning golden hour or before evening golden hour
Those times that are next to golden hour will give a similar look to golden hour, but without the problems mentioned above.
The times after morning golden hour and before evening golden hour will give you the best combination of soft, direction light, and bouncing, ambient light. The light will be warm, but not distracting. The dynamic range of the scene will be a little bit smaller, meaning that your camera will better capture the brights and the darks in the image. Your subjects won't have the sun in their eyes.
The look you get during these times is still similar to golden hour. The sun is still relatively low in the sky, the light is still pretty soft, but the light is more consistent and the scene is easier to capture.
Another nice feature of shooting near golden hour is that depending on the work you are doing, you can choose to include golden hour as a part of your shoot. You can use the time next to golden hour to get your bread and butter shots, and then do something more bold and stylized as the sun gets low.
How to calculate the actual time to shoot
Using an app or website that will give times for sunrise and sunset, as well as times for golden hour, is the best option to determine when to go out and shoot. Here are some good options:
- Photopills
- The Photographer's Ephemeris
- golden-hour.com
If you only have your sunrise or sunset time, which is easily obtained from a google search or even by asking Siri, Alexa, or your preferred virtual assistant, you're pretty safe in most parts of the world to assume that golden hour runs about one hour after sunrise, and about one hour before sunset. You can figure out your shoot time based on that information.
Incidentally, there is also a skill for Amazon Echo that can give you the time of golden hour. If you have an echo, it's worth checking out.
How to use the sun at this time
It may seem like an odd thing to think about, given that we use the sun every day, but when shooting portraits, it is important to consider how you will use the sun as a light source. At the time of day I am recommending, there are a few different options that may work well for you.
- Sun as backlight: This is my favorite way to shoot in this light.
 Place your subject between your camera and the sun. You can play with the angle here, so the sun could be directly behind your subject, or somewhere behind your subject but in frame, or behind your subject and out of frame. These will yield different looks. Backlighting really shows edge detail, so make sure that stray hair and other potential distractions are under control. The important technical detail in this setup is to make sure that you set your exposure to properly expose the subject, not the background. Spot metering can help to dial this in properly. It is possible that your background will blow out to white when shooting this way. If you want to keep that under control, use a reflector to put some light on your subject. This will reduce the dynamic range between the subject and the background.
 - Sun as key light: Putting the sun behind you or to your side can work in certain situations as well. Anywhere that you would put a key light (directly over your camera, off to the side at 45 degrees, or an even more extreme angle) is a place that you can put the sun.
 The sun will probably still be low enough that this can be a fairly soft light. You'll most likely want a reflector to soften shadows on the face. I like to put the sun at a more agressive angle, like 60 degrees to one side of the subject, and make sure that I can fill in the shadows with a reflector. Keep in mind that a strong angle will accentuate potentially unflattering detail on the face, so use this setup with caution. Also, do pay attention to the intensity of the light. It's possible that it will be too strong and your subject will be forced to avoid squinting. This setup won't always work.
 - Sun hidden: Another thing you can do is to put the sun behind something, like a tree. Of course, you can shoot in shade in any time of day (more on that below), but by putting the sun behind an object, you can get interesting glow and ambient light off of that object. I like to put the sun behind a large tree, and then put my subject in front of a tree. The shadows should be OK because the sun is blocked, and the tree will give an interesting, rim-lit glow.

What if I have to shoot midday?
Taking portraits midday is more difficult, but don't let anyone tell you that it is impossible. You simply need to know the limitations of that type of light, and find ways to work around it. Here are three quick tips on shooting midday.
- Find the shade: If the transition between light and shadow is harsh and ugly, the easy solution is to go somewhere that is pure shadow. This is a limitation you will have to consider when choosing a location to shoot. My favorite sources of shade are large trees, sides of buildings and park pavilions. When shooting under something like a tree, be sure that you are in pure shade. If the leaf cover is not dense enough, you can be left with a splotchy mess, so do watch out. If you are somewhere where there is no shade, you can always make your own. For shooting up close, it can be as simple as using a reflector to block the sun. For larger setups, you can purchase or make a light tent or other large diffusion panels.
 These are essentially pieces of translucent rip-stop nylon on some sort of frame that will diffuse sunlight. You can make them with supplies from your local hardware and craft stores!
 - Get fill light: At midday, the shadows everywhere are harsh, but they are most noticeable on your subject. Using a reflector or fill flash if you have one will eliminate the worst of the problem.
- Post-process: Editing your images in a program like Lightroom can help eliminate the distractions of harsh shadow. Even if you have to shoot in a less than ideal situation, you can boost shadows, bring down highlights, reduce local contrast, and use tools like the brush tool or the radial filter to bring emphasis to the right place in the photo.
Are there other great times to take portrait photos?
Sure there are! Here are some other good options:
- Cloudy weather: Sun, you just scored yourself a giant softbox! On a cloudy day, there is shade everywhere, so you can shoot any time of day.
 Keep in mind that if the sky is drab, thing will look drab, so unless it is interesting, try not to include too much of the sky. Also, the light will be very blue, which is not a flattering portrait light, but you have some leeway to adjust this in post-production.
 - City at night: Today's cameras are good enough that you can take night portraits without flash if you have other light sources available. I realize this is not “natural light” in the strictest sense, but is is light you can access without flash gear. Try taking portraits under city streetlights, or next to the marquee of a theatre. These photos can be unique and compelling.
- Next to any big window: When the sun is high in the sky, consider going inside and shooting next to a large window. Window light is nice because it is usually soft and even. You get the brightness of midday light without the harsh shadows. Consider using a reflector to even out shadows on your subject's face.

Happy Shooting
I hope you've found some helpful information in this article about the best time of day to take portrait photos in natural light.
Do you have a favorite natural light technique? We would LOVE to hear about it in the Improve Your Photography Facebook Group! Join the group and ask away 🙂
Link Disclosures
What’s The Best Time To Take Pictures Outside?
There’s nothing quite like taking pictures outside. No matter which of the different types of photography is your favorite or what subjects you love to photograph, there’s something about natural light that just can’t be replicated in a studio. Whether you like shooting portraits, landscapes, or anything in between, you’ll want to know what the best time to take pictures of your subjects is. A great photographer should definitely have a handle on what to expect when shooting outside at different times of day and in different conditions.
Shooting in the best available light will ensure that the images featured in your online photography portfolio are as gorgeous as possible. They’ll make people feel like they were out there with you, and hopefully help you land some paid photography jobs!
The best time to take pictures outside will depend on what look you’re going for in your outdoor pictures. We know that’s going to vary depending on what your photography project is, so get those ideas churning and read on to find out when the best time is for you to get out there and shoot.
You’ve probably heard photographers go on and on about how incredible the golden hour is for taking outdoor pictures. Lots of people consider this the best time of day to take pictures, and there is definitely a lot to love about it! As the old saying goes, when the sun goes down, a thousand Instagrams go up.
So, when exactly is the golden hour? It’s usually defined as the period shortly after sunrise or before sunset. At these times, the sun is quite low in the sky, so the natural light is super-soft and flattering. It also gives off a warm reddish hue. It’s one of the best times to take pictures, especially if you’re shooting portraits.
People look best when the shadows on their face are soft and diffused, and golden hour photos achieve this without much effort or extra equipment. The warm light is also universally flattering, so your subjects are bound to love how they look, which is important if you want to avoid an unhappy photography client!
If you’re a landscape photographer, the golden hour can offer some of the best outdoor lighting for pictures, if that warm hue is what you’re after. Certain scenes, like the canyons of the southwestern USA, are practically begging to be photographed during the golden hour.
- Lighting conditions are fleeting. Since the sun is rapidly ascending or descending, you might find that the lighting conditions change too quickly. If you need more time to adjust your subjects or explore a location, the golden hour might not actually be ideal. For example, if you’re shooting a subject who is not particularly comfortable in front of the camera, the best light might be gone before you’re able to get that perfect shot.
- It might not complement your subject. Shooting right around sunrise or sunset can introduce some really intense colours into the background of your image. If you’re trying to shoot a sunset, that’s great. But if you’re shooting anything else, the blaring colours might actually draw the eye away from your subject, which isn’t ideal. You don’t want to overpower the main subject of your photograph, after all.
- It can be at an inconvenient time of day. Depending on where you are in the world and what time of year it is, the golden hour might be way before most people want to wake up, or too late to be convenient.
 Sure, your portrait clients might look amazing in this lighting, but getting them up at the crack of dawn might not be a feasible option. Running a successful portrait photography business means keeping these things in mind.
 - It might be hard to fill shadows on your subjects face. Usually a reflector will do the trick, but if the sun is very low, it can be hard catch that light on the reflector.
A good remedy to these challenges? Try shooting a few hours after the morning golden hour or before the evening golden hour. This is one of the best times of day for photos because you will get some of the gorgeous effects of the golden hour without having to worry as much about the challenges.
Basically, as long as the sun is low in the sky, your outdoor pictures will benefit from a softer light and a pleasant glow. Bonus: your subjects don’t have to squint for the whole shoot. For a soft, romantic glow, the hours around golden hour probably take the win when it comes to the best time to take pictures.
Context definitely matters when deciding on the best time to take pictures. If you’re shooting corporate headshots, maybe that romantic glow isn’t exactly appropriate for the task at hand. In that case, you might find that mid-morning and afternoon (avoiding high noon) is the best time to take outdoor photos.
Since the sun isn’t directly above your subject, you won’t have to worry too much about harsh shadows that look super unflattering. Compared to the reddish, orange hues of sunset lighting, shooting before and after noon will produce a more yellow light. This is one of the best times to take pictures because it still flatters a lot of skin tones. You can also use a silver or white reflector if you want to make the light a little bit less yellow, or a gold reflect if you want to warm up your subject’s complexion.
If you’re just going for an urban photo walk, this is one of the best times of day to take photos, since the light will be nice and even. Even if you’re not a total pro when it comes to manual camera settings, your auto setting will have no trouble producing a beautiful, clear, nicely lit image. Mid-morning and mid-afternoon are great times of day to shoot from the hip.
High noon is definitely not considered the best time of day to take pictures outside by most photographers, but, believe it or not, it has its merits! Although it’s not going to be the choice time of day for a wedding photographer, an urban landscape photographer will absolutely love the hard shadows. They can lend a really dramatic and look to a photo, which isn’t always a bad thing. If you want a crystal-clear shot of a body of water, noon is the best time of day to take pictures.
Even if you are shooting portraits at noon, there are ways to avoid having very hard shadows on your subjects face. The key is to fill those shadows somehow. You can, of course, use a reflector if you have on handy.
If you don’t, try to find something reflective in your surroundings. A subject seated at a light-colored table might have enough reflection from that table to look nice and evenly lit. Something like a light-colored wall or, if, you’re at the beach, the sand could also do the trick. Keep an eye out for shadowy areas as well, since they might be the most flattering places to position your subject.
This might not be the best outdoor lighting for pictures, but that doesn’t mean you can’t make the most it! Plus, if you’re going for a very high-contrast look, there’s no better time than high noon to achieve it. Embracing the hard light photography conditions of noontime shooting will challenge you and possibly produce some of your most creative shots.
Everyone talks about the golden hour, but you don’t hear the blue hour mentioned as much. So what is it, exactly? The blue hour occurs right before sunrise, and right after sunset. It’s the time when the sun is behind the horizon, but there is still some ambient light to work with. You can think of it as dawn and dusk.
As the name suggests, your photos will have a bluish tone if you shoot at these times of day. It’s very brief, so you’ll have to move quickly and know what you want to shoot, but it is absolutely one of the best times for outdoor photos.
Shooting during blue hour gives a quality of peace and stillness to photos, especially if you can shoot during the morning blue hour when you’ll be able to capture outdoor scenes before they’re filled with people. It’s of the best times to take pictures of winter scenes—they’ll look amazing shot during this time day, and you can capture some seriously National Geographic-worthy pictures of water during this time of day, too… If you can find a location where lights are reflected in water, such as homes on a lakeside, they will make a gorgeous subject for the blue hour.
Cityscapes lend themselves really well to blue-hour photography, too. It’s one of the best times of day for photos of urban scenes because most of the artificial lights that illuminate cities have a yellow hue, and the contrast between the ambient blue and the urban yellow lights is very photogenic.
If you’re into painting with light, this is the best time to do it. You’ll have to get used to night photography settings if you want to make the most of blue hour, but it’s well worth it!
If you’re wondering when exactly you should get getting out there to catch the golden hour and blue hour, there are tons of apps out there that can help you out. PhotoPills is a cool option that will tell you things like the rising and setting times of the sun and the moon, so you can plan your outdoor pictures accordingly. (Want more cool apps? Check out our list of the best landscape photography apps. )
)
So far, we’ve been assuming that you’ll be shooting in clear conditions, not matter what time of day it is. Of course, no matter where you live, it definitely won’t be clear all the time or even most of the time. So, what’s the best time for photography on a cloudy day?
The clouds will diffuse the sun’s rays no matter what time of day it is, so you won’t notice as much of a difference as the sun moves through the sky. There also won’t be as much of a noticeable golden hour. This may not sound like the best time to take pictures outside, but the benefit is that you won’t get any harsh shadows and the lighting will probably stay consistent throughout your shoot.
If you can look for bursts of light, you might actually capture some really interesting shots that you wouldn’t be able to get on a totally clear day. You’d be amazed what a difference a reflector can make on a cloudy day.
If you want to get creative, the clouds themselves can become part of your shot, too. Embrace the grey! Remember, with the right photo editing skills, the best monitor for photo editing and good editing software, you can also bring some warmth back into images that were taken on a less than a sunny day.
Depending on what you want to capture, the best time to take photos outside may actually be—surprise!—night time. Night photography is a whole different animal, and you’ll have to get quite comfortable with using the manual settings on your camera, but there are certain outdoor pictures you can capture at night that you just can’t shoot during the day.
Since the world tends to be much more still at night, that crazy busy city intersection might be totally quiet at night. If you want to capture the world as people don’t usually see it, night time is definitely one of the best times to take pictures.
Portraits shot at night time also have an edge that daytime portraits just don’t have. By placing your subject around interesting light sources, such as neon signs, you’ll be able to create some truly portfolio-worthy portraits. Just make sure you shoot RAW vs. JPEG if you choose this time of day to shoot.
If you don’t have an online portfolio website yet, not to worry. It’s easy and fast to put together something really professional-looking if you choose the right website builder for the job. If you’re just starting out, it’s a good idea to look for one with a free trial. That’ll give you some time to play around with different templates and typography, and to set up some galleries, before you take the plunge.
You’ll also want to keep an eye out for an online portfolio that offers built-in client proofing. Quick turnaround is important to photography clients, so if you just shot an awesome outdoor portrait shoot, this feature will let you upload watermarked images to a proofing gallery straight from Lightroom for client review.
If you shoot landscapes or want to work as a travel photographer, a built-in blog is another feature you might want to look for in a website builder. That way, you don’t have to direct people to a whole separate site to read about the behind-the-scenes details of the best time to take pictures. Check out our SEO guide so that you can pack some SEO punch into those blog posts too, driving more traffic to your portfolio.
Ready to build a photography portfolio website that captures clients’ attention? From image-focused themes to a built-in proofing tool, we’ve got photographers covered. Start your free trial with Format today!
Clearly, the best time of day to take pictures outside can be just about anytime, depending on what you’re shooting and what look you’re going for. So don’t let the weather or time of day be an excuse—get out there, start shooting!
Looking to elevate your outdoor photography game?
10 Awesome Landscape Photography Tips
Silhouette Photography 101: Master the Basics
18 Landscape Photographers Who Will Inspire You to Get Outside
Picking a Time for an Outdoor Portrait Shoot
Photo: Christopher Mowers
When planning a portrait session, I'm often asked what time is best? Some have heard to photograph during sunrise or sunset, others have heard that cloudy days are best, and still others have heard something completely different.
The best time of day for portrait photography is a couple of hours after sunrise and a couple of hours before sunset. During this time, it is best to shoot after the morning golden hour or before the evening.
What is golden hour?
Golden hour is the time of day when the sun is low on the horizon. It happens twice a day, at sunrise and sunset. Despite the name, this period can last longer than an hour. It all depends on the location and time of year. Due to the fact that the sun is low, the shadows become softer, and their angle and length are more pleasing to the eye. Also, as the name implies, warm colors prevail at this time, which makes portraits look much better.
Why is the best time not the golden hour itself?
Golden hour is a great time to shoot portraits, but there are several reasons why it's best to focus on just after morning golden hour or just before evening golden hour.
- Golden hour is a period of incredibly wide dynamic range: When the sun is high in the sky, there is usually not much difference between the brightest and darkest areas (narrow dynamic range).
 As soon as the sun goes down closer to the horizon, everything changes. This phenomenon is one of the reasons photographers love golden hour so much. The problem is that it is difficult for cameras to cope with such a variety of tones. Some of them do a lot better than previous generations, but no camera has yet reached the capabilities of the human eye. If you choose a time when the sun is a little higher, soft shadows will remain, and there will be less problems with dynamic range.
- Harder to get fill light: When the light source is low enough, everything looks more directional. There is less light around that could bounce off objects and fill in the shadows on the face. This can be compensated for with a reflector, but it's easier when the sun is slightly higher. Also, do not underestimate the possible effect of a low-hanging sun on the model. If the sun is close to the horizon, the model should try not to squint when the sun enters her or his field of view.

- During the golden hour, the light changes rapidly: The golden hour is a fleeting moment and ever-changing light. This is especially critical for portrait photography. If you're working during the golden hour, you need to constantly adjust the camera settings, which can completely forget about the artistic part. A time when the sun is slightly higher provides pleasant but more consistent and predictable light.
- Time may be too early or too late: This is not always a problem, but golden hour occurs early in the morning and late in the evening, especially in the summer. There is a chance that the client will not be able to get up at 5:30 in the morning for a photo for a graduation portrait. Also during this time, it may be difficult to access certain places where you want to shoot.
- Colors can be too bright: Colors during golden hour are beautiful, but they can be distracting. In portrait photography, your task is to focus on the person or group of people who are the main subject in the frame.
 A crazy, explosive sunset in the background is not always the right choice. Of course, we need a nice color and an interesting sky background, but if the sunset itself is more interesting than the subject, that's a problem.
- You may miss: As I mentioned above, the golden hour is usually very short. If you delay, you will miss your chance. If you can still shoot in the morning, you will have to go home in the evening.
Time after morning golden hour or before evening golden hour
Select time after morning golden hour or before evening golden hour. A time that approximates the golden hour will provide a similar effect, but without the above problems.
This period provides the best combination of soft, directional light and reflected ambient light. You will get warm but not distracting lighting. The dynamic range of the frame will be slightly less, so the camera will be able to better capture all the highlights and shadows, and the sun will not shine into the eyes of the model.
The view obtained under such conditions is very similar to the golden hour. The sun is still quite low on the horizon, the light is soft but more stable, making it easier to take a picture.
Another advantage of working during this time is that, depending on the desired result, the golden hour can be included in the shooting session. You can start early by taking basic photos and then, as the sun sets lower, allow yourself to get a little creative.
How to calculate the right time to shoot
Using apps or websites that show sunrise and sunset times and golden hour start and end times is the best option if you need to know the time. Here are some good options:
- Photopills
- The Photographer's Ephemeris
- golden-hour.com
If you only know the time of sunrise and sunset, which you can easily find out from Siri, Alexa or any other virtual assistant, you can safely assume that the hour after sunrise and about an hour before sunset will be golden. Based on this information, you can estimate the shooting time.
Incidentally, the Amazon Echo has a feature that can tell you the golden hour. If you have this gadget, be sure to try it out.
How to work during this time
This question may seem strange, since we use the sun for photography every day, but when working with portraits, it is important to consider exactly how you will use such a light source as the sun. There are several options that can help when shooting.
- Backlight: This is my favorite way to shoot at this time. Place the model between the camera and the sun. You can play around with the angle so that the sun is directly behind the model or positioned behind the back, but still in the frame. As a result, you will get a completely different effect. This approach emphasizes the contours a lot, so make sure that messy hair and other potential distractions are under control. An important technical detail of this arrangement is that you need to expose, focusing on the model, and not on the background.
 Spot metering will help with this. Most likely, in such a situation, the background will turn white. If you don't want this, use a reflector to bounce some of the light onto the model. This will reduce the difference between subject and background.
- Sun as key light: Positioning the sun behind you or to your side can also work in some situations. In this situation, any place you would put the key light (directly above the camera, at a 45 degree angle, or even more extreme angle) will do. Chances are the sun will be low enough to still end up with a relatively soft light. You may need a reflector to soften shadows on your face. I prefer to place the sun at a more aggressive angle, like 60 degrees to one side, and fill in the shadows with a reflector. Keep in mind that a larger angle will accentuate potentially unattractive facial features, so use this approach with caution. Also pay attention to the intensity of the light. If the sun shines too brightly, the model will have to make an effort not to squint.
 This method doesn't always work.
- The sun is not visible: Another option is to hide the sun behind something, such as a tree. Of course, you can shoot in the shade at any time of the day (more on that later), but by placing the sun behind an object, you can get radiance and diffused light coming from that object. I like to make the sun behind a big tree and then put the model in front of it. There are no problems with shadows, since the sun is not visible, but this creates interesting lighting.
What if I need to shoot at noon?
Photographing portraits in the daytime is difficult, but don't believe those who say it's impossible. You just need to consider the limitations of this type of lighting and find ways to work within them. Here are three little tips for midday photography.
- Find the shadow: If the transition from light to shadow is abrupt and unpleasant, the easiest solution is to find a completely shaded area.
 It is worth considering this limitation when choosing a location for shooting. My favorite sources of shade are big trees, buildings and park pavilions. When positioned near a tree, make sure you are in solid shade. If the leaf cover isn't thick enough, you'll end up with a patchy mess of light and shadow, so be careful. If there is no shadow, you can always create one. When shooting at close range, it is enough to use a reflector to block the sun. For larger shooting, you can buy or make some kind of special tent for photography or put large diffusing panels. Surely you can find some kind of translucent tear-resistant nylon placed in a frame. In extreme cases, buy the necessary materials and do it yourself!
- Add a fill light: At noon we are surrounded by harsh shadows and most of all they are visible on the subject. To get rid of the biggest problem, use a reflector or fill light flash if you have one.
- Post-Processing: Editing your photos in a program such as Lightroom can help you get rid of distracting harsh shadows.
 Even if you're working in a less-than-ideal situation, you can always emphasize shadows, reduce highlights, reduce local contrast, and use tools like a brush or a radial filter to bring attention to the main details of the photo.
Is there still a good time to shoot?
Of course there is! Here are some good options:
- Cloudy weather: On such days, the sun has a giant softbox! When it's cloudy outside, shade is literally everywhere and you can shoot at any time of the day. Keep in mind that when the sky is monotonous, the photo will also look monotonous, so try not to include a lot of sky in the frame if there is nothing attractive in it. It is also worth considering that the light will have a bluish tint, which is not very good for portrait lighting. However, this shortcoming can be corrected during post-processing.
- City at night: Modern cameras are good enough to be able to photograph portraits without using a flash if there are extraneous light sources at night.
 I understand that this is not "natural light" in its strict sense, but it is the light that can be achieved without the use of a flash. Try taking a portrait under a street lamp or near a theater sign. Such photos are unique and attractive.
- Near any large window: When the sun is high above the horizon, go indoors and try to take some photos near a large window. Light from windows is great as it is usually soft and even. You get the brightness of midday light without harsh shadows. Consider using a reflector to keep the shadows on the model's face smooth.
Happy shooting!
I hope you found this article helpful in finding the best time to shoot outdoor portraits. Tell us in the comments what time of day you prefer to take pictures and if you have any favorite techniques!
Author: Christopher Mowers
07/04/2018 Views : 55510 Source: improvephotography.com Translation: Alexey Shapoval
More photography tips
Sort: New Commented Viewed
Prisms, which are usually shown in physics classes at school, can be a great accessory for creative photography. They create great rainbow highlights and other effects...
Read more →
19/01/2020. Photography - Tips for photography. Translation: Alexey Shapoval
28 487
0
In the first part, we have already covered how to convert a regular camera and make it suitable for IR shooting. Now let's find out everything you need to get excellent...
Read more →
12/24/2019. Photography - Tips for photography. Translation: Alexey Shapoval
10 177
0
Color infrared (IR) photography is amazing and surprisingly easy if you have the right tools and techniques at your disposal. In this material, divided...
Read more →
03/12/2019. Photography - Tips for photography. Translation: Alexey Shapoval
12 809
Using your own light sources when shooting street portraits makes it possible to illuminate the subject at any chosen angle.
Read more →
11/11/2019. Photography - Tips for photography. Translation: Alexey Shapoval
12 880
0
Just a few decades ago, the term "street photography" did not even exist, although the very first photograph in the world, taken by Joseph Nicéphore Niépce in 1826, depicts a city.
Read more →
04/11/2019. Photography - Tips for photography. Translation: Alexey Shapoval
16 125
0
Most modern cameras, be it DSLRs or mirrorless cameras, have the ability to manually set the white balance depending on the shooting conditions. Even...
Read more →
25/10/2019. Photography - Tips for photography. Translation: Alexey Shapoval
28 397
0
The term "golden hour" professional photographers call the time of day with the most favorable lighting. Light is a very important aspect of photography. You can capture the most stunning landscape or model, but without the right lighting, you'll end up with a flat, boring, and featureless picture.
| Apple in Telegram and YouTube. Subscribe! |
♥ RELATED: How to change/replace the sky in a photo using the Luminar app on Windows or Mac.
When shooting outdoors, artificial lighting cannot be used to illuminate the subject and must rely on natural light. That is why it is important to choose the right time for shooting outdoors. Fortunately, professional and amateur photographers have found a perfect solution to this problem since the advent of the first camera - the so-called "golden hour".
♥ BY TOPIC: How to use "Google Photos" and how is it beneficial for the iPhone owner?
What is Golden Hour
Golden Hour, also known as the Magic Hour, is the first hour before sunrise and the last hour before sunset, although the exact length of this time period depends on the season. At this time, the sun is low in the sky, giving a soft diffused light, more favorable than the harsh daylight that many of us are used to shooting in. Ambient light reduces contrast and makes the shot more pleasing, while long shadows help bring out details, adding texture and depth to the photo. In addition, there are usually far fewer people at dusk and dawn, which makes it possible to shoot in a more relaxed environment.
♥ BY TOPIC: How to create a double in a photo (clone objects) on the iPhone.

When the Golden Hour Rule Applies
The golden hour rule can be used for any outdoor shooting. In addition to landscapes and cityscapes, this rule is great for portraits, plants, and even cars. Professional photographers firmly believe in this rule, some even adhere to it so strictly that they refuse to shoot at any other time of the day. You do not have to be so principled at all, but remember that it is worth listening to the advice of experts, as a rule, these people know what they are doing.
♥ RELATED: How to take a good photo: 5 simple tips for those who want to improve the quality of their photos.
How to determine the golden hour
The easiest and fastest way to calculate the most favorable hours for shooting is to use the Golden Hour Calculator. This program determines the golden hour using more complex algorithms than those described above, but it is easy to use and offers very accurate data. If you prefer to determine the "golden hour" yourself, pay attention to the local time of sunrise and sunset, for this you can use the online calculator. Next, you need to make simple calculations: the first "golden hour" begins before sunrise and lasts almost an hour, the second - about an hour before sunset and ends almost immediately after it.
iPhone photographers can use the amazing Golden Hour One app.
♥ RELATED: 30 most famous fake photos you could believe.
Shooting Tips
Once you've chosen your subject and time, don't rush to grab your camera and run for great shots. Before you do, here are a few tips to help you shoot flawlessly and make the most of your time.
♥ BY TOPIC: Retouch on iPhone: Best photo retouching iOS apps.
Use tripod
It will be pretty dark outside around sunrise or sunset, but it would be quite a shame to miss out on the incredible hues and textures while waiting until it gets brighter outside. Mount your camera on a tripod, select a low camera ISO and use a slow shutter speed.
♥ BY TOPIC: Face swap, sex change, hairstyles, makeup, body shaping, photo and video effects and masks for iPhone - 20 best apps.
Take the time to set up your camera
The Golden Hour starts quite unexpectedly, so you need to prepare well in advance. Come to the location with a margin of time, even if you have to wake up in the middle of the night.
♥ BY TOPIC: How to automatically improve photo quality on iPhone and iPad.
Continue shooting
During the golden hour, the light changes quite quickly and the scene can take on a completely different look within minutes. Don't go home after taking one or two photos, but keep shooting to capture the full range of lighting effects.
Stock up on a flashlight and a hot drink
It's often quite dark and cold in the wee and dusk hours.