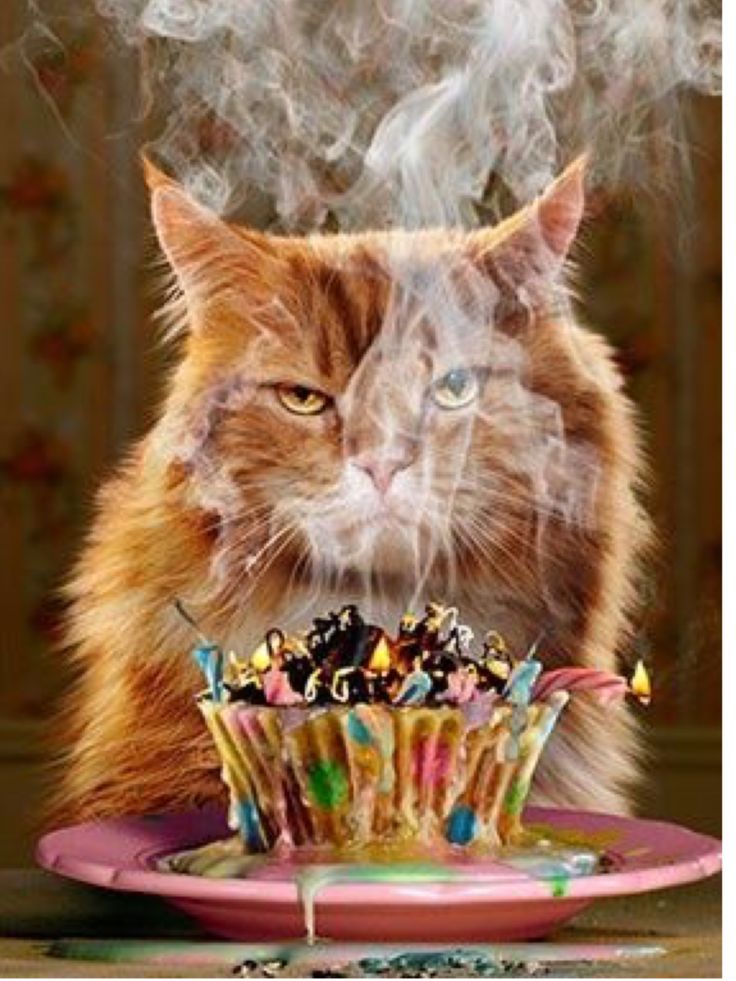
Do it yourself cake smash
10 Tips For The Best DIY Cake Smash Photos
Hello! If you’re here reading this tutorial which is aimed at beginners, then our Enthusiast Photography Course might be just what you’re looking for. This course has taught thousands of women to shoot confidently in manual mode to take photos they love (in just 8 weeks!). If that sounds like something you’d be interested in, click here to find out more!
DIY Cake Smash Photos
What better way to celebrate your baby’s first birthday than by taking some fun cake smash photos!
But what if the expense of the baby’s 1st birthday present including the party, the cake, and the decorations, has exhausted your budget and there’s nothing left for a professional cake smash photoshoot?
Or maybe you even tried to do the cake smash pictures yourself already… and got a little Pinterest fail situation happening?
You probably couldn’t put your finger on exactly what was wrong with your photos… but you just know it fell flat!
With our 10 easy professional tips, complemented with stunning photos taken by Justine Eacott, Advanced Photography Course graduate… we will show you exactly how to DIY beautifully lit, beautifully styled, gorgeous cake smash photos!
1.
Colour
Between props, the cake and the baby, there’s a lot going on when taking photos for a cake smash photoshoot. You can avoid adding visual chaos in the form of jarring colour combos by using a color scheme and choosing analogous colours. Analogous colours are next to each other on the colour wheel and when used together, create a harmonious overall look.
Justine has used pink and apricot through to yellow and green, against a soft apricot backdrop. Note that her use of the green is minimal and works only to lift the other colours.
Props
I get it. Your baby has a lot of special items you would like to include in your cake smash pictures.
When looking for how to do cake smash photography it can be tempting to keep adding elements to the shot, but when it comes to props, always follow the less is more rule. In the same way that clutter can cause distractions, so can too many props.
Choose 2-3 items and stop there. Remember, a cake smash photoshoot is all about your baby and this milestone… let the baby and the cake be the heros!
The less elements that work for attention, the more powerful and striking the resulting photos will be!
That being said, if you are really having a hard time with bub, I recommend a few small natural wooden toys like cars or horses.
Lots of balloons, but the elements are limited so it absolutely works – flowers, balloons, done.
Clothing
The best option for taking great cake smash photos is no clothes other than a nappy.
Why?
Less to clean up!
But also, it’s as simple as you can get. There is nothing more distracting in these types of photos than an outfit with multiple colours, fabrics, logos, and pictures.
If it’s winter, it might be too cold for the baby to go bare chested, even indoors. In that instance, keep clothing simple.
As an example, for this cake smash photoshoot session Justine used a simple white bodysuit that blends. The motif on the bodysuit is subtle, relevant, and sticks to the colour theme. As a bonus, the “one” on her bodysuit tells part of the story.
2. Compositions
Storytelling
Written stories have a beginning, middle and end. They describe the scene and talk about details.
When we approach photography in the same way, we use our images to tell the story. The best way to do that is by taking a variety of wide shots which set the scene, and some detailed shots to add that extra layer of information.
Take your shots wide…
…get in close and focus on other elements including (and especially) the cake…
…and whilst you’re there make sure to grab some beautiful portrait shots as well!
Perspective & Angles
Get variety in your photos by shooting from lots of different angles and positions.
This tip is one of the easiest and most powerful things you can do in child photography, including when taking cake smash photos – get down low to eye level with your subject. It’s the best way to ensure good eye contact, and makes it easier to engage your subject.
Related: Get Down to Their Level
If shooting from your standing height, make sure they look up at you… the alternative is a confusing photo of the top of their head!
3. Set Up
Floor
Maybe it’s obvious… but when looking for how to do a cake smash photoshoot at home, don’t choose to set up on your expensive persian rug or your shag carpeting!
Set it up instead on tiles or floorboards and save yourself the insanity of trying to get electric blue buttercream or chocolate cake out of white carpet!
Backdrop
The easiest backdrop by far is simply a plain light coloured wall.
If you don’t have a plain wall near good natural light, try an inexpensive DIY cake smash backdrop.
For this session, Justine answered both the floor and backdrop issues by using a long piece of vinyl and attaching it to the top of a backdrop frame with clips.
As far as DIY backdrops go, vinyl isn’t the cheapest option. But it’s an awesome backdrop for so many reasons… cake spills just wipe off, it doesn’t wrinkle, doesn’t require ironing, it’s sturdy so it drapes perfectly, and it’s easy to store (just fold it!).
Related: DIY Photography Backdrops
4. Background Clutter
Eliminating all background clutter is one of the most powerful things you can do not only when taking cake smash photos but whenever you want to elevate your photos from snapshots to looking professional.
Clutter makes our photos look chaotic because it adds too many extra elements and draws the viewer’s eye away from the main subject.
Indoors, clutter can come in many forms like stray toys, a basket of laundry in the background or a pile of newspapers on the dining table.
If you can’t move the clutter, move your subject.
With that in mind, think about clutter whenever you’re styling and deciding how many elements to include. No matter how pretty the elements you’re adding look… too many of them and it just becomes clutter. Your beautiful baby and the cake are the subjects, not all the other things around.
Related: Clear the Clutter
5. Natural Light
For a light, bright, cheerful look that suits cake smash photos so well, use soft natural light. As a bonus, it’s easy to use and easy to find!
Soft light wraps gently and evenly around our subject and is free from harsh shadow lines.
You can either do your cake smash outdoors or you’ll find it indoors near large windows and doorways. If the light coming through your window is too harsh, it may cause sharply defined shadow lines which can be unflattering. If that happens, diffuse the light through the use of a sheer fabric such as chiffon or curtain netting.
Make sure you turn any overhead lights off as they will interfere with your natural light source and cast unwanted hard light shadows.
Related: DIY Indoor Natural Light Studio
6. Get Help
Having a second pair of hands could come really handy when taking cake smash photos. If your baby is crawling, your helper can ensure she or he stays confined in the cake smash location and doesn’t drag bright blue buttercream throughout the house!
You can also ask them to grab your baby’s attention from time to time so that you can get some eye contact shots. They can use bubbles, peek a boo, etc but when doing this, ask them to position themselves directly behind you. This way the baby will look in the direction of your lens.
7. Timing
Party
If you’re having a party for your baby’s first birthday, schedule to take your cake smash photos another day. Parties are busy, tiring, with many distractions and lots of people around.
Hungry
What happens if you put food in front of a baby who just had a full meal 5 minutes ago? When organizing your cake smash photoshoot make sure your baby is hungry enough to taste the cake with enthusiasm!
Tired
Why would you schedule your cake smash pictures for 3pm when your baby is tired and cranky and ready for their afternoon nap?
Choose a time of day when your baby is usually feeling their happiest, for the best chance of happy expressions!
8. Clean Up
Don’t waste the clean up after a cake smash photoshoot. It’s a perfect opportunity for more great photos!
Use a container as a makeshift bathtub, but try to avoid plastic tubs as they don’t tend to be very photogenic.
This large metal bucket used by Justine is a fantastic option.
If you use a small tub, the baby has no choice but to sit or kneel, ensuring they remain at eye level with your lens. It also prevents the baby from slipping under water and leaves your hands free to shoot.
Add elements such as a rubber ducky, flowers, sliced fruit… the options are endless. But remember, keep it simple, less is more!
9. Settings
Exposure
Once you’ve finished with the set up, choose your settings and take some test shots. If you’re happy… then bring the baby in!
The last thing you want is for the baby to start without you as you fiddle around trying to get your settings right!
Shutter Speed
Whether you’re indoors or out, I recommend a shutter speed of 1/400 as a minimum. This will eliminate unwanted blur from the speed of motion you could expect when doing a cake smash photoshoot.
If shooting outdoors, you may have enough light to go even faster. The faster the better!
Aperture
Choose an aperture that is wide enough to blur your background, but narrow enough to help you nail focus given the baby may be moving a bit. If you feel confident with your ability to focus as very wide apertures, you could open up to around f/2.
I recommend trying around f/3.5 but bear in mind the resulting depth of field will vary a little depending on the distance between baby and cake, and your focal length.
Then choose an ISO to balance the other two settings and achieve a nice light exposure. Given your fast shutter speed and indoor location, you will probably need to push your ISO.
10. Gear
A DSLR you can use in manual mode is essential so that you can control the shutter speed and aperture.
If you’re shooting in auto mode, take control of your camera and take photos you love by switching to manual mode.
I recommend a lens focal length of around 35-50mm. This range is perfect for cake smash photos as it enables you to get in close whilst still including the set up.
Related: Getting out of Auto
Many thanks and much love to Click Love Grow Advanced Photography Course graduate Justine Eacott for generously sharing her images! If you want to see more of Justine’s work, head to Justine Eacott Photography.
And if you’re passionate about photography and you want to find out more awesome advice about taking photos you’ll love, just have a look at my other blog entries or join the free course.
Download the Guide
4 Steps to Beautiful Kids Photos
Use these tips & tricks to help you take gorgeous non-cheesy photos of your kids! Xx
So… are you ready to take full control and master your camera in manual mode? If you want to learn how to confidently take photos you love (on purpose, every time!)… our next Enthusiast Photography Course begins in January. Click here to find out more and reserve your spot!Spread the love
11 Colorful Techniques for DIY Cake Smash Photography
By Hillary GrigonisA- A+
Download as PDF
Subscribe Below to Download the Article Immediately
You can also select your interests for free access to our premium training:
Business Basics
Cheat Sheets
Child Photography
Colorful Cityscapes
Composition
Creative Photography
Creative Portrait Concepts
Digital Photo Collages
Fairytale Portrait Photography
Food Photography
Interior Photography
Landscape Editing
Landscape Photography
Lightroom Processing
Lightroom Presets
Long Exposure
Macro Photography
Milky Way Photography
My Camera and Photography
Organic Marketing
Pets
Product Photography
Sky Photography
Social Media
Still Life
Time-Lapse Photography
Travel Photography
Urban Photography
Wildlife Photography
Your privacy is safe. I will never share your information.
 Nothing quite says beautiful mess like first birthday cake smash photography. But when you decide to go the DIY route, the results tend to be less beautiful and more mess.
From shooting my firstborn’s cake smash to his little sister’s, I’ve discovered a few tricks to getting colorful, messy first birthday photos with DIY cake smash photography.
From keeping it simple to plan the cleanup, here are 11 tips to make those cake smash photos memorable.
Sekonic Flashmate Light Meter
Capture the perfect lighting for your cake smash photos with this compact and easy-to-use light meter.
Buy from Amazon
×
Sekonic L-308X-U Flashmate Light Meter
Amazon
$229.00 $284.70
Buy Now!
[ExpertPhotography is supported by readers. Product links on ExpertPhotography are referral links. If you use one of these and buy something, we make a little bit of money. Need more info? See how it all works here.]
1. DIY Cake Smash: Ditch the Plastic High Chair
High chairs are designed to let babies feed themselves with minimal mess. But the mess is what makes great cake smash photos!
Ditch the high chair, and you’ll be able to photograph the cake in their toes (trust me, they’ll have cake in their toes).
Putting the baby and the cake on a flat surface gives them free reign to make a mess—and isn’t that what cake smash photos are all about?
There is one exception. I’ve seen some great cake smash sessions done with a painted wooden high chair.
While even a wooden high chair keeps them from getting cake in their toes, painted wooden high chairs are sweet but simple props and offer a different style of cake smash images.
2. DIY Cake Smash Photography — Do It Yourself (But With Help)
The biggest issue I face when photographing my own kids compared to working with a client is getting them to smile when they can’t see me because of the big camera in front of my face.
I’ve discovered that I get much better grins when I have some help—usually dad, grandma or grandpa, or someone else they love, doing something silly.
My favorite picture of my son is from when he was giggling at his grandma with a huge dimpled smile that lit up his entire face.
For a cake smash, the extra help goes even further. For my daughter’s first birthday, her papa helped make sure that the frosting mess stayed on the backdrop and not all over my living room.
3. Keep Props Simple for DIY Cake Smash Photos
I’m not sure who was more excited for her cake smash photography session, my daughter, or me. That excitement makes it pretty easy to go overboard with props, but I knew if I didn’t keep it simple, I’d end up with photos that were too busy once the cake was smashed everywhere.
Choose a simple background with only one or two props besides the cake. (It’s also perfectly fine to do just a background and cake.) Keep in mind you’ll want to shoot several angles, so you may want to arrange your props to have some close-ups that crop some of the items out.
Besides being simple, the props I used were pretty inexpensive. The background is actually a piece of wall panelling I picked up at a hardware store for about $25 and cut into two pieces.
The cake stand is an $8 candle holder, similar to this one, which was perfect for an over-sized cupcake.
I then just added a pre-made banner and a bag of balloons I picked up at a dollar store.
4. Color Coordinate
Going into my daughter’s DIY cake smash photography session, I knew I wanted a low key background with pops of color. Start with one item that you would like to coordinate in the session—for me, that was the headband she’d worn for all of her monthly photo sessions throughout the first year. Then, add in colors that coordinate or compliment that item.
Pay close attention to the color of the cake frosting too. White frosting may look good, but it is also the hardest to photograph, since white objects are more prone to becoming overexposed highlights. I used blue icing, and while the photos turned out good, blue does tend to stain more than other colors.
5. Schedule the Session for the Least Fuss
The timing of the cake smash photoshoot matters more than you’d think. For my son’s first birthday, I did his cake smash at his birthday party—besides making the session more stressful, it made my son a bit more nervous with so many people around. Because I was also playing hostess, I rushed through the photos.
So for my daughter’s cake smash, I planned the session during the day, well before her nap time, and when I would have the best light coming in through the windows. (And yes, it’s perfectly fine if the cake smash photos aren’t done on their actual birthday.)
6. Look for Light
For the fun, playful look that comes with cake smash photos, look for a soft light that’s easy to work with.
I set up in my living room during the day, where I had light coming in from the front and left sides from several different windows. That left me with plenty of light to shoot without a flash, but soft enough to not leave any weird shadows.
Look for a spot in your home that has great window light—avoid the harsher light by using a large north or south facing window. If you’re stuck with a window that has the sun streaming in, use a sheer white curtain—this will act as a cloud to soften the sunlight a bit.
Of course, if the weather cooperates, you can also set up outside in the shade.
7. Perfect Your Exposure Before the Cake Comes In
Once the cake comes in, you’ll need to take photos quickly, so make sure your settings are good ahead of time. I took a photo of just the cake and background by itself, then put the cake away and took a few pictures of just my daughter.
Besides adding to the variety of the session with a few mess-free images, I was able to make sure that my exposure was accurate and my shutter speed was fast enough to keep her from blurring.
8. Encourage Shy Babies
Someone just set a giant cake in front of you—you’re going to dig in, right? I would too, but babies aren’t always the same way. If the birthday baby doesn’t seem interested after the first few minutes, try putting your finger in some frosting and giving them a taste.
Once they realize what’s in front of them, most babies will happily dig in themselves.
9. Adjust Your Composition
A typical cake smash will only take a few minutes of actual cake smashing, so shoot fast but be prepared to adjust your angle to get a variety of shots. I started at my daughter’s eye level because I like the intimate feeling of photographing kids from their perspective.
But, I also took a few shots toward the end standing up so that I could see the tiny frosting handprints.
Don’t be afraid to get in close too—some of my favourite shots are just toes covered in cake.
10. Keep Clean Up in Mind
As you plan a DIY cake smash session, it’s important to consider the clean up too. Keep paper towels handy. Plan on going straight from the cake smashing to the bathtub and tossing any clothing straight into the wash to avoid staining.
If you were able to recruit help, take a few shots of the background after the birthday boy or girl is on the way to the bathtub (and you can take photos of the clean up too).
11. Keep Edits to a Minimum
One more perk to shooting with the intention of getting messy? Editing is simpler as well. The mess is part of the memories, so don’t try to “fix” any frosting splotches. I shot in RAW, then adjusted for better brightness and contrast but otherwise kept the edits to a minimum.
That first birthday cake is a big milestone; taking a few cell phone photos of the birthday baby in a plastic highchair just doesn’t do it justice. Planning a DIY cake smash photography session allows you to capture more colorful, messy photos of that momentous first birthday.
Conclusion
Not only does a cake smash session make perfect first birthday photos but is also sure to be one of those cherished memories that will last forever!
With just a little time and creativity, anyone can take amazing DIY cake smash photos too.
Sekonic Flashmate Light Meter
Capture the perfect lighting for your cake smash photos with this compact and easy-to-use light meter.
Buy from Amazon
×
Sekonic L-308X-U Flashmate Light Meter
Amazon
$229.00 $284.70
Buy Now!
How to cut a cake beautifully [11 types of cakes]
This article will be useful to anyone who plans to enjoy themselves or treat someone to such a dessert dish as a cake. Yes, exactly how to cut a cake, including how to cut a wedding cake correctly, will be discussed in this article. Therefore, if you are a future bride or a future groom, then be sure to read it.
It is quite pleasant to realize that today there are a huge number of design ideas and configurations of cakes, but here a difficulty arises - you need to cut them all in your own way in order to preserve its aesthetics and unique taste, and not turn our treat into a crumpled unsightly mass. On the Internet, you can find many options for dividing pies into equal portions, but we will describe the most practical, simple and less energy-intensive ways. nine0003
Before we start cutting the cake, we need to make sure that the knife we are going to cut it with has a triangular blade and is well sharpened. Otherwise, greased cuts, uneven pieces and squeezed cakes are provided to you. It is better to avoid this by preparing the tools in advance, which also include a special spatula for transferring a portioned piece to a personal plate. Now on the market you can buy sets for cutting and serving desserts made in the same style. Handmade wedding sets look especially cute. We also note that in restaurants, usually when cutting especially large wedding cakes, they often prepare a bowl of hot water on the table with the cake to moisten the knife edge when cutting. This is done in order to preserve the beautiful appearance of each piece and so that the cream does not stick to the knife too much and the cuts are not smeared. nine0003
With the tools sorted out, let's go directly to the cutting process. All schemes for dividing the cake into pieces can be structured according to the shape, height and number of intended servings. That is, there are schemes for cutting round, square, rectangular, multi-tier, single-tier but high, for large and small companies.
Round
If you need to divide a round cake into equal parts, you can do it in the following ways.
Wedges
This is one of the best known and most commonly used methods. To cut into wedges, you need to find the center of the cake, and gradually move the tip of the knife from the center to the edges. But this scheme is only suitable for small cakes, otherwise the portions will be very large.
The second option to get even triangular pieces is quite simple. It is necessary, having walked with a knife from one edge to the opposite edge, to divide it into two semicircles in diameter, then each semicircle is still in half so that four sectors are obtained. And then each quarter, passing from the edge through the center to the other edge of the circle, once again divide in half. In this way, equal triangular slices are quickly and simply formed. nine0003
Diamonds
If you want to properly cut the biscuit into diamonds, you must first divide the dessert into strips with horizontal lines. After that, walk with a knife diagonally to the previously obtained strips. So the diamonds will turn out to be as identical as possible in size, rather than you will outline and cut each diamond separately. It depends on the diameter of the cake which stripes need to be outlined so that there are beautiful rhombuses.
Square
Square and rectangular confections not only look amazing, because they give room for imagination in the design of the surface, but are also quite easy to divide into equal portions. That is why often wedding cakes are ordered square. They can be very easily separated in two forms:
Diced
To do this, make two or three long cuts (depending on the width of the dessert) with the same distance, and then cut the cake several times across, thus dividing the long strips into equal square portions.
Triangles
Cut the cake into rectangular pieces as described above. Remember that they should be 2 times less than guests. Then simply cut each rectangle diagonally and serve the dessert to the table. Note that at first, with this method, it is better to divide it into rectangles, and not into squares, so that as a result, triangular small slices are more convenient for serving. nine0003
Non-standard shape
The confectionery world does not stand still, new trends appear every season that amaze and surprise lovers of sweets with their appearance. Among the orders there are cakes:
- in configurations of different geometric shapes, in addition to the main ones described above;
- in large numbers or letters;
- the silhouette of some significant object or animal (a cake-car, or a cake-bear, in the shape of a heart, etc.)
Such cakes certainly look impressive, and photos and videos from the holiday look especially colorful. However, if it is necessary to cut it, the question arises: “How to make sure that everyone gets the same share, and that it is beautiful?” This question is especially relevant at celebrations. Have you noticed when, standing in front of a large custom-shaped wedding cake, the newlyweds exchange glances with each other in the hope that the partner knows what to do? Or the hero of the day, who spins around the cake in the form of a number of his age, not knowing which side to start cutting? nine0003
To avoid such embarrassing situations, we remember the universal options for cutting a non-standard cake.
Mesh
It is most convenient to cut the product resembling the outlines of an oval and a heart along the length into strips of the desired size, and then cut them into rectangles.
Chamomile
If we are talking about confectionery products made with a complex silhouette, then it is best to cut them using the “chamomile” method.
To do this, visually separate the middle into a round cutout, and cut the part around the perimeter into proportional pieces without affecting the center. After the extreme pieces are separated, proceed to the central part, which can be divided like a standard round-shaped cake. From the photo above, it is visually clear that the number of divisions into circles according to the “daisy” pattern depends on the size of the treat. nine0003
Tiered cake
But how to divide the cake if it is multi-tiered? Usually tiered masterpieces are served at weddings or large celebrations, and large-scale events. For the convenience of serving and demonstrating the grandeur of the event, special shelves for confectionery have now become often used. On such shelves, as in the photo below, each tier lies on its own base and it is not difficult to correctly distribute it among the guests.
But there are multi-tiered cakes with two or three tiers located directly on top of each other. In this case, it does not hurt for young people to know how to properly cut a tiered cake so as not to destroy the entire structure. nine0003
1) The very first top layer must be carefully removed. If it is a wedding cake, it is traditionally left to the bride and groom. Then the cake itself starts to be cut from the second tier, gradually moving down
2) For two-tiered wedding cakes, another scheme is proposed, in which the upper tier is not separated. The newlyweds cut the cake starting from the bottom tier around the circumference of the top tier. In this way, two rings are obtained, as it were, the outer of which is divided into squares, or rather trapezoids, and the inner one is cut into 4 segments in the position in which it originally stood. And after that, pushing out from the center, each segment is laid on a flat side and divided into the required number of strips. However, according to tradition, part of the upper tier is left young. Visually how to divide according to the rules of this scheme is shown in the photo. nine0003
Confectioner's Tips
In conclusion, let's add a few important tips regarding the main dessert dish of any event, which will greatly facilitate the process of preparing and organizing your holidays.
To know exactly what weight cake to order, calculate approximately 100-150 gr per guest. But if you choose decor with mastic, remember that it is very heavy, so it is better to make pieces weighing about 200 grams.
There is a curious way to beautifully divide almost any cake so that it stays fresh longer, the edges do not dry out, and the cream does not weather. It is called "The Mathematical Method of F. Galton". First you need to cut and remove the strip from the middle. Then you need to combine the remaining two halves and again cut a strip from the middle of both halves. As a result, quarters should remain, which are divided radially. They just need to be aligned with each other to keep the confection together. And cut the cut strips into cubes or rhombuses and serve to the table. This method is especially relevant if a large cake is bought, and there is a high probability that the delicacy will remain uneaten. This division is suitable even for bunk wedding structures. nine0003
On the photo below you can see and take note of this scheme
Try not to order too high cakes. It is better to let it be of medium height, but wide in diameter. This also applies to wedding desserts. Of course, single-tier wedding "turrets" are now at the peak of trends, but how to cut a tall cake? There are many video instructions for cutting a tall cake on the net, but in our opinion they are not entirely aesthetic in the process, and require additional time and utensils. Judging by the reactions in the comments on our Instagram page, tall specimens are undoubted favorites, but still, a small design is much easier to distribute and beautifully serve. nine0003
Bride and groom chocolate figurines, hearts, bows, flowers, or any other fondant, chocolate or sugar figurines should not be cut together with the cakes. It is best to remove the decorations on the surface of the cake before cutting and serve along with a portion of the cake on the table of the newlyweds. And if they are made of inedible materials, then young people can keep them as a keepsake and use them on their wedding anniversary.
Consider the composition of the sliced cake when storing before serving. If you ordered a soft sponge cake with a berry or fruit filling in the filling, then it is better to leave it in the refrigerator for the whole day so that it does not drip. And products with caramel creams, hard cakes like dacquoise, or nougat are better to keep warm for 20-30 minutes before serving. Organizers of weddings and other celebrations must pay attention and be aware of such features. nine0003
Cutting a two-tier cake at a wedding for the convenience of the newlyweds and saving time is best entrusted to the staff of the institution. Don't worry, most of the time they are experienced in this business and will calmly cut your dessert into as many pieces as you need.
Pele chocolate cake at home recipe with photo step by step
Contest winner Best recipe of the week November 20-26
Pele chocolate cake at home
Unfortunately, yours is turned off or not working Javascript . To work with most of the functions on our site, this is a necessary element. Contact your administrator to resolve this issue.
Composition / ingredients
12
Change composition
servings:
Step by step cooking
Cooking time: 1 h 30 min PT1h40M-
Step 1:
Let's prepare the ingredients. Melt the butter.
-
Step 2:
Mix cocoa and sugar.
-
Step 3:
Add eggs, stir. Add oil, kefir.
-
Step 4:
Mix soda with vinegar, mix well. And immediately add to the test. We add flour. We knead the dough. If the dough is liquid, add 3 tablespoons of flour. The dough should be like a pancake or like thick sour cream. Let's prepare the form. Let's cover it with paper. I had 24cm.
-
Step 5:
According to the recipe, put 10 tablespoons into a mold and bake at 180g for 30 minutes.
 You can divide the dough into 4 parts and bake 4 cakes. nine0003
 -
Step 6:
We take out the finished cake and let it cool. The same with the other test.
-
Step 7:
I got 4 cakes. One can be left for sprinkling the cake. But I left them and baked another half portion of the cake.
-
Step 8:
Make cream. Beat butter at room temperature until white. It's about 5 minutes. Then add condensed milk in 3 stages.
-
Step 9:
Soak the cakes well with syrup. Mix the syrup, I had chocolate with water. You can add a little cognac or liquor. And apply cream. The cream can be divided into equal parts. Then our layers will be even. nine0003
-
Step 10:
Spread cream all over the cake.
-
Step 11:
Top and sides too.
-
Step 12:
Grind the cake into crumbs.
-
Step 13:
And sprinkle all over the cake.
 We put it in the refrigerator overnight. Enjoy!
What is this code for?
Attention! A special application must be installed on the phone / tablet. nine0002 Read more about this code.">
Similar recipes
The remaining categories
Chocolate cake
on the festive table recipes
Cakes without mastic home recipes
Cephilore
on March 8 delicious recipes
Oil
Calorie content of products possible
- Chicken egg - 157 kcal/100g
- Egg protein - 45 kcal/100g
- Egg powder - 542 kcal/100g
- Egg yolk - 352 kcal/100g
- ostrich egg - 118 KAL/1000051 Sugar -Pesok - 398 kcal/100g
- Sugar - 398 kcal/100g
- Fat kefir - 62 kcal/100g
- Kefir 1%fat - 38 kcal/100g
- Kifir Kifir.

Learn more