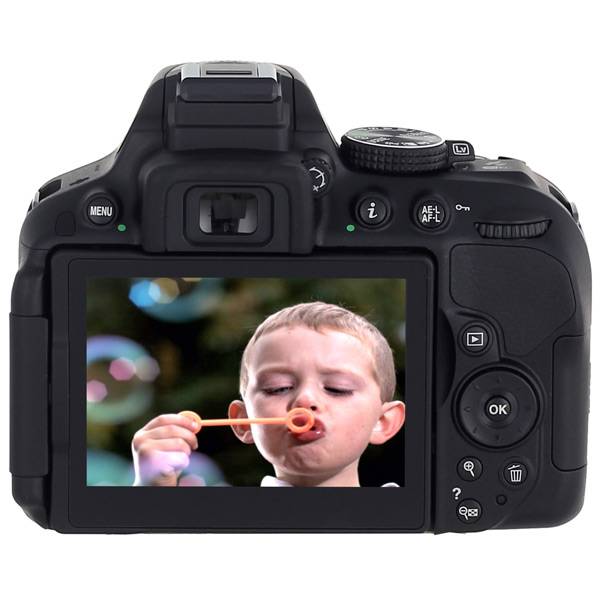
Glasses product photography
How to Photograph Eyewear for Ecommerce and Online Stores
Eyewear, such as sun and eyeglasses, are made of highly reflective materials. They tend to have glares and reflections once photographed. Suffice to say that using flash is not the best idea for this kind of product photography. Well, this is true; however, it might be tricky to do but there are, in fact, ways to minimize glare and reflections when shooting highly reflective surfaces.
Here are tips and ideas that you can use when doing eyewear product photography:
1. Prepare the Products
Preparing the products beforehand ensures that you have a seamless shoot later on. Although you can do product photo retouching at the end of the shoot, having clean glasses will be more helpful. Wipe off the glass surfaces so that fingerprints are removed. You must wear cotton gloves to prevent new prints from showing up on any of its surfaces. There will be less need to do product photo editing when smudges and fingerprints are kept to a minimum.
2. Prepare the Set up
Organize the glasses to make it easier and faster to see which product is up for the next shoot. It is encouraged to use a lightbox with a plain white background. There should be a sturdy surface to hold everything up. The camera should be on a tripod too to ensure less movement during the actual product photography.
3. Control the Lighting
Although it seems difficult to use lights for eyewear product photography, having plenty of it is actually ideal. The technique is to know where to position the lights so that fall off reflections is blocked and what equipment to use to control the harsh lights. Unwanted reflections will be blocked if you extend the white background underneath the product and end up at the bottom of the camera. All lights should also be attached to umbrella diffusers so they do not give off a too harsh light.
4. White Balance Set up
Photo retouching services can fix anything but it can be challenging to correct problems that are caused by ineffective lighting. One way to achieve an all-white background is by setting up the white balance on the camera. You do not even need to be confused by this since most cameras have an automatic white balance function and choose which one to have for the particular light that you have in the studio. This will ensure that the camera will work well with the light source that you have set up for the shoot.
5. Camera Set-Up
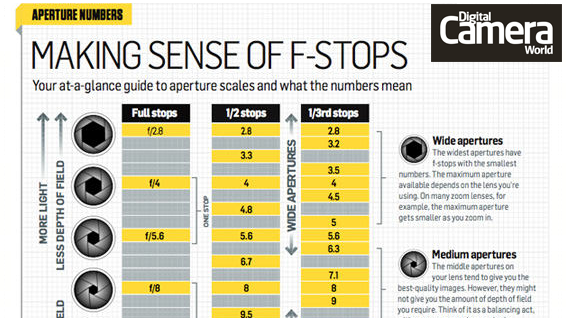
Another way to minimize the photo editing services needed for eyewear photos is by correctly setting up the camera. A large aperture, preferably f/11or higher, a shutter speed that is based on the camera’s viewfinder, a low ISO (ISO 100 is fine), and focusing on the center will get you that most flattering photos for eyewear product photography. You can, of course, play with your camera’s settings to see which would deliver pleasant results. What you have to prioritize is having a camera that gives high-resolution photos in order to help capture the perfect photos.
6.
 Position the Eyewear Well
Across all types of products, every detail count. You need to remember this as you position the eyewear for the shoot. You must experiment around with the angles by changing the camera height, do nice close-ups, tilt the camera, and choose angles that show off the lenses, arms, and frames.
Image via ray-ban.com
7. Watch out for Reflections
Since the eyewear surfaces are reflective, you must be aware that everything around it can accidentally show up in the picture. Check the photos for such reflections after every change of angle. It can be frustrating to see yourself or the studio as a reflection on the sunglasses’ frames later.
8. Create a Context
Most photo editing services suggest having a clipping path and background removal for product photos. This truly helps in making the eyewear the main focus of the photo. There are also instances when having props can be helpful especially if you are trying to create a context for the shoot. You may use the box that came with each eyewear to have the product something to lean on. A bit of the logo, the case, or even the store’s branding is perfectly acceptable.
9. Make it More Special
Try to create a more interactive way for the customers to check out each eyewear by having 360° photos or videos. Do sequence shots that will be later on stitched together to make a nice video of rotating eyewear. You may also play with the light as it moves during each photo as it will give a nice color and light transition effect on the video.
10. Post-Production Processing
It can be overwhelming to do eyewear product photography, especially because there are too many things to watch out for. If there are mistakes along the way, such as bad lighting, wrong positioning of products, and stray reflections, do not fret just yet. You still have the post-processing stage to correct those.
There are times when everything looks messed up but there are also moments when you get almost perfect shots. These happen not only with newbie product photographers but also with professionals. This is why post-production is important with every shoot since it is the time where you can adjust everything, digitally. Correct the exposure, lights, and even wipe off smudges and other eyesores from the photos.
Bottom Line
There are many creative ways to photograph reflective objects. As long as you follow the tips that were earlier discussed, then you should not have a lot of problems regarding eyewear product photography. If you are having trouble with your shoot, take comfort in knowing that there are experts who can help you save the photos so you will have the best one for your product pages.
Need help with your eyewear product photography pictures? Ephotovn can do the rest of the post-processing so you will have professional-looking eyewear photos for your website!
Let Ephotovn Be Your Partner In Your Photography Business
Ephotovn understands the importance of producing amazing photos to sell your products.
 With our expert team, we can assure that all the time, effort, and money you invested will not be wasted.
Contact Ephotovn Now!
Disclaimer: We do not own some of the images, videos and content being shared on this page. Please note that some of the images, videos we used have copyrights belonging to their original owners. No copyright infringement intended. If you originally owned the images, videos and content we shared and distributed on our website, and do not wish to have your work get published or distributed should make your wishes known to us. You can email us at [email protected]. We will take your content down and never publish it on any of our pages.
7 Sunglasses Product Photography Tips For Stunning Photos
Disclosure:
SkylineFBA.com is a participant in several affiliate programs and may be compensated for referring traffic and business to these companies at no additional cost to you.
Sunglasses product photography is a tough task, especially when it comes to reflective surfaces like sunglasses. It can be difficult to get the right angle and capture that perfect shot that isn’t ruined by glare or unwanted reflections.
But don’t let that deter you. Creating visually appealing images of eyewear is possible with certain tips, tricks, and techniques.
Get the best sunglasses photographs with these awesome tips:
- Manipulate lighting to reduce glare.
- Shoot sunglasses based on their characteristics.
- Utilize different scenes and props.
- Use a tripod to ensure consistent, stable images.
- Use the proper camera settings,
- Shoot the right angles.
- Edit your pictures for quality.
Turn Your Product Photos Into Infographics Without Hiring A Designer
In this article, we’ll discuss the most important product photography tips for shooting sunglasses that we use in our own studio for making images stand out and look their best.
1. Manipulate Lighting To Reduce Glare
Behind the scenes image in our studio shooting a pair of glasses.When it comes to reflective products like sunglasses, the number one issue photographers face is glare. This can be caused by many things, including the lighting in your scene or even the sunglasses themselves (mirrored sunglasses are notoriously difficult to photograph).
Fortunately, with some simple changes to your lighting setup, you can avoid most of these issues. You just need to know what works and what angles cause problems so you can fix them.
For a complete write-up on dealing with reflective products, check out our post here. Otherwise, be sure you follow these tips:
- Avoid using harsh, direct lighting. This typically causes glare and unwanted reflections. Use softer lights instead such as those found in light modifiers.
- Utilize diffusion materials. Diffusion materials like Savage Translum (Amazon) help create gradients of light that are visually pleasing and don’t cause reflections or glare.

- Light the materials your sunglasses reflect. Reflective surfaces like mirrors, glass, and polished metals will only show the light source, which is why everything else is dark and black. Instead, surround your sunglasses with diffusion materials and light those.
- Use a strip box. Strip box lighting modifiers (Amazon) are the best for controlling and shaping light. They also allow you to create the most visually pleasing lighting gradients when paired with diffusion material.
2. Shoot Sunglasses Based on Their Characteristics
Lifestyle image of eye glasses taken in our studio.Not all sunglasses are the same. There are opaque lenses, mirror lenses, translucent tinted sunglasses, and metallic frames, among others. When photographing sunglasses, you must consider the frames and lenses when preparing to shoot. Different lenses require different lightning manipulation, angles, and techniques.
This section will cover a few different lenses and frames and some tips for photographing them.
Clean Your Sunglasses
There’s nothing worse than shooting the perfect picture of sunglasses only to realize there are unsightly smudges and fingerprints on the lenses. To avoid this, wear cotton gloves when setting up the sunglasses for shooting.
In addition, clean the lenses with glass cleaner and then wipe them down with a microfiber cloth to remove any tiny fibers. Doing so will reduce the time spent editing. Sometimes close-up camera shots pick up on things we don’t see right away, so it’s important not to skip this step even if you don’t see any noticeable blemishes.
Mirror Lenses
Mirror lenses are notoriously difficult to photograph. They’re highly reflective and pick up every reflection within a few inches. The best way to photograph sunglasses with mirror lenses is by surrounding them with diffusion material.
To do this:
- Place your lighting beyond 45º angle.
- Place a white foam board or Savage Translum directly in front of the sunglasses.

- Shoot just above the sunglasses and from a 45º side angle. This type of shot will capture the lenses, frames, and arms of the eyewear without creating glares or reflections.
To shoot frontal pictures of mirror lenses, utilize the white foam board or diffusion material by cutting a small hole for your camera lens.
Metallic Frames
Metallic frames cause problems because both the frames and the lenses are reflective. To prevent this, use diffusion and light reflectors to reduce shine.
I recommend the Neewer Light Reflector 5-in-1 from Amazon.com. This range of metallic shades enables you to customize your lighting and reflect light in an efficient way. In addition to light reflectors, experiment with foam boards. The color of the foam board you’ll need depends on how harsh the light is on each side.
Treat the metallic frames just like you would if it were sunglasses with mirror lenses. Place the diffusion material over the frame and use light reflectors to bounce white or silver light onto them, which will create a nice lighting gradient.
Clear Frames
Clear frames may seem challenging to shoot, but it’s relatively easy compared to mirror lenses and metallic frames. Instead of setting up your lighting around your sunglasses, you will be lighting the background instead.
- For clear frames, lower the lighting intensity so that the clear frames stand out against the background.
- Then set up your strip boxes to create a lighting gradient on your background, which can be diffusion material or colored paper.
Plastic or Matte Frames
If your sunglasses have frames that are plastic or have a matte finish, then your job is going to be much easier. Plastic or matte finished frames tend to create no reflections, so you can use any type of lighting for them.
Position your lights in a three-point lighting setup and place a white foam board or diffusion material in front of the highly reflective parts of the sunglasses. Then use your strip box angled between 20-45º for a smooth gradient.
3. Utilize Different Scenes and Props
Photo by Ethan Robertson on Unsplash.Simple photographs of sunglasses against a solid colored background are an excellent way to showcase design and details, but sometimes context matters. People, settings, and props create context for sunglasses which may help them sell.
Below are some examples of how to add context to your sunglasses photos:
- Use Models – Models showcase how the glasses look on an actual human. This is especially important if you sell different sunglasses sizes (i.e., toddlers, kids, adults, etc.). Use models in various scenes—at a party, on the beach, driving a car, hiking, and so on.
- Shoot in Different Settings – Photograph sunglasses in different settings depending on the collection. For example, shoot glasses from your summer collection on a mound of sand at the beach. For an Autumn collection, take pictures of them near a leaf pile.
- Photograph Through The Lenses – Shoot scenes through the lenses of sunglasses to showcase the tint.
 This is especially important for sunglasses with different lens hues. Nature scenes are excellent for this purpose.
 - Utilize Accessories – Aviator sunglasses, in particular, were designed for wear with headgear. When photographing a pair of aviator shades, a military-style cap is a suitable prop. On the other hand, fashion sunglasses may be photographed next to jewelry or a pair of shoes.
Pictures of your sunglasses with context do not need to be the primary photo on your storefront, but having them available gives potential buyers the chance to see them in action.
Check out our article on lifestyle product photography for more tips and tricks.
4. Use a Tripod To Ensure Consistent, Stable Images
When taking photographs of sunglasses for a storefront, you’ll want consistent images across the board. Similar photos of your products develop brand recognition and keep the products fresh in the minds of potential consumers.
Mark the area where your tripod sits during shooting and align it exactly the same every time. Doing so allows you to accurately photograph the sunglasses and maintain consistency throughout your online store.
In addition, tripods reduce instability, allowing you to shoot at a larger aperture (we’ll discuss this more in the next section) for images with lots of bokeh (blurry background).
Another reason why a tripod is important is due to the Law of Reflections. Because you’ll want to place your lighting and diffusion beyond the angle of incidence, it’s important that your camera position does not change.
Using a tripod ensures that your camera position stays the same every time.
5. Use the Proper Camera Settings
Your camera settings play an essential role in ensuring consistent results and stunning photographs every time. This section will cover several different camera settings that you can adjust to improve your sunglasses photography.
Shooting Mode
I highly recommend shooting sunglasses in Manual mode. This mode gives you complete control over the camera’s settings.
Controlling settings is especially important when using reflectors, foam boards, and different light settings. Automatic mode doesn’t adjust based on all present factors and can even change between shots. With you in control, you ensure the best results.
For more info, check out our article on the best camera settings for product photography.
White Balance
Adjusting the white balance on your camera ensures that the camera is shooting correctly with the type (fluorescent, natural light, etc.) and level of light you’re using. A proper white balance setting creates an accurate representation of the colors you’re shooting.
White balance is particularly important when shooting on a white backdrop, as it ensures a perfectly pristine background.
Below is a table of recommended white balance settings for three different types of light:
| Tungsten Lighting | 2500-3500 K |
| Fluorescent Lighting | 4000-5000 K |
| Natural Light | 5500-6500 K |
When in doubt, it’s perfectly fine to use the automatic white balance setting. However, I recommend using one of the settings above based on your lighting or setting it with the X-Rite Color Checker for best results.
Aperture
Aperture affects how much light enters the camera lens. A higher aperture is ideal for bringing entire scenes into focus, whereas a lower aperture creates “depth of field,” which blurs the background.
When shooting sunglasses, you’ll want the sunglasses to be in focus. An aperture of F11 or greater is ideal for solid backgrounds. It captures all of the detail and creates sharp, crisp images of the eyewear.
Sometimes a lower aperture is necessary, such as when you’re shooting sunglasses with a beach scene in the background. An aperture of F6 will keep the sunglasses as the focal point and slightly blur the sand and ocean.
ISO
The higher the ISO, the brighter the photograph—but that’s not always a good thing! Higher ISOs are generally used for dark environments, but there’s a catch: the higher the ISO, the grainier the image. Pictures with a lot of grain will not showcase your sunglasses in the best light.
For highly detailed pictures of sunglasses, choose an ISO as close to 100 as your lighting will allow. To prevent motion blur and achieve those perfectly crisp images, use a tripod.
6. Shoot the Right Angles
Hero image of Kirkland Sunglasses taken in our studio.When photographing eyewear, make sure that you’re getting the right angles. You want to capture every detail, from the clarity of the lenses to the intricate detail on the arms. The more information you provide with visuals, the more comfortable buyers will feel about purchasing your sunglasses.
The most basic shots for product photography of sunglasses include front, side, and ¾ view. These are a must-have for online storefronts. If you’re taking additional photos, utilize high and low angles, close-ups, and camera tilts that show off the lenses, frames, arms, bridge, and other intricate details.
Remember to remain consistent, and include the same shots for each pair of sunglasses you’re selling.
7. Edit Your Pictures For Quality
Once you’ve mastered lighting, camera setup, and angles, it’s time to tweak those photographs! If you’ve used the tips above, any imperfections in your shots should be at a minimum. With that said, there’s still some editing to do!
Below, we’ll cover three of the most common edits for sunglasses photography.
- Color Issues – The color should be closely matched to the actual color of the sunglasses. If there are any significant variations, you’ll need to adjust the hue, white balance, and/or curve (changes color tonality).
- White Background – When shooting on a white background, adjust the image’s saturation and clean it up using the clone/heal tool for a pure white finish.
- Glares – Overexpose the lenses. If only one lens is affected, you can copy the clear lens, mirror it, and then paste it over the glare.
- Crop – If foam board, light stands, or any other unwanted objects show up near the edges of your photo, remove them using the crop tool.

Final Thoughts
Photographing sunglasses is difficult if you jump in with a camera and just start shooting. Photographers need to learn tips, tricks, and techniques, especially when shooting reflective surfaces like eyewear.
Don’t let glares, reflections, smudges, and color discrepancies discourage you from photographing sunglasses. Once you know how to control light, hit the right angles, and edit your images, creating stunning product photography becomes second nature.
If you need professional help to shoot your sunglasses, contact us today! We are product photographers that specialize in reflective products like sunglasses, watches, sunglasses, and other items that are difficult to shoot.
10+ tips on how to photograph people with glasses and how to avoid them
Have you ever tried taking photos of someone with glasses?
When my daughter Ellie got her first pair of glasses in early 2011, I was faced with a new photography challenge. Since she wears glasses all the time, it is important for her self-esteem to take pictures of them on herself. Since photographing a person with glasses is more difficult than without them, I had to learn how to avoid and accept glare with glasses.
I had no idea how difficult it would be until I started taking pictures and portraits. The light reflects off the glass and hides the eyes. Sometimes it creates strange green colors or reflections on the surface coming from all directions.
After a long practice last year, here are some tips to help you photograph people with glasses:
1. Look for the light. As with glare, look for glare on the glasses. It's tricky, but watch how the light and glare hit the glass. Turn or slightly turn your head if necessary. Sometimes it helps to find a suitable shaded area that blocks the light.
2. Photojournalism or storytelling. If the subject is not looking directly at you, you will usually have less glare or it will become less important.
Ellie looks away from the camera.
Ellie looks down:
3. Tilt your head. I'm 100% sure Ellie gets tired of hearing me say "tilt your head down or tilt your head like this". By slightly tilting or tilting your head down, in many situations we managed to get rid of glare. The only potential negative is that sometimes the glasses cut off the eyes. And the eye and eyelid through the glass is not visible. But for me it is in many cases better than reflection.
In this first photo, can you see the greenish glow in her eyes?
In the second image, her head is tilted down and at an angle. It's a compromise and I often make several of each type.
4. Shade them. Use a hat or something on top to partially or completely block certain light rays that are causing the problem.
Ellie was wearing a hat in this super stupid photo. . There are light highlights on the sides, but do not cover the main part of her eyes.
5. Remove lenses. I didn't do it personally. But many photographers force the subject to stick out the glass from the frames. This way you will be able to capture the subject as it appears, but without glare. This greatly simplifies the work of the photographer, but who wants to remove the lenses from the frame? Not me. I would ruin them...
Used in this project and related activities:
6. Raise the glasses at an angle. Another trick photographers sometimes use to avoid glare instead of tilting their head is to actually angle the glasses. Instead of resting the back of the glasses over your ears, they rise above them, causing the glasses to tilt downwards. Sometimes it looks awkward, so I don't use this method.
7. Take your time. Explain to the subject that the glasses often reflect light and other objects, so you may need to position them so that the light does not enter the eyes and is not distracting. Take your time while shooting. Getting rid of glare and white spots on glasses in post-processing and Photoshop is much more difficult.
8. Take them off. When I got glasses in college, I always took them off for pictures. For people who wear glasses only occasionally, this is the easiest way. But this is not the best solution for people who have worn glasses for a long time, or, in my opinion, for children. You don't want your child to feel like something is "wrong" with him just because he wears glasses. In my daughter's situation, if I ask her to "take them off", even if it makes it easier to photograph her, it might be a signal that she's not that good with them or that the glasses are too much of a problem. I would never want to undermine her self-confidence. So if she doesn't wear them, they stay. In addition, if you are a professional photographer, if your client does not want glasses to be worn, it is not recommended to offer to take them off. Before you start charging for photography, make sure you can shoot your subject with glasses if necessary.
9. Sunglasses. One of the easiest ways to shoot in the sun is to wear sunglasses. This is a great way to take outdoor shots, although it may not be suitable for professional portrait photographers.
10. Accept the highlights. Sometimes, especially in the open sun and when the subject is in the company of several people, this cannot be avoided. The biggest goal is not to cover your eyes with bright spots of light, but if the light hits other parts of the glasses, it's not always a bad thing. And even if it is, sometimes photography still works. How could I get rid of this image just because of the light?
And if I asked Ellie to tilt her head, it would spoil the point.
If all else fails, there's always Photoshop:
- Remove the two and swap them in Photoshop. Here's a tutorial on swapping eyes from one image to another, showing you how to take a picture with glasses on and then off for a second. then combine the parts of each to get a photo with non-glare glasses.
- Additional editing techniques. While there is no Photoshop action to get rid of lens flare, you can do a few things in Photoshop.
- Try setting the burn tool to low flow to darken the haze from the goggles.
- Use a Photoshop action such as MCP Ophthalmologist to sharpen, lighten, or darken areas of the eyes where needed. Sometimes you will find that darkening or sharpening is only needed for one eye as the light affects one lens more than the other.
- If necessary, use the Clone Tool, Patch Tool, and Heal Tool to remove small highlights in one go.
These tools can be complex and time consuming, but also effective.
- On rare occasions, you may have one eye fine and the other with poor glare. You can duplicate a good eye and occasionally replace a bad one using a good layer mask and transform.
- If you're not great with Photoshop, you can always hire a professional retoucher to fix just about any problem for a fee.
What is the best way to look in glasses in a photo?
Do you like to be photographed, but you wear glasses and therefore the pictures come out “not very good”? Many experienced photographers confirm that it is more difficult to shoot a person with glasses correctly and beautifully than it seems. And yet it is possible, you just need to know a few secrets. How best to go to the photo if you wear glasses, read this article.
The main problem is reflected light and glare
Even if in life you are satisfied with the shape of the frame and you look stylish and impressive in glasses, the situation changes in the photo. Most often, photographers are faced with such a problem as glare reflected light. If you do not “catch” the correct angle, these glare in the picture may look like defects, glare, reduce the contrast of the image, and degrade its quality. It is unlikely that you will be delighted and want to post a photo on a social network in which you have a white spot instead of an eye. The problem of glare can be solved in several ways:
- Photographing people wearing glasses outdoors is preferable on cloudy days or in the evening when the sun has already set. The absence of bright reflected light will allow you to choose any angles for shooting without worrying about its result.
- It is more difficult to photograph those who wear glasses during the day on a sunny day than on an overcast day. The main tip that helps reduce glare is to look away from the lens. It is enough to turn or tilt your head a little, and the light will no longer be reflected from the glasses, creating ugly spots in the photo.
 Another advantage of this shooting option is that the reflections of the photographer or foreign objects in the glasses will not be visible in the pictures. Photos in profile, with the head thrown back or thoughtfully lowered, usually turn out to be relaxed, “alive” and therefore especially valuable and effective.
- Another tip is to bring a cute hat, sassy cap or other headgear to your photo shoot that can create a shadow on your face, thereby eliminating glare and reflections. Having thought over the image in advance, you can get very original and stylish pictures.
Correct posing matters
If you're shooting with glasses, you don't have to wear them over your eyes. As part of the photo session, you can “play” with accessories and poses, which will add originality to the pictures and help to radically solve the problem of glare while keeping the glasses in the frame. How can you pose?
- Try on the image of a business coquette - to do this, simply move the frame to the tip of your nose and look at the photographer over the lenses.

- Show off your eyes by removing your glasses over your forehead or hair. Note that wearing an accessory instead of a headband is considered unacceptable from the point of view of etiquette, but within the framework of a photo shoot and a specific image, such an option can look very harmonious.
- You can simply remove the glasses and casually turn them in your hands.
A photo with glasses for documents - is it possible or not?
A passport is an identity card, and therefore no experiments with images and accessories in such photos are allowed. If you wear glasses all the time, then the law allows you to take a passport photo with glasses. At the same time, it should be borne in mind that now your personality, if necessary, will be identified precisely from this photo. But what if one day you forget your glasses at home, switch to permanent use of contact lenses or do laser correction? In some cases, it is easier to take a passport photo without glasses, and if necessary, confirm your identity by simply removing them.