Gopro time lapse calculator
Time Lapse Construction Photography | Time Slice Camera | CamDo
Sales and Support operate 9am to 5pm, Monday to Friday (Pacific Time). Current Pacific Time is:
How can we help you?
If you have questions or need help with one of our time lapse construction photographyproducts, make sure to read the search the support pagesor FAQ's page first.
Contact Details
CamDo is an online retailer only, and as such you are unable to pick up products from our head office, but we can arrange pick up from our warehouse in Georgia. We can be contacted by email, phone or mail. However, for the quickest and most thorough response, please email us and we will be happy to discuss any issues related to your time lapse construction photography equipment.
Business Hours
Mon-Fri
9am-5pm Pacific Time
Address
*COVID-19 Update: Please contact us for confirmation of address for various purposes.
None of the following addresses is a physical office, nor are they the address for returns. Please refer to the FAQ's page for information on returns.
Our warehouse is in GA, USA.
Our head office is 1200-555 West Hastings Street, Vancouver, BC, V6B 4N6, Canada.
If your purchasing process requires a USA address, the following can be used: 100-412 N Main Street,Buffalo, WY, 82834, USA.
Need to purchase in Europe from our reseller?
Contact [email protected]
Interested in being a reseller?
If you are interested in becoming a reseller, head on over to this page to contact us for more information.
Send us your footage!
We love to see the creative ways that our customers put our time lapse and time slice cameraproducts to work. So please send your footage to [email protected] so that we can feature it on our blog our website for others to enjoy and learn from. That's what it's all about!
Looking for something Custom?
CamDo represents an international team of software and hardware developers with years of experience developing custom solutions to real world problems. In particular, we have recently been working with the GoPro camera to exploit its capabilities using custom accessories which extend its purpose to meet the needs of creative individuals and groups who have the ideas, but not the means to make them a reality. Some of our custom projects have been used to solve problems for one customer, other solutions have been implemented in retail products that have sold globally in huge quantities. If you would like to discuss your project with us, please fill in the contact form on this page, and tell us more about it!
Marketing & Press Inquiries
If you're a member of the press or would like to pitch a marketing opportunity to us, please [email protected].
Contact form
If you would prefer, you can use the contact form below to get in touch about our time lapse construction photography products.
Time Lapse Calculator
Created by Bogna Szyk
Reviewed by Steven Wooding
Last updated: May 12, 2022
Table of contents:- How to use time lapse photography
- What can our timelapse calculator do?
Whether you are a professional photographer or a beginner who just discovered your newest passion, this time-lapse calculator will make preparing that magical night sky video a blast. You will be able to determine the capture interval, the number of photos you need, and the size of a memory card that will accommodate all of your precious pictures.
Thanks to this tool, you will never have to spend hours calculating the parameters of your timelapse!
How to use time lapse photography
The basic idea of time-lapse photography is taking photos at a much slower rate than they are going to be viewed. The images are combined to form a much shorter video than the total recording time. When the video is viewed, the time appears to elapse much faster than reality.
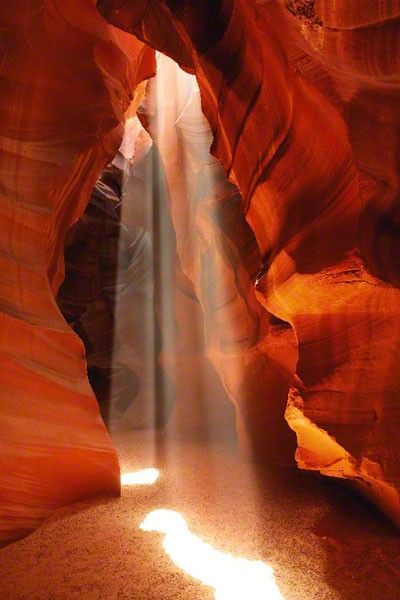
This kind of photography allows for capturing effects that are very subtle for the human eye, for example, the motion of stars and the sun in the sky.
What can our timelapse calculator do?
Our time lapse calculator can find seven basic parameters of a standard time-lapse sequence. You have to predetermine four of them, and the time-lapse calculator will automatically find the rest.
-
Clip length – Duration of the final video created with time-lapse photography. Usually, these clips don't exceed 30 seconds – if you want a longer video, it can be hard to take all of the photos in one shooting.
-
Total recording time – Total time you need to spend taking pictures for your time-lapse. This can range from 30 minutes for a short clip to a few hours for longer clips with a higher interval between shots.
-
Frames per second – Number of frames in the final clip shown per second. Typically, 24 frames per second are used. Try not to go below 12 fps, as this will affect the image fluidity. High frame rates (up to 60 fps) correspond to high-quality videos, for example, in 4K quality.
-
Image size – Data size of one photo taken during the time-lapse. You can read it off your camera's settings. If the total memory usage exceeds the capacity of your memory card, you can try to decrease the image size.

-
Capture interval – The time interval between two consecutive photos. It usually doesn't exceed 30 seconds - a higher interval can cause the video to "jump" between frames. It can be calculated by dividing the total recording time by the number of photos.
-
Number of photos – Total number of photos you need to take for your time-lapse. It is simply the clip length multiplied by the frame rate.
-
Memory usage – Total amount of space the photos will take on your memory card. It is found by multiplying the number of photos by individual image size. To calculate the size of compressed videos, make sure to look at the video file size calculator. If you want to know how much time you will need to transfer these files from the memory card to the hard drive, check out our bandwidth calculator.
Bogna Szyk
Clip length
Total recording time
Frames per second
fps
Image size
Capture interval
Number of photos
Memory usage
Check out 28 similar photo and video calculators 📷
3D render timeAspect ratioAudio file size… 25 more
Shooting with a GoPro camera in Timelapse mode
Timelapse is the effect of the accelerated passage of time on video, which is quite popular lately. Its other name is interval shooting. The essence of the effect is to take a photo at certain intervals from the same or a close angle with the subsequent connection of these frames into a video sequence. This creates the feeling that time is running very fast or fast forward.
How do you make videos like this?
Before you start shooting, you need to prepare your camera. Check the security of the mounts you will be using, the cleanliness of the lens, the battery level, and the amount of space on the memory card. After that, decide on the angle from which you will shoot the video, and install the camera. Make sure everything you want to shoot is in the lens, nothing is blocking the camera's view, and there are no unnecessary details in the frame. In the camera settings, select the Timelapse mode, which will automatically merge the frames into a video sequence, Nightlapse, Nightlapse . This mode is suitable for shooting at night when there is almost no light (for example, shooting a starry sky). In the presence of lighting, even in the dark, your shots may turn out to be overexposed. Set the required resolution and frames per second.
The number of frames per second depends on what you want to shoot and what effect you want to achieve. At the same time, there is a general recommendation that the faster the subject moves, the more frames per second should be taken. This will help to avoid flickering in the frame, and the video will look nicer and more legible. To make it easier for you to decide how many frames per second you need, we have compiled a small table for you showing the most common options:
| 0.5 second | Travel, movement, movement of insects, fast processes |
| 1 second | cooking in oven or fire, movement of clock hands |
| 2 seconds | road traffic, congestion and movement of people |
| 5 seconds | clouds, sunrise, sunset |
| 10 seconds | also sunrise and sunset, slow clouds |
| 30 seconds | movement of the sun, moon, stars, shadows |
| 60 seconds | plant growth |
To understand how long it will take you to shoot one video and how much space you need on the memory card, you can use a special calculator.
When you have completed all the necessary preparations, start the recording. Try not to touch the camera during recording, make sure that foreign objects do not block the lens. Be sure to check out the resulting video. If you see that something went wrong during the shooting process, it’s easier to reshoot the video right away than to spend time again preparing and going to the right place or trying to remove unwanted frames during editing.
If you want to achieve a beautiful effect with the movement of the camera around its axis during time-lapse shooting, use the rotating platform. It will very slowly rotate the camera around its axis, and as a result, the camera will move much slower in the video than all the surrounding objects.
GoPro: how to create a time-lapse video?
Before we explain how to create a time lapse video with GoPro, here are some basic guidelines and tips on where to look for scenes to capture.
There are two ways to record video using the time-lapse technique:
- You shoot a video and then increase its playback speed.

- Separate frames are taken at the same time interval, which are then “glued” together to get a video (the quality will be higher in this case).
With lightweight, versatile action cameras like the GoPro, the possibilities for time-lapse photography are almost endless. You can mount the camera on the roof of your car while driving around the city or shooting at sporting events - in short, you can shoot almost anywhere.
Of course, classic scenes such as changing skies, sunsets and sunrises, work on construction sites or moving crowds can be captured with GoPro.
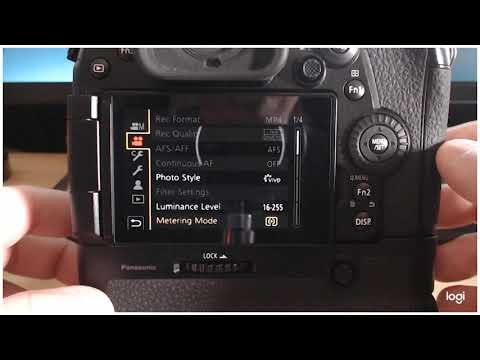
1 GoPro: Choosing the Right Time-Lapse Mode
Setting Up Your GoProFirst of all, activate the appropriate shooting mode on your camera. The action camera will automatically take photos at regular intervals.
Turn on your GoPro and press the POWER/MODE button three times to activate Time Lapse mode
2 Time lapse: set the time interval between frames
Depending on which scene you have chosen for your time lapse video, you will have to use different shooting intervals. This is due to the fact that cars, for example, disappear from the frame faster than the setting sun.
After turning on your GoPro, press the POWER/MODE button four times to enter the settings. Then press the MODE button four times again to set the time interval.
The allowable time intervals for time lapse shooting are from 0.5 to 60 seconds. For shooting people and cars, an interval of 0.5-2 seconds is suitable. When shooting sunset or sunrise, clouds or moving crowds, we recommend using an interval of 2 to 10 seconds.
10-60 second intervals are suitable for slow moving shadows cast by objects in sunlight, or if you want to record a 24 hour time lapse video.
3 Time Lapse: Calculating Time
How to calculate time interval for GoPro?To make a video out of multiple photos, you need 30 photo frames per second of video. Knowing this, you can easily calculate how long your time-lapse clip will be.
In order not to shoot too long, you can calculate the time required to get a 10 second interval video. To do this, we use the following formula: multiply 10 seconds by 30 frames per second. So to create a 10 second video, we need 300 photos.
Now calculate the shooting time. With an interval of 5 seconds, we need 300 x 5 = 1500 seconds to shoot, that is, a total of 25 minutes.
4 GoPro time-lapse video: it's time to shoot!
When the settings suitable for the shooting situation are set, you can safely press the button and start recording. According to the selected interval, the red lamp will flash during shooting.
Before starting, check again that interval shooting is selected as the recording mode, and the set interval is displayed in the upper right corner.
Remember to make sure you have enough space on your memory card to store the required number of photos. It is better to pre-format the card - this will facilitate subsequent processing of the results.
You may need an extra battery for long time-lapse shooting with your GoPro. Or you can simply connect a charging cable to the camera: the advantage of GoPro is that it can shoot even while charging.
5 Create videos from GoPro photos
GoPro StudioOnce GoPro has captured the required footage, you can start creating time lapse video. To do this, the photos are interconnected in such a way that 30 frames are reproduced in one second. You can glue photos together using the free GoPro Studio program.
- Install and open the program, then connect your GoPro to your computer to import files. To do this, click "Import new files" in the upper left corner and select the folder in which our photos are located.
- After importing the files, click on the Play button. GoPro Studio will automatically create a time lapse.
- Click "Add to conversion list" under the video, and then on the "Convert all" button in the lower right corner of the screen.
- Editing video: changing settings, adding text if desired.
- Exporting the finished video. To do this, click on the "Step 3 - Export" button in the upper right corner. Before doing this, make sure that the frame rate is set to 29.

Learn more