Leading lines composition photography
Leading Lines in Photography: The Essential Guide
What are leading lines in photography, and how can they improve your compositions?
In this article, you’ll discover everything you need to know about leading lines, including:
- Why every photographer should learn how to use leading lines (hint: they can majorly increase a photo’s impact)
- Plenty of easy places to look for leading lines
- How to use lines for beautiful, three-dimensional images
- Much more!
So if you’re ready to become an expert, then let’s get started!
Leading lines in photography: a definition
Leading lines refer to lines that lead the viewer’s eye from one part of a composition to another. Usually, these lines start at the bottom of the frame and guide the eye upward, from the foreground of the image to the background.
When used as a compositional technique, leading lines generally move toward the main subject of a photo. For instance, a river might lead the eye toward a fog-covered mountain in the background, or a log might lead the eye toward a stunning sunset.
Note that leading lines can be anything: rivers or logs, as mentioned in the examples above, but also marks on a road, pointed rocks on a beach, lines in the sand, the walls of a house – if it looks like a line and is capable of guiding the viewer’s eye, then it can work!
Why are leading lines important?
Leading lines guide the viewer through a composition.
So by carefully positioning leading lines in the frame, you can draw attention to areas of a photo that matter, like a beautiful mountain or sunset on the ocean. In other words, you can use leading lines to get the viewer to look where you want them to look – and avoid areas you’d prefer they avoid.
You can also use leading lines to create flow, often referred to as dynamism, throughout a composition. Leading lines naturally take the viewer on a journey around the photo, which keeps them engaged (always a good thing!).
Plus, leading lines are a great way to create three-dimensionality (i.e., depth) in an image. By emphasizing the start of a line before letting it fall away into the backdrop, you create a 3D illusion that looks incredible in scenic landscape photography.
How to use leading lines: the basics
Working with leading lines requires two simple steps:
- Find a leading line
- Incorporate that leading line into your composition
Of course, this is easier said than done, but neither of the above steps is actually difficult; they just take a bit of perseverance. Let’s look at each step in turn.
Step 1: Find leading lines
No matter where you live, and no matter where you like to take photos…
…leading lines are all around.
It might not seem likely, but it’s true. After all, remember that leading lines are just lines, and plenty of those exist, right? The key is to find them (and incorporate them creatively into your compositions, as I discuss in the next section).
So where, specifically, should you look for leading lines?
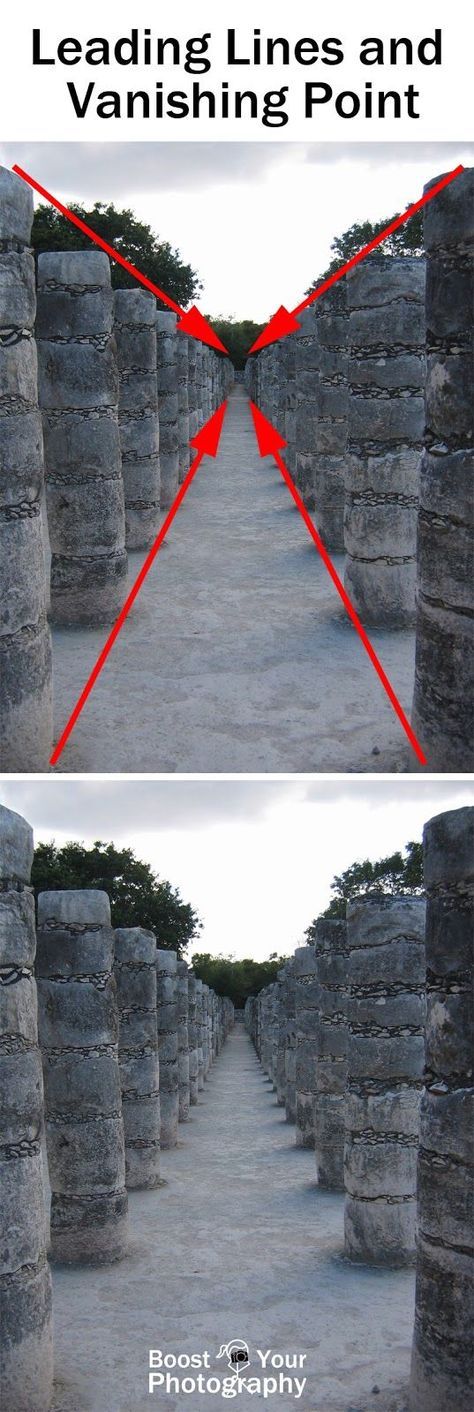
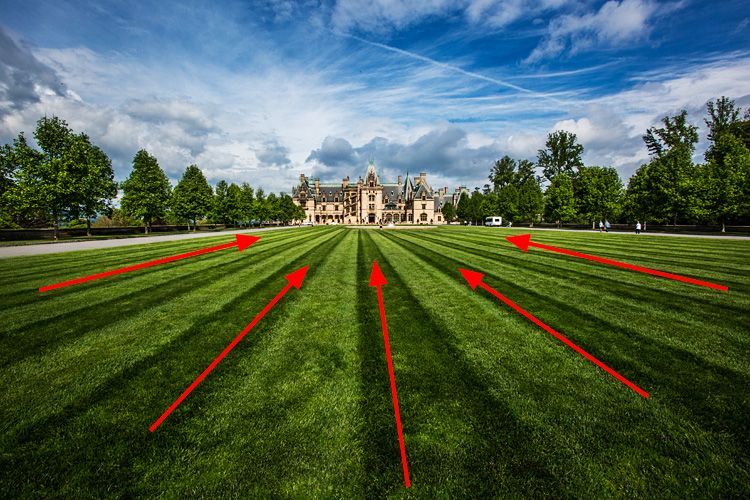
Personally, I think the best place to start is with a path; paths are inherently leading because they go somewhere, and the path edges often create a vanishing point on the horizon (the place where two or more lines converge at theoretical infinity). Plus, you can find paths all over the place – in forests, at parks, in the city, even in the countryside (roads count as paths!).
The leading lines of this road converge at a vanishing point.But you can find plenty of other leading lines, too. While photographers certainly use paths in their compositions, they also work with patterns in the sand, fallen logs, bunches of flowers, interesting rocks, bridges, fences, and more. Here’s a whole list of items to consider:
| Human-made leading lines
| Natural leading lines
|
Of course, the list is hardly exhaustive; there are always more leading lines out there just waiting to be found! So the next time you’re setting up a shot, take a moment to examine the scene for prominent lines. You’re bound to find some good ones, even if it takes a bit of searching.
Step 2: Incorporate leading lines into your composition
So you’ve found a leading line or two. Well done – but the work isn’t complete! Now it’s time to actually incorporate the leading lines into your composition, a deliberate, thoughtful process.
First, ask yourself: Where do I want this leading line to take the viewer? Oftentimes, the answer will involve an interesting feature in the background – such as a sunset – so you’ll need to adjust your camera position until the leading line points roughly in the right direction.
(If the leading line isn’t going where you want it to, you can try moving forward and backward or side to side along the line, or you can find another leading line that works better in your composition. A leading line that points away from your main subject is likely counterproductive. )
)
Next, ask yourself: Is the leading line interesting enough that it can act as a foreground subject? And can I get close enough to make it large in the frame?
If your leading line is interesting and you know you can get close, do it. The best photos often involve a strong leading line, one that draws the viewer into the foreground then leads them from foreground to background, like the stones in the photo below:
The soft leading line of the river’s edge creates depth.Of course, some leading lines just can’t hold the viewer’s attention, or they’re not accessible, and that’s okay – leading lines are always powerful, even if they aren’t showstoppers. You can still use them, but make sure you find an interesting foreground subject that catches the eye or really tighten up your composition to focus on the main subject.
Finally, once you’ve roughly positioned your subject and any leading lines, evaluate the scene one more time. Think about ways that you could enhance the effects of the leading lines, perhaps by changing your camera position, by getting lower or higher, or even by using a wider or longer focal length.
Then take your shot!
Tips and tricks for working with leading lines
Now that you’re familiar with the basics, let’s discuss a few tips to improve your compositions with leading lines, starting with:
1. Use the widest lens you have available
You don’t need a wide-angle lens to create stunning leading line compositions.
But it really, really helps.
Why? Well, a wide-angle lens lets you capture an expansive scene – so you can position leading lines toward the bottom of the frame, then let them flow into the shot, slowly getting farther and farther away until they disappear (or reach your main subject).
Compare this to a telephoto composition, where the leading lines generally start close to the subject, then quickly terminate. Less dynamic, less interesting, and less three-dimensional.
Many landscape photographers shoot with ultra-wide focal lengths for this exact reason. They often find a leading line, use a wide-angle lens to emphasize it, and create a stunningly deep composition.
Make sense?
2. Don’t be afraid to incorporate multiple leading lines into a single composition
A single leading line is nice…
…but if you can find multiple leading lines, all guiding the viewer toward your main subject, your composition will be insanely strong.
For instance, you might use both edges of a road to point toward a distant mountain. Or you might use two lines in the sand – one starting in the bottom right, and one starting in the bottom left – to point toward a blue ocean.
Note that all of your leading lines should point toward the subject as much as possible. If the lines deviate from your subject, they’ll guide the viewer in the wrong direction, which will prevent them from fully appreciating the image. Getting two or more lines to converge toward your subject may take some creativity, but the end result will be worth it.
3. Use the near-far technique to create plenty of depth
The near-far technique is especially common in landscape photography. It’s a simple way to create tons of depth in your photos, and it’s how you can capture powerful photos like this one:
It’s also really simple to use. Here’s what you do:
First, make sure your leading line is suitably eye-catching. It should act as a subject in its own right – like an interesting rock or a patch of colorful flowers.
Second, make sure you use a wide focal length. I’d recommend working with at least 35mm (on a full-frame camera), but 24mm, 18mm, or even 14mm is better.
Third, mount your camera to a tripod and get down low over your subject. You want to make the leading line prominent in the frame, even if it means getting a few inches from your subject. And you’ll want to dial in a narrow aperture, such as f/8, f/11, or even f/16, in order to keep both the foreground and background sharp.
Your final shot will look incredible – with an interesting foreground subject, a line that leads the eye, plus (hopefully!) an interesting background subject to complete the composition.
How to use leading lines for better compositions: final words
Leading lines are the key compositional elements that carry our eye through a photograph. They can be used to tell a story, place emphasis, and draw a connection between two objects.
So start thinking about leading lines wherever you go. Practice finding leading lines in the chaos of everyday life. Your compositions will get very good, very fast!
Now over to you:
What do you think about leading lines? Do you plan to incorporate them into your photos? Do you have any examples of leading line photography? Share your thoughts in the comments below!
Leading Lines in Photography: A Complete Guide
“You don’t take a photograph, you make it,” Ansel Adams once said. Great point, but let’s take it a step further. An important thing to remember is that photographs are just a type of picture, and pictures are made of lines.
As photographers, we use lines to create visual interest with patterns, rhythm, and flow, and to draw attention to things. Learning to see lines and use them in your compositions is a big step in going from “taking pictures” to “making photographs.
One of the most important lines in photography is the leading line. A leading line is a line in a composition that guides the viewer’s eyes from one part of the picture to another. It is often used to point to the main subject or region of interest in the frame, and it’s a very effective tool to control how a viewer reads your picture.
How Leading Lines Work
Leading lines are used in all types of photography to guide the viewer and organize the frame. You see them in landscapes, astrophotography, scenics, sports, wildlife, architecture, photojournalism, portraits, and every other genre. A road leading to a house is a leading line. A fence stretching across a field that draws you to a barn, a cow, or whatever, is a leading line. A branch pointing to a bird is a leading line.
Other examples include a trail or path, power lines, arms, legs, reflections, ripples in water, a flock of birds, a line of people, cars, shoreline, wave, river or stream, rocks, horizon, mountains, footprints…the list could go on and on.
How to Find Leading Lines
As mentioned, pretty much anything can be used as a leading line. It doesn’t have to be an obvious continuous line like a road. It could be a series of rocks, flowers, or even stars like the Milky Way. The trick is to see these things not as rocks, flowers, or stars, but as lines and get them to point to something.
The photographer in this image is using the dock as a leading line to draw the viewer’s attention across the picture and toward the sun.Claude Monet, the great Impressionist artist, has some helpful advice on that score. “To see we must forget the name of the thing we are looking at,” he said. I don’t know if he really said this quote that is widely attributed to him, but if he didn’t someone should have. It’s great advice for “seeing” compositionally and in “making” rather than taking photographs. So forget the name of things for a moment and treat everything as a design element when composing your images.
Your phone or the LCD screen on the back of your camera can help shift your mindset and you see things that way. The screens compress scenes into two dimensions, which makes it easier to see things as pictures with lines rather than objects with names.
Technically, leading lines are supposed to point to something, to lead you somewhere. However, like any so-called “rule”, it’s just a guideline and you don’t have to be a fanatic about it. The “something” that the line leads to doesn’t always have to be emphatic. Sometimes the destination can be more like a hint than a big bang.
For example, something as simple as a splash of beautiful light can be enough to create a feeling of destination for a line. Look at the image above. The dirt road goes nowhere. It just disappears into the woods. So I used Lightroom’s Radial Gradient and mask to brighten up the area in the background. It helps to draw the eye through the image and create a sense of place. There’s a feeling that there’s something back there. We don’t know exactly what it is, but that’s okay. Sometimes it’s helpful to leave something to the viewer’s imagination. Let them finish the image.
The Decisive Moment
Or let’s say you find a great line, but nothing is happening at either end. You could follow Henri Cartier-Bresson’s approach and wait for the Decisive Moment. In other words, set yourself up at one end of a line and wait for something to happen at the other end.
In the picture above, I liked the pattern created by the line of buoys in the water. It was interesting, but it was just lying there. Then I saw a swan heading my way. I watched and waited until the swan was in position at the end of the line to hit the shutter button.
Editing Leading Lines
Sometimes it can help a photo if you add a little emphasis to your leading line. For example, if you have a trail leading somewhere, use Lightroom’s Adjustment Brush – or whatever tool your software has – and do a little dodging to brighten the line a bit. Just don’t overdo it. You want it to be a fairly subtle adjustment, just enough to make the line pop a bit and draw the viewer’s eye.
There are always exceptions. There may be times when you want the line to shout “here I am!” If that’s the case, crank up the brightness. However, less is usually more.
Use an Adjustment Brush or other editing tool to highlight your leading line to make it stronger and easier for the viewer to see and follow.
Make Your Own Leading Line
You can even use a subtle brightness adjustment to create the impression of a leading line if one doesn’t exist. For example, let’s say there’s an old car in a field of grass. Use Lightroom’s Adjustment Brush to paint a line through the field to the car. It doesn’t have to be precise. Use a soft feathered edge and jiggle it a bit as you paint the line. Then drag the Whites or Exposure slider to the right a bit to create a small adjustment in brightness and you’ve created a path to the car.
You can even use a brightness adjustment in post processing to create a leading line. In the picture above, I used the Adjustment Brush to create a line by brightening the dried grass.Lines Do More Than Lead
In addition to acting as an arrow that points to a subject, the shape of a leading line can affect the emotional impact of an image. For example, diagonal lines create a dynamic sense of energy and flow through an image. Horizontal lines tend to feel static while a vertical line may feel rigid or imposing. Curved lines like an S or C curve have a relaxed sense of flow to them while a zig-zag may feel more nervous or tense. A broad line will feel bold while a thin line may feel precise and surgical. Converging lines create a sense of distance and perspective while diverging lines are expansive.
Sometimes a line or lines can be the star of the show and not just lead you somewhere. Properly framed, lines create interesting patterns and textures that can stand on their own as designs.
Lines create patterns, rhythm and textures, which can create interesting pictures whether or not they lead anywhere.Conclusion
The challenge we all face as photographers is to turn a scene or moment into a photograph. Lines are a fundamental element of design and are used in every form of visual art from architecture and landscape design to sculpture, graphics, painting, and photography. They are part of the visual grammar that helps images communicate. Learning to use lines will help you create more compelling compositions and move you from “taking pictures” to “making photographs.
About the author: John Tunney is a fine-art photographer and instructor living on Cape Cod in Massachusetts. His work has been featured in in a solo exhibition at the Griffin Museum of Photography and in many solo and group shows in galleries and other exhibition centers. His book, The Four Seasons of Cape Cod, was published in 2016. He teaches programs on Cape Cod, in Maine and in Iceland.
Image credits: All photos by John Tunney.
How to Use Leading Lines for Better Composition
June 27, 2020 - Theory
Leading Lines is a composition technique in which the viewer of your photos is drawn to lines that lead to the main subject of the image.
The leading line makes an easy path for the eyes to pass through the various elements of the photo. They usually start at the bottom of the frame and guide the eye up and in, from the foreground of the image to the background, usually leading to the main subject. nine0003
The easiest place to find the leading line is on the road. Roads by their very nature lead because they go somewhere, give us a sense of movement, and lines often point so far inward that they reach a vanishing point—the place where two or more lines converge at theoretical infinity.
When leading lines, such as roads, connect the foreground to the background of a scene, they help create depth and dimension that draws the viewer into the image.
Leading lines meet around us in cities and in nature. Your job as a photographer is to find them and place them in the photo so that they lead to something, even if that something is infinity. nine0003
Logs on the beach draw the viewer's eye in the frame and lead to the house.
As you prepare to take your shot, take the time to look around the scene for any noticeable lines. Clear your mind, relax your eyes, and notice where they naturally go.
Pay particular attention to artificial things, such as:
- roads
- fences
- boardwalks
- bridges
- lampposts
- buildings
- create depth and perspective by placing a main line leading from the foreground to the background;
- create a visual journey from one part of your image to another;
- Position your subject where the lines converge to make the subject stand out more in the frame and draw the viewer's attention directly to it; or
- make a circular composition with lines leading the eyes in a circular motion and never going out of bounds.

Arranging elements in a frame can involve using different lenses to change perspective, but you can usually do this by simply moving around so that your chosen point of view is focused.
The leading line of the path leads the eye straight to the maple tree.
Leading lines are a key compositional element that pervades our photography. They can be used to tell a story, provide emphasis, and add a connection between two objects. nine0003
Use them creatively and expressively to help you tell your unique photographic story.
How to Use Leading Lines to Enhance Your Photos - Artists, Photographers and Sculptors Around the World
Leading Lines are one of the most powerful and underutilized compositional tools. So, what are the leading trends in art and photography? Leading lines are lines that direct the viewer's eye to a specific point. nine0087
You may be wondering why leading lines are so important? This tool is important because you can choose where you want the viewer's eye to go in the frame. It can be a person or a vanishing point in the background of the image.
 I'll give you all the information you need to start using leading lines to create a better image.
Low angle photo of a yellow bridge using a photo of a leading line
What is a leading line? nine0097
What is a line in the definition of a photograph? A line in a photograph is a point that is moving, leading to something. Some lines are obvious and some are implied. The viewer's eyes are naturally drawn along the lines. These can be vertical, parallel, curvilinear, diagonal, and even strong horizontal lines.
The leading line helps the viewer move from one part of the image to another. This creates movement in the photo and makes it more interesting. This movement draws the viewer into the image. If the photo is very saturated, you can use the front line to draw the viewer's attention to the part of the photo that they should be focusing on. nine0003
Photographs with leading lines usually contain paths, rails, buildings, bridges, or streets.
 Even rows of trees or lampposts creating lines. Typically, leading lines start from the bottom of the photo and lead the eye up or in.
 Leading Lines vs Paths
When it comes to graphic leading lines and leading paths, there is a slight difference between the two. The same camera settings are used, such as shutter speed, but the aperture may change.
The difference between a leading line and a path is simple. The leading line will take you to the point of interest in the frame. The leading path will usually lead you to a vanishing point.
For example, the image below contains a leading line as it draws your attention to the snowy mountains.
Road leading eyes to snow-capped mountains via composition lead line The image below contains the path as it winds through the image to Vanishing Point in the distance.
Road in the woods showing a leading line in a composition
How not to use leading lines in photography
How do you use lines in photography? It is very important to understand how to use the leading line correctly.
 If used incorrectly, the leading line will be more harmful than helpful.
 An important question you must ask is where do your lines lead your viewer's eyes?
If the answer is “nowhere in particular” or “outside the image, avoiding the main subject”, then you are not photographing correctly. nine0003
Last week I filmed a local viaduct. I was walking through a nearby field, trying to find the best viewing angle.
Walking around the field, I noticed that there were many leading lines. I could use them to direct my viewer's attention to my main subject, the viaduct. But first I had to find what I needed.
At first I missed a lot of lines that could only confuse the viewer. Here is one:
Photograph of a viaduct with incorrect use of leading lines
Quite a pretty picture, isn't it? Good use of lines heading towards the bridge? Almost.
If you follow the lines across the frame, your eyes will move out of the frame to the left.

It's pretty easy to get nervous looking for powerful leading lines in a photo. But if the lines don't point exactly where you want them to, they do more harm than good.
Now let's see how you can properly include leading lines in a photo. nine0003
How to use leading lines in a photo
So, the same place, only this time I'm a few meters further down the field.
A photograph of a viaduct containing leading lines to draw the attention of viewers
Notice the difference?
I found some lines that take your eyes up to the bridge and down this path. It makes you feel like you're standing in the frame and looking at the path you have to follow to get to your destination. This destination is a bridge in the distance. nine0003
Notice how much more powerful the correct leading lines make the same image?
Whether you're taking landscape or street photography, position and perspective are everything. If you do not quite understand how to do this, then there is always photoshop.

Examples of Leading Lines
Tracks
Here's a picture I took on the London Underground. The wide-angle lens puts you in the frame and exaggerates the length of the lines.
There are a lot of lines in this scene. The lighting strip at the top and the pavement at the bottom lead the viewer to the very end of the tunnel. An excellent example of such a path.
The London Underground with a strip of white illumination showing the images of the lines in the photographic composition
And here's another one. Repeating arches add depth and we follow each repetition as they form lines. You can even take them further by turning on the rule of thirds.
This is an easy way to create a path with leading lines. Make the lines in the image the main focus. nine0003
Other types of leading lines
If you want to draw attention to a particular part of the frame, look for a line that already exists. Then use it to your advantage.
Learn more