Photography rules for portraits
Traditional Portrait Photography Rules and How to Break Them
Portrait photography rules are good. They keep us portrait photographers on track. Rules in general help us stay organized and give us that comforting feeling of familiarity. They give us routine and structure. They have been developed over centuries, and they are here to stay.
[Read: Tips to Shooting Creative Indoor Portraits Using Only Window Light]
But what if we bent traditional portrait photography rules, even just a bit? How could we do that to have an even greater impact on our photographs? What if we deviated to create an image that focused on emotion rather than how technically perfect it is?
Let’s explore.
Understand Portrait Photography Rules Before You Break ThemBecause artistic rules help viewers make sense of a visual piece, there are some do’s and don’ts that we all come to understand when we first become photographers:
- Don’t shoot in harsh light with unwanted shadows on your subject’s face.
- Use a center composition or the rule of thirds so that your viewer stays engaged with the visual.
- Don’t shoot up through your subject’s nose.
- Shoot at eye level with your subject.
- Don’t chop a subject’s limbs at awkward points with your framing and composition.
[Read: The Rule of Thirds—How to Use It and When to Break It]
These portrait photography rules are super important, but as a creative artist, we should take liberty in creating original artwork that challenges these guidelines while still respecting them. Creative experimentation, after all, is an extension of conventional photography that allows the artist to try something new.
Rule: A portrait composed in the center of the frame with the subject’s eyes in focus. Creative experimentation: The organic framing makes the image go beyond just a simple portrait.Rule: A subject in silhouette with center composition. Creative experimentation: Use of blur, light flare and a double exposure with lace curtains creates a softer perspective in the image, while giving the viewer multiple perspectives to take in and get fully immersed in the image. How to Know Which Portrait Photography Rules to Break
One of easiest ways to embrace imperfection while breaking tradition is to start with something familiar. Rather than a blank canvas, start with an outline.
Start with a rule that you are familiar with. Challenge yourself to write down this rule and see how you can deviate from it.
[Read: Aperture and Depth-of-Field—How to Understand (and Break) the Rules]
Now friend, the resulting image does not have to be a masterpiece. It doesn’t even have to make visual sense; you just need to have created it knowing that it came from a place of discomfort. It can be your creative experiment, a path to learning more about yourself. But I guarantee you one thing: The more you push yourself to create with no boundaries, with no pressure to be perfect from anyone, the more you will fall in love with your work again! Aha!
A portrait photographed high up the nose from down below in harsh light. Embracing blur during golden hour.A multiple exposure shot with strawberries.Observe to Find Fresh Perspectives Around You
Observing really helps unleash the full potential of our minds and thoughts, and it opens up the possibilities of endless creativity. You could draw from TV shows, music, paintings, nature—even your own life experiences. There is beauty everywhere we go, including the places we are used to seeing every single day.
Play with your composition. This is where it’s at if you want to explore storytelling. Go beyond the rule of thirds or leading lines and challenge yourself to “see” more.
[Read: How to Find Creative Photography Inspiration in 7 Steps]
Play and replay the “what if?” question in your mind on repeat and see what you get. Most of your attempts may be unsuccessful, but you will thank yourself for trying. You will get that one shot that was successful by simply observing, taking in the scene and changing your perspective. And maybe that one shot is enough to shake things up for you in a bigger way.
Photography is simply your medium, and rules only exist to give you a starting point. The decision to create a story with your work from the basic premise of a traditional portrait photography rule is entirely up to you as an artist.
Jyo Bhamidipati is an electrical engineer and an award-winning published fine-art lifestyle photographer, as well as a mentor and educator, based in Sacramento, California. She is a lover of light and shadows and seeks to capture the everyday perfectly imperfect beauty around her. She strives to be experimental in her vision and constantly works on pushing the boundaries in her photography. Jyo is the instructor of the highly popular workshop with Click Photo School called The Imperfectionist, where she encourages everyone to embrace imperfections in their everyday lives and practice creative artistry.
10 Portrait Photography Tips and Rules for Better Photos
By Joshua DunlopA- A+
Download as PDF
Subscribe Below to Download the Article Immediately
You can also select your interests for free access to our premium training:
Business Basics
Cheat Sheets
Child Photography
Colorful Cityscapes
Composition
Creative Photography
Creative Portrait Concepts
Digital Photo Collages
Fairytale Portrait Photography
Food Photography
Interior Photography
Landscape Editing
Landscape Photography
Lightroom Processing
Lightroom Presets
Long Exposure
Macro Photography
Milky Way Photography
My Camera and Photography
Organic Marketing
Pets
Product Photography
Sky Photography
Social Media
Still Life
Time-Lapse Photography
Travel Photography
Urban Photography
Wildlife Photography
Your privacy is safe. I will never share your information.
 There are many different ‘rules’ for portrait photography, but these are my top 10. If you can follow these, then you will see a big improvement in your portraiture.
Sure, there are no rules of photography, but that’s why I’ve surrounded the word in quotation marks. Break the rules as much as you want; in fact I encourage you to experiment.
Just know that these rules are very popular and widely followed for a reason. . .
They work!
Aperture of f/8-f/16
If you’re not familiar with aperture, allow me to briefly sum it up for you. The wider the aperture, the lower the f/number, and the shallower the depth of field.
The opposite is true for narrow apertures.
It’s widely agreed that around 2-4 stops wider than your narrowest aperture (f/22) is where your lens will be at its sharpest. That’s why we often use f/8-f/16 when taking portraits.
It’s very sharp, and the depth of field is deep enough to keep the whole face in focus, but not so deep that there’s no blur at all in the background.
You want a slight blur to help separate the background from the subject.
It’s common practice to shoot in manual or aperture priority mode because you can easily select the aperture which best suits your photo.
Eye Direction
There are two rules that I like to follow here. You either look straight into the camera, or your eyes follow the direction of your nose.
Anything in between has no place in portraiture, in my opinion.
When you look away in some ambiguous direction, you give the photo an ambiguous feel, like there’s something more than the viewer should be looking for, when in reality, there’s not.
Keep it simple. We will try to follow eye-lines when we see them, so it’s best that we’re not sent off in the wrong direction. Keep the attention on the subject.
[For even more useful tips on portraiture and setting up for portrait photography, check out out our Complete Guide to Portrait Photography —Ed.]
Use a Longer Focal Length- 70-135mm
Using a longer focal length isn’t some sort of magic trick that makes your subject look better, it’s all about your distance from a subject.
If you have a look at the photo below, you’ll see that the longer the focal length, the further away I have to move, and the more compressed the image looks.
This compression is flattering for your subject because it appears to compress facial features slightly and make us look thinner. And that never hurts.
Have a look at the photos below, it was taken at 105mm.
An 85mm Prime lens is a great choice for portrait photography.
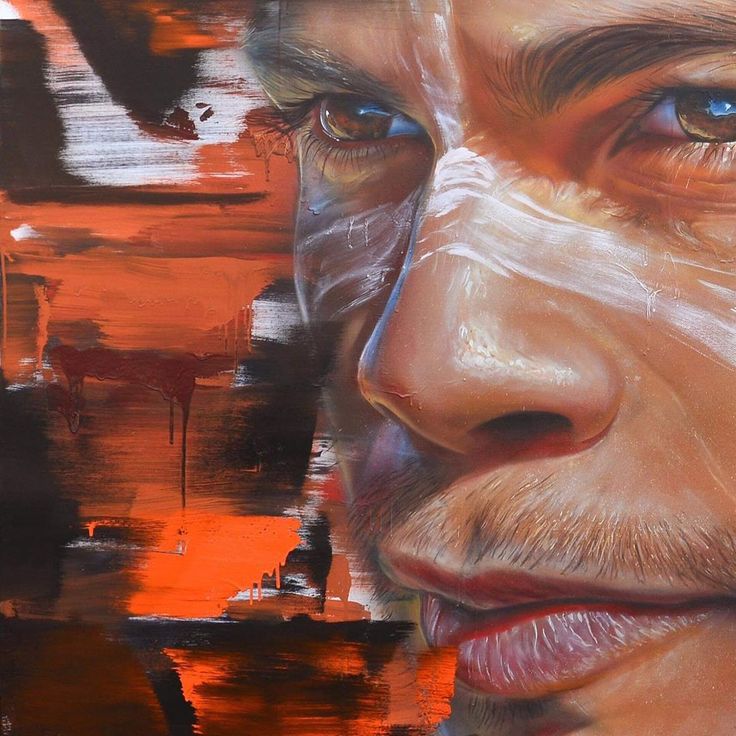
Black & White is Timeless
There’s just something about black and white portraiture.
The texture really stands out when you’re shooting in black and white, and it’s in these small details of texture that you find the character of a person’s face.
It also removes any distracting colours and strips the focus back to the person, rather than anything else that may be appearing in the scene.
Some of the most inspiring portraits in the world are in black and white, whether that’s down to technological restrictions (initially at least) in the case of Irving Penn, or choice, in the case of Henri Cartier-Bresson.
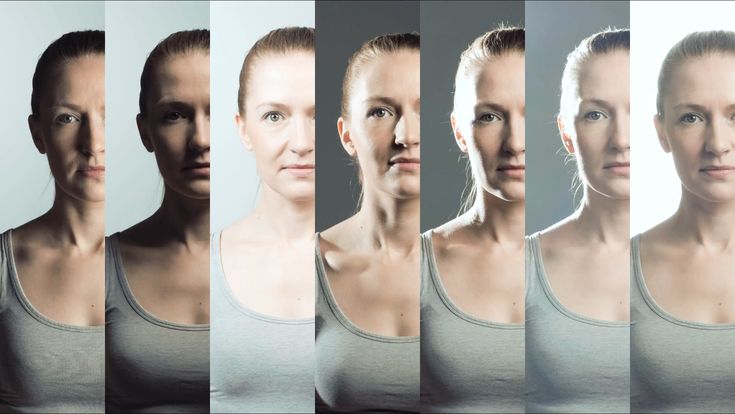
Off-Camera Lighting is Essential
This is a very important rule because the lighting is half the battle when it comes to taking portraits.
When you have a light source coming from the same angle as the camera, you completely flatten the image, because there are no shadows left.
When you move the light source to just slightly away from the camera, it immediately adds depth.
If you can use off-camera lighting, preferably with a beauty dish or softbox, then that’s great, but if you don’t have this at your disposal, then not to worry.
I often use window light, as it acts like a lot like a lightbox (in fact, this is what studios used to use back in the day), and you can simply move your subject, rather than trying to manipulate the light.
Have Your Model Towards The Camera
The camera adds ten pounds. It’s your job as the photographer to try to remove them again.
You can be the best photographer in the world, and have the best lighting, but if you can’t direct your models correctly, you’re still going to have weak photos.
When we stand straight into a camera, we’re at our widest, and we produce a block in the photo.
If the photo is of our head and shoulders, then we’re now the full width of the image. Not good.
Conversely, when a model turns into the camera, ideally with the shoulders at slightly different heights, they seems to shrink in the frame slightly, and this is great for making them look both skinnier and more interesting.
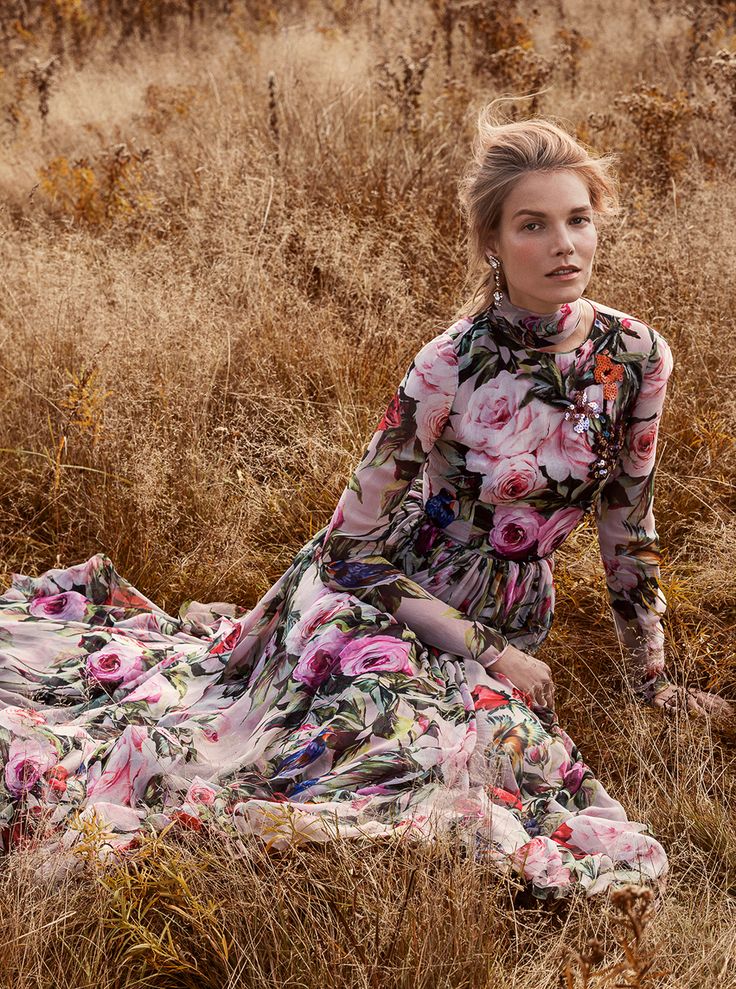
Avoid Bright Clothing
Remember, a portrait is about the subject, not the clothes they’re wearing.
When the subject is wearing really bright and colourful clothing, it’s going to be distracting for the viewer, who is going to be automatically drawn to it.
This is often overlooked because it’s down to the subject/client, rather than the photographer, but you need to pay close attention to what they’re wearing if you want to get the best results.
Obviously, if you’re taking fashion photos, this rule goes out of the window.
Watch that Chin!
No one likes to see their double chin in a photo, and it’s actually not that hard to make sure that your subject isn’t flashing theirs.
It’s all about the jaw.
That’s a link to a video from Peter Hurley, who knows what he’s talking about when it comes to portraits. Peter sums it up really nicely.
It’s pretty simple really, you want to make sure that your subject brings their head forward slightly, and then tilts their jaw down and out.
Simple, double chin removal process complete. Well, as much as possible at least. And don’t worry about it feeling unnatural, as I’m sure you’re all sitting at your computers craning your necks.
Remember what I said about compressing images by using longer focal lengths. You won’t notice the neck.
Remove Background Clutter
There’s a reason that portraits are often taken on a very boring background. It can be from a white screen to a textured wall, and anything in between. Just so long as it’s fairly uniform and not distracting.
Because distracting is the key word here.
Just like bright clothing, you don’t want to distract the viewer away from the subject.
So although you may be tempted to take a portrait against the backdrop of a sunset, that doesn’t really have a place in portrait photography, that’s more of an extension of landscape photography.
Portraits focus on the person.
Keep it simple.
Pay Attention to the Nose/Cheek Line
If you haven’t noticed this before, I can guarantee that after reading this, it will start to stand out like a sore thumb to you.
When we take portraits, we usually take them head-on, right? With maybe a slight turn to one side. Well, as we turn our heads slightly the nose goes with it.
The nose/cheek line I’m referring to is when the nose points out past the cheek. This makes it stand out and look large. It also ruins the flow of the face, in my opinion.
Have a look at my comparison below.
6 Rules for Portrait Photography for Beginners
- The photo
- 5 min to read
- 24061
Portrait photography is very different from all other types of photography. In order for you to master this format, we have collected for you 6 rules for portrait photography for beginners that will prevent you from making the most common mistakes. nine0011
1. Technology
Any camera is suitable for portraits. The advantage of a SLR camera is a prompt response to commands, a change of optics that allows you to vary the shooting modes, the ability to shoot in manual mode, which means that you have many opportunities to solve your artistic tasks and the ability to shoot in difficult conditions (for example, in dark premises).
Good portraits can also be taken with compact cameras. But it's better if your compact has a zoom (the longer the better - the background will blur more, the proportions of the face will be better). nine0011
For SLR cameras, it is recommended to use lenses with a focal length of 50-80 mm (up to 135 mm in some cases). With a focal length less than 50 cm, you will get distorted proportions of the model. When shooting a portrait, preference should be given to portrait lenses with soft-focus optics.
Soft-focus optics hides skin imperfections and focuses attention on the main elements of the portrait (eyes, mouth, forehead), gives a sense of volume due to smooth sharpening drops from the main to the less important. nine0021 Sometimes it is necessary to use a flash or a reflector to even out the brightness in the frame and highlight the shadows.
2. Settings
Portraits are usually shot with a shallow depth of field. A small depth of field means an open aperture, i. e. small aperture values (better from about f 2.8). If you are shooting with a compact, shoot at the maximum zoom position.
What will it do? The subject will be sharp and the background will be blurred. We must not forget about the distance at which you shoot and that the depth of field depends on this distance. Of course, it all depends on your artistic goals, but in a classic portrait, the eyes should be sharp and preferably the rest of the face of the person being portrayed. If you are shooting two or a group of people and you want the whole group to be in focus, you need to stop down the aperture (f 8 - f 11 and more). nine0011
The shutter speed for portraits should not be too slow. People can't move or breathe for a long time. If the shutter speeds are too long, the photos will not be sharp. In addition, long exposures cause tension in the filming. At short shutter speeds, you capture the moment and everything that was intended is in sharpness (eyes, ...). This is especially true for children who cannot sit quietly in one place. The faster the shutter speed, the more likely you are to get a sharp shot. We have already written that it is better to shoot children at shutter speeds no longer than 1/250 s, for adults you can use slower shutter speeds. It is important that you have enough light to shoot. It is optimal to shoot on the street or at home by the window. nine0011
Try not to raise the ISO. Shoot at ISO 100 if possible.
The focus in a classic portrait should be on the eyes (not on the nose, not on the forehead, or anywhere else). It is best to put the camera in manual focus point selection mode and choose the point that falls on the eyes of the model.
3. Light
In order to get a three-dimensional face in a photograph, it is best to use light falling slightly from the front and side (front-diagonal lighting). In principle, good results can be obtained with side lighting, but with side lighting it is best to use a reflector (which, for example, can also serve as a white wall of a house) or an external flash. It is best to shoot outdoors in the morning or early evening. If you shoot at noon when the sun is at its zenith, the overhead light will produce deep shadows and very sharp contrast. nine0011
With backlighting, you can get a silhouette if you shoot in the evening, for example. If you want to light up your face, you'll also need a reflector or an external flash. Front lighting will flatten the face and should be avoided.
At home, it is best to shoot with light from the window (if possible, not from the sunny side). Transparent curtains will help you make the light diffused and softer.
4. Shooting point
Every photograph usually starts with choosing a shooting point. That is, from a close distance or from afar, from above or below, to the right or left, the model will be taken. The shooting point mainly determines the composition of the shot. nine0021 The scale of the image will depend on the distance. As we have already mentioned, there is no need to reinvent the wheel in photography. The scale of the portrait has long been determined by the fine arts. By scale, portraits are divided into full-length, generational, bust (bust) and fragmentary.
Bust portraits are the most popular. They allow you to convey the appearance and "look" into the eyes of the person being portrayed, convey the peculiarity of his face (external resemblance). With the help of a bust portrait, you can try to convey the inner world of a person. nine0011
A bust portrait should be taken with a telephoto (portrait) lens from a distant point. Otherwise, there is a risk of distortion of the shape of the face and loss of external resemblance.
By removing the shooting point, you can get a half-length portrait. Most often, half-length portraits are taken while sitting. Hands also participate in the half-length portrait. You have to be very careful with your hands. With the help of the position of the hands, you can determine the mood of the portrait. The position of the hands should be absolutely natural. To keep your hands relaxed, you can give the person being portrayed some thing in their hands. nine0011
Generational portrait sets the task of showing the proportions of the figure even more. Try to shoot generational portraits not statically, but in an energetic turn and with an active gesture.
We move away from the shooting point and further away from the face of the model. In a full-length portrait, you can show the proportions of the figure. It’s better to shoot in height without standing up - it’s very difficult.
When shooting bust portraits, it is best to shoot from the model's eye level. Half-length portraits are taken from the level of the chin. When shooting a full-length portrait, shoot from the waist level (crouching). nine0011
5. Composition
In portrait photography, all the classic rules of composition apply, which we have written about more than once. Particular attention should be paid to the background. It should not distract from the person being portrayed. Do not shoot portraits against contrasting, bright, or colored backgrounds. Calm, solid backgrounds that do not distract attention are best suited.
Do you remember the composition rule that says you shouldn't place your main subject in the middle of the frame? This rule applies here as well, but in a portrait it is very important that the frame is balanced. That is, there must be something in the frame that balances it. It can be just an abstract background. nine0011
When filling the frame, it is very important to take into account the direction of the model's gaze. That is, if a person looks to the left, then on the left there should be enough space for a look. The gaze should not rest on the edge of the picture. The mood of the picture depends on the direction of view. The shot can be made more interesting if the model is not looking at the camera, but somewhere else.
6. Working with the model
Very often we see tense faces and forced smiles in the pictures. Most people see the camera and start "posing". This rarely gives a good result, as portrayed during posing, as a rule, tense up. A good portrait photographer should be able to reveal the inner world of a person, and this is possible only when the model is relaxed and naturally laid-back. We have already written that every photographer has his favorite genre in photography. A portrait photographer must love communicating with people and be able to win over a person. nine0021 Shooting is best started with a casual conversation. When the person relax, you can start shooting.
At the beginning of shooting, you can say that you are not shooting yet, but simply choosing a shooting point and setting up your technique, trying out a new lens, i.e. take test shots. Often at this time you will be able to capture the best shots. Interesting shots are also obtained during breaks, when the model is tired, stops “posing” and relaxes. Here you can again say that while the model is resting, you are again testing the technique and choosing an angle for further shooting. nine0021 All this, of course, does not apply to professional models who know how to work in front of the camera.
Source: Photoschool
- # advice
- #list
- #article
- #photo nine0009
- five
- Change perspective Of course, shooting a model with a camera placed strictly at eye level is correct and logical, but if you try to add some variety when shooting a portrait, you can get interesting shots.
 For example, you can stand on the contrary higher than the model and remove it from above or sit down, the main thing is to find the angle from which the model will be most interesting.
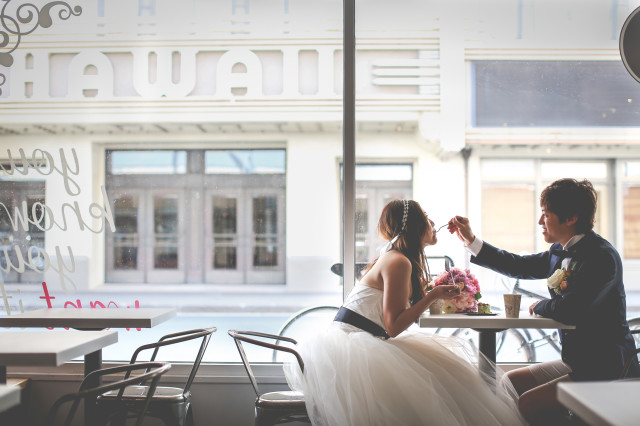
 - Direction of view of model Here you can also choose the most successful and interesting position. nine0021 - In classic portraits, the model looks directly into the lens and creates the illusion that she is looking at you. There is some connection. However, if you look beyond the frame, as if into the distance, the portrait takes on a different meaning, looking at this photo, you wonder what is there, in the distance. If, at the same time, you also give more space, the picture will cause more interest than the usual, standard production. It would also be acceptable to capture emotions on the face of the model, but you need to make sure that there are no distracting objects and objects in the background. nine0021 - If the model's gaze remains in the frame, you can direct it to any object or object.
 For example, a girl looking at salutes, a child looking at a toy, etc. Thus, a secondary semantic center is created, as if you are telling some kind of story to the person looking at your photo.
 - Composition in photography And there are rules here, for example, the “one-third rule” (try to avoid dividing the frame into symmetrical parts. It’s better to visually divide the frame into three parts and, for example, place the sky in the upper third, and everything else in the lower two-thirds . Similarly, you can vertically split the frame into three parts). But you can also get great results in portraits by placing your subject in the center or on the very edge of the shot. Violating the rule of "free space for the model's view" can also achieve interesting results. In general, the rules for constructing a composition can be counted from a dozen, and through experiments and trials, each master as a result necessarily receives works worthy of admiration. nine0004
- Experimenting with lighting Lighting is another "trump card" with which you can achieve extraordinary results.
 Hide something, highlight something. For example, side lighting will create a mood, add some mystery, hide the secondary and highlight the main thing. Lighting is an element of unpredictability and gives unlimited possibilities when shooting portraits.
By combining slow shutter speeds with flash, you can also achieve impressive, unusual results. nine0004 - Additional semantic center By adding an object to your frame, you can create another semantic center that can make the frame more advantageous. It may happen that you divert the viewer's attention from the main semantic center, but you can try to add variety, add meaning to the story told through the photo.
- Experiments with pose There are situations when the standard approach to model setting does not bring the desired result. Perhaps a little imagination, such as an unusual pose or even a jump, and you will achieve a completely different picture. Even if at first glance the pose is unnatural, this is not a reason to abandon experiments.
 nine0004
 - Capture sincerity, capture feelings and emotions Of course, not all people like to pose for photographers if they are not professional models. Therefore, sometimes, in order to make a good shot and not see a “frozen” face when shooting a portrait, it is necessary to place a person in the atmosphere familiar to him. At work, at home, with family. In this case, you need to take pictures in series, to catch successful emotions and feelings. Ask the person to experiment with the face, let him move, do something, talk, laugh... In such situations, a telephoto lens will be very useful, which allows you to take pictures from a long distance when the person cannot see you. This is especially suitable for shooting children. And then you will get extraordinary pictures, with sincere emotions, and it is possible that the person himself will be surprised to see himself in them ...
- Get close - a body part is in the frame Get close enough or use a long lens with your camera so that you can only photograph a particular part of the person's body.
 Portrait - it can be separate eyes, hands, mouth, or even just a torso, you can leave enough space for the imagination. Sometimes what's left outside the frame will say a lot more than what's in the frame.
 - Depth of field There is another variant of the previous method, it consists in drawing attention to a certain part of the face or body by defocusing on the rest of the frame. Defocus can be applied to clothes, other parts of the body, hands. You can even leave only one part of the body in focus. Following this advice, you leave the viewer space for the imagination, but also focus on something specific according to the idea. nine0004
- Continuous shooting Often, in order to choose one, the most magnificent, from hundreds of shots, you need to ensure this choice. And this is only possible if you take a series of pictures. Take your time, experiment, look for good angles and it will all pay off for you!
Rules for shooting a portrait
There are rules and regulations for portrait photography developed over the years, but after looking at numerous works, one can make a bold conclusion - the best portraits are those made with violations of certain rules and laws! nine0011
You must have come across a situation where the studio seems to be good and the camera and light, but you don’t like the person looking at you from the picture, he doesn’t look like the original . .. What is the reason and how to achieve exactly the perfect shot when shooting a portrait. It happens that a person does not recognize himself in the picture, he imagined himself completely different, and the photographer showed him an unusual side, noticed something. And it is this “something” that can become a highlight. nine0011
A real photographer, a specialist in portraits, will try to learn about a person during the time that they are together, understand him and "discover". After an hour of a photo session, the photographer knows more about the client than he does about his sister. Then the picture will be unforgettable!
Using a series of shots, at least 50, you have the opportunity to choose one, the most successful. Therefore, the main thing is to shoot in series. Artistic success is possible when you understand that the most important thing in portrait photography is the client. If you are so busy that you are not able to think about others, then do not count on a good result. nine0011
There are two things you need to remember when working on a portrait. The first is the background. Of course, it is necessary to focus on the main thing, and this is the object itself. But a gray nondescript background will not decorate your picture. So try to find a compromise here. It is necessary to ensure that photography is a work of art in itself. A low ISO setting, lenses, tripods, and at least a mid-range digital camera will help you with this.
The second important element of portraiture is lighting. It is necessary to achieve shadows on the parts of the face that need to be hidden and vice versa, using reflectors (umbrellas), diffusers to illuminate the right places. In the event that it is not possible to use special devices, and there is no finance for their purchase, you can cheat. The object can be placed in a lighted park, next to a large window, on which a white reflective sheet of paper is placed. nine0011
Don't forget a tripod because you'll have to use slow shutter speeds. The best light for portraits is soft and off-screen. A large window facing north is just right. In this case, almost no shadows can be observed. If you shoot outdoors on a cloudy day, even better. But if the day is sunny, you need to make sure that the use of a reflector and a flash will remove the shadows under the eyes.
Have you ever wondered, “Why are some people considered photogenic and others not?” And of course, every photographer asks a different question - how to use the photogenic character when shooting and how to compensate for its absence? This will help rules of portrait photography that every portrait photographer should know
To answer these difficult questions right away, you do not need to convene a council and spend hours on endless discussions. Photogenicity is not so much a person's appearance as his self-perception and behavior in front of the camera lens. Most often, people who do not like themselves or are accustomed to consider themselves non-photogenic are pinched on the set, because they are afraid of a poor-quality result in advance. All this, of course, is reflected in the photograph. The task of the photographer in this case is to break down the wall between himself and the model, help the person on the other side of the lens feel comfortable, and then find positions, angles and lighting that will bring out his best and unique features. And it's great when the result brings satisfaction to both the photographer and the model. nine0011
Keep in touch with the model during the shooting
As we have just noted, the secret of successful photography is more than technical aspects, light and camera. It all starts with the interaction between the model and the photographer to create a comfortable atmosphere for both. Typically, this involves some kind of exploration of your character, their interests and personality. You should know everything from hobbies that can be a great conversation starter to specific factors like favorite music that can make a person relax, sing along or dance. nine0011
If you're shooting a person you don't know yet, look at the rest of the portraits you can find and be careful - everyone has favorite things, colors in clothes, poses, facial expressions, and even a good location when shooting. And these are the things that you, as a photographer, definitely need to consider.
If you know a character or he trusts you, it's not so easy either - after all, even the most open people sometimes feel tight and shy of the camera. Therefore, do not neglect the opportunity to create a pleasant environment in which the model will be easier. nine0011
Always pay attention to the background and lighting
When the day of shooting comes, you need to be prepared and have a clear plan - both for the environment and setting in which the portrait will be shot, and for the settings with which you are going to shoot.
If you are shooting indoors or in a studio, check out the available options for backgrounds and indoor lighting. Will it be possible to use natural light in the frame, or will you have to rely entirely on lamps and softboxes? Will clean walls be available, or draperies that can be used as a backdrop, or will the interior become the environment. nine0011
If shooting outdoors using natural light, consider the time of day, the direction of the sun, and how and where you plan to position the model. Always remember that early morning and mid-afternoon (2-3 hours) is the best time for portraits with natural light. But filming at noon, with the most harsh light and shadows, on the contrary, is better to avoid. It's a good rule of thumb to check weather forecasts - cloudiness, for example, can help create a portrait with soft shadows, like a natural reflector. nine0011
Ideally, the model should be facing the sun, or at an angle where the lighting accentuates the features, but, on the contrary, smooths out unpleasant shadows. When composing a portrait, it is essential to look behind the model and note details such as distracting backgrounds, objects that break the composition, and so on. While on the camera display or in the viewfinder, such things are easy to miss, so you just need to learn and get used to.
Observe camera position and lens focal length
In order not to sound lengthy, let's explain them in more detail. When we take a picture, we transfer a three-dimensional, 3d image into a flat 2d space. Therefore, depending on the focal length and the position of the camera and lens, you can either emphasize or hide imperfections. And of course, this will be reflected in the final picture. The number of individual characteristics of each of the millions of faces is limitless: it can be bright eyebrows, specific noses, double chins and much more. From this it may seem that it is almost impossible to take a perfect or even successful shot, but this is not at all the case. It is with the help of the location of the camera relative to the model that you can choose the most successful angle. nine0011
Depending on whether you want to shoot a portrait from a closer distance, you want to create a beauty shot, or you want to capture a character in a natural environment doing their favorite activity, you will have to choose the approach to shooting. Especially when shooting portraits, it must be taken into account that the object or part of the face that is closest to the lens will appear larger than the rest. This effect is even more pronounced when using a wide-angle lens. Therefore, when shooting portraits, wide angles are not recommended. nine0011
Again, this feature needs attention when shooting characters with specific large noses. The longer the focus of the lens, the flatter and more compressed the elements will appear. The face, in this case, will be rounder, and the nose - shorter and more harmonious. That is, a telephoto lens with a focal length of 200mm, located a little further, but aimed directly at the face of the model, will create a more pleasant effect than a regular 85mm portrait lens.
Always look into the eyes
Eyes are not without reason called the mirror of the soul, in portrait photography a lot can be conveyed through the look of the character, so when shooting, often attention and emphasis is placed on the eyes. Similarly, focus is important - if the image is sharp and bright, but the eyes are out of focus, the essence of the picture is lost. nine0011
With the help of a glance, you can convey both the mood and the idea of the frame, thanks to its direction, you can build a composition. In short, the possibilities are only limited by the imagination of the photographer.
Sony cameras have a very handy feature - -Eye AF, which allows you to focus on the character's eyes. In addition, flexible focus points can be used to position the focus on the eye. Thus, regardless of the depth of field, the eyes are always in focus. nine0011 Photographs tell a story, and even if you like classic portraits, sometimes you can push the boundaries. There is always an environment around the subject of photography that can also be used. Thus, by zooming in and out, moving further and moving closer, you can change the mood and atmosphere of the frame. If you are photographing children, for example, do not do this from your own height. On the contrary, by shooting them from their level, you can achieve a greater effect of realism, convey their personality and make the photo more personal. If you want to achieve a special effect, you can shoot from below, and from above, and from the side - it all depends on what kind of story you want to tell. The tone and look of your subject's skin plays a very important role in a portrait. Appearances are deceiving to the untrained eye, so a camera's white balance can easily be deceived by the surroundings. Reflections from walls, clothing or greenery, even daylight, can make all the difference in balancing a shot. Therefore, do not fully rely on automatic white balance settings camera - a mistake can cost time and productivity. White balance cards, filters, and calibration tools should always be in your arsenal. They will help to build the right balance in any situation. If you're working in low light conditions but still want your character to stand out, the available light can be realigned to match them with a collapsible reflector. The reflectors are available in white, silver, gold or black, and we have already written about their specifics in more detail. nine0011 Feel free to use them for portraits. In situations where the available lighting does not allow for a pleasing white balance, a very affordable shooting setting is to convert the image to black and white. It also adds a vintage effect to the portrait. In addition, in a black and white frame, the background colors will not distract attention from the emphasized outline of the character at all. That is, all attention will be focused on it. You can shoot a portrait in color at RAW , and convert to black and white after, this will give you the opportunity to further twist the settings and achieve the desired effect. We often say that RAW is the best format for shooting. No matter what type of footage you're aiming to capture, this format will allow you to achieve the best quality and more opportunities in post-processing. They weigh more than others and will require more free space on the memory card, but the benefits in this case greatly outweigh. nine0011 In essence, RAW files can be described as a kind of negatives of film photographs. Once you download them directly from your camera, you can edit them to add contrast, pull colors, tone, and more without affecting the original. The JPEG format that all cameras shoot is a compressed format in which the quality is reduced. And with quality, important information is lost. For tasks such as social networks, for example, JPEG photos are more than enough, although it is worth remembering that every time we reduce and change such a frame, we lose data. Don't be afraid to move
 The same thing works with adults - looking at a person at their own height is one of the tricks that will help you anchor your own psychological connection with the character in the frame and reflect his personality. nine0011
 Keep an eye on white balance settings

Black and white portrait
 In this case, you can connect creativity and emphasize everything that will give the character character.
 Shoot in RAW

Learn more