Exposure triangle of photography
What is the Exposure Triangle? Aperture, ISO and Shutter Speed
What is the exposure triangle?
First, let’s define exposure triangle
Although the exposure photography triangle is one term, it is composed of three different elements. To learn to use the exposure triangle, you must understand how each variable works. To get a better understanding, let’s define exposure triangle.
EXPOSURE TRIANGLE DEFINITION
What is the exposure triangle?
The exposure triangle consists of three variables that adjust how a camera captures light: aperture, shutter speed, and ISO. Together, these three elements properly expose a shot. The three variables of the exposure triangle are all dependent on each other. For example, adjusting one of the three variables will entail an adjustment of another to maintain proper exposure. The exposure triangle is also referred to as the photography triangle and camera triangle.
Aperture, shutter speed, and ISO are the primary variables of the camera triangle that control exposure. However, each variable also affects other qualities of an image. Depth of field, motion blur, and noise are all determined by elements of exposure triangle photography.
What is the exposure triangle composed of?
- Aperture
- ISO
- Shutter Speed
We're about to discuss the Exposure Triangle in more concrete terms but, in the meantime, download your copy of our Ultimate Guide to Exposure — a FREE E-book that covers everything you need to know.
Free downloadable bonus
FREE Download
Ultimate Guide to Exposure
The Exposure Triangle is something every photographer and cinematographer needs to master. Download our FREE e-book to get in-depth explanations and tutorials on topics like aperture, ISO, shutter speed, and how to balance these settings to nail perfect exposure every time.
Photography triangle explained
Aperture
How does the exposure triangle work? To better understand the exposure triangle, let’s examine each variable one by one starting with aperture. The literal definition of aperture means “opening” or “hole.” The aperture of a camera lens is a hole that regulates how much light passes through to the film or sensor.
When the shutter button of a camera is hit, the aperture opens up to a predetermined width and lets in a specific amount of light. Aperture works with ISO and shutter speed to control exposure. Here is an image of an exposure triangle cheat sheet that you can save for reference when shooting your next project.
What is the Exposure Triangle Chart?As you can see from the exposure triangle chart, the width of a camera lens’ aperture is measured in f/stops written in numbers like 1.4, 2, 2.8, 4, 5.6, 8, 11 and 16.
Smaller apertures, like f/16, let in less light. Larger apertures like f/1.4 let in more light. To better understand aperture, take a look at our in depth video breakdown of aperture. Note the visual differences in aperture sizes and how it adds to the overall visual storytelling.
What is Aperture & the Exposure Triangle Explained • Subscribe on YouTube
As you can see from the video, aperture not only affects exposure, but depth of field as well. Small apertures like f/16 create a deep depth of field, allowing more to be in focus. Larger apertures like f/1.4 create a shallow depth of field allowing for a blurred background.
While aperture is an incredibly important variable in exposure triangle photography, it heavily depends on our next variable — shutter speed.
Exposure triangle explained
Shutter Speed
When the shutter button of a camera is pressed, the aperture opens up. How long the aperture stays open is determined by the camera’s shutter speed. Shutter speed controls how long the sensor of the camera is exposed to light.
Shutter speed is measured in fractions of a second. For example, a shutter speed of 1/60 holds the shutter open for one sixtieth of one second. The longer the shutter speed is in time the more light is let in. If it is shorter in time, less light is let in. Here is a video by Phlearn that breaks down shutter speed and how it affects exposure.
Like all the other elements of the exposure triangle, shutter speed does not only affect exposure, but other visual elements as well. For shutter speed, motion blur is affected. When shooting with limited light, you may think it would be a good idea to adjust your shutter speed to let in light longer. So, you set it at a 1/20.
The downside of a longer shutter speed like 1/20, is that motion blur becomes much more prominent when you are either capturing a moving subject or the camera itself is moving.
The Exposure Triangle Photography • Shutter SpeedOn the opposite end of shutter speeds, fast shutter speeds like 1/1000, will be crisp, but it will also let in less light making it not very ideal for darker shots. This effect also applies when shooting video.
Fast shutter speeds like 1/1000 will capture crisp shots that can look jolty and unnatural to the human eye. Slower shutter speeds will produce motion blur and more out of focus images.
When it comes to cinematography and shutter speed, shutter angles and the 180 degree rule will help you achieve a cinematic look. What are shutter angles?
Shutter angles provide a way to describe the relationship between frame rate and shutter speed. It uses the concept of rotary shutters to illustrate how light passes through an angled opening once per revolution. Larger angles equal more light passing through. This translates to slower shutters dn more motion blur.
Take a look at this example from Saving Private Ryan that utilizes a slower shutter speed for choppier, jittery shots.
Shutter Speed in the Camera Triangle • Saving Private RyanAlthough modern digital cameras’ shutter speeds do not use a rotary shutter, shutter angles are still a primary means of describing motion blur in an image and how it correlates to frame rate. The most important concept to remember about shutter angles is the 180 degree shutter rule.
The rule simply means that to achieve a natural amount of motion blur in your shot, simply double the frame rate you are shooting at to find your shutter speed. This is also known as a cinematic shutter speed.
Shutter Angles vs Shutter SpeedA cinematic shutter speed captures motion in a way that is most natural to the human eye. For example, if you are shooting at a frame rate of 30 fps, the cinematic shutter speed to shoot at would be 1/60.
Once light passes through the aperture for a specific amount of time determined by the shutter speed, it finally lands on the camera’s sensor in a digital camera. The sensitivity of the camera’s sensor to light is determined by our next variable — ISO.
The exposure triangle photography
ISO
ISO determines how sensitive a digital camera’s sensor is to light. In a film camera, ISO refers to a specific film stock’s sensitivity to light. With new technology in DSLR cameras, a camera’s sensor can adjust their ISO and sensitivity to light depending on the available light of a shot.
ISO is measured in ISO values such as 50, 100, 200, 400, 800, 1600, 3200, etc. A lower ISO value such as 50 makes a camera’s sensor less sensitive to light. A higher ISO value such as 1600 makes a camera’s sensor more sensitive to light. This video tutorial breaks down the correlation between ISO values and exposure.
What is ISO? ISO in photography triangle exposureISO might sound like it is too good to be true when shooting with limited light. And that is because it is too good to be true. Increasing your ISO to brighten up your shot does come at a cost. That cost is image noise.
Image noise is random variation in color information within an image. Noise causes textural and visual changes in a shot that, when present in large amounts, can appear low quality and unprofessional.
Within filmmaking, however, some cinematographers have experimented with low amounts of image noise to imitate the effect of film grain which can add texture and energy to a shot. This video essay dives into how film grain and noise can be an artistic decision to create a unique visual look.
Now that you understand each element of the exposure triangle, you might be wondering “What is the exposure triangle used for?” The quick answer is that it’s used to properly expose an image. That said, how you properly expose an image will vary depending on the situation you are shooting in. Let’s dive into a few common scenarios that will help you understand how to balance the three variables to capture a great shot.
Exposure triangle explained
Exposing with too much light
There are pros and cons when shooting in an environment with a lot of light, such as an midday exterior shot. The benefit would be that you can shoot at your camera’s low native ISO allowing for minimal image noise and a full dynamic range.
However to avoid overexposure in your shot, you’ll need to adjust either your aperture, shutter speed, or both. If you are shooting a still photo, you may want to begin with shooting at a faster shutter speed to cut down the amount of light coming into the camera.
This will allow you to control the light without compromising your desired aperture and depth of field. For more tips on shooting in bright settings, check out the tips in this video by B&H Photo.
How to Take Portraits in Harsh Sunlight • 5 Quick TipsIf your image is still overexposed, start closing down your aperture to something larger like f/16. While this will affect your depth of field, it will help to properly expose your shot.
If you are shooting video in a bright setting, you won’t have the luxury of adjusting your shutter speed. Let's take a look at this scene from No Country for Old Men. The scene is an exterior location with harsh, midday desert sunlight
No Country for Old Men • 'The Discovery'Let’s take a look at what the different variables of the exposure triangle might have been set to in this scene.
Shutter Speed
To maintain a cinematic shutter speed when shooting at 24 fps, the shutter speed would be set at 1/48th of a second.
Aperture
The aperture of this scene would need to be as small as possible to cut down the amount of light let in. The depth of field is also deep. Shooting at about an f/16.
ISO
To determine the ISO of this brightly lit shot, we would look at what the native ISO of the camera is. No Country for Old Men was shot on an ARRICAM Lite with a native ISO of 500. Depending on if the shot is still overexposed, the ISO would be set at 500 or less.
Bonus
If the shot is still overexposed given the harsh sunlight, an ND filter would also be utilized to cut down light without adjusting the aperture. This will allow you to shoot at a wider aperture without overexposing.
Photography triangle exposure
Exposing with limited light
On the other side of the lighting spectrum, is shooting with a limited amount of light. This could be the case when shooting at night, within closed interior locations, or shooting without much lighting equipment.
To avoid an underexposed shot, you’ll need to find a balance of all three light exposure variables that properly expose your shot while also achieving the visual look you desire. This exposure triangle diagram is a great reference to use when determining what settings will allow more light in and what side effects it would entail.
Let’s take a look at an example of a low light shot from the film 1917. In this scene, the only source of light is coming from the flashlight practicals. Finding a balance within the photography triangle exposure will help properly expose the shot while maintaining the image’s quality.
1917 • Photography triangle exposure exerciseShutter Speed
Again, since this is a cinematic feature film a cinematic shutter speed is needed. To maintain a cinematic shutter speed when shooting at 24 fps, the shutter speed would be set at 1/48th of a second.
Aperture
To let in the most amount of light possible, the aperture should be as wide as possible. But in an interview, cinematographer Roger Deakins said he wanted a bit more depth. To let in as much light as possible with a bit of depth, the aperture would be set at an f/2.8.
ISO
1917 was shot on an ARRI ALEXA Mini LF. Deakins also said that with this camera he could set the ISO to 1600 without the risk of noise. This helped Deakins properly expose the scene while maintaining the quality of the shots.
For more on how Deakins shot 1917, here's the man explaining the process, including the challenges and solutions they came up with.
How Deakins Shot 1917 • Subscribe on YouTubeIf you are thinking of shooting in a low light scenario, be sure to check out this video breaks down a few lighting techniques on how to shoot in low light utilizing all three elements of the exposure triangle.
How to Film in Low Light • Exposure triangle explainedFinding a balance between all three in a low light setting will depend heavily on what you want to capture. For example, if you want to shoot a video with a shallow depth of field, opening up to a f/1.4 may be enough to properly expose your shot. But if you want a deep depth of field by shooting at an f/5.6, you may need to increase your ISO.
The exposure triangle photography
Exposing for movement
The exposure photography triangle’s primary function is to properly expose an image. But what is the exposure triangle good for when it comes to capturing movement? Different variables of the exposure triangle can impact how motion appears in a shot.
When capturing images with quick, fast movements a higher shutter speed is typically better. In still life photography, capturing a bird flying in the sky will appear too blurry with a slower shutter speed. A faster shutter speed of around 1/500th of a second to 1/1000, will be able to capture the bird mid-action with full clarity and sharpness.
To better understand how shutter speed affects motion blur and sharpness, check out this video tutorial.
When shooting video, fast moving action would also benefit from a fast shutter speed. Sporting events, action scenes, or a live concert entail quick movements. If captured with a slow shutter speed, these movements can appear blurry or even out of focus.
Take a look at this scene from John Wick 3. The fight scene is not blurry, but crispy and clear, most likely due to a fast shutter speed.
John Wick: Chapter 3 - ParabellumShutter Speed
Although you should follow the 180 degree shutter rule, there are times to bend it. Shooting an action scene is one of them. Cranking up you shutter speed in this scene to about 1/125th of a second makes movements more crisp and intense with minimal motion blur.
Aperture
Since the shutter speed is increased, the amount of light let in is decreased. To balance this out and properly expose the shot, the aperture would open up to about an f/2. 8 to let in light but maintain some depth of field.
ISO
The ISO setting will depend on the native ISO of the camera. However, there is a decent amount of light in the shot and the ISO will probably not need to be increased from around an ISO 500.
Keep in mind that a faster shutter speed will entail an adjustment of another exposure variable to let in more light. It also will break your cinematic shutter speed so be mindful of this adjustment and decide whether it is needed.
Mastering the exposure triangle is a fundamental skill necessary for every photographer and cinematographer. While it may seem incredibly technical, it is what allows the best cinematographers and photographers to capture the creative images that they envision.
Reading and understanding the different variables of the exposure triangle is just part of the battle of mastering exposure. The second part is getting out and experimenting with the different functions of your camera. Spending time shooting is just as important as the research you put in. Now get out and get shooting!
Free downloadable bonus
FREE Download
Ultimate Guide to Exposure
The Exposure Triangle is something every photographer and cinematographer needs to master. Download our FREE e-book to get in-depth explanations and tutorials on topics like aperture, ISO, shutter speed, and how to balance these settings to nail perfect exposure every time.
UP NEXTUltimate Guide to Aperture
If you’re looking to dive in deeper and learn more about each individual component of the exposure triangle, take a look at our next article. We dive in deep into aperture, how it affects exposure, depth of field, and the story you are telling. Learn more by reading our ultimate guide to camera aperture.
Up Next: Aperture explained →
The Exposure Triangle - A Beginner's Guide
For many starting out in photography, the relationship between aperture, shutter speed, and ISO can be confusing. To further muddy the water, the terms ‘stop’ and ‘f-stop’ are often used interchangeably but refer to different things. In this article, I would like to take some of the mystery out of these concepts by talking about the exposure triangle and why it is important to understand for those who are starting out. Please keep in mind that the concepts in this article are oversimplified to make it easy for beginners to understand, especially when it comes to ISO.
Table of Contents
1) The Exposure Triangle
Aperture, shutter speed, and ISO make up the three sides of the exposure triangle. They work together to produce a photo that is properly exposed. If one variable changes, at least one of the others must also change to maintain the correct exposure. For more information on this topic, you may which to check out our detailed summary of exposure.
2) Stop!
Before we go too far, let’s start our discussion by talking about a stop of light. Understanding what a stop is is key to understanding the exposure triangle. In photography, a stop refers to the doubling or halving of the amount of light that makes up an exposure. Each photo that we take requires a certain quantity of light to expose it correctly. Adding a stop of light by doubling the exposure will brighten an underexposed image. Conversely, decreasing an exposure by one stop (halving the amount of light) will darken an overexposed image.
So how do you add or take away a stop of light? To do this, we need to change the aperture, shutter speed, and/or ISO. Let us look at each of these individually.
3) Shutter Speed
Shutter speed is the length of time light is allowed to hit the sensor. It is measured in seconds. Shutter speed is probably the easiest of the exposure triangle sides to understand. To double the amount of light, we need to double the length of the exposure. For example, moving from a shutter speed of 1⁄60 s to 1⁄30 s will add a stop of light because the shutter will remain open twice as long. Changing from a shutter speed of 1s to 1/8 s will decrease the exposure by three stops. Why? From 1s to 1⁄2 s is one stop. Then 1⁄2 s to 1⁄4 s is another stop. Finally, 1⁄4 s to 1⁄8 s is a further halving of the time the shutter remains open or the third stop.
4) Aperture
Aperture refers to the size of the circular hole in the lens that lets in light. The bigger the hole, the more light that reaches the sensor. In fact, each time you double the area of that opening, you double the amount of light or increase the exposure by one stop. On the other hand, if you half the area of the opening, you half the amount of light hitting the sensor. And you guessed it; that will decrease the exposure by one stop.
Now without getting too technical, an f-stop is a ratio that relates to the size of that opening. Mathematically it is equal to the focal length of the lens divided by the diameter of the lens. At first glance the values on the f-stop scale are confusing. The numbers don’t seem to make any sense. Why do small values correspond to larger openings and vice versa? For a simple explanation, keep reading.
To understand why large f-stop numbers refer to small openings and small f-stop numbers refer to large openings requires a bit of math. Don’t worry; I will try and keep it simple. If you take the ratio I mentioned above:
f-stop = focal length/diameter
and rearrange it for diameter, you get:
diameter = focal length/f-stop
What this means is that for any given focal length, we can calculate the diameter of the aperture by dividing the focal length by the f-stop value. But when you divide a given focal length by a large f-stop number, the result is a small diameter. Therefore, the area of the opening is small. Conversely, if you divide the same focal length by a small f-stop number, you get a large diameter. And a large diameter means a bigger area and more light passing through the opening.
Also, it turns out that to double the area of the opening, the f-stop needs to be divided by the square root of two (1.414). That is why the f-stops are not nice round numbers. To half the area, the f-stop needs to be multiplied by the square root of two.
If you are so inclined, prove this to yourself with a little geometry. Remember that the area of a circle is:
Area = (π/4)diameter2
Try calculating the area of the aperture for a lens with a 50mm focal length using different f-stop values. As you move up the f-stop scale, you should see the areas doubling.
5) ISO
The final variable in the exposure triangle is ISO. You can think of ISO as the sensitivity of the digital sensor (although it is a lot more complicated than that). Higher values of ISO mean that the sensor does not need to collect as much light to make a correct exposure. Low ISO values mean that the sensor will have to gather more light to make the exposure.
Here is the ISO scale. Like shutter speed, this scale is easy to understand. Doubling the ISO equates to a one stop increase in exposure. Halving the ISO leads to a reduction of the exposure by one stop.
6) The Bucket Analogy
For any photograph, there is only one mathematically correct exposure. However, there are hundreds of combinations of aperture, shutter speed and ISO that can be used to create that exposure. The combination we choose depends on what our artistic vision for that image is. For now, let’s just look at how the three variables in the exposure triangle work together. In my next article, I will talk about how to use aperture, shutter speed, and ISO artistically.
For any given exposure, if one of the three variables change, you must adjust one (or both) of the others in the opposite direction. For example, if you decided to decrease your shutter speed by two stops, you will need to increase your aperture or ISO by two stops. You could also change both aperture and ISO by one stop with the same effect.
As another example, say you increased your ISO by four stops. Then you would need an equivalent decrease of four stops in aperture or shutter speed (or a combination of the two).
So lets put it all together using an analogy. Instead of light, let’s talk rain. Specifically filling up buckets with rain water. The exposure will be the total amount of water collected. Let’s say our ‘exposure’ is one gallon.
In this analogy, ‘shutter speed’ is the length of time we leave the bucket outside in the rain to fill up. How hard it is raining is our ‘aperture.’ A downpour would be a wide open aperture (large opening, small f-stop number) while a light sprinkle would equate to a tiny aperture (small opening, large f-stop value).
Finally, the width of the bucket represents ‘ISO.’ Now, all our buckets have to measure one gallon to collect the correct ‘exposure.’ However, a very shallow, wide bucket (think very sensitive, high ISO) will fill up much faster than a tall, skinny bucket (low ISO).
There are many scenarios which will collect our one-gallon ‘exposure.’ To make things a bit easier, we will fix one variable, and let the other two change. Let’s start by fixing ISO. If we have two buckets that are the same shape, we could put one out in a downpour for a short length of time to collect one gallon. Or, we could put the other out for a long time during a light sprinkle to collect that same gallon of water. However, if we put the bucket out for a long time in a downpour, we would over expose our image. Water would be spilling out onto the ground! Conversely, putting the bucket out in a light sprinkle for a short length of time would not fill up the bucket. Our bucket would be under exposed.
Here is another scenario. This time lets assume that there is a steady rain. If we have a wide bucket, we won’t need to leave it out for long to collect a gallon of rain. However, if we put out a skinny, tall one-gallon bucket in the same rain, it will take much longer to fill the bucket up.
Lastly, let’s fix the time we leave the buckets outside. To collect one gallon of water we could put the wide, shallow bucket out in a light rain. Or, we could put the tall, skinny bucket out in a downpour for the same time to collect exactly one gallon of rain water.
As you can see, there are lots of combinations of ‘shutter speed,’ ‘aperture’ and ‘ISO’ that yield one gallon of ‘exposure.’ Is one combination better than another? Well, that depends on how you want your photograph to look. What is important is the understanding that if you increase or decrease one variable in the exposure triangle by a number of stops, you must make up for that by decreasing or increasing one of the others (or a combination of the others) by an equal number of stops.
7) Conclusion
A stop is the doubling or halving of the light that makes up an exposure. We can add or subtract stops by changing the aperture, shutter speed, or ISO. So the next time someone tells you that you need to increase your exposure by a couple of stops, you will hopefully know what they mean and how to do it.
I hope you found this article useful. If you have any questions, please feel free to ask in the comments section below.
Learning Exposure - The Exposure Triangle / Sudo Null IT News
Bryan Peterson wrote Understanding Exposure, which is a recommended read if you want to break out of your digital camera's Auto mode and experiment with manual settings.
In it, Brian identifies three main elements to consider when experimenting with exposure and calls them the 'Exposure Triangle'.
Each of its three sides relates to light: how it enters and interacts with the camera.
Three elements:
1.Photo sensitivity of the camera matrix (ISO) - determines the sensitivity of the matrix of a digital camera to light
2. Aperture - the size of the gap in the lens at the time of shooting
3. Shutter Speed - the amount of time that the shutter is open
From the intersection of these three elements, exposure is obtained.
The most important thing is that changing one element will affect all the others. This means that you will not be able to manipulate with impunity only one element - you will always have to keep an eye on the rest.
3 metaphors for understanding the exposure triangle of digital photography:
Many, when describing the relationship between ISO, aperture, and shutter speed, use metaphors to help them get used to the topic. Let me share three. However, like any other metaphors, they are far from perfect and are only illustrative:
Window
Imagine that your cell is a window with shutters that open and close.
Aperture is the size of the window. The larger it is, the more light enters inside and the room becomes brighter.
Exposure is how long the shutters are open. The longer you leave them open, the more light gets in.
Now imagine that you are sitting in this room wearing sunglasses. Accordingly, your eyes are less sensitive to light (the same happens at low ISO values).
There are several ways to increase the amount of light in the room (or at least make it appear so. You can keep the shutters open longer (longer shutter speed) or make the window bigger (open the aperture wider)) or you can take off your sunglasses (increase ISO value) .
In general, this is not the best example, but you get the point.
Sunbathing!
Another metaphor a friend shared with me recently is to imagine that exposure is like getting a tan.
I have never been able to tan properly because of my skin. And all I got was that I burned in the sun. Thus the sensitivity of the skin is comparable to the value of the photosensitivity. Some people are more sensitive to the sun than others.
Exposure in this metaphor is how much time you spend in the sun. The more you spend in the sun, the more likely you are to get a tan (of course, if you spend a lot of time in the sun, this means that the picture is overexposed).
The diaphragm is a sunscreen that is applied to the skin. The cream "blocks" the sun with different strengths, which depends directly on the type of cream chosen. Even if you apply cream to a person who is very sensitive to sunlight, it will help them spend more time in the sun (for example, by increasing the aperture, you can use a faster shutter speed and / or reduce the ISO value).
As I said, none of the metaphors is perfect, but they allow us to illustrate the dependence of each element on the other two.
The third metaphor I've heard is the garden hose: the thickness of the hose is the diaphragm, the amount of time the water flows out of the hose is exposure, and the pressure of the water is light sensitivity.
Summing up
Perfecting the art of display requires a considerable amount of time. In many ways, this is the art of judgment, and even experienced photographers experiment with settings as they go. Always keep in mind that changing one of the elements not only affects the exposure of the image, but also other aspects of it (for example, changing the aperture size changes the depth of field, changing the ISO value affects the graininess of the picture, and changing the shutter speed affects how motion is captured ).
What's great about digital cameras is that they're the perfect tools for learning exposure. You can take as many shots as you like at no cost, and not only do they let you shoot in Auto and Manual modes - but also in semi-automatic modes such as 'aperture priority' and 'shutter priority' which allow you to make decisions about one of the two elements, leaving the choice of the remaining two to the camera automation.
Much more can be said about each of the three elements, but more on that in other articles
The fundamental rule in photography is the exposure triangle
In photography, exposure refers to the amount of light captured by the camera. One of the most basic photographic principles, exposure is directly related to the highlights and shadows of an image.
Image is said to be normally exposed, if it looks like what the eye sees. Overexposure occurs when too much light enters the camera, making the image brighter than normal exposure. Underexposure is the opposite: not enough light enters the camera, resulting in a dark image.
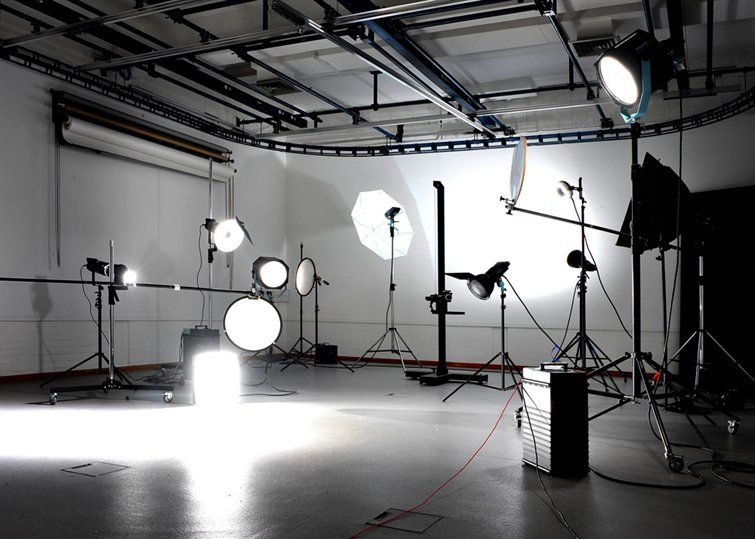
Creating the perfect exposure is often a tedious task for the photographer when using manual (manual) mode , because some factors are controllable, while others are not. If you're shooting in daylight, obviously you can't turn off or darken the sun; therefore, you must somehow adjust the camera settings to create the desired exposure, or move to another location. Another possibility is to use an ND filter. If you're shooting in a studio, then you have complete control over the lighting.
Note that perfect exposure is subjective because exposure is a creative act, so it depends on what the director intended to be correct. Underexposure, for example, is often purposefully used in horror films to evoke anxiety, tension, or fear. Subtle overexposure is often used to capture dreams or memories.
The exposure triangle is a fundamental way of relating the three variables that determine the exposure of a photograph: aperture, shutter speed, and ISO. In order to achieve the desired result, all three parameters must be balanced in order to adjust one of them, requiring adjustment of at least one of the others. Not only do they affect exposure, but they are also the biggest determinants of the global appearance of an image; thus their mastery is absolutely essential, both in technique and composition.
Side 1: Aperture
Aperture is a measure of how open or closed the light aperture of a lens is. A wider aperture (or a small f-number ) means that light will pass through the lens, simply because the aperture is larger. A narrower aperture (or a larger f value) allows you to reduce the intensity of light falling on the camera's sensor.
You will wonder why we would like less light to reach the matrix. The answer in most cases is that we want to increase the depth of field. It is the result of changing the considered parameter f. A narrow "aperture" (higher f-numbers) gives greater depth of field, allowing more of the scene to be in focus (more applicable in landscape photography). Wider apertures create a shallow depth of field that can help separate the main subject from the background and is one of the greatest compositional tools at your disposal (relevant for portrait photography or macro photography).
You should also know that most lenses are sharpest in the f/5.6 - f/8 range. However, many photographers are willing to sacrifice some of the sharpness of the subject for the volume effect provided by a wide open aperture.
1/2500, f/2.2 at 135mm and ISO 100Side 2: shutter speed
matrix, this period of time is called - the exposure time, adjusted by changing the shutter speed - that is, the shutter speed parameter when setting up the camera. Longer exposure times increase image blur, including blurring due to camera shake, and fast shutter speeds result in a sharper image.
The amount of light entering the camera's sensor depends on shutter speed - exposure time, and also has a direct impact on color saturation
If you are photographing a sunset, or a group portrait, different exposure settings will be required for normal tonality and sharpness of the pictures. These are two very different lighting scenarios with two very different results.
Optimal exposure can be defined as the shutter speed with which the photographer achieves the desired effect in the picture, whether it is the blur of a waterfall or the sharpness of a reportage shot capturing a certain moment.
From a technical point of view, the camera's sensor has a limited useful exposure range, sometimes called dynamic range . If, for any reason, part of the picture is actually exposed outside of this range, then the camera sensor produces pictures with incorrect exposure. For example, images can be unexposed "dark" or "white" - overexposed, in both cases there is a loss of information about the shades of color and tone needed to describe the "details". Thus, the purpose of adjusting shutter speed in a camera is to control the physical amount of light from an object that is perceived by the camera's sensor, for maximum image detail.
Shutter speed is a measure of how long the camera shutter remains open and how long the image sensor is exposed to light.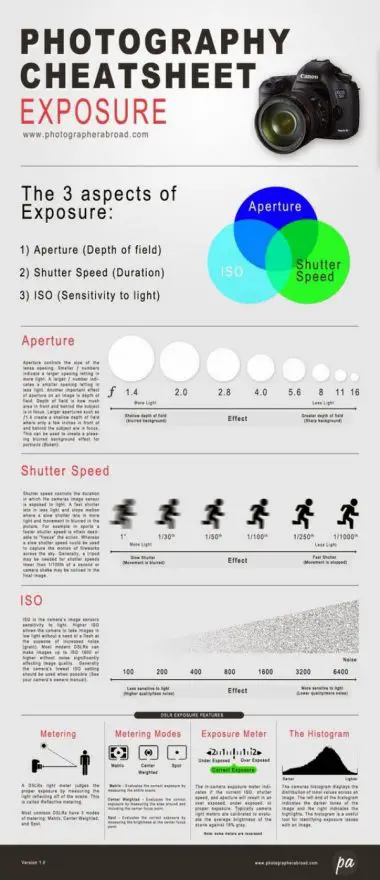 A faster shutter speed gives the sensor less time to perceive light and therefore results in a lower exposure. A slower shutter speed allows light to reach the sensor for longer and this results in a higher exposure.
So the reason we're going to use faster shutter speeds is to stop motion, whether it's camera shake or a moving subject, so we can keep our focus. Remember that as long as the shutter is open, the camera is essentially recording the position of all objects in the frame; if one of them moves, the result is an unwanted blur (although it is sometimes desirable, as when shooting city roads at night).
Using slow shutter speeds can also create very pleasing effects when photographing bodies of water. 6s, f/16 at f.r. 17 mm and ISO 100Read Exverts to determine the time you need
to verify the importance of this parameter by reading articles:
- Strengthening the sharpness of the photo
- Age with a large aging
- 900 night city
Side 3: ISO
In the past, when film ruled the roost, there wasn't the flexibility to control ISO that we have now.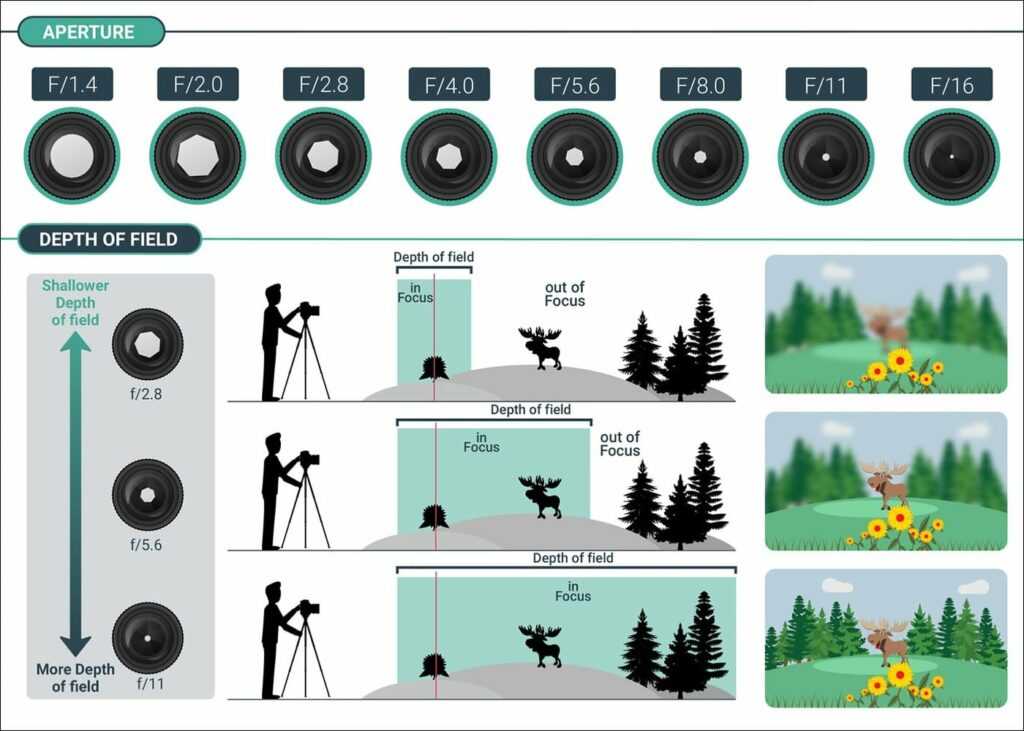 We can say that the exposure triangle was a triangle with a fixed side - ISO film. It would be possible to control the sensitivity to light by changing the film that was used in the DSLR, but once the roll was installed in the camera, it was not changed until it ran out. Currently, we can control the sensitivity of the sensor on the fly, although we don't technically control the sensitivity; actually controls the post-image gain applied to the signal, you interpret this as gain.
Increasing ISO essentially allows you to work in less light conditions. As always, there is a trade-off: increasing the ISO results in more noise and less detail. Noise is the result of random fluctuations in an electrical signal. At lower ISO values, the amount of image signal is large relative to noise (signal-to-noise ratio), which means that noise usually remains unobtrusive. When working at higher ISOs, the image signal is usually close in magnitude to the noise, and thus the noise enters the image.
Think of the image signal and noise as a basket of balls. If my image signal is 1000 balls, I won't notice if the noise adds 4 or 5 balls. If my image signal is small, say 10 balls, it will be very noticeable if the noise adds 5 balls to the heap. When I amplify this signal by increasing the ISO, the relatively high level of noise will also be greatly amplified.
So why use a high ISO? Often, when you are working in low light conditions, using the largest possible aperture and the slowest shutter speed you can not increase the ISO value. Otherwise, your only choice is to increase the ISO. The lens cannot physically open itself wider and, as discussed above, sacrificing sharpness for slower shutter speeds is rarely worthwhile. It is preferable to have some graininess and a crisp image rather than a smoother image with less detail.
There is little light in this room, except for the tiny music table lights you see in the right corner. 1/80s, f/2.8 at 200mm and ISO 6400EV step and stop
doubles half the amount of light reaching the sensor. This is where the math can get a little annoying. For example, the step of changing the sensitivity from ISO 200 to 400 is an increase by one stop; a change from a shutter speed of 1/30 to 1/120 second (most cameras will do this to 1/125) a two stop slower. However, the f-stops corresponding to the aperture are arranged in a geometric series that roughly approximates the powers of the square root of two, in other words, in the following sequence, each new f-stop represents a decrease in the aperture opening: f/1.4, f/2, f/ 2.8, f/4, f/5.6, f/8, f/11, f/16, f/22. Is the sequence intuitively understood as in the case of shutter speed or sensitivity (“doubling” or “halving”) is impossible? Just remember the sequence. Changing one of the exposure triangle settings to stop requires adjusting one of the other two settings. For example, going from f/2.8 to f/8 means decreasing the setting by 3 stops, so we are now using 1/2 * 1/2 * 1/2 = 1/8 of the light entering the lens.
(Side 4: Image Stabilization)
No, the exposure triangle has not turned into an exposure square. This is just a note about image stabilization: remember that this can help you work with slower shutter speeds that allow you to use narrower apertures for greater depth of field or lower ISOs. However, don't make the mistake of equating camera shake with subject movement. Image stabilization only helps in the first case, it is ideal for static subjects.
Examples
Let's look at some illustrative examples of the exposure triangle.
All shots taken at 85mm. Note that each time I decreased the aperture by one stop, the shutter speed also decreased by one stop; thus, the overall exposure is the same in every shot. However, the differences are quite noticeable. In the f/1.4 example, the flower in the center of the frame is quite distinctly separated from the background. At f/8, the depth of field is much greater; the fence is much more visible, and it's not clear where the focus of the photo is. Also, in the last two images, there is a risk of blur due to camera shake by shooting at a shutter speed slower than the reciprocal of the focal length, 1/85.