Framing a shot
|
frame, framing, in frame
Definitions: A frame is a single image of film or video. Framing (a shot) involves composing the visual content of a series of frames as seen from a single point of view, i.e., a fixed camera. In frame is the term used by screenwriters to indicate the entrance of a person or thing into a framed shot. Background: The “frame” of fine art was adopted by photography and then filmmaking to describe the borders of the camera lens. When framing a shot, the filmmaker creates a visual within the dimensions of the lens just as a painter creates a visual within the dimensions of a canvas. A major difference is that most framed shots include people and/or things in motion. Another is that the first objective of framing is not to create a picture worth a thousand words; it is to advance the motion picture’s narrative. Below are popular guidelines for framing a shot. Many have their roots in photography and some in Western fine art. Establishing Shot The farther a subject is from the camera, the more important its relationship to its surroundings. Shots in which distance makes facial expressions unreadable tend to be establishing shots, so-called because they establish the locales of the action to come. A common establishing shot would be characters entering building. Masterful establishing shots add more than where to the narrative. In the frame below from “Lawrence of Arabia” (1962), it is established the place is a desert waterhole. But watching the distant figure of Lawrence approach, we are impressed with how vast, empty and lethal the surroundings are. The desert becomes a character itself. Lead Space When a character looks at someone or something outside the frame, the character's positioning should favor the side of the frame opposite his line of sight. Rule of Thirds Landing points of focus tend to fall along the intersections of two horizontal and two vertical lines, each set of lines dividing the screen into thirds. From an intersection, the eye tends to move along the vertical or horizontal line to another intersection. Accordingly, a frame’s main subject or subjects should occupy an intersection and continue along the horizontal or vertical line from it. Ideally the eyes of subjects looking inside the frame should either occupy an intersection or be pointed at one. Diagonal or Dynamic Tension
As noted, our visual focus is not fixed even when we view a static image. Images that invite our vision to move horizontally and vertically are easier to understand. We greet diagonal compositions with uncertainty that generates tension. It's a visual effect first discovered by fine art. Former art student Adolf Hitler was certainly aware of it when he designed the Nazi flag. A diagonal technique unique to filmmaking is the Dutch angle, whose origin was in German cinema during World War I. Germany insisted that films shown in Germany be made in Germany, which led to two distinct schools of filmmaking—German and Hollywood. German filmmaking took its inspiration from Expressionist painting, emphasizing states of mind over storytelling. The Dutch angle, which involved shooting with a titled camera, was a popular device for evoking tension and anxiety. It was adopted after World War I by directors such as Alfred Hitchcock, Carol Reed, John Huston, Jacques Tourneur and Orson Wells, who appears below in a Dutch angle shot from "Citizen Kane" (1941). Related Terms: POV shot 180 Degree Rule Thirty Degree Rule MTV style editing CGI VFX Hollywood Lexicon Index Return to Top |
 Lead space is the line-of-sight portion of the frame with nothing in the foreground. This technique is particularly favored when filming conversations in which the character spoken to is off-screen. There are various phenomenological explanations why lead space does what it does, but the bottom line is lead space is essential to the illusion filmmakers seek. Below are examples of lead space, the first from "Titanic" (1997) and second from "The Wolf of Wall Street" (2013).
 For instance, in the frame below from “Bridesmaids” (2012), the eyes of the first two women, Kristen Wiig (left) and Rose Byrne, occupy the top intersections while the eyes of the far right woman, Maya Rudolph, are pointed at the top left intersection. The torsos of Wiig and Byrne each follow the lines to and through the lower intersections. Along the horizontal line of the lower right intersection we see the hand of Byrne, whose arm is embracing Rudolph. Of course, like all cinematography rules, Rule of Thirds is a rule until you can break it successfully.
 Diagonal lines of floors, windows, shadows, trees, etc. are elements filmmakers use to invoke tension. The thriller “North by Northwest,” (1959) gets our hearts beating with the opening credits (see below).
Camera Shot Framing Techniques — Frame Your Shots like a Pro [Video]
Camera Shot Framing
Camera framing explainedWhen you begin creating a shot list for a project, you first create a mental picture of each shot. Where are the characters positioned? Is the frame balanced or symmetrical? What about when there is more than one character in a shot? These decisions all add up to camera framing.
Before we jump into the specific types with camera framing tips, we'll begin with a camera framing definition.
Camera Framing Definition
What is camera framing?
Camera framing is the placement and position of the subjects in your shots. Shots are all about composition. Rather than pointing the camera at the subject, you need to compose an image. For filmmakers and videographers, a major consideration for framing is the number of subjects you feature in your shots, and their physical relationship to each other and the camera.
Considerations when camera framing a shot:
- Size — the size of your subject has a direct relationship to the importance of that subject
- Relationships — when we see more than one character in a shot, we are meant to acknowledge their relationship (romantic, contentious, etc.
 )
) - Balance — a "balanced" frame includes elements on the left and right side of the frame
We've created two mood boards in StudioBinder's storyboard creator that features the most commonly used shot framing, all on one page. If you follow the links to each project, you can explore the full collections and download PDF copies as reference.
First up, we have the camera framing examples from our featured video above. Pictured here are the silhouette illustrations but can you recognize what movie each of these is from? You'll find the actual movie stills once you follow the link.
Shot Framing • Shot Listed in StudioBinder
Based on how you plan to position your subjects, you'll need to adjust your camerawork. You'll want to capture your framing details on a shot list well before you arrive on set. That way you have a clear idea for the scene and can communicate your vision with ease.
That's not to say that things may not change the day of the shoot. But, having a shot list at the ready showcases that the director and DP have done their homework and are well prepared.
SINGLE SHOT EXAMPLE
Single ShotWhen your shot captures one subject it’s known as a single shot.
Here's an example of a single shot:
Single Shot Example • X-Men: Days of Future Past
Single shots can be set and framed in any shot size you like, just as long as there is only one character featured within the frame.
Now, why did I say featured rather than simply in the frame?
The reason is because you can have an over-the-shoulder single, also known as a "dirty single" that technically has more than one person in the frame, but the character in the foreground isn't featured.
Here's an example of a dirty single:
Over-The-Shoulder Shot Example • Armageddon
Two SHOT Example
Two Shot or 2-ShotA two-shot is a camera shot with 2 characters featured in the frame.
Here's an example of a two-shot:
2-Shot Example • The Lord of the Rings
Two shots are often really useful for allowing performances to play out in a single take, which can be especially useful for comedy.
THREE SHOT EXAMPLE
Three Shot or 3-ShotA three-shot is a camera shot with 3 characters featured in the frame.
Here's an example of a three-shot:
3-Shot Example • Harry Potter
Three shots are really important in adventure films, or really any film that has a group of characters, because it is an enormous time drain to shoot 3 singles just to show every character, not to mention jarring.
OTS Shot Example
Over-The-Shoulder Shot (OTS)Another element of camera shots to consider is the perspective of the shot. An over-the-shoulder shot shows your subject from behind the shoulder of another character. Because it emulates perspective, it’s common in conversation scenes.
Here's an example of an over-the-shoulder shot:
(OTS) Over-The-Shoulder Shot Example • Westworld
Over-the-shoulder shots can help to provide scene orientation, and connect the characters on an emotional level.
Watch: The Over The Shoulder Shot in Film (and How to Shoot a Dialogue Scene) • Subscribe on YouTube
Over-the-Hip SHOT EXAMPLE
Over-The-Hip Shot (OTH)An over-the-hip shot is similar to over-the-shoulder in that the camera is placed with a character's hip in the foreground, and the focus subject in the plane of acceptable focus.
Here's an example of an over-the-hip shot:
Over-The-Hip Shot • Minority Report
You'll gain a similar effect from an over-the-hip shot as you would an OTS, but if you have one character standing, and the other sitting, kneeling, or any other configuration that places the subjects on "uneven terrain" it will often suggest a power imbalance.
POV SHOT EXAMPLE
Point of View Shot (POV)Now let's talk about choosing camera shots that show the point-of-view (or POV) of one of your characters. A POV shot is a camera shot that shows the view from a character or an inanimate object, like a bullet whizzing through the air or a bowling ball rolling down the lane.
Most POV shots will be from a character's perspective, but there is no hard and fast rule that requires them to be from living creatures.
Here's an example of a point-of-view shot:
Point of View Shot • Kill Bill
A POV shot is generally sandwiched between two other shots:
- A camera shot of a character looking at something
- Cut to your (POV) point of view camera shot
- A camera shot showing the character's reaction
A point of view shot shows us exactly what the character sees, and we get to understand what's generating the character's reaction.
Insert Shot Example
Insert Shot
An insert shot can have many functions and often becomes the key shot is directing an audiences attention. If we see a character look at something, the subsequent insert shot shows us what they see.
They can also be used to show the audience a detail that goes unnoticed by the characters, leading to dramatic irony.
In this video, we break down how the Coen Brothers have mastered the insert shot (and how you can too). It's not just what we see in an insert shot, it's how the information is presented.
Art of the Insert Shot • Subscribe on YouTube
Camera FramingExplore Camera Framing
Browse camera framing techniques, and learn how to combine them with other shots, angles and camera movements for impact.
Different Types of Camera Framing
Explore 50+ Camera Shots & Angles
UP NEXT
50+ Camera Shots: The Complete Guide
Camera framing is just one aspect to directing with the camera. There are also dolly zooms, crab shots, bird's eye view, rack focus, and more to consider. If you'd like to see our entire list of camera shots, this next post is for you. Camera angles, movement, focus, framing, equipment — you'll get everything you need to build your next shot list.
Up Next: 50+ Camera Shots in Film →
How to properly crop photos. 5 Important Points
A portrait photographer's style is not only determined by how he works with light, which lens he chooses to shoot with, or how he processes the final files. Cropping plays an important role in his work, because cropping an image can be a decisive factor in creating the final impression that this photo will make on the viewer.
It is recommended to crop the photo at the model's waist, mid-thigh, or below her knees, through the forearm or top of the head. If in the end you are going to cut off the waist, it is better to ask the model to raise her arms so that in the end you do not have to cut them too
"Learn the rules like a pro so you can break them like an artist," said Spanish and French artist Pablo Picasso.
It is not recommended to crop the image at the level of any joint of the model, whether it be fingers, knees, elbows or wrists. Also, don't crop your chin when taking portraits - this will make your model look awkward and rather odd.
There are a few basic rules for framing portrait shots. It takes many photographers many years of trial and error to isolate them for themselves and study them thoroughly. These rules are of great importance for the visual impact that portraits will have in the future on a potential viewer. nine0003
Be sure to remember that there are exceptions to all rules. The world of art would have simply collapsed long ago if its rules were not constantly checked and violated again - after all, this is the whole essence of creativity. Pablo Picasso, Jackson Pollack, Vincent van Gogh are examples of those artists whose styles broke all the rules described in drawing books. At one time they were mocked, they were literally ridiculed by colleagues and critics, and today the paintings of these masters are priceless. They were able to easily break the rules of painting after they thoroughly studied the canons. This is how you create your own style! nine0003
5 tips on how to crop portraits best: the form that you want to get as a result, that is, the frame is already cropped, instead of shooting "with a margin" or somehow, and then cropping the picture in post-processing.
There are two good reasons for this approach:
- Images cropped "inside the camera" look completely different than those that have been cropped for further processing in the editor. Filling the frame and cropping it tightly means you'll create a great background blur that eliminates any possible distracting background elements and brings the subject into focus.
- The original file size remains the same. An arbitrarily photographed and then cropped image can only be a certain fraction of the original file size, so a file that originally weighed 30MB as a full size image will be reduced to 3MB after cropping.
 It should also be taken into account that full-size images, in contrast to those that have a lower resolution, will have much more detail and sharpness. nine0024
Forbidden! Cropping the photo at the level of the joints
Cropping at the mid-thigh line usually gives visually more pleasing results than cropping the frame at the knee level of the model. Showing only the part of the knee where the dress or shorts ends is also undesirable.
False
Correct
In addition, there are certain poses for models that show the body in a more favorable light. It is recommended that you always look for ways to present your model in which parts of her body are lengthened rather than shortened. Try to emphasize the best aspects and hide or reduce the imperfections of your subject. nine0003
Trimming at model's knees, waist, elbows, ankles, wrists, etc. can cause the model to look extremely clumsy in the photo. And cutting off arms or legs will lead to the fact that a person will generally appear square or visually larger than it actually is.
Position your subject's eyes in the top third of the frame and avoid cropping at the level of the model's chin snapshot. Also, you should never crop the chin of a person in the frame, otherwise it will give the impression that you were shooting extremely inattentively, and besides, such cropping, again, looks awkward. nine0003
In the example above, the final shot was cropped very tightly because the placement of the hands looked a little messy. In this case, you can see that the image is cropped so that the eyes are located in the upper third of the frame, diverting attention from the cropped shoulder and fingers of the model. As a result, it turned out to be visually the most "strong" option.
Go beyond just one shot
The explosion of social media has radically changed the way portraits are taken. In the past, most portraits were shot vertically. Now, when shooting, you need to take into account that many web resources, social networking platforms use not only vertical and horizontal images, but also place square frames. You can start with vertical portrait shots and then rotate the camera to take horizontal shots. nine0003
One option for positioning your model might be to fill the left or right half of the third of the frame. This will make the portrait more interesting and visually more dynamic.
You never know where the final image may end up after some time, so you need to think about it and consider all possible outcomes in advance. It only takes a couple of minutes to shoot a little wider, horizontally and vertically at the end of each adjustment.
Frame the way you feel and intuitively feel right
Use these tips as a starting point on your way to finding your own style. Start with a full-length portrait and first frame using the traditional rules. Later, try to break them, and then analyze the received images and only then decide which method you like best.
Create your own photography style through experimentation - each model, location or just pose will always be different. Don't be afraid to mix and match and try something new. The only question you should ask yourself during the cropping process is whether the result of cropping looks like a mistake or like the author's intention. nine0003
Sometimes, following the rules of "letter for letter" framing, you can deprive portraits of soul and any intrigue. Maybe one day you even want to create a series of portraits that would be in visual dissonance. This is one of the ways to evoke an emotional reaction in the viewer, photos will leave their mark on the memory.
The more you shoot, the better you'll get an intuition for what shot will look right. For more confidence, just take the time to take several versions of the photo and compare them. nine0003
How do you like to crop your portraits? Do you like to crop in the process of shooting or in post-production?
Photo cropping
Many aspiring photographers don't care about framing at all. What is framing, why is it needed? That's what we'll talk about today.
First of all, framing is the refinement of the boundaries of the frame. And the ratio of the borders of the frame is called its format. The format can be very different, it depends on the creative intent of the author, and on the specific plot, and on many other things. The two main formats established in photography are vertical and horizontal. Less often you can find a square format, even less often round or oval. Fitting the plot into a non-standard format is done during processing, but you need to think about the composition of such a frame already when shooting. nine0003
The boundaries of the frame, if the compositional decision is made correctly, should limit the most important thing in the space being filmed. If possible, from this space it is necessary to exclude all the details that do not work for the plot, which will distract the viewer when viewing the photo from the main thing that is depicted on it. In this case, you need to take into account not only the very nature of the plot or object that you are shooting, but also its position in space, its proportions. The shooting point is also important. Given all this, the photographer must distribute the "material" of the frame both in plane and in depth. nine0003
Often, inexperienced photographers shoot everything in a row, without thinking, mechanically press the shutter button. You need to choose a frame consciously. Never forget about the direction of shooting, the size of the plan, the illumination of the object and the distance to it, about the color scheme. Do not forget the main thing: to create a good picture that could be called a work of art, you need to know and correctly apply the basic laws of composition for building an image on a plane. But even here there are exceptions. Sometimes a spontaneously taken picture makes an indelible impression on the viewer. But this happens only when shooting something unusual, amazing, in a picture where the main role is played by the event itself (for example, some kind of disaster, fire, accident, a funny fall of an artist on stage). nine0003
Objects that are relatively small in height and significant in horizontal length are best shot in a vertical format. Objects of this kind well fill the plane of the vertical format frame. The photographer has the opportunity to include within its boundaries those furnishings that surround the object, which is the main one. All this makes the photo fuller, more convincing, enriches the picture. Portraits, tall buildings, bouquets of flowers in a vase are often shot in vertical format... But the horizontal format, in contrast to the vertical one, makes it possible to cover a much larger space. That is why the expanses of nature, views of cities, interiors of various buildings are usually presented to the viewer in a horizontal format. nine0003
The square format is quite rare. It should be used in cases where the space with such proportions is enough for the photographer to correctly build the composition of the frame in order to place all the necessary details on its area. If you have no reason to increase the height or width of the frame, build a composition in a different way, feel free to shoot in a square. But remember: if you have already chosen a square, you should understand that in this particular case, in this particular shot, the use of a horizontal or vertical format will lead to a violation of the natural ratio of the main object and the details surrounding it. nine0003
Any format should help, and not interfere with, the viewer to understand the content of the frame, to feel the mood that the photograph reflects. When you determine the image format, work with frame boundaries, do not forget one of the main rules. In the direction of movement, gesture, look, turn of the head, you need to leave some free space. This gives the composition of the picture a dynamic, makes it more lively, natural. This emptiness, perhaps even quite extensive, will not disturb the balance of the composition, will not cause a feeling of empty space. Quite the contrary: your picture will acquire completeness and balance. nine0003
If you are shooting a moving subject, never crop the frame so that the subject is very close to its edge, which is located in the direction of travel. This arrangement causes the viewer a very unpleasant feeling. The dynamics completely disappear, the illusion of braking appears, the object seems to unnaturally freeze in place, and does not move. A photograph that has a lot of space behind a moving subject looks just as bad. Here again, the balance of the frame is disturbed. Never forget these rules when shooting moving subjects! But even here it is impossible without exceptions. Violation of the laws of composition, and not only in such cases (shooting moving objects), is always possible, but it is very rarely justified. Unless when shooting some unusual story that requires a special creative approach of the author. nine0003
Carefully approach the choice of format and building the composition of the frame and when shooting a portrait.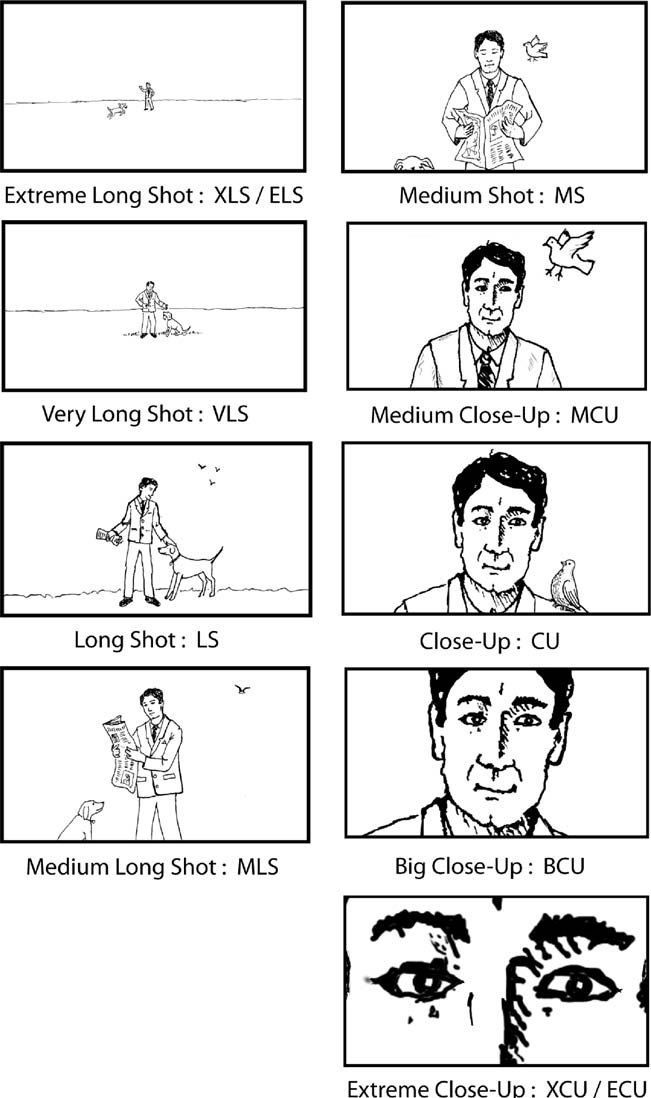 Here, special attention should be paid to choosing the optimal size of the space above the head of the person being portrayed. If it, this space, is excessively small, then the compositional and visual center of the portrait becomes not what we need - the face, but what we don’t need at all: minor details of clothing, for example, or unfavorably shown features of the figure ... Yes, plus everything, it seems that the head of a person, as it were, rests on the ceiling, which in this case is personified with the upper border of the frame. nine0003
But an excessively large space above the head of the person being portrayed adversely affects the composition. The fact is that in this case, the balance is disturbed in the frame. The main thing in the portrait - the person's face, the plot center of the whole composition - in this case will be below the visual center of the picture. And this creates the illusion of instability of the image, its gravitation downwards. When the boundaries of the frame are brought closer, whether vertical or horizontal, the viewer's attention is focused on those objects that are in the center, which emphasizes their significance and importance.