Learn lighting for photography
Photography Lighting for Beginners - 3 Essentials
Summary: The word photography actually stems from Greek roots that mean "writing with light." In order to truly take control over your photography, you have to understand light and how it works. But grasping lighting is a bit more complex than learning the controls of your cameras — it bounces off some objects while passing through others, creates large or small shadows and even influences the colors of the image.
In this guide for beginners, you’ll learn:
- How the position of the light affects a photograph
- How to create mood lighting and flattering shadows
- How different lighting conditions and sources change the colors in the image — and how to fix it
- How to use basic concepts to take more control over both natural and artificial light
Even the most expensive camera is worthless inside a completely dark room.
Photography originated from a chemical reaction that occurred when light hit certain materials, and while the cameras inside our smartphones have come a long way from the first room-sized cameras, the essence of photography has remained the same: light. Whether you are shooting film or digital, you cannot shoot anything without light.
The way a light is captured inside a photograph has a dramatic effect on the final image — it’s why a professional photographer can shoot amazing images with a toy camera. So what do beginners need to know to harness the incredible power of light? Mastering photography lighting beings with understanding three concepts: position, strength and color.
Photoshoot Lighting Setup: How Position Plays A Role
Imagine you’re back in that completely dark room — but now you light a candle. Where that candle is in relation to the object you are shooting plays a dramatic role on the overall look of the final image. In photography, sometimes you can move that light source, and other times you have to move the subject to alter the position of the light.
Front lighting, or placing the subject so that light is directly in front of the person or object, brings out the detail. Why? With the light directly in the front, the shadows fall behind the object, so there aren’t any shadows in the image to conceal any details. Front lighting is the simplest to shoot, however, it sometimes looks rather flat or boring.
Side lighting, or placing the light source or the subject so that the light hits from the side, fights the boring look of front lighting by creating shadows and depth. Side lighting is still fairly simple to shoot — you just have to careful and watch how the shadows fall. Side lighting doesn’t have to be at a 90 degree angle and even minor adjustments can change the way the shadows fall. When shooting with lighting from the side, watch where the shadows fall — small adjustments in the subject’s position can create more interesting or flattering shadows.
Back lighting is the trickiest of the bunch — proceed with caution. Without a light modifier or the understanding of manual mode, you’ll end up with a silhouette. Beginners are often best to avoid backlighting scenarios, like when you place the subject directly in front of a window. Don’t ignore it for too long however — once you’re comfortable in manual mode, backlighting can create spectacular images. When backlight, many things appear to glow — leaves and flowers, for example. Backlighting also gives portraits a nice pop and almost a halo effect.
With the light hitting the subject from behind, all of the light’s shadows are in the front of the subject, which turns the subject into a dark silhouette. Using manual modes, however, you can adjust the exposure so that the subject will be properly exposed. That will leave the background overexposed, but that sometimes creates a neat effect, like this:
— Photo by Hillary K Photography (www.hillarykphoto.com) and used with permission
See how the background is completely overexposed behind the newlyweds? To prevent overexposing the background, a reflector or a flash in front of the subject can provide a more even exposure while still giving the subject that backlit glow, like this:
— Photo by Hillary K Photography (www. hillarykphoto.com) and used with permission
The position that the light is in determines where the shadows fall — and while it’s impossible to move the sun, moving the subject (or using a mobile light source like an off-camera flash) gives photographers the power to choose just where those shadows fall.
Photography Lighting Basics: Soft Light Vs. Hard Light
Changing the position of the light source in relation to the subject changes where the shadows fall, but just how light or dark are those shadows? That’s where the light source, and any light modifiers, come into play.
A hard light source produces shadows with minimal transition between the light and dark areas of the image. While hard light refers to the transition between light and dark and not how deep the shadows are, hard light is often (but not always) associated with creating deeper, darker shadows. Hard light gets a bad rep — used incorrectly, hard light will create dark shadows under the eyes in a portrait, for example. But, hard light tends to create more contrast in an image. Hard light can be combined with the position of the light to avoid shadowy eyes and create drama inside a portrait.
Soft light, on the other hand, has a much more subtle transition between the light and dark areas of the image. Shooting with soft light has less drama, but the smoother shadows prevent details from being lost in the dark areas of the image. When shooting a portrait, hard light tends to emphasize imperfections in the skin while soft light tends to disguise blemishes a bit better. Soft light is like the front lighting of light direction — it’s a great starting point for beginners because it’s easier to work with.
So what makes a light source hard or soft? Large light sources produce soft light, while smaller light sources crate those harsh shadows. Just imagine holding a flashlight underneath your face telling scary stories around the campfire — the creepiness comes from the light and dark areas with no transition between them. Camera flashes, without a modifier, create hard light because they are small light sources.
But, distance also plays a role. Close light sources are softer, while distant light sources create that harsher transition between light and dark. Taking a portrait next to a window, shooting close to the window will create soft light while moving the subject to the opposite side of the room will create harder shadows.
The sun is a large light source — but it’s so far away that it becomes a hard light source. Shooting in the middle of the day with a cloudless sky, you’ll wind up with dark, hard shadows.
On a cloudy day, however, that same sun produces a soft light. Why? The clouds diffuse the light, or spread it out over a larger area, and making a light larger makes it softer. That’s why many photographers love cloudy days — the soft light is easy to work with.
Clouds are not the only diffusers either — lights such as flashes and studio strobes can use diffusers too. A white umbrella placed in between the light and the subject, called a shoot through umbrella, softens the light. Soft boxes are another form of diffusers — and some of them are even small enough to use on an on-camera flash. Bouncing a light source also softens it — bouncing a hot shot flash off the ceiling or a white wall, for example. Using a flash softbox or taking the flash off camera and putting it on a stand with an umbrella allows photographers to take a small, hard light source and create soft lighting.
Used together, the direction and softness of the light can be used to create different effects and moods in a photograph. Hard side lighting creates lots of drama, while a soft front light creates a softer mood.
Color Temperature: Understanding the Kelvin Scale
A lightbulb may look white to our eyes, but light actually comes in different colors. The sun at sunset creates an orange light. A florescent light bulb will create a different color of light than an incandescent one.
A camera’s white balance corrects the image automatically so white objects are white in the photograph under different light sources. Most cameras have an automatic white balance mode, as well as options named after the different types of light sources, like shade and incandescent. Manual white balance allows you to take a picture of a white object, then the camera will determine the white balance from that image. Manual white balance doesn’t offer as much control as using the Kelvin scale, however.
Adjusting the white balance on the Kelvin scale is the equivalent of manual mode for exposure — it gives photographers complete control over the white balance. Shade is often set at 7500K, while daylight is about 5500K and sunset 2500K.
An accurate white balance means that objects that are white in real life are also white in the image — but "accurate" isn’t always what’s right for the photograph. Using the Kelvin scale to skew the white balance to be more orange creates a warm feeling in an image, creating a look similar to shooting near sunset. On the other side, adjusting the white balance towards the blue end creates a cooler look, often used to create a somber mood in a photograph. Film photographers often used warming and cooling filters to create these effects, but digital photography makes it easy to simply adjust the white balance in camera (or in post).
White balance is also one of the reasons many photographers shoot RAW files instead of JPEG — with a RAW file, adjusting the white balance is as simple as using a Lightroom slider. Getting it right in-camera is easier, but editing in post with a RAW file makes fixing white balance errors easy. RAW files also make it easy to remove a green or purple hue as well.
Outside of using white balance to create a balanced image or one that’s warm or cool, photographers can also get creative with the source of their light using flash gels. These colored pieces fit over the flash and create colored lights — like the lights on a dance floor. Since color helps create mood in a photograph, using gels can be a fun way to experiment with the color of light.
Without light, there is no photography — and without understanding light, you simply cannot become a great photographer. Start simply by learning to recognize soft light and front and side lighting — these types of light are easy to work with and great for beginners. As you advance and learn how to modify light, then move onto experimenting with hard light and backlighting — they may be trickier to get right, but they can create some pretty dramatic images.
Beginners Guide to Photography Lighting Techniques (+Pro Tips)
Knowing how to work with different light sources and lighting setups is one of the biggest challenges of photography. That’s why we put together this guide to photography lighting: to give you a practical place to start.
In it, we’ll look at how to choose the right lighting – be it natural or artificial light – to suit your photography.
By the end of the guide, you’ll be ready to start shooting with different types of light in many different situations. So, let’s get started.
Table of Contents
6 Basics of Photography Lighting
The word photography means “drawing with light”. So, we’ll take a quick look at some lighting basics before answering the question, “What is the best lighting for photography?”.
Natural light – provided by the sun and moon – is constantly changing with the time of day and the weather.
So, explore the effect of light – go out and shoot at different times of the day, see how this alters the images you create. How do the tones in the image change?
You may find in certain situations that you need the addition of artificial light, and the most obvious tool for the photographer is the camera flash. Simply put, you can use it to provide a good exposure when conditions are too dark.
On the downside, a direct flash is often too much and burns out details. To mitigate this, you can bounce the flash off another surface like a wall or ceiling.
- What is flash photography?
A single light or flash can help show the effects of directional lighting. Choose some simple objects – fruit, china bowls – and set up your light source to one side of your subject. Then move it around the subject and observe how the highlights and shadows change shape.
Shadows can increase the three-dimensional look and can make an image a lot more dramatic. If you’re shooting a person, check out what happens to the detailing and tones on the face when you move your light source into a different position.
Tip: Convert your image to black and white to see the tones more clearly and then compare your results with full-colour images of the same subject.
3. Soft Light vs Hard LightPhotography lighting can be ‘soft’ or ‘hard’. Hard light will make the image more contrasty – reducing the midtones.
Soft light will decrease the contrast level and increase the range of midtones giving a cosy, reflective feel.
An on-camera light like a flash or LED panel is usually a hard light source, while a light diffused by a softbox or umbrella is a soft one.
A white surface reflects light back to the light source; a black surface absorbs light.
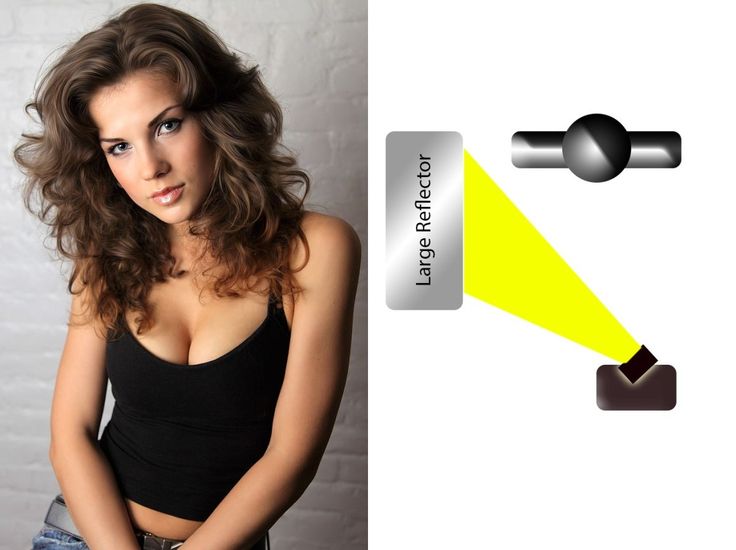
Reflectors are widely used – indoors and outdoors – to reflect light back onto a subject to reveal more detail or balance the contrast across an image. Reflectors can be all different colors – to learn more about each type, see our guide: what are reflectors used for in photography?
Diffusers are used over a light source (such as a flash, strobe or video light) to spread the beam more evenly and reduce its intensity.
They’re also useful when you’re trying to light glass and avoid reflections.
5. Color Temperature and White BalanceAll light has colour – even ordinary daylight. Think of the “golden hour” just before sunrise when the light is infused with yellowy-orange hues.
Colour temperature is measured in degrees Kelvin or K. These range from Shade at 7500K (blue and cool) through Daylight (about 5500K) to moonlight, which is much whiter at 4120K, on to candles at 2500k (red and warm).
Artificial lights have distinctive colours – LEDs often cast a blue light, but standard house bulbs are warmer. Fluorescent lamps at 4500K and halogen lights are yellower, 3,000K.
The white balance control in your camera lets you adjust the settings so that white objects are white and the other colours in view will be correctly balanced to it. There are automatic white balance settings that provide standard choices for different types of lighting.
Post-processing programs such as Lightroom and Photoshop have settings to let you adjust the white balance in an image to compensate for unwanted colour casts – learn more in our guide.
6. StrobesStrobes are another common light source, and a powerful alternative to flash. They can be linked to a remote trigger system on the camera, so they act as more powerful off-camera flashes.
Strobes have very quick recycle times and produce a very quick, strong burst of light.
Light Functions
Here are some of the most popular light functions that can be used indoors or outdoors, in the studio or on location:
- Key Light – The main light trained on the subject to create highlight and shadow.

- Fill Light – A fill light literally ‘fills’ in dark areas with light.
- Backlight – This is a light set up behind a subject to help isolate the subject from its background. It’s often placed so the subject shields it from the view of the camera. It’s often considered the best lighting setup for for portraits to highlight hairstyles.
- Rim Light – This is when a backlight is set up close to the subject and, with careful placing, produces a line of highlight around the edge of the subject. Very dramatic and eye-catching!
8 Popular Photography Lighting Techniques
Here we look at some popular photography lighting techniques that you can easily try out and get to grips with in your own photography.
1. High Key LightingCredit: Emily Hopper
A high key style uses two or more light sources to create a brightly lit image, with little or no visible shadows. It’s frequently used in commercial photography to create bright, airy images that still retain a lot of detail.
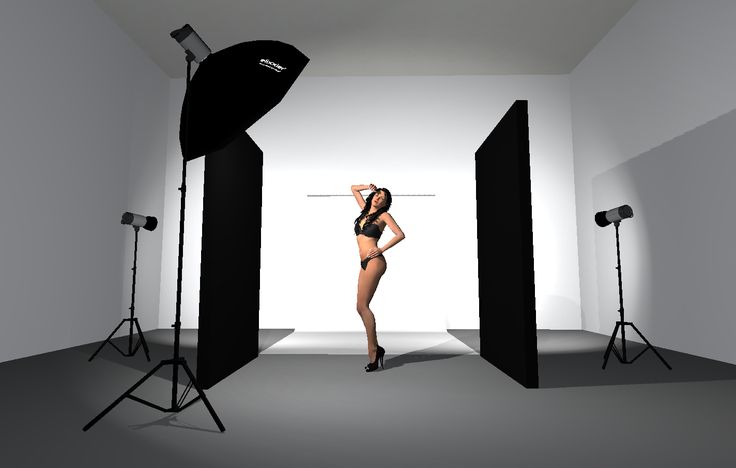
Three-point lighting uses a key light, a fill light and a backlight. This gives the photographer a lot of control in terms of light and shadow.
3. Broad and Short lightingCredit: Ales Dusa
Used in portraiture. Broad lighting is when you light the side of the face nearest the camera. Short lighting is illuminating the side of the face furthest from the camera.
4. Rim lightCredit: Cottonbro
Rim light is a type of backlighting. You can create it with an artificial light source or with natural light like the sun (particularly at sunset).
With this setup, the edges of your subject are lit up by the backlight – typically, this leaves hairs and the very edge of your subject illuminated. It helps separate your subject from the background and is very effective.
5. Split LightingSplit lighting is used in portraiture with the light source side-on to achieve a perfect half-lit, half-shadow effect on a face.
Backlighting is when you light up a subject from behind. It can be used to create silhouettes or semi silhouettes. If you introduce a fill light, you can overcome silhouetting.
7. Rembrandt LightingCredit: Hollie Mateer
Rembrandt lighting is a portrait lighting technique. Named after the great painter, it requires a side key light positioned to create a small triangle of light under the eye on the cheekbone on the further side of the face.
8. Butterfly lightingCredit: Ziphaus
For a butterfly light effect, you place your light in front and shining down onto the face. This creates a distinctive ‘butterfly’ shadow under the subject’s nose and helps to emphasise facial features such as cheekbones.
What Equipment Do You Need for Photography Lighting?
Photography Lighting Gear of Chris Ross Leong
You can do a lot with a single light source such as a flash, but as you become more experienced in photography, you will see that different situations require different lighting solutions.
Here’s a list of the main types of light sources:
- Speedlight / Flashgun – Great for artificial lighting indoors – you can bounce a flash off a wall or ceiling to light up an entire room (depending on its size). A flashgun is very versatile and can be used for many types of photography including portraits, macro and product photography.
- Strobe – Strobe lights give a short, powerful burst of light off-camera. In simple terms, they work as ‘more powerful flashes’ and they’re great for on-location or outdoor work.
- Continuous Lighting / Hotlight – Traditionally used as fill lights for studio work, they give an even light over a large area. Used in film and video as well as photography, they’re called ‘hotlights’ because they become very hot!
- Striplight – Striplights make a linear beam of light as opposed to the more normal cone of light provided by photo-lights. They’re commonly used in studio lighting, particularly for full-length portrait and modelling work.
 You can buy LED striplights quite cheaply.
 - Ring light – Ring flash or continuous ring lights are used to cast even and often strong light on subjects.
Modifiers are used to modify the quality of a light source. Here’s a list of some of the most popular:
- Umbrella – A shoot-through umbrella is an easy-to-use and affordable light modifier – all you need is a flash, a light stand and the umbrella. Widely used in portraiture, they cast diffused, even and soft light over your subject – but the light will spill over.
- Softbox – Like umbrellas, softboxes are a great modifier for beginners as there are many inexpensive options out there. Creating a soft quality of light, while allowing good control of the lighting, a softbox enables you to light your subject without illuminating the background. They’re great for portraits, and simple to set up too – see: how do you light a softbox at home?
- Grid or gridbox – Lighting grids can attach to softboxes, or you can buy a separate all-in-one gridbox that can attach to your speedlight.
Grids control the spill of light from your source.
- Beauty dish – A beauty dish is perfect for head and shoulder portraiture. Often used by fashion photographers, it can be described as a semi-hard light, resulting in sculpted, but not harsh, facial features.
- Octabox – Sometimes called simply an ‘octa’, the octabox creates very soft and flattering light. It’s a great on-location lighting modifier to compliment available light.
- Snoot – A cylindrical tube that fits over a light or flash, a snoot gives directional control over your light. Perfect for very high contrast portraits, or spotlighting.
Here is some other photography lighting equipment that’s commonly used in a studio or on location:
- Triggers – Remote triggers allow you to take control of lighting positions, as they let you set up flashes off-camera.
- Color gels – Color gels can be used for color correction or creative effects.
 For example, you can use a blue gel to convert tungsten light to look more like daylight.
 - Reflectors – You can use reflectors to enhance natural or artificial light by bouncing it back onto your subject. They’re an inexpensive tool to add to your camera bag.
- Backdrops – Simple and non-distracting backgrounds are the perfect complement to photography lighting.
- Light Stands – Unless you have an assistant to hold your lights or flashes, a light stand is a real must for any photography lighting set up.
- Sandbags and weights – These can help keep your light stands and flashes sturdy and upright. The last thing you want is a light stand falling over mid shoot!
- Lighting simulator – did you know there’s software that lets you plan where to place your photography lights, then simulates how the light will look in the faces of your subjects? It’s called set-a-light 3d, and it’s amazingly helpful for studio work.
 Read our set.a.light 3d review to learn more.
There are tons of brands and models of off-camera light to choose from here in 2023, but our recommendation as the best bang for your buck brand is Godox.
Godox has made a name for itself in the photography industry for producing a wide range of high-quality products at surprisingly affordable prices.
Here are 3 of their latest products that you should consider when building a studio kit:
- Godox AD100 Pro Pocket Flash – compact speedlight with a removable battery that gives you up to 360 full-power flashes and thousands of lower power flashes with a recycling time of between 0.01 – 1.5 seconds. For something about the size of a can of Coke, the AD100 packs a lot of punch for a great price!
- Godox SL150R Zoom RGB LED Video Light – this powerful moonlight offers a variable beam spread of 20 to 65 degrees and a variable colour range of 2800 to 6500K with a high CRI/TLCI rating for accurate colour rendering.
 You can control Hue, Saturation, Intensity and Magenta/Green for 36,000 custom colours! There’s even the option to choose from 13 special effects, including Laser, Lightning, Broken Bulb, TV, Fireworks and more.
 - Godox TL60 Tube Light – With a built-in battery that provides over 2 hours run time, this 29.5″ x 1.9″ tube light allows you to light normally hard to reach places, with wireless control and a wide CCT range of 2700 to 6500K to meet any ambient light challenge. The RGB mode with Hue, Saturation, and Intensity control gives you access to a wide selection of of custom colors.
If you’re trying to build a DIY studio to record YouTube videos, we’d recommend the SL150R as your main key light (modified with an octobox or shoot-through umbrella), and one or two TL60 tube lights to provide some background ambience.
Photography Lighting FAQsHow do I get good indoor lighting for photography?
- Use window light if you don’t have access to any artificial lighting.

- Add a reflector to window light to have more control over it.
- Try turning off the room light if shooting in the daytime – you may have enough available light.
- Use a flash and bounce it off the ceiling for well-controlled fill lighting.
- If you’re looking to light your subject more creatively, use a softbox for a flattering but flexible soft light source.
Are LED lights good for photography?
LEDs have several benefits in photography: they last longer, they don’t overheat, you can use themon-camera or on a stand, and they’re very cost-effective. An LED panel light is a good general-purpose light for a beginner and they often come with colour filters.
How do you fake natural light?
Use large diffusers – such as a softbox or octabox – to soften the distractingly harsh look of flashlights or strobes. You can also fill in shadow detail in a natural-looking way with a white or silver reflector. Coupled together you can mimic the look of sun or window light.
What lighting is closest to natural light?
White LED lights are designed to mimic daylight. They’re balanced to give a natural look. You can also create a more natural light look in photography with modifiers on artificial lights, such as a softbox.
What is the closest light to sunlight?
LED lighting can be very close to sunlight. With colour temperatures typically between 5200K – 6400K, this is as close as artificial light can come to sunlight.
What do you call a light used to gently illuminate shadows?
A fill light used in conjunction with a diffuser can be used to subtly lift shadows in images without creating new shadows.
What lighting is best for outdoor photography?
Speed lights can be set up off-camera, they’re easily portable and can be set up via triggers for remote use. Therefore, they’re perfect for outdoor use. Use light modifiers for added control of your lighting.
What kind of lights do YouTubers use?
Ring lights are often used by YouTube vloggers. They create a flattering light, effectively remove shadows and create a pleasing catchlight in the eyes. They are easy to store and set up.
Final Words
Whether you start with a flash or an LED panel, you can soon accumulate diffusers and reflectors inexpensively. For beginners, an umbrella or softbox and a reflector is a great place to start and you can add other equipment as you go.
Above all, whatever equipment you invest in, the key is always experimentation. Remember it’s always about nuance: an alteration to camera settings, the subject or the position of your light sources can elevate your images to new creative heights.
Please get in touch via the comments section below with any questions and I will be happy to respond to you.
Highly Recommended
8 Tools for Photographers
Check out these 8 essential tools to help you succeed as a professional photographer.
Includes limited-time discounts.
Learn more here
How to learn to see light and make your photos better
Your camera doesn't see light and shades as well as you do. Cameras are not yet advanced enough to capture as wide a tonal range as a human can see it in a single raw image.
Our brain is constantly evaluating light and adjusting dynamics so you can see much more detail in the brightest and darkest areas of what you're looking at, as well as in the midtones. Understanding the difference between what you see and what the camera captures will help you become a more creative photographer (and save you time in post-processing). nine0003
Different types of light
Basically, light can be hard or soft, direct or diffused. Direct light usually comes from a relatively small light source, creating a shadow with sharp edges, like on a sunny day. Ambient light, such as when the sun is behind a cloud, creates soft shadows or little to no shadows.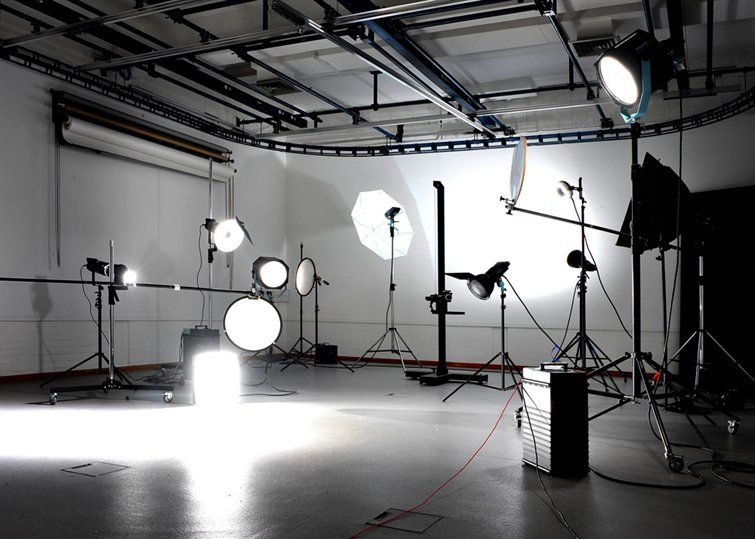
Hard light features high contrast, hard edges and lots of texture and detail. nine0024
Soft light is characterized by subtle shadows, less contrast, less texture and detail.
Light has many other qualities depending on the time of day, season, atmospheric conditions and geographic location. The light can be warm and have a golden hue, which usually happens in the mornings and evenings. It can also be cold and bluish in color, often on city streets where buildings block the sun, or on very cloudy days. nine0003
Light tonal range
Usually with soft light you get a narrower tonal range (lower contrast). In soft lighting conditions, your camera will produce images with shadow and highlight detail if you expose your photos correctly.
Soft light
In hard light, the tonal range between the brightest and darkest parts of the image can be much larger. Your camera may not be able to capture the detail in the highlights and the darkest areas of your image in the same frame (I'm not talking about HDR or other manipulations right now). nine0003
Hard Light
When you learn to see light and understand the type of light you are photographing in, you will feel it and become more creative and technically accurate in your photography.
Using Light to Match the Mood
If you want to create a gentle portrait with soft, relaxing hues, you don't just need your subject to be in the right mood, you need lighting that will match the mood. Soft, diffused light will help you achieve your goal, while trying to create this style of portrait outdoors in the middle of a bright sunny day can be doomed to failure. nine0003
Here, soft lighting captures detail in all areas of the image and creates an attractive portrait of a girl.
Sometimes working with soft light can be tricky if it's too flat and boring and your subject has very little tonal range. In situations like this, I tend to add an alternate light source from a flash or reflector to give a more dynamic look to my photos.
Hard light can create more dramatic shots. Using the contrast range so that parts of your composition are isolated, either because they are too bright or too dark for the camera to capture, is often an effective way to create more creative photographs. nine0003
Here, the hard light accentuates the hands, making the background completely black.
Control your exposure carefully
Exposing an image to render details in the highlights and letting the shadows show little or no detail is a great technique to learn. Alternatively, in harsh lighting conditions, you can adjust the exposure for the dark areas of your composition and you will lose detail in the highlights. nine0003
Photographers who are more technically oriented believe that exposure should be uniform without loss of detail and may disagree with this concept.
Once you have a concept for the photo (or series of photos) you want to take, taking photos in the best light will have a significant impact on your results. Choosing the right lighting to create the feel you want to convey with your photograph adds more depth to your images and a sense of connection with those viewing them. nine0003
Focusing primarily on technical details will not have this effect in many cases.
Be creative with your light
Lighting can be a dilemma if it doesn't match the mood or scene you want to photograph. Encouraging yourself to create interesting, engaging stories, even when faced with adverse lighting conditions, is a big challenge and will help you grow as a photographer. nine0003
I used an on-camera flash because the ambient light was very flat.
Pay attention to the light wherever you are, even if you don't have a camera with you, just look at the light.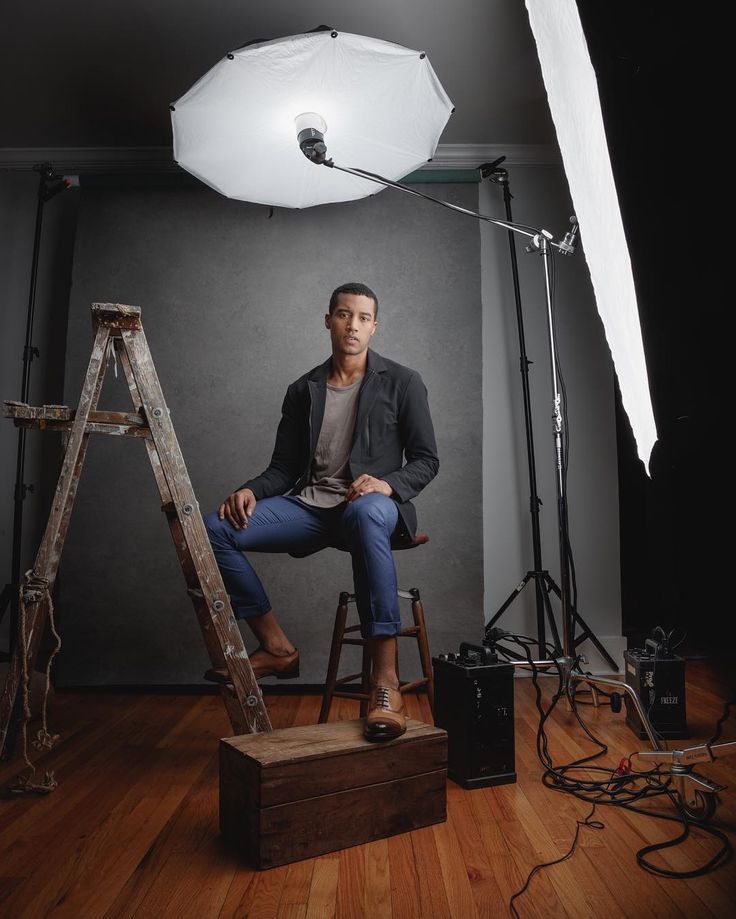 Think about it. Think about the qualities of light and how they will affect your photos.
Will light help or hinder you from creating the style of photography you want?
Learn to see the light
If the light is not suitable for what you want to appear in your photographs, you will need to make adjustments by adding light with a flash or reflector or other additional light source. Sometimes even changing the viewing angle in relation to your subject will have a significant impact on the mood and how the light is transmitted. For example, using backlight instead of front or side lighting.
Author: Kevin Landwer-Johan
Translation: Tatyana Saprykina
Did you like the lesson? Share with your friends!
Tags: Photography techniques, Landscape photography, Portrait photography, Children photography, Lessons for beginners, Composition techniques
Light in a photo studio. Lesson 1
Articles Lessons
Light in the photo studio. Lesson 1
Many aspiring photographers take their first steps with natural photography. Here, nature itself places accents, exposes the light, and the photographer can only see the picture and catch the moment. There are few such "tips" in studio work. It is necessary to independently think over the image, arrange objects and set the light. At the same time, photo studio equipment may differ in power, quantity and lighting effects. In this article, we want to talk about some of the features of the arrangement of light in a photo studio and its use. nine0003
Almost every photo studio has a white background in its arsenal. It allows you to take portrait and product photos. This is the most common type of work for photographers: photos for documents, photo catalogs for online stores, advertising work, etc. At the same time, to get an image on a pure white background, just the color of the background itself is not enough. Without proper lighting, it will turn out with a gray tint. To do this, photographers use an additional light source for the background - a soft box (light box), which gives a soft diffused light. And in order for the background to appear pure white in the photo, it is necessary to light it up - to make the background lighting a little brighter than the lighting of the object itself. nine0003
However, during professional work, more complex rules for arranging light in a photo studio are used. The main indicator here is the exposure - the amount of light received by the photosensitive element; in other words, how much the frame is filled with light. Exposure can be changed with shutter speed and lens aperture. At the same time, it is very difficult to determine "by eye" the correct placement of lighting devices in the studio, to choose the necessary shutter speed and aperture opening. Moreover, the concept of “correct exposure” for each frame will be different. In such cases, professionals trust their measurements to an exposure meter or flashmeter - a special measuring technique that allows you to correctly set the aperture and shutter speed, determine the brightness, contrast for each individual photo. nine0003
Before starting a photo session, it is necessary to think over in advance the layout of lighting fixtures, their height and possible filters. Next, all the necessary lighting devices are set up step by step:
Leading light is the main source of illumination in the lighting scheme. It is he who draws the main volumes of the object, hence the name. In the English-speaking world, this light is called "key light", i.e. key light. The source of the key light is usually one, and it is the most powerful in comparison with the others. Side or top light is classically used as key light. nine0003
Fill light is a light that is used to evenly illuminate the entire scene. It is usually used either to highlight shadows, or to generally equalize the illumination in the frame in order to be able to properly expose the picture at the desired shutter speed and aperture.
Modeling light is used to create accents (highlights) or to soften individual shadows on the subject. Typically, modeling light is highly focused, and its power is set so as not to interrupt the main cut-off pattern. nine0003
Backlight (also known as contour light) is created using a source located behind the model. It is usually used to separate the model from the background, to create accents and to artistically highlight the contours of the figure. In classic portrait shooting , the backlight is directed either from behind or from behind at an angle (behind the shoulder). Schemes using backlight are the most beautiful. Backlighting looks spectacular in male portraits, and also looks interesting for highlighting the lush hairstyles of girls. By the way, it is thanks to the backlight that the pictures taken at sunset seem so magical! nine0003
Background light - as you might guess from the name, it is used to highlight the background. The fact is that due to the distance between the background and the model, when using, for example, one light source, the background turns out to be darkened.