Low vantage point photography
70 Examples Showing A Great Use Of A Low Vantage Point
Thank you to all the photographers that shared their entries showing a low vantage point for a chance to win aPolaroid Zip Instant Mobile Printer and a set of ViewBug's Lr presets. Polaroid's latest photographical advancement is Zip, the instant printer. It's the size of your phone and wirelessly prints photos in less than a minute.
"Colloseum Puddlegram " by bengreenphotography
"| RED LIGHTS | " by Franziskus
"Golden Gate Bridge at Dawn " by clubby
"Wondering thoughts " by danielventer
"Autum Carpet " by Buck56
"Vacant " by mariostomazou
"ICE ON FIRE-GIANLUCA-BIONDI " by Blionbg
"1212121212 " by Prijaznica
"Drinker Moth " by chrisjarvis
"Calla Lily of the Valley " by jamiemacisaac
"Snail on Leaf " by alanasisk
"Cheetah Couple " by sakevanpelt
"ELEGANT NUDE " by AJVITARO
"Autumn's calling " by traceydobbs
"Munching Snail " by FalconEyesPhotography
"Winter Droplet " by kylere
"Heavenly " by BoCanete
"Whistler BC biking trails at the train wreck " by lukechadwickjones
"If a tree falls in the forest " by peternestler
"MODEL: DEXIENG Y " by EPhotography
"Curls " by clementinacabral
"Benjamin Sheares Bridge " by GkCM
"Frosted " by aaronjgroen
"Mount Taranaki " by mrlesterchan
"Silence. .. please! " by AlessandroDeLuca
"cascate sos molinos " by MaurizioCasulaPhoto
"The Moment " by Adam_Burke
"Body #3 " by CreativeVibesPhotography
"Lumière " by thierryvouillamoz
"Sun kissed " by JeffreyA
"Mushrooms in the fog " by Mirza_Cengic
"In the garden " by tammyswarek
"Sunset Over Wheat Field " by Dragan_Milovanovic
"Change your perspective " by stevenwebber
"Limides " by Juliocastropardo
"Violets during the sunrise " by marcocalandra89
"stanley creek " by rcscharf
"DSC_0325 " by Iamshanebennett
"Jocassee: Place of the Lost One " by TammyN
"Bristlecone " by aaronmmoshier
"Mystic Jungle " by DrewHopper
"Lizard Eye " by LucyCMorr
"Dawn Warmth " by Rwbjj
"Glorious Morning " by amazedbyyou
"Last light. . " by elenapardini
"Fall flare " by ImagesbyStina
"cave window " by colelmore
" " by johnthorburn
"Dasha " by maniablack
"Dunrobin Castle " by MarkGillespiePhotography
"Petra, Jordan " by lukegram
"Sunset Ride " by yurraro
"THE GREATER ALTAR OF ICELAND " by Pixelecta
"Big Foot " by AlissaBethPhoto
"DSC04593-Edit-Edit-Edit " by (A)aaronchoiphoto
"sunscreen and ND filters the perfect beach day! " by (A)lianeguerinbolles
"The Wheel " by (A)peterstevens
"Boston sunset " by (A)andreafanelli
"Frogworld " by Mougaard
"The Witches House " by RyanWunsch
"Yotsuyu " by Annahem
"Three Colours of Dusk " by ManuKeggenhoff
"Merry Christmas! " by akphotographystudio
"Child's Play " by SonyaAdcockPhotography
"Sunrise " by swqaz
"Sitting Tight " by (A)blootoonloon
""Summer Tanager" " by DeanSmithPhotography
What Is It and How to Use It • PhotoTraces
In this article, you’ll learn all about vantage points in photography – including what it actually is, plus tips and tricks for great results.
I’ll also include plenty of vantage point photography examples; that way, you can understand exactly how different vantage points impact your images and how you can adjust your vantage point to achieve different effects.
Ready to become a vantage point expert? Then let’s jump right in, starting with a simple definition:
Table of Contents
What Is Vantage Point in Photography Composition?
Vantage point refers to the perspective or angle from which you take a photo (relative to your main subject). You can shoot from above the subject for a high vantage point, from below your subject for a low vantage point, or on the same level as your subject for an eye-level vantage point.
Types of Vantage Points in Photography Composition
Photographers have five general vantage points to consider, and in this section, I’ll take you through each option:
1. Low Vantage Point
As the name suggests, a low vantage point is shot from below the subject.
The effect depends on the lens type; a wide-angle lens tends to render a tall, powerful, looming subject, whereas a telephoto lens will have a less pronounced result.
A low vantage point can be useful in landscape photography, particularly when you want to lead the eye from foreground to background. By getting down low, you can enhance the foreground while bringing it closer to the background.
You can also use a low vantage point in portrait photography to make your subject appear stronger (for this reason, a low angle is commonly used for portraits of men). And in macro photography, low vantage points are used to position brightly colored subjects against the bright backdrop of the sky.
Of course, a low vantage point generally requires scuffing up your knees, and it can even involve lying in the dirt. Physically, a low vantage point is the most demanding option on this list.
2. High Vantage Point
To capture a high vantage point, you must shoot from above your subject, looking downward. This can range from photographing slightly above your subject’s eyeline, all the way to photographing at a 90-degree angle from the ground.
A high vantage point generally makes subjects look smaller and more compressed; subjects photographed this way tend to flatten into one another.
The simplest high vantage point now involves raising your camera into the air. But to pull off a significant high vantage point, you will need some method of getting above your subject. If you’re on a portrait shoot, you might consider bringing a folding stepladder. You can also climb stairs, get onto a roof, shoot from a balcony, stand on a car, or find some other inventive way of shooting downward. If you’re photographing a landscape, you should find lookouts, climb hills/mountains, and more.
When is a high vantage point useful?
While an ultra-high vantage point isn’t common in portrait photography, shooting from slightly above your subject’s eyeline is often encouraged. This will minimize any double chins while making the eyes the focus of the shot. And in landscape photography, a high vantage point is great for conveying a scene’s vast, sweeping grandeur.
3. Eye-Level Vantage Point
The eye-level vantage point is direct, intimate, and lets you see right into the world of your subject – which is why it’s quite possibly my favorite vantage point of all time and the one I use most frequently in my photography.
Eye-Level Vantage Point in Travel PortraitAn eye-level vantage point involves shooting at your subject’s eye level. (For subjects without eyes, such as plants, trees, and the like, an eye-level view involves shooting on a level with the bulk of the subject.)
And I’m not the only one who loves the eye-level vantage point. Bird and wildlife photographers get down low, so they’re on a level with their subject for beautifully intimate portraits. Portrait photographers often shoot on a level to create a greater viewer-subject connection.
Also, note that an eye-level vantage point offers the most accurate, natural depiction of subjects. If you shoot a portrait at eye level, for instance, distortion is minimal, you’re capturing the subject eye to eye, and you’ll feel like the subject is genuinely in the room.
4. Aerial View
I’ve already talked about the value of a high vantage point. But an aerial vantage point takes this to the next level, putting your camera high in the sky and shooting directly downward toward subjects, often hundreds of feet away.
While it’s technically possible to achieve the aerial view by handholding a shot from atop a mountain or hill, it’s pretty rare. In reality, most aerial vantage points are captured by photographers in helicopters, or (especially in recent years) photographers with drones. Drones, in particular, let you carefully select aerial compositions – compositions that often completely compress the landscape below and create a gorgeous contrast between different elements of the landscape as viewed from a high height.
An aerial view is great for emphasizing color and tonal contrast. It’s also perfect for capturing more abstract compositions that emphasize shapes and lines over volume. That’s why landscape photographers love shooting aerials of landscapes, while portrait photographers and street photographers tend to avoid aerial views with a passion.
5. Closeup View
The closeup vantage point simply involves getting ultra-close to your subject so you can capture every little detail.
To achieve a closeup view, you’ll appreciate a dedicated macro lens, though you can also gain this vantage point with a relatively close-focusing lens or with accessories such as extension tubes or close-up filters.
Closeup photography comes with its own challenges, and there will likely be some trial and error as you play with different apertures, shutter speeds, and focusing techniques. That said, you can certainly create stunning shots by concentrating on the details, especially if you like photographing nature.
The closeup view is popular among nature photographers, but you can also use it for wedding details, portrait details, and even landscape details.
Vantage Points in Landscape Photography: Closeup View of the IcebergHow to Use a Vantage Point in Landscape Photography
If you want to use vantage point to improve your landscape photos, here are a few simple tips:
Shoot Every Scene With as Many Vantage Points as Possible
As I’ve emphasized throughout this article, a vantage point change is a big deal. By adjusting your vantage point, you can dramatically impact your composition – by making certain objects seem larger or smaller, by minimizing certain objects’ effects within the frame, by compressing or expanding the objects of the scene, and much more.
Which is why I highly recommend you don’t just rely on a single vantage point when doing landscape photography. Instead, start with the most obvious vantage point.
But then switch things up. Get down low and shoot up for an interesting low angle. Find a nice lookout point to shoot the composition from above.
Just experiment, and you’ll undoubtedly get great results.
Test Out Different Focal Lengths With Different Vantage Points
Every focal length gives a slightly different effect at each vantage point.
So if you’re not getting the look you’re after, or you simply want a unique perspective, then don’t be afraid to zoom in or out.
Personally, I’m a big fan of the wide-angle plus low vantage point combination. But you should also try to shoot eye-level shots with a wide-angle lens and eye-level shots with a telephoto lens, telephoto aerials, and more.
Use Different Vantage Points to Create Juxtaposition
Here’s one last fun vantage point tip:
When you’re shooting landscapes, first find an interesting foreground subject with a decent amount of height, such as a flower, a tree, a tall rock formation, etc.
And then slowly change your vantage point, watching as the relationship between foreground and background elements change.
Simply by getting higher or lower, you can force the foreground and background to intersect. You can force them apart. You can create depth or create flatness or create tension or create space – really; the sky’s the limit, so make sure you always experiment with different perspectives and juxtapositions!
That’s how you’ll find a truly unique, compelling, even jaw-dropping result.
By changing the vantage point, I placed the yacht in the background between the poles.Vantage Point in Photography: Conclusion
Vantage point isn’t the easiest aspect of photography to master – but if you remember the advice from this article, you’ll be well on your way to capturing stunning photos using different vantage points.
So get out. Have fun.
And shoot from all different angles!
Articles Related to “Vantage Points in Photography Composition: What Is It and How to Use It“
High and Low Angle Photos: Features, Examples
Very often very high or very low angle shots are of more interest than those taken at eye level. One of the reasons explaining this is that a person is used to seeing everything from the height of his height.
High angle shooting
The top shooting point has a peculiarity: all foreground objects are projected onto the background of the lower surface (for example, the ground). And, of course, the viewer perceives a specifically similar image: it seems that the foreground objects have lost their height. The top points, among other things, guarantee the creation of an expressive image of wide spaces, as well as a clear identification of the position of figures in space.
The advantage of shooting from a high angle is that it creates a bird's-eye effect. If the upper shooting point was chosen, then the image may acquire an unusual composition - after all, the position of objects fixed in this way can no longer be seen from any other angle. A similar technique can be useful when shooting still life, when the photographer wants to create a harmonious composition that includes objects of different sizes. Indeed, when viewed from top to bottom, tall objects "flatten".
If, when working with a still life, the problem of shooting from the top point is solved quite simply with the help of a tripod, then when shooting outdoors, in order to get a top view, you need to, well orienting yourself on the terrain, choose the most suitable place for the shooting point. Such a place can be the top of a hill, the window of the top floor of the house.
It is worth noting that the top shooting point brings a different effect in different genres of photography. For example, in portrait photography, this angle is used if they want to emphasize the vulnerability and weakness of the character. Indeed, in this case, the faces in the frame will be flattened. Portrait photography from a high angle is also used when they want to depict a child from the point of view of an adult.
As for architectural objects, a high vantage point can help emphasize those features of the building that are simply never visible to ordinary passers-by, which means that the viewer looking at such a photo will be pleasantly surprised.
Shooting from a high vantage point is also very advantageous for landscape photography, as the view from above helps to avoid the horizon or sky from being framed. In this case, the photographer has a good chance to depict the rural landscape from an unusual angle.
Lower angle of shooting
The main feature of shooting from a lower angle is that the size of the object increases optically in the frame. If small objects in the frame become larger, then it becomes easier to convey their shape. This is why the lower angle is useful when shooting still lifes, when you need to build a composition from small objects.
If the camera is mounted at a low point, even against a large backdrop, foreground subjects will appear larger. Thus, a shallow foreground can be optically enlarged with a wide-angle lens. In this case, a deep perspective will appear in the frame, but the focus on distant objects will remain.
In landscape photography, using a lower angle will help to avoid the appearance of inconspicuous or empty areas in the frame. Indeed, when shooting from a lower angle, it is possible to choose some small detail of the landscape in the foreground as the center of the composition (a separate flower, a pebble, etc.).
As for shooting from a lower angle outdoors, it is believed that shooting from a low point will help to emphasize the height of the subject. But at the same time, it is recommended not to abuse this technique. After all, the taller the building, the larger the shooting angle is required. You should be aware that in this case the perspective is bound to be distorted.
The low angle technique is very useful in portrait photography if the photographer wishes to emphasize the importance or power of the person being photographed. The same technique will be useful when creating a photo portrait of a child - in this case, the child will look more confident and independent.
Conclusion
The choice of the lower or upper shooting point is a visual technique. And any visual technique requires a logical justification, which is due to both the content of the picture and the idea of the photographer.
Working with multi-layer composition / Shooting for beginners / Photography lessons
Shots with multi-layer composition attract attention. If the photo has interesting foreground, midground, and background, the viewer will be able to dive deeper into the frame, feel the story better, and you will be able to tell the story in your photo more vividly and in detail. Often in the frame, it is due to a different combination of plans that a plot, a story is born. In this article, we will give some simple tips that will allow you to work more efficiently with multi-dimensional composition.
Everyone is familiar with such concepts as foreground, background, background. And knowing what it is, it is already possible to consciously work with a multifaceted composition. The only subtlety is that the plan only works when a specific object is placed on it, which the viewer can identify. It's just that the space (field, forest, and so on) is not yet a full-fledged plan in the photo. But a flower in a field or an unusual tree are already quite recognizable objects that can become foreground or background.
The photo above shows a classic example of a multifaceted composition: a tree in the foreground, rocks with a cross in the middle, the rising sun in the background.
NIKON D810 / TAMRON SP 15-30mm F2.8 Di VC USD A012N SETTINGS: ISO 220, F4.5, 1/50s, 15.0mm equiv.
Keep an eye on the background
Often a beginner photographer doesn't pay attention to the background. But extra objects on it will be clearly visible in the picture, they will distract the viewer from the main object. We do not need road signs, lampposts, bright elements of playgrounds “sticking out of people's heads”. Distracts the viewer's attention from the main object and "photographic garbage": cars, bystanders, bright signs and signs. Of course, it is better to remove all such elements from the frame altogether. But if this is not possible, then you can greatly blur the background with a fast lens.
Blurring the background can hide fine details in it. Nevertheless, in general terms, the background continues to be “read” in the photo and complements our plot. Therefore, choose a beautiful, interesting background for shooting!
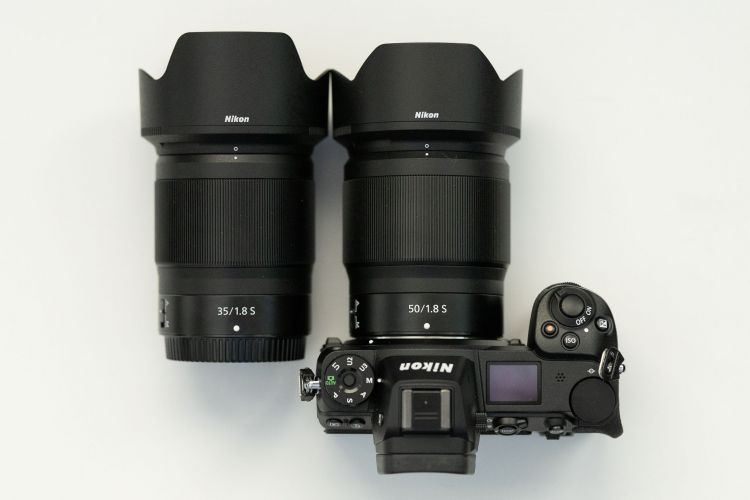
High-aperture lenses are used to produce strong background blur. Nikon AF-S 50mm f / 1.8G Nikkor, Nikon AF-S 85mm f / 1.8G Nikkor are well suited for these purposes.
Nikon AF-S 50mm f/1.8G Nikkor
Nikon AF-S 85mm f/1.8G Nikkor
Sharpening the foreground and background
Often the photographer is faced with the opposite problem. When you need not to blur the background in the photo, but, on the contrary, to make everything sharp. To do this, simply stop the aperture to F11-F16 and shoot at a short focal length (at the minimum zoom of the lens). For an in-depth study of this topic, we have an article on working with depth of field. Once you learn how to work with hyperfocal focusing distance, sharpness will no longer be a problem for you.
NIKON D850 / 18.0-35.0 mm f/3.5-4.5 SETTINGS: ISO 31, F16, 1/60s, 18.0mm equiv.
Due to its wide field of view, short throw optics are perfect for working with multi-layered composition in landscape and architecture photography. The AF-P DX Nikkor 10-20mm F4.5-5.6G VR is a wide-angle lens for DX-format cameras.
Nikon AF-S 18-35mm f/3.5-4.5G ED Nikkor is a relatively affordable, lightweight and very sharp full-frame wide-angle lens.
Think about whether the scenes in your photo are logically connected
Beginning photographers often do not follow the combination of foreground and background and, as a result, get in the photo not what they expected. A textbook example is a man whose horns “grow out of his head”. In real life, these horns simply hung on the wall behind him, but in the photo, having connected with the model’s head, they became like part of the photographer’s plan. As a result, the viewer sees the cuckold in the photo and perceives the picture as a joke at best.
But diversity can be used to tell a photo story. It is enough to show a little attention to your story, and you will see things that will better convey your idea to the viewer.
Objects on different plans complement each other, tell the story of the picture.
NIKON D810 / 18.0-35.0 mm f/3.5-4.5 SETTINGS: ISO 200, F14, 1/30 s, 24.0 mm equiv.
For the viewer to see everything, do not overlap the shots with each other.
Another beginner's mistake - the foreground and background overlap each other in the photo so much that it is impossible to evaluate any of them. To prevent this from happening, you can simply use the rule of thirds by placing one of the plans on the left intersection of the lines, and the other on the right.
Incidentally, the layout aid grid on Nikon cameras can be displayed both in the viewfinder and on the Live View screen.
Enabling the framing grid in the Nikon Z 7 menu
The framing grid on the Nikon Z 7 camera screen
When you meet an interesting subject to shoot, look for the foreground or background for it.
How does a beginner photographer shoot? Having found an interesting object for shooting, he immediately aims the camera and takes a picture without leaving the place where he was visited by inspiration. As a result, most likely, the picture will turn out boring. An advanced photographer will first think about the shooting point and the layout of the future image. It is quite possible that an interesting foreground (or background) will be found nearby, which will definitely make the frame more interesting. Before pressing the shutter button, study the area around your chosen subject!
By the way, the foreground doesn't have to be sharp. Now there is even a certain fashion for using a beautifully blurred foreground in the layout.
NIKON D810 / 105. 0 mm f/2.8 SETTINGS: ISO 64, F5, 1/8000 s, 105.0 mm equiv.
In the case of landscape photography, the main subject will be more or less obvious: a beautiful mountain with a setting sun, an interesting house, a tree. However, your viewer has seen beautiful mountains and houses many times both in photographs and in life. It is important to show your own point of view on the chosen plot in the photo. This will help competent work with foregrounds. So, in the case of a landscape in the foreground, you can show small objects of the landscape - flowers, stones, textures. Thus, the viewer will get a complete impression of the plot. And just a frame full of details is always more interesting to consider.
Working with multi-layered composition will force you to think about the shooting point
A novice photographer often does not think about the shooting point, which makes his pictures look imperfect, chaotic. Making a conscious choice of foreground or background for your subject will help you be more mindful of your photos and produce more dramatic results.
