Creating time lapse
How to make your very own time lapse
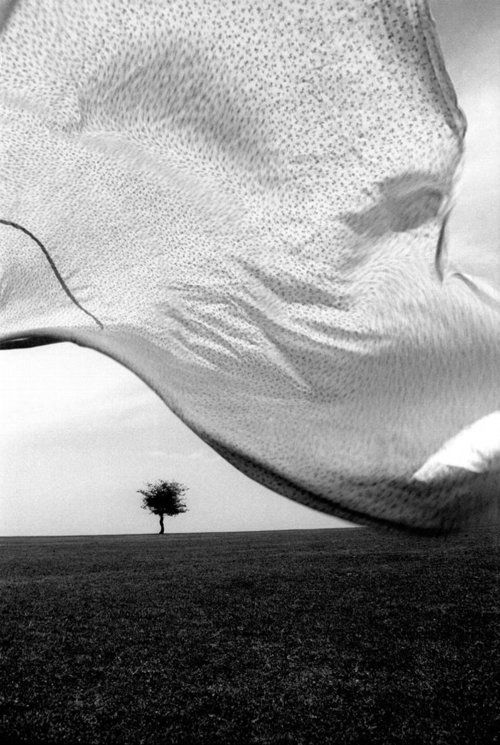
A rising sun, a tumultuous sky, a slow illumination of city life. It’s not hard to see why time lapses are one of the most captivating film genres. They’re beautiful and experiential — pushing us outside our human frame of reference and allowing us to see everyday life in one majestic sweep. The principles of a great time lapse are surprisingly simple. And because they’re so watchable, you can use them for almost anything. They’re great for capturing montages, event set-ups, workout sets, and so much more. In this guide, we’ll show you how to make a time lapse video using three different methods. You’ll learn how to make a time lapse with a DSLR camera, an iPhone, and a video file. We’ll also include a few examples for inspiration.
How to capture a time lapse
There are two main techniques for making a time lapse video: you can either speed up video footage in post or piece together still photos. Just remember that each method requires specific prep, execution, and cerebral power. Weigh in the pros and cons for each method and consider the amount of footage, time to edit, data requirements, and equipment needed to achieve your time lapse goals. Let’s break down the steps for each method!
What is a time lapse video?
A time lapse is a period of time captured on video and played back at a much faster rate.
How to capture a time lapse using a DSLR Camera
If you’re looking for a professional, classic time lapse, we recommend using stills from a DSLR camera. Still photos allow for longer exposure and create a beautiful motion blur. Another benefit to photos over raw video is that you’ll have a far greater resolution. More resolution = more freedom in post to zoom in and out as you please. Keep in mind that creating large scale time lapses with your DSLR means capturing thousands of stills and editing down your footage. Regardless of the finished product, we recommend investing in solid data storage to save all your hard work. To achieve the classic time lapse with your DSLR, follow these five steps:
1. Start with a stable tripod or surface
This will ensure your video stays still and captures high-quality video without any disruptive shakiness.
2. Use still photo mode on your DSLR
Don’t forget to check to make sure you’re on manual exposure — you won’t want this changing from frame to frame.
3. Use slower shutter speed
This will give your video a more blurred-motion effect. Faster speed will make your video look choppier. (You may need an ND filter to achieve this!)
4. Use a timer
Your camera may have an internal time lapse or interval mode. If you’ve got it, use it! It will make your life easier.
5. Import and stitch together
Once you’ve captured all of your individual stills, import them into your editing software and stitch them all together.
How many photo stills will I need to make a time lapse video?
Generally, a video frame rate is made up of 30 frames per second. A photo will make up 1/30th of your video frame rate. Decide the desired length of your video in seconds, then multiply it by 30 to get your number!
How to capture a time lapse video with an iPhone
If you prefer shooting time lapse video on iPhone or android — fear not! Mobile devices are great for mobility, minimizing equipment required to shoot, and reducing budget to produce a film. This is a great option for small businesses, influencers, or brands focused on social channels like Instagram. Short, punchy time lapse videos are popular on mobile devices and can take your video strategy in a whole new direction. Check out how to create time lapse video from your iPhone:
- If you’re an iPhone user (iOS 8 or higher) tap the camera app and swipe to the time-lapse mode.

- Depending on your subject, choose between a portrait or landscape shot (ex. A person versus an outdoor setting).
- If you plan to take a landscape shot, we’d recommend using a tripod to stabilize your phone.
- Once you’re done recording, the video will automatically compress and appear on your camera roll.
There are even more ways to capture time lapse video on your phone, though!
iPhone and Android mobile apps for creating a time lapse
If you’d rather let apps work their magic, we’ve got a few faves for iPhone: 1. Hyperlapse from Instagram 2. Lapse It 3. Lapse It Pro And for our Android users, try these handy tools to make a time lapse in no time: 1. Lapse It 2. Framelapse
3. Microsoft Hyperlapse Mobile
Check out our guide on creating video with your phone
It’s easy, we promise!
Watch now
How to make a time lapse video from a video file
You can also create a time lapse with video files. Shooting a video and speeding it up requires less pre-planning on your part than using a collection of stills. It’s worth noting that this technique works well during the day, but isn’t as successful for nighttime shots. You’ll also likely get a stuttering effect and less of a ‘motion blur’ that’s common in a collection of stills with this method.
1. Find a stable surface
Are you sensing a pattern here? Keep it still!
2. Select video mode on your DSLR
Make sure you’re also in manual mode, so you have more control over your exposure!
3. Slow your shutter speed
Shoot for 1/30 and 1/60 to minimize choppiness when editing in post.
4. Record your video
Don’t be afraid to go long: the longer you shoot, the more dramatic the effect you’ll see in post. We recommend at least an hour for peak drama.
5. Edit away
Once you have your images, import them into your editing program. Line them up sequentially, and you have a time-lapse! If you are just filming your subject, speed up the footage for the same effect.
What’s the best way to create a day to night time lapses?
We recommend aperture priority mode (noted as ‘Av’ or ‘A’) if your lighting will be changing drastically. This allows you to set the aperture of the lens and your camera will automatically adjust the shutter speed to maintain the correct exposure.
Time lapse examples we love
Now that you’ve gotten a glimpse at the various ways to capture an epic time lapse, let’s take a look at the creators who are mastering their craft on Vimeo and beyond.
“Night Light” by Arthur Cauty
Arthur Cauty captured textures of light and motion in this beautiful video example. Pore over his Vimeo profile to learn how to create the illusion of movement.
“SOUTH AMERICA” by Morten Rustad
Morten Rustad created beautiful footage after a year traveling in South America. Check out how he used motion controlled gear to reveal unexpected details.
“PATAGONIA 8K” by Martin Heck
Time warper Martin Heck shot 6 weeks of footage to create this stunning exploration of landscapes in southern Chile and Argentina. The video you see here is a magnificent culmination of over 100,000 individual frames.
Wrap up: Master the art of time lapse video
Time lapse videos are a fun way to capture gorgeous scenery or create compelling content on social media. Whether you’re chasing a dramatic vista, observing the night sky, or capturing a vanishing horizon on the back of a bike, get to work, then share it right here on Vimeo!
Originally published December 16, 2010. Original copy written by Dalas Verdugo.
How to Make a Time Lapse Video in 5 Simple Steps
How to Time Lapse a Video
How to make a time lapse video
Before we get into how to make a time lapse video, it is important to have a solid understanding of time lapse photography and videography. To put it in the simplest terms, how time lapse video works is with a slow frame rate. Instead of the standard 24 or 30 frames per second, a time lapse video might only take 1 or 2 frames per second.
For time lapse photography, this can be a slow exposure of a single frame. We’ll also be talking about how to create a hyperlapse as well, which is a time lapse video with camera movement.
Check out some great time lapse videos and take a behind the scenes look at how to make a time lapse movie.
Hyperlapse and Time Lapse Photography in Practice
Now that we’re clear on precisely what a time lapse is, it’s time to learn how to do a time lapse video. We’ve broken down the process into five essential steps.
How to make a normal video into a time lapse
1. Choose your subject
The best way to make a time lapse video involves carefully choosing the subject of your time lapse. The same considerations toward framing and composition when shooting a normal photo or video apply to time lapse photography and great time lapse videos as well.
But the best way to record a time lapse involves the additional consideration of time, specifically change over time. A time lapse video where nothing changes isn’t going to be very interesting. The most important thing when choosing a time lapse subject is movement.
The options for the type of movement to capture in a time lapse are near limitless. The movement of people, animals, vehicles, water, clouds, anything at all, can make for a dynamic and engaging time lapse.
The following time lapse examples from Breaking Bad showcase how to do a time lapse video with a variety of subjects and movement styles.
Time lapses and hyperlapses found frequent use in Breaking Bad
Time lapse videos of course have a place outside of narrative works as well. Time lapses are a staple of documentary filmmaking. A time lapse video can also serve as its own piece of media without the need to be attached to a larger work.
This time lapse video offers a stunning glimpse of the day and night cycle of life at sea.
30 days at sea in a single time lapseThere’s no one correct answer to the question: how do you make a time lapse video? There are multiple valid ways to execute a time lapse just as there are many ways to utilize them. Get creative with your time lapses. This technique allows for far more experimentation and exploration.
How to do a time lapse video
2. Prepare your gear
Before you go out shooting time lapses, you’ll need to choose your gear. You have a lot of choices for time lapse cameras and time lapse apps ranging from simple and cheap, to complex and expensive.
Time Lapse Camera
The first and most important piece of gear to decide upon is the camera. Choosing the best video camera will either set you up for success or give the entire project less-than-ideal results.
Technically speaking, you can learn how to make a time lapse video with any digital camera on the market. Many consumer and prosumer grade cameras have built-in time lapse modes that will allow you to easily capture your own time lapses.
GoPros and most DSLRs, for example, come equipped with special time lapse functionality making them extremely effective time lapse cameras. You can even make a time lapse video on your iPhone or Android device. If you’re wondering how to make a time lapse video on your iPhone, it can be as simple as recording video normally and then speeding up the footage with a time lapse app or one of the best video editing apps.
There also exist specialized time lapse cameras designed with this exact purpose in mind. A couple of brands focusing on time lapse specialized cameras include Brinno, Work Zone, and Moultrie cameras.
It’s a good idea to compare cameras and keep your specific goals in mind before making a purchase. This video shows direct comparisons between a few possible time lapse camera options.
Time Lapse Cameras • Go Pro Hero 7 vs Afidus vs Canon 80 DA camera is the only piece of equipment that you 100% need in order to make a simple and basic time lapse. But there are a number of additional tools and timelapse software to achieve better results if you’re willing to spend a little extra time and money.
Tripods and Motorized Heads
Your top priority after a camera should without a doubt be a tripod, lest you be at the mercy of flat surfaces to perch your camera on. A time lapse is not the type of thing that is easy to capture handheld.
A simple tripod which you can get for just a couple of dollars should be enough to get the job done. If you want to spring for something more expensive, there are motorized tripod heads made specifically for capturing automated hyperlapses.
This video is a review of a Movo brand motorized tripod head, but there are many brands available on the market.
Motorized tripod head in actionIntervalometer
After a camera and tripod, your next priority should likely be an intervalometer. Before you go out and purchase an intervalometer, be sure to check through the menus of your camera as some cameras have them built into their hardware.
An intervalometer isn’t necessary if you’re only looking to capture a quick and simple time lapse but if you want to step up your time lapse game, an intervalometer is a must-have. The video below offers a quick breakdown of what an intervalometer is and how it works.
Those are the most important pieces of gear when preparing to shoot a time lapse. There are other little accessories and programs such as time lapse calculators and time lapse apps but, odds are, you can get by without them if you know how to properly calibrate your camera settings, which we’ll cover in the next section.
When it comes to time lapse calculators, a normal calculator will give you the exact same information as long as you know the proper formulas. The simplest and most useful formula is time per frame (TPF), multiplied by frames per second (FPS), multiplied by 60 seconds. Using this formula will tell you how long to record in order to end up with your desired time lapse length or “recording time” (RT). TPF x FPS x 60 = RT.
how to make a time lapse video slower
3. Select your settings
Calibrating your camera to its ideal settings for time lapse capturing can be a real challenge for anyone not technically-minded. If your camera is one of many to have a built-in time lapse mode, this will make your calibration step much easier but there are still likely certain options you could fine-tune to achieve even greater results.
This video from Fstoppers offers an in-depth tutorial on the best way to make a time lapse video with plenty of great, technical tips and tricks in regards to selecting your camera’s settings.
Technically focused time lapse tips and tricksThe essential goal when calibrating is to shoot with the slowest shutter possible within your camera. This will make for a smooth looking time lapse video; or give the smoothest image with the highest amount of movement in time lapse photography.
Without slowing down your shutter speed, you can still capture a time lapse by speeding up your video in post, but the end-result will not look as fluid. And the moving images will not have motion blur if shooting at a high frame rate.
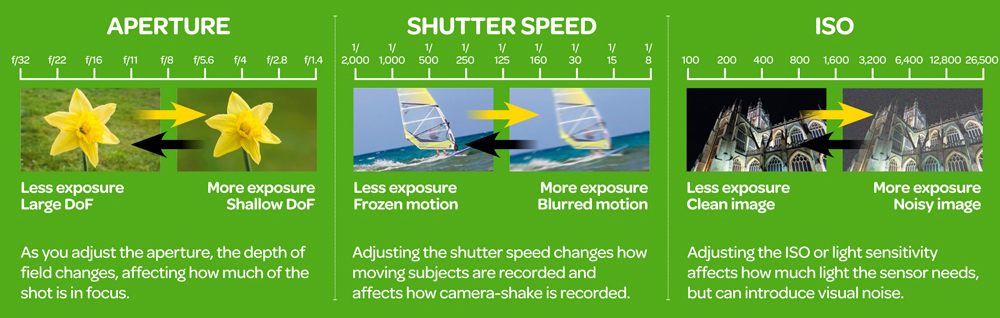
Slowing down your shutter speed isn’t typically a one-step process as it requires altering your other camera settings in order to accommodate for altered exposure time. Lowering both the ISO and aperture of your camera will allow you to slow down your shutter speed without compromising the integrity of your image.
How to make a time lapse video
4. Shoot your time lapse
Now you’re finally ready to shoot your time lapse. There are a few different methods with differing levels of efficacy. If you’ve done the leg work of the previous steps, choosing a good subject, gathering the appropriate gear, and selecting the best settings, then shooting your time lapse photo or video could be a piece of cake.
Simply mount your camera on a tripod and, if your settings are correct, just hit record or snap that photo. If a still photography time lapse is your goal, then the actual capturing process may take you just a few seconds. When capturing a time lapse video, the process can take as long as you want the video to be.
This long-term time lapse shows the effects of evaporation over the course of 66 days. The possibilities for timeless are boundless.
But what about when you want camera movement within your time lapse? A moving time lapse actually has its own name: a hyperlapse. Just like a standard time lapse, there are many ways to create a hyperlapse.
The most professional (i.e., expensive) method of creating a hyperlapse can involve pricey equipment like motion-controlled cameras with timed shutters and intervalometers, but there are cheaper ways to execute this effect as well.
Check out the below video for an easy-to-follow tutorial on how to capture a quick hyperlapse on the fly without tons of fancy equipment.
Camera settings, shooting, and editing a hyperlapseThere are a couple of other considerations you may want to take into account when shooting: weather and battery life. If you plan to shoot a long-term outdoor time-lapse video or shooting in the rain, then weather-proofing your camera is an absolute necessity.
It would be a shame to have your long-term time-lapse video ruined by a dead battery. Specialized time lapse cameras are often built with lengthy battery lives and some even give you the option to rotate through batteries without powering down. You just need to remember to make the switch before it's too late.
The most ideal option for extremely long-term time lapses, (e.g., a time lapse that lasts for days, weeks, months, or even years) would be to hardwire the camera directly into a permanent power source. Not all cameras are designed for this so be sure to check your camera’s specs.
Time lapse software
5. Edit your time lapse
The editing process for a time lapse can vary depending on your shooting method. If you shot your time lapse for an extended period of time at a normal frame rate, then the editing process involves bringing your clip into the timeline and speeding that footage up. This is not ideal as it can produce a jittery image, and it will also be lacking the desirable motion blur on dynamic subjects.
Shooting time lapse video using ideal settings and with a camera enabled with a time lapse mode, the result won’t actually be a video, at least not a first.
Shooting a time lapse properly will leave you with a long series of still images that can then be stitched together at your desired frame rate. Most major editing programs will be able to assemble your time lapse, Adobe Premiere for example is great for assembling time lapse videos. Here's a tutorial on how to use the Adobe Suite to edit your time lapses at a professional level.
Using Lightroom, Premiere, and/or After Effects to assemble a time lapseOnce your time lapse is edited, you are finished. You now have a high-quality time lapse and the only thing left to do is share it. The only thing left to do is keep shooting more impressive time lapses.
UP NEXTThe filmmaker’s guide to frame rates
If you plan to start making your own time lapses, you’ll need a thorough grasp over the concept of video frame rates. An understanding of frame rates is crucial to assembling a time lapse once the time lapse source has been captured. Different frame rates can even help in the actual shooting of the time lapse itself. There are simple math formulas that can tell you precisely how long to record or how many photos you will need, so long as you know your desired end-length and frame rate.
Up Next: Filmmaker’s Guide to Frame Rates →
Top 10 Timelapse Apps
Time-lapse, that is, slow-motion (frame-by-frame) shooting, is gaining more and more popularity. The market quickly responded to the demand, and today there are quite a few applications for such shooting.
In this article, you will find descriptions of the best slow motion apps for both Android and iPhone smartphones.
Built-in Camera Applications
We say it all the time and say it again: the best camera is the one you always have with you. The same applies to slow motion apps.
You may not even realize that you already have such an app, but the stock camera app for iPhone and Android does give you that ability. In this case, it's a video recording app, and it's very easy to use.
Just press the red button and start capturing. We don't know how long this app can shoot, but we easily created a 10 second time lapse video. It's even more of a hyperlapse, as you can move around while capturing.
The only problem is that this tool does not offer any additional functionality. But you can edit the already captured video later using this or any other video editing app.
And it will not be difficult for you to share the footage with other users.
Hyperlapse Instagram (iOS)
Instagram is famous not only for its famous square format and many specialized filters, but also for its applications. Hyperlapse is one such app created by Instagram for capturing videos.
Hyperlapse is one of the best slow motion apps because it's incredibly easy to use. What distinguishes it from other similar applications is that Hyperlapse allows you to make time-lapses in motion. You can even use it as an image stabilizer when shooting regular video. It makes you think creatively and motivates you to take action.
The only problem is that you can only share the captured video on Facebook or Instagram. But if your main goal is to create good timelapses, then this iPhone app is really for you.
Download
Timelapse Pro (iOS)
Timelapse Pro for iPhone is a great slow motion video app. By logging into this application, you can immediately start shooting, literally with the touch of a button.
After the timelapse is captured, you can apply one of 25 video effects to it. You can even add an audio track if needed. Save your file in the application so that you can later share it with other users on social networks.
You can set all the necessary parameters in advance - the number of frames per second, the duration of the shooting, even the start delay. In addition, you can lock exposure and focus (this is a very useful feature). The app uses sound effects to indicate activity.
What we especially like about Timelapse Pro is the tilt-shift effect, which will make your image look like a miniature (almost toy) village scene.
Download
Timelapse (iOS)
This small but powerful app deserves a place on our list. It offers the possibility of manual control of parameters such as saturation, brightness, contrast and, of course, exposure.
In addition, you can record 4K videos and save RAW files with it. This is a huge advantage in providing high quality footage.
If that's not enough for you, there's a feature that allows you to record video with tilt and shift (imitation of the tilt-shift effect). Incredibly, there is no time-lapse flicker. This is very important for night shooting.
What we particularly liked was the ability to frame-by-frame edit the recorded time-lapses. Awesome! A great option for beginners and professional photographers.
Download
Timelapse Video Editor Pro (Android)
Timelapse Video Editor Pro is a professional tool for recording slow motion video using Android device. You can even use it as a video editor by speeding up or slowing down previously recorded footage. And, yes, you can convert regular video to time lapse.
The application has many other functions. For example, there are three options for improving the quality of your timelapses. In addition, there are four different speed settings.
All captured videos and time lapses can be cropped, so you don't have to worry if some unwanted object gets into the frame.
This great timelapse app allows you to share your footage with other users.
Download
Pic Pac Stop (Android)
Despite its funny name, Pic Pac Stop is a serious slow motion app for Android. Moreover, it is one of the best applications. It allows you not only to shoot, but also to import or convert already captured video into time-lapses.
Even after the video has been imported, you can still edit it. A nice bonus is the ability to add audio.
One of the best features is voice control. You can control manual mode using voice commands.
The app is interesting and useful, but you need to purchase the professional version to be able to use all the features.
Download
Framelapse (Android)
Like most good time lapse apps, Framelapse lets you set the settings manually. Exposure, white balance, timer - all this can be changed. You can even apply filters if you wish.
You can set the frame interval, video duration, and orientation for video. The resolution and bitrate can also be set as you wish.
This is one of the easiest apps to use, so you will use it more than others. If you're not too bothered by pop-up ads, then the free version is a great option for you. You will have to pay for the pro version, which gives you white balance and auto exposure lock.
Framelapse is one of the best time lapse apps for Android.
Download
Microsoft Hyperlapse Mobile (Android)
When it comes to hyperlapse apps, this app for Android mobile devices can be your guarantee of creating the best work. Its first advantage is a simple user interface.
You can not only shoot video, but also import it. This makes this application one of the best on the market.
You can change the video recording speed from 1x to 32x. To just stabilize your footage, use 1x speed. This speed will also keep the sound intact.
Once you've captured the time lapse, you can select a resolution (720p or 1080p) and then save the file.
And of course you can share the final result with other users once the rendering is complete.
Download
Lapse It (iOS, Android)
Lapse It has all the features you can expect from one of the best time lapse apps. Here you can manually set all settings such as focus, ISO and white balance.
What you hardly expected to see is the possibility of shooting videos using the stop-motion technique. In addition, you can change the video resolution, codec, frame rate per second. You can even add an audio track or effect.
All in all, this is a very powerful time lapse app for Android and iPhone. Start using it today.
Download
Time Lapse Camera (Android)
When you are about to download this Android time lapse camera app, you might see the name Time Spirit. It is no coincidence that the developers changed the name in the middle of the release, so do not delay downloading the application.
From the very beginning of using Time Lapse Camera, you will have two options for working: either photo-lapse or time-lapse. Photo Lapse lets you choose up to 30 pre-made images that the app will turn into a slow motion video. This option is great for projects where you take multiple images in the same place throughout the day. The second option allows you to capture a time lapse or convert an existing video to a time lapse.
You can add audio, change the resolution (maximum 1080p) and choose the duration from 1 minute to 12 hours.
Download
Tags: android iOS Hyperlapse Instagram Timelapse Pro timelapse Timelapse Video Editor Pro Pic Pac Stop Framelapse Microsoft Hyperlapse Mobile Lapse It Time Lapse CameraHow to make a time-lapse on a camera or smartphone - a detailed guide | Articles | Photo, video, optics
Surely you have ever seen videos where all sorts of long events occur in a matter of minutes or even seconds. Such videos are called time-lapses and can have any plot - from a flower in bloom to the construction of a skyscraper. Want to learn how to do something similar? In this article, we show you how.
Photo: pixabay.com
What is timelapse
Timelapse is a kind of art, which is based on the combination of many frames into one video. If you thought it was just a fast-forward video, you were wrong. Imagine how many gigabytes (or terabytes) in this case would take a time-lapse of construction for many months of a building. From a technical point of view, it would be impossible or at least extremely problematic to implement this.
With the right approach, time-lapse shooting will become available to you even from a smartphone or an amateur SLR camera. What is needed for this and what nuances should be taken into account for beginners, we will now tell.
Is the interval shooting mode mandatory, and what is needed for time-lapse
The first and most important thing you need is a camera (or a modern smartphone). If you are just starting to conquer the new shooting mode, you can use any SLR or mirrorless camera. Some models even have an interval shooting function, but if it is not there, this is not a problem.
Make sure you have a memory card with sufficient capacity. You will need a lot of time-lapse shots, and all of them need to be saved somewhere. You will not have the opportunity to replace the memory card, since the camera must remain stationary all the time (although this is a matter of technology). Also make sure the battery has enough power to take the required number of shots.
Another essential element is the tripod. You have to take pictures from a certain position. The camera must be rigidly fixed in the initially set position and remain motionless until the very end of the shooting. For reliability, you can hang some weight on the tripod hook, which will add stability.
You can do without a tripod if you find a place to keep your camera still. Photo: pixabay.com
If your camera doesn't have a time-lapse feature, get a programmable remote. It will automatically release the shutter at a set time interval (for example, every 30 seconds). Buying an expensive branded remote is not necessary. For our task, an inexpensive Chinese device is quite enough (it all depends on the budget).
Time lapse software
If you are using a smartphone instead of a camera, you do not need a remote control, but you will need to install an application for time-lapse photography. If you have an Android phone, search Google Play for the following apps: Time Lapse Camera, Framelapse, or Time Lapse. For iPhone users, apps like Skyflow, Lapse It, or OSnap can be recommended.
The choice of such software is huge, so you can search for other programs that suit you, focusing on the set of available functions, interface and other features.
How to make a time-lapse from a photo - setting up the camera correctly
If your camera has a time-lapse function, the task will be greatly simplified. All you have to do is securely set up your tripod, choose your composition and focus. Some camera models even have the ability to set the start time for shooting. This is quite convenient, since you can prepare everything in advance and leave it, and at night or early in the morning the camera will start shooting by itself. What to do with camera settings:
- Choose the RAW image format. This will expand your possibilities in post-processing. It will be easy to correct the white balance, exposure or other shortcomings.
- Disable autofocus. Otherwise, the camera may focus on another object (for example, a dog running past or a bird flying by).
- Set the white balance to manual. Otherwise, this setting will be adjusted automatically depending on the lighting, and the pictures will end up with different tone.
- Fully open the diaphragm. This will help to avoid changing the exposure between shots (which often happens in modern cameras).
Many modern SLR cameras have a built-in time-lapse function. Photo: canon.com.au
Shooting a time-lapse on Android and iPhone
In this case, everything is even simpler. You just need to choose the right application and make the necessary settings, or choose one of the ready-made presets (they are in most programs). You can manually enable or disable noise reduction and autofocus, adjust shutter speed, exposure, white balance, and more. Practice before you start a long shoot so you don't waste time.
The Framelapse application interface has a lot of functions with which you can configure almost any parameters. Photo: gehack.com
Choosing a shooting speed for a time lapse
One of the most common time lapse questions is related to determining the appropriate shooting interval. The most common mistake made by beginners is that timelapse objects move in jumps. This happens with dynamic scenes where cars drive or people walk. The reason for the jumps is banal: too long an interval between frames and a short shutter speed.
There is a basic formula to start from. The shutter speed should be half the interval between frames. For example, if you are shooting with a 4-second pause, set your shutter speed to 2 seconds. The interval itself is selected according to the speed of moving objects:
- walking person - from 1 to 3 seconds;
- moving car - 1 second;
- floating clouds - from 2 to 10 seconds;
- northern lights - no more than 10 seconds;
- starry sky - from 20 to 50 seconds;
- waterfall - 2 to 5 seconds;
- sunrise or sunset - 1 to 3 seconds;
- blooming flowers - 1 to 10 minutes;
- building construction - 5 to 15 minutes.
These are very approximate intervals, from which we recommend starting - select the optimal time for each specific condition.
How to shoot a time-lapse: step by step instructions
In general, everything is quite simple, but there are nuances. If you act according to our algorithm, you will quickly understand everything:
- Mount your camera or smartphone on a tripod and make sure everything is still.
 All photographs must be taken from the same angle.
 - If your camera does not have a time-lapse function, connect the remote control to the camera and set the desired settings.
- Set the camera to manual mode and choose an exposure. These parameters should not be automatically changed, otherwise the frames will be different.
- Check exposure by taking a few shots. Make sure there are no overexposed areas. Also adjust the lens by manually setting the desired focus.
- If using a DSLR, cover the viewfinder, otherwise stray light can affect exposure (it will change between shots, resulting in flickering in the finished time lapse).
- Take a test shot again after checking the composition, exposure, and focus.
- Consider how many frames you need. Go beyond the 25 fps standard. Accordingly, to get a video for 10 seconds, you need 250 shots. It is better to take with a margin: this will give more options when editing.
- When you're done, start shooting and don't touch the camera until the process is complete.

You can also choose a longer interval for sunrise time-lapse, depending on the length of the video you want. Photo: flickr.com
Editing pictures and creating a time lapse
Some advanced cameras and many smartphone applications collect time lapses automatically, but the result is not always as expected. To get the best quality, you have to do everything manually. To do this, we suggest using popular graphic editors:
1. Import images into Adobe Lightroom and edit one of the images. To do this, it is better to take a frame from the middle of the resulting chain. When all the necessary parameters are set, copy them to the rest of the pictures.
2. Export all images to JPEG format with a resolution of 1920 x 1080 pixels (this is Full HD).
3. Open Adobe Photoshop, select the Window item on the toolbar and change the working environment to Motion .
4. Select menu File => Open and find the folder where the exported images are located. There we select the first frame. Before confirming the opening, press the button Parameters and check that next to item Image sequence there is a checkmark .
5. Set the desired frame rate. It is better to use the classic version - 25 per second.
6. The video will be displayed on the bar at the bottom of the screen. Now you can run a preview and evaluate the result. For the first time, the video can be jerky - this is normal, especially for low-powered computers.
7. If the result is satisfactory, export the sequence of images to video format. Click for this File => Export => Video rendering .
8. Come up with a name for the file and determine the video format. We advise you to choose H.264: it is the most common. The frame rate and resolution will depend on the original pictures that were imported.
The process of creating a time-lapse from a photo can seem quite complicated and confusing, especially at the “assembly” stage.