F stops and shutter speed
Aperture vs Shutter Speed - Difference and Comparison
In photography, aperture (also called f-number) refers to the diameter of the aperture stop (the stop that determines the brightness in a photo at an image point). Shutter speed on the other hand, is the total amount of time the shutter of the camera is open.
Comparison chart
| Aperture | Shutter Speed | |
|---|---|---|
| Definition | In photography, aperture refers to the diameter of the aperture slot. When expressed as an f-number, it refers to the focal length of the lens divided by the aperture diameter. | Shutter speed refers to the length of time that a camera's shutter is open, i.e. exposure time. |
| Use | Aperture controls the distance range for how far away objects can be from the camera for them to appear sharp and in focus in the picture. | Shutter speed is used to provide a sense of movement and is important in capturing images for objects that are not still. |
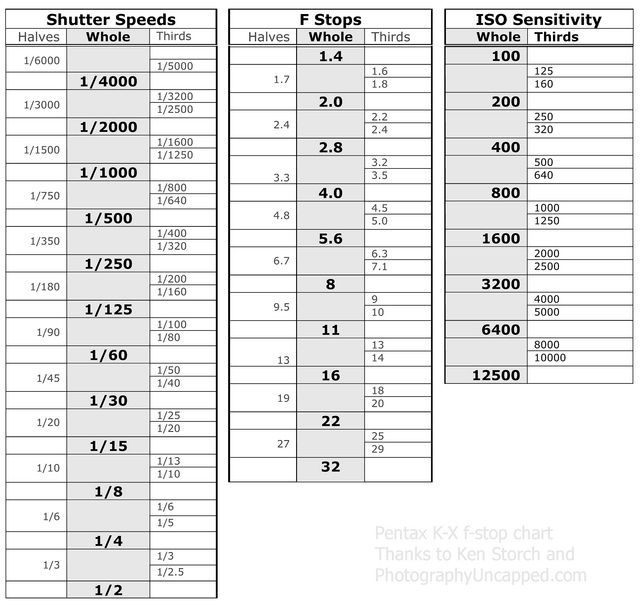
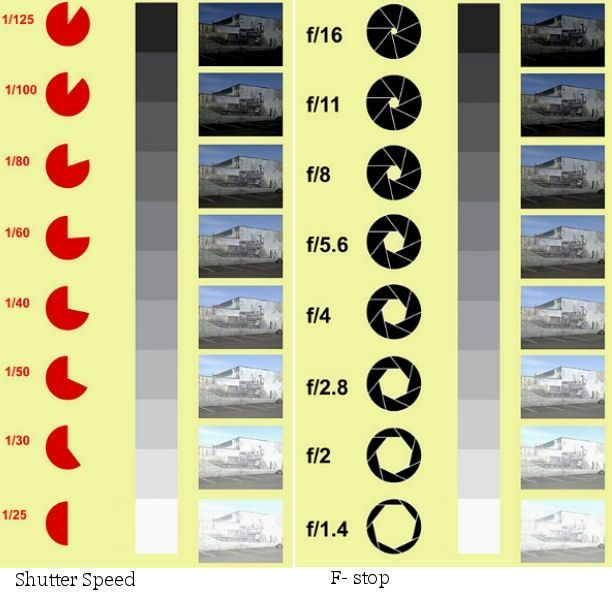
| Standard units | Standard measurements for aperture are f/2.8, f/4, f/5.6, f/8, f/11, f/16 and so on. | The agreed standards for shutter speed are 1/1000 s, 1/500 s, 1/250 s, 1/125 s, 1/60 s, 1/30 s, 1/15 s, 1/8 s, 1/4 s, 1/2 s, 1 s. |
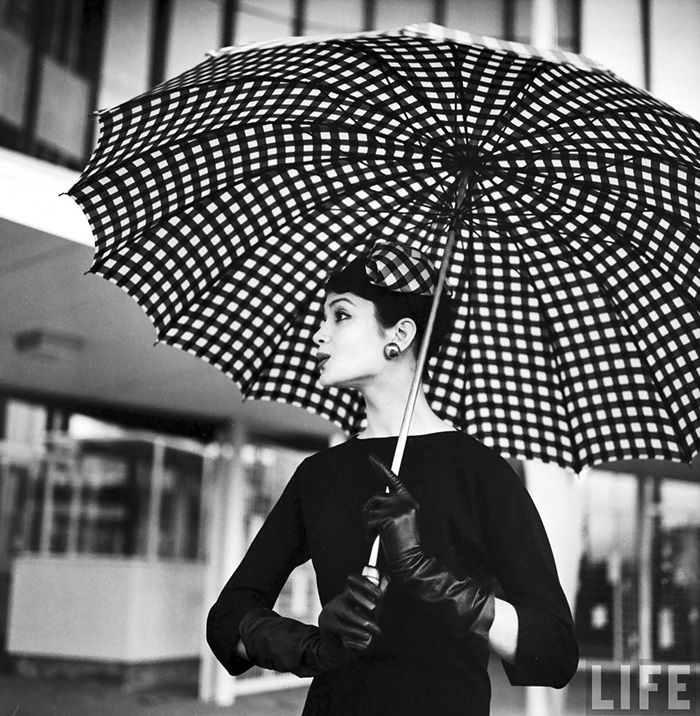
A shot of a jet of water from a hose; fast shutter speed to capture a crisp image of moving water drops.
Function of Aperture vs Shutter speed
The aperture and shutter speed together control the amount of light reaching the image sensor (or film) of a camera. The degree of the sensor's exposure to light determines the brightness of the picture.
If the aperture (diameter of the aperture stop) is small, the depth of field (i.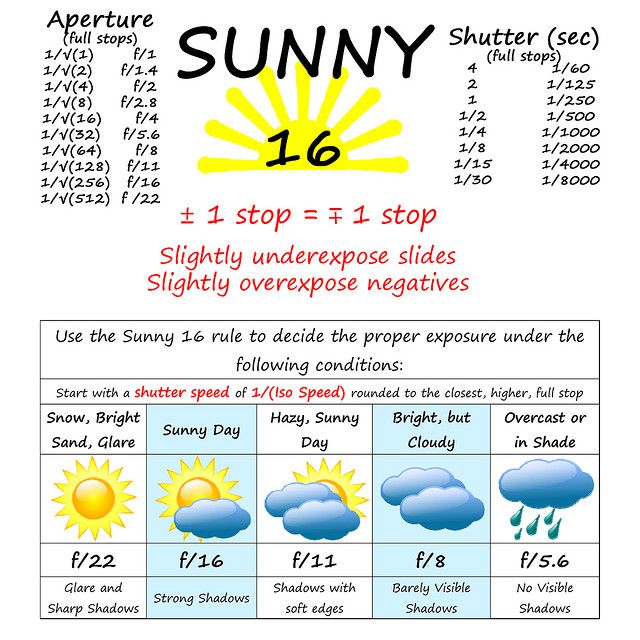 e. the distance range over which objects appear acceptably sharp in the picture) is larger. So all objects at varying distances from the view finder will be in equal focus. So the subject matter may be at a greater distance from the plane of focus and still appear in focus in the photograph.
The shutter speed controls the length of time that a camera's shutter remains open. So in effect, it helps the aperture restrict the amount of light that is allowed to reach the object. The impact of shutter speed is most prominent when photographing moving objects. Images taken with a lower shutter speed are blurred and invoke a visual sense of movement. A higher shutter speed allows clear images that are great for capturing specific moments in time e.g. a crisp picture of a football player in mid air.
Units for specifying shutter speed and aperture
Diagram of decreasing apertures, i.e. increasing f-numbers, in one-stop increments. Each aperture has half the light gathering area of the previous one.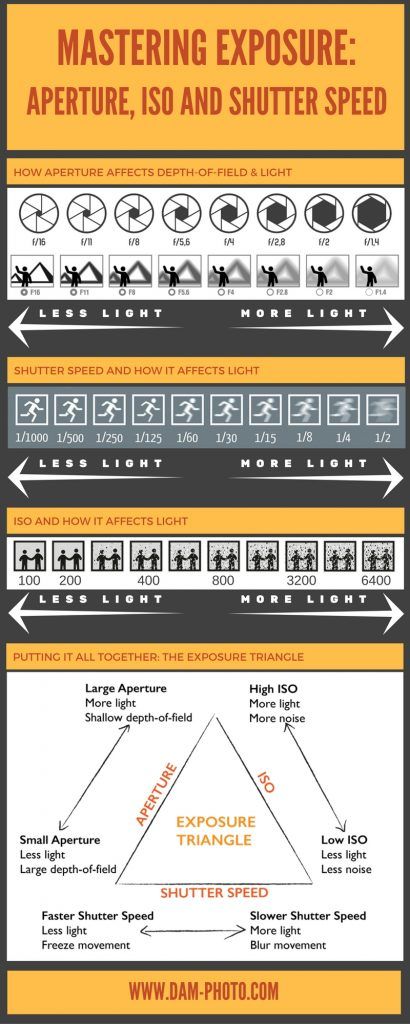 The actual size of the aperture depends upon the focal length of the lens.
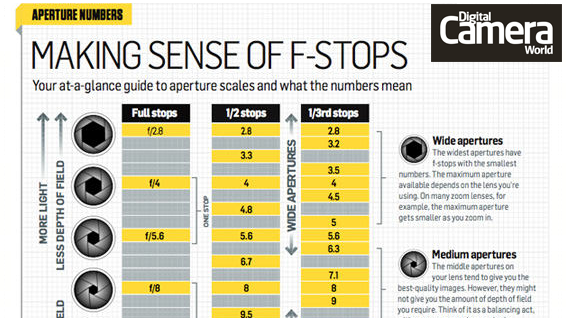
Aperture is also called f-number (sometimes called focal ratio, f-ratio, f-stop, or relative aperture[1]). It is a representation of the diameter of the aperture stop in terms of the focal length of the lens. In other words, the f-number is the focal length divided by the "effective" aperture diameter. It is a dimensionless number. Standard ways of representing aperture are in sequence (f/2.8, f/4, f/5.6, f/8, f/11, f/16, etc.).
The agreed standards for shutter speed are 1/1000 s, 1/500 s, 1/250 s, 1/125 s, 1/60 s, 1/30 s, 1/15 s, 1/8 s, 1/4 s, 1/2 s, 1 s.
Correlation Between Shutter Speed and Aperture
Aperture and shutter speed together determine exposure. Exposure is measured in exposure value (EV), also called stops. Multiple combinations of shutter speed and aperture can give the same exposure: an exposure with a shutter speed of 1/250 s and f/8 is the same as with 1/500 s and f/5.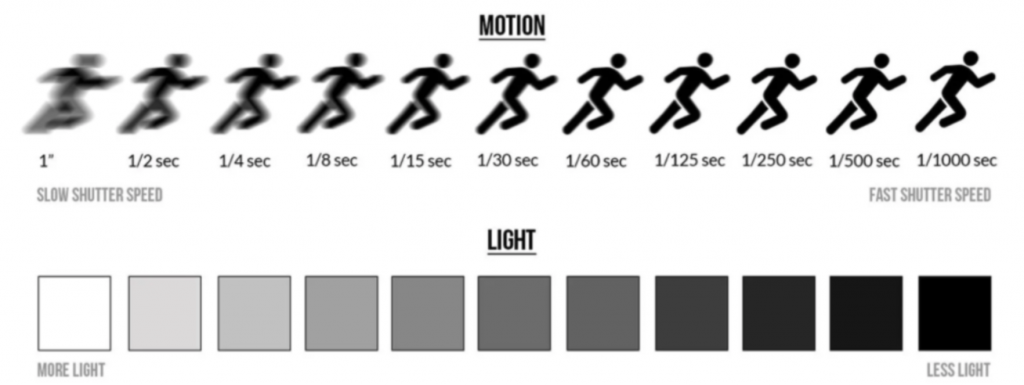 6; or 1/125 s and f/11. Halving the shutter speed doubles the exposure (1 EV more), while doubling the aperture increases the exposure by a factor of 4 (2 EV).
Videos
This video explains the definitions of Aperture, ISO and Shutter Speed:
The following video provides recommendations on what shutter speeds and apertures to use:
And this video offers more recommendations on ISO settings, aperture and shutter speed:
Etymology
The word aperture is derived from the Latin word apertura which means an opening. Shutter was used in reference with photography in 1862 and meant a device for the opening and closing of the aperture of the lens.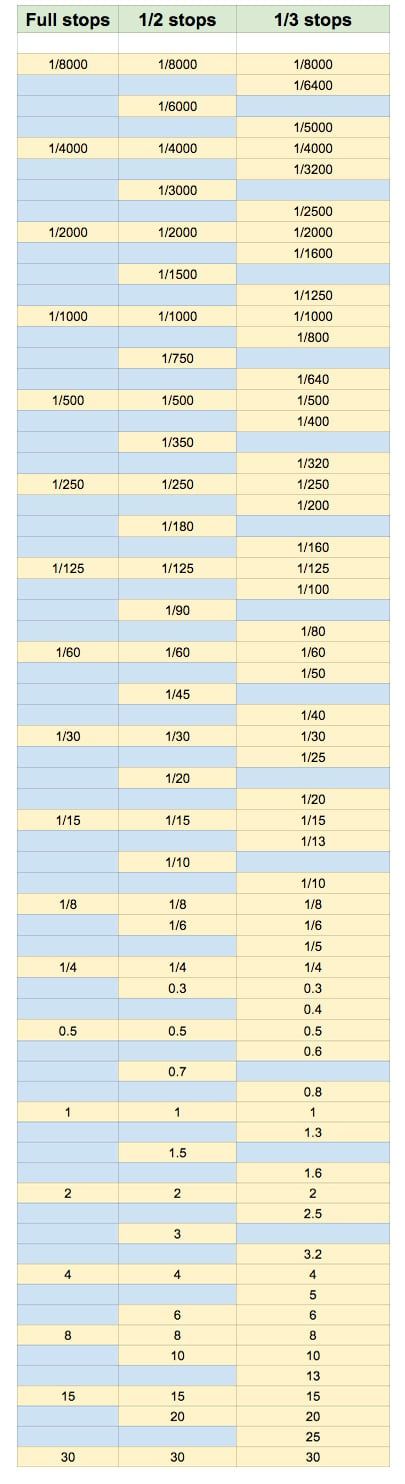
References
- Wikipedia: Shutter speed
- Wikipedia: Aperture
- Follow
- Share
- Cite
- Authors
Share this comparison:
If you read this far, you should follow us:
"Aperture vs Shutter Speed." Diffen.com. Diffen LLC, n.d. Web. 12 Dec 2022. < >
Understanding ISO, Shutter Speed and Aperture
It is difficult to take good pictures without having a solid understanding of ISO, Shutter Speed and Aperture – the Three Kings of Photography, also known as the “Exposure Triangle“. While most new DSLRs have “Auto” modes that automatically pick the right shutter speed, aperture and even ISO for your exposure, using an Auto mode puts limits on what you can achieve with your camera. In many cases, the camera has to guess what the right exposure should be by evaluating the amount of light that passes through the lens. Thoroughly understanding how ISO, shutter speed and aperture work together allows photographers to fully take charge of the situation by manually controlling the camera.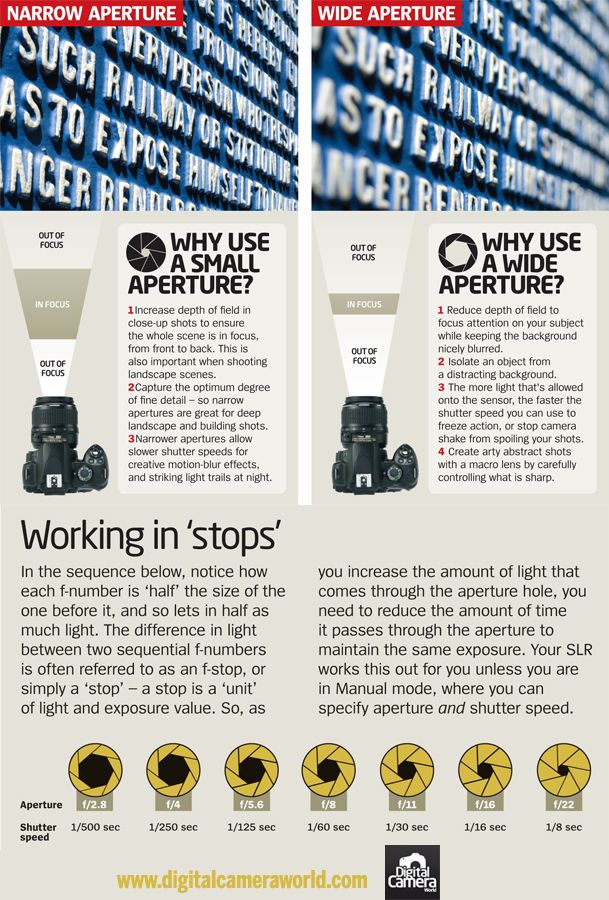 Knowing how to adjust the settings of the camera when needed, helps to get the best out of your camera and push it to its limits to take great photographs.
Let’s quickly review a summary of the Exposure Triangle as a refresher:
- Shutter Speed – the length of time a camera shutter is open to expose light into the camera sensor. Shutter speeds are typically measured in fractions of a second, when they are under a second. Slow shutter speeds allow more light into the camera sensor and are used for low-light and night photography, while fast shutter speeds help to freeze motion. Examples of shutter speeds: 1/15 (1/15th of a second), 1/30, 1/60, 1/125.
- Aperture – a hole within a lens, through which light travels into the camera body. The larger the hole, the more light passes to the camera sensor. Aperture also controls the depth of field, which is the portion of a scene that appears to be sharp. If the aperture is very small, the depth of field is large, while if the aperture is large, the depth of field is small.
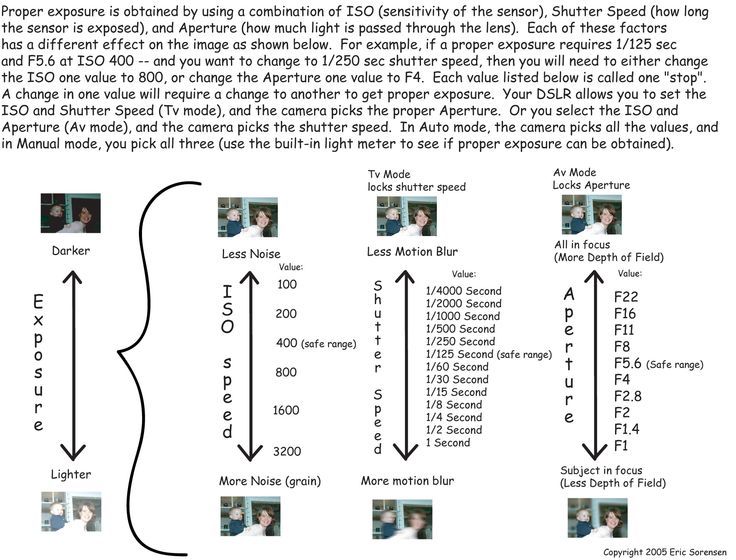 In photography, aperture is typically expressed in “f” numbers (also known as “focal ratio”, since the f-number is the ratio of the diameter of the lens aperture to the length of the lens). Examples of f-numbers are: f/1.4, f/2.0, f/2.8, f/4.0, f/5.6, f/8.0.
 - ISO – a way to brighten your photos if you can’t use a longer shutter speed or a wider aperture. It is typically measured in numbers, a lower number representing a darker image, while higher numbers mean a brighter image. However, raising your ISO comes at a cost. As the ISO rises, so does the visibility of graininess/noise in your images. Examples of ISO: 100, 200, 400, 800, 1600.
Also, take a look at this article if you would like to understand what exposure actually means.
And if you’re more of a visual learner, we recently published a comprehensive, beginner-friendly video on this exact same topic:
Table of Contents
1) How Do Shutter Speed, Aperture and ISO Work Together to Create an Exposure?
To have a good understanding about exposure and how shutter speed, aperture and ISO affect it, we need to understand what happens within the camera when a picture is taken.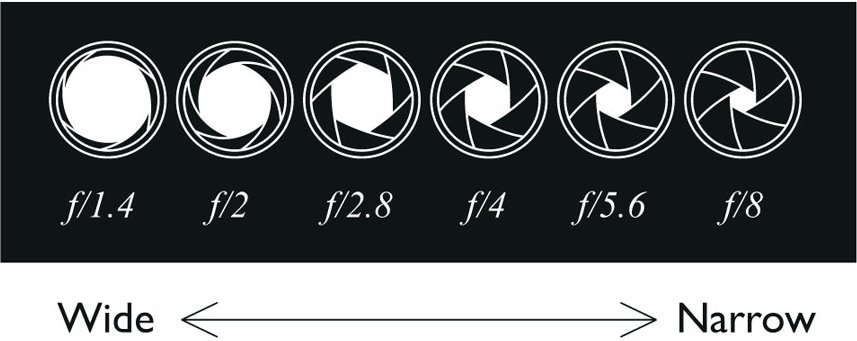
As you point your camera at a subject and press the shutter button, the subject gets into your camera lens in a form of light. If your subject is well-lit, there is plenty of light that travels into the lens, whereas if you are taking a picture in a dim environment, there is not much light that travels into the lens. When the light enters the lens, it passes through various optical elements made of glass, then goes through the lens “Aperture” (a hole inside the lens that can be changed from small to large). Once the light goes past the lens aperture, it then hits the shutter curtain, which is like a window that is closed at all times, but opens when needed. The shutter then opens in a matter of milliseconds, letting the light hit the camera sensor for a specified amount of time. This specified amount of time is called “Shutter Speed” and it can be extremely short (up to 1/8000th of a second) or long (up to 30 seconds). The sensor then gathers the light, and your “ISO” brightens the image if necessary (again, making grain and image quality problems more visible).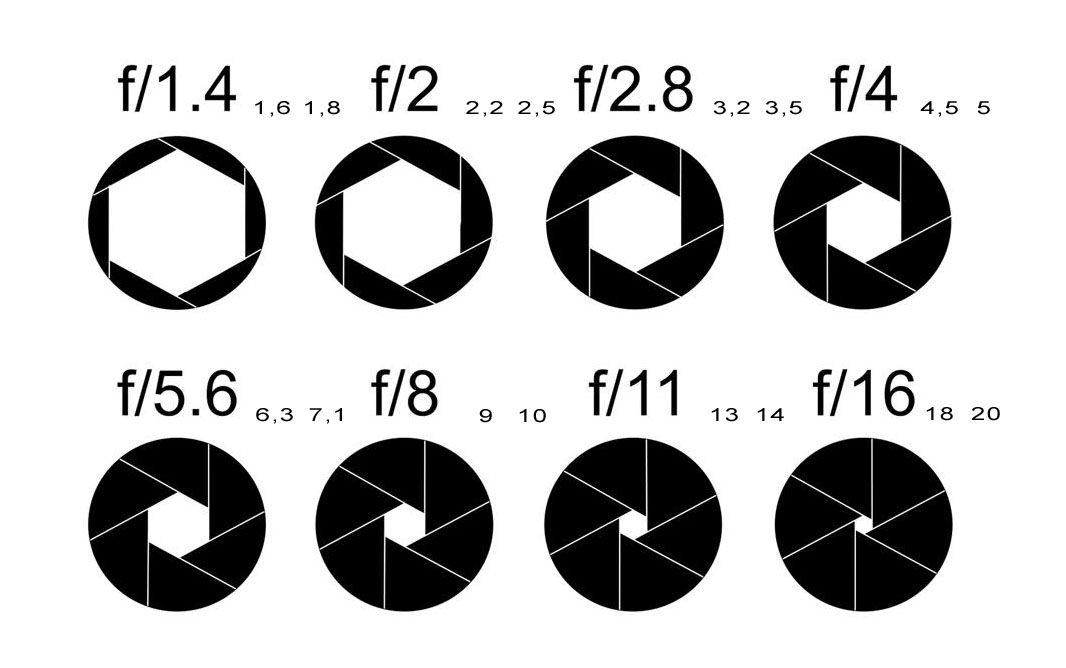 Then the shutter closes and the light is completely blocked from reaching the camera sensor.
To get the image properly exposed, so that it is not too bright or too dark, Shutter Speed, Aperture and ISO need to play together. When lots of light enters the lens (let’s say it is broad daylight with plenty of sunlight), what happens when the lens aperture/hole is very small? Lots of light gets blocked. This means that the camera sensor would need more time to collect the light. What needs to happen for the sensor to collect the right amount of light? That’s right, the shutter needs to stay open longer. So, with a very small lens aperture, we would need more time, i.e. longer shutter speed for the sensor to gather enough light to produce a properly exposed image.
Now what would happen if the lens aperture/hole was very big? Obviously, a lot more light would hit the sensor, so we would need a much shorter shutter speed for the image to get properly exposed. If the shutter speed is too low, the sensor would get a lot more light than it needs and the light would start “burning” or “overexposing” the image, just like magnifying glass starts burning paper on a sunny day.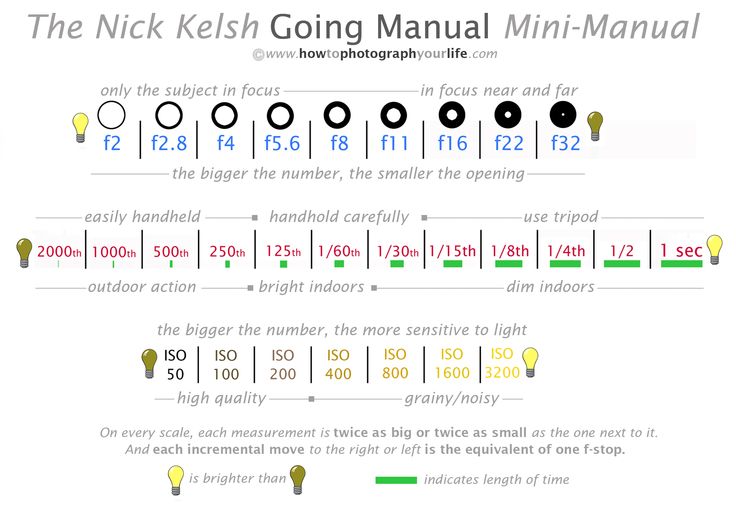 The overexposed area of the image will look very bright or pure white. In contrast, if the shutter speed is way too high, then the sensor is not able to gather enough light and the image would appear “underexposed” or too dark.
Let’s do a real-life example. Grab your camera and set your camera mode to “Aperture Priority“. Set your lens aperture on your camera to the lowest possible number the lens will allow, such as f/1.4 if you have a fast lens or f/3.5 on slower lenses. Set your ISO to 200 and make sure that “Auto ISO” is turned off. Now point your camera at an object that is NOT a light source (for example a picture on the wall) then half-press the shutter button to acquire correct focus and let the camera determine the optimal exposure settings. Do not move your camera and keep pointing at the same subject! If you look inside the camera viewfinder now or on the back LCD, you should see several numbers. One of the numbers will show your aperture, which should be the same number as what you set your aperture to, then it should show your shutter speed, which should be a number such as “125” (means 1/125th of a second) and “200”, which is your sensor ISO.
Write down these numbers on a piece of paper and then take a picture. When the picture comes up on the rear LCD of your camera, it should be properly exposed. It might be very blurry, but it should be properly exposed, which means not too bright or too dark. Let’s say the settings you wrote down are 3.5 (aperture), 125 (shutter speed) and 200 (ISO). Now change your camera mode to “Manual Mode“. Manually set your aperture to the same number as you wrote down, which should be the lowest number your camera lens will allow (in our example it is 3.5). Then set your shutter speed to the number you wrote down (in our example it is 125) and keep your ISO the same – 200. Make sure your lighting conditions in the room stay the same. Point at the same subject and take another picture. Your results should look very similar to the picture you took earlier, except this time, you are manually setting your camera shutter speed, instead of letting your camera make the guess. Now, let’s block the amount of light that is passing through the lens by increasing the aperture and see what happens.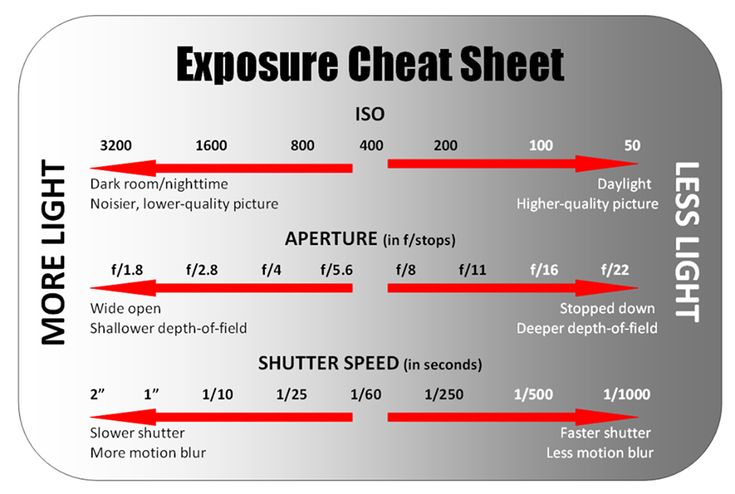 Increase your aperture to a larger number such as “8.0” and keep the rest of the settings the same. Point at the same subject and take another picture. What happened? Your image is too dark or underexposed now! Why did this happen? Because you blocked a portion of the light that hits the sensor and did not change the shutter speed. Because of this, the camera sensor did not have enough time to gather the light and therefore the image is underexposed. Had you decreased the shutter speed to a smaller number, this would not have happened. Understand the relationship?
Now change your aperture back to what it was before (smallest number), but this time, decrease your shutter speed to a much smaller number. In my example, I will set my shutter speed to 4 (quarter of a second) from 125. Take another picture. Now your image should be overexposed and some parts of the image should appear too bright. What happened this time? You let your lens pass through all the light it can gather without blocking it, then you let your sensor gather more light then it needs by decreasing the shutter speed.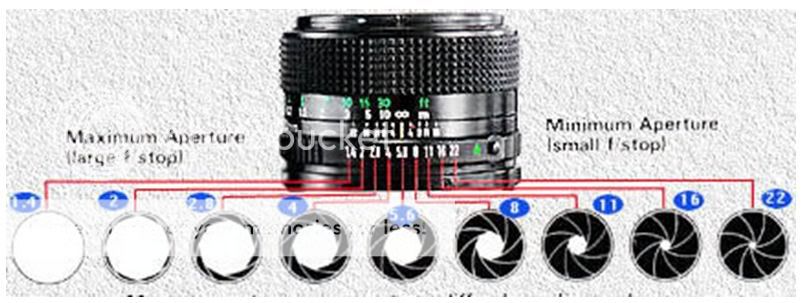 This is a very basic explanation of how aperture and shutter speed play together.
So, when does ISO come into play and what does it do? So far, we kept the ISO at the same number (200) and didn’t change it. Remember, ISO means sensor brightness. Lower numbers mean lower brightness, while higher numbers mean higher brightness. If you were to change your ISO from 200 to 400, you would be making the photo twice as bright. In the above example, at aperture of f/3.5, shutter speed of 1/125th of a second and ISO 200, if you were to increase the ISO to 400, you would need half the time to properly expose the image. This means that you could set your shutter speed to 1/250th of a second and your image would still come out properly exposed. Try it – set your aperture to the same number you wrote down earlier, use a shutter speed that is twice as fast, then change your ISO to 400. It should look the same as the first image you took earlier. If you were to increase the ISO to 800, you would need to again use a shutter speed that’s twice as fast, from 1/250 to 1/500.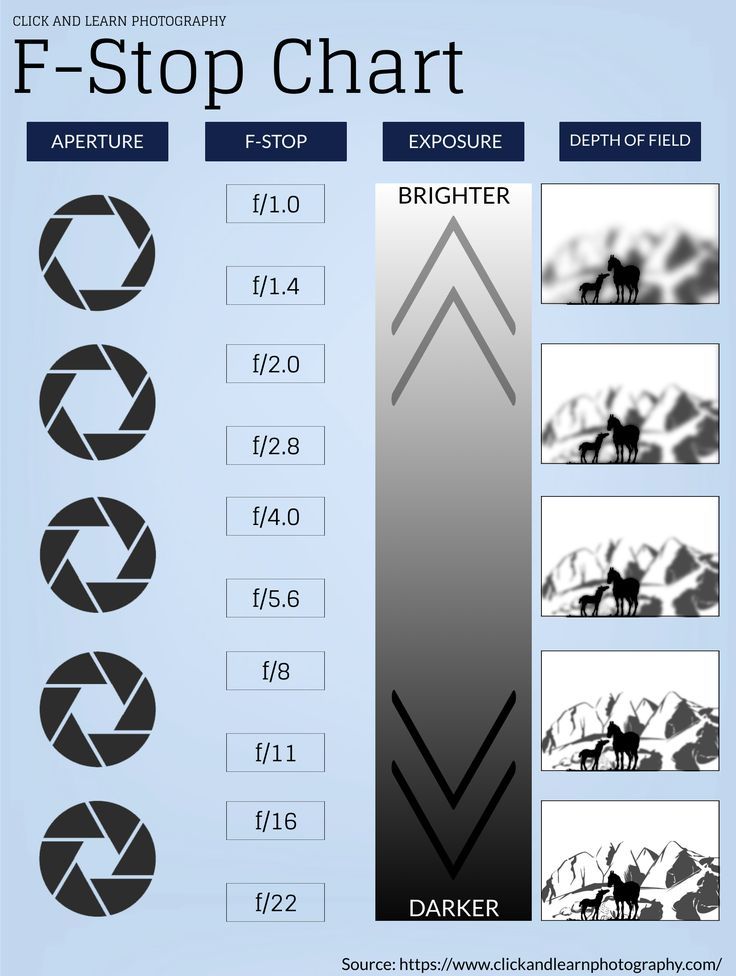
As you can see, increasing ISO from 200 to 800 will allow you to shoot at higher shutter speeds and in this example increase it from 1/125th of a second to 1/500th of a second, which is plenty of speed to freeze motion. However, increasing ISO comes at a cost – the higher the ISO, the more noise or grain it will add to the picture.
Basically, this is how the Three Kings work together to create an exposure. I highly recommend practicing with your camera more to see the effects of changing aperture, shutter speed and ISO.
2) What Camera Mode Should I Be Using?
As I pointed out in my “Understanding Digital Camera Modes” article, I recommend using “Aperture Priority” mode for beginners (although any other mode works equally well, as long as you know what you are doing). In this mode, you set your lens aperture, while the camera automatically guesses what the right shutter speed should be. This way, you can control the depth of field in your images by changing the aperture (depth of field also depends on other factors such as camera to subject distance and focal length).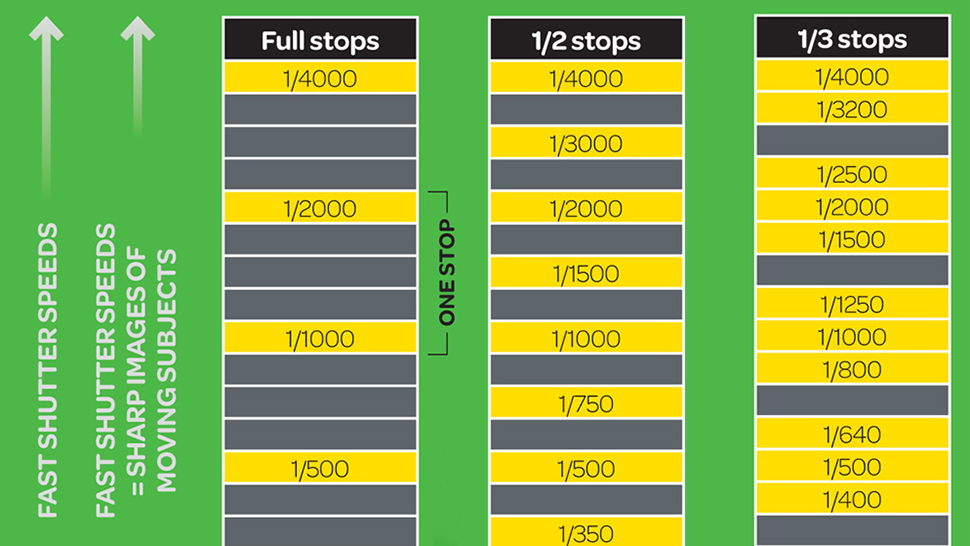 There is absolutely nothing wrong with using “Auto” or “Program” modes, especially considering the fact that most modern DSLRs give the photographer pretty good control by allowing to override the shutter speed and aperture in those modes. But most people get lazy and end up using the Auto/Program modes without understanding what happens inside the camera, so I highly recommend to learn how to shoot in all camera modes.
3) What ISO Should I Set My Camera To?
If your camera is equipped with an “Auto ISO” feature (known as “ISO Sensitivity Auto Control” on Nikon bodies), you should enable it, so that the camera automatically guesses what the right ISO should be in different lighting conditions. Auto ISO is worry-free and it works great for most lighting conditions! Set your “Minimum ISO/ISO Sensitivity” to 100 on Canon cameras and 200 on latest Nikon cameras, then set your “Maximum ISO/Maximum Sensitivity” to 800 or 1600 (depending on how much noise you consider acceptable). Set the “Minimum Shutter Speed” to 1/100th of a second if you have a short lens below 100mm and to a higher number if you have a long lens. Basically, the camera will watch your shutter speed and if it drops below the “Minimum Shutter Speed”, it will automatically increase the ISO to a higher number, to try to keep the shutter speed above this setting. The general rule is to set your shutter speed to the largest focal length of your lens. For example, if you have a Nikon 70-300mm f/4.5-5.6 zoom lens, set your minimum shutter speed to 1/300th of a second. Why? Because as the focal length of the lens increases, so do the chances of having a camera shake that will render your images blurry. But this rule doesn’t always work, because there are other factors that all play a role in whether you will introduce camera shake or not. Having shaky hands and improperly holding the camera might cause extra camera shake, while having a lens with Vibration Reduction (also known as Image Stabilization) might actually help to decrease camera shake.
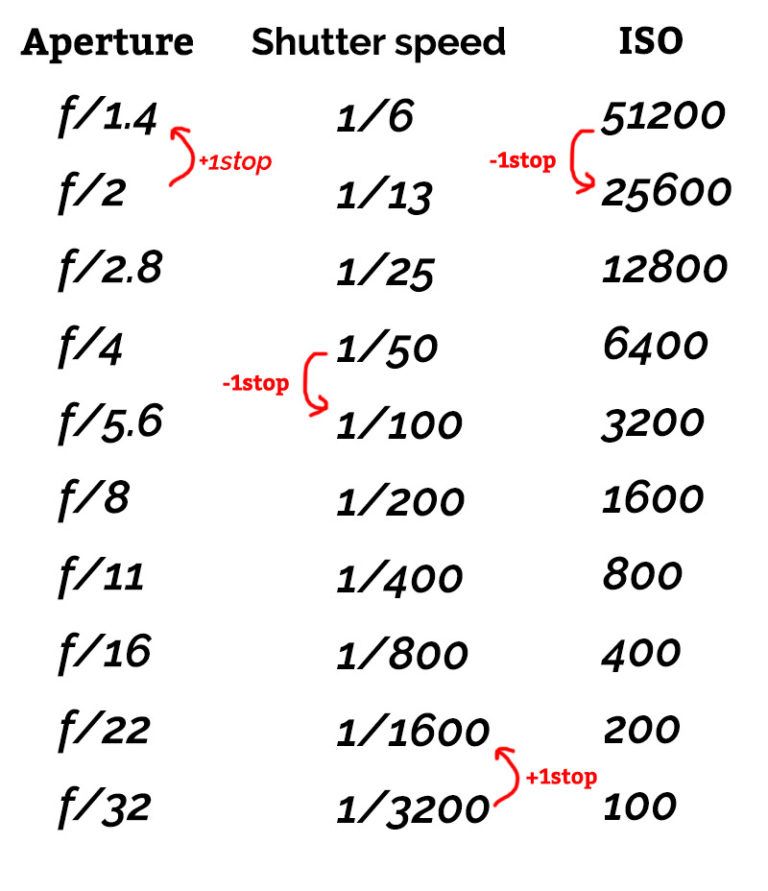 Either way, play with the “Minimum Shutter Speed” option and try changing numbers and see what works for you.
If you do not have an “Auto ISO” option in your camera, then start out with the lowest ISO and see what shutter speeds you are getting. Keep on increasing the ISO until you get to an acceptable shutter speed.
4) Exposure Compensation
Another great feature of all modern DSLRs, is the ability to control the exposure by using the “exposure compensation” feature. Except for manual mode, exposure compensation works great for all camera modes. Whether you are shooting in Aperture Priority, Shutter Priority or Auto/Program modes, dialing the exposure compensation up or down (plus to minus) will allow you to regulate the exposure and override the camera-guessed settings. If you find your image (or parts of your image) underexposed or overexposed, you can use exposure compensation to adjust the exposure without manually changing the aperture or shutter speed.
5) Should I Use Flash or Increase ISO?
It really depends on what you are taking a picture of. Sometimes it is not possible to use your built-in camera flash in a low-light environment. For example, if your subject is standing far away, you might not be able to reach the subject with your flash. In that case, the only solution is to either come closer to the subject, or turn off flash completely and use a higher ISO. Obviously, for landscape or architectural photography, you should always turn off your flash, because it will not be able to brighten up the entire scene. So in a low-light situation, the only two options are to either increase the ISO so that you can shoot hand-held, or set the camera to the lowest ISO and use a tripod.
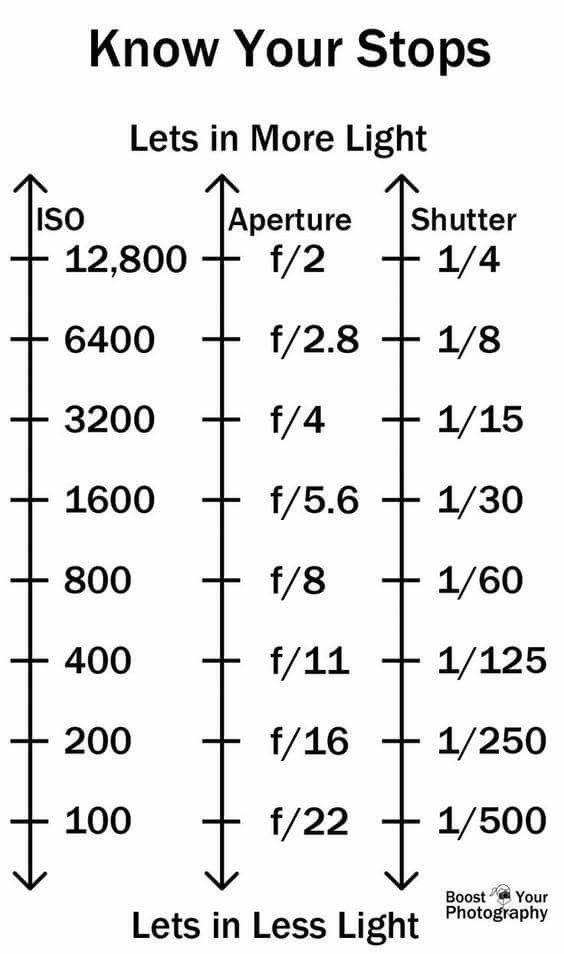
6) What are “Full Stops”?
Have you ever heard of a term “full stop” in photography? Each of the increments between ISO numbers is called “a full stop” in photography. For example, there is one full stop between ISO 100 and ISO 200, while there are two full stops between ISO 100 and ISO 400. How many stops are there between ISO 100 and ISO 1600? That’s right, four full stops of light.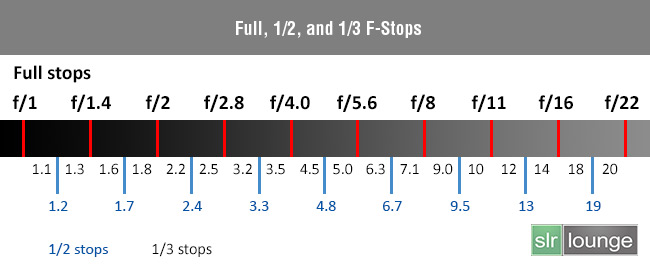 Why do you need to know about stops? Because you might see it in photography literature or photographer might mention stops and it is sometimes confusing to understand what it truly means. But the term “full stop” does not just apply to ISOs – the same concept is there for shutter speed and aperture. It is easy to remember full stops between shutter speeds, because you just start from one and divide the number by two: 1, 1/2, 1/4, 1/8, 1/15, 1/30, 1/60, 1/125, 1/250, 1/500, 1/1000, etc. Obviously, the numbers are rounded (starting from 1/15, which should be 1/16) to make it easy for photography. It is harder to memorize stops in apertures, because the numbers are computed differently: f/1, f/1.4, f/2, f/2.8, f/4, f/5.6, f/8, f/11, f/16, etc. To read more about stops, please see our detailed Exposure Stops article.
7) Specific Examples and Case Scenarios
Let’s now go over what you could do in your camera to properly expose an image in different lighting conditions.
- What should I do in low-light situations? Use Aperture-Priority mode, set your aperture to the lowest possible number.
 Be careful if you have a fast lens such as Nikon 50mm f/1.4, because setting aperture to the lowest number (f/1.4) will make the depth of field very shallow. Set your “Auto ISO” to “On” (if you have it) and make sure that the maximum ISO and minimum shutter speed are both defined, as shown in section 3. If after increasing your ISO you are still getting small shutter speeds (which means that you are in a very dim environment), your only other options are to either use a tripod or a flash. If you have moving subjects that need to be “frozen”, you will have to use flash.
 - What do I need to do to freeze action? First, you will need plenty of light. Freezing action during the broad daylight is easy, whereas it is extremely tough to do it in low-light situations. Assuming you have plenty of light, make sure that your aperture is set to the lowest number (again, be careful about depth of field), then set your “Auto ISO” to “On” (if you have it) and set your minimum shutter speed to a really high number such as 1/500th or 1/1000th of a second.
 For my bird photography, I try to keep shutter speeds at 1/1000th of a second and faster:
- What should I do in low-light situations? Use Aperture-Priority mode, set your aperture to the lowest possible number.
- What settings do I need to change to create a motion blur effect? Turn off Auto ISO and set your ISO to the lowest number. If the shutter speed is too fast and you still cannot create motion blur, increase aperture to a higher number until the shutter speed drops to a low number below 1/100-1/50 of a second.
- What do I do if I cannot get proper exposure? The image is either too dark or too bright. Make sure that you are not shooting in Manual Mode. Set your camera meter to “Evaluative” (Canon) or “Matrix” (Nikon). If it is already set and you are still getting improper exposure, it means that you are probably taking a picture where there is a big contrast between multiple objects (for example bright sky and dark mountains, or sun in the frame) – whatever you are trying to take a picture of is confusing the meter within your camera.
 If you still need to take a picture, set your camera meter to “Spot” and try to point your focus point to an area that is not too bright or too dark. That way you get the “sweet middle”.
 - How can I isolate my subject from the background and make the background (bokeh) look soft and smooth? Stand closer to your subject and use the smallest aperture on your lens. Some lenses can render background much better and smoother than others. If you do not like the bokeh on yours, consider getting a good portrait lens such as the Nikon 50mm f/1.4 or the Nikon 85mm f/1.4, which is considered to be one of the best lenses when it comes to bokeh.
- How can I decrease the amount of noise/grain in my images? Turn off “Auto ISO” and set your ISO to the base ISO of the camera (ISO 100 on Canon and ISO 200 on Nikon).
Previous: What is ISO?
Law of reciprocity. manual mode. Manual
Switching from automatic to manual photography can be nerve-wracking, especially if the user is not fully aware of the functions associated with each of the exposure settings.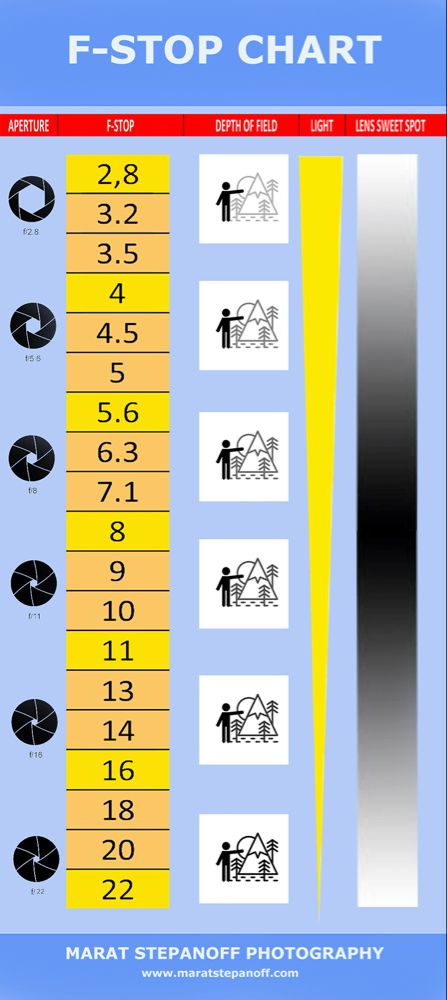 Since this article explains the concept of the law of reciprocity for manual mode, we hope that it will help you understand the relationship between stop compensation between ISO, shutter speed and aperture, and apply all the skills to your daily photography without difficulty.
Reciprocity in this context is the relationship between shutter speed and aperture. It stipulates that increasing the aperture by one stop is equivalent to doubling the shutter speed. Both increase the light by one stop.
When you have the right level of light for a perfect exposure, you can increase your aperture by one stop and trade that in for doubling your shutter speed (halving your exposure time). Twice as much light falling in half the time equals the same amount of light. This allows the photographer to keep the same exposure but change aperture or shutter speed for artistic or practical reasons.
To brush up on the exposure triangle, let's first look at the three main options available.
- Aperture
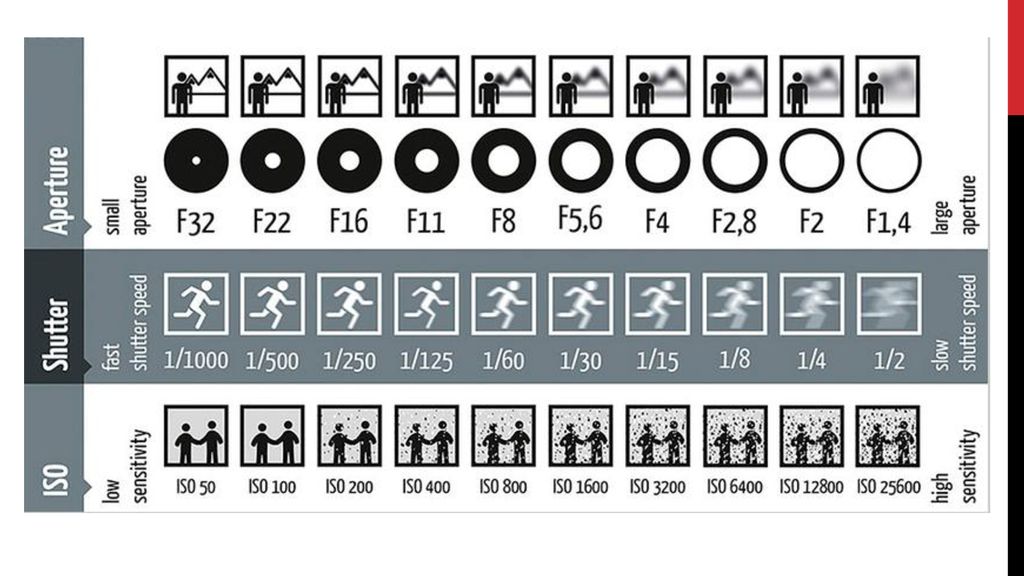
Aperture is determined by the opening of the lens through which light passes. A large aperture produces images with a shallower depth of field, gradient blur, and allows more light to enter (example shown above on the left). A smaller aperture lets you capture less light, less gradient blur, and more depth of field.
Aperture is defined in f-stops (for example, f/4 or f/2.8 is the focal length of a lens divided by the diameter), but like everything photographic, it refers to stops of light. The smaller the f-number, the larger the aperture.
Apertures can be remembered with a simple concept - alternately doubling the numbers 1 and 1.4. So 1, 1.4, 2, 2.8, 4, 5.6, 8, 11, 16, 22, 32, each of which is an increase of 1 stop. Therefore, f/1.4 is one stop higher than f/1, f/8 is three stops higher than f/2.8.
- Shutter speed
Shutter speed indicates how fast the camera shutter closes when taking a photo.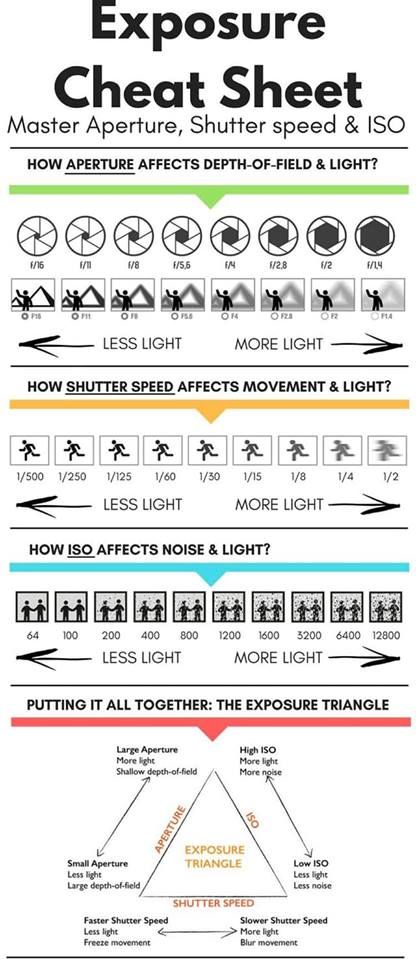 A slow shutter speed allows you to capture more light, which will make your shot brighter, but will blur the movement of your subject (assuming it's moving). Fast shutter speeds capture a moving subject, reduce camera shake, but capture less light.
At a shutter speed of, say, 1/100 second, it takes twice as long to open as 1/200 second, and therefore lets in light twice as long. Shutter speeds are measured in seconds and fractions of a second, and they can also be compared in stops of light with doubling the duration, which means 1 stop more.
- ISO
ISO refers to the graininess and sensitivity of the camera to light. A low ISO setting creates less image noise and reduces light sensitivity. Higher ISO creates more visible noise and increases light sensitivity.
So ISO can be used to influence combinations of shutter speed and aperture.
Law of reciprocity
The brightness of an image is determined by the amount of light that hits the light sensor and the sensitivity of that sensor.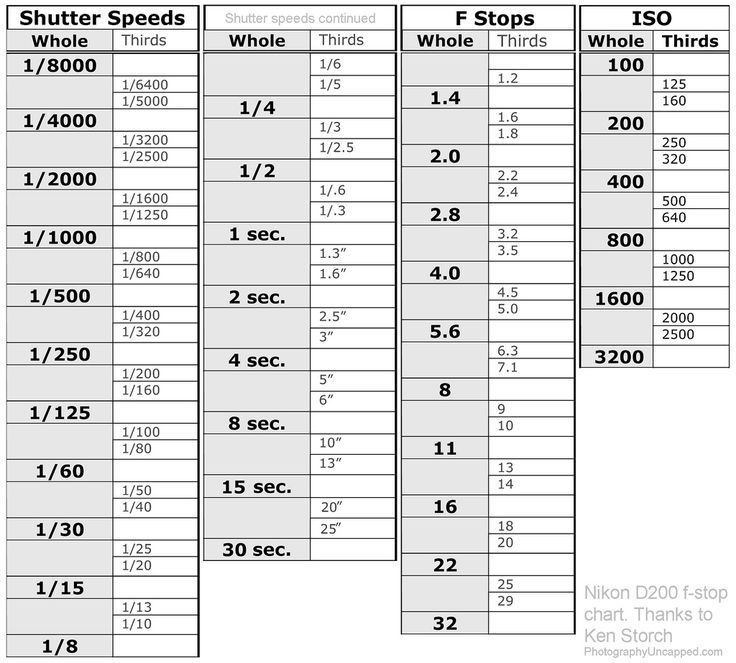 This is controlled by exposure time (shutter speed), light intensity (aperture), and sensor or film sensitivity (ISO).
Simply put, the law of reciprocity is essentially the act of compensating for an equal - or close to equal - number of stops of one exposure setting by others. It will help you as a photographer to achieve the same or nearly the same exposure in your photo, but with different effects depending on the exposure compensation setting.
When setting these items, you take into account this law, which establishes an inverse relationship between the intensity and duration of the light that the camera is exposed to in order to shoot with the correct exposure. ISO simply acts as an additional method of control.
Exposure = Intensity * Time
Equivalent exposures can be obtained by reducing one option and increasing the other proportionally. Therefore, if the duration is halved, the intensity must be doubled.
By balancing the value with ISO, the image will either increase or decrease noise.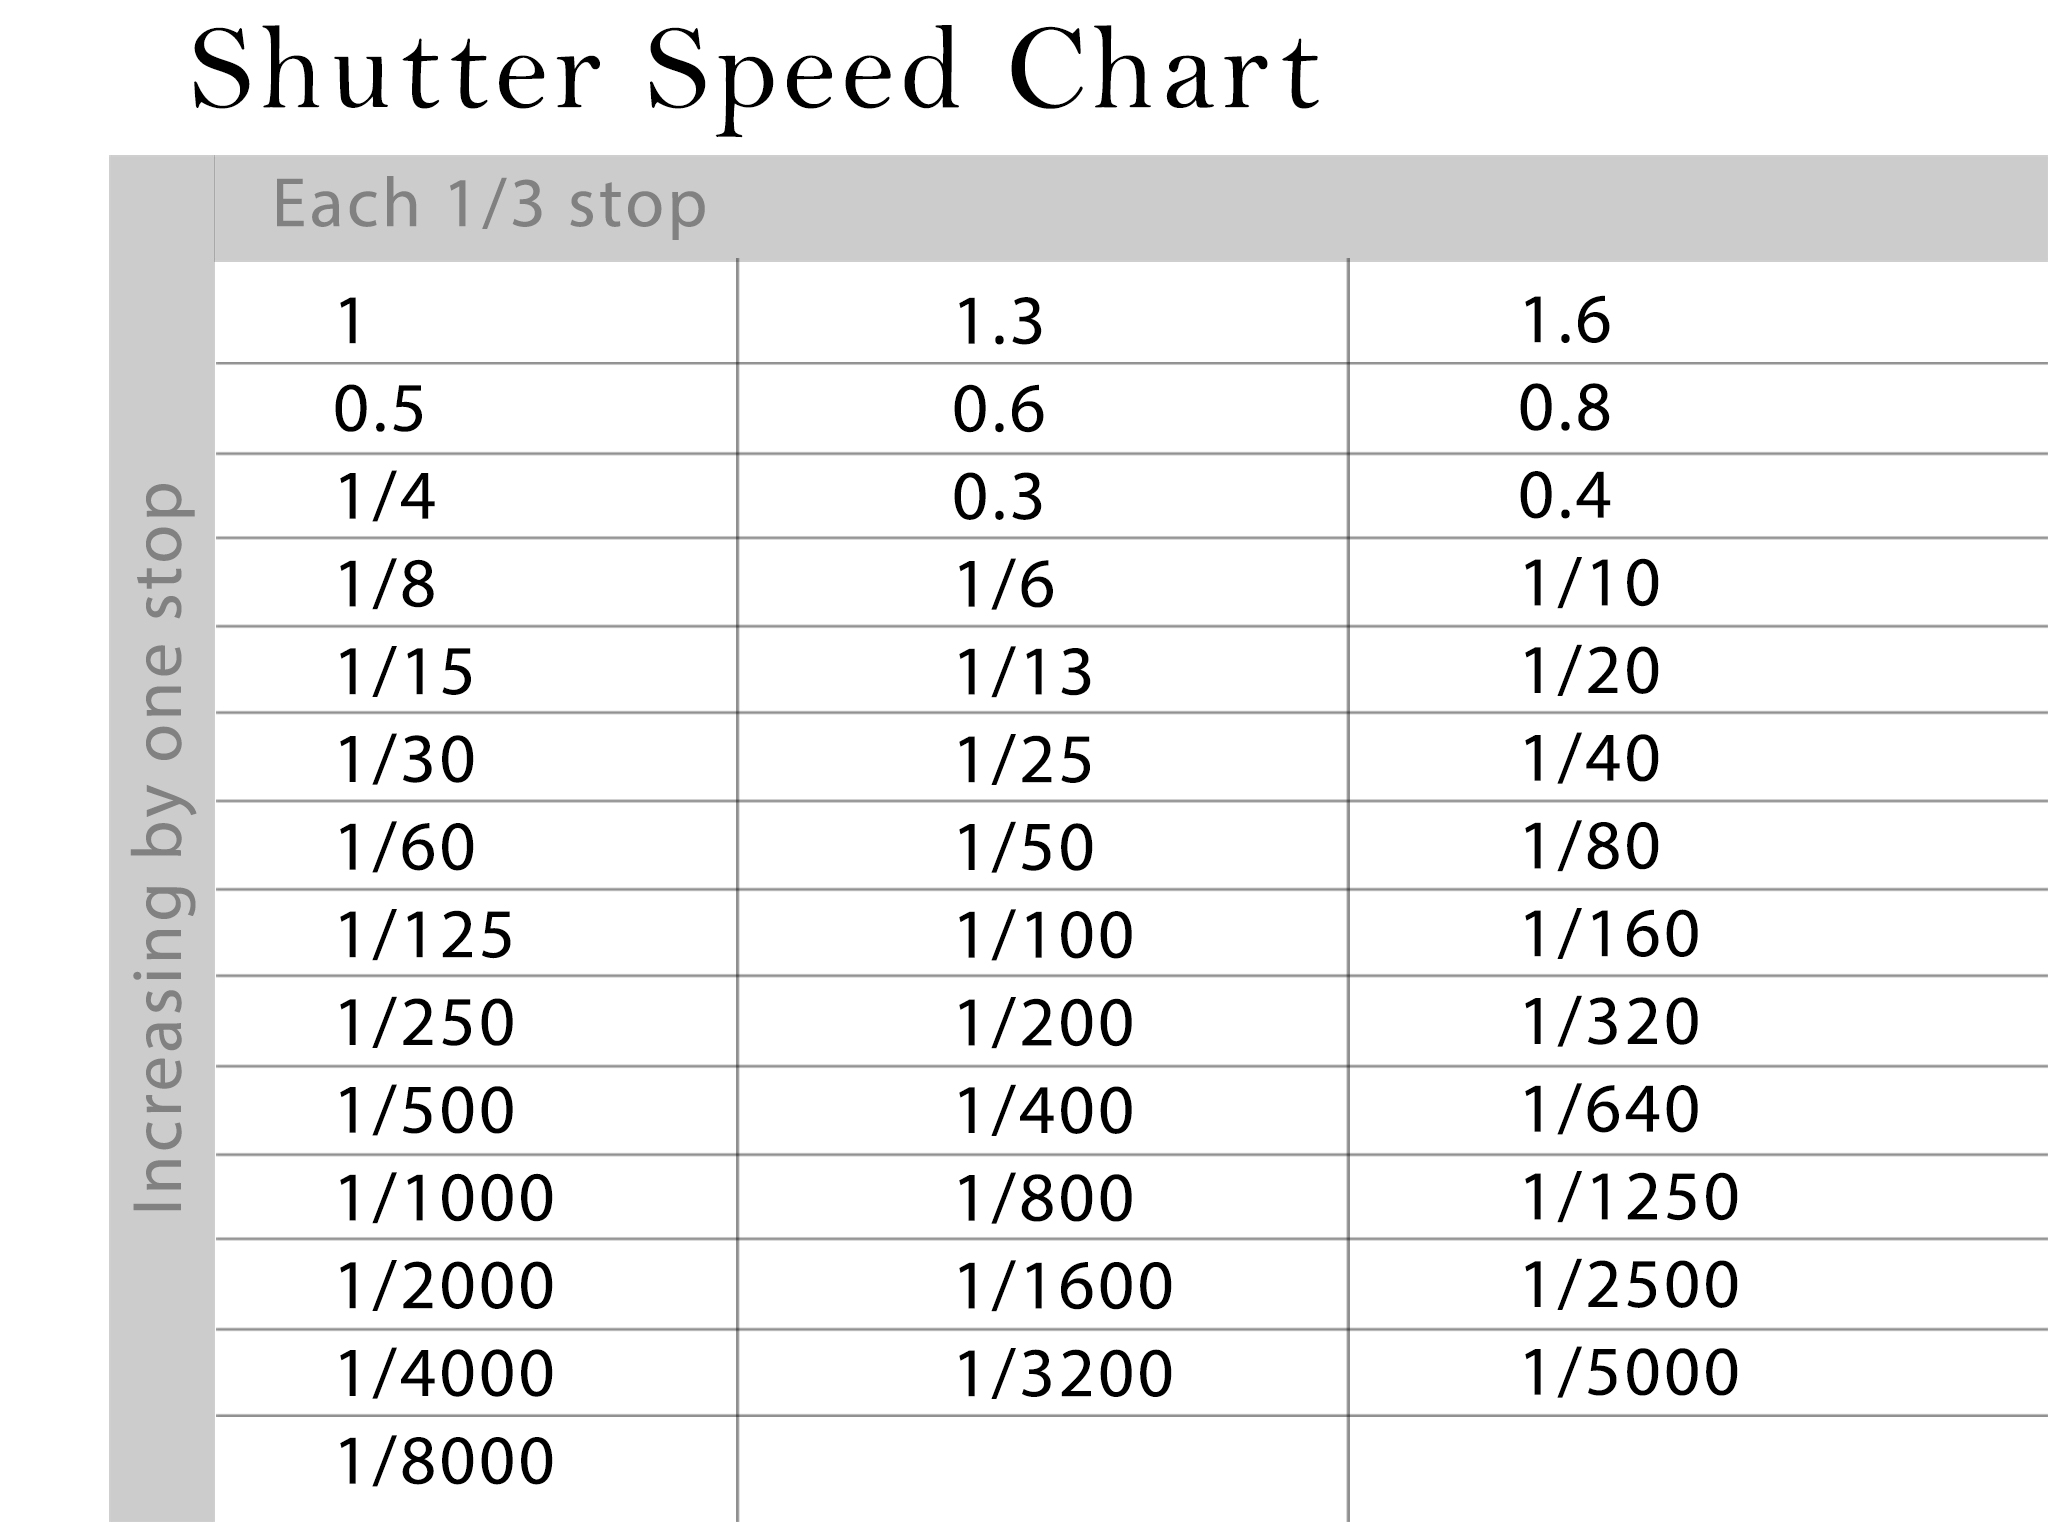 This applies to other exposure settings where you can achieve more or less motion blur with shutter speed and more or less depth of field with aperture.
If you have a camera nearby, grab one and practice with the situational examples below!
The law of reciprocity in situations of use
- Situation 1. You want to capture more details of the globe and highlight the globe against the background of plants. You have used the largest aperture possible for a shallow depth of field.
Solution: If you are not satisfied with the result even after using the largest aperture to achieve the minimum depth of field, you can use a larger focal length (from 35 mm to 70 mm) to compress the background and increase the blur beyond globe (focal point). However, this will increase your apertures and thus make the image darker. In order to capture more details of the globe, we decided to use a faster shutter speed (from 1/8 to 1/60s), which also darkened the image.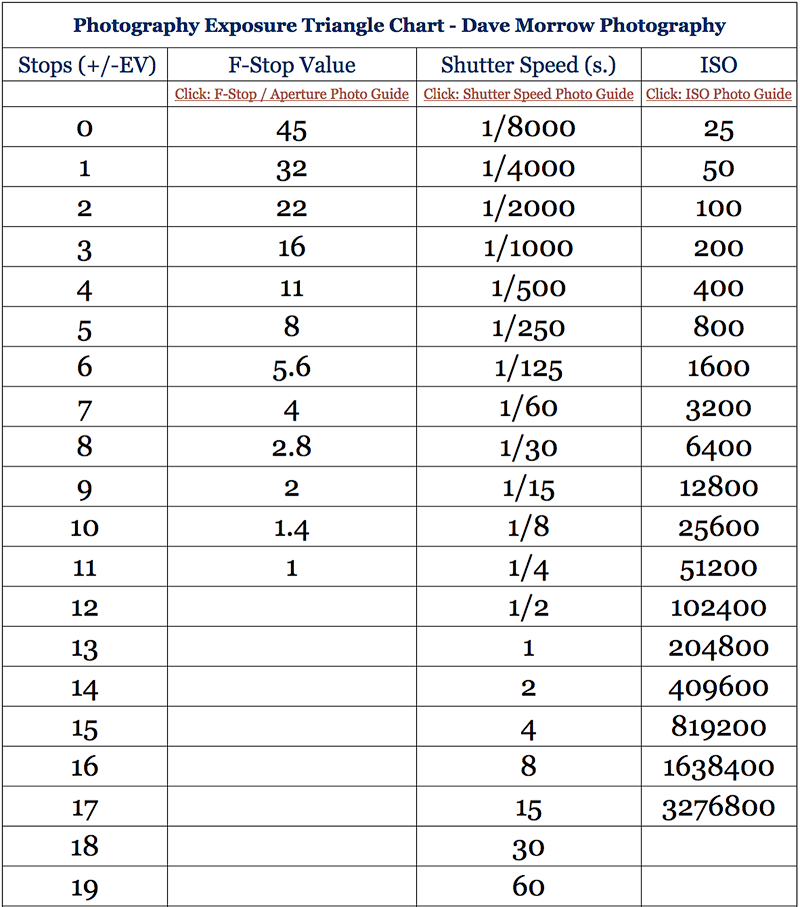
This means that you have now compensated for the underexposed image due to changes in aperture and shutter speed with your ISO (ISO 200 to ISO 2500).
- Situation 2: you want to sharpen the plants so that they complement the globe in the picture while maintaining the same brightness. Also, more movement of the sphere needs to be captured.
Solution: You can use a smaller aperture of f/11 to make the plants in your frame clearer. However, using a smaller aperture darkens the image. This means that you will need to compensate by using a slower shutter speed or higher ISO. Since we want to capture more of the movement of the spinning sphere, we used a slower shutter speed of 1/40s, which was doubled as a solution to brighten up the image. We also increased the ISO to achieve the same brightness as the first frame.
- Situation 3. You are shooting in a dark room and want to capture more details of the movement of the spinning sphere.
 In addition, you want the plants to be the center of attention too.
Solution A . You can use a smaller f/8 or f/11 aperture to reduce blur in your plants. You can also use a faster shutter speed to capture more details of the spinning globe. However, this will make your image even darker, leaving you to increase the ISO to make the image brighter. Raising the ISO multiple times can result in too much grain in the photo and may not produce a perfect shot, so solution B below is for you!
Solution B. In this case, you should work on compensating for external factors such as adding a light source (so you don't have to use just a high ISO to make the image brighter) or changing the scene itself. To reduce the blurring of your plants, you can move them closer to the globe while manually rotating the globe more slowly to capture detail without using a faster shutter speed.
The Law of Reciprocity in Manual Mode is a guide for those who want to hone their problem-solving skills related to the limitations of photography and the exposure triangle.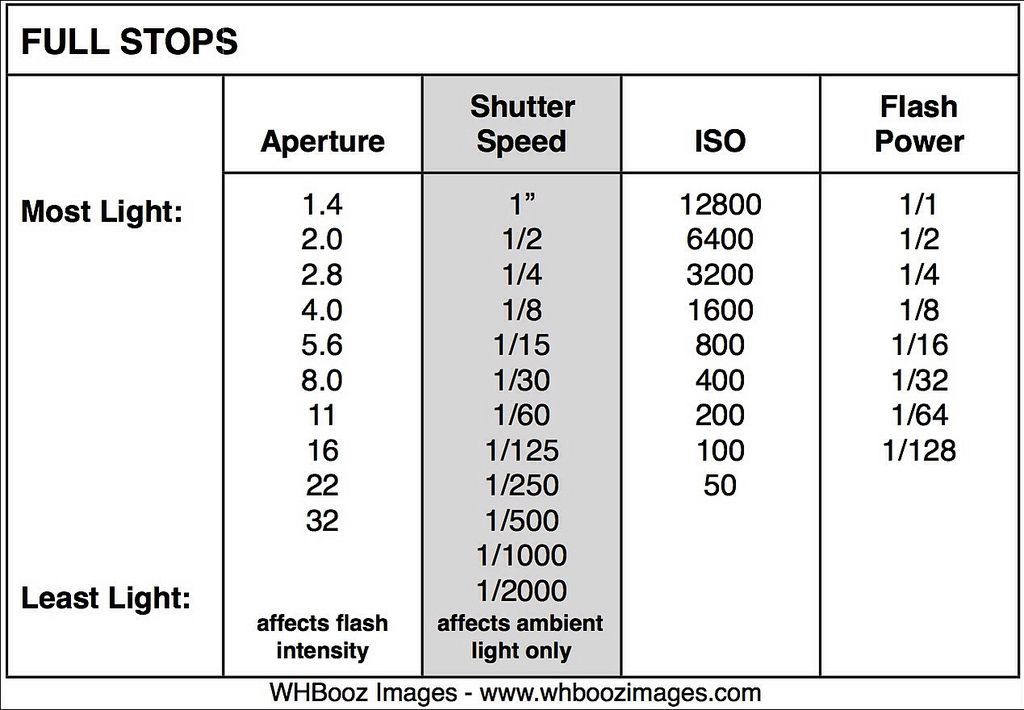 The photographer may want to overexpose or underexpose an image. Understanding the law of reciprocity allows you to do this in a manageable and intuitive way, with an understanding of the difference in exposure in the image, as well as various changes in the depth of field or any increase or decrease in motion blur.
"Stops" in exposure
Exposure is determined by shutter speed (shutter speed), aperture and ISO. "Stops" allows you to compare and change these three parameters to get the desired image. it is avoided as being too complicated, but in fact it is extremely simple:
Stop is doubling or halving the amount of light hitting the sensor during shooting.0013
And if you hear from a photographer, for example, that he wants to increase the exposure by one stop, it just means that he is going to double the amount of light hitting the sensor compared to the previous frame.
The term "Stop" is a measure of exposure and means doubling or halving the amount of light hitting the camera's sensor.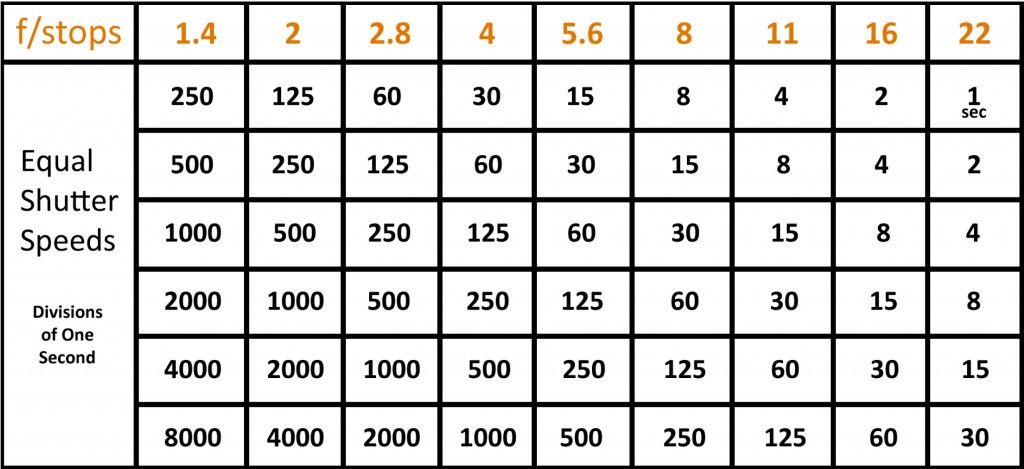
The amount of light that hits the sensor when shooting is the exposure. Exposure is determined by three parameters - shutter speed, aperture diameter and ISO (light sensitivity). All these parameters have different units of measure, and it is the concept of "stops" that is designed to be able to compare them with each other.
Stops and shutter speed
The shutter speed determines how long the camera's shutter will be open during shooting. The longer it is open, the more light enters the matrix and the greater the final exposure becomes. Doubling and halving shutter speed results in a 1-stop increase or decrease in exposure.
Typical exposure stops that the exposure is reduced by 1 stop. Similarly, if we change the shutter speed from 1/60 to 1/30 of a second, thereby doubling the amount of light, we will have an increase in exposure by 1 stop.
Most cameras have 1/3-stop shutter speed increments, so three steps is equivalent to a 1-stop exposure change.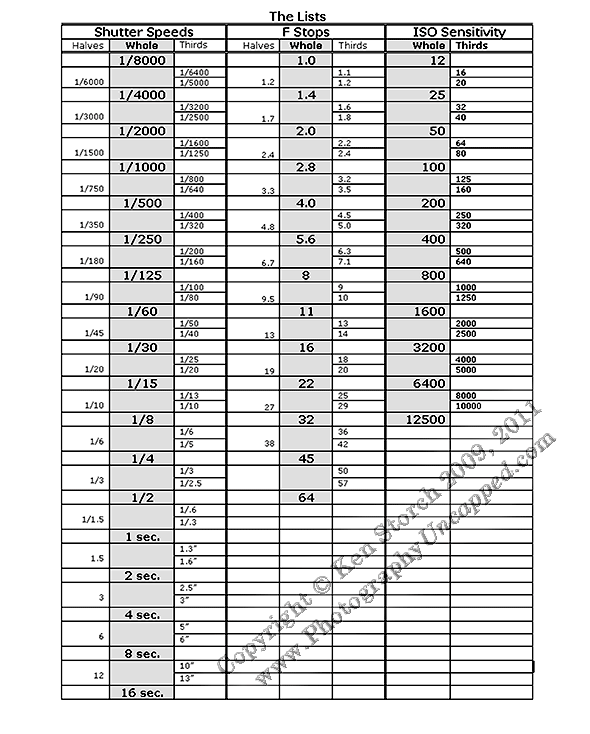
Feet and ISO
The ISO value indicates how sensitive the camera's sensor is to the light that hits it. Other things being equal, a faster shutter speed or smaller aperture can be used with a more light sensitive sensor and end up with the same exposure as with a less sensitive sensor and more light.
Typical ISO stops
The ISO number is measured according to the American Standards Association scale, developed for films. The ratio is as follows - the higher the ISO value, the higher the sensitivity of the matrix. Doubling the ISO gives a 1-stop increase, halving it reduces the exposure by 1 stop, the principle is the same as with shutter speed.
For example, changing the ISO speed from 100 to 200 doubles the sensitivity of the sensor, resulting in a 1-stop increase in exposure. Similarly, changing from ISO 800 to ISO 400 reduces exposure by 1 stop. The step of changing the ISO number on most cameras is 1 stop.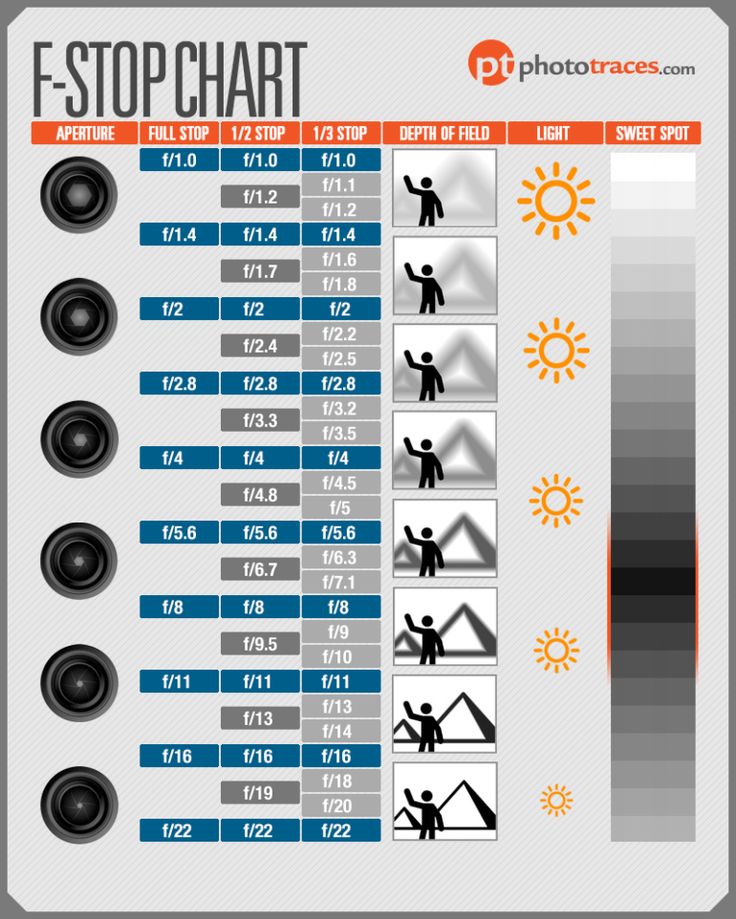
Stops and Diaphragm
Aperture is measured by numbers preceded by an f, sometimes called "f-stop", which refers to the diameter of the diaphragm. The smaller the number after f, the larger the aperture and the more light hits the sensor; the larger the number after f, the narrower the aperture and the less light enters the camera.
Typical aperture stops
In the case of aperture, doubling or halving the aperture value does not give a whole stop. In this case, the coefficient is 1.41 (the square root of two). For example, changing the aperture value from f/2.8 to f/4 is equivalent to decreasing the exposure by 1 stop, since 4 = 2.8 * 1.41. Changing the aperture from f/16 to f/11 increases the exposure by 1 stop, since 11 = 16/1.41.
As with shutter speed, most cameras have 1/3 stop apertures.
Equivalence stops
Stops allow us to directly compare shutter speed, aperture and ISO.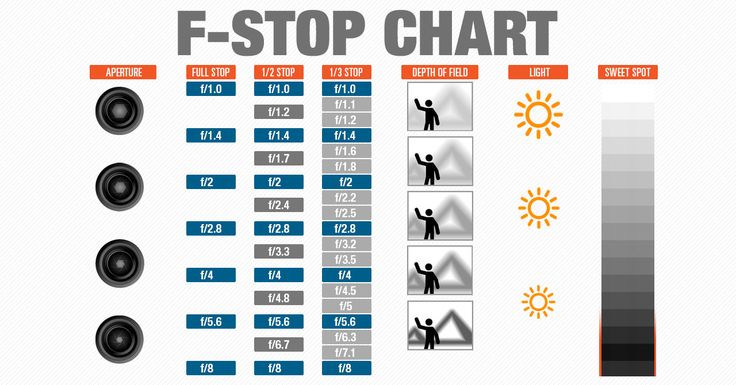 This means that you can easily change these three parameters while leaving the exposure unchanged.
Let's take an example. Let's say you're shooting at 1/60s, f/8, and ISO 200. However, you find that your subject will be a bit blurry at this speed, so you decide to lower your shutter speed to 1/120s.
With this decrease in exposure by 1 stop, you will get a dark frame, since the light now penetrates the matrix 2 times less than before this change. To compensate for this reduction, you must now raise your exposure by 1 stop at the expense of something else. Now, since we know how to change stops, this will be fairly easy to do.
For example, you can open the aperture wider to let in more light - set f / 5.6 instead of f / 8 - thereby raising the exposure by one stop and returning, in fact, to the original version. Or you can increase the ISO speed to ISO 400, which will also increase by 1 stop.
It is easy to see that stops are an easy way to set and adjust exposure.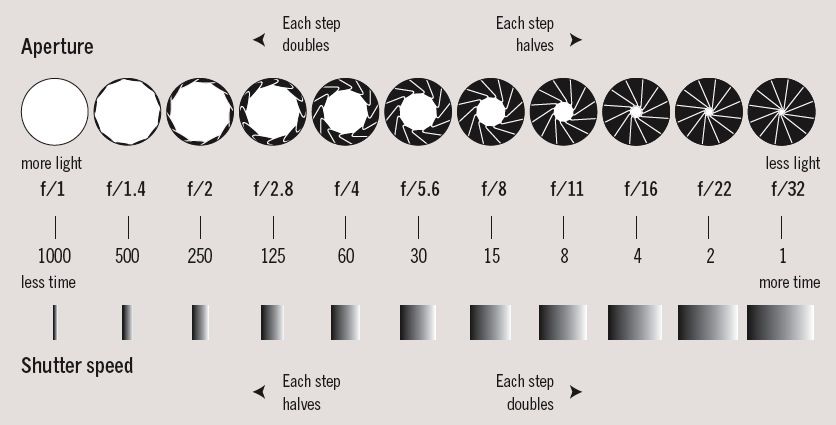
Exposure specifics
When changing the three exposure settings, always remember that changing each of these settings has a different effect.
Extract. If the shutter speed is relatively slow, the photo may come out blurry, either from camera shake during shooting or from the movement of the subject itself.
Diaphragm. A wide aperture produces a shallow depth of field, and some subjects in the composition may be out of focus. On the other hand, shallow depth of field allows you to isolate the subject. Therefore, if you want to achieve this effect, you should not use narrow apertures (large f-numbers).
ISO . The higher the ISO, the more "noise" is present in the photo, and the clarity also decreases.
Like everything in photography, adjusting the three exposure settings requires a certain balance. First of all, you need to decide on the effect that you want to get and only then select the appropriate settings that will allow you to create this effect and avoid shortcomings.