Informal balance pictures
Understanding Balance in Photography
Balance is a compositional technique in photography that juxtaposes images within a frame so that the objects are of equal visual weight. When different parts of a photo command your attention equally, perfect balance is achieved. In photography, there are two main techniques of balance you should be aware of: formal and informal. We’ll discuss the difference between each and how they can affect your photo.
*** To learn more about White Balance, see our Photography 101 Workshop in our store.
Knowing how to effectively balance objects within a photo is a skill that all serious photographers must learn. The problem with improperly balanced photographs is that they are less appealing to look at and can instantly turn off a viewer.
Balancing elements in photography becomes important when you frame your shots. If you think back to the chapter on the rule of thirds, you’ll remember that we explained how placing the main subject of your photo off center can create a more dynamic photo. That’s because asymmetry makes a photo more appealing to a viewer because it causes visual tension.
The only problem with the rule of thirds is that it can also leave a wide open empty space in a photo which may make the scene feel empty. In some instances this may work very well for your image, but if it doesn’t you should try to balance the visual weight of your subject by including other objects to fill the empty space.
The two main techniques of using balance in photography are classified as formal and informal balance.
Formal Balance
Formal balance can be defined as symmetrical balance. In the previous chapter, we taught you how to achieve symmetrical balance in photography. All you have to do is frame the shot so that one or more identical or similar subjects are repeated symmetrical on each sides of a given point.
The photo below is a great example of formal balance. Notice how the egg is framed in the middle of the photo with an even amount of space around all sides. The colored triangle shapes on the table top also lends itself to using this type of balance. If this photo was framed differently (using the rule of thirds), with the egg positioned on one of the left or right side of the frame, it would most likely feel unbalanced because one half of the image would be completely empty.
Photo by PhotoChart
Portraits can benefit greatly by using formal balance. Framing a subject in the middle of the frame for a portrait can help to reduce any visual distractions a background may contain. It’s always a safe bet to frame a portrait in this way. After capturing a standard shot such as this, you can then move on to other types of positioning for the model that are more visually interesting, but still being properly balanced. This can be achieved by using informal balance.
Photo by Cosmopolitan of Las Vegas
Informal Balance
Informal balance is a less obvious form of balance in photography and requires more attention. It’s a concept that can be difficult to be specific about because it can be achieved in a variety of ways. Simply put, informal balance occurs when dissimilar elements balance each other out on each side of the frame. The size of each element can be irrelevant, but more often than not it’s better to have a larger element juxtaposed with a smaller element or elements to make a good composition.
A well composed photo using informal balance is usually more appealing to look at compared to a formally balanced photo.
Perhaps the best way to learn about informal balance is by looking at several photo examples that effectively showcase it.
Photo by Chang Liu
Notice how the photo above feels properly balanced while containing two subjects. The man’s position in the bottom left of the frame is counterbalanced perfectly by the sea creature (which is smaller in size) in the top right. If you try to imagine this photo with either one of these subjects removed, it would feel unbalanced. For example, if the sea creature was missing from the image it might feel too heavily weighted visually at the bottom of the frame with just the man looking at an empty space above. If this was the case, a center aligned formal balance might feel better to the eyes.
Photo by Shannon Kokoska
Above, is another great example of how two objects of varying size can be used to counterbalance each other within the frame. The OUT sign is tall and vertical, while the building is long and horizontal. Juxtaposing of size and direction perfectly complements each other. The positioning of both elements within the frame also provides proper balance for this photo. Notice, how in the alternate examples to the right, the photos feel unbalanced. If the building was centered in the frame, closer to the sign, a large empty space would remain on the left side of the frame, making it feel unbalanced. The same unbalanced feeling would occur if the sign was positioned in the middle of the frame, closer to the building, creating an empty space on the right of the frame.
Photo by Photography Corner
Above is a final example of a photo using informal balance. The photographer positioned himself to place the juniper in the foreground and to the left side of the image, and the rock formation in the background and to the right side of the image. This framing effectively lends foreground interest and balance to the composition. If the juniper was left out of this photo, it might feel unbalanced to the viewer.
The Rule of Thirds Works Well with Informal Balance
If you didn’t notice already, each of the previous examples followed the rule of thirds. It’s important to keep this in mind when trying to create the best looking photos that utilize the informal balance technique.
Other Ways to Use Informal Balance
In the previous examples, we showed you how objects of different size can be used to counterbalance each other within a frame. While this is the most obvious way to use informal balance in photography, there are other ways.
Other methods you can use include:
Light against dark
A small area of white in a photo can be balanced by a larger area of black, and vice versus. Each one does not have to have the same intensity.
Colors
A small area of vibrant color can be balanced by a larger area of neutral color. Vibrant colors provide more intensity and therefore large neutral areas can be used to compensate for it.
Texture
Small areas with interesting textures in a photo can be balanced by larger areas of smooth, un-textured elements.
This was an excerpt from the book Mastering the Art of Photography Composition: Learn Tips and Tricks for Better Creative Photos for Beginners and Intermediate Photographers
. For more tips and tricks professional photographers use to craft great image design and capture beautifully composed images, check out the book on his Amazon Store. The author of the book is FreeDigitalPhotographyTutorials.com, a website dedicated to helping others become better photographers through free photography tutorials.
5 Types of Balance in Photography + TOP Examples
Understanding how to use balance in your photography is crucial to creating images that have an impact on your viewer.
Balance can be quite an abstract concept to get your head around and for this reason, it often doesn’t get as much focus as it should.
Balance helps to guide the viewer’s image around the image without resting too heavily on any one particular part, creating a sense of satisfaction.
Balance will play a major role in shaping the emotional response that a photo creates so it’s important to understand how it can affect your image-making and how you can put this knowledge to good use.
See also: What is Radial Balance
What is Balance in Photography Composition?
Balance is a way of using the composition of a photo to create a sense of unity, giving a viewer a feeling of satisfaction. All of the elements within the photo work with one another, making the image complete and cohesive.
Alternatively, you might want to create a sense of imbalance to instil a feeling of disharmony, purposefully creating tension that will put your viewer on edge and disrupt their sense of how a photo should sit together.
Balance draws on mankind’s history of image-making, relying on conventions that have been used in fine art paintings for centuries. Not only do our brains naturally like these conventions, but they also teach us how to understand every new image that we see.
If an image feels balanced, it’s something that we know instinctively and can appreciate, even if that appreciation is completely unconscious.
How we choose to juxtapose the various competing elements in our photo will determine the sense of balance and there are several ways of understanding how this balance works.
(For more inspiration, check out these examples of juxtapostion photography used recently. )
)
What are the Types of Balance in Photography?
There are five different types of balance in photography.
While you might not set out with your camera and think: “Right, I’m going to use this type of balance to take this photo of this specific subject”, getting to know these basic principles will give you a solid foundation for developing as a photographer.
1. Formal / SymmetricalFormal photos are symmetrical, typically splitting the image using an imaginary, vertical line down the centre so that the left and right halves are fairly close to being identical, or at the very least hold equal amounts of visual weight.
Some small details in the scene might disrupt this symmetry, but the main subject has enough symmetrical balance that it gives an overwhelming sense of evenness in the photo, with each side of the image feeling even.
This is how many of us start out in photography: putting the subject of the image right in the middle of the frame so that there is even space on each side.
This is a basic and understandable way of creating a photo: you want to capture something in an image and it makes sense to position it in the most important part of the frame: the middle.
Symmetrical photographs surround us, often happening where an image just needs to be simple, such as in a portrait, or as a means of conveying or illustrating a basic message.
The human brain loves patterns and because of this, symmetry in photography can really grab a viewer’s attention.
While we might be keen to move on to more complex means of composing photographs, the simplicity of symmetrical balance can make it a powerful tool. It’s perfect for an impactful image where you want as few distractions as possible, and it also lends itself well to subjects such as beauty or glamour.
A perfectly centred face taps into our understanding of symmetry as something that is desirable and attractive, feeding on our own subconscious feelings that a symmetrical face is a beautiful face.
Credit: Pat Whelen
Formal photography draws heavily on fine art, going all the way back to paintings from the 15th century, or even as far back as Greek temples from 600 BC. Symmetry gives us a feeling of stability, calmness, tranquillity, and formality.
It can give us a sense that something is complete, crafted with precision and control.
The central line dividing an image doesn’t necessarily need to run vertically. Sometimes, a sense of balance symmetry can be implied, and it can even occur diagonally:
Because of all of this, a formal photo can be childishly simple in its approach, or perhaps painfully obvious in its construction, or carefully constructed to give a strong sense of balance and harmony — or possibly even a mixture of all three.
2. Informal / AsymmetricalAn informal photo uses asymmetry in its composition, creating more complex images.
At first, you might assume that this means that an informal photo is unbalanced, but the technique draws on the brain’s love of patterns to juxtapose elements in the frame so that they feel as though they are placed perfectly in relation to one another.
It is the relationship between the different elements that create a sense of balance in photography, drawing again on how as a society we have learned to see images, shaped by a history of art and the images that surround us every day.
A photograph with asymmetrical balance often ties in closely with the rule of thirds. In a photo that is 3:2 in ratio and landscape in orientation, we can take the subject away from the centre of the frame and position it so that it sits on one of the two imaginary, vertical lines that the rule of thirds suggests.
The rest of the scene will determine how the main subject can be placed when creating this sense of asymmetrical balance, but it is important to remember that a subject gains visual weight the closer it gets to the edge of the image.
Other factors such as geometry also play a key part in how this balance is created. Consider these two triangles:
The first triangle has stability and doesn’t feel like it needs to move. By contrast, the second triangle, though occupying an almost identical position, creates tension, its left-hand corner pointing us away from the centre of the frame, reflecting its unstable base and giving the impression that it wants to escape.
The first image gives a sense of asymmetrical balance, while the second image implies a sense of tension.
Similar things can occur with people. A portrait of a person positioned to one side of a frame looking inwards feels calm, but if that person is positioned to the left and is looking to the left, it creates a sense of stress.
If a person has space within the frame to gaze into — often referred to as looking space — there is a feeling of balance.
This is emphasised further if a person is moving. Consider this photo:
Even though the geometry of the composition might be pleasing, the photograph gives a sense of uncertainty as it’s not clear where the person is about to go.
A viewer might feel that this image isn’t entirely satisfying because their sense of balance is disrupted by the movement of the person towards the edge of the frame.
By contrast, giving the person space to move into can create a sense of balance and harmony:
Another way to balance out a subject that you have placed off centre is to use a secondary element on the opposite side of the image — not to balance the image perfectly in terms of symmetry or weight, but to act as a compliment.
Negative space — empty areas — can feel heavy in their visual weight, and breaking up that space can create a sense of evenness.
Often, the secondary element offers contrast to the primary subject, differing in size, geometry, brightness, vibrancy, color, texture — even focus or proximity to the lens. Background elements can be used to complement the main foreground interest.
In this example that hints towards the rule of thirds, the distant, out of focus people compliment the main subject:
Contrasting colors can also be effective:
Sometimes, depending on how it is framed, the negative space in an image can offer enough contrast to give balance:
3. Tonal Balance
Tonal balance is a form of informal balance and is best understood in terms of black and white photography.
We often try to create an even spread of tones within an image, from complete black, through a range of shades of grey, through to complete white.
Darker areas naturally carry more visual weight, and tonal balance is achieved when the various elements of an image balance out the heavier areas.
4. Color BalanceCredit: Claudio Fonte
Color offers another type of informal balance. Vibrant colors naturally carry more visual weight, while more neutral tones hold less, allowing us to try and find balance between the two.
Bold colors can feel overwhelming, and mixing in more neutral shades can even out an image. Alternatively, you might use colors that are on the opposite side of the color wheel to give balance.
This isn’t always something that we can control while shooting, but it might be something that you look to emphasise when you come to edit your photographs.
Conceptual balance is the final type of informal balance, this time moving away from the form of a subject and towards a type of balance that is metaphysical — i.e., more abstract ideas such as knowledge, being, time, and space.
Rather than using a secondary element that offers contrast in terms of shape, distance, color, tone, texture, etc., balance is achieved because the theme of that secondary element is starkly different to the main subject.
A photo that uses conceptual balance might juxtapose a historic stone building with a glass skyscraper or, as seen in our example, confinement versus freedom.
See more about conceptual photography here.
Tips for Creating Balance In Your Photographs
- Think geometrically – as you take more photographs, you will naturally start to see more geometric shapes in your images and you will start to learn how they fit together to create a pleasing and balanced composition.

- Go minimal – if a composition feels unbalanced, see if you can remove anything that is unnecessary, reducing what’s in the frame to its essential parts. The fewer elements, the easier they are to balance.
- Edit your work – this doesn’t mean playing with presets in Lightroom; instead, it means looking through your images and figuring out which ones work — and why they work.
- Play with cropping – sometimes a weak composition can be turned into a great photo by simply cropping it intelligently. Try different ratios too — 4:5 and 1:1 lend themselves to different ways of balancing a photo.
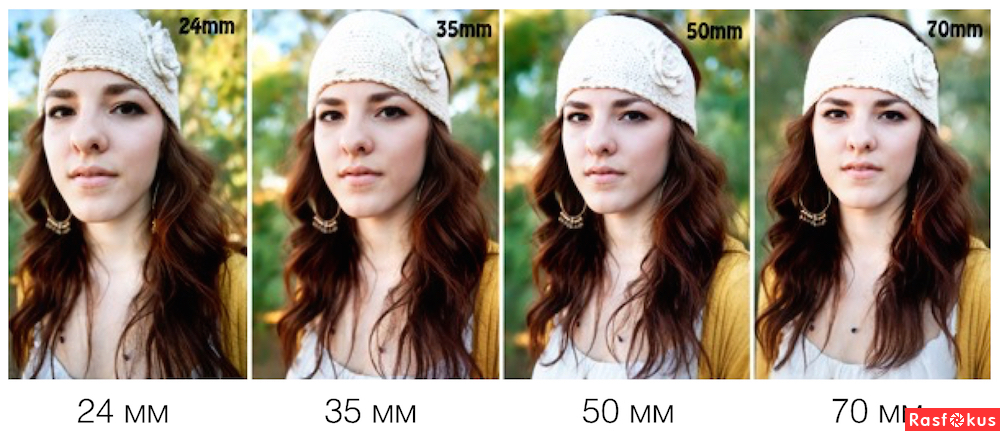
- Try a wide-angle lens – a wide-angle lens — something between 24mm and 35mm, perhaps — can feel a bit challenging at first because it takes in so much of what’s in front of you. However, the width makes it easier to find geometric shapes, and it also gives you more options to crop when you come to edit.

- Take a lot of photos – the beauty of digital photography is that there’s almost no limit to the number of photographs you can take so try lots of different compositions for the same subject. Your odds of getting a great photo are increased and by looking through your photos, you will start to learn why other compositions didn’t quite work as well.
- Spend time with the masters – the biggest names in the history of photography knew how to create balanced compositions and their work can be a valuable resource for developing your eye. And don’t forget painters — photographers are simply following the rules that they established!
- Practice – improving balance in your photographs isn’t achieved by memorising this article and applying the ideas to every photo. Finding balance comes from experience, and experience comes through practice.
Balancing Photography | Final Words
Balance is a complex subject when it comes to creating impactful photographs and, as mentioned, it’s not enough to read about how it works.![]() Instead, an understanding of balance in photography comes through taking lots of images and figuring out what works and what doesn’t.
Instead, an understanding of balance in photography comes through taking lots of images and figuring out what works and what doesn’t.
Hopefully, this article is a good starting point! Don’t be shy if you have any questions — simply drop us a comment down below. Good luck!
Highly Recommended
8 Tools for Photographers
Check out the 8 essential tools to help you succeed as a professional photographer.
Includes limited time discounts.
Learn more here
| To create interesting images, we use compositional techniques in our scenes. One of the non-trivial rules is radial equilibrium. This method aims to balance the image through radial symmetry. Let's take a look at how you can bring a touch of perfection to your images with photographer Tamara Kedves.
What is radial balance? In the context of compositional balance in photography, we are talking about formal and informal techniques. According to this approach, symmetrical balance is formal, while asymmetric balance is informal. In geometry, the term radius means the distance between the center of a circle and its outer edge.
Radial balance is a form of symmetrical balance in which elements of the image "spread" outward from a central point. Thus, they create an even pattern, adding depth and visual movement to the image. That is, radial balance comes from the idea of creating balance with radially oriented lines or shapes that draw the eye to the central focal point of the image. This can help draw the viewer's attention to the subject in the center. Typical examples are flowers with outward petals or the curled up tail of a lizard.
Radial Composition in Art Radial composition is often used in art to create a sense of harmony. Radial composition, due to its attractive nature, has been used by artists for centuries. Mandalas were created as a symbol of perfect balance as early as the 4th century. In Greek mythology, the sun god Helios was often depicted with a crown of divergent lines. It was believed that these lines represent a radiant light, representing the rays of the sun. During the Renaissance, radial composition was used to highlight important figures in a scene. In Titian's Assumption of the Virgin, objects are seen radiating away from the main figure (Mary), with her upper body framing a circle of radiant light. In the Athenian school of Raphael of famous philosophers, the radial properties of the surrounding architecture are emphasized. Since then, radial balance has appeared in different eras. Abstract Expressionism used radial balance to emphasize feelings through forms. The Bauhaus art movement also played well on the use of geometric shapes and patterns. How to create radial balance in photography There are two important things to pay attention to when creating radial balance: composition and subject selection. You need to compose the image so that the center point where the radial lines come from is in the middle of the photo.
Smooth radial elements create a harmonious flow throughout the image, while sharp, chaotic lines create a scene of vigorous movement. You can find ways to create radial balance in your daily life. Since balance creates a sense of perfection in people, we tend to apply this technique in architecture. The most popular and simple items you can use are glasses and ladders.
Round shapes are also common in nature. To emphasize radial balance in photographic composition, it is useful to use wide-angle lenses. They naturally distort the view and force you to focus on the middle of the photo. This place in the middle should be the center of your subject. One of the photographer's favorite examples of radial composition is long exposure shots of stars at night. These photographs capture the so-called star trails - the traces of stars as the Earth rotates. These images were created with a very long exposure. Usually such shooting takes more than an hour! But the results are impressive, showing perfect radial balance.
You can also try experimenting with different angles, such as shooting from the air or from below. Using a perspective unfamiliar to the human eye, these techniques add strength to the radial balance of the composition of your images. Arches, stairs, reflections, plants… radial elements can be found in all genres of photography. Create radial images with camera movement or abstraction.
Radial composition can also be used to draw attention to a specific object or person. You can, for example, take a picture through a round window that forms a frame for your subject. A sunburst halo can serve the same purpose if used properly. So radial composition is good as a tool to highlight a specific object in a frame. For example, you can take a picture of an airplane, in a halo of sunlight, or take a picture of a portrait in which a person is sitting in a window or door frame. While this may seem like a fairly easy task in terms of composition, incorporating simple radial elements into your composition can add more depth and expression to an image.
Conclusion Composition in photography is an interesting topic for every beginner. It takes time and practice to learn how to create balanced images. Tags: ideas, composition, theory |

 The strength of this technique lies in the fact that the circular arrangement of objects seems to be perfectly balanced. The circle is a symbol of perfection and cyclicality, it creates a sense of integrity in the viewer.
  Geometry became more important with the advent of the avant-garde at the beginning of the 20th century.
  Snail shells, flowers, and even human pupils can be turned into amazing models if you want to experiment with radial composition.
  Using radial balance will give your images a unique look. In addition, it will make the viewer feel a certain perfection in the frame. As the psychology of perception and photography continue to evolve, we may discover new ways to achieve balance or imbalance in a photograph, making this area fertile ground for experimentation.
 Balance in landscape composition
Balance is the foundation of good landscape composition. However, not only. Any psychologist will tell you how important it is to find balance in life. Each athlete will emphasize the need to keep balance. There are many such examples. But today we will consider only one: what does balance mean in landscape composition?
A successful project is an art. This statement is unlikely to come as a revelation to you if you are familiar with the world of art: the process of designing a garden is built on the same principles that govern the world of art. They include concepts such as emphasis, composition, rhythm and balance. These principles can be traced to the perception of any pleasant landscape.
What is balance in landscape design?
This question is difficult to answer. The balance is like irony: it's hard to define, but you feel if it's there. The dictionary defines balance as a harmonious or satisfactory placement or proportionality of parts in a work. Let's take an example. When you load a large pallet on one leg, you will always distribute the load evenly or the pallet will tip over. The eyes perceive this almost "psychological" picture of imbalance in other situations where there are no physical consequences. This is why it is so important to strive for visual sustainability in garden design. It does not irritate the senses. Visual stability is achieved if the plants are strategically planned in the garden, taking into account color, density, size and shape. All four of these features carry visual weight. For example, dark colors are often perceived as heavier than whites or pastels; plants with openwork foliage contrast with rough foliage, etc. Size and shape also affect the “weight” scale.
For example, a tall tree needs an equal opponent to balance it: another vertical tree of similar size, or a horizontal object that is as wide as the tree is tall. If there isn't enough room for a horizontal "balance", you can simply carve out a more modest version from the vertical element: for example, a lighter item should move away from a heavier one.
Formal and informal
There are two ways to find balance in the garden: symmetrical and asymmetrical. Formal landscapes have a symmetrical balance. The viewer can determine the center, as well as the right and left sides, mirroring each other.
Formal design is best used on a flat site and when working with a central feature such as a fountain or a door. The asymmetrical balance of landscape projects is not so easy to perceive. A picture may seem arbitrary and natural, but it can be either well-organized or complete chaos. Informal designs are suitable for slopes, wooded areas, or landscapes around structures where symmetry is lacking.
Perceptual point
It is very important to decide which composition you are trying to balance. General landscape? Or concentrate on individual fragments of the garden? Once you have answered this question, it is time to choose your first viewpoint. If the garden is being viewed from multiple viewpoints, first decide which view is most important. Only after you have mastered its balance can you move on to a secondary view. Be patient: experiments may take some time, and the balance may change as the garden grows. A landscape takes on a formal look when it has a central focus, such as a tree. Elements on either side of focus are set symmetrically. When the focus is moved from the center, the view is not symmetrical and therefore informal. In this case, the horizontal characteristic (bush) balances the vertical characteristic (tree). The arbor will balance a very large tree: despite being smaller in size, the stiff, rigid forms of the arbor carry considerable visual weight.
When is balance reached?
It is difficult to determine whether the landscape is balanced or not. You will probably rely on intuition more than conscious calculation. Perhaps, instead of using complex mathematical formulas, you should simply step back and, having cast an attentive glance like a painter, make a decision. A good exercise is photography on black and white film and application. Remember that sometimes color distracts your perception, so ditch the color film. By balancing the elements in the picture with the appliqué, you will make the composition more peaceful and satisfying. Take pieces of paper and stick it on your photo. Then experiment by drawing plants of various shapes and sizes on paper. Once you've determined which shapes and sizes improve the overall balance of the image, you'll have the best clue as to what types of plants to use. After that, it remains only to choose planting material that grows in your area and matches the color. A simple sheet of paper gives rise to a lot of ideas for implementation in the garden.