Photography with flash tips
How to Use A Flash (10 Tips for Better Photos)
Learning how to use a flash may sound complicated. But we provide 10 simple tips to make the task easy for you!
Introducing flash techniques to your photography doesn’t only mean more light. It also means more exposure options, control, and complications. But it also opens up whole new areas of photography, allowing you to advance your skills.
© Kevin Landwer-Johan[Note: ExpertPhotography is supported by readers. Product links on ExpertPhotography are referral links. If you use one of these and buy something, we make a little bit of money. Need more info? See how it all works here.]
How to Use A Flash (10 Tips for Better Photos)
Here are 10 tips for better flash photography. These will help both beginners and advanced photographers.
1. Learn Settings and Modes to Sync the Flash and Camera
When it comes to flash photography, there are three important settings you need to know:
You need to adjust your camera exposure settings to match the output from the flash. TTL and Auto modes are the easiest to use, especially when you are not used to using a flash. But they are not always as accurate as Manual mode can be.
2. Use Your Flash For the Best Lighting Outcomes
Most people use flash photography only when it’s dark at night or indoors. This is because there isn’t enough natural light or ambient light. But there are many other situations where we recommend it.
You can use a flash to get rid of shadows from your photo. Adding in an extra light source can minimize shadows by filling them in. Place the flash opposite the light source causing the shadows to achieve this.
© Kevin Landwer-JohanYou can also use flash and a slow shutter speed when photographing a moving subject. This creates a half-frozen impression. This technique might take some practice to master. But it’s a fun and often unpredictable way to practice your skills.
Illuminating your subject more than the background helps to isolate it. Set your flash so the output is much higher than the background light. This causes your subject to be brighter. This means it stands out more.
Adding a little flash with dull light can bring a photo to life. Light can be flat on cloudy days, before sunrise or after sunset. Introducing a little flash into a scene when the light is like this can liven it up.
Strong backlight is also often a challenge. Balancing flash with backlighting diminishes the washed-out look. This is due to the strong light behind a subject.
3. Use a Flash to Correctly Expose an Image
One of the best flash photography tips I can offer is balancing your flash and camera settings. Unbalanced settings lead to too much or not enough light from your flash.
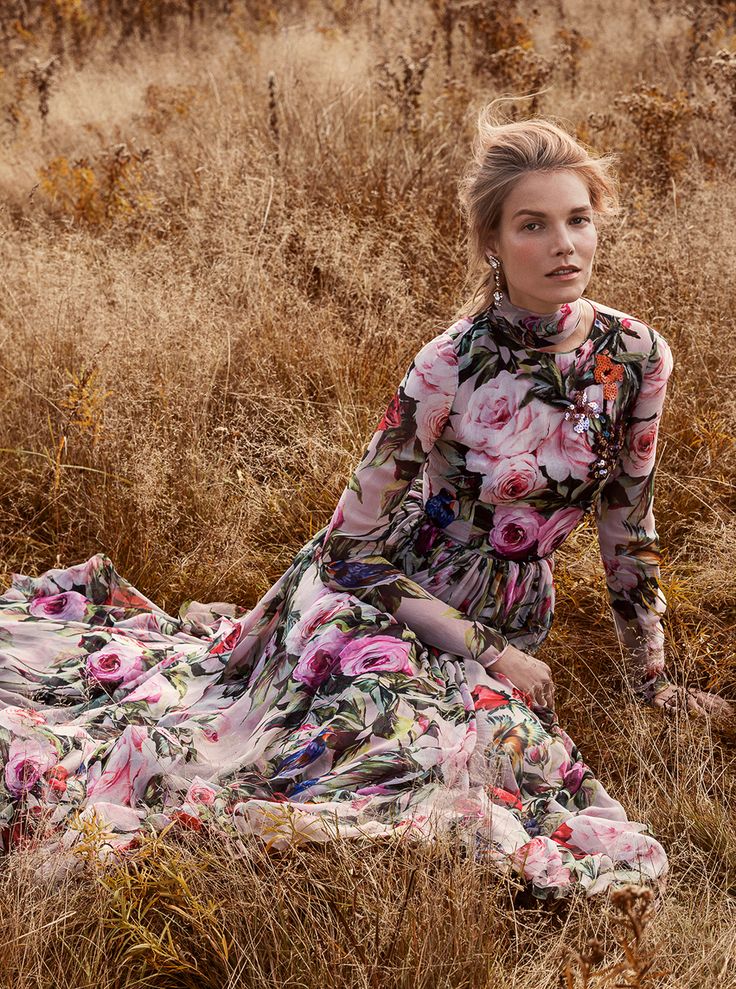
Take the photo below, for example. I started by making a reading of the ambient light with my camera’s exposure meter. I set my camera using manual mode settings. I took my exposure reading in this photo to expose the background well.
© Kevin Landwer-JohanMy wife was standing in the shadow of the rock. So I would have underexposed her if I had not used a flash. I popped up the on-camera flash and set it to TTL. In this case, it gave me a well-balanced exposure. The light on my wife and the background was similar.
If there is an imbalance between the ambient light and the flash, your photos will not look natural. This is okay if it is what you want.
You can set your camera’s exposure to underexpose a background. And you can have your flash illuminate your subject with the correct amount of light. When the difference in settings is extreme, it results in an imbalance. Photos again look unnatural.
The effects can be subtle and quite interesting when there’s less difference. This is how I created the photo below of a young woman dancing.
© Kevin Landwer-Johan4. Flash Photography and Shutter Speed
Shutter speeds are limited with flash photography. You cannot use the fastest shutter speeds when you are using flash. This is because the flash must synchronize to fire when the shutter is open. At a faster speed, the shutter is not completely open all at once.
Modern cameras limit the shutter speed to the max sync speed the camera is capable of. This varies from camera to camera but is typically around 1/250 s.
On higher-end cameras with dedicated flash units, it can be much faster. Check if your shutter speed is set above your camera’s sync speed. The camera then automatically sets a slower shutter speed.
Using a faster shutter speed allows you to open your aperture wider. This means you need less flash output, and your flash recycles and is ready to fire sooner.
You need faster shutter speeds with a flash for pictures in bright sunshine. To help you choose, think about how shutter speed has more effect on the ambient light. And aperture has more effect on the flash exposure.
Set your shutter speed so that the ambient light in your scene is good. Then set your flash to balance for the look and feel you want. ISO also affects your exposure. But not as much with flash output.
5. Change Aperture Settings for Motion Blur and More Light
With your flash to manual, check the aperture setting. It determines how much light from the flash influences your exposure. Your choice of ISO and shutter speed also affect your choice of aperture.
You can set your shutter speed anywhere within the sync range. This does not influence the exposure the flash provides. But it does affect the exposure from ambient light if there is any.
I took this photo of coffee beans below in a dark room with very little ambient light. I used an aperture of f/5.6 and set my flash manually to achieve the correct exposure. I chose a shutter speed of 1/15 s to allow for some motion blur in the falling beans.
The lack of ambient light is important here. This means that a faster or slower shutter speed would not have affected my exposure.
© Kevin Landwer-JohanI made this photo of a rickshaw below with ambient light and a flash to get a good exposure. The combination of my aperture setting (f2/. 8) and flash output exposed my subjects well.
Using a shutter speed of 1/8 s meant the ambient light affected the background somewhat. But it did not affect the subject. The flash makes the subject a little brighter than the ambient light.
© Kevin Landwer-JohanAperture settings when using TTL and Auto flash are not so vital. With these flash settings, the calculation is made for flash output. It takes into account all the camera’s exposure settings.
6. Change the Distance to Your Subject for Best Exposure and Lighting
Light diminishes the further it gets from the source. With the sun, we hardly notice it because it is so far away. With a flash, it’s different.
The further your flash is from your subject makes a difference. Say you are one meter away from your subject. You then need half the output of light from your flash than if you were two meters away.
© Kevin Landwer-JohanWe have all seen photos where the photographer has the flash too close to the subject. And it’s overexposed. To avoid this, move back and use a longer lens.
Being too close to your subject and having your flash output too high causes dark shadows. This is because unmodified light from a flash is very harsh. You can use several techniques to get soft light that looks more appealing. Here are some of them…
7. Bounce Your Flash to Soften and Direct Light
The easiest way to change the flash output softer is by “bouncing your flash.” Turning the head of your flash, so it’s not pointing straight at your subject can help soften the light.
You usually need something for the flash’s light to bounce off so some light is directed at your subject. You can use a ceiling above you, a wall behind or beside you, or a portable reflector. Bouncing the flash causes the light to scatter. This increases the surface area of the light.
Light directly from the flash is harsh because the flash head is small. Increasing this area by bouncing the light spreads it around. This results in softer shadows.
If you are bouncing your flash, you increase the effective distance of your flash to your subject. You must increase the flash output to keep the same exposure with manual settings. Or you must increase your aperture and ISO settings. With TTL or Auto, the camera and flash calculate the difference and adjust the flash output.
© Kevin Landwer-JohanBouncing your flash also alters the direction light hits the subject. Too much flash bounced from above can cause dark shadows under people’s eyes, noses, and chins.
Bouncing flash off a wall beside your subject significantly alters the photo’s look. And if you bounce flash from a wall or reflector directly behind you? It gives a different, often nicer, look.
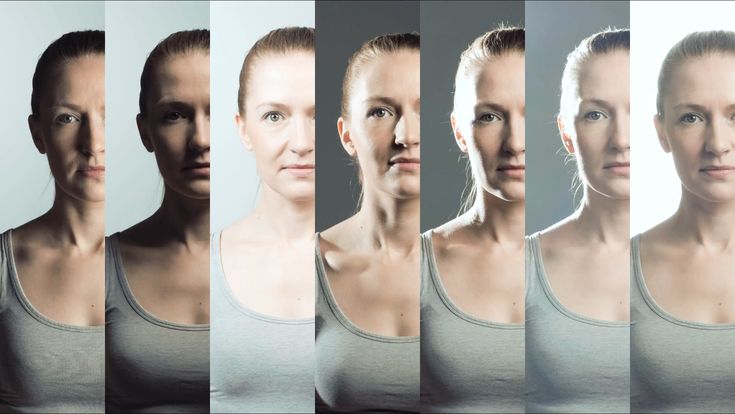
Below are three example photos:
- I used a direct flash on the first one.
- I bounced the flash off a gray wall to my right in the second.
- I made the third photo by bouncing the flash off a large silver reflector behind me.

Look at the right side of the figure’s face. The shadow difference is most noticeable. Keep in mind that you get a color cast if you bounce your flash off a colored surface.
8. Use a Softbox to Change the Look and Feel of Flash Photography
One of my best photography accessories is a small collapsible softbox I use with a flash. This extra kit can make an immense difference to the look and feel of your photographs.
I have a softbox that is 60 x 60 cm square. You can buy smaller versions too. But these don’t have the same capacity to spread and soften the light.
© Kevin Landwer-JohanLight is diffused and softened before it reaches your subject. The shadows will be less harsh, and the look of the light will be more natural. It is designed to be used off-camera and triggered remotely.
You can use a softbox like this on a light stand or have someone assist you. In the image below, I had the flash and softbox on a light stand to my left. I manually set the flash and camera to balance the flash with the ambient light.
9. Use Your Flash Off-Camera for More Creative Lighting
Using an on-camera flash, either the one built into the camera or an external flash on the hot shoe is very limiting. You can only have the light coming straight at your subject or bouncing from a surface nearby.
Taking your flash off your camera opens up many more creative lighting possibilities. You can position it to one side, above, below, or even behind your subject.
When using an off-camera flash (most of the time), I place it opposite the main ambient light source. This allows me to balance the light by filling in, or partially filling in, shadows. But there are no limits to where you can place your flash, so long as its light still reaches your subject.
The most important thing is creating light that comes from the best direction. It should fit the style of photo you want. This is the flexibility you have when using a flash off-camera.
For the photo below, I was up on the mezzanine market level, and my model was on the lower level. The flash and softbox were on a stand outside the bottom right of the frame, also on the lower level.
© Kevin Landwer-Johan10. Use Rear Curtain Synch for Moving Subjects and Nice Back Blur
Modern camera shutters are made of two “curtains.” When the front curtain opens, the sensor is exposed to light. When the second or rear curtain closes, the exposure ends.
Most cameras default to the flash being triggered once the front curtain is fully open. You can change this setting on your camera. Then the flash is triggered immediately before the rear curtain closes.
This may not seem like much of a difference. Our exposures are typically only fractions of a second. But using a slower shutter speed with rear sync can produce very different-looking photos when there’s motion. (It makes no real difference when nothing is moving.)
Photographing something moving and using a slow shutter speed produces some blurring of the moving subject. If you set your flash to front curtain sync, the subject will be “frozen” at the start of the exposure. The blur trail then appears in front.
The blur happens before the flash fires if you use rear curtain sync. The moving subject is frozen just before the shutter closes, and the blur appears behind it. Even with only a slight amount of blur, the results are much more pleasing than with front curtain sync.
Synchronization can also manually happen when it comes to long exposures. In the image below, my wife was about three meters in front of the camera and off to the right with the flash. I wanted the flash closer to the taxi truck as it entered the bridge.
© Kevin Landwer-JohanAt that distance, the flash would not trigger automatically. The exposure time was 1.6 seconds. My wife was manually firing the flash. It took several attempts to get some frames exposed well. I had the flash firing before the rear shutter curtain closed.
Conclusion
Put in the time to learn how to use a flash and practice. Studying and comparing your results gives you practical experience. Through this process, you learn far more than by only reading or watching videos about how to do it.
Once you are grounded in the basics and grasp how the flash works, cut loose! Play with motion, bounce it, and use a softbox or several external flash units… You can check out our other article on using a ring flash next!
Beginner's Guide to Flash Photography
Most beginner photographers start their journey using only natural light. As they progress and develop their style, some choose to learn and master flash photography, while others choose to refine and perfect the natural light aesthetic. While there is no “right” or “wrong” path, a strong understanding of flash photography is important to have, even for photographers with styles defined as “natural light” or “bright and airy.” A full understanding of flash gives a photographer full control over a scene, regardless of the weather or ambient lighting conditions. That is NOT to say that all photographers MUST use flash, but rather that they should have the knowledge and expertise to use it when doing so would create a better image or an image more in line with their creative vision.
Moreover, flash photography does not have to be intimidating. To help, we’ve compiled 9 helpful tips from our Lighting 101 workshop to use as your guide to flash photography, starting from how to use and operate a speedlight to full creative control of your flash. The goal of this guide is for you to walk away with a sound understanding of flash photography that you can use to build upon with experience and practice.
Here is the outline of this camera flash guide:
- Realize Why You Need Flash
- Understand the Difference between TTL vs. Manual Flash
- Learn the 5 Most Common Light Patterns
- Choose Your Quality of Light
- Balance Flash with Ambient Light
- Memorize The Inverse Square Law (Flash Power)
- Understand Bounce Flash vs.
 Direct Flash
 - Use Flash Modifiers
- Understand Creative vs. Corrective White Balance
Step 1: Realize Why You Need Flash
After a certain point, natural light simply just isn’t enough. Here are 5 of our top reasons as to why you should use flash::
- Control/Modify Light: while the sun is a powerful key light source, it can be difficult to try and modify such a large light source and flash allows you to do that.
- Control the Amount of Light: when you’ve lost your natural sunlight there is only so much you can push your camera to retain the information in the image and this is where flash comes in to assist.
- Control Direction of Light: we can time our shoots around sunrise and sunset but what happens when you are forced to shoot in the peak afternoon sun or late at night? Using OCF allows you to change the angle and direction of your light source freely.
- Control the Quality of Light: for the majority of the day, the sun is a harsh light source with only a few ways to modify it to make it softer.
 Flash gives you the opportunity to create the exact quality of light with flash modifiers like MagMod.
 - Control the Color of Light: this is where the creativity of flash trumps the power of the sun, especially when working indoors and having to bounce your flash to combat the nasty tungsten lighting we find in most rooms.
Step 2: Understand the Difference Between TTL vs. Manual Flash
When it comes to photography as a professional, you want control & precision. You don’t want your camera making decisions for you because it makes it hard to replicate settings, figure out how to troubleshoot, or even give you creative control. Let’s understand the difference between TTL and Manual Flash:
- TTL – The flash takes a reading and makes its best guess. The flash fires a pre-flash, which takes a measurement of the light reading, and then fires the flash at the power level that it thinks will properly expose the image. The biggest pro is that it’s automated and does the thinking for you, but it comes with a whole list of cons which is why we prefer manually controlling our flash.

- Manual – The photographer controls the exact power. At the end of the day, we want full control and precision. We want every one of our shots to be equal in exposure so that way when we get into post-production, we can apply one set of development settings to it and be done.
More Information: Watch this quick minute tutorial using Manual Flash to create soft light!
Step 3: Learn the 5 Most Common Light Patterns
More Information: Read this article to better understand how to use light direction and light quality to take better portraits.
Step 4: Choose Your Quality of Light
Light qualities – starting from left to right: Soft, Hard, Diffused, and Specular. Learn the differences below.
There is no absolute right or wrong when it comes to the artistic world of photography, however, there are looks that do tend to go better for specific situations. Let’s discuss the differences between the 4 different qualities of light.
- Hard Light: A light that qualifies as soft or hard is quite simple, it is the transition from light to shadow on a subject.
- Soft Light: has a gentle transition from light to shadow.
- Diffused Light: A light that has its reflective qualities removed is called diffused light. When this light hits a subject, the reflective light does not bounce back into the camera. Showcasing a soft and diffused light quality
- Specular Light: A light that retains its reflective qualities. When this light hits a subject, the reflective light bounces back into the camera. This light has stronger highlights and stronger contrasts.
More Information: We recently did a Slice of Pye Episode on the Profoto Instagram covering this topic – you can watch the full episode here!
Step 5: Balance Flash with Ambient Light
The balancing act is simple in theory: lower flash power combined with longer shutter speeds offer a more natural look, and higher flash power with shorter shutter speeds will create something more dramatic looking that no one would ask, “did they light that?”. Look at the scene in which you’ll be shooting and think of how you want the background to look, without paying as much attention to how the subject will be exposed, again working within the parameters of your camera’s flash sync speed. Once you’ve got that look dialed in, we can go on to the next step – adding the flash.
When working with flash, your aperture will determine how much of the flash gets to the sensor. This means that if you’ve chosen a wide aperture for your desired background look, you will need less flash power to get your ideal exposure. The power of your flash is determined by your desired look and you can see on the slide from Lighting 101 above, for a natural look you’ll want to decrease flash power and brighten your ambient light exposure.
More Information: Read this article to better understand how to balance ambient exposure with flash.
6. Memorize The Inverse Square Law (Flash Power)
This slide is taken from Lighting 101 and described the relationship between distance and light intensity.The Inverse Square Law states that any physical law stating that some physical quantity or strength is inversely proportional to the square of the distance from the source of that physical quantity.
For example, if you set up your light 1 meter away from your subject and you are getting 100% power flash hitting your subject. You move your light back 1 meter and now you’re 2 meters away. Does that mean you lost half your light, about 50%? It seems to be logical but it’s not the case. You actually lose 75% of your light.
More Information: Check out our Lighting 101 workshop to fully comprehend the Inverse Square Law!
Step 7: Understand Bounce Flash vs. Direct Flash
Bounce flash does not work in every situation, but it provides a great solution for indoor venues with low, neutral or bright ceilings. If the ambient light in the room is an unusual color, such as blue, try using daylight colored light (flash without a gel, temperature set to 5500K) to more naturally light the subjects in the scene. Otherwise, if you use a gel and set the temperature to 3200K, the subjects will look yellow or orange, and after adjusting the white balance in post, the blue lights will turn a deeper shade of blue. Ultimately, gel (or don’t gel) to match the dominant light color in the room.
Direct flash has a very distinct purpose and looks when used correctly. Often times, amateurs point the flash straight forward because they want to fill the face with light in dark situations make the subject look like a deer in headlights. The key here is anything but subtlety. Give the flash enough power to become the main and primary light in the scene. Just watch out not to blow any highlights, especially over the skin.
More Information: Both have their intended uses however, there is almost always a better option than using direct flash so it’s important to understand when it can be used vs. when it shouldn’t be used. Here is a great example of when direct flash is appropriate.
Step 8: Use Flash Modifiers
Start modifying your flashes for creative or corrective changes to your light.While understanding how to use a flash is the first step, modifying it for corrective and creative control will really help perfect the shot. Our favorite flash modifiers on the market are the MagMod flash modifiers. They are great for beginners and give photographers the ability to quickly and easily modify their flash. These are our top 3 favorites:
- MagSphere: an omnidirectional flash diffuser that gives you the best looking light possible.
- MagGel: is made of silicone rubber material which holds up to 3 gels. This is great for corrective/creative white balance which you will learn about in the next section.
- MagGrid: carefully optimized beam pattern provides even light coverage and eliminates unwanted light spill, allowing photographers to capture cleaner and more consistent photographs between shots.

Besides MagMod modifiers, one of the best modifiers to have on you at all times is a shoot-through umbrella. This is a great flash modifier for soft, beautiful light no matter where you are.
Step 9: Understand Creative vs. Corrective White Balance
In photography, there is always room to bend the rules when it comes to the “correct” way to do something. Creatively speaking, there is no “perfect” way to set your White Balance. Every type of light has a color and the best way to achieve the right color in almost every situation is actually the WB setting that may seem the most intimidating and yet is actually the most simple: Kelvin White Balance.
This slide represents Kelvin White Balance settings for corrective white balance.
This slide represents Kelvin White Balance settings for creative white balance.
Take your camera inside and outside, and practice dialing the Kelvin up and down until the image looks right. (of course, if you want to cheat, you can check the chart we’ve provided!) In no time at all, you’ll start to remember which numbers correspond to which shooting conditions. A lot of indoor light is somewhere around 3000-4000K. Daylight is around 5000-6000K. Deep shade, or after-sunset light, is 7000K+. In no time at all, this will become second nature!
More Information: Check out our Ultimate Guide to Creative Use of White Balance.
We hope you enjoyed our Beginner’s Guide to Flash Photography! If you’ve mastered the foundation of flash photography be sure to check out our more advanced off-camera flash courses to learn creative tips and techniques to up your flash game or purchase our comprehensive Flash Photography Training System which includes Lighting 101, 201, 3, and 4!
How to shoot with an external flash
A camera flash is a tool that many photographers have, but not everyone knows how to use. Every day I see this amazing piece of equipment being wasted throwing a harsh light on the subject when it can be wrapped in soft, directional lighting. Flash, that's a sculptor's chisel, not a sledgehammer. You only need to know a few basic techniques.
Of the 400+ weddings I've photographed over the years, most of the indoors were shot with flash. I have a suitcase full of studio lighting that I occasionally use at events, but more often than not, I prefer my little on-camera flash (don't confuse it with the built-in flash). You can create beautiful light bouncing off walls, ceilings, mirrors, professional wrestlers, or a flock of sheep. nine0003
Let me give you a few examples using my favorite model, my wife Karen. Each of these photographs was taken with the same lens (50mm), shutter speed (1/180) and aperture (f/4). We also didn't move at all. We are 10 feet from the gray paper background, white walls to the left and right about 7 feet apart. The ceiling is also white. The only difference in these photos is that I am changing the direction of the flash.
Do's and Don'ts
In the first example, I photographed Karen with direct flash. (She laughs because she thinks I don't know what position the flash is in).
This is a sharp, flat light. There is an unpleasant shadow in the background. This is the opposite of reflected light and is generally an extreme case of flash position. Move on.
Slightly better
Here I improved things a bit by bouncing the flash off the ceiling. The light is softer, but it's still coming from above, creating unattractive shadows under her eyes, and there's not enough glare in her eyes. We can do better!
Looks good
Here I've set the flash to the side so that the light bounces off the wall to my left, giving a softer, better directed and more dimensional light. I think this is what you need!
What's going on here?
For fun, I rotated the flash from top to bottom and aimed the light at the floor, so now the light comes from below. We call it Franken light (monster light). This isn't something you'll often need, but if you're hired to photograph a vampire, this is a good scheme to have in your kit.
All of these photographs illustrate the two main factors I think about when shooting with bounce flash: the direction of the light and the quality of the light (softness). nine0003
Direction of the light
This just refers to the direction from which the light comes; something that is very easy to control with bounce flash. If you aim it at the ceiling, the light will bounce onto the object from above. If you point the flash to the side, then the light will return from the same side, and so on.
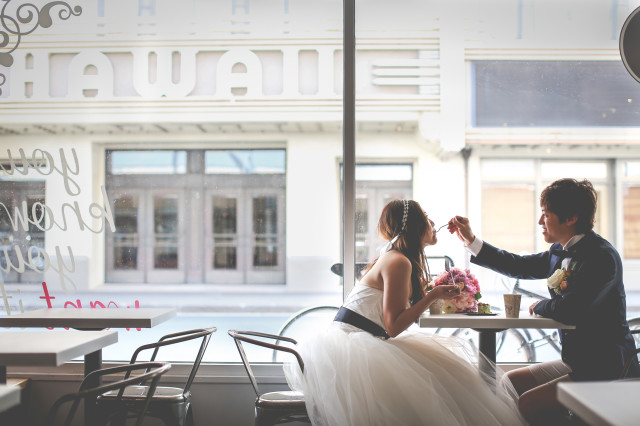
Look at this simple portrait of wedding guests (above). The woman is looking to the right, so I bounced the light off the wall on the same side and got a nice light on her face. If the other person I want to photograph is looking the other way, all I have to do is turn the flash 180 degrees and bounce the light off the opposite wall. That kind of versatility is great when shooting events. nine0003
In this photo of the newlyweds walking down the aisle, I have the flash light bounced off the wall on the left. If you look at the people in the background, you get a general idea of the lighting there.
The most beautiful light usually comes from the side, not from above. If the flash fires at a 90 degree angle to the left, the light will return from the left also at a 90 degree angle. By the way, from this angle you can get beautiful light at dawn and at sunset.
Light quality ( softness )
The softness of light is mainly affected by the size of your light source. With bounce flash, this is the area of the wall or ceiling that the light bounces off. I think this is the most difficult concept for people trying to bounce flash light. Just think of your light source as the surface illuminated by the flash (not the flash itself).
The larger the light source, the softer the light. In other words, the larger the area covered by the flash, the softer the light reflected from it will be. To cover a larger area, simply move further away from the reflective surface to allow the flash light to spread more. Many flashes have a zoom that allows you to create a narrow or wide beam (a wide beam allows the flash to spread faster, and vice versa). nine0003
It can be hard to imagine, so I took some pictures to illustrate how it works. In the first photo (above), my flash is fully expanded to create the widest beam possible. I then pointed it at the wall in my studio about 10 feet away. As you can see, the flash illuminates most of the wall. This allows for soft, beautiful light to reflect back towards us.
In the second photo (below), I placed the flash closer to the wall with the same zoom. As you can see, already a smaller part of the wall is illuminated, which means that the light source has become smaller (harder - less soft). nine0003
In the third photo, I left the flash at the same position, but closed the zoom. Therefore, the light source is now smaller (the area of the wall that reflects the light is the light source).
You can cast your light across the entire ballroom, for example, and it will come back soft and beautiful. In the photo of loving parents listening to the wedding speech, my flash light traveled 20 or 30 feet to the wall and back. The further it goes, the wider it spreads, and the softer the lighting is. Wonderful! nine0003
Flash Power Issues and Difficult Locations
There is a limit to flash output, and thus how far you can be from a reflective surface. Luckily, with a digital camera, it's easy to do a few quick tests to see how far you can go.
For example, let's say you're in a large conference room and you're photographing a speaker at the annual prune vendor convention. The hall is lit only by those awful ceiling lamps, and if you don't improve the situation, you will never get a job with this client again. So you're trying to bounce the flash light off the wall on the speaker's left side, but your flash isn't powerful enough to do so. Your image is underexposed and the camera battery is exhausted to recharge the flash. nine0003
In this situation, you can try a couple of different ways to fix the problem:
If nothing works, you may have to resort to a direct flash, but this should be the last resort.
Of course, you are not always in a room with white walls, but if you look around, you can find something to reflect the light from. White ceilings and dark wood walls? Bounce the light off the ceiling (but try to point the flash a little to the side to give the light some direction). You can reflect the beam from a dark surface. If it's not completely black, it will still reflect some light.
I bounce the flash off everything from brick and wood paneling, although it must be admitted that such surfaces absorb a lot of light and drain batteries faster, so they are not perfect (they also give the image a tint). nine0003
When I walk into a room where I'm going to use bounce flash, I immediately look around and think what could be the reflective surface (light source). I identify surfaces that suit me (mostly light/reflective) and place them to take advantage of them.
Let's look at a few more examples:
For these newlyweds, the first wedding dance took place in the Peabody Library in Baltimore, in a very large space, in which there is not even a solid wall, how the shelves are arranged. I increased the ISO to 4000 and was able to bounce the flash to get nice light in the photo. nine0003
I also include a photo of the whole space so you can see where I had to work.
This sleepy little girl was photographed at a wedding reception at a country club in Virginia. I bounced the flash light off the wall 30 feet to my left, and got a little help from the purple lighting in the background.
This wedding portrait was taken at night at Camden Yards in Baltimore. It was outdoors and there was nothing I could aim the flash at, so I had an assistant hold a white reflector behind me and to the left of the camera, where I pointed the flash. nine0003
As I write this article, I am sitting in a restaurant with a black ceiling, dark walls, dark carpet, and dark furniture. This is a truly light-absorbing space, but there are some framed photographs and a mirror. I'm sure I could bounce light off them and get some decent light if needed.
You can quickly master flash bounce. Once you become familiar with the possibilities, it will be a matter of experimenting and refining your technique. Take a look around and ask yourself what you can use to reflect the light. Look at your subject and think, "Which side would the best light come from?" nine0003
Then try pointing the flash to the right, to the left, behind you. Once you know this, you'll be the flash bounce master! Do you want to learn how to take photos like in glossy magazines using a regular external flash? If so, feel free to click on the picture below.
Author: Dennis Drenner
Share with your friends!
Flash photography | SONY
Language
ILCE-1
The camera can use the flash to take pictures regardless of the shutter type setting. Because the camera's flash performance differs depending on the shutter type setting, use the optimal setting according to the shooting conditions. During mechanical shutter shooting, you can expand the flash sync speed range using the MENU settings.
Flash speed by shutter type
Flash sync speed*1
- *1:
- When [Exposure step*] is set to [0.3 EV]
- *3:
- Only available in S (Shutter-priority) or M (Manual exposure) photography mode.
High-speed sync photography (HSS)*1
Status when high-speed sync photography is set to ON
Mechanical shutter
Electronic shutter
- *1:
- When [Exposure step*] is set to [0.3 EV]
- *3:
- Only available in S (Shutter-priority) or M (Manual exposure) photography mode.
Continuous shooting speed (when shooting without flash)*2
Mechanical shutter
Electronic shutter
- *2:
- Continuous shooting speeds without using flash are indicated.
 When shooting with the flash, the continuous shooting speed may become slower depending on the flash and how it is used. nine0262
 - *3:
- Only available in S (Shutter-priority) or M (Manual exposure) photography mode.
- *4:
- Settings when shipped from the factory. You can select [20 images/sec], [15 images/sec], [10 images/sec] or [5 images/sec] in MENU.
- *5:
- Setting the shutter speed to 1/400 second (full frame) or 1/500 second (APS-C format) reduces the maximum continuous shooting speed. nine0262
- *6:
- When shooting in uncompressed RAW, the maximum speed is 20 shots per second.
Difference between the flash units that can be used depending on the shutter type
When [Mech. Shutter]:
You can use a flash with a sync terminal cord or a Sony flash.
When [Elec. Shutter]:
You can use a flash made by Sony that supports the Multi Interface Shoe. nine0003
When [Auto] is selected:
- You can use a flash with a sync connector cord or a Sony flash during single shooting, bracketing shooting, and self-timer shooting.
- Only a flash compatible with the Multi Interface Shoe (manufactured by Sony) can be used during continuous shooting.
Continuous shooting using the flash
When you perform continuous shooting using the flash, the continuous shooting speed varies depending on the flash used and the brightness of the flash light. Also, during flash shooting, when the electronic shutter is selected as the shutter type, the continuous shooting speed becomes faster than the mechanical shutter speed, and the resulting images may often appear darker due to the flash not firing. In this case, reduce the brightness of the flash using the manual setting and adjust the ISO and shutter speed to minimize the chance of the flash not firing.