Remote shutter for nikon
Remotely Taking Photographs | Nikon
Intermediate
Flexible wired & wireless remote shooting options expand your photo taking capabilities
Flexible wired & wireless remote shooting options expand your photo taking capabilities
Glossary
There is a certain elegance to taking photographs using a wireless option (or a wired option for that matter), even if you’re standing next to the camera—it affords you the ability to connect with your subjects on a more intimate level, as the camera is no longer a barrier between photographer and subject.
Q. How many different ways can you “click” the shutter of your DSLR or Mirrorless Camera?
Press the shutter
Set off the shutter using the self-timer
Use a cable release or remote cord such as the 10-pin connector type MC-30/MC-30A or MC-36/MC-36A; or the MC-DC2 remote cord, which utilizes the accessory terminal on select cameras. This tethers you to the camera, but, depending upon the length of the cord, you can be anywhere from 1 - 12 feet from the camera when you take the shot.
Use the ML-3 Modulite remote control set, which uses Infrared (line of sight) to trigger the camera. The range is 26 feet. (Compatible with select Nikon cameras.)
Use the ML-L3 remote to trigger the shutter. This is also a line of sight option, using Infrared to communicate with the camera. The range is 16 feet. (Compatible with select Nikon cameras.)
Use the Wireless Remote Controller System (WR-R10, WR-T10, WR-1, WR-A10), which uses radio frequencies (not a line of sight system) to trigger the shutter. (Compatible with many Nikon cameras, check your User's manual to see if your camera can use this system.)
Go completely wireless, using the WU-1a or WU-1b Wireless Mobile Adapter to trigger the shutter from your compatible smartphone or tablet. Or for cameras with built-in Wi-Fi, simply turn it on and use the WMU or SnapBridge app (depending upon the camera model) on your compatible smartphone or tablet.
For select cameras that are compatible with the WT-4A, WT-5A, WT-6A or the WT-7A wireless transmitters or the WT-5A wireless transmitter + UT-1 communications unit/UT-1 communications unit), you could shoot and send images to a computer or FTP server via Wi-Fi® or a wired Ethernet connection respectively.
 Depending upon your camera, remotely control the camera from a computer running Camera Control Pro 2 software; or shoot and send images from your DSLR or Mirrorless camera to a computer or FTP server.
So, as you can see, there certainly are a myriad of ways to trip the shutter on your camera to take a photograph, however some are more ideally suited to specific shooting situations than others. Lets look at the different situations you might find yourself shooting in and the best solution for each.
Set the self-timer
Want to take a photograph of a bunch of friends—and get in the shot too? Well, you’ve got a few choices. Set the camera on a tripod, frame up the shot and set the self-timer. Then you just have to quickly get into place before the self-timer trips the shutter.
Use an Infrared Remote
If running into the scene isn’t for you, don’t worry; you’ve got plenty of other choices. Odds are, if you could have run quick enough to get into the scene by the time the self-timer went off, then the camera is in direct line of sight of your subjects. In this case, you can use either the ML-L3 or ML-3 remotes, which use Infrared (line of sight) to trigger the camera. The range on the ML-L3 is 16 feet from remote to camera, and the range on the ML-3 is 26 feet from remote to camera.
Use a remote cord or cable release
Say you’re photographing a young child and want her to see your funny expressions so she’ll laugh. Place the camera on a tripod and use a cable release like the MC-30A to trip the shutter.
Another instance when you might be setting a camera up on a tripod, is in Astrophotography (photographing the night sky). One of the more popular types of Astrophotography is the shooting of time-lapse movies of the stars traveling across the sky. Oftentimes, this is done from sunset to sunrise, showing the vibrant colors of sunset, fading into the dark sky and back to vibrant sunrise again. Newer Nikon DSLRs and the Z system Mirrorless cameras have a built-in Interval Timer which is used to snap images in an orderly manner, every few seconds or so, for however long you want the exposure to be, depending upon the look you’re going for.
In this case, you’ll want to use a simple cable release to trip the camera. Using the cable release means there’s less of a chance of camera shake from your pressing the shutter button.
For cameras that utilize the accessory terminal, the MC-DC2 provides you with a cabled remote firing solution, and it features a lockable shutter release that’s used when shooting in Bulb mode.
If you’re using an camera with a 10-pin connector, you can use the MC-36A remote cord, which incorporates an Interval Timer into its features.
Go wireless
For a photojournalist who’s capturing an important occasion that can’t be repeated, such as the presidential inauguration, you’ll likely be using multiple cameras that have to be set up beforehand, and tripped off during the event—and its likely you won’t be so close to the cameras either. In this instance, the Wireless Remote Controllers (such as the WR-R10 transceiver that’s placed on the camera (the WR-R10 uses an accessory port connector, so if you’re using one of the higher-end DSLRs that instead use the 10-pin connector, you’d also need the WR-A10 Adapter) you’d use and receives the signal from the WR-T10 Wireless Remote Controller transmitter) would be the way to go. Or you could use multiple WR-1 Wireless Remote Controllers. (These units are both transmitter and transceiver in one).
Because this system uses radio frequencies instead of Infrared, you aren’t limited to the transmitter being in the line of site of the transceiver. The range on this system is also much greater than the line of sight options. The range of the WR-T10 to WR-R10/WR-R10+WR-A10 is 66 feet. The range of one WR-R10 used as a transmitter to another WR-R10 used as a transceiver is 164 feet. The range of a WR-1 to another WR-1 is 394 feet.
Shoot wirelessly using a smartphone or tablet
There’s another option for today’s connected photographers who want to be able to share their images on the web from the moment the shots are captured. Using a Nikon camera that is compatible with the WU-1a or WU-1b Wireless Mobile Adapters, you can set the camera on a tripod or sturdy surface, leisurely get into the shot, and use your Apple iPhone®, iPad® or iPod touch®, or smartphone or tablet running on the Android™ system (using the appropriate Nikon Wireless Mobile Utility App. ) to snap the shot, upload the images to your smart device and quickly share on the web or via email.
There are also a number of camera models that have Wi-Fi built in and use either the WMU or SnapBridge apps to connect to a smartphone or tablet for downloading and sharing images on the internet. (Again, check your User's manual.)
You could also use the Wireless option to set up your camera to shoot timid creatures in a nature setting. When you see your shy subject nearing the frame, get ready—and then snap the shot.
Shoot and send images to a computer for viewing on set
For the pro photographer shooting studio portraits or commercial images, who needs to send images from the camera to a computer or FTP server for viewing by an art director or client on a monitor, you could use one of the Nikon wireless transmitters such as the WT-7A, WT-6A, WT-5A or WT-4A (depending upon which transmitter your camera uses). For folks using the D810, D800/D800E, D7000, or D7100 DSLRs, the UT-1 will provide you with an Ethernet connection going from the camera to a computer or FTP server. In PC Mode, you can even shoot from the laptop so long as it is running Camera Control Pro 2 software. For those same cameras, the UT-1 + WT-5A will provide a wireless connection to a computer or FTP server.
111of6
The D5200 is shown here with the WR-R10 wireless remote controller attached. The WR-R10 is a transceiver. The WR-T10 transmitter sends signals to the receiver to operate the camera wirelessly.
The D5200 is shown here with the WR-R10 wireless remote controller attached. The WR-R10 is a transceiver. The WR-T10 transmitter sends signals to the receiver to operate the camera wirelessly.
The D4 body is shown here with the WT-5A wireless transmitter attached. Underneath the WT-5A, you can see the open door showing where an Ethernet cable would be plugged in for a wired connection.
The D4 body is shown here with the WT-5A wireless transmitter attached. Underneath the WT-5A, you can see the open door showing where an Ethernet cable would be plugged in for a wired connection.![]()
The UT-1 communications unit provides a wired Ethernet connection for the D800 and select other Nikon D-SLRs, to communicate with a computer or FTP server. When combined with the WT-5A, the UT-1 provides a wireless connection between the camera and a computer or FTP server.
The UT-1 communications unit provides a wired Ethernet connection for the D800 and select other Nikon D-SLRs, to communicate with a computer or FTP server. When combined with the WT-5A, the UT-1 provides a wireless connection between the camera and a computer or FTP server.
The WR-1 wireless remote controller is shown here connected to the D7100 using the MC-38 connecting cord. The WR-1 and camera are sitting on the Nikon SK-7 bracket for flexibility in handling.
The WR-1 wireless remote controller is shown here connected to the D7100 using the MC-38 connecting cord. The WR-1 and camera are sitting on the Nikon SK-7 bracket for flexibility in handling.
The D5200 can also utilize the WU-1a wireless mobile adapter which, when used with the free Mobile Utility app, allows you to shoot with the D5200 and download images to your smartphone or tablet.
The D5200 can also utilize the WU-1a wireless mobile adapter which, when used with the free Mobile Utility app, allows you to shoot with the D5200 and download images to your smartphone or tablet.
The WU-1b is also compatible with select Nikon 1 series interchangeble lens digital cameras including the Nikon 1 J3. When used with the free wireless mobile utility and a compatible smartphone or tablet, images can be shot and downloaded to the smart device.
The WU-1b is also compatible with select Nikon 1 series interchangeble lens digital cameras including the Nikon 1 J3. When used with the free wireless mobile utility and a compatible smartphone or tablet, images can be shot and downloaded to the smart device.
Can my Nikon 1 or COOLPIX go wireless too?
Set the Self-Timer
Nikon DSLRs, Z System Mirrorless camera and select Nikon 1 and COOLPIX camera users can also utilize some of these same ways of wirelessly taking photographs. Most of these cameras have a self-timer built-in. By placing your camera on a tripod or stable surface, and setting the self-timer, you can get into your shot.
Use the ML-L3 Wireless Remote Control
Select models of Nikon 1 advanced interchangeable lens digital cameras as well as certain COOLPIX compact digital cameras can utilize the ML-L3 wireless remote control, which uses an Infrared signal to tell the camera to snap a picture. You can be up to 16 feet away from the camera, however you will need to be in ‘line of sight,’ so the camera and ML-L3 can communicate via the Infrared signal.
Use a smartphone or tablet to shoot
Digital camera models such as select DSLR, Nikon 1 and COOLPIX models are compatible with the WU-1a or WU-1b, wireless mobile adapters. Nikon’s Mobile Utility app for lets you use your iPhone, iPad, iPod touch or smartphone or tablet running on the Android system to shoot and download images from the camera. Even newer cameras including DSLR and Z System Mirrorless as well as COOLPIX cameras have Wi-Fi built-in and can be controlled via the SnapBridge app on your compatible smartphone or tablet. Check your camera's User's Manual to see which options your camera offers.
For a list of Nikon remotes and releases; and the compatible Nikon Z Mirrorless, DSLR, COOLPIX & Nikon 1 digital cameras, download the Nikon Remotes Compatibility Chart PDF.
Cameras having Wi-Fi® capability can only be used with a compatible iPhone®, iPad®, and/or iPod touch® or smart devices running on the Android™ operating system. The Wireless Mobile Utility application must be installed on the device before it can be used with these cameras. Compatibility information can be found, and the application can be downloaded, at:
Apple, the Apple logo, iPhone, iPad and iPod touch are trademarks of Apple Inc., registered in the U.S. and other countries. App Store is a service mark of Apple Inc.
Android and Google Play are trademarks of Google Inc.
Wi-Fi® and the Wi-Fi CERTIFIED logo are registered trademarks of the Wi-Fi Alliance.
All Nikon trademarks are trademarks of Nikon Corporation.
This Article Goes Great With These Products
111of0
ML-L3 Wireless Remote Control (Infrared)
ML-L3 Wireless Remote Control (Infrared)
Enables wireless remote shutter release. Trigger the shutter remotely when using slower shutter speeds to prevent camera movement.
Infrared Remote Control enables wireless remote shutter release of select Nikon cameras.
The range is approx. 16 ft in front of the camera.
The ML-L3 offers an immediate release mode and two second delay mode.
LCD, Video and Photo Gallery images are for illustrative purposes only.
Accessories
-
Learn more about the CML-L3 Case for ML-L3
$2.
 00
00Something went wrong. Please try again in a few minutes.
Ratings & Reviews
Compatible With
-
Learn more about the D610
Starting at $1,599.95
Something went wrong. Please try again in a few minutes.
-
Learn more about the D7500
Starting at $999.95
Something went wrong. Please try again in a few minutes.
-
Learn more about the D7200
Starting at $1,099.95
Something went wrong. Please try again in a few minutes.
-
Learn more about the D3400 Triple Lens Parent's Camera Kit
$1,049.95
Something went wrong. Please try again in a few minutes.
-
Learn more about the D3400
Starting at $499.
 95
95Something went wrong. Please try again in a few minutes.
-
Learn more about the D3300
Archived
Something went wrong. Please try again in a few minutes.
-
Learn more about the D5300
Starting at $599.95
Something went wrong. Please try again in a few minutes.
-
Learn more about the D5500
Starting at $699.95
Something went wrong. Please try again in a few minutes.
-
Learn more about the D7100
Archived
Something went wrong. Please try again in a few minutes.
-
Learn more about the D3200
Archived
Something went wrong. Please try again in a few minutes.

-
Learn more about the COOLPIX P900
Archived
Something went wrong. Please try again in a few minutes.
-
Learn more about the D750
Starting at $1,699.95
Something went wrong. Please try again in a few minutes.
-
Learn more about the Nikon 1 V3
Archived
Something went wrong. Please try again in a few minutes.
-
Learn more about the COOLPIX P7800
Archived
Something went wrong. Please try again in a few minutes.
-
Learn more about the COOLPIX A
Archived
Something went wrong. Please try again in a few minutes.
-
Learn more about the Nikon 1 J1
Archived
Something went wrong.
 Please try again in a few minutes.
 -
Learn more about the D5200
Archived
Something went wrong. Please try again in a few minutes.
-
Learn more about the Nikon 1 V2
Archived
Something went wrong. Please try again in a few minutes.
-
Learn more about the D600
Archived
Something went wrong. Please try again in a few minutes.
-
Learn more about the D7000
Archived
Something went wrong. Please try again in a few minutes.
-
Learn more about the COOLPIX P7700
Archived
Something went wrong. Please try again in a few minutes.
-
Learn more about the Nikon 1 J2
Archived
Something went wrong.
 Please try again in a few minutes.
 -
Learn more about the Nikon 1 V1
Archived
Something went wrong. Please try again in a few minutes.
-
Learn more about the COOLPIX P7100
Archived
Something went wrong. Please try again in a few minutes.
-
Learn more about the D90
Archived
Something went wrong. Please try again in a few minutes.
-
Learn more about the D3000
Archived
Something went wrong. Please try again in a few minutes.
-
Learn more about the D5100
Archived
Something went wrong. Please try again in a few minutes.
-
Learn more about the COOLPIX P7000
Archived
Something went wrong.
 Please try again in a few minutes.
 -
Learn more about the D60
Archived
Something went wrong. Please try again in a few minutes.
-
Learn more about the D5000
Archived
Something went wrong. Please try again in a few minutes.
-
Learn more about the D50
Archived
Something went wrong. Please try again in a few minutes.
-
Learn more about the D70
Archived
Something went wrong. Please try again in a few minutes.
-
Learn more about the D70s
Archived
Something went wrong. Please try again in a few minutes.
-
Learn more about the D40X
Archived
Something went wrong.
 Please try again in a few minutes.
 -
Learn more about the D40
Archived
Something went wrong. Please try again in a few minutes.
-
Learn more about the D80
Archived
Something went wrong. Please try again in a few minutes.
Product Forum
Support
Product Registration
Registering your Nikon product allows us to send you (with your permission) important updates, service information and helpful hints, and it makes it easier should you ever need to call in for help.
Register your product online now. View in a new window
Nikon Answers Site
We store all resolved problems in our solution database. If you can’t find a relevant answer, feel free to submit a question to our technical support team.
View Questions & Answers View in a new window
Remote control photography | Help using SnapBridge
- Android iOS
The SnapBridge app allows you to use your smart device as a remote control while shooting. Use it to release the shutter, start and end movie recording, focus, or start and end time-lapse photography, time-lapse movie recording, or focus shift photography. For a list of cameras that support this feature, see here.
The view through the lens is not displayed on the Bluetooth remote control display. Use the camera to frame and check focus.
-
After turning on the camera, tap in the SnapBridge application tab. Remote Photography will change to Bluetooth Remote Control .
-
Touch Bluetooth remote control to view Bluetooth remote shooting controls.
Note : Touching Bluetooth Remote Control while the camera is in playback mode displays the remote playback control buttons.
 Touch the icon at the top of the remote control screen to view remote shooting controls.
 -
Frame the picture in the camera display or viewfinder and tap (press halfway) to focus. The focus indicator will appear on the remote control screen and the camera will focus. To refocus the camera, tap once to end focusing and then tap again to repeat the focus operation.
-
Tap the shutter-release button to release the shutter and take a picture.
Note : If the camera is in burst mode, it will continue to take pictures while the shutter-release button is pressed.
Shutter-release button functions for long exposures in mode M depend on the option selected.
- Bulb : Shutter stays open while shutter-release button is pressed halfway and closes when finger is removed from button.
- Time : Tap the shutter-release button once to open the shutter and again to close it.
SnapBridge movie button activated when camera is in movie mode. Tap the button once to start video recording. During recording, the button changes to ; tap again to end the recording.
Press to view shooting information.
For time-lapse photography, time-lapse photography, or focus shift photography, tap to select the desired option and start shooting. Settings can only be adjusted using camera controls.
If the memory card inserted in the camera is write-protected or the camera is unable to take photographs for any other reason, an error message will appear on the remote control screen. Check the memory card or the condition of the camera.
The view through the lens is not displayed on the Bluetooth remote control display. Use the camera to frame and check focus.
-
After turning on the camera, tap in the SnapBridge application tab. Remote Photography will change to Bluetooth Remote Control .

-
Touch Bluetooth remote control to view Bluetooth remote shooting controls.
Note : Touching Bluetooth Remote Control while the camera is in playback mode displays the remote playback control buttons. Touch the icon at the top of the remote control screen to view remote shooting controls.
-
Frame the picture in the camera display or viewfinder and tap (press halfway) to focus. The focus indicator will appear on the remote control screen and the camera will focus. To refocus the camera, tap once to end focusing and then tap again to repeat the focus operation.
-
Tap the shutter-release button to release the shutter and take a picture.
Note : If the camera is in burst mode, it will continue to take pictures while the shutter-release button is pressed.
Shutter-release button functions for long exposures in mode M depend on the option selected.
- Bulb : Shutter stays open while shutter-release button is pressed halfway and closes when finger is removed from button.
- Time : Tap the shutter-release button once to open the shutter and again to close it.
SnapBridge movie button activated when camera is in movie mode. Tap the button once to start video recording. During recording, the button changes to ; tap again to end the recording.
Press to view shooting information.
For time-lapse photography, time-lapse photography, or focus shift photography, tap to select the desired option and start shooting. Settings can only be adjusted using camera controls.
If the memory card inserted in the camera is write-protected or the camera is unable to take photographs for any other reason, an error message will appear on the remote control screen. Check the memory card or the condition of the camera.
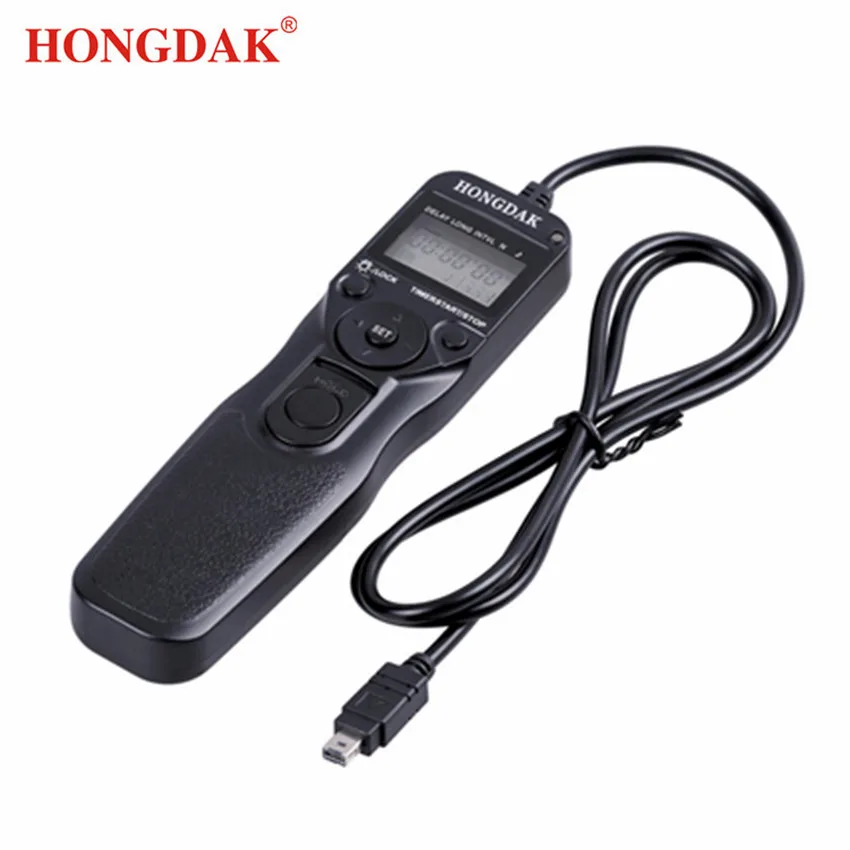
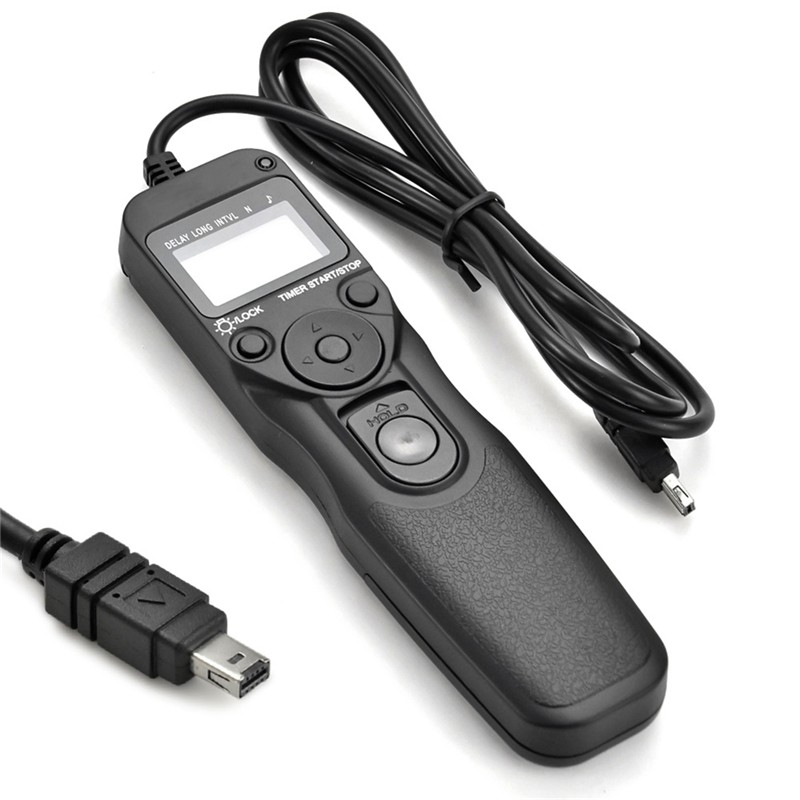
Wired Remote Shutter for Nikon
I want to talk about buying a wired remote shutter release for the Nikon D3100 and the like (for all Nikon models that use the proprietary MC-DC2 wired remote).
Sometimes, when shooting in the evening at slow shutter speeds, you get photos with a clear “shake”. It seems that shooting is not 2s hands" - I use a small FED's tripod - but still - sometimes there are blurry photos.
By analogy with Canon's (which with the help of CHDK you can implement such a remote trigger literally on your knee in 5 minutes), it was decided to purchase a remote control for Nikon (there is no IR control in the D3100). But it was not there!!! The price tag was quite inhumane! No, it won't work like that...
I started looking in offline stores... The price is more or less, but I decided to look at Aliexpress as well. The price for such a remote control was quite adequate - what is sold offline is at least 3-4 times more expensive than in China. And the remote control was ordered. The seller did not delay the shipment for a long time - after a couple of days he issued a track, which immediately began to be tracked. And so SF Express took my package to its destination.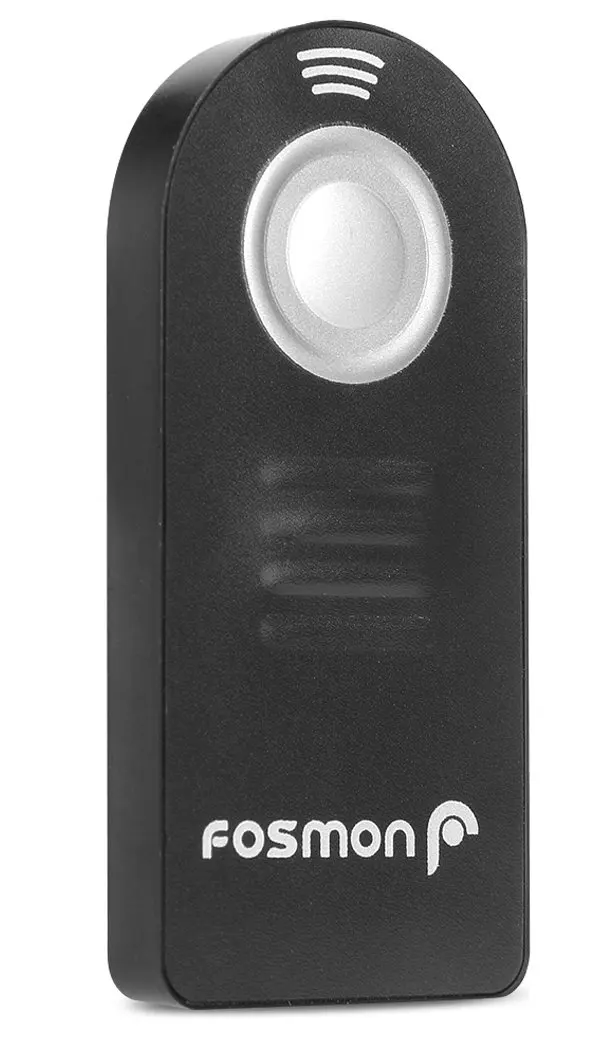 After 16 days, Nova Poshta handed me a gray package and the delivery was over.
Having unpacked the parcel, I saw a cardboard box with rather tolerable polygraphy and printing. In the box was the remote itself in a separate bag and instructions.
The instruction manual consists of only 4 paragraphs.
- connect remote to camera first
- half press for auto focus and select shutter speed (shutter speed)
- press the button to take a picture
- at slow shutter speeds in BULB mode - press the button and move the frame as shown in figure
The second side of the instructions is the same, only in Chinese.
Lightweight remote control, Weight - only 41 g. Dimensions respectively 98x28x20 mm. The case is made of rough plastic, the shutter button is made of glossy. After unpacking, there is no smell from the remote control - so there is no need to ventilate on the balcony, as is often the case with Chinese plastic.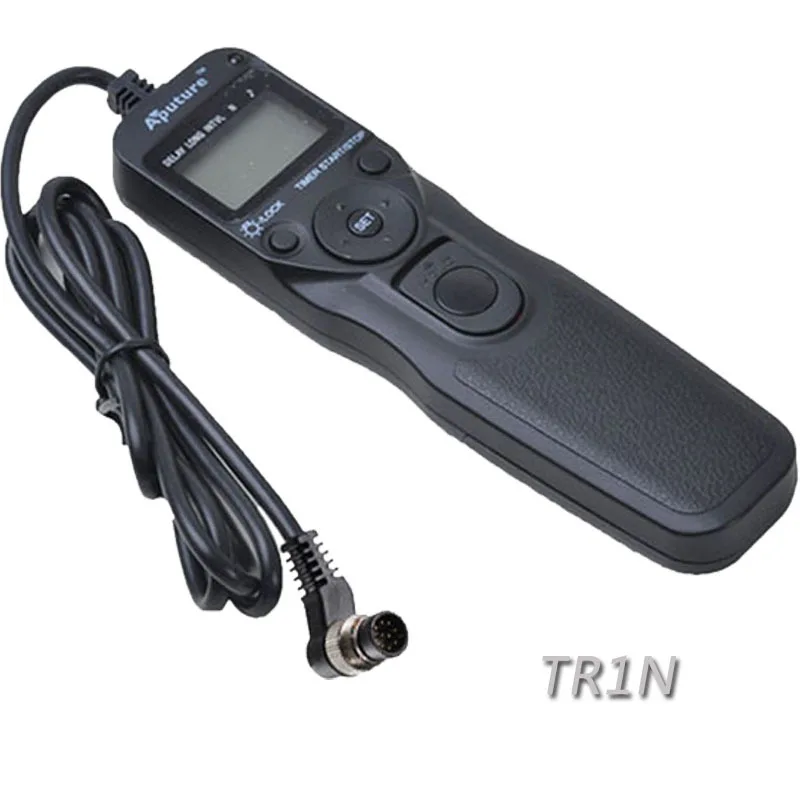
On the front side there is a release button (two-way button, but it is almost not felt tactilely) and a sliding button lock. The name of the manufacturer's company is also applied ...
On the back of the remote control, the marking is “MC-DC2” and a notch to prevent the remote control from slipping out of your hands.
Wire 90 cm long, not rigid. At the end of the wire there is a “proprietary” connector used in cameras Nikon D3100/D7100 /D7000/D5300/D5200/D5100, etc.
The button, when pressed, is blocked by a sliding part on the front panel, which is quite convenient in bulb mode (BULB MODE). By sliding the frame to its original position, you can release the button.
In general, this is a normal “remote button” for a camera. It performs its functions at 99.99%.
The only BUT - they could also make an L-shaped (or L-shaped - as it is more convenient for anyone to read) connector. But this is my IMHO.