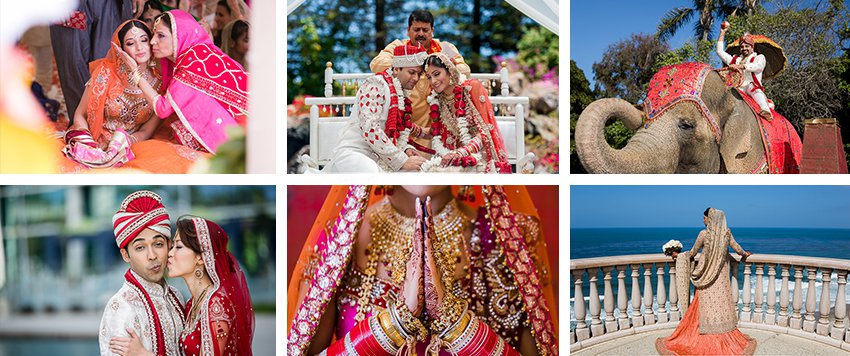
Warm colours photography
How to Use Color in Photography
At a technical level, color can be complicated; just see our recent article on sRGB vs Adobe RGB vs ProPhoto RGB. But at an artistic level, it is one of the most important parts of an image, impacting emotions and interest unlike almost any other element of photography. This article introduces the concepts of color and color relationships, including how to use them to take the best possible photographs.
Table of Contents
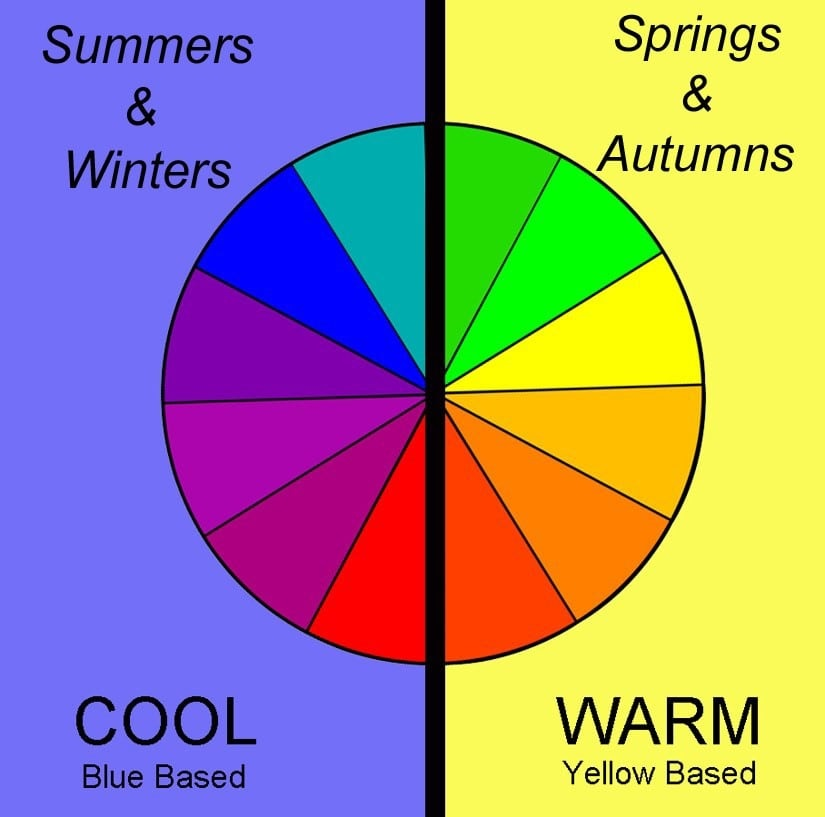
Warm vs Cool Colors
The two broad types of color are warm and cool. Warm colors include red, orange, and yellow, while cool colors include green, blue, and violet. The two categories of color have their own moods, and it helps to ask yourself which ones you’re photographing at a given time if you want to optimize how your photos look.
Warm colors are more active and emotionally charged. They jump out at the viewer, attracting attention and drawing interest. In general, warm colors are rarer than cool colors, so an image which has even a small splash of warmth can stand out. This is one reason why photos at sunset and sunrise, as well as fall colors, are as popular as they are.
Cool colors, on the other hand, are more subdued and gentle. They fade into the background, particularly if a warm color appears in the same spot. In general, they don’t attract the same degree of attention as a warm color, though that certainly isn’t a bad thing. Warm colors can be overpowering; cool colors are more likely to appear soothing and calm. Much of nature is made of cool colors, although sunset and sunrise can turn even a blue landscape golden.
Below, I’ll cover each of the six main colors – red, orange, yellow, green, blue, and violet – as well as the emotions that are generally associated with each. Keep in mind that emotion is a tricky part of photography to pin down, and you can take pictures which don’t have the following emotions simply by altering your choice of subject or composition. But the following effects do make a difference.
NIKON D810 + TAMRON 15-30mm F2.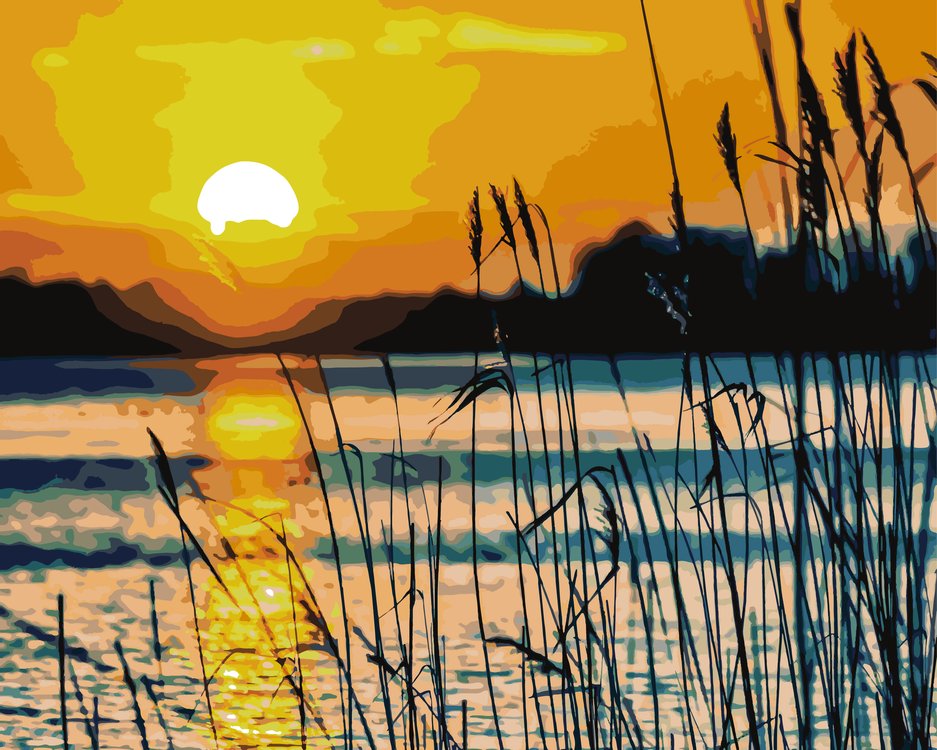 8 @ 15mm, ISO 64, 1/60, f/16.0
Examining the Emotions of Each Color
1. Red
As one of the rarest and most powerful colors in nature, red is particularly important to photographers. With the historic associations between the color red and the emotions of passion and excitement, it’s no surprise that this is a very active color. It can also be too intense for certain images; a little red goes a long way.
To find red in nature, look for leaves in autumn, red rocks in places like the American Southwest, or the occasional vivid sunset. In other genres of photography, like portraiture, keep in mind that any red your subject wears will draw the eye, whether clothing or makeup. And with wildlife photography, red subjects – such as the bright eyes of a tree frog or a cardinal against the snow – have immediate sticking power.
Dead Horse Point Sunrise, Nasim Mansurov2. Orange
Compared to the color red, orange is one of the more common in nature. It’s not just sunsets, either.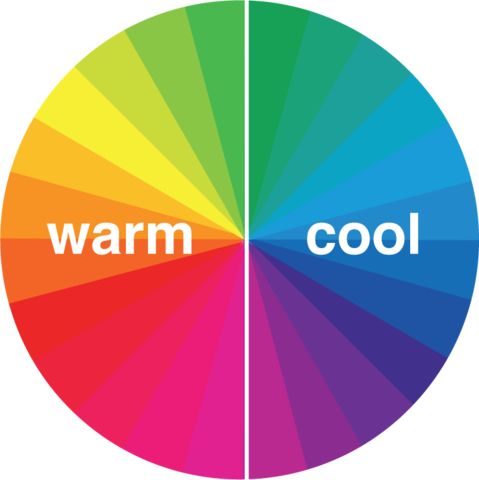 The color brown is typically just a darker shade of orange, and it appears in nature all the time.
Orange comes in a wide range of tonalities, from the dark brown of trees to the bright orange of a pumpkin. It conveys a feeling of warmth, and it is not as overpowering as red. But orange isn’t a passive color, either; it draws quite a bit of attention, especially when placed against a cooler background. To me, it always feels like it contains a bit of adventure.
False Kiva, Nasim Mansurov3. Yellow
Yellow is the brightest and most optimistic color, particularly when it appears on its own and not as a blend with orange or green. However, it is this blended yellow we see most commonly in the world. Even bright green grass and vivid orange sunsets almost always have a component of yellow.
On the other hand, if you keep an eye out for it, you’ll still find yellow on its own in nature. Sand, autumn leaves, and even the sun at certain times of day are all bright yellow, and they work well in photos where your goal is a sense of positivity and excitement.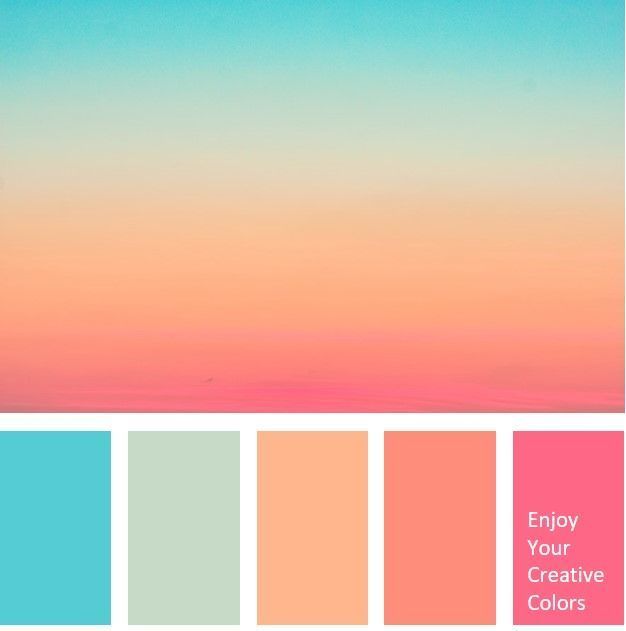 Like red and orange, yellow is a warm color, and it draws the eye whenever it appears. Look close enough, and you’ll find ways to include it in your photography.
4. Green
Even though blue is the most common color in nature, thanks to water and sky, green is the one we most associate with life. Our visual systems recognize more shades of green than any other color. So, your photographs can include shades of deep green, vivid green, electric green, dark green, bright green, and almost endless variations thereof.
At its heart, though, green is a familiar and soothing color. Because it represents the living world, it creates a sense of calm for those of us who enjoy spending time in nature. In that sense, green is the warmest of the cool colors.
Ying Yang, Nasim Mansurov5. Blue
One of the first people to write about the relationship between color and emotion was Goethe in his 1810 Theory of Colors, in which he said that blue “draws us after it.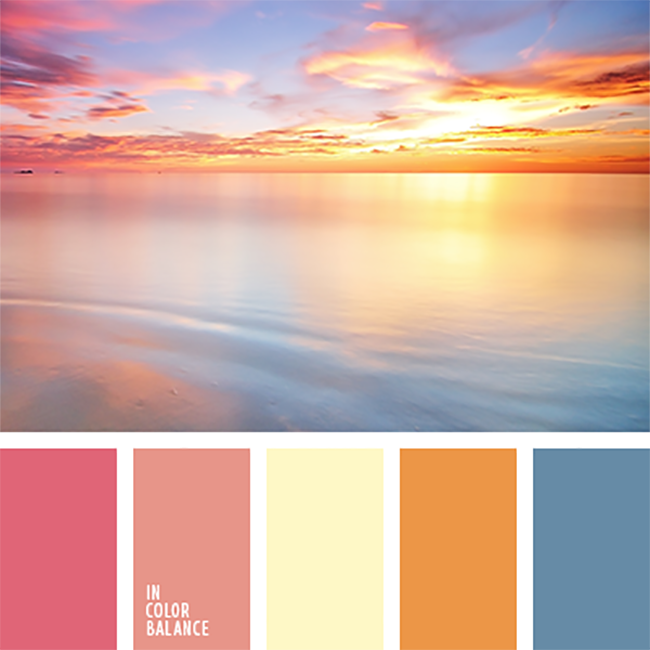 ” Today’s prevailing view isn’t so different. Perhaps this is a case where artistic tradition has overtaken reality, but maybe there’s something to it. After all, blue is associated directly with distance in the real world. Haze on the horizon, as well as the blue sky itself, both signal faraway, even unreachable destinations.
Blue, on top of that, is not a busy color. It is calmer and less flashy. A well-known fact of Instagram photography is that blue images get more likes, on average, than those with warmer colors. This is because the busy colors of red and orange do not translate as well to a smaller screen, while blue is not nearly as distracting.
Dark blue and light blue convey somewhat different emotions. Dark blue can be strong and foreboding, as in a dark cloud. Light blue is gentler and more optimistic. But both are peaceful; even a blue storm usually has an element of calm to it.
As the most common color in nature, both in the sky and in water, chances are good that you’ll find the emotions of blue in many of the photos you capture.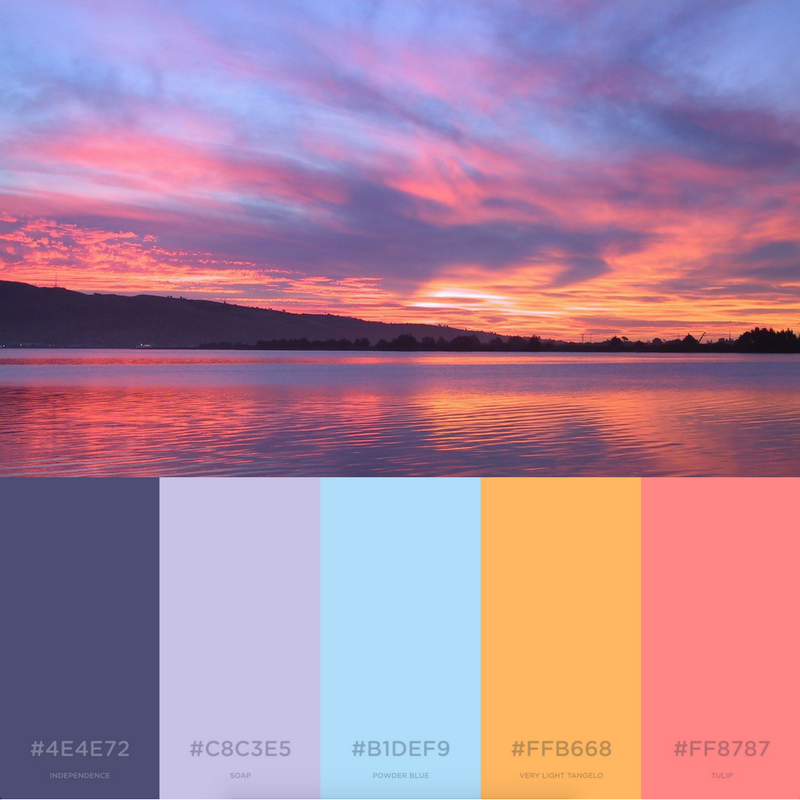 Whether as the sole color in a calm, deep image or the background to a warm color’s attention-grabbing power, blue can complement most any emotional message in a photo with success.
6. Violet
Violet is perhaps the rarest color to see in its pure form in nature, usually found only in very specific sunsets or flowers. Although historically associated with royalty and riches, the color violet in photography takes on many of the same connotations as blue; in fact, it most commonly appears in the world as a mixture with blue, forming a bluish-violet color in the sky or sea.
The color violet has a sense of tranquility to it – a calmness that is pleasant and often unexpected. If you ever have the chance to photograph a display of this rare color, like lupine flowers in bloom, make the most of it; violet is unusual enough that it makes your photos stand out.
NIKON D800E + 105mm f/2.8 @ 105mm, ISO 100, 1/6, f/16. 0
0Color Harmonies and Relationships
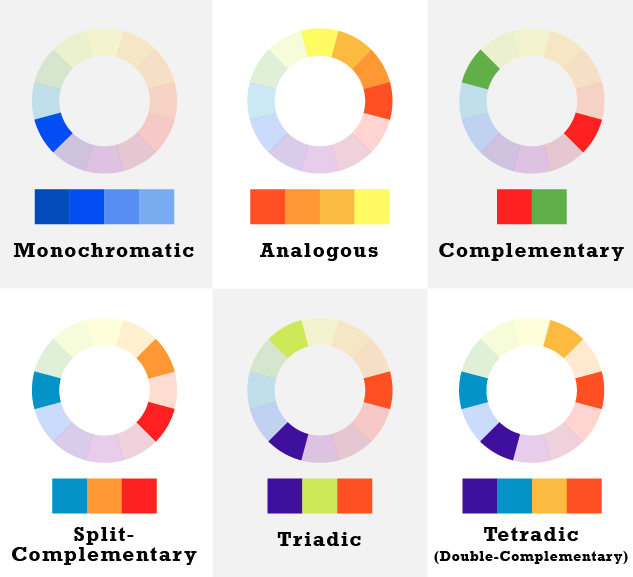
Just as important as individual colors are the ways in which they interact. This varies from simple color contrasts to complex harmonies; the real world has almost endless variety in color. Some of these relationships work better than others, though it will take a bit of practice – and often some post-processing – to get exactly the result you want.
1. Warm and Cool Colors
As mentioned a few times so far in this article, the difference between warm and cool colors is an important one. When both types appear clearly in the same photo, they form a strong color contrast that can be a focal point of interest.
In classic color theory, every cool color’s complement (opposite) is a warm color, and vice versa. Red and green are complements; so are orange and blue, as well as yellow and violet.
One important part of complementary colors is that they have inherent contrast when placed next to one another in a photo, similar to a composition that juxtaposes black and white. Take a look at the photo below, for example:
There are only two dominant colors in the image above, blue and yellow-orange, and they intersect in a few different areas. One of the most important is the sky, where the warm cloud sits against a cool background. In the black and white version of this photo, there is very little separation between the two, and therefore not as much attention drawn to the top of the photo. But in color, the strong contrast draws attention to the sky, making it a very important element of composition.
2. Complementary Colors and Other Relationships
Several other color relationships are said to be attractive, such as a combination of the three primary colors (red, yellow, and blue). The same is true of colors between the ones listed above, like yellow-orange or blue-green, which have their own sets of complements as well.
Although I don’t dismiss the idea that these more complex color harmonies are often beautiful and emotive, the reality is that this discussion can get quite tangled when discussing three or more colors.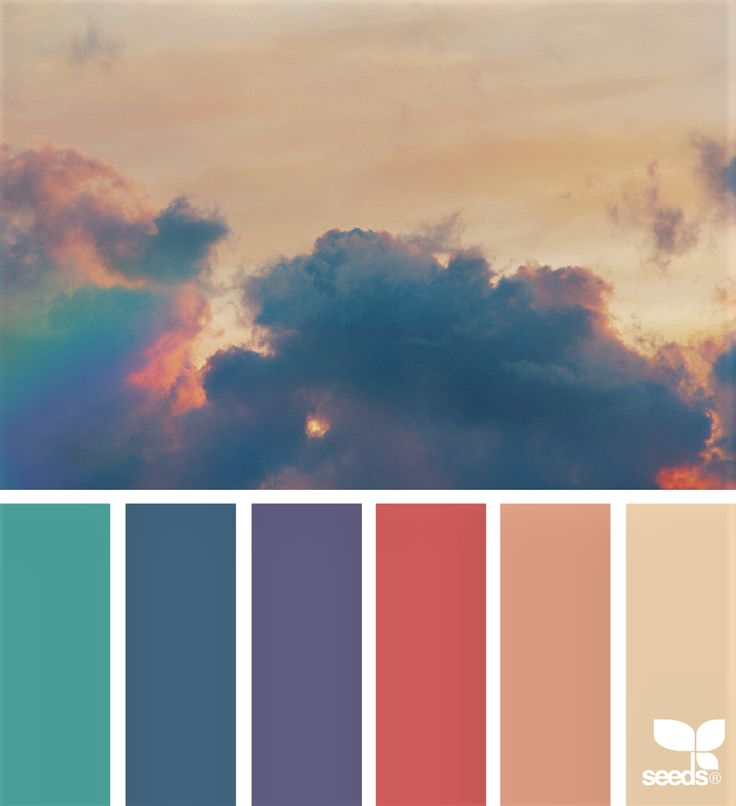 Quite simply, real-world colors are not like painting. In most cases, you can’t choose a perfect blue-green to harmonize with equal parts red and orange; reality is messier than that.
If you want to delve into deeper discussions on color harmonies and relationships, there is no harm in doing so, and potentially some interesting information to learn. But my main recommendation is just to look at the scene in front of you and try to picture if its color “looks right” to your eye. That is far from be precise, but there’s more value to a gut feeling in photography than in trying to match an ideal that you may not find in the real world.
The one exception is in the post-processing stage, when you have a bit more flexibility to shift the hue and saturation of the colors in your image. In that case, it’s worth spending the time to edit the photo in a way that harmonizes well, either by a color wheel definition or, more probably, just something that looks good to your eye.
Perhaps the colors in this image fit with a particular scheme of color harmonies; perhaps they don’t.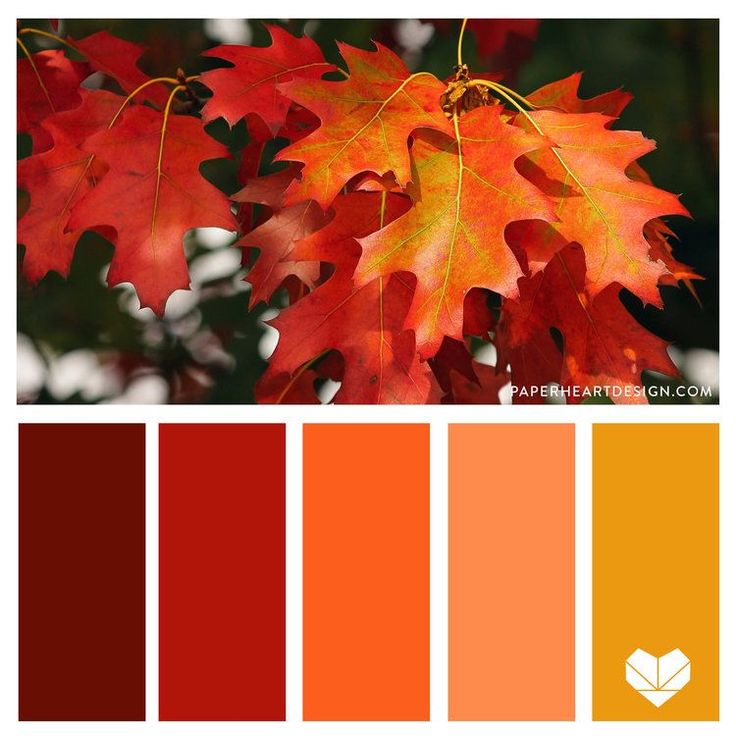 But to my eye, the colors work well together. That’s what attracted me to capture and post-process this image the way I did in the first place.
Conclusion
Color is one of the deepest topics in photography, but it carries emotions so strongly that it is worth trying to think about its characteristics consciously whenever possible. I often find myself working to make a photo as simple and unified as possible, with just a single color that dominates the frame. Or, if conditions are right, looking for a warm-cool split can result in photos that draw a lot of attention, much like shooting with high contrast.
However, the most important part about color at the end of the day is simply what looks good to your eyes. Whether in the field or in post-production, the colors you choose have a major impact on your personal style; some famous photographers have a “look” to their images that’s largely due to their color palette. So, once you understand the fundamentals of color, it’s best to take this information and make it your own.
I’ve also published a video which dives into some of these topics in more detail, which you may enjoy:
Take me to Chapter 6: Simplicity
Warm Verses Cool Color Temperatures – SLR Photography Guide
In photography, color concepts can vary greatly. For example, when you take photos, do you ever think about whether you want to create a warm or cool image?
Take these two images below.
I shot these two images one after another, yielding different results depending on how I set my camera’s color temperature. Apart from cropping into a square and resizing for this article, no other edits have been done to them. They are how they came straight out of the camera.
Color Concepts.
 Kelvin Settings
To create an image with warmer tones (photo on the right), select the cloudy or shade white balance. Either setting will make your scene or portrait look warmer. Or better still, learn how to make better use of your camera’s Kelvin White Balance setting.
Greater than 5000K will yield a warmer orange light. Less than 5000K will create a more blue, cooler feel to an image.
I highly recommend sitting your camera on a tripod at sunrise or sunset and experiment with Kelvin White Balance at extreme ends of the scale. This is the best way to learn the art of color concepts yourself. It is amazing how creative you can get in camera when it comes to color tones.
If you don’t have a Kelvin setting, another option would be to shoot in RAW file format and change the color temperature in your RAW file editor. This would yield the same results as if you did it in camera.
Using Color Concepts to Influence Mood
Did you know you can also use color concepts to influence how a viewer feels when they look at your photo? Of course, everyone will interpret each image differently, however generally speaking, a simple shift in color temperature can present a particular emotion or mood to your viewer.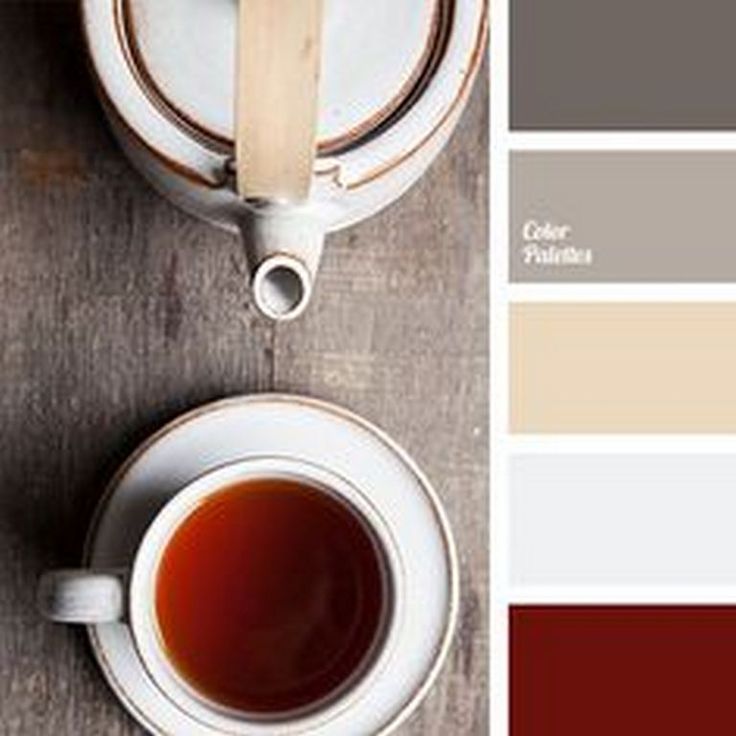
Cool colors can evoke feelings of calmness. However it can also evoke melancholy, loneliness and a feeling of coldness in a scene. Think about a cold winter day, or a lonely walk along the beach.
Warm colors on the other-hand evoke happiness by enhancing a feeling of warmth in a scene. Like sitting near a fireplace, or enjoying a sunset. Hence why some of the best portrait images often have warm color tones. There is something about family and warmth that just fits together.
Look at the two images of the tree again. In reality I was photographing at 5am in 4 degree temperatures. Yet the image on the right has a feeling of warmth to it. The exact same subject with a completely different mood when compared to the colder image with a blue color temperature.
There is no right or wrong when it comes to color temperature. It’s entirely based on the emotion you want to convey and your creative goal for the image. You are the artist, what ever color concept you feel is right, is your choice!
What about capturing warm and cool colors in a single image?
Contrasting colors are hard to ignore as they help create incredibly dynamic compositions. Think in terms of opposites on the color wheel. The most eye catching images are those that contain colors at opposing sides. For example orange / reds and blue / greens.
One Last Example of Color Concepts
Blue and orange, purple and yellow, pink and green. Photograph contrasting colors and you’ll no doubt capture your viewers attention.
How to re-tint a photo or movie scene | Articles | Photo, video, optics
Sometimes you look at a photographer's work, an Instagram blogger's shots, or a film's gamut, and you want the same colors as theirs. The first impulse is to search through all the filters in the downloaded photo editors, pump up the presets. But the pros are the pros that create a picture not like everyone else.
Learn how to re-tint a reference in Photoshop, whether it's a photograph or a screenshot from a movie, and explain when the magic of a photo editor won't achieve the effect of the original, and what you can do in the future to fix it.
Photo: Elizaveta Chechevitsa / instagram.com/chechevic_a
Toning is a color or colors that transform the look of a photo. Tinting paints the picture in the colors you need for the idea and change the mood in the frame. For example, sepia will create a touch of vintage, orange tones are associated with warmth, comfort, which are good for weddings and family shoots, and cool bluish colors are associated with gloom and drama, which is suitable for genre portraits.
Toning means that the appearance of all colors in the photo will change as a result. This is especially true for neutral colors - black, white and gray. The eye is most sensitive and accustomed to them. We know exactly how objects painted in these colors should look like. For example, it is an axiom that snow in real life is white, but if suddenly it turns purple or green in a picture, it will catch your eye and create a certain effect.
The repetition of any tinting comes down to the fact that we must understand what colors black, white and gray were painted in the reference, and then transfer these shades to our picture.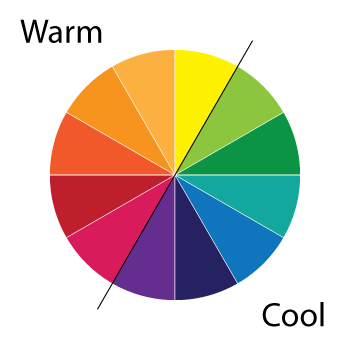
Only the color information is left in the picture on the right. This allows you to see the main shades that are present in the photo / Illustration by the author
How to repeat the tinting in Photoshop using the curve
1. Open the photo or screenshot that you want to repeat the tinting.
2. Open adjustment layer Curves/Cruves .
How Curves work and how to use them to tone, lighten, darken and raise contrast in a photo, we talked about in this article.
In Curves, you are interested in the three eyedroppers on the left side of the panel, called the black point, gray point, and white point / Illustration by the author
painted in these colors in life.
To make your life easier, hold down ALT and click on the black point slider first - this way Photoshop will show the darkest areas in the picture. Then It will look like black spots on a white background. Then click on the white point slider - so on a black background you will see white areas. These are the lightest areas in the picture.
If they are not highlighted, the sliders can be moved slightly from the edge to the center horizontally. Remember the dark and light areas and go to step 4.
The black point slider with ALT held down temporarily changes the picture and shows the darkest objects - a stripe behind the hero's back, the back of the head, hair near the neck, leopard spots on the right. It is best to navigate by the main object in the frame - models / Illustration by the author
4. Take a black eyedropper, click on the area that should be black. We repeat the same with gray and white pipettes.
This will change the colors in the photo to become more neutral. If the tinting was warm, chocolate, the picture will become colder. And vice versa.
In fact, this is how we remove the toning from the reference, return the colors to natural ones. This is necessary in order to then “pull out” these shades from the sample and transfer them to your picture.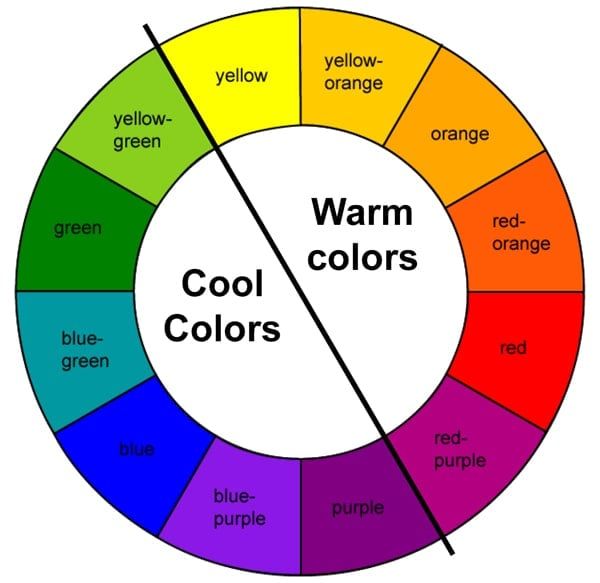
The photo on the left is the result of white, black and gray point manipulation. The curve that removes the tint has changed. You will need it in point 5 / Illustration by the author
Don't be alarmed if the colors in the reference image become inadequate when you use three pipettes at once. This means that the photo does not contain all three neutral colors. Then, to repeat the tinting, it is enough to take samples with one or two pipettes: black and white; black and gray; white and grey. Here it will only help to carefully observe how the picture changes, to analyze it. For example, if you understand that there are no gray objects in the photo, take only black and white eyedroppers. Do not forget about the ALT method from point 3 - it helps to find areas with black and white pixels.
5. The colors in the reference photo have become neutral. Now we need to invert the curve to bring out the tinted colors. We will then transfer them to another picture.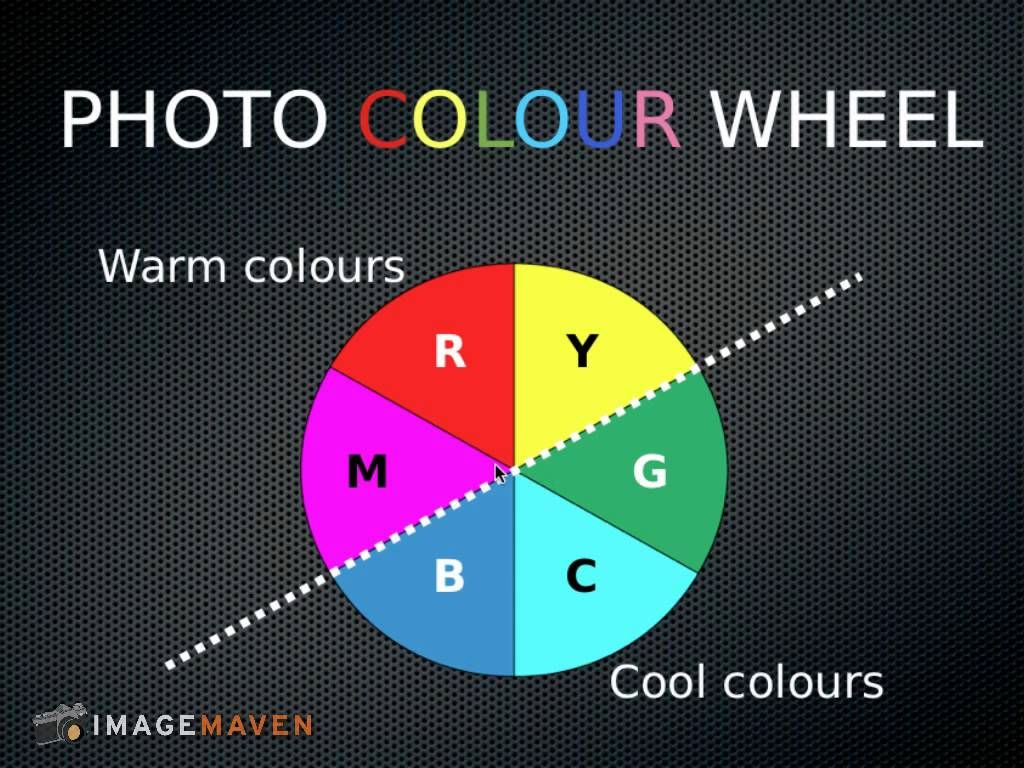
To invert the curve, first click on the master curve - it's called RGB. If there is at least one point on the curve, click on it.
If you click on the drop-down list, you will see 4 curves - master RGB curve, Red/Red, Green/Green and Blue/Blue channel curves. All of them will be needed to copy the tinting / Illustration by the author
Below you will see two columns - Input / Input values \u200b\u200band Output . This is where the point originally stood and where it moved to. You just need to swap these numbers around by manually rewriting them.
Select each point in each channel in turn and swap the numbers in the lower column. Here you need to enter 127 in Input / Input values, and 148 in Output / Output values \u200b\u200b / Illustration by the author
Do this for each point on each curve in all four channels - RGB, Red, Green and Blue . There can be a maximum of three points on one curve.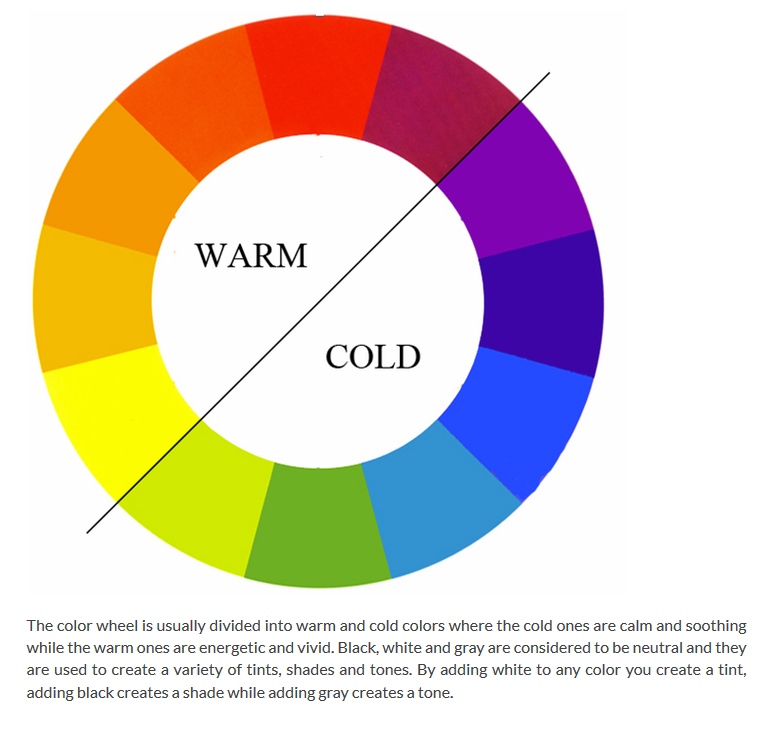
After you will see that the tinting not only returned - its effect doubled / Illustration by the author
6. Pick up the Curves layer in which you did all the manipulations and transfer it to the photo you want to tint. Ready! The colors in the image will be tinted with the reference colors.
The photo on the left is the tint that we took from the picture from the pizzeria / Illustration by the author
Important: there are times when there is no black, white or gray in the photo at all. Then the task becomes more complicated - you need to independently sort through all the curves, bringing the colors to neutral ones, such as in life.
Here it is easiest to focus on familiar objects - if you know that the photo was taken on a bright sunny day, and for some reason the sky is yellow, then it needs to be returned to the usual blue. If the skin gives off purple, it means that purple has been added to the tint in medium tones.
Why it is not possible to repeat the tinting and why the presets do not work
The techniques studied above, as well as the downloaded presets, will bring the colors in the photo to the desired ones. But this is not enough for the picture to acquire the same atmosphere as the original.
We have collected common reasons why tinting and presets do not work, look ugly and, most importantly, how to fix it and what needs to be considered at the time of shooting.
- The photo is much lighter or darker than the reference.
It is difficult to create an atmosphere of mystery, like from some kind of horror, when the picture was taken on a hot summer afternoon.
1. Try to darken or lighten the image using layers Brightness/Contrast Brightness/Contrast, Exposure/Exposure, Levels/Levels or Curves/Cruves.
2. Pay attention to the lighting and camera settings while shooting. If the ISO and aperture do not darken the scene even more, use ND filters on lenses that do not let in excess light.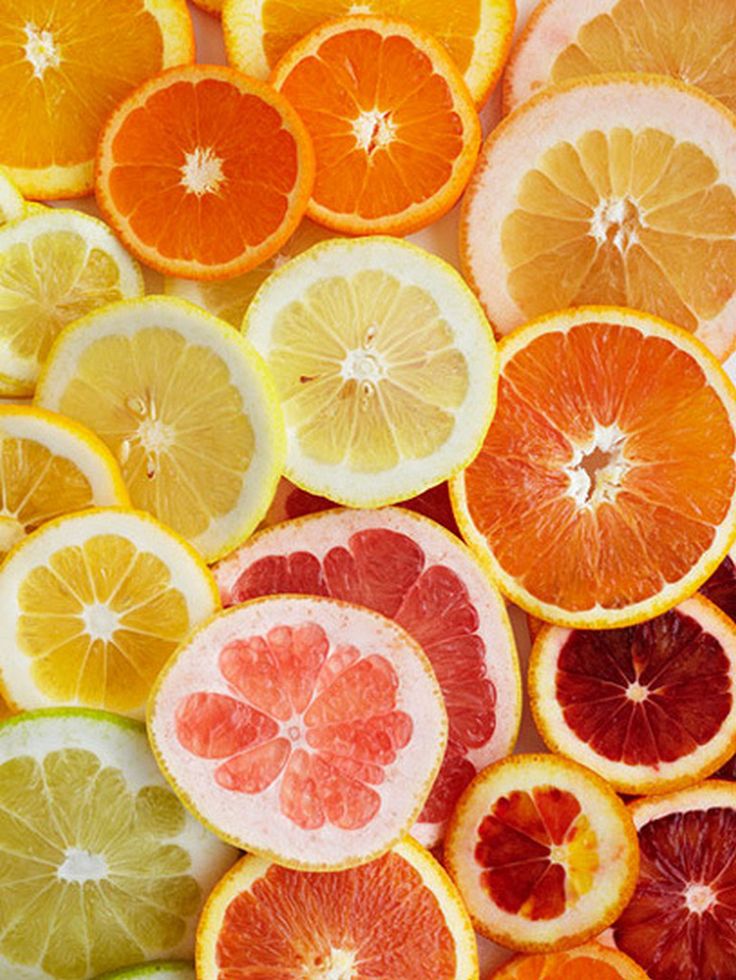 If, on the contrary, there is not enough light - external flashes.
- The reference and your image differ in the nature of the light.
You won't be able to get a soft light tint with soft chiaroscuro if you shoot with hard light, which produces contrasting, sharply defined shadows.
Study in advance the picture or screenshot that inspired you. Softboxes and umbrellas will help create soft light, tubes, reflectors, beauty dishes with honeycombs will help to create hard light. If the heroes have colored backlights, then illuminate them from the side or from behind with a reflector with color filters, a lightsaber.
- The colors inside the photo.
Nearly every post in the retouching communities, newcomers ask the same thing - how to make chocolate or brown toning in Photoshop. The general principle we described above is to add a warm color to at least the shadows and midtones.
But then all experienced photographers and retouchers notice the following - it is impossible to achieve the desired effect without choosing the location, clothes and accessories of the hero in advance.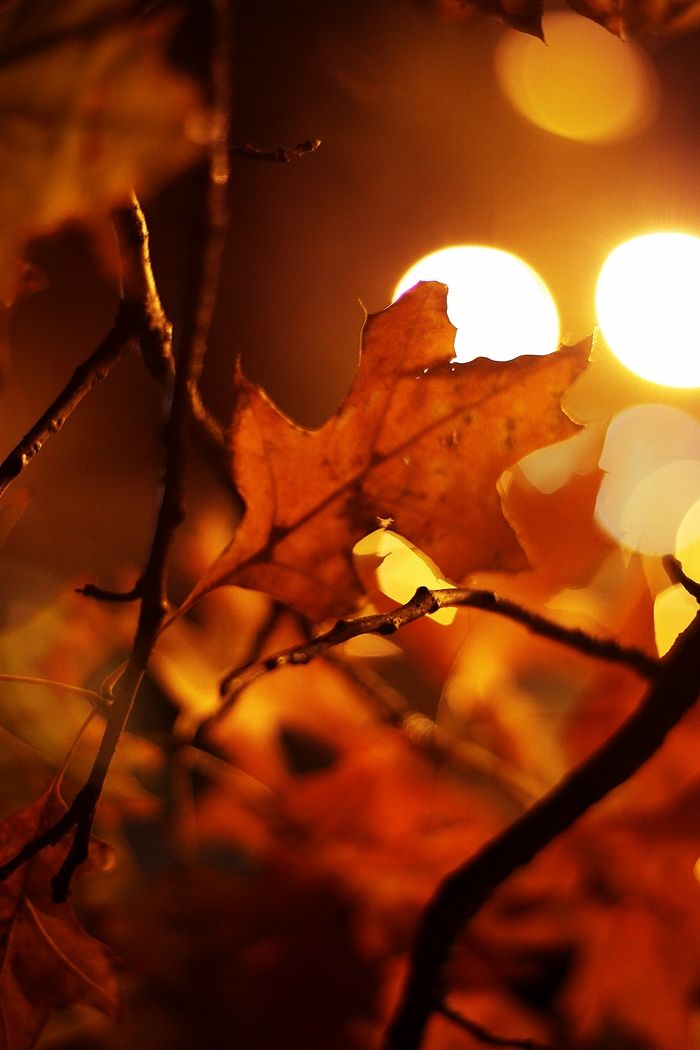 With all your desire, you will not get a beautiful chocolate tint if the photo has a model in blue clothes on a purple background. The effect of mystery and innuendo, which gives a dramatic portrait, where almost the entire hero is in shadow, will not appear if you put the model on a white background, and also dress her in ruffles and bows. You won't be able to make the model look like the rays are falling through the blinds unless you let the light through the blinds or use gobo masks. This must be accepted and taken into account in advance.
The photo on the left looks warmer not only because of the toning - the brown background, orange table, red glass, yellow lamps, as well as the color of the clothes and pizza enhance the "warm" effect. The photo on the right is the same toning as on the left, but the cold background changes the perception / Photo: Elizaveta Chechevitsa / instagram.com/chechevic_a
Choose the model’s wardrobe and accessories in advance.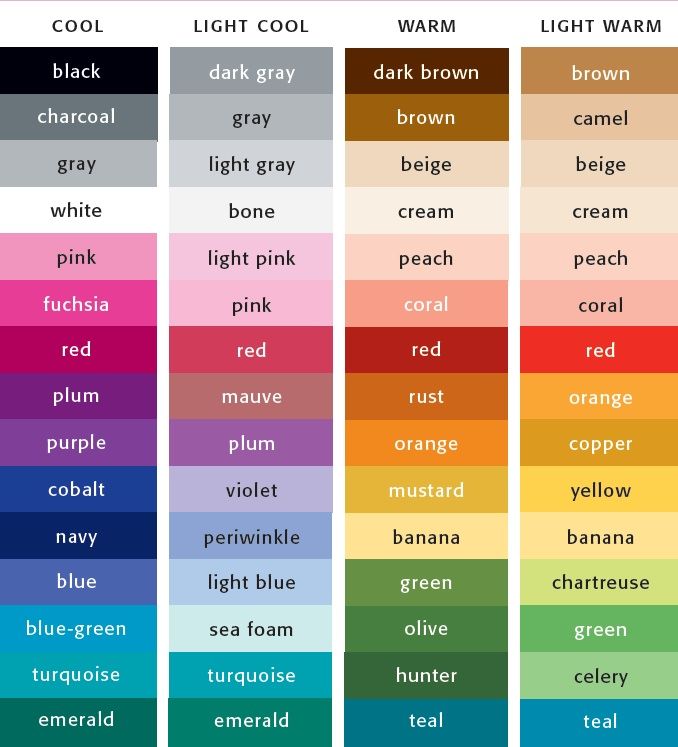 Evaluate the background of the reference and select the same or similar. For example, white, black or gray backgrounds can be recolored to any color using color filters. For a photo with chocolate toning, a textured fabric background in warm colors is suitable. Or take a green chroma key, which you can cut out and put any other background in its place.
Separate elements of clothing and accessories can already be repainted in Photoshop itself using the tools Hue/Saturation Hue/Saturation, Selective Color Correction/Selective Color, or an ordinary brush in blending mode Chroma/Color.
How to use split toning to make your photos stand out
In this tutorial, we will cover the topic of Lightroom split toning, or otherwise split toning. Have you ever taken a photo and then felt frustrated that you didn't capture the moment? It may look exactly like what you saw, but looking at the image, you realize that something is missing.
It is one of the most difficult challenges photographers face to express a feeling or vision in a 2D environment.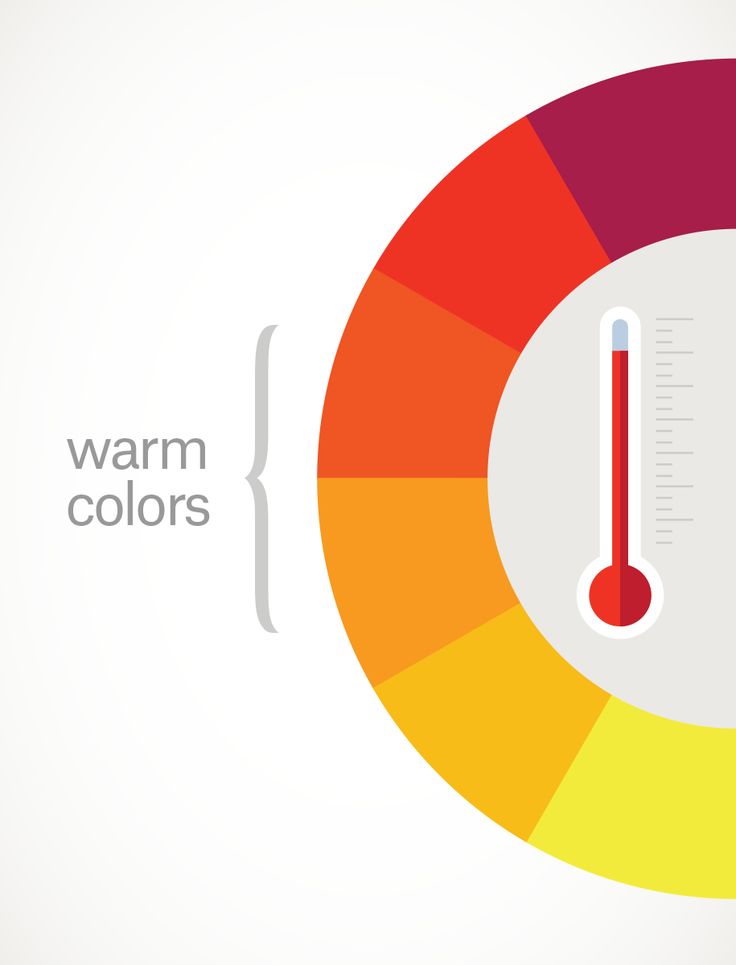 One of the most important tools in a photographer's kit is color.
An example of a warm split toning in Lightroom.
I'm not talking about the color of the objects in your photo, like a red car or a yellow dress. I mean the overall color tone, the tone of your image, that's also important.
Color influences human perception so much that there is a whole science about it. Even some basic knowledge of color theory can improve your photos.
Beyond White Balance
The first place to go to change the hue is the white balance. For example, if it's a gray overcast day, you can move the temperature slider to the warmer side, making the image yellow-orange or sunny. Move it in the opposite direction and your image will become colder and bluer.
Example cold split tinting .
While changing the white balance is useful, it is still a global adjustment and affects the entire image.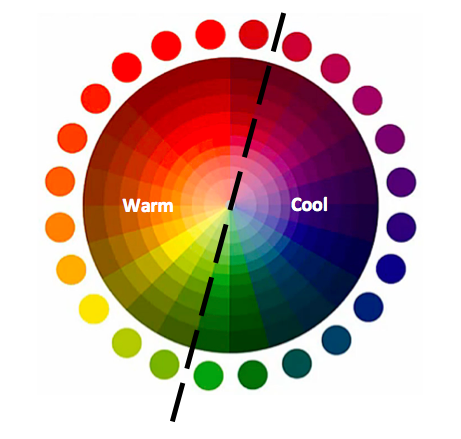 In other words, editing the tint of a photo with white balance alone is like a mechanic trying to fix an engine with a sledgehammer. This is not the right tool for the job.
To do finer processing and thus have more control over the overall mood of an image, you should look into split toning.
Magenta and warm tones.
A bit of toning history
Toning was originally a way to change the color of black and white photographs. For example, in the past, chemicals were added during the development process to give the pictures a sepia tone. Over time, tinting chemicals began to be used in other shades, like red and blue.
This may sound complicated, but in today's digital photo labs, all split toning really means adding color to the shadows, the highlights, or both. There are several ways to split toned an image. One of the most common is to add yellow to highlights and blue to shadows, or vice versa. However, let's see how you can adjust one color to create a certain mood using Adobe Lightroom (also possible with Photoshop and Bridge).
This is what the split toning sliders look like in Adobe Lightroom.
Zen Magenta
Magenta is my favorite color to add to my images. Like yin and yang, this color (purple red) represents harmony, balance, love, and personal growth. It has a calming effect that stimulates creativity and happiness.
When using magenta for split toning, I usually use it in either the shadows or the highlights. I rarely make changes to both because it's often too much. Basically I'm adjusting the shadows as they are usually the underexposed dark parts of the image and I'm trying to lighten them up. If the picture is very bright, then I edit the highlights.
There are no set rules for how far sliders can be moved. However, I prefer to move the Hue slider somewhere between 230-250 and the Saturation between 10-20. It all depends on the image and the intensity of colors, shadows and highlights. You can also use the eyedropper to pick a color.
Another added bonus of adding some magenta is that it tends to smooth out the rough edges of colors. Browns, greens, and yellows become smoother, giving the image a soft tint.
Lightroom split toning keyboard shortcuts
There are a few keyboard shortcuts in Lightroom's split toning panel that you should be aware of.
First, it can be difficult for you to pick the right color when the saturation is low. To boost a hue to 100% saturation, simply press and hold Option for Mac (or Alt for Windows), then move the hue slider to one side. This will show the color in full strength, so it will be easier for you to select it.
Second, to make it easier to see the colors in the image, hold Option/Alt and then move the Balance slider in the Split Tone panel.
Experiment
Split toning is so much more than magenta.