What are macro photos
Everything You Need to Know About Macro Photography
Many photographers today want to know how to take macro pictures, thanks to a growing number of beautiful images online of small plants, animals, and insects. Macro photography is not always easy, especially for beginners, but it is one of the most rewarding genres of photography you can do. With the right skills, you will be able to capture amazing images even in your own backyard. To learn macro photography from start to finish, you should begin by reading the tips and techniques in this guide, taught by an award-winning macro photographer exhibited at the Smithsonian Museum of Natural History. By the end, you will know exactly how to put these recommendations into practice and capture stunning macro photographs for yourself.
Macro photo exhibited in the Smithsonian Museum of Natural History from 2015 to 2016, “Nature’s Best Photography” award winner. © Spencer CoxNIKON D800E + 105mm f/2.8 @ 105mm, ISO 100, 1/640, f/3.
Before anything else, if you’re more of a visual learner, you may want to watch the following video we created to introduce macro photography. It covers many of the same topics as this article, although some sections have been shortened for the sake of video length:
What Is Macro Photography?
Macro photography is close-up photography of small subjects, including things like bugs and flowers. You can take macro pictures in a studio or outdoor environment so long as you are magnifying your subject sufficiently.
Officially, you may hear that macro photography only happens when you take pictures of small subjects with a magnification of “life size” or greater. I will cover more about the meaning of magnification and life-size in a moment, but essentially it means that you must take pictures where your subject is the same size as your camera sensor or smaller, and it fills the frame. (So, if your camera sensor is one inch wide, you would be photographing something 1 inch or smaller.)
That is a very strict definition, and frequently you will hear photographers call an image “macro” even when it shows a slightly larger subject. The same is true of the photos in this article, many of which do not fit this technical definition, but they are close-up photographs nevertheless.
NIKON D7000 + 105mm f/2.8 @ 105mm, ISO 800, 1/250, f/22.0Introducing Macro Photography for Beginners
How do you take macro photos? Here are the most important steps:
- Understand macro photography terminology.
- Pick the right camera and lens equipment.
- Get enough depth of field.
- Pick camera and flash settings for a well-lit photo.
- Focus on the most important part of your subject.
- Learn the common behaviors of various insects.
- Compose and take your picture.
Some of these are harder to do than you might think, such as getting enough depth of field and focusing on the most important part of your subject. However, the tips in the rest of this macro photography tutorial will give you a good idea of where to begin, and you should be able to master everything with a bit of practice.
What Is Magnification?
In macro photography, it is important to know how large or small your subject appears on your camera sensor. Comparing this number versus your subject’s size in the real world gives you a value known as your magnification.
If that ratio is simply one-to-one, your subject is said to be at “life size” magnification. For example, if you’re photographing something that is one centimeter in length, and it is projected exactly one centimeter onto your camera sensor, it is at life size (regardless of the size of your camera sensor).
Typical sensors in DSLRs and mirrorless cameras range from about about 17 millimeters to 36 millimeters across. So, a 1 cm subject is pretty big by comparison, taking up a significant portion of your photo. If you end up making a large print, that tiny object will appear huge – potentially billboard sized!
To make things easier to understand and compare, macro photographers use an actual ratio rather than always saying “life size” or “half life size.” Specifically, life size is 1:1 magnification. Half life size is 1:2 magnification. Once you get to about one-tenth of life size, you arguably are not doing close-up or macro photography any more.
Good macro lenses let you shoot at 1:1 magnification, and some specialized options do even more than that. (Canon has a macro photography lens that goes all the way to 5:1, or 5x magnification, which is insane!) However, other lenses on the market called “macro” may only go to 1:2 magnification or even less. Personally, my recommendation is to get a lens that can go to at least 1:2 magnification, and ideally 1:1 magnification, if you want as much flexibility as possible.
NIKON D7000 + 105mm f/2.8 @ 105mm, ISO 450, 1/400, f/4.0What Is Working Distance?
Working distance is easy: It’s the distance between the front of your lens and your nearest subject. If your working distance is too small, you might end up scaring your subject or blocking the light simply because you are too close. Ideally, you will want a working distance of six inches (15 centimeters), with the best case scenario being twice that or more.
The working distance of a lens is smallest at 1:1 magnification, since you obviously must be as close as possible to your subject to capture such extreme photos. Also, lenses with a longer focal length have more working distance than lenses with a more moderate focal length. For example, the Nikon 200mm f/4 and the Canon 180mm f/3.5 are two examples of macro photography lenses with large working distances. By comparison, the Nikon 60mm f/2.8 macro lens has much less working distance.
It is always best to look for a lens with the largest possible working distance so that you are less likely to scare your subject or cast a shadow on it. However, macro lenses with a longer focal length like 180mm or 200mm are generally more expensive. If you want to balance price and working distance, consider a lens in the range of 100mm to 150mm. Personally, I use a 105mm macro lens.
Best Cameras for Macro Photography: DSLR vs Mirrorless
For macro photography, both DSLRs and mirrorless cameras can work very well. The key is to pick a camera that lets you use a good macro lens, and ideally one which has as little lag as possible between seeing your subject, pressing the shutter button, and having the image recorded. Traditionally, these both were areas where DSLRs held an advantage, due to lagging electronic viewfinders and fewer native macro lenses on mirrorless cameras. Today, those differences are generally negligible, and sometimes lean in favor of mirrorless.
Mirrorless cameras also frequently have other benefits that you might find useful, such as focus peaking (an overlay that shows which parts of your subject are in focus – helpful for manual focus macro photography). Also, the ability to review your photos without taking your eye from the viewfinder is valuable if you want to judge things like sharpness and flash exposure quickly.
The only thing I would caution is that, if you do pick a mirrorless camera, you should get one with an electronic viewfinder. Trying to compose and hold a macro photo steady with a rear LCD screen, especially at extreme magnifications like 1:1, is a nightmare. Since mirrorless cameras with electronic viewfinders frequently cost more than a competing DSLR, you might want to pick up a DSLR (potentially a used one) if you are on a budget. But all of this is very picky. Regardless of the camera, you will be able to get some excellent photos – and you will never find a camera that guarantees a perfect keeper rate for such difficult subjects!
NIKON D800E + 105mm f/2.8 @ 105mm, ISO 100, 1/250, f/8.0Best Cameras for Macro: Full-Frame vs Crop-Sensor
If your goal is to create photos with the highest magnification possible, full-frame cameras are usually overkill for macro photography. Even the Nikon D850 with 46 megapixels cannot match the potential macro detail of the 20 megapixel Nikon D7500, simply because the D7500 has a slightly higher pixel density.
With macro photography, the highest pixel density (most pixels per square millimeter of the sensor) is what determines the maximum detail you can get on your subject. The D850’s large sensor has fewer pixels per millimeter than the crop-sensor D7500, despite having more total pixels. In many genres of photography, larger pixels – and more total pixels – are preferable. With 1:1 macro photography, though, it’s all about pixel density. The reason? When you crop a D850 photo to match images from the D7500, you lose enough pixels that the D7500 wins (though not by much).
Still, full frame cameras are great for macro photography. You shouldn’t think otherwise. If you take photos that aren’t at maximum magnification, they still have all their usual benefits over smaller sensors. So, a full-frame (FX) camera is still generally better for macro photos than a crop-sensor (DX or aps-c) camera, but by a smaller amount than in other types of photography.
Best DSLR for Macro: Canon vs Nikon
For almost all genres of photography, Canon and Nikon (and Sony, and others) are so close in quality that arguments about which is “better” are, at best, extremely picky. Sure, there are differences, but it is rare that any system has a flaw that is fatal for the typical user.
As far as macro photography, this is still true, but you do need to keep some extra considerations in mind. Canon cameras in particular do not calculate aperture in the same way that cameras from other brands do. Specifically, when you shoot at high magnifications like 1:1, the Canon cameras will read your aperture value incorrectly. It might say f/11, when everything about the photo (diffraction, depth of field, and exposure included) acts as if you’re shooting at f/22.
That is because aperture, on any lens, starts to do unexpected things at such high magnifications. In short, when your aperture is physically one size, it acts like another. Nikon, Sony, and other manufacturers all tell you the “functionally correct” aperture (f/22 in this case), while Canon does not. So, you need to keep that in mind when you shoot Canon cameras. This is far from an impossible drawback to overcome, but it is important to know about. The more frequently you change magnifications, the more of a problem this is.
In the following sections, I will cover depth of field, focusing, and composition in macro photography. Use the menu below to go to the next section, which covers how to focus for close-up photos – one of the most important (and difficult) techniques you’ll need to learn in order to take good macro pictures.
Table of Contents
Everything You Need to Know About Macro Photography
Depth of Field for Close-Up Photos
For non-macro photography, your subject won’t be especially close to your camera – maybe 5 or 6 meters, or even as far away as the horizon. At these distances, a normal aperture of f/8 or f/11 typically will render a sharp scene from front to back (aside from extreme telephoto shots, since telephotos have less depth of field).
Macro photography is different. When you take close-up photos, you naturally end up with very little depth of field, even at small aperture values. At 1:1 magnification, your depth of field may be so thin that you can’t get a fly’s head and feet both to appear sharp at the same time, even though they are just millimeters apart!
NIKON D7000 + 105mm f/2.8 @ 105mm, ISO 100, 1/40, f/3.2The thin depth of field is related to another challenge of macro photography: You don’t have much light. Why not? There are four main reasons why you’ll have to work with very little light in macro photography:
- Your camera itself usually blocks some natural light.
- Your flash might not point at the right angle to illuminate your subject.
- Apertures like f/11, f/16, or smaller are necessary in order to get enough depth of field, but they reduce light.

- You’ll need to be at very fast shutter speeds in order to reduce blur from camera motion (which is magnified for close-up photography), also darkening the image.
With all these issues together, your close-up photos can look like you’ve left on your lens cap in the middle of the day. So, how do you balance depth of field with capturing enough light? There are a few ways, each with their own compromises.
Method 1: Open Up Your Aperture
You may choose to live with a thin depth of field for your macro photography – to the point where you won’t be able to get an entire ant head to appear sharp at the same time. If that seems fine to you, just open your lens’s aperture as wide as possible (or only slightly stopped down – something from f/2.8 to f/5.6), and you’re set to take macro photos.
The benefit of this approach is that you don’t have to worry about complex lighting setups or software fixes to make your macro photos look good, since you’ll generally capture enough light to make things work. The downside is that it becomes nearly impossible to focus your lens handheld at the closest magnifications, since there is essentially no depth of field.
For that reason, this method works best if you are trying to take photos of subjects that are a bit larger, in the range of 1:4 to 1:10 magnification. However, I do not recommend it if you want to take life-size photos at 1:1 magnification.
NIKON D800E + 105mm f/2.8 @ 105mm, ISO 100, 1/640, f/3.5Method 2: Stop Down and Use a Flash
The next method (and the one I use the most) is to stop down the aperture to a small value. By small, I mean f/16 or f/22. The upside to using such a small aperture is that it is easier to get your subject to appear in focus – though still tough – and your depth of field becomes manageable.
However, a flash is essentially mandatory with this method, since you are losing a huge amount of light. On top of that, diffraction starts to have a noticeable impact on the sharpness of your photos. Still, it is important to keep in mind that an f/22 image with diffraction looks far sharper than an f/4 picture without any depth of field.
Method 3: Stack a Set of Macro Photos
Another method is focus stacking. It involves taking your photos at more “moderate” apertures, with lower diffraction but a shallow depth of field (usually f/8 or f/11).
To counteract this tiny depth of field, you take several photos at different focus distances and combine the best parts of each in post-processing. For example, you may take one photo where a bug’s head is in focus, one where the wings are in focus, and a third where the back legs are in focus. Then, you can merge them into a sharp bug photo from front to back. We have a separate tutorial on focus stacking at Photography Life as well.
There are two upsides to this method: First, image quality is extremely high, since diffraction is a non-issue. Second, you have the ability to extend your depth of field artificially so that any subject can be completely sharp from front to back, even at especially high magnifications.
The downsides are numerous, however. Focus stacking is typically confined to studio and tripod work because precision focus is required. Another downside is the time involved. For maximum quality, you may need to combine dozens of photos into a single picture, which can take hours of photography and post-processing. You also need specific software to combine focus-stacked images (such as Photoshop or Helicon Focus), with better and more specialized options generally costing more.
The biggest issue, though, is that your subjects need to be completely still. It is possible to find bugs that aren’t moving, but it isn’t always easy. This method works best for plants, or bugs that are drowsy and waiting for the sun to come out (try the early morning).
This is also a fairly costly option, because you will need a decent amount of dedicated equipment. A solid tripod, a tripod head, a macro focusing rail, and special software are all requirements for the most dedicated focus stackers.
Method 4: Tilt Your Plane of Focus
The final way to increase depth of field is to buy a special type of macro photography lens: a tilt-shift. These lenses let you tilt the depth of field along your subject. For example, you may be able to focus simultaneously on a bug’s head and wings, even though both are different distances from the lens. Potentially, you can get an entire bug to be sharp in a single photo at much more reasonable apertures than normal.
There are many downsides here, though. First, tilt-shift macro lenses (like the Nikon PC-E 85mm f/2.8D) cost at least $1000 used and up to $1800 new. They generally don’t focus to 1:1 macro (about 1:2 instead), they only focus manually, and they are difficult to use without a tripod. Lenses like this mainly shine for studio work of non-moving subjects, in which case focus stacking may be the preferable option. That is not to say this method is always a bad one, but that it is very specialized, and most photographers will not find tilt-shift lenses to be the best option overall.
Which Method Is Best to Capture Enough Depth of Field?
Most macro photographers use a combination of the above methods depending upon the situation. Personally, I tend prefer to use a flash and a small aperture for high magnification macro photography. If I am taking pictures of larger subjects like dragonflies and lizards, I will use a wider aperture and shoot in natural light. With practice, though, the key is to realize for yourself which scenarios demand each of these methods, making it easier to set your camera appropriately.
The next step in taking good macro photos is to focus properly. I will cover that process on the following page of this tutorial, including some details that may be different from what you would expect.
Table of Contents
What is macro? Features and Techniques for Shooting Small Objects / Shooting for Beginners / Photography Tutorials
Shooting small objects is fun but challenging. And in this lesson you will learn more about macro photography.
What is macro? On the scale of shooting
In general, “macro” means something large: macrocosmos, macroeconomics… But in the case of macro photography, we are talking about the scale of shooting.
What is the scale of the survey? Imagine that we are photographing a coin with a diameter of 22 mm. If we ensure that the projection of the coin on the camera matrix is the size of the coin itself (that is, 22 mm), we will get a shooting scale of 1:1. The coin will take up the entire frame! Shooting at a scale of 1:1 is called macro photography - shooting at a large scale . Close-ups of objects and details that can be seen with the naked eye are obtained. But with macro photography, we cannot observe microscopic objects and phenomena - they become noticeable at a shooting scale of about 20:1. And here we can already talk about microphotography - this is how the world sees a microscope.
Coin taken in 1:1 scale. Its projection on the camera matrix is the same size as the coin itself - 22 mm in diameter. Recall that the dimensions of the full-frame matrix are 36 × 24 mm.
NIKON Z 7 / NIKKOR Z MC 105mm f/2.8 VR S SETTINGS: ISO 64, F16, 1/200s, 105.0mm equiv.
Macro photography is not a separate genre of photography, but rather a technique that is used in various directions.
For example, it is used for shooting insects, plants and fungi, for scientific purposes, in forensics, dentistry, and simply in creative tasks when shooting still lifes and sketches.
NIKON D850 / 85 mm f/1.4 SETTINGS: ISO 64, F10, 2 s, 85.0 mm equiv.
Minimum lens focusing distance and macro photography
How do I take a close-up photograph of a subject? The answer is obvious: get closer to him. But everyone who has tried to shoot small objects with a conventional (for example, whale) lens knows that the camera simply cannot focus at close distances.
Every lens has a minimum focusing distance. Closer than this distance, the lens will not be able to focus, this is a design limitation. When focusing at short distances, simple lenses can noticeably reduce image quality. The minimum focusing distance of conventional lenses is rarely enough even for shooting at a scale of 1:5. By the way, the maximum shooting scale of the lens is always indicated in its characteristics on the manufacturer's website.
Many cameras and smartphones have a macro mode, but it does not always allow you to shoot with the proper scale (at least 1:5). This automatic scene program will only help focus on the subject closest to the lens, but will not zoom in or reduce the minimum focusing distance of the available lens.
Not all close foreground shots qualify as macro photography. Here, small flowers turned out to be quite large, but their scale is far from even 1:10.
1:1 scale photography requires special equipment. You can use macro bellows, macro rings, or even a normal reading magnifier to shorten the focusing distance. But there are specialized solutions on the market - macro lenses. Their main feature is the ability to focus and obtain high-quality images at short distances. The standard zoom ratio is 1:1, and this is the ratio that all modern Nikon macro lenses provide. For example, Nikon NIKKOR Z MC 105mm f / 2.8 VR S achieves this shooting scale at 29cm from the matrix plane. Comparable to a portrait lens of the same focal length, the NIKKOR AF-S 105mm f/1.4E ED. Its minimum focusing distance is already 1 meter, on it the shooting scale is about 1: 7.5!
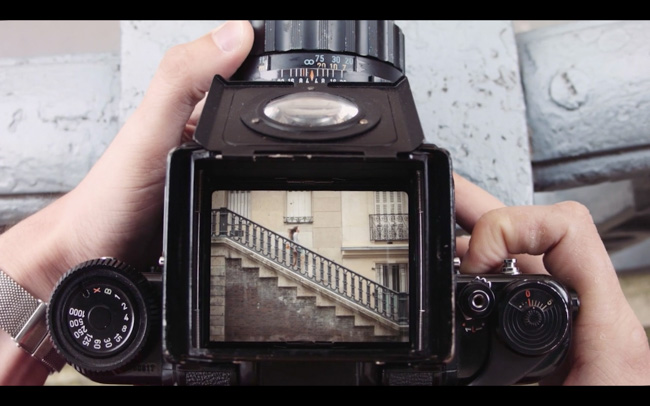
An important point: the focusing distance is measured not from the front lens of the lens, but from the focal plane, from the camera's matrix. To know where to count the focusing distance from, there is a Ꝋ sign on the camera, it is located on the top edge of the camera. But sometimes you can come across the concept of “minimum focusing distance”. In this case, we are talking about the distance from the front lens to the subject. This value is relevant when shooting wildlife.
NIKON Z 7 / NIKKOR Z MC 105mm f/2.8 VR S SETTINGS: ISO 64, F4, 1/40s, 105.0mm equiv.
Challenges of macro photography and macro lenses
What challenges does a photographer face when shooting small objects? We will analyze the main points, and through them we will talk about macro photography techniques.
- Lack of depth of field . What determines the depth of field in a photograph? From the focusing distance, the focal length of the lens and the aperture value. The smaller the shooting distance, the less space will fall into the depth of field. This turns into a real problem when it comes to shooting small subjects. Sometimes the depth of field is a fraction of a millimeter! Interestingly, with the same aperture value and shooting scale (for example, 1:1), the depth of field will be the same regardless of the lens and its focal length. The shooting scale just sets the focal length and distance. This is easy to check using the IPIG formula or calculator.
 To gain depth of field, it is useless to choose a "fifty kopeck" instead of a 105mm lens. At a scale of 1:1, the depth of field will be just as small due to the shorter focusing distance. Almost all macro lenses are telephoto. A long focal length allows you to keep a sufficient distance from the subject without perspective distortion in the frame.
Depth of field at F14 is less than a centimeter. And here the zoom is far from 1:1…
NIKON Z 7 / NIKKOR Z MC 105mm f/2.8 VR S SETTINGS: ISO 64, F14, 1s, 105.0mm equiv.
Close the aperture to increase the depth of field. Therefore, many macro lenses allow you to close it to values like F32, F64, while ordinary lenses have a limit value usually F16 or F22 ... By reducing the aperture ratio so much, the photographer will inevitably encounter diffraction and lack of illumination. But in this way we will get the necessary depth of field, and this is the main thing! The lack of lighting is compensated by a flash or shooting from a tripod at a slow shutter speed (if the subject is stationary).
If you are willing to spend more time shooting (and in the case of commercial photography this is provided for by the budget and terms of reference), then it is more reasonable to use focus stacking instead of a fairly closed aperture with diffraction. Fortunately, all modern Nikon cameras allow you to shoot with focusing steps - all that remains is to assemble one frame with a huge depth of field from numerous sources in Photoshop or Helicon Focus.
Macro photography with Nikon Z 7 and Nikon NIKKOR Z MC 105mm f/2.8 VR S
- Difficulties with autofocus . With such a shallow depth of field, it will be difficult for the camera to focus - the zone of sharpness in the frame is too small. So a common property of macro lenses is unhurried autofocus. This is not reportage optics. Many old-school photographers generally only use manual focus when shooting macro. Both options are convenient on Nikon Z cameras. Macro autofocus works well. When shooting handheld, AF-C tracking and area tracking are a good combination, so focus accuracy is less affected by camera shake in your hands.
 And if you decide to aim manually, it will also be convenient due to the ability to increase the focus area, the presence of focus peaking.
It is much more convenient to aim from a tripod: this way the distance between the camera and the object will not constantly change due to hand shaking.
NIKON D5600 / 40.0 mm f/2.8 SETTINGS: ISO 100, F16, 1/160 s, 60.0 mm equiv.
- Lighting . Macro shooting involves working with closed apertures. And if so, most likely, natural light will not be enough. Partly the situation is saved by the presence of optical stabilization. Many Nikon Z cameras have image stabilization based on sensor shift. With its help, you can shoot handheld at shutter speeds up to 1/10 s (in my subjective experience). By the way, the Nikon NIKKOR Z MC 105mm f / 2.8 VR S macro lens also has its own built-in stabilizer. It works in tandem with a stabilizer on the matrix.
An ordinary flashlight is used as additional lighting. The light from it made it possible to make the lighting more interesting, more voluminous, and emphasized the texture of the moss.
NIKON Z 7 / NIKKOR Z MC 105mm f/2.8 VR S SETTINGS: ISO 64, F16, 2s, 105.0mm equiv.
Whether or not your camera has stabilization, using a tripod will improve your shots when shooting still (and slow moving) subjects. A tripod will allow you not only to use shutter speeds of any length, but also to correctly compose the frame and accurately focus. Without a tripod, the shaking of the camera in your hands will interfere with this.
When shooting moving subjects, macro flash can be used. It is attached to the lens mount. You won’t be able to use the usual built-in or on-camera external flash in macro photography: the lens will cast a shadow on the subject. Macro flashes are widely used in insect photography, dental photography, forensic science, and science. They do not allow you to apply complex lighting schemes, but working with them is quick and easy. In jewelry photography, where it is required to correctly position highlights and shadows on the smooth surfaces of precious metals and stones, studio lighting is used: monoblock, softboxes, frost frames, and so on.
Nikon R1C1 Macro Flash Kit
Macro lenses in the Nikon Z system
The Nikon Z system currently has two macro lenses. Let's give them a brief description.
Nikon NIKKOR Z MC 50mm f/2.8 is a versatile fifty-kopeck piece with macro capability. You can shoot any scenes on it: from landscape (macro lenses are traditionally very sharp) to portraits.
Nikon NIKKOR Z MC 50mm f/2.8 allows you to shoot macro at a scale of 1:1. However, the relatively short focal length of 50mm forces the photographer to shoot very close to the subject in order to get that much magnification. The minimum focusing distance is 16 cm. Getting so close is not always possible, say, when shooting insects. At full frame, it will give a relatively wide field of view. This option is suitable for food photography, but for classic product or jewelry photography it is still wide: perspective distortions will appear. But for crop, this lens will be an ideal macro lens with the right angle of view (75mm equiv.). When focusing, the “trunk” of the lens extends, it indicates the scale with which the shooting is currently taking place.
The lens is dust and splash resistant, lightweight (only 260g) and compact. This is an excellent choice for amateur shooting and for product photography using crop cameras like the Nikon Z 50 or Nikon Z Fc.
NIKON Z 7 / NIKKOR Z MC 50mm f/2.8 SETTINGS: ISO 64, F6.3, 1/6s, 50.0mm equiv.
Nikon NIKKOR Z MC 105mm f/2.8 VR S is a professional macro lens, successor to the legendary Nikkor AF-S Micro 105mm f/2.8G IF-ED VR DSLR model. 105mm is the optimal focal length for most macro tasks. It allows you to get a magnification of 1:1 from a relatively long distance of 29cm, and at the same time the picture will be with minimal perspective distortion. However, due to the strong background blur and long focal length, it will be good for portraiture and other genres.
Dignity Nikon NIKKOR Z MC 105mm f/2.8 VR S - internal focusing: when focusing, the “trunk” of the lens does not move forward. The internal design is better protected from dust and moisture.
NIKON Z 7 / NIKKOR Z MC 105mm f/2.8 VR S SETTINGS: ISO 64, F16, 1/4s, 105.0mm equiv.
The Nikon NIKKOR Z MC 105mm f/2.8 VR S has an information display. Using the Disp button, you can choose what information will be displayed on it: aperture value, focusing distance or shooting scale.
The lens is sharp even at wide aperture, and chromatic aberrations are almost perfectly corrected - you won't see colored contours around contrasting subjects.
If the Nikon NIKKOR Z MC 50mm f/2.8 is an all-rounder with a full macro function and a cool option for crop cameras, then the Nikon NIKKOR Z MC 105mm f/2.8 VR S is a professional tool sharpened for macro. With him, you will be able to seriously engage in all areas of subject and jewelry photography, shooting nature and living beings.
The world of macro photography is amazing! Try yourself in this genre: it will captivate both creatively and professionally! Share your work in the comments!
What is macro photography? | Macro photography tips
A popular genre of photography, macro photography is close-up shots of small objects that are usually not easy to see in detail. It gives us the opportunity to take a fresh look at the world around us, because the fashion for such pictures will hardly ever pass, and the ability to take beautiful macro photos is almost elevated to the rank of art.
Is it possible to learn it without any special knowledge and skills? Yes, all you need is a high resolution camera, knowledge of basic techniques and a lot of patience. Below we will give the main rules of macro photography from people who do it professionally.
Among ordinary people who do not know what macro photography is, it is widely believed that any photo that gives a very close-up can be called a macro photo. Therefore, in social networks you will see a lot of pictures taken on an Android phone or iPhone.
If you have a modern model of a phone with a good camera that has a macro mode, you can start practicing with it. However, later, if you decide that you want to seriously devote yourself to macro photography, you will still need to change your smartphone to a camera with a suitable lens. When you decide to buy, first study lens reviews, read discussions in thematic groups. It is impossible to advise any specific models, since each photographer has his own way of shooting, and everyone should make a choice based on their preferences and financial capabilities.
Choose the right lens
There are many macro lenses with different zoom ratios. Among professional photographers, models with parameters from 1:1 to the almost incredible 1:5 are considered as such. In fact, a 1:1 lens is not enough to shoot something smaller than ordinary objects, and so well distinguishable to the naked eye.
Ordinary lenses can be used at first, supplementing them with macro rings - tubes that are attached between the camera and the lens, thereby increasing the distance. This is a good and inexpensive situational replacement for special equipment, if you choose between them and the usual zoom, but you need to understand that this is an ersatz. With rings, it is impossible to focus on distant objects, the focal range is limited, and as a result, the image quality is not perfect. In addition, there is a danger of bringing dust onto the sensor during the installation of the ring.
Aperture value
One of the most important tips for macro photography is to choose the right aperture value. You need to work with a very small area in focus, because you need to maximize the depth of field. Sometimes lenses shoot well at f2.8, but you should focus on f4 and beyond. At the same time, of course, you need to decide how to compensate for insufficient lighting.
Auxiliary Macro Technique
It is very common to use a ring flash for photography, which is able to smooth out the flaws that inevitably arise due to the specific combination of aperture and shutter speed settings, as well as in case of lack of light. The standard flash for macro shooting is not suitable, it will either make the photo flat or ruin the frame with inappropriate shadows.
Often a Close-Up filter with a magnifying glass effect is attached to the camera, and this can also be a temporary replacement for a special lens, but it is impossible to photograph without distortion in this case.
Tripod or more required. Don't convince yourself to keep your vehicle perfectly still, you'll just waste your time and your chance to get great shots. Even with a standard 100mm macro lens, the slightest shift will be noticeable in macro photography.
What should be the focus?
Even if it is a very small subject, it will most likely not be in focus entirely. Determine which part will be the most important in the photo, and focus on it.
Shutter release
If the technician is standing on a tripod and shooting a stationary or slowly moving object, you can set a slow speed without losing focus. But if the object is moving actively, the response time must be increased, otherwise the image will be smeared.
How to shoot and what to shoot
The answer to the question "how to take a macro photo" directly depends on the understanding of what or whom you are going to shoot. Moving or stationary objects, living beings, outdoors or indoors. We are surrounded by many things that look amazing up close: a dry leaf, a butterfly wing, a handful of spices from a kitchen cabinet ... choose objects and backgrounds for them.
The peculiarities of choosing a background in this case are that it should either set off what is happening in the foreground, or be conditionally absent, simply framing the subject. Start from the principle of "warm object - cool tones background" and change these rules if necessary. For colorful objects, choose the most contrasting background, otherwise they will simply merge with it in the frame.
Light is very important. If you shoot outdoors, then try to "catch" the morning and evening soft lighting or shoot in cloudy weather. Make sure your shadow is out of the frame. Depending on the lens and shooting conditions, you can use natural, artificial and mixed lighting, as well as polarizing filters to eliminate glare.
But the main secret of how to make a great macro photo is not in the right focal length or background, but in the photographer's endless patience. Focus on the subject completely, study it before picking up the camera. Think: how best to photograph it? Be ready to simultaneously be focused on the object and constantly change the look at it, the surroundings and approach to shooting, change angles, angles, backgrounds, lighting. Experiment with colors - because sometimes even on a budget smart phone you can take a delightful macro photo that was “made” by the game of shades.
And, of course, to understand that “just large” does not mean “good”, and in general it is not the main thing in macro photography. The main thing is a new look at a familiar object, and magnification is only a tool, not an end in itself.