Shooting house pictures
12 Tips for Impressive Real Estate Photography
Real estate photography is always in demand, with houses going on and off the market daily all over the world. Every agent is battling for homebuyers’ attention with the best real estate photos.
Shooting professional photography for real estate can seem a little tricky at first. But with these simple real estate photography tips, you’ll produce beautiful, consistent property photos. These will have your local real estate industry agents calling you back in no time!
[Note: ExpertPhotography is supported by readers. Product links on ExpertPhotography are referral links. If you use one of these and buy something, we make a little money. Need more info? See how it all works here.]
What Is Real Estate Photography?
Hearing about professional real estate photography might be surprising for some of you. Why would people take photos of houses?
But the truth is, there’s a lot of demand for real estate photographers given the current housing market in many parts of the world. This specialized genre may seem simple, but it does require certain skills to take effective and compelling photos of homes for sale.
Is Real Estate Photography Profitable?
Since it’s a niche discipline, it’s not as popular as landscape or portrait photography. But this means you’ll have better chances of getting more clients and earning more than photographers in other niches, especially if you learn how to market your real estate photography business, too!
Also, as there are plenty of real estate agents, we know there won’t be a shortage of houses to photograph. Estate agents will sometimes keep old photos but are more likely to commission new photographs when selling a house. This is because changes may have been made to the building or garden, and they want to be as accurate as possible.
How Much Does A Real Estate Photographer Make?
Like any other type of photography, real estate photography pricing is tricky and depends on a few variables.
In real estate photography, the location and the size of the house play a significant role in determining the price. Of course, your experience also comes into play. It makes sense to charge a bit less than more seasoned photographers if you’re still starting.
On average, a real estate photographer will charge about $200 or less for properties under 3,000 square feet. For larger houses, they could charge between $250 and $500.
If your area is a prime spot for real estate (think major cities like New York, London, Paris, et al.), this could be the perfect photography career!
What’s Necessary for Real Estate Photography?
Real estate photography doesn’t require a lot of equipment with much of it being quite standard. Let’s go through the list below to see the tools you might have and might need.
Camera
You’ll need to have a camera that can shoot manually for real estate photography. Any crop or full-frame sensor DSLR or mirrorless camera would be perfect for the job.
Lens
A wide-angle lens helps you capture tight spaces. The unique optics tend to make rooms look more spacious. The best options you have are the NIKKOR 16-35mm for Nikon and the EF 16-35mm f/4 for Canon. You may want to consider the Sigma 12-24mm f/4 Art Lens known to be the current industry standard. Sigma produces mounts for both Nikon and Canon, so check them out before you buy!
If you have the budget, consider getting a tilt-shift lens. This option is perfect for real estate photography because it eliminates the distortion that a wide-angle lens causes. It tends to be more expensive than its regular counterparts. But you can always buy a used one.
The best lenses for real estate photography include the Rokinon TSL24M-N 24mm, Canon TS-E 17mm f/4L, and Nikon PC-E FX Nikkor 24mm f/3.5 ED.
Tripod
A tripod stabilizes your camera and ensures you don’t have motion blur in your images. It also helps retain the perspective in your shots. If you set it up at five feet, all your images will be the same height.
Remember that consistency is a top priority, especially in real estate photography.
Remote Trigger
If you’re shooting with low shutter speeds, it’s best not to touch the camera. Even pressing the shutter to take a photo can introduce an unwanted camera shake. I suggest using a remote trigger for touch-free operation.
Flash
Strobes or flashes are among the most essential but often overlooked tools in real estate photography. They are invaluable, especially in poorly-lit homes.
There are two main types of flashes—monolights and flashguns. You can start with flashguns because they’re cheap. But as you photograph more spacious properties, monolights would be the best option since they have a brighter light output.
There are tons of choices, from the entry-level Godox TT600S to the top-of-the-line Profoto B10.
Flash Trigger
You’ll need a flash trigger when using an off-camera flash for your photography. You attach the transmitter to your camera’s hot shoe and the receivers to the flash units.
It’s worth noting that some strobes already have built-in receivers. Once you finish connecting all of them, press the shutter, and the flash will fire simultaneously.
Light Modifiers
Bare flash often creates unappealing results in real estate photography. In most cases, all you have to do is point them toward the ceiling to soften the light they produce. But what if the roof is too high or you’re not getting enough light bounce?
Then consider using light modifiers. In most cases, shooting umbrellas are enough to do the job. They’re small, lightweight, and portable. And they don’t get in the way when photographing in small spaces.
Light Stands
Of course, you’ll also need light stands to support your flash units. A regular light stand will often work for lightweight flash heads. But more rigid C-stands may be necessary for bigger monolights. Depending on the location, you may need one to four of these to light up an area.
All you need to start with real estate photography is a camera, lens, and tripod. All the other items mentioned will help you get better results and finish at a faster pace though. But you don’t have to acquire all these tools at once.
Before the Real Estate Shoot
1. Have a Standard Shot List for Each Property
While no two homes are identical, there are typical shots that every professional real estate photographer will take.
Knowing what to cover is an essential tip in learning how to shoot professional real estate photography.
- Two wide-angle shots of each bedroom, the kitchen, and the living room.
- One photo of the bathroom, unless it’s incredibly beautiful or spacious.
- One to three photos of the backyard, unless it has some unique features. And then one to two shots of the front of the home to show off the “curb appeal.”
- One shot of each feature includes the laundry room, garage, and pantry.
This list will help make sure you have a point of reference to hit all your must-have real estate shots.
You can also give your list to the real estate agent, so they know what to expect.
2. Prepare Your Gear the Night Before
Preparation is crucial in real estate photography. There’s nothing worse than being at a shoot and finding that you forgot something. You may be knowledgeable enough to work around it. But having a few items missing means that you need to work on your feet a little more. Here are some more preparation tips:
- Always take your charger. A dead battery is a dead shoot.
- If you have a secondary camera, take it.
- Prepping your photography gear includes charging all batteries, formatting your memory card, and packing your bag.
- Look up the address to ensure you’ve scheduled enough time for the drive.
- If you have backup gear, be sure to pack those items as well.
On the Property
3. Declutter
Decluttering is one of the most important real estate photography tips. We get used to bits of clutter building up over time in our own homes. But all those small items that we don’t notice will stand out in a photo. Ensure that homeowners keep the surfaces as clean as possible—countertops, coffee tables, desks, etc.
When shooting interiors, don’t photograph closets unless they’re spacious or customized. Most of the time, a closet is a perfect spot to stash those small items until you’re done shooting. If you want some decorative items, leave one to three.
Sometimes you’ll arrive, and there’s still clutter that you know will not look appealing in the photos. There’s nothing wrong with suggesting hiding a few things. A professional real estate photographer will spend up to an hour constructing the scene for one perfect shot.
4. Walk Through the Home Before You Start Shooting
Each home is different. Getting a feel for space before picking up the camera will give you an idea of how to shoot it. Mentally note the best angles and what small items you may need to move. Doing so also allows you to ask the homeowner to move objects.
Remember, real estate photography is about making the building look good, not making the current interior look good!
Additionally, it lets you know which spaces are ready. And which rooms may need a few more minutes of tidying up. Knowing this will let you know in what order you’ll want to start taking real estate photos.
If you’re not good at remembering details, take notes. It makes it easier for you to organize the rooms before doing your real estate photography work.
5. Lights On or Off?
There are valid points for having the lights on or off when doing real estate photography.
Turning the lights on makes the space feel warmer and more welcoming. But it introduces varying color temperatures. You will then need to adjust the white balance in post-processing.
Leaving the lights off gives you an even light temperature. But it also often gives off a cold feeling in real estate photos.
I take it one property at a time and decide based on what each home requires. If the property has large windows, consider opening them to let light inside. Natural light looks best in most situations.
But what if the property doesn’t have enough windows or has low lighting? Then that’s when you use the interior lights or external flash units.
If the light bulbs in the house have different color temperatures, turn them off and use flash instead. Warm incandescent and cool fluorescent lamps don’t mix well in real estate photography. Of course, you can turn on a desk lamp for effect as long as it doesn’t cast any lousy shadow.
Whatever decision you make, be consistent throughout the entire home!
Taken with onboard flash, turned to bounce light off the wall behind.During the Shoot
6. Use a Flash and Bounce to Diffuse
Agents and homeowners usually rush to put the listing online. And budgets don’t allow for many photography hours for one listing.
Using a flash unit attached to your camera is one way to keep you quickly moving from one space to another. When using a flash on your camera, bounce the light off the walls to soften it.
If we point the camera flash directly into the room, we get a dreaded bright area in the center. And then a quick drop to shadow around it. This is known as vignetting, but it’s undesirable for real estate photography.
Turn the flash so that it bounces off a wall behind you, the ceiling above, or even one of the side walls. This way, you allow that light to diffuse into the space and give a more even look. You can also try attaching light diffusers to your light source.
Of course, these positions aren’t possible with a pop-up flash on your camera. So I suggest buying a flashgun that features a multi-angle flash head.
I also recommend using your flash on manual mode. Doing so gives you complete control of its strength. I use 1/16th power as a starting point and adjust from there. You may want to go as high as full power if you’re shooting towards bright windows.
For larger spaces, install your flash units on your light stands. Position them out of the frame and angle them toward the ceiling.
Ultimately, the position of your lights depends on the size and shape of the room. You can place your strobes in the corners or even behind you in most cases. But if those areas don’t work, you may have to try other spaces until you get even illumination.
7. Shoot Straight for Less Distortion
This tip is crucial when shooting real estate photography.
When shooting different angles, be sure to keep the camera straight. Doing so helps avoid distortion that you’d later need to straighten in Lightroom or Photoshop. You should use a sturdy tripod or adjust your live view settings to display the virtual horizon (or virtual level).
You’ll notice that the vertical lines start to slant if you point the camera ever-so-slightly up or down. They’ll distort in one direction or the other.
The ideal height for real estate photography is about 5 feet. Each home is different. But this is the height that looks most natural and feels most balanced.
If you go too high, you start to see too much ceiling and not enough liveable area. If you go too low, you begin to see too much furniture and not enough of the actual room.
8. Use a Drone for a Bird’s Eye Perspective
Modern real estate photography has reached new heights, quite literally, using drones. Drones can reach a unique perspective that would have been impossible or amazingly expensive only a few years ago. The height will be able to give a view of the whole property and its borders.
Drone real estate photography is often used when a unique selling point of the house is the location and surroundings. These real estate photos allow you to show off the amazing views while having the property in the shot.
You will increasingly see that real estate agents now use video as well as real estate photos to advertise their properties. Adding a drone option to your bag of tricks is a great way to make your real estate photography business stand out. And it can help increase your real estate photography pricing!
Editing Real Estate Photos in Lightroom
9. Correct Distortion Using Lens Correction and Transform
One of the downsides of using wide-angle lenses in real estate photography is the presence of distortion. This type of optics tends to make everything look warped.
Make sure to apply a lens correction and correct your verticals first. These two settings will make the photo look more polished.
You can find the Lens Correction module within the Detail module. Check the box that says “enable profile corrections.” Ensure that the lens you used appears in the drop-down menu under Lens Profile.
Next, jump down to the Transform module. Check the box that says “constrain crop.” Then click on Auto. After clicking Auto, you’ll see that box darken, meaning it’s applied.
Double-check that it corrected all of the lines. If not, you can manually use the sliders in that module to make adjustments.
10. Making the Basic Adjustments
The main adjustments I make are lowering highlights, brightening shadows, deepening blacks, and increasing clarity.
It will take a bit of time to develop your style and workflow. So go ahead and experiment with your real estate photography. Over time, you might just have the right Lightroom preset for every shot.
11. Make the Light Temperatures Consistent
When it comes to real estate photography, getting accurate colors is essential. If you leave lights on inside the rooms, you’ll have some yellow tones. These will look quite different from the bluer sunlight. It’s best to balance these light temperatures in Lightroom or Photoshop. That way, the photo has a more polished and professional look.
The Adjustment Brush is ideal for this scenario! Select a brush and adjust the light temperature towards blue for warmer light. Do this until it looks neutral and blends with the surrounding area.
If you use the Adjustment Brush, increase the brush size, feathering, and brush strength. This method allows for even softer blending.
You can also balance the light temperatures in-camera using a color checker or a grey card. All you have to do is take a photo of the card in front of the scene you’re about to shoot. Once you load your real estate images to Photoshop, open White Balance, click the grey on the card with the Eyedropper tool, and Photoshop will automatically adjust the colors.
Remember to do white balance and color correction for every shoot. Doing so conveys to your clients that your photography is consistent and professional.
12. Make it Composite
The number one piece of advice I can give you when working in real estate photography is to make Photoshop composites out of your images.
As a real estate photographer, you will spend most of your time preparing the shot with the camera on the tripod. This means you will be able to seamlessly stitch together different sections of your composition as long as you don’t move the camera.
This is particularly useful if you don’t have a range of different flashguns for different areas of the photograph. You can walk around the frame with a flashgun in one hand and a remote trigger in the other, taking a selection of images. Remember, it won’t matter if you’re in the photograph or not. You can edit yourself out!
I would suggest that you start with a base image of your composition. Then fill in each section of the room with a flash—the doorways, the walls, the dark shadows created by furniture, and any other points of interest.
You can correctly expose the indoor light in tricky situations by making a composite. This method is like creating your custom HDR image, but you provide the added light yourself!
You can also use this method for an exterior photo. Use the flash to illuminate different sections of the house at different times. This completely dispels the myth that you need multiple flashes. The truth is, it can all be done with one.
The key to this method is blending the images to look like one image. Great real estate photographers will have you believing their pictures are from a single exposure.
This method does rely heavily on your Photoshop abilities. Get familiar with Photoshop composites before using this method in your real estate photography jobs.
Conclusion
To make real estate photography a reliable income stream, or if you want to be a professional photographer in this field, maintain consistency in your process and practice!
Don’t obsess over photography equipment when starting. You don’t need a lot to achieve beautiful real estate pictures. Top-level real estate photographers can do a whole job independently without any assistants.
With all the tips discussed above, you’ll be on your way to creating a full portfolio!
Check out our Effortless Editing with Lightroom to master all of our techniques!
photo shooting house | TikTok Search
TikTokUpload
For You
Following
blessshot
Blessshot
poses you can do at home 🏠 #homepictures #homeshooting #homeposes #home #pose #poses #posing #poseideas #posingtips #photoinspo #blessshot
TikTok video from Blessshot (@blessshot): "poses you can do at home 🏠 #homepictures #homeshooting #homeposes #home #pose #poses #posing #poseideas #posingtips #photoinspo #blessshot". for pictures you can do | AT HOME | 🏠 | .... Danza kuduro remix.
18K views|
Danza kuduro remix - HUAD
blessshot
Blessshot
Homeshootings are so cool! 🏠 #home #homeshooting #pose #poses #posing #poseideas #posingtips #posingideas #fyp #foryou #viral #blessshot
7.7K Likes, 10 Comments. TikTok video from Blessshot (@blessshot): "Homeshootings are so cool! 🏠 #home #homeshooting #pose #poses #posing #poseideas #posingtips #posingideas #fyp #foryou #viral #blessshot". ✨Posing Ideas for the home✨. 7years x latch.
106K views|
7years x latch - elfixsounds
tizi030tizi
Laetizia von Hofe
did a shooting at home w my bestie @marthe. sell 😌 #fy #fypシ #berlin #model #fürdich #photoshoting #inspo #modelshooting #instagram #photos #posing
650 Likes, 9 Comments. TikTok video from Laetizia von Hofe (@tizi030tizi): "did a shooting at home w my bestie @marthe.sell 😌 #fy #fypシ #berlin #model #fürdich #photoshoting #inspo #modelshooting #instagram #photos #posing". THE INSPO | THE OUTCOME. The Hills.
4696 views|
The Hills - Modelsphase
itselijones
Eli Jones
How I make over $300 an hour taking photos of houses! #photography #photomagic #realestate #realestateagent #realestateinvestor
12.2K Likes, 134 Comments. TikTok video from Eli Jones (@itselijones): "How I make over $300 an hour taking photos of houses! #photography #photomagic #realestate #realestateagent #realestateinvestor". Paradise.
159.1K views|
Paradise - Ikson
blessshot
Blessshot
fangt an zuhause zu shooten 🙏🏼 #home #homeshooting #pose #poses #posing #poseideas #posingtips #blessshot
9.3K Likes, 16 Comments. TikTok video from Blessshot (@blessshot): "fangt an zuhause zu shooten 🙏🏼 #home #homeshooting #pose #poses #posing #poseideas #posingtips #blessshot". for | HOME PICTURES | ✨ | .... Still Don't Know My Name.
121K views|
Still Don't Know My Name - Labrinth
ivannajacksongrafix
Ivanna Jackson | Photographer
Creating at home #homephotoshoot #maternityphotoshoot #pregnant @zuzanalova
11. 7K Likes, 88 Comments. TikTok video from Ivanna Jackson | Photographer (@ivannajacksongrafix): "Creating at home #homephotoshoot #maternityphotoshoot #pregnant @zuzanalova". We did a maternity photoshoot at home | With no fancy lights or set up | Here how the photos turn out . original sound.
250K views|
original sound - Tik Toker
aliceakarin
Alice Karin
Day 1 of home photo shoots #photography #artist #fyp #closeup #photoshootideas #photoshop
29.9K Likes, 61 Comments. TikTok video from Alice Karin (@aliceakarin): "Day 1 of home photo shoots #photography #artist #fyp #closeup #photoshootideas #photoshop". Put a one color background | A camera ofc | AND A LITTLE WATER | .... original sound.
306.5K views|
original sound - xxtristanxo
juliaedwards____
Julia Edwards
The house we did a swimwear shoot at!!!! #housegoals #model #photoshoot #foryou #foryourpage
7. 1K Likes, 32 Comments. TikTok video from Julia Edwards (@juliaedwards____): "The house we did a swimwear shoot at!!!! #housegoals #model #photoshoot #foryou #foryourpage". Ginseng Strip 2002.
128.8K views|
Ginseng Strip 2002 - Yung Lean
viorenstianery
VIO 🦋 | ig : @viorenstianery
Follow me for more ☺️❤️ #tipsbuatkamu #tiktokphotoshoot #selfportrait #selfportraitideas #photoshootideas #homephotoshoot #homephotohacks #trending
37K Likes, 188 Comments. TikTok video from VIO 🦋 | ig : @viorenstianery (@viorenstianery): "Follow me for more ☺️❤️ #tipsbuatkamu #tiktokphotoshoot #selfportrait #selfportraitideas #photoshootideas #homephotoshoot #homephotohacks #trending". Ideas At Home | Part 28 | @viorenstianery | .... Nobody.
485. 1K views|
Nobody - Mitski
10 ideas how to take beautiful photos on your phone | Articles | Photo, video, optics
You don't have to have a cool camera to take extraordinary pictures. Photo: photojaanic.com
Everyone can take an unusual picture with a smartphone. To do this, it is not necessary to travel the world and have a fancy camera and other equipment. All you need is to understand the capabilities of your camera and a little technical knowledge. Here are 10 ways to get interesting mobile photos.
Shoot against a light source
Silhouettes add mystery to photographs. Photo: Emil Pakarklis, eyeem.com
Creating a silhouette is one of the key techniques in creative photography. By hiding the model in the dark, you add a sense of mystery to the frame, allowing the viewer to think of a unique story behind the shot.
For a beautiful silhouette, the light source must be behind the subject when shooting. When shooting outdoors, the sun should be below the horizon. The right time for such photo shoots is sunsets and sunrises.
Shoot from different angles
Photo: iphonephotographyschool.com
Most often, photographs are taken from chest level. But if you change the angle, the picture will be more interesting. Change the shooting angle - sit, kneel or even lie down on the floor or the ground. When shooting from below, the subject in the foreground will appear larger.
For unusual shots, shoot a skyscraper, a tree, or a decorative chandelier from bottom to top (or vice versa, from top to bottom).
Another promising technique is shooting through a "frame" (window, doorway or archway). It draws attention to the background of the frame.
Focus on one color
To make your shots more attractive, you can emphasize or desaturate certain colors in post-processing, you can directly on Instagram before posting. Photo by expertphotography.com
Create visual consistency by focusing on one color. Such pictures look aesthetically pleasing. You can achieve a similar effect by finding similar colors in one place, as in the photo above.
Play with reflections
Symmetry in photographs is eye-catching. Photo: blog.hubspot.com
Reflections can be used to create an original photograph. They can be found almost everywhere - in puddles, large bodies of water, mirrors, sunglasses, glasses, metal surfaces, glass buildings, windows, and so on. Reflections allow you to create beautiful symmetry for interesting photos.
Use Leading Lines
Leading lines are lines that lead from the foreground to the background of the scene. Photo: iphonephotographyschool.com
Lines allow you to guide the viewer's eye around the frame. Leading or leading lines do not have to be straight, they can be curvy. For example, stairs, building facades, railway tracks, roads or paths in the forest.
For a guide line to add depth to an image, it must start at the bottom of the photo and go up and in, from foreground to background, usually leading to the main subject. This is an easy way to take a mesmerizing photo.
Use the rule of thirds
The grid is a useful feature in the mobile camera app. Photo: iphonephotographyschool.com
You can use the rule of thirds to create an interesting shot. In this case, the frame is divided into 9 equal rectangles using two vertical and two horizontal lines, and the main object is located along or at the intersection of these lines. This arrangement of elements adds balance to the frame.
Many smartphone cameras (i.e. iPhone, Samsung, Huawei, Xiaomi, etc.) have a special tool to make this task easier. It's called the grid (enabled in the "Settings" of the camera).
To get a beautiful shot when shooting landscapes, it is better to place the horizon not in the center, but along the upper or lower grid line. They can also be used to level the horizon in a frame.
Simplify the composition
Simple images look better than those that are overloaded with details. Photo: iphonephotographyschool.com
If your picture has too much detail, its beauty is lost because it is not clear what to focus on. One way to get an original shot is through simple composition. For this it is important that:
- there was 1 main object in the photo;
- the background was simple;
- There was a lot of empty or “negative” (as it is called in photography) space in the image, as it draws attention to the subject.
Simple photographs often catch the viewer's attention.
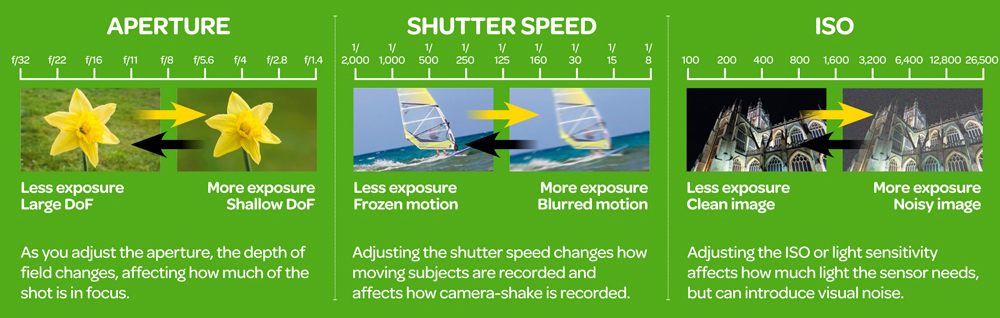
Adjust exposure
Proper exposure adds detail to a shot. Photo: iphonephotographyschool.com
To get a bright, detailed shot, you need to adjust the exposure before shooting. The cameras of many smartphones have this feature, look in the settings. To do this, you need to press the display to set the focus, then slide your finger down (to get a darker image) or up (brighter).
Sometimes, in order to get unusual photos, you can, on the contrary, deliberately overexpose (make too bright) or underexpose (too dark) the frame. For example, to create a silhouette when the subject is completely black, the picture needs to be underexposed.
Use repeating patterns
Even cups of soup can catch your eye. Photo: blog.hubspot.com
Repeating patterns such as lines, geometric shapes, shapes and colors are pleasing to the eye. They look great in photos. Even a tiled floor, stones on the pavement and roofs of houses can look interesting and bewitching.
Use the burst mode
The burst mode allows you to capture great shots on the move. Photo: iphonephotographyschool.com
Moving subjects are not easy to photograph - either the picture is blurry, or you can miss the moment by pressing the shutter button too late. The situation can be corrected by the continuous shooting mode, when many photos are taken at the same time. And then in the gallery you can already choose the best of them.
This mode is available on smartphones from many manufacturers, including Apple, Samsung, Xiaomi and others. Look in the "Settings" of the camera for how you can take continuous shooting on your phone.
Continuous shooting mode increases the chances of capturing high-quality dynamic images, as well as photos of children, animals or water splashes.
Your mobile phone's camera can be a powerful tool for taking beautiful photos if you know how to use it.
Top 10 Natural Light Photography Hacks | Articles | Photo, video, optics
Natural light is the most accessible and cheapest option for photography. It is ideal for beginners, because you can not spend money on additional accessories and focus on the composition of the frame, working with the model, learning the camera settings. Professionals do not disdain natural light, getting beautiful pictures without additional light sources.
The sun, a natural light source, has features that can both play into your hands and complicate the process of shooting if you don't think about them. We share the secrets of how to shoot with natural light in order to get high-quality and interesting shots.
The ability to work with natural light is fundamental for a photographer. No outdoor photo shoot is possible without it / pixabay.com
The best time to shoot with natural light
Professionals believe that there is no right or wrong time for photography. This is true, but shooting at different times of the day and in different weather has its own characteristics.
How to get hard light when shooting with natural light
Hard light comes from direct sunlight. This is possible in cloudless, clear weather, when the sun is not scattered by clouds. In time, this is the noon hours, when natural light falls almost vertically.
Many photographers advise to avoid shooting during these hours. The sun is so high and shines so strongly that in the photo it is expressed in hard and deep shadows, as well as overexposures. In addition, bright light is unpleasant for the eyes, and it will be difficult for the model to completely relax the face - this can be critical for portraits.
Nevertheless, hard light is often used to show brutality, character. He is not afraid in image and fashion shoots. It can create the right atmosphere if you are photographing architecture, landscapes, street reports. For example, to convey the stuffiness of a summer city, a clear and bright frosty morning, to make the viewer feel the heat of the desert.
How to get soft light when shooting with natural light
Natural sunlight becomes soft when diffused. To get such a light - with barely noticeable light and shade transitions, light gentle shadows, without bright highlights - photograph in cloudy weather, when the sky is covered with clouds.
Also, soft warm light in cloudless weather is possible during the so-called “regime time” or “golden hour”. This is a short interval at dawn and sunset, when the sun shines weakly and almost horizontally. Such light is often used in portrait photography, creating a warm golden backlight around the model.
The setting sun draws a luminous outline around the couple and creates a cozy mood with warm light / pixabay.com
Choose your angle
When shooting with artificial light in the studio, the model and the photographer often remain still. Only the power, height, location of the monoblock and light-shaping nozzles change.
Natural light cannot be controlled. The photographer must carefully monitor their own position and control how the model is positioned relative to the light. For example, if you put the model against the light, the face may appear underexposed, while the background may be overexposed. If the sun shines directly on a person's face, he will squint.
Also remember that the intensity and color temperature of natural light varies. The day is brighter than the evening. At sunset, the light is warmer than at dusk.
Look for studios with large windows
Shooting in a studio with natural light is attractive because, without leaving the room, in any weather, you can get a shot with good lighting. This is provided that there is enough light in the selected room of the photo studio. Specify the dimensions of the hall and windows before booking the studio, and also find out which side of the world the room faces.
Model tests and snaps are taken in studios with large windows in natural light (a series of shots taken according to a certain standard, where the figure and face of the model are clearly visible), where it is important to accurately show the parameters of a person and his appearance.
Use a wide-angle lens when shooting in a small room
Natural light allows you to shoot not only in studios, but also in apartments where it can be problematic to place artificial light due to the small size of the room. In such cases, a wide-angle lens is perfect - thanks to it, you capture not only the hero, but also the environment in the frame. This will create a portrait with a story, a plot.
In dark apartments, a wide-angle lens should be fast. Read about life hacks for shooting with a wide angle in the material.
Make sure you don't shoot against the sun
In "peak time" shooting against the light gives a nice lens. During cloudy weather, the light is scattered evenly, giving the same illumination at any position of the model.
If the model is placed with its back to the light on a bright sunny day, then two options are possible: either the person will be immersed in a deep shadow, or there will be a solid white veil behind him - overexposure. To avoid this, position the model differently relative to the sun. For example, sideways.
The situation when a person is immersed in a deep shadow when shooting against the sun plays into the photographer's hands if you need to photograph a silhouette / pixabay. com
com
There is another possible solution to the problem, a technical one - adjusting the exposure bracketing. Then the camera will take several frames - light, medium, dark, which will allow you to combine them in post-processing and get a photo with ideal illumination of the foreground and background.
Read about what exposure is and how to set it up in this text.
Adjust the light intensity
You can hide from the scorching sun in the open air in the shade of buildings or trees. And the natural light in the room is also easy to adjust! To make it weaker, move the model away from the windows. You can also draw a curtain or blinds, put up a flag that blocks the light.
An idea for a note: using curtains and blinds, you can get interesting artistic shots by illuminating only part of the hero.
Work with shadows
Shooting through fabrics, meshes, gratings will give an interesting pattern on the model. Also, when shooting in the open air, interesting shadows on the hero can be obtained using branches or flowers. Such solutions are successful for artistic and fashion shootings.
Shooting through the blinds on a sunny day gives interesting dynamic stripes on the model / Photo: Elizaveta Chechevitsa / instagram.com/chechevic_a
Illuminate the subject with a reflector
A reflector is indispensable for shooting with natural light. On a bright sunny day, it will help brighten shadows and diffuse excess light. In the studio, the reflector will give a more uniform cut-off pattern if you highlight the half of the model's body farthest from the window.
Here we talked in detail about what kind of reflectors there are and how to work with them.
Be ready for the unexpected
Natural light is good for a beginner not only because it is cheap, but it also forces you to constantly adapt, change settings, adapt to situations. For example, cloudy weather can change to sunny. And, if in the first case you tried to make the frame brighter and more contrast, then in the second you will have to deal with overexposure.
The most difficult part is partly cloudy when you need to constantly change camera settings and color temperature. Sometimes conditions change so frequently that you don't have time to press the shutter button when it's time to change the shooting settings again.
There are additional risks when shooting en plein air. It can rain or snow at any moment. The easiest way in this case is to use a waterproof case. By the way, here are some more tips for shooting outdoors in difficult weather conditions.
Light is not everything
On the one hand, natural light is a challenge for the beginner, and on the other hand, it teaches him to work in any conditions and quickly adapt to the situation. But interesting light is not the only thing that makes a photo beautiful and effective.
For example, a gothic vampire or witch is unlikely to look good on a beach or even in a forest on a bright sunny day. And the tender bride will look out of place in an abandoned house at dusk.